PCX 4000
PCX 4000
PCX 4000

Create successful ePaper yourself
Turn your PDF publications into a flip-book with our unique Google optimized e-Paper software.
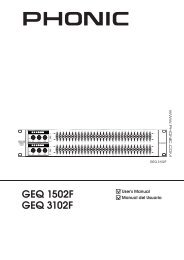
10 15 18<br />
1 2 3 4 5 6 8 9 11<br />
12 13<br />
14 16 1 19 20 21<br />
English<br />
4-Way Mono Operation<br />
Set the <strong>PCX</strong><strong>4000</strong> to 4-way mono by using the Mode buttons on<br />
the rear of the device (the left button should be released, the right<br />
button pushed-in). When set correctly, the mono LED on the front<br />
of the device will light up, as well as the corresponding function<br />
buttons. When set to mono, the various controls on channels 1<br />
and 2 will work as the single mono channel’s controls.<br />
Front Panel<br />
1. Input Control<br />
This control will adjust the input gain between -12 and +12 dB.<br />
2. Low Cut Button<br />
Pushing this button will activate a low cut (high pass) filter, set<br />
at 25 Hz, which will help protect woofers from extremely low<br />
frequency signals.<br />
3. Low/Low-Mid Crossover Frequency Control<br />
This control will determine the crossover frequency between<br />
the low and low-mid frequency signals. When the Crossover<br />
Frequency button on the rear of the device is pushed in, the<br />
frequency range is multiplied by a factor of 10.<br />
4. Low-Mid/High-Mid Crossover Frequency Control<br />
This control will determine the crossover frequency between the<br />
low-mid and mid-high frequency signals. When the Crossover<br />
Frequency button on the rear of the device is pushed in, the<br />
frequency range is multiplied by a factor of 10.<br />
5. Delay Control<br />
Use this control to add a delay of up to 2ms to the low frequency<br />
output. This allows users to better align speakers in phase.<br />
6. Low Output Control<br />
This controls the level of the low-band output between -6 and<br />
+6 dB.<br />
7. Low Phase Invert Control<br />
This button reverses the phasing of the low-band output, making<br />
the signal appropriate for out-of-phase or incorrectly wired<br />
speakers.<br />
8. Low Mute Button<br />
Pushing this button will mute the low-band signal.<br />
9. Low-Mid Output Control<br />
This controls the level of the low-mid-band output between -6<br />
and +6 dB.<br />
10. Low-Mid Phase Invert Button<br />
This button reverses the phasing of the low-mid-band output,<br />
making the signal appropriate for out-of-phase or incorrectly<br />
wired speakers.<br />
11. Low-Mid Mute Button<br />
Pushing this button will mute the low-mid-band signal.<br />
12. CD Horn Button<br />
Pushing this button in will provide frequency correction on the lowband<br />
output ideal for use with constantdirectivity horns.<br />
13. High-Mid/High Crossover Frequency Control<br />
This control will determine the crossover frequency between<br />
the high-mid and high frequency signals. When the Crossover<br />
Frequency button on the rear of the device is pushed in, the<br />
frequency range is multiplied by a factor of 10.<br />
14. High-Mid Output Control<br />
This controls the level of the high-mid-band output between -6<br />
and +6 dB.<br />
15. High-Mid Phase Invert Button<br />
This button reverses the phasing of the high-mid-band output,<br />
making the signal appropriate for out-of-phase or incorrectly<br />
wired speakers.<br />
16. Mid-High Mute Button<br />
Pushing this button will mute the mid-high-band signal.<br />
17. High Output Control<br />
This controls the level of the high-band output between -6 and<br />
+6 dB.<br />
18. High Phase Invert Button<br />
This button reverses the phasing of the high-band output, making<br />
the signal appropriate for out-of-phase or incorrectly wired<br />
speakers.<br />
19. High Mute Button<br />
Pushing this button will mute the high-band signal.<br />
20. Threshold Control<br />
This control determines the threshold of the built-in limiters. Users<br />
can adjust the threshold between -8 dB and OFF.<br />
21. Limiter Button<br />
Pushing this button activates the built-in limiter circuits. When the<br />
signal on any of the outputs surpasses the set threshold, the limiter<br />
is engaged and the corresponding ‘LIM’ LED (located above the<br />
output’s controls) will light up.<br />
<strong>PCX</strong><strong>4000</strong>