Hydraulic Technology Worldwide - Enerpac
Hydraulic Technology Worldwide - Enerpac
Hydraulic Technology Worldwide - Enerpac

You also want an ePaper? Increase the reach of your titles
YUMPU automatically turns print PDFs into web optimized ePapers that Google loves.
5 Maintenance and troubleshooting<br />
Preventative maintenance can be<br />
carried out by the user. Full<br />
maintenance must be carried out by<br />
an approved and authorized<br />
technician appointed by <strong>Enerpac</strong>.<br />
Recommended intervals are:<br />
a) 3 months – Heavy Duty use,<br />
b) 6 months – Normal use<br />
c) 12 months – Infrequent use.<br />
- Non destructive testing must be<br />
carried out if the tool has been used<br />
under severe conditions.<br />
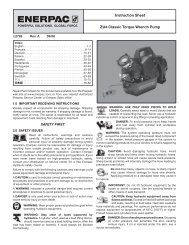
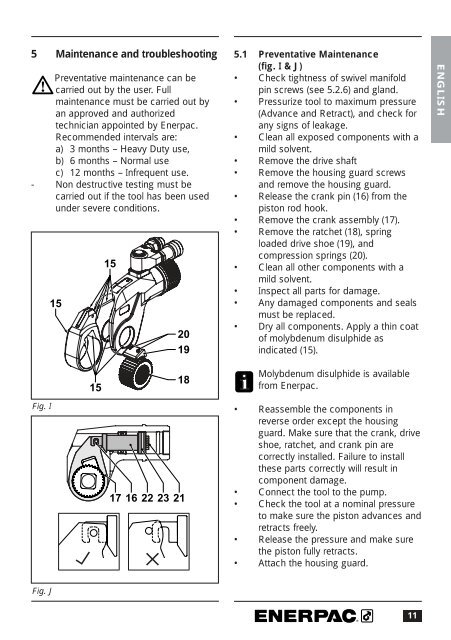
Fig. I<br />
Fig. J<br />
15<br />
15<br />
15<br />
20<br />
19<br />
18<br />
17 16 22 23 21<br />
5.1 Preventative Maintenance<br />
(fig. I & J)<br />
• Check tightness of swivel manifold<br />
pin screws (see 5.2.6) and gland.<br />
• Pressurize tool to maximum pressure<br />
(Advance and Retract), and check for<br />
any signs of leakage.<br />
• Clean all exposed components with a<br />
mild solvent.<br />
• Remove the drive shaft<br />
• Remove the housing guard screws<br />
and remove the housing guard.<br />
• Release the crank pin (16) from the<br />
piston rod hook.<br />
• Remove the crank assembly (17).<br />
• Remove the ratchet (18), spring<br />
loaded drive shoe (19), and<br />
compression springs (20).<br />
• Clean all other components with a<br />
mild solvent.<br />
• Inspect all parts for damage.<br />
• Any damaged components and seals<br />
must be replaced.<br />
• Dry all components. Apply a thin coat<br />
of molybdenum disulphide as<br />
indicated (15).<br />
Molybdenum disulphide is available<br />
from <strong>Enerpac</strong>.<br />
• Reassemble the components in<br />
reverse order except the housing<br />
guard. Make sure that the crank, drive<br />
shoe, ratchet, and crank pin are<br />
correctly installed. Failure to install<br />
these parts correctly will result in<br />
component damage.<br />
• Connect the tool to the pump.<br />
• Check the tool at a nominal pressure<br />
to make sure the piston advances and<br />
retracts freely.<br />
• Release the pressure and make sure<br />
the piston fully retracts.<br />
• Attach the housing guard.<br />
11<br />
ENGLISH