Cool & Warm Mist Ultrasonic Humidifier - QVC.com
Cool & Warm Mist Ultrasonic Humidifier - QVC.com
Cool & Warm Mist Ultrasonic Humidifier - QVC.com

Create successful ePaper yourself
Turn your PDF publications into a flip-book with our unique Google optimized e-Paper software.
Oscillation<br />
When the humidifier is producing mist, press the OSCILLATION ON/OFF ( ) button<br />
to turn on the motorized oscillation feature. The nozzle at the top of the unit will<br />
oscillate in a 120° range from side to side. To target the nozzle and mist in a fixed<br />
direction, press the OSCILLATION ON/OFF ( ) button when the nozzle is at the<br />
desired position and the nozzle will stop and direct mist to the desired area only.<br />
(Fig.2)<br />
NOTE: The oscillation feature will not operate if the humidifying function is not<br />
operating. Oscillation feature will only work when mist is being produced.<br />
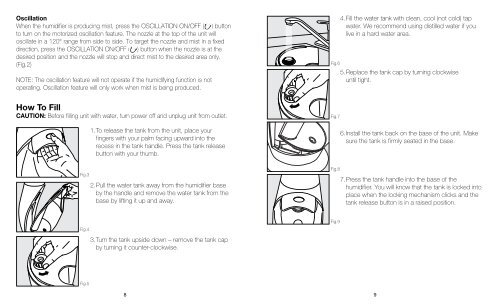
How To Fill<br />
CAUTION: Before filling unit with water, turn power off and unplug unit from outlet.<br />
Fig.3<br />
1. To release the tank from the unit, place your<br />
fingers with your palm facing upward into the<br />
recess in the tank handle. Press the tank release<br />
button with your thumb.<br />
2. Pull the water tank away from the humidifier base<br />
by the handle and remove the water tank from the<br />
base by lifting it up and away.<br />
Fig.6<br />
Fig.7<br />
Fig.8<br />
4. Fill the water tank with clean, cool (not cold) tap<br />
water. We re<strong>com</strong>mend using distilled water if you<br />
live in a hard water area.<br />
5. Replace the tank cap by turning clockwise<br />
until tight.<br />
6. Install the tank back on the base of the unit. Make<br />
sure the tank is firmly seated in the base.<br />
7. Press the tank handle into the base of the<br />
humidifier. You will know that the tank is locked into<br />
place when the locking mechanism clicks and the<br />
tank release button is in a raised position.<br />
Fig.4<br />
3. Turn the tank upside down – remove the tank cap<br />
by turning it counter-clockwise.<br />
Fig.9<br />
Fig.5<br />
8 9