BAÃO DE BLOQUE METÃLICO THERMOBLOCK Modelo ... - Auxilab
BAÃO DE BLOQUE METÃLICO THERMOBLOCK Modelo ... - Auxilab
BAÃO DE BLOQUE METÃLICO THERMOBLOCK Modelo ... - Auxilab

Create successful ePaper yourself
Turn your PDF publications into a flip-book with our unique Google optimized e-Paper software.
AUXILAB S.L.<br />
Material de laboratorio<br />
Laboratory supplies<br />
BAÑO <strong>DE</strong> <strong>BLOQUE</strong> METÁLICO<br />
<strong>THERMOBLOCK</strong><br />
<strong>DE</strong>CLARACIÓN <strong>DE</strong> CONFORMIDAD CE<br />
CE <strong>DE</strong>CLARATION OF CONFORMITY<br />
DÉCLARATION <strong>DE</strong> CONFORMITÉ CE<br />
El fabricante | The manufacturer | Le furnisseur:<br />
AUXILAB, S.L.<br />
Declara que el equipo | Declare that the equipment | Declaré que láppareil:<br />
BAÑO <strong>DE</strong> <strong>BLOQUE</strong> METÁLICO | <strong>THERMOBLOCK</strong> | THERMOBLOCS<br />
Código | Code | Code: 50603010.<br />
<strong>Modelo</strong> | Model | Mòdele: 603/10.<br />
<strong>Modelo</strong> / Model 603/10<br />
Cumple las siguientes directivas | Meet the following directives | Accomplit les directives suivantes:<br />
73/23/CE | Directiva de seguridad eléctrica<br />
Directive for electrical safety<br />
Directive the sècurité électrique<br />
89/336/CE | Directiva de Compatibilidad electromagnética (CEM)<br />
Directive for electromagnetic compatibilit y (EMC)<br />
Directive the compatibilité electromagnétique (CEM)<br />
Cumple las siguientes Normas: | Meet the following Standars | Accomplit les normes suivantes:<br />
EN 61326 | Material eléctrico para medida control y uso en laboratorio<br />
Requisitos de compatibilidad electromagnética (CEM.)<br />
Electrical equipment for measurement, control and laboratory use<br />
EMC requirements.<br />
Matériel électriques de mesure, de commande et laboratorie<br />
Prescriptions relatives à la CEM.<br />
EN 61010-1 | Requisitos de seguridad de equipos eléctricos de medida, control y uso en laboratorio<br />
Parte 1: Requisitos generales<br />
Safety requirements for electrical equipments for measurement, control and laboratory use<br />
Part 1: General requierements.<br />
Règles de sécurité pour appareils électriques de mesurage, de régulation et de laboratorie<br />
Partie 1: Prescriptions générales.<br />
EN 61010-2-020 | Requisitos particulares para equipos de laboratorio utilizados para el calentamiento de materiales.<br />
Particular requirements for laboratory equipment for the heating of materials.<br />
Prescriptions particulières pour appareils de laboratories utilisés por l´echauffement des<br />
matières.<br />
Fdo: Alfonso Ainciburu Sanz<br />
DIRECTOR | GERENTE<br />
BERIAIN a 08 de ABRIL de 2008<br />
Este manual es parte inseparable del aparato por lo que debe estar<br />
disponible a todos los usuarios del equipo. Le recomendamos leer<br />
atentamente el presente manual y seguir rigurosamente los procedimientos<br />
de uso para obtener las máximas prestaciones y una<br />
mayor duración del mismo.<br />
This manual should be available for all users of these equipments. To get<br />
the best results and a higher duration of this equipment it is advisable to<br />
read carefully this manual and follow the processes of use.<br />
Pol. Morea Norte, Calle D Nº 6 31191 · Beriain (Navarra) ESPAÑA · Teléfono: +34 948 310 513 · Fax: +34 948 312 071 / 948 310 500<br />
correo@auxilab.es · www.auxilab.com·CIF: B31072218<br />
Revisión 1, Abril-08 Manual de instrucciones 50603010 Pág. 1
CASTELLANO<br />
Gracias por haber adquirido este equipo. Deseamos sinceramente que disfrute del baño<br />
de bloque metálico Nahita 603/10. Le recomendamos que cuide el equipo conforme a lo<br />
expuesto en este manual.<br />
Nahita desarrolla sus productos según las directrices del marcado CE y haciendo hincapié<br />
en la ergonomía y seguridad del usuario.<br />
La calidad de los materiales empleados en la fabricación y el correcto proceder le permitirán<br />
disfrutar del equipo por muchos años.<br />
El uso incorrecto o indebido del equipo puede dar lugar a accidentes, descargas eléctricas,<br />
cortocircuitos, fuegos, lesiones, etc. Lea el punto de Mantenimiento, donde se recogen<br />
aspectos de seguridad.<br />
LEA <strong>DE</strong>TALLADAMENTE ESTE MANUAL <strong>DE</strong> INSTRUCCIONES ANTES <strong>DE</strong><br />
OPERAR CON ESTE EQUIPO CON EL FIN <strong>DE</strong> OBTENER LAS MÁXIMAS PRES-<br />
TACIONES Y UNA MAYOR DURACIÓN <strong>DE</strong>L MISMO.<br />
ANNEX I: WIRING DIAGRAM<br />
(This diagram is just for you reference. Manufacturer reserves the right to modify or<br />
improve it).<br />
Input Power AC 220V, 50Hz<br />
Fuse<br />
AC 250V 2.5 A<br />
Single switch<br />
AC 250V 10 A<br />
ENGLISH<br />
Tenga especialmente presente lo siguiente:<br />
• Este manual es parte inseparable del baño de bloque metálico Nahita 603/10, por lo que<br />
debe estar disponible para todos los usuarios del equipo.<br />
• Debe manipularse siempre con cuidado evitando los movimientos bruscos, golpes, caídas<br />
de objetos pesados o punzantes; evite el derrame de líquidos en su interior.<br />
• Nunca desmonte el equipo para repararlo usted mismo, además de perder la garantía<br />
podría producir un funcionamiento deficiente de todo el equipo, así como daños a las personas<br />
que lo manipulan.<br />
• Para prevenir fuego o descargas eléctricas, evite los ambientes secos y polvorientos. Si<br />
esto ocurre, desenchufe inmediatamente el equipo de la toma de corriente.<br />
• Cualquier duda puede ser aclarada por su distribuidor (instalación, puesta en marcha,<br />
funcionamiento). Usted puede también mandarnos sus dudas o sugerencias a la siguiente<br />
dirección de correo del Servicio Técnico Nahita (asistencia@auxilab.es) o bien llamando<br />
al Tel: 807117040 (0.30 Euros/min).<br />
• Este equipo está amparado por la Ley de garantías y bienes de consumo (10/2003).<br />
• No se consideran en garantía las revisiones del equipo.<br />
• La manipulación del equipo por personal no autorizado provocará la pérdida total de<br />
la garantía.<br />
• Los fusibles o accesorios, así como la pérdida de los mismos, no están cubiertos por<br />
dicha garantía. Tampoco estarán cubiertos por el periodo de garantía las piezas en su desgaste<br />
por uso natural.<br />
• Asegúrese de guardar la factura de compra para tener derecho de reclamación o prestación<br />
de la garantía. En caso de enviar el equipo al Servicio Técnico adjunte factura o<br />
copia de la misma como documento de garantía.<br />
• Rellene y envíe la garantía antes de los 15 días después de la compra.<br />
• El fabricante se reserva los derechos a posibles modificaciones y mejoras sobre este<br />
manual y equipo.<br />
Power switch<br />
12V 150W<br />
Fan<br />
J 2 J 3<br />
Driving module<br />
J 1<br />
TE Refrigerator<br />
J 6<br />
LCD Film switch<br />
16 PIN 6 PIN<br />
J 11 J 44<br />
J 33 CPU controlling<br />
J 22<br />
Sensor<br />
Pág. 2 Manual de instrucciones 50603010 Revisión 1 Aril-08<br />
Version 1 April-08 Instruction manual 50603010 Page 23
ENGLISH<br />
provoke damages to the general operating system or the electrical installation, as well<br />
as injuries to the people that usually handle the dry bath (burns, hurts…) or damages in<br />
nearby equipments.<br />
In the event of breakdown please contact your distributor to overhaul through Nahita<br />
Technical Assistance Department.<br />
Cleaning<br />
• Never use scourers or substances that can grate for cleaning metallic parts such as stainless<br />
steel, aluminium, coatings, etc. as they damage the dry bath and produce an early<br />
ageing of the equipment.<br />
• Use a fluff-free cloth dampened with soaped water that does not contain abrasives.<br />
ATTENTION!! IF EQUIPMENTS ARE NOT PROPERLY CLEAN AND<br />
DISINFECTED THEY WOULD NOT BE ALLOWED TO REPAIR BY OUR<br />
TECHNICAL SERVICE.<br />
INSTRUCTIONS ON ENVIRONMENT PROTECTION<br />
Do not dispose of this product in the usual household garbage at the end of it´s<br />
life cycle; hand it over at a collection point for the recycling of electrical and electronic<br />
appliances. The symbol on the product, the instructions for use or the packing<br />
will inform about the methods for disposal.<br />
The materials are recyclable as mentioned in it´s marking. By recycling, material recycling or<br />
other forms or re-utilization of old appliances, you are making an important contribution to protect<br />
our environment.<br />
Please inquire at the community administration for the authorized disponsal location.<br />
¡ATENCIÓN! NO SE ADMITIRÁ NINGÚN APARATO PARA REPARAR<br />
QUE NO ESTÉ <strong>DE</strong>BIDAMENTE LIMPIO Y <strong>DE</strong>SINFECTADO.<br />
ÍNDICE <strong>DE</strong> IDIOMAS<br />
Castellano<br />
Inglés<br />
Certificado CE<br />
ÍNDICE <strong>DE</strong> CONTENIDOS<br />
1. APLICACIONES <strong>DE</strong>L INSTRUMENTO<br />
2. <strong>DE</strong>SCRIPCIÓN<br />
3. ESPECIFICACIONES TÉCNICAS<br />
4. INSTALACIÓN / PUESTA EN MARCHA<br />
5. MANTENIMIENTO Y LIMPIEZA<br />
ANEXO I: DIAGRAMA ELÉCTRICO<br />
1. APLICACIONES <strong>DE</strong>L INSTRUMENTO<br />
CASTELLANO<br />
2-12<br />
13-23<br />
24<br />
El baño seco (incubadora) 603/10 es un nuevo producto controlado por un microprocesador,<br />
que puede ser ampliamente usado para la conservación y reacción de las muestras,<br />
la amplificación de DNA, la pre-desnaturalización de la electroforesis y coagulación del<br />
suero sanguíneo.<br />
Todos los equipos se suministran sin bloque metálico permitiendo que cada usuario lo<br />
pueda configurar según sus propias necesidades. Para ello, disponemos de bloques metálicos<br />
de distintas capacidades<br />
Características:<br />
1. Display LCD para la visualización del tiempo y la temperatura controlados digitalmente.<br />
2. Visualización simultánea de la temperatura actual y establecida.<br />
3. Se puede configurar el tiempo de control de temperatura.<br />
4. Uso de módulos metálicos para evitar la producción de polución.<br />
5. Módulos metálicos fáciles de reemplazar, limpiar y desinfectar.<br />
6. Protección de temperatura incorporado, más fiable de usar.<br />
7. Ajuste de temperatura<br />
8. Timbre de alarma al acabar la duración del control de temperatura.<br />
9. Función de pausa<br />
3<br />
4<br />
5<br />
6<br />
11<br />
12<br />
Page 22 Instruction manual 50603010 Version 1 April-08<br />
Revisión 1, Abril-08 Manual de instrucciones 50603010 Pág. 3
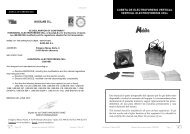
2. <strong>DE</strong>SCRIPCIÓN<br />
1.1 Bloque<br />
1.2 Panel de mandos<br />
<strong>THERMOBLOCK</strong> MO<strong>DE</strong>L 603/10<br />
adj<br />
set<br />
stop<br />
start<br />
1.1<br />
1.2<br />
Panel de mandos y diagrama del display (pantalla):<br />
1.3 Interruptor de encendido/apagado<br />
1.4 Toma de corriente<br />
1.5 Fusible<br />
1.3 1.4<br />
1.5<br />
2.5<br />
Funciones de los botones<br />
2.1 ADJ: Botón de ajuste de la temperatura:<br />
Para ajustar correctamente la tempe-<br />
<strong>THERMOBLOCK</strong> MO<strong>DE</strong>L 603/10<br />
ratura del display con la temperatura que<br />
es realmente.<br />
stop<br />
2.2 SET: El botón SET se usa junto con los 2.1<br />
2.3<br />
selectores de aumento y disminución para<br />
adj<br />
set<br />
establecer la temperatura y tiempo requeridos<br />
de funcionamiento.<br />
2.4<br />
start<br />
2.3 START: Botón de funcionamiento:<br />
Para empezar a trabajar<br />
2.4 STOP: Botón de parada y pausa:<br />
2.8 2.2 2.6 2.7<br />
cuando se aprieta una sola vez, la máquina pausa; si se aprieta otra vez, el trabajo se para.<br />
2.5 : Selector de aumento de la temperatura o el tiempo.<br />
2.6 : Selector de disminución de la temperatura o el tiempo.<br />
2.7 : Botón de movimiento hacia la derecha: Usado junto con el botón "ADJ" se ajusta<br />
el error entre la temperatura real y la que se visualiza en el display.<br />
2.8 : Botón de movimiento hacia la izquierda.<br />
<br />
<br />
ENGLISH<br />
CASTELLANO<br />
ENGLISH<br />
If you are not using the equipment for a long period of time please make sure it is disconnected<br />
from the net and protected from dust (this way you will avoid accidents and<br />
will extend its working-life).<br />
Security<br />
• The dry bath must be used by previously qualified staff that knows how the equipment<br />
works thanks to the user manual.<br />
• You should put the dry bath in a horizontal plane stable table, having a safety area of at<br />
least 30 cm per side.<br />
• Do not place the equipment near any warm supply (burners, blowlamps, etc), nor<br />
expose it directly to the sun. Avoid vibrations, dust and dry environments.<br />
• During its functioning dangerous materials such as flammable or pathological substances<br />
must be out of the safety area.<br />
• When you are not using the dry bath for a long period of time please make sure it is<br />
unplugged in order to avoid possible accidents.<br />
• It is essential to have the equipment switched off and unplugged from the net before<br />
cleaning, checking components or replacing any piece (e.g. replacement of a fuse).<br />
• Never try to repair the dry bath by yourself, since you will lose the warranty and may<br />
provoke damages to the general operating system or the electrical installation, as well as<br />
injuries to the people that usually handle the equipment (burns, hurts…).<br />
• Try not to spill any liquid on the control panel, though it is properly insulated. In case<br />
you have any doubts do please immediately unplug the dry bath (see Maintenance).<br />
• Made under the European regulations for electrical security, electromagnetic compatibility<br />
and security on machines.<br />
5. MAINTENANCE AND CLEANING<br />
To get the best results and a higher duration of this equipment it is essential to follow<br />
the processes of use.<br />
Note: All the processes of use mentioned below will not have any value unless you keep<br />
a continued and careful maintenance.<br />
• Please follow the processes of use of this manual.<br />
• This manual should be available for all users of this equipment.<br />
• Always use original components and supplies. Other devices can be similar but they<br />
can damage the equipment.<br />
• The dry bath is supplied with a Schuko standard wire. It has to be plugged to an earth<br />
connection and the socket should be handy and ready to unplug the equipment in case of<br />
emergency.<br />
• Never try to repair the equipment by yourself, since you will lose the warranty and may<br />
Pág. 4 Manual de instrucciones 50603010 Revisión 1 Aril-08<br />
Version 1 April-08 Instruction manual 50603010 Page 21
The system will save the data and increase to 100 ºC<br />
automatically. The cursor will disappear as showed in<br />
chart.<br />
• When the system temperature reaches 100 ºC, the<br />
temperature of PV is actual temperature and the temperature<br />
of "AdjTemp" is 100 ºC with the cursor. The<br />
"Adj" and "*" is flickering.<br />
• After 20 min, the actual temperature of thermometer<br />
is 98.0 ºC. Press buttons remove to the left or right<br />
to make the cursor rest on the digital you want to<br />
change. Press increasing or decreasing to adjust.<br />
• After the finish of adjustment, the screen displays as<br />
chart.<br />
• After the finish of adjustment, press button removes<br />
to the right and ADJ at the same time and keep off at<br />
once. After 8s the cursor display and the system<br />
accepts the adjustment. The screen returns to the display<br />
as the chart.<br />
After the adjustment, the temperature displayed is<br />
the same the actual temperature<br />
PV: 40.1 C Adj *<br />
AdjTemP= 40.1 C<br />
PV: 100.1 C Adj *<br />
AdjTemP= 100.0 C<br />
PV: 100.1 C Adj *<br />
AdjTemP= 98.0 C<br />
PV: 100.1 C Adj *<br />
AdjTemP= 100.0 C<br />
PV: 98.9c T:1<br />
SV: 40.0 1:00M<br />
PV: 40.0C T:1<br />
SV: 40.0 1:00M<br />
NOTE: During the adjustment, press the button removes to the right and ADJ contemporary<br />
to cancel the adjustment. The system keeps the last adjustment¡, so don't press<br />
casually.<br />
5. Exchange of the metal block<br />
Open the transparent lid and pull out the four screws which fix the block to the heating<br />
board with the screwdriver, close the lid, and put out the block from the main engine.<br />
Take another model of block, steadily lays aside on the main engine. Put in the instalment<br />
holes the screws, and fix with the spanner the metal block on the instrument.<br />
The bath doesn't include any block. The following blocks are available:<br />
Code<br />
Capacity<br />
90603021 96 wells of 0.2 mL<br />
90603022 54 x 0.5 mL<br />
90603023 35 x 1.5 mL<br />
90603024 35 x 2.0 mL<br />
ENGLISH<br />
3.1 Display de la temperatura actual<br />
3.2 Display de la temperatura establecida<br />
3.3 El primer segmento<br />
3.4 Señal de recuerdo de que la máquina<br />
esta trabajando<br />
3.5 Display del tiempo establecido<br />
3. ESPECIFICACIONES TÉCNICAS<br />
1. Condiciones normales de trabajo<br />
- Temperatura ambiente: 5 ºC - 30 ºC<br />
- Humedad relativa: < 70%<br />
- Alimentación: AC 220 V, 50 Hz<br />
3.1<br />
PV: 100.1c T: 1*<br />
SV: 100.0c<br />
20:30 M<br />
3.2<br />
2. Parámetros básicos y prestaciones<br />
Referencia 50603010<br />
<strong>Modelo</strong> 603/10<br />
Rango de temperatura RT +5 ºC - 100 ºC<br />
Temporizador<br />
Precisión temperatura < 0.3 ºC<br />
Resolución pantalla 0.1 ºC<br />
Tiempo de calentamiento (de 20 ºC a 100 ºC)<br />
Potencia<br />
1min - 99h 59 min<br />
12 min<br />
120 W<br />
Fusible 250V 2.5A ?5×20<br />
Medidas (mm) 300 x 212 x 180<br />
Peso (kg) 2.5<br />
El baño no incluye ningún bloque. Los siguientes bloques están disponibles:<br />
Referencia<br />
Capacidad<br />
90603021 96 x 0.2 mL<br />
90603022 54 x 0.5 mL<br />
90603023 35 x 1.5 mL<br />
90603024 35 x 2.0 mL<br />
CASTELLANO<br />
3.3<br />
3.5<br />
3.4<br />
Page 20 Instruction manual 50603010 Version 1 April-08<br />
Revisión 1, Abril-08 Manual de instrucciones 50603010 Pág. 5
4. INSTALACIÓN / PUESTA EN MARCHA<br />
Inspección preliminar<br />
• Desembale el baño seco, retire el plástico que lo envuelve y quite la protección de<br />
poliespán en que viene encajado. Retire todas las protecciones y, sin conectar el equipo a<br />
la red eléctrica, asegúrese de que no presenta ningún daño debido al transporte. De ser<br />
así, comuníquelo inmediatamente a su transportista o suministrador para que pueda<br />
hacer las debidas reclamaciones en el plazo establecido.<br />
• Guarde el embalaje, ya que siempre se deben realizar las devoluciones en su embalaje<br />
original con todos los accesorios suministrados.<br />
• Compruebe los accesorios que usted debe recibir junto al equipo:<br />
- Cable de red<br />
- Manual de instrucciones<br />
- Certificado de garantía<br />
Solo aceptamos devoluciones de equipos en los 15 días posteriores al envío y siempre<br />
que vengan completos en su embalaje original.<br />
Instalación<br />
Antes de comenzar a utilizar el instrumento, es conveniente familiarizarse con sus componentes<br />
y fundamentos básicos, así como con las funciones de sus controles.<br />
LEA <strong>DE</strong>TALLADAMENTE ESTE MANUAL <strong>DE</strong> INSTRUCCIONES ANTES <strong>DE</strong><br />
OPERAR CON ESTE EQUIPO CON EL FIN <strong>DE</strong> OBTENER LAS MÁXIMAS<br />
PRESTACIONES Y UNA MAYOR DURACIÓN <strong>DE</strong>L MISMO.<br />
• Coloque el baño de bloque sobre una mesa horizontal, plana y estable, creando un espacio<br />
libre de al menos 30 cm por cada lado. No coloque el equipo en zonas próximas a fuentes<br />
de calor (mecheros, sopletes...), ni lo exponga directamente a la luz del sol, etc.<br />
• Evite en el lugar de trabajo la presencia de productos inflamables o tóxicos.<br />
• El equipo se suministra con un cable Schuko estándar.<br />
• Inserte el cable de alimentación de corriente alterna (CA) a la base de corriente 220V<br />
50Hz ±10% provista de toma de tierra y por el otro extremo al conector del baño de bloque.<br />
Ni el fabricante ni el distribuidor asumirán responsabilidad alguna por los daños<br />
ocasionados al equipo, instalaciones o lesiones sufridas a personas debido a la inobservancia<br />
del correcto procedimiento de conexión eléctrica. La tensión debe ser de 220<br />
V, 50 Hz ± 10%.<br />
Puesta en marcha (Modo de uso)<br />
1. Configuración de la temperatura y el tiempo<br />
• Cuando encienda el baño visualizará en la pantalla LCD la<br />
puesta en marcha del sistema en la que aparecerá "System-<br />
Testing……" a su vez que oirá un sonido de "du…".<br />
CASTELLANO<br />
System-Testing<br />
......<br />
ENGLISH<br />
• Press the button STOP to stop the operation. The flicker of the "*" and ":" will be stopped.<br />
The operation will re-run after pressing the START button and the symbol of "*" and<br />
":" will flicker again.<br />
• Pressing the STOP button and holding 3 seconds, the program operation will be stopped.<br />
The display will return to the beginning picture. The symbol of "*" will disappear.<br />
3. Temperature error adjustment<br />
The temperature of the Instrument has been adjusted before it is sold out. But if there is<br />
deviation between the actual temperature and the displayed temperature due to some<br />
reasons, you can do as follows to correct the error.<br />
Notes: The Instrument uses double temperatures adjustment to ensure its veracity. This<br />
means it is linearly adjusted on 40 ºC and 100 ºC two points. The temperature veracity<br />
will be within ± 0.5 ºC after the double temperature adjustment.<br />
Both circumstances and the block temperature should be lower than 35 ºC.<br />
4. Adjustment methods as follows:<br />
• After the start up of the Instrument, it enters waiting interface. Make sure the temperature<br />
in display is below 35 ºC. If the temperature is higher than 35 ºC, you should wait<br />
until the temperature is below of 35 ºC.<br />
• Inject olefin oil into one of the cone-shaped wells, and then put a thermometer into this<br />
well (Make sure the precision of the thermometer should be within 0.1 ºC and the temperature<br />
ball should be absolutely immerged into the cone-shaped well). Heat insulation<br />
material is needed on the block to separate it from the circumstance.<br />
NOTE: Please read the actual value after 20minutes' constant temperature to ensure the<br />
adjustment precision.<br />
• Press button removes to the right and ADJ button<br />
contemporary to enter the temperature adjustment<br />
interface as in the drawing. The temperature begins to<br />
rise to 40.0 ºC automatically and "*" is flickering in the<br />
right corner.<br />
The temperature of "PV:" and "AdjTemp" is current<br />
temperature 20.5 ºC. When the temperature reaches 40<br />
ºC, the temperature of "PV" is current temperature of<br />
block while the temperature of "AdjTemp" is still 40 ºC<br />
with cursor. The "Adj" and "*" is flickering.<br />
• After 20min, the actual temperature of thermometer<br />
is 38.8 ºC. Press buttons removes to the left or right to<br />
make the cursor rest on the digital you want to change.<br />
Press increasing or decreasing button to adjust and<br />
press START to confirm.<br />
PV: 20.5 C Adj *<br />
AdjTemP= 20.5 C<br />
PV: 40.1 C Adj *<br />
AdjTemP= 40.0 C<br />
PV: 40.1 C Adj *<br />
AdjTemP= 38.8 C<br />
Pág. 6 Manual de instrucciones 50603010 Revisión 1 Aril-08<br />
Version 1 April-08 Instruction manual 50603010 Page 19
• Press the button of SET and keep off at once. Now,<br />
after the temperature set (SV) there is a cursor "_".<br />
Press button removes to the right or to the left to move<br />
the cursor, and press increasing or decreasing button<br />
PV: 30.0C<br />
SV: _37.0C<br />
T:1<br />
20:00M<br />
to change the digital on the cursor into the one required. T:1 means controlling temperature<br />
for the first segment. The time also can be set using the former way. (For example: as<br />
show in the chart, the current temperature is 30 ºC, the set temperature is 37 ºC, the first<br />
temperature control segment and the temperature control time is 20 h).<br />
• Press the button of SET again, and can be set using<br />
the former way. T:2 means controlling temperature for<br />
the second segment. (for example: as show in the<br />
chart, the current temperature is 30 ºC, the set temperature<br />
is 99 ºC, the second temperature control segment<br />
and the temperature control time is 1h 30 min).<br />
PV: 30.0C T:2<br />
SV: _99.0C 1:30M<br />
NOTE: After the first temperature control segment is completed, it steps into the second<br />
temperature control segment automatically.<br />
• After the completion of the set, press the SET again.<br />
About 8 seconds later, the cursor will disappear. The<br />
system accepts the set and operates under the set. The<br />
picture returns to T:1 temperature-control segment.<br />
PV: 30.0C T:1<br />
SV: 37.0C 20:00M<br />
NOTE: After pressing the button of START, the operation starts according to the set<br />
finally. If the time set is 0 h 0 min, the operation starts after pressing START button.<br />
When the temperature reaches its set temperature, the instrument will keep this temperature<br />
forever.<br />
2. Run and stop functions<br />
• After pressing START and keeping off at once, the operation runs at the set. The symbol<br />
of "*" will be displayed and flickering in the circle of 2 s. After the first segment is completed,<br />
it steps into the second segment automatically.<br />
PV: 32.5C T:1 *<br />
SV: 37.0 C 20:00M<br />
PV: 37.0 C T:2 *<br />
SV: 99.0 C 01:30M<br />
ENGLISH<br />
NOTES:<br />
1. After the start of operation, the temperature PV displays the current temperature of<br />
the module. When the current temperature reaches the set temperature, the time is counted<br />
backwards and the symbol of ":" will flicker in the circle of 2 s.<br />
2. When the second temperature-control is finished, the buzzer alarms and displays the<br />
signal of "PROGRAM END".<br />
• Alrededor de 6 segundos después, visualizará la<br />
cifra 30.0 (en PV) que es la temperatura actual del bloque;<br />
37.0 (en SV) que es la temperatura anteriormente<br />
establecida. T: 1 significa control de temperatura en el<br />
primer segmento y 10:00 es el tiempo anteriormente<br />
establecido.<br />
• Pulse el botón SET y entonces en los datos de temperatura<br />
en la línea de "SV:" aparecerá un cursor "_".<br />
Pulse los botones de movimiento hacia la derecha y<br />
hacia la izquierda para mover el cursor por los valores<br />
PV: 30.0c<br />
SV: 37.0c<br />
PV: 30.0c<br />
SV: _37.0c<br />
T: 1<br />
10: 00M<br />
T: 1<br />
20:00<br />
y pulse los selectores de aumento y disminución para cambiarlos a los que requiera. El<br />
tiempo también puede ser cambiado como se ha descrito anteriormente. (Por ejemplo:<br />
como se indica en el cuadro, la temperatura actual es de 30 ºC, la temperatura establecida<br />
o marcada es de 37 ºC, estamos en el primer segmento de control de temperatura y el tiempo<br />
de control de temperatura es de 20 h).<br />
• Pulse SET otra vez, y puede ser configurado utilizando<br />
los pasos anteriores. T:2 significa control de<br />
temperatura para el segundo segmento. (Por ejemplo:<br />
como se muestra en el cuadro, la temperatura actual<br />
es de 30 ºC, la temperatura establecida de 99 ºC,<br />
PV: 30.0c T:2<br />
SV: _99.0c 1: 30M<br />
segundo segmento de control de temperatura y el tiempo de control de la temperatura es<br />
1 h 30 min).<br />
NOTA: Cuando se completa el primer segmento de control de temperatura, automáticamente<br />
pasa al segundo segmento de control de temperatura.<br />
• Después de acabar el trabajo, pulse SET otra vez.<br />
Alrededor de 8 segundos después, desaparece el cursor.<br />
El sistema acepta la configuración y trabajará de<br />
acuerdo a ella. El display vuelve al primer segmento<br />
de control de temperatura.<br />
CASTELLANO<br />
PV: 30.0 C T: 1<br />
SV: 37.0 C 20:00<br />
NOTA: Al presionar START, el equipo empieza a trabajar de acuerdo a como se le ha<br />
configurado finalmente. Si el tiempo que se le establece es de 0 h 0 min, empieza a trabajar<br />
después de pulsar el botón START. Cuando alcance la temperatura que tiene establecida,<br />
el instrumento conservará constantemente esta temperatura.<br />
2. Funciones de inicio y parada<br />
• Pulse START y el baño empezará a trabajar según lo que se le estableció. Aparecerá un<br />
asterisco que parpadea en el display. Después de que complete el primer segmento, el instrumento<br />
pasará automáticamente al segundo segmento de control de temperatura.<br />
Page 18 Instruction manual 50603010 Version 1 April-08<br />
Revisión 1, Abril-08 Manual de instrucciones 50603010 Pág. 7
PV: 32.5C T:1 *<br />
SV: 37.0 C 20:00M<br />
PV: 37.0 C T:2 *<br />
SV: 99.0 C 01:30M<br />
NOTAS:<br />
1. Después de empezar a trabajar, la temperatura de la línea PV muestra la temperatura<br />
actual del bloque. Cuando la temperatura actual del bloque alcance la establecida, se<br />
produce la cuenta atrás y el símbolo de ":" empezará a parpadear en dos segundos.<br />
2. Cuando se acaba el segundo segmento de control de temperatura, se produce una<br />
señal de alarma y se visualiza en display "PROGRAM END".<br />
• Pulse STOP para parar el funcionamiento. El "*" y ":" dejarán de parpadear. Si pulsa<br />
START la máquina retomará el trabajo, y el "*" y ":" volverán a parpadear.<br />
• Si presiona STOP durante 3 segundos, se para definitivamente el trabajo. El display volverá<br />
a su cuadro inicial. El "*" desaparecerá.<br />
3. Corrección de la desviación de temperatura<br />
La temperatura del instrumento ha sido ajustado antes de salir de la fábrica. Pero si hay<br />
desviación entre la temperatura real y la que muestra para corregirlo haga lo que sigue.<br />
NOTA: El instrumento para autenticar su precisión posee un doble ajuste de temperatura.<br />
Esto significa que se ajusta linearmente en 2 puntos: 40 ºC y 100 ºC. La precisión de<br />
la temperatura estará dentro de ± 0.5 ºC después del doble ajuste.<br />
La temperatura del bloque tendrá que ser menor de 35 ºC.<br />
4. Métodos de ajuste<br />
• Después del arranque del baño, entra en una interface de espera. Asegúrese que la temperatura<br />
marcada en el display sea inferior de 35 ºC. Si la temperatura es mayor de 35 ºC<br />
tendrá que esperar hasta que sea inferior.<br />
• Injecte un aceite de alqueno dentro de uno de los pocillos, y después introduzca un termómetro<br />
dentro de ese pocillo (asegúrese de que la precisión del termómetro es de 0.1 ºC<br />
y que el sensor de temperatura este completamente sumergido dentro del pocillo).<br />
NOTA: Por favor, lea la temperatura después de 20 minutos de temperatura constante<br />
para asegurar su precisión.<br />
• Presione al mismo tiempo los botones de movimiento<br />
hacia la derecha y ADJ para entrar en la<br />
interfaz de ajuste de temperatura. La temperatura<br />
automáticamente empieza a aumentar a 40 ºC y<br />
aparece un asterisco parpadeante en la esquina<br />
superior derecha.<br />
PV: 20.5C<br />
AdjTemP=<br />
CASTELLANO<br />
Adj*<br />
20.5 C<br />
ENGLISH<br />
equipment to the net, make sure that it does not present any damage because of the<br />
shipment. In case the dry bath presents any damage tell it immediately to your transport<br />
agent or dealer so that they can make the claims in the correct time limit.<br />
Please keep the original wrapping; you will always need it for returns enclosed with all<br />
the accessories supplied.<br />
Please check that all the accessories are enclosed with the equipment:<br />
- Net wire<br />
- Instruction manual<br />
- Warranty certificate<br />
We will only accept any equipment return within 15 days after delivery and provided<br />
it comes in its original wrapping.<br />
Installation<br />
Before using this instrument, it is convenient for you to familiarize with its components<br />
and basic essentials.<br />
PLEASE READ THOROUGHLY THE INSTRUCTIONS BEFORE CONNECTING<br />
AND OPERATING WITH THIS EQUIPMENT<br />
Please put the dry bath on top of a horizontal, plane and stable table making a free space<br />
at least at 30 cm per side. Do not put the dry bath near any warm supply (burners, blowlamps…),<br />
nor expose it directly to the sun, etc.<br />
Avoid inflammable or toxic substances in the working area.<br />
The dry bath is supplied with a Schuko standard wire<br />
Please insert the wire that feeds the AC electric current in the base of current 220 V, 50<br />
Hz ± 10% provided with earth wire and to the other end to the dry bath connector.<br />
Neither the manufacturer nor the distributor will assume any responsibility for the<br />
damages produced to the equipment during its installation or damages to persons suffered<br />
by the improper use of the electric connection. The tension should be 220 V, 50 Hz ±<br />
10%.<br />
Setting up<br />
1.Temperature and time set<br />
• The LCD will display the picture as the chart when the instrument<br />
powers on and the instrument goes into the initial<br />
state with the sound of "du…";<br />
• About 6s later, the figure 30.0 (P) is the block's<br />
current temperature; the figure 37.0 (S) is the former<br />
set temperature. T: 1 means controlling the temperature<br />
for the first segment. Time display 10:00 is the former<br />
set time.<br />
System-Testing<br />
......<br />
PV: 30.0c T: 1<br />
SV: 37.0c 10: 00M<br />
Pág. 8 Manual de instrucciones 50603010 Revisión 1 Aril-08 Version 1 April-08 Instruction manual 50603010 Page 17
3.1 Display of the current temperature<br />
3.2Display of the set temperature<br />
3.3 The first segment<br />
3.4 Operation remind sigma<br />
3.5 Display of the set time<br />
3. TECHNICAL SPECIFICATIONS<br />
1. Normal working condition:<br />
- The using environmental temperature: 5 C - 30 C<br />
- The relative humidity: < 70%<br />
- The using power: AC 220V, 50Hz<br />
2. The basic parameters and performance:<br />
3.1<br />
PV: 100.1c T: 1*<br />
SV: 100.0c<br />
20:30 M<br />
3.2<br />
Code 50603010<br />
Model 603/10<br />
Temperature range RT +5 ºC - 100 ºC<br />
Timer set<br />
Accuracy of the temperature < 0.3 ºC<br />
Display accuracy 0.1 ºC<br />
Heating time (from 20 ºC to 100 ºC)<br />
Power supply<br />
1min - 99h 59 min<br />
12 min<br />
120 W<br />
Fuse 250V 2.5A ?5×20<br />
Dimensions (mm) 300 x 212 x 180<br />
Weight<br />
2.5 kg<br />
The bath doesn't include any block. The following blocks are available:<br />
Code<br />
Capacity<br />
90603021 96 x 0.2 mL<br />
90603022 54 x 0.5 mL<br />
90603023 35 x 1.5 mL<br />
90603024 35 x 2.0 mL<br />
3.3<br />
3.5<br />
ENGLISH<br />
3.4<br />
CASTELLANO<br />
La temperatura de "PV" y "AdjTemp" es la temperatura<br />
actual de 20.5 ºC. Cuando la temperatura<br />
alcanza los 40 ºC, la temperatura de "PV" es la<br />
temperatura del bloque mientras que la temperatura<br />
PV: 40.1C<br />
AdjTemP=<br />
Adj *<br />
40.0C<br />
de "AdjTemp" esta en 40 ºC junto con el cursor. ADJ y el "*" parpadean.<br />
• Después de 20 minutos, la temperatura del termómetro<br />
(temperatura real) es de 38.8 ºC. Pulse PV: 40.1C Adj *<br />
los botones de movimiento hacia la derecha o la<br />
izquierda para mover el cursor y cambiar el dato<br />
en "AdjTemp". Con los selectores de aumento y<br />
disminución ajústelo y pulse START para confirmar.<br />
El sistema guardará los datos y automáticamente<br />
irá subiendo de temperatura hasta 100 ºC. El<br />
cursor volverá a desaparecer.<br />
AdjTemP=<br />
PV: 40.1C<br />
AdjTemP=<br />
38.8C<br />
Adj *<br />
40.1C<br />
• Cuando el sistema llegue a 100 ºC, la temperatura<br />
de "P" es la temperatura actual y la temperatura<br />
de "AdjTemp" marca 100 ºC junto al cursor.<br />
"ADJ" y "*" parpadean.<br />
• Después de 20 minutos, la temperatura del termómetro<br />
(real) es de 98 ºC. Pulse los botones de<br />
movimiento hacia derecha o la izquierda para llevar<br />
el cursor a "AdjTemp" para modificarlo. Pulse<br />
los selectores de aumento y de disminución para<br />
ajustarlo.<br />
• Después de acabar el ajuste, se visualizará así el<br />
display:<br />
• Después de terminar con el ajuste, presione al<br />
mismo tiempo el botón de movimiento hacia la<br />
derecha y ADJ. Después de 8 segundos, el sistema<br />
acepta el ajuste. El display vuelve a su posición<br />
normal.<br />
Después del ajuste, la temperatura mostrada es<br />
igual a la real.<br />
PV: 100.1C Adj *<br />
AdjTemP= 100.0C<br />
PV: 100.1C Adj *<br />
AdjTemP= 98.0C<br />
PV: 100.1C Adj *<br />
AdjTemP= 100.1C<br />
PV: 98.9 T:1<br />
SV: 40.0 1:00M<br />
PV: 40.0 T:1<br />
SV: 40.0 1:00M<br />
4. INSTALLATION / SETTING UP<br />
Preliminary inspection<br />
Unwrap the dry bath, take off the involving plastic and take off the polispan protection<br />
in which it comes fitted. Take off all the protective items and, without connecting the<br />
NOTA: Durante el ajuste, pulse simultáneamente el botón de movimiento hacia la derecha<br />
y ADJ para cancelarlo. El sistema conserva el último ajuste, así que no debe presionarlos<br />
sin razón.<br />
Page 16 Instruction manual 50603010 Version 1 April-08<br />
Revisión 1, Abril-08 Manual de instrucciones 50603010 Pág. 9
CASTELLANO<br />
5. Cambio del bloque metálico<br />
Abra la tapa transparente y con la llave extraiga los cuatro tornillos que fijan el bloque<br />
metálico a la placa calefactora, cierre la tapa, y quite el bloque del instrumento.<br />
Ponga el bloque que va a colocar en la placa calefactora. Coloque los tornillos y fije con<br />
la llave el bloque al baño.<br />
Los siguientes bloques están disponibles:<br />
2. <strong>DE</strong>SCRIPTION<br />
1.1 Standard block<br />
1.2 Operation panel<br />
1.3 Power switch<br />
1.4 Power socket<br />
1.5 Fuse socket<br />
ENGLISH<br />
Referencia:<br />
Capacidad<br />
90603021 96 pocillos de 0.2 mL<br />
90603022 54 x 0.5 mL<br />
90603023 35 x 1.5 mL<br />
90603024 35 x 2.0 mL<br />
<strong>THERMOBLOCK</strong> MO<strong>DE</strong>L 603/10<br />
stop<br />
1.1<br />
1.2<br />
Cuando no vaya a hacer uso del baño de bloque durante largos períodos de tiempo, asegúrese<br />
de que esté desconectado de la red y protéjalo del polvo (evitando así posibles accidentes<br />
y prolongando la vida útil del equipo).<br />
adj<br />
set<br />
start<br />
Seguridad<br />
• El baño debe ser utilizado por personal cualificado previamente, que conozca el equipo<br />
y su manejo mediante el manual de uso.<br />
• Coloque el equipo sobre una mesa horizontal, plana y estable, creando un espacio libre<br />
de al menos 30 cm por cada lado.<br />
• No coloque el baño de bloque en zonas próximas a fuentes de calor (mecheros, sopletes...),<br />
ni exponga el equipo directamente a la luz del sol. Evite las vibraciones, el polvo y<br />
ambientes muy secos.<br />
• Durante su funcionamiento, el material peligroso como líquidos inflamables o material<br />
patológico, deben estar fuera del área de trabajo.<br />
• Cuando no vaya a hacer uso del equipo por largos períodos de tiempo, asegúrese de<br />
que está desconectado de la red para evitar posibles accidentes.<br />
• Para cualquier manipulación de limpieza, verificación de los componentes o sustitución<br />
de cualquier componente (ej: sustitución de fusible) es imprescindible apagar el equipo y<br />
desconectarlo de la toma de corriente.<br />
• No intente repararlo usted mismo; además de perder la garantía puede causar daños en<br />
el funcionamiento general del equipo, así como lesiones a la persona (quemaduras, heridas...)<br />
y daños a la instalación eléctrica.<br />
• Procure que no entre agua en el cuadro de controles, aunque éste se encuentre debidamente<br />
aislado. Si por cualquier causa sospecha que ha entrado agua o cualquier líquido<br />
desconecte el equipo inmediatamente (ver Mantenimiento).<br />
• Fabricado según las directivas europeas de seguridad eléctrica, compatibilidad electromagnética<br />
y seguridad en máquinas.<br />
Operation panel and display diagram:<br />
1.3 1.4<br />
1.5<br />
Button instruction:<br />
2.5<br />
2.1 ADJ: Temperature adjustment button:<br />
<strong>THERMOBLOCK</strong> MO<strong>DE</strong>L 603/10<br />
Used together with button removes to<br />
the right to adjust the error between actual<br />
temperature and the displayed temperature.<br />
2.1<br />
stop 2.3<br />
2.2 SET: Set button: used together with<br />
adj<br />
set<br />
increasing and decreasing button to set the<br />
start<br />
operation temperature and time required<br />
2.4<br />
2.3 START: Run button: Start the operation.<br />
2.4 STOP: Stop / pause button: when you<br />
2.8 2.2 2.6 2.7<br />
press the button once, the operation is paused; if you press it again, the operation will<br />
stop.<br />
2.5 : Increasing button of the temperature or time<br />
2.6 : Decreasing button of the temperature or time<br />
2.7 : Button removes to the right: Used together with ADJ button to adjust the error<br />
between actual temperature and the displayed temperature.<br />
2.8 : Button removes to the left.<br />
<br />
<br />
Pág. 10 Manual de instrucciones 50603010 Revisión 1 Aril-08<br />
Version 1 April-08 Instruction manual 50603010 Page 15
ENGLISH<br />
ATTENTION!! IF EQUIPMENTS ARE NOT PROPERLY CLEAN AND<br />
DISINFECTED THEY WOULD NOT BE ALLOWED TO REPAIR BY OUR<br />
TECHNICAL SERVICE.<br />
5. MANTENIMIENTO Y LIMPIEZA<br />
CASTELLANO<br />
Para un adecuado funcionamiento del baño de bloque es necesario seguir algunas recomendaciones.<br />
IN<strong>DE</strong>X OF LANGUAGES<br />
Spanish<br />
English<br />
CE certificate<br />
IN<strong>DE</strong>X OF CONTENTS<br />
1. USES OF THE INSTRUMENT<br />
2. <strong>DE</strong>SCRIPTION<br />
3. TECHNICAL SPECIFICATIONS<br />
4. INSTALLATION / SETTING UP<br />
5. MAINTENANCE AND CLEANING<br />
ANNEX I: WIRING DIAGRAM<br />
1. USES OF THE INSTRUMENT<br />
2-12<br />
13-23<br />
22<br />
14<br />
15<br />
16<br />
16<br />
21<br />
23<br />
Nota: Todas las normas de utilización citadas anteriormente carecerán de valor si no<br />
se realiza una continua labor de mantenimiento.<br />
• Siga las instrucciones y advertencias relativas a este manual.<br />
• Tenga este manual siempre a mano para que cualquier persona pueda consultarlo.<br />
• Utilice siempre componentes y repuestos originales. Puede ser que otros dispositivos<br />
sean parecidos, pero su empleo puede dañar el equipo.<br />
• El baño de bloque dispone de un cable de red Schuko; éste debe conectarse a una toma<br />
de corriente que esté conectada a tierra, debiendo quedar a mano para poder desconectarlo<br />
en caso de emergencia.<br />
• No intente repararlo usted mismo; además de perder la garantía puede causar daños en<br />
el funcionamiento general del equipo, así como lesiones a la persona (quemaduras, heridas...)<br />
y daños a la instalación eléctrica, o equipos eléctricos cercanos.<br />
• En caso de avería diríjase a su proveedor para la reparación través del Servicio Técnico<br />
de Nahita.<br />
Limpieza<br />
The dry bath (Incubator) 603/10 is a new product controlled by the miniature computer,<br />
which can be widely used for the preservation and reaction of the samples, the amplification<br />
of DNA, the pre-denaturation of the electrophoresis and blood serum coagulation.<br />
The dry bath is supplied without metallic block allowing each user to make up the<br />
equipment according to its own necessities. For this purpose, there are available metallic<br />
blocks with different capacities.<br />
• Para la limpieza de las partes metálicas, acero inoxidable, aluminio, pinturas, etc nunca<br />
utilice estropajos o productos que puedan rayar, ya que deterioran el equipo, limitando su<br />
vida útil.<br />
• Para la limpieza del equipo recomendamos se utilice un trapo libre de pelusa humedecido<br />
con agua jabonosa que no contenga productos abrasivos.<br />
Features of this product as follows:<br />
1. Temperature and time digital displayed in LCD and digital controlled<br />
2. Display of the set and current temperature contemporary<br />
3. The time of temperature-control can be set up<br />
4. Using of metal modules to avoid product pollution<br />
5. Easy replacement, cleaning and disinfecting of metal modules<br />
6. Built-in over-temperature protection, more reliable for using<br />
7. Temperature adjustment<br />
8. Buzzer alarm in the end of temperature control duration<br />
9. Pause function<br />
Page 14 Instruction manual 50603010 Version 1 April-08<br />
Revisión 1, Abril-08 Manual de instrucciones 50603010 Pág. 11
ANEXO I: DIAGRAMA ELÉCTRICO<br />
(Este diagrama es sólo para su referencia. El fabricante se reserva el derecho a posibles<br />
modificaciones y mejoras sobre el).<br />
Alimentación AC 220V 50Hz<br />
CASTELLANO<br />
ENGLISH<br />
Thank you for choosing this equipment. We sincerely wish that you enjoy your dry bath<br />
Nahita 603/10. We highly recommend looking after this equipment according to what is<br />
stated in this manual.<br />
Nahita develops its products according to the CE marking regulations as well as<br />
emphasizing the ergonomics and security for its user.<br />
The correct using of the equipment and its good quality will permit you to enjoy this<br />
equipment for years.<br />
The improper use of the equipment can cause accidents and electric discharges, circuit<br />
breakers, fires, damages, etc. Please read the point of Maintenance, where we expose the<br />
security notes.<br />
Fusible<br />
AC 250V 2.5 A<br />
TO GET THE BEST RESULTS AND A HIGHER DURATION OF THE EQUIP-<br />
MENT IT IS ADVISABLE TO READ THOROUGHLY THIS MANUAL BEFORE<br />
OPERATING WITH THE EQUIPMENT.<br />
Interruptor<br />
encendido/apagado<br />
12V 150W<br />
Enchufe único<br />
AC 250V 10 A<br />
Ventilador<br />
J 2 J 3<br />
Módulo de conducción<br />
J 1<br />
Refrigerador TE<br />
J 6<br />
J 33<br />
LCD<br />
Teclado<br />
membrana<br />
16 PIN 6 PIN<br />
J 11 J 44<br />
CPU<br />
J 22<br />
Sensor<br />
Please bear in mind the following:<br />
• This manual is inseparable from the dry bath Nahita 603/10, so it should be available for<br />
all the users of this equipment.<br />
• You should carefully handle the dry bath avoiding sudden movements, knocks, free fall<br />
of heavy / sharp objects on it. Avoid spilling liquids inside the equipment.<br />
• Never dismantle the different pieces of the dry bath to repair it yourself, since it could<br />
produce a defective use of the whole equipment and a loss of the product warranty, as<br />
well as injuries on people that handle the dry bath.<br />
• To prevent fire or electric discharges avoid dry or dusty environments. In case it may<br />
happen unplug the equipment immediately.<br />
• If you have any doubt about setting up, installation or functioning do not hesitate in<br />
contacting your wholesaler. You can also tell us any doubts or suggestions you have by<br />
contacting Nahita Technical Assistance Department by email to asistencia@auxilab.es or<br />
by telephone: +34 807 117 040 (0.30 Euros/min).<br />
• This equipment is protected under the Warranties and consumer goods regulation<br />
(10/2003).<br />
• Overhaul is not covered by the dry bath warranty.<br />
• Operations made by non-qualified staff will automatically produce a loss of the equipment<br />
warranty.<br />
• Neither fuses nor accessories (including their loss), are covered by the product's<br />
warranty. The warranty neither covers piece's deterioration due to the course of time.<br />
• Please make sure you keep the invoice, either for having the right to claim or asking for<br />
warranty coverage. In case you have to send the equipment to Nahita Technical Assistance<br />
Department you should enclose the original invoice or a copy as guarantee.<br />
• Please do not forget filling the warranty certificate and send it before 15 days after the<br />
date of purchase.<br />
• Manufacturer reserves the right to modify or improve the manual or equipment.<br />
Pág. 12 Manual de instrucciones 50603010 Revisión 1 Aril-08<br />
Version 1 April-08 Instruction manual 50603010 Page 13