DJ TORRE CERAMICO - Olimpia Splendid
DJ TORRE CERAMICO - Olimpia Splendid
DJ TORRE CERAMICO - Olimpia Splendid

Create successful ePaper yourself
Turn your PDF publications into a flip-book with our unique Google optimized e-Paper software.
STUFA CERAMICA OSCILLANTE<br />
con TELECOMANDO<br />
MANUALE DI ISTRUZIONI<br />
(DA CONSERVARE CON CURA)<br />
<strong>DJ</strong> <strong>TORRE</strong> <strong>CERAMICO</strong>
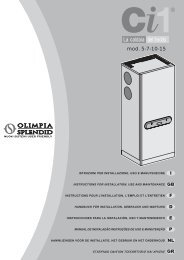
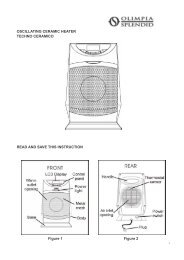
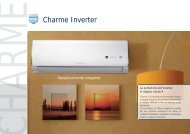
Illustrazione del prodotto<br />
FRONTE LATO RETRO<br />
A Apertura di uscita aria calda H Maniglia<br />
B Base antiribaltamento I Apertura di entrata aria<br />
C Corpo J Spina<br />
D Rete metallica<br />
E Pannello di comando<br />
F Apertura di entrata aria calda<br />
G Interruttore generale<br />
Figura1<br />
Norme generali di sicurezza<br />
1. Questo apparecchio deve essere usato esclusivamente attenendosi<br />
rigorosamente alle istruzioni contenute nel presente manuale.<br />
Qualsiasi impiego diverso da quello espressamente previsto dal<br />
fabbricante è esplicitamente escluso perché potrebbe comportare<br />
rischi di incendio, folgorazione o infortunio.<br />
2. Assicurarsi che il voltaggio della corrente di alimentazione<br />
corrisponda a quello previsto per l’apparecchio (AC220-240V/50Hz).<br />
3. Non permettere che l’apparecchio sia usato da bambini o da invalidi<br />
senza adeguata sorveglianza; accertarsi che i bambini non lo<br />
utilizzino come un giocattolo.<br />
2
4. L’apparecchio è dotato di una spina che deve essere inserita<br />
perfettamente nell’apposita presa. In caso di difficoltà di inserimento<br />
della spina nella presa di corrente, contattare un elettricista<br />
qualificato.<br />
5. Ove possibile, evitare l’uso di prolunghe perché la prolunga<br />
potrebbe surriscaldarsi con conseguente rischio di incendio. Non<br />
utilizzare mai un’unica prolunga per alimentare più di un<br />
apparecchio.<br />
6. Se il cordone di alimentazione è danneggiato, la sostituzione deve<br />
essere effettuata dal fabbricante, dal centro di assistenza o da un<br />
tecnico qualificato e competente per evitare qualsiasi tipo di<br />
inconveniente.<br />
7. Non introdurre le dita o oggetti estranei nelle aperture per la<br />
ventilazione e per l’uscita dell’aria onde evitare il rischio di<br />
folgorazione, incendio o danni all’apparecchio. Non ostruire in alcun<br />
modo dette aperture e non eseguire alcun intervento<br />
sull’apparecchio durante il funzionamento.<br />
8. Per evitare il rischio di incendi, lasciare sempre libere le prese e le<br />
uscite dell’aria. Non appoggiare l’apparecchio su superfici morbide,<br />
per esempio su un letto, onde evitare che le prese e le uscite<br />
dell’aria possano essere ostruite.<br />
9. Appoggiare sempre l’apparecchio in funzione su una superficie<br />
piana, verificando che sia perfettamente stabile e che non vi sia<br />
rischio di ribaltamento. Sistemare il cordone di alimentazione in<br />
modo che su di esso non appoggi né l’apparecchio né alcun altro<br />
oggetto. Non far scorrere il cordone sotto a tappeti o moquette. Non<br />
coprire il cordone con tappetini, guide o altro. Collocare il cordone<br />
lontano dalle posizioni di passaggio, dove potrebbe esserci il rischio<br />
di inciamparvi.<br />
10. Durante il funzionamento l’apparecchio si riscalda. Per evitare<br />
ustioni, evitare di toccarne le superfici calde e, per spostarlo,<br />
utilizzare sempre l’apposita maniglia. Tenere la stufa lontano da<br />
eventuali materiali combustibili quali mobili, cuscini, coperte, carte,<br />
indumenti e tende, verificando che tali materiali siano ad una<br />
distanza di almeno 0,9 m. dalla parte anteriore e di almeno 0,3 m.<br />
dai lati e dalla parte posteriore dell’apparecchio.<br />
11. Non utilizzare l’apparecchio nelle immediate vicinanze della vasca<br />
da bagno, della doccia o della piscina.<br />
12. L’apparecchio è destinato esclusivamente all’uso in ambiente<br />
domestico.<br />
3
13. Non coprire! ATTENZIONE: Per evitare il surriscaldamento,<br />
non coprire l’apparecchio.<br />
14. L’apparecchio non deve essere collocato nelle immediate vicinanze<br />
di una presa di corrente elettrica.<br />
15. ATTENZIONE: Per evitare il pericolo di resettaggio accidentale<br />
dell’interruttore a relè termico, è necessario che l’apparecchio non<br />
venga alimentato tramite un dispositivo di commutazione esterno,<br />
come ad esempio un timer, e che non venga collegato ad un circuito<br />
regolarmente inserito e disinserito dall’utenza.<br />
LEGGERE ATTENTAMENTE LE PRESENTI<br />
ISTRUZIONI E CONSERVARLE CON CURA<br />
Funzionamento<br />
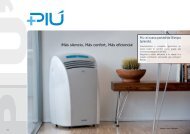
Pannello di comando:<br />
Tasto<br />
modalità<br />
operativa<br />
Tasto “Power<br />
&<br />
Thermostat”<br />
Spia<br />
alimentazione<br />
F<br />
Indicatore<br />
modalità<br />
operativa<br />
Tasto<br />
oscillazione<br />
Tasto<br />
Timer<br />
Indicatore di<br />
temperatura<br />
Indicatore Timer<br />
Figura 2<br />
1. Estrarre con cautela l’apparecchio dal cartone e dal sacchetto.<br />
2. Appoggiare l’apparecchio su una superficie perfettamente piana.<br />
3. Dopo aver inserito la spina di alimentazione nella presa di corrente,<br />
accendere l’apparecchio mediante l’interruttore generale sul retro; si<br />
udirà un “beep” e si accenderà una spia rossa ad indicare che<br />
l’apparecchio è alimentato. La spia rossa rimarrà accesa finché<br />
l’apparecchio non verrà spento mediante l’interruttore generale o<br />
scollegato dalla rete elettrica mediante rimozione della spina dalla<br />
presa di corrente.<br />
4
4. Per avviare l’apparecchio, premere il tasto POWER&THERMOSTAT.<br />
5. All’accensione, l’apparecchio inizia a funzionare in modalità HIGH<br />
(1800 watt), sul display LCD viene visualizzata la temperatura corrente<br />
dell’aria e il VENTILATORE inizia a girare. Contemporaneamente sul<br />
display LCD compare la scritta “HIGH”.<br />
6. Premere il tasto MODE per regolare l’apparecchio in modalità LOW<br />
(1100 watt); sul display LCD compare la scritta “LOW”.<br />
7. Premendo nuovamente il tasto MODE, l’apparecchio passa in modalità<br />
AUTO (1800 watt). Sul display compare a questo punto la scritta SET<br />
TEMP (temperatura impostata) (vedere le istruzioni per l’uso del<br />
termostato più avanti).<br />
8. Premere ancora una volta il tasto MODE per impostare l’apparecchio in<br />
modalità FAN (20 watt). Sul display LCD comparirà la scritta “FAN”. In<br />
questa modalità operativa, funziona unicamente il ventilatore e non vi è<br />
alcuna produzione di calore.<br />
9. Premendo nuovamente il tasto MODE, l’apparecchio ritorna in modalità<br />
HIGH. Continuando a premere il tasto MODE, si ripete il medesimo<br />
ciclo (HIGH, LOW, AUTO, FAN).<br />
10. Premendo il tasto OSC., l’apparecchio inizia ad oscillare avanti ed<br />
indietro. Per arrestare l’oscillazione, premere nuovamente il medesimo<br />
tasto.<br />
11. Per spegnere l’apparecchio, premere il tasto Power & Thermostat,<br />
disinserire l’alimentazione mediante l’interruttore generale e infine<br />
staccare la spina dalla presa di corrente.<br />
FUNZIONE TIMER: La funzione TIMER consente di impostare il tempo di<br />
funzionamento da 1 a 8 ore ed è attivabile in tutte le modalità operative<br />
(HIGH/LOW/AUTO/FAN). A TIMER disattivato, premere il tasto “TIMER”<br />
per attivare questa funzione; sulla destra del display LCD comparirà il<br />
numero “1”; premendo nuovamente, verranno visualizzati in sequenza i<br />
numeri “2”, “3”, “4”, “5”, ecc. fino a “8”. Per disattivare il TIMER, premere il<br />
tasto “TIMER” quando sul display LCD compare il numero “8”; premendo<br />
ancora, si riattiva la funzione TIMER. Il TIMER effettua il conteggio delle<br />
ore con incrementi di un’ora finché l’apparecchio si porta automaticamente<br />
in modalità stand-by. Con l’apparecchio in questa modalità, premere il tasto<br />
“Power & Thermostat” per riavviarlo.<br />
P.S.: Se sulla destra del display LCD non compare alcuna scritta significa<br />
che la funzione TIMER non è attiva.<br />
USO DEL TERMOSTATO<br />
1. Premere il tasto Mode finché sul display è visualizzata la modalità<br />
AUTO.<br />
2. Per regolare la temperatura, ruotare il tasto Power & Thermostat in<br />
5
senso orario per aumentarla e in senso antiorario per diminuirla.<br />
3. Non appena la temperatura dell’aria aumenta di 2-3 gradi rispetto alla<br />
temperatura impostata, la funzione di riscaldamento si arresta<br />
immediatamente e dopo 15 secondi l’apparecchio cessa di emettere<br />
aria calda.<br />
4. Quando la temperatura dell’aria scende al di sotto della temperatura<br />
impostata, l’apparecchio si rimette in funzione.<br />
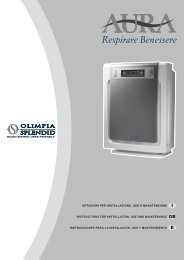
Telecomando:<br />
Figura 3<br />
1) Inserire la spina dell’apparecchio nella presa di<br />
corrente e premere l’interruttore generale posto<br />
sul basamento.<br />
2) Avviare l’apparecchio premendo il tasto<br />
POWER.<br />
3) Per le funzioni attivabili mediante i tasti OSC.,<br />
TIMER e MODE, vedere le istruzioni contenute<br />
nella sezione FUNZIONAMENTO.<br />
4) I tasti TEMP. (▲,▼ o +,-) servono per la<br />
funzione termostato e funzionano esattamente<br />
con il medesimo principio del tasto ruotante<br />
Power & Thermostat.<br />
5) Il telecomando è alimentato da due batterie<br />
AAA. Per la sostituzione delle batterie, ove<br />
richiesto, rimuovere il coperchio del vano<br />
batterie sul retro del telecomando.<br />
6) Non mescolare batterie vecchie e nuove e non<br />
utilizzare batterie con caratteristiche diverse da<br />
quelle prescritte.<br />
7) In caso di rottamazione dell’apparecchio,<br />
rimuovere le batterie e provvedere al loro<br />
smaltimento secondo quanto previsto dalle<br />
disposizioni di legge in vigore.<br />
Caratteristiche di sicurezza<br />
1. L’apparecchio è dotato di un dispositivo di protezione da<br />
sovraccarico termico atto ad evitarne il surriscaldamento.<br />
2. Qualora dovesse raggiungere una temperatura di surriscaldamento,<br />
l’apparecchio si spegne automaticamente. Per rimetterlo in funzione<br />
è necessario eseguire un resettaggio (vedere la Sezione<br />
RESETTAGGIO DELL’APPARECCHIO).<br />
6
Resettaggio<br />
1. Staccare l’apparecchio dalla presa di corrente ed attendere 5-10<br />
minuti per consentirgli di raffreddarsi.<br />
2. Trascorsi 5-10 minuti, ricollegare l’apparecchio all’alimentazione e<br />
rimetterlo in funzione normalmente.<br />
Manutenzione<br />
AVVERTENZA: STACCARE SEMPRE IL CORDONE DALLA PRESA DI<br />
CORRENTE PRIMA DI SPOSTARE L’APPARECCHIO O ESEGUIRE<br />
QUALSIASI INTERVENTO DI MANUTENZIONE.<br />
NON IMMERGERE L’APPARECCHIO IN ACQUA<br />
PULIZIA: Pulire l’apparecchio almeno una volta al mese o con maggiore<br />
frequenza qualora ve ne fosse la necessità.<br />
Per la pulizia della griglia usare la spazzola aspirante di un aspirapolvere in<br />
modo da asportare ogni traccia di sporco e lanugine dall’interno<br />
dell’apparecchio.<br />
Non tentare in alcun caso di smontare l’apparecchio.<br />
Non rimuovere mai l’elemento di protezione della griglia e non mettere mai<br />
in funzione l’apparecchio con la protezione smontata.<br />
Pulire il corpo dell’apparecchio con un panno morbido (NON USARE MAI<br />
ALCOOL O SOLVENTI).<br />
CONSERVAZIONE: Conservare l’apparecchio, unitamente alle presenti<br />
istruzioni, nella sua scatola originale in un luogo fresco e asciutto.<br />
7
CONFORMITA’ ALLE DIRETTIVE VIGENTI<br />
Questo prodotto è contrassegnato dal marchio CE ed è conforme<br />
alle Direttive 73/23/EEC (Bassa Tensione) e 89/336/EEC<br />
(Compatibilità Elettromagnetica) e successive modifiche.<br />
Questo simbolo riportato sul prodotto e sull’imballo sta ad indicare che<br />
l’apparecchio non può essere smaltito come i normali rifiuti domestici ma deve<br />
essere consegnato ad un centro di raccolta per il riciclaggio e lo smaltimento<br />
degli apparecchi elettrici ed elettronici. Il rispetto di queste norme in materia di<br />
smaltimento è estremamente importante ai fini della tutela dell’ambiente. Per<br />
ulteriori informazioni riguardo al riciclaggio di questo prodotto, rivolgersi alle autorità<br />
locali, al servizio di raccolta rifiuti della vostra città o al negozio presso il quale<br />
l’apparecchio è stato acquistato.<br />
La presente normativa è valida soltanto per i paesi membri dell’Unione Europea.<br />
8
OSCILLATING CERAMIC HEATER<br />
with REMOTE CONTROL<br />
USER INSTRUCTIONS<br />
SAVE THESE INSTRUCTIONS<br />
<strong>DJ</strong> <strong>TORRE</strong> <strong>CERAMICO</strong><br />
9
Product Appearance<br />
Figure1<br />
General Safety Information<br />
1. Use this heater only as described in this manual. Any other use not<br />
recommended by the manufacturer may cause fire, electric shock or<br />
injury to persons.<br />
2. Make certain that the power source conforms to the electrical<br />
requirements of the heater (AC220-240V/50Hz).<br />
3. The appliance is not intended for use by young children or infirm<br />
persons without adequate supervision. Young children should be<br />
supervised to ensure that they do not play with the appliance.<br />
4. To reduce the risk of electric shock, this plug is intended to fit in a<br />
suitable outlet. If the plug does not fit fully in the outlet, contact a<br />
10
qualified electrician.<br />
5. Where possible, avoid using extension cords because the extension<br />
cord may overheat and cause a fire risk. Never use a single<br />
extension cord to operate more than one heater.<br />
6. If the supply cord is damaged, it must be replaced by the<br />
manufacturer or its service agent or a similarly qualified person in<br />
order to avoid a hazard.<br />
7. Do not insert or allow fingers or foreign objects to enter any<br />
ventilation or exhaust opening as this may cause an electric shock<br />
or fire or damage the heater. Do not block or tamper with the heater<br />
in any manner while it is in operation.<br />
8. To prevent a possible fire, do not block air intakes or exhaust in any<br />
manner. Do not place the heater on soft surfaces, such as a bed,<br />
where openings may become blocked.<br />
9. Always place the heater on a stable, flat surface when operating, to<br />
prevent it tipping over. Locate the power cord so the heater or other<br />
objects are not resting on it. Do not run power cord under carpeting.<br />
Do not cover the power cord with throw rugs, runners, or the like.<br />
Arrange the power cord away from room traffic and where it will not<br />
be tripped over.<br />
10. This heater is hot when in use. To avoid burns, do not let bare skin<br />
touch the hot surfaces. Always use the handle when moving this<br />
heater. Keep combustible materials, such as furniture, pillows,<br />
bedding, papers, clothes and curtains at least 0.9 m from the front of<br />
the heater and at least 0.3 m from the sides and rear.<br />
11. Do not use this heater in the immediate vicinity of a bathtub, shower<br />
or pool.<br />
12. The heater is intended for household indoor use only.<br />
13. Do not cover! WARNING: in order to avoid overheating, do<br />
not cover the heater.<br />
14. The heater must not be located immediately below a socket.<br />
15. CAUTION: in order to avoid a hazard due to inadvertent resetting of<br />
the thermal cutout, this appliance must not be supplied through an<br />
external switching device, such as a timer, or connected to a circuit<br />
that is regularly switched on and off by the utility.<br />
11
READ AND SAVE THESE INSTRUCTIONS<br />
Operation<br />
Control Panel:<br />
Figure2<br />
1. Carefully remove the heater from the bag and the box.<br />
2. The heater must be placed on a flat surface.<br />
3. When the heater is plugged in and turned on using the power switch on<br />
the rear of the unit, there will be a “beep” and a red power light to<br />
indicate that the unit is powered. The red light will remain lit until the<br />
power switch is turned off or the heater is unplugged from the outlet.<br />
4. Press the POWER&THERMOSTAT KNOB to start the heater.<br />
5. Upon turning the heater on, the unit will be in HIGH heat mode (1800<br />
watts), the LCD will display the current air temperature, and the FAN<br />
starts to run. At the same time “HIGH” will appear on the LCD.<br />
6. When the MODE button is pressed at this point, the heater will be set to<br />
LOW heat mode (1100 watts), and “LOW” will appear on the LCD.<br />
7. Pressing the MODE button once more will set the heater to AUTO<br />
mode (1800 watts). Notice that the display now displays a SET TEMP<br />
indicator (see THERMOSTAT INSTRUCTIONS).<br />
8. Press the MODE button again and the heater will be in FAN mode (20<br />
watts). “FAN” will appear on the LCD. FAN mode is for fan-only<br />
operation, with no heat output.<br />
9. Press the MODE button again and the heater will go back to HIGH heat<br />
mode. Continuing to press the MODE button will cycle the unit through<br />
HIGH, LOW, AUTO and FAN modes.<br />
10. Press the OSC. button, the heater will oscillate back and forth. Press it<br />
again to stop oscillation.<br />
11. To turn the heater off, press the Power & Thermostat knob, and turn<br />
12
off the power switch, then remove the plug from the outlet.<br />
TIMER FUNCTION: The TIMER function allows users to set the running<br />
time from 1 to 8 hours, in any operating mode (HIGH/LOW/AUTO/FAN).<br />
When the TIMER is off, press ''TIMER'' to start this function and the right<br />
side of the LCD screen displays "1"; press again to display "2", then,<br />
"3.4.5...8". The TIMER is turned off by pressing the "TIMER" button while<br />
LCD displays "8". If pressed again, the timer function will be restarted. The<br />
TIMER will count down the hours an hour at a time until the appliance goes<br />
to standby mode automatically. If the machine is in standby mode, press<br />
"Power & Thermostat" to restart it.<br />
N.B.: if nothing is displayed on the right side of the LCD screen, the timer<br />
function is off.<br />
THERMOSTAT INSTRUCTIONS<br />
1. Press the Mode button until the display shows AUTO mode.<br />
2. To adjust the set temperature, turn the Power & Thermostat knob<br />
clockwise to increase the desired temperature and counter-clockwise to<br />
decrease the desired temperature.<br />
3. When the air temperature rises 2~3 degrees above the set temperature,<br />
the heater will stop heating at once and stop blowing after 15 seconds.<br />
4. When the air temperature drops below the set temperature, the unit will<br />
come back on.<br />
Remote Control:<br />
Figure3<br />
1) Plug the heater into the outlet and switch on the<br />
power switch on the base.<br />
2) Press the POWER button to start the heater.<br />
3) The OSC., TIMER and MODE buttons function in<br />
the exact same manner as that indicated in the<br />
OPERATION instructions above.<br />
4) The TEMP. buttons (▲,▼ or +,-) are for the<br />
thermostat and function in the same way as the<br />
Power & Thermostat knob.<br />
5) The remote control is powered by two AAA<br />
batteries. There is a cover on the back of the<br />
remote control that can be removed for<br />
replacement of the batteries as required.<br />
6) Do not mix old and new batteries, or batteries of<br />
different specifications.<br />
7) The battery must be removed from the appliance<br />
before it is scrapped; it is to be disposed of safely.<br />
Safety Features<br />
13
1. A thermal overload protector is built into the heater to prevent<br />
overheating.<br />
2. When an overheat temperature is reached, the heater automatically<br />
shuts down. It can only resume operation once the user has reset<br />
the unit (see RESET INSTRUCTIONS).<br />
Reset Instructions<br />
1. Unplug the heater and wait 5-10 minutes for the unit to cool down.<br />
2. After 5-10 minutes, plug the unit in again and operate normally.<br />
Maintenance<br />
WARNING: ALWAYS UNPLUG THE CORD BEFORE MOVING OR<br />
SERVICING.<br />
DO NOT IMMERSE THE HEATER IN WATER.<br />
CLEANING: Clean the heater at least once a month, or more often if dirty.<br />
Clean the heater grill with the vacuum brush attachment on your vacuum<br />
cleaner. This will remove lint and dirt from the inside of the heater.<br />
Do not attempt to take apart the heater.<br />
Do not remove the grill guard or allow the heater to be operated without the<br />
grill guard in place.<br />
Clean the body of the heater with a soft cloth (NEVER USE ALCOHOL OR<br />
SOLVENTS).<br />
STORAGE: Store the heater with these instructions in the original box in a<br />
cool, dry place.<br />
14
CONFORMITY WITH DIRECTIVES<br />
This product is CE marked to denote conformity with Directives<br />
73/23/EEC (Low Voltage) and 89/336/EEC (Electromagnetic<br />
Compatibility), as amended.<br />
This symbol on the product or its packaging indicates that the appliance<br />
cannot be treated as normal domestic trash, but must be handed in at a<br />
collection point for recycling electric and electronic appliances.<br />
Your contribution to the correct disposal of this product ensures the<br />
environment is not endangered by incorrect disposal.<br />
Further information about the recycling of this product can be obtained from your local<br />
town hall, your refuse collection service, or the store at which you bought the product.<br />
This regulation is valid only in EU member states.<br />
15
ESTUFA CERÁMICA OSCILANTE<br />
con CONTROL REMOTO<br />
MANUAL DE INSTRUCCIONES<br />
(CONSERVAR CUIDADOSAMENTE)<br />
<strong>DJ</strong> <strong>TORRE</strong> <strong>CERAMICO</strong><br />
16
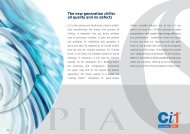
Ilustración del producto<br />
PARTE<br />
FRONTAL<br />
COSTADO<br />
PARTE<br />
POSTERIOR<br />
A Abertura de salida aire caliente H Manija<br />
B Base antivuelco I Abertura de entrada aire<br />
C Cuerpo J Clavija<br />
D Red metálica<br />
E Panel de mando<br />
F Abertura de entrada aire caliente<br />
G Interruptor general<br />
Figura 1<br />
Normas generales de seguridad<br />
1. Este aparato debe ser utilizado ateniéndose estrictamente a las<br />
instrucciones contenidas en el presente manual. No está permitido<br />
ningún uso diferente al expresamente previsto por el fabricante, ya<br />
que podría comportar riesgos de incendio, electrocución o<br />
accidentes.<br />
2. Verifique que el voltaje de la corriente de alimentación corresponda<br />
al previsto para el aparato (220-240 Vca/50 Hz).<br />
3. No permita que el aparato sea utilizado por niños o minusválidos sin<br />
adecuada vigilancia; verifique que los niños no lo utilicen para jugar.<br />
17
4. El aparato posee una clavija que debe ser correctamente<br />
introducida en la toma correspondiente. En caso de dificultad para<br />
insertar la clavija en la toma de corriente, recurra a un electricista<br />
cualificado.<br />
5. Evite en lo posible el uso de alargaderas, ya que éstas podrían<br />
recalentarse y provocar un incendio. Jamás utilice una sola<br />
alargadera para conectar más de un aparato.<br />
6. Si el cable de alimentación está dañado, la sustitución debe ser<br />
realizada por el fabricante, por el centro de asistencia o por un<br />
técnico cualificado y competente, para evitar cualquier tipo de<br />
inconveniente.<br />
7. No introduzca los dedos u objetos extraños en las aberturas de<br />
ventilación y de salida del aire, para evitar riesgos de electrocución,<br />
incendio o daños en el aparato. No obstruya dichas aberturas y no<br />
realice ninguna intervención en el aparato durante su<br />
funcionamiento.<br />
8. Para evitar el riesgo de incendio, deje siempre libres las entradas y<br />
las salidas de aire. No apoye el aparato sobre superficies blandas<br />
(por ejemplo, una cama), para evitar que las entradas y las salidas<br />
de aire se puedan obstruir.<br />
9. Apoye siempre el aparato en funcionamiento sobre una superficie<br />
plana, verificando su perfecta estabilidad, sin riesgo de vuelco.<br />
Coloque el cable de alimentación de tal modo que sobre el mismo<br />
no se apoye el aparato ni ningún otro objeto. No coloque el cable<br />
debajo alfombras o moquetas. No cubra el cable con alfombrillas,<br />
guías, etc. Coloque el cable alejado de los lugares de paso, para<br />
evitar tropiezos.<br />
10. Este aparato se calienta durante el funcionamiento. No toque las<br />
superficies calientes para evitar quemaduras; utilice siempre la<br />
manija correspondiente para transportarlo. Mantenga la estufa<br />
alejada de materiales combustibles (por ejemplo, muebles, cojines,<br />
mantas, papel, ropa o cortinas), verificando que estos estén a una<br />
distancia mínima de 0,9 m de la parte frontal y 0,3 m de los<br />
costados y de la parte posterior del aparato.<br />
11. No utilice el aparato en las inmediatas cercanías de la bañera, de la<br />
ducha o de la piscina.<br />
12. El aparato está destinado exclusivamente al uso en ambientes<br />
domésticos.<br />
18
13. ¡No cubrir! ATENCIÓN: Para evitar recalentamientos, no<br />
cubra el aparato.<br />
14. El aparato no se debe colocar en las inmediatas cercanías de una<br />
toma de corriente.<br />
15. ATENCIÓN: Para evitar el peligro de activación accidental del<br />
interruptor de relé térmico, el aparato no se debe conectar a<br />
dispositivos de conmutación externos (por ejemplo, temporizadores)<br />
ni a un circuito que sea activado y desactivado regularmente por el<br />
usuario.<br />
LEA ATENTAMENTE LAS PRESENTES<br />
INSTRUCCIONES Y CONSÉRVELAS<br />
CUIDADOSAMENTE<br />
Panel de mando:<br />
Funcionamiento<br />
Botón modo<br />
operativo<br />
Botón Power<br />
& Thermostat<br />
Piloto<br />
alimentación<br />
Botón<br />
oscilación<br />
Indicador<br />
modo<br />
operativo<br />
Botón<br />
temporizador<br />
Indicador de<br />
temperatura<br />
Indicador<br />
temporizador<br />
Figura 2<br />
1. Extraiga con cuidado el aparato de la caja y de la bolsa.<br />
2. Apoye el aparato sobre una superficie perfectamente plana.<br />
3. Después de introducir la clavija de alimentación en la toma de corriente,<br />
encienda el aparato con el interruptor general en la parte posterior; se<br />
oirá un tono y se encenderá un piloto rojo que indica que el aparato<br />
está conectado. El piloto rojo permanece encendido hasta que el<br />
aparato es apagado con el interruptor general o desconectado de la red<br />
eléctrica, extrayendo la clavija de la toma de corriente.<br />
19
4. Para encender el aparato pulse el botón Power & Thermostat.<br />
5. Al encenderse, el aparato comienza a funcionar en modo HIGH (1800<br />
W); en el display LCD se visualiza la temperatura corriente del aire y el<br />
ventilador comienza a girar. Simultáneamente, en el display LCD<br />
aparece la indicación HIGH.<br />
6. Pulse el botón MODE para poner el aparato en modo LOW (1100 W);<br />
en el display LCD se visualiza LOW.<br />
7. Pulsando nuevamente el botón MODE, el aparato pasa al modo AUTO<br />
(1800 W). En el display se visualiza la indicación SET TEMP<br />
(temperatura regulada; véanse más adelante las instrucciones para el<br />
uso del termostato).<br />
8. Pulse una vez más el botón MODE para poner el aparato en modo<br />
FAN (20 W). En el display LCD se visualiza FAN. En este modo<br />
operativo funciona solamente el ventilador y no hay ninguna<br />
producción de calor.<br />
9. Pulsando nuevamente el botón MODE el aparato vuelve al modo HIGH.<br />
Si se sigue pulsando el botón MODE, se repite el mismo ciclo (HIGH,<br />
LOW, AUTO, FAN).<br />
10. Pulsando el botón OSC. el aparato comienza a oscilar hacia adelante y<br />
hacia atrás. Para detener la oscilación, pulse nuevamente el mismo<br />
botón.<br />
11. Para apagar el aparato pulse el botón Power & Thermostat,<br />
desconecte la alimentación con el interruptor general y, por último,<br />
desconecte la clavija de la toma de corriente.<br />
FUNCIÓN TEMPORIZADOR: La función TEMPORIZADOR permite<br />
regular el tiempo de funcionamiento de 1 a 8 horas y es activable en todos<br />
los modos operativos (HIGH/LOW/AUTO/FAN). Con el temporizador<br />
desactivado, pulse el botón TEMPORIZADOR para activar dicha función; a<br />
la derecha del display LCD aparece el número 1; pulsando nuevamente se<br />
visualizan en secuencia los números 2, 3, 4, 5, etc., hasta el 8. Para<br />
desactivar el temporizador pulse el botón TEMPORIZADOR cuando en el<br />
display LCD aparece el número 8; pulsando una vez más se reactiva la<br />
función TEMPORIZADOR. El temporizador cuenta las horas con<br />
incrementos de una hora hasta que el aparato se pone automáticamente<br />
en modo STAND-BY. Cuando el aparato está en este modo de<br />
funcionamiento, pulse el botón Power & Thermostat para reencenderlo.<br />
Nota: Si a la derecha del display LCD no aparece ningún mensaje, significa<br />
que la función TEMPORIZADOR no está activa.<br />
USO DEL TERMOSTATO<br />
1. Pulse el botón Mode hasta visualizar en el display el modo AUTO.<br />
2. Para regular la temperatura, gire el botón Power & Thermostat en<br />
20
sentido dextrógiro para aumentarla y en sentido levógiro para<br />
disminuirla.<br />
3. Cuando la temperatura del aire aumenta de 2-3 grados con respecto a<br />
la temperatura regulada, la función de calentamiento se detiene<br />
inmediatamente; después de 15 segundos, el aparato deja de emitir<br />
aire caliente.<br />
4. Cuando la temperatura del aire desciende por debajo de la temperatura<br />
regulada, el aparato se reenciende.<br />
Control remoto:<br />
Figura 3<br />
1) Introduzca la clavija del aparato en la toma de<br />
corriente y pulse el interruptor general situado<br />
en la base.<br />
2) Encienda el aparato pulsando el botón<br />
POWER.<br />
3) Para las funciones activables con los botones<br />
OSC., TEMPORIZADOR y MODE, véanse las<br />
instrucciones contenidas en la sección<br />
FUNCIONAMIENTO.<br />
4) Los botones TEMP. (▲, ▼ o +,-) se utilizan para<br />
la función termostato y funcionan exactamente<br />
con el mismo principio que el botón giratorio<br />
Power & Thermostat.<br />
5) El control remoto es alimentado por dos<br />
baterías AAA. Si es necesario sustituir las<br />
baterías, quite la tapa del compartimiento de las<br />
baterías, situado en la parte posterior del<br />
control remoto.<br />
6) No mezcle baterías viejas y nuevas, y no utilice<br />
baterías con características diferentes de las<br />
prescritas.<br />
7) En caso de desguace del aparato, extraiga las<br />
baterías y elimínelas según lo previsto por las<br />
disposiciones legales vigentes.<br />
Características de seguridad<br />
1. El aparato está dotado de un dispositivo de protección contra las<br />
sobrecargas térmicas que evita el recalentamiento.<br />
2. En caso de recalentamiento el aparato se apaga automáticamente.<br />
Para reencenderlo es necesario reiniciarlo (véase la sección<br />
REINICIO DEL APARATO).<br />
21
Reinicio<br />
1. Desconecte el aparato de la toma de corriente y espere 5-10<br />
minutos para que se enfríe.<br />
2. Una vez transcurridos 5-10 minutos, vuelva a conectar el aparato a<br />
la alimentación y enciéndalo normalmente.<br />
Mantenimiento<br />
ADVERTENCIA: DESCONECTE SIEMPRE EL CABLE DE LA TOMA DE<br />
CORRIENTE ANTES DE DESPLAZAR EL APARATO O DE REALIZAR<br />
CUALQUIER OPERACIÓN DE MANTENIMIENTO.<br />
NO SUMERJA EL APARATO EN AGUA<br />
LIMPIEZA: Limpie el aparato al menos una vez por mes o, si es necesario,<br />
con mayor frecuencia.<br />
Limpie la rejilla utilizando el cepillo aspirante de un aspirador para quitar la<br />
suciedad y la pelusa del interior del aparato.<br />
Jamás intente desmontar el aparato.<br />
Jamás extraiga el elemento de protección de la rejilla ni encienda el<br />
aparato con la protección desmontada.<br />
Limpie el cuerpo del aparato con un paño suave (JAMÁS UTILICE<br />
ALCOHOL O SOLVENTES).<br />
CONSERVACIÓN: Conserve el aparato y estas instrucciones en su caja<br />
original, en un lugar fresco y seco.<br />
22
CONFORMIDAD CON LAS DIRECTIVAS VIGENTES<br />
Este producto posee marca CE y responde a las Directivas 73/23/EEC<br />
(Baja Tensión) y 89/336/EEC (Compatibilidad Electromagnética) y<br />
posteriores enmiendas.<br />
Este símbolo, presente en el producto y en el embalaje, indica que el aparato<br />
no puede ser eliminado como los residuos domésticos normales, sino que<br />
debe ser entregado a un centro de recogida para el reciclaje y eliminación de<br />
los aparatos eléctricos y electrónicos. El respeto de estas normas en materia<br />
de eliminación es extremadamente importante para la tutela del ambiente. Para más<br />
información sobre el reciclaje de este producto, diríjase a las autoridades locales, al<br />
servicio de recogida de residuos de su ciudad o a la tienda en la que el aparato ha sido<br />
comprado.<br />
La presente normativa es válida solamente para los países miembros de la Unión<br />
Europea.<br />
23