
Create successful ePaper yourself
Turn your PDF publications into a flip-book with our unique Google optimized e-Paper software.
Características técnicas Technical information<br />
• Se extenderá el adhesivo con un paleta y se extenderá y peinará con una llana dentada de al menos 10 mm de profundidad<br />
de diente. Se alisará con la parte plana de la llana hasta dejar la superficie completamente cubierta de adhesivo sin dejar<br />
ningún hueco.<br />
• En exteriores se recomienda el doble encolado, extendiendo una fina capa de adhesivo en el reverso de la baldosa hasta<br />
quedar totalmente cubierta. El objetivo del doble encolado es mejorar la adhesión y evitar que queden huecos debajo de las<br />
baldosas en donde pueda acumularse el agua de lluvia.<br />
• Colocar la baldosa en su sitio ayudándose, si es necesario, de crucetas de plástico para guardar las juntas de colocación<br />
entre las piezas cerámicas. Se recomienda una junta de 7 mm. Asegurarse que la baldosa queda bien asentada y nivelada<br />
con respecto a las piezas del contorno.<br />
LAYING THE TILES:<br />
• The tiles should be laid with a type C2 E S1 adhesive, as per standard UNE-EN 12004. This is the standard name used by tile<br />
adhesive manufacturers for “improved deformable cement-based adhesives for outdoor use” with an extended open time.<br />
Follow the adhesive manufacturer’s instructions for preparing and applying the adhesive.<br />
• Under no circumstances should the adhesive be applied in adverse weather conditions, i.e. temperatures below 5ºC or above<br />
35ºC, or in rain or strong winds.<br />
• The adhesive’s open time should not be exceeded (i.e. the maximum working time for laying the tiles from the moment that<br />
the adhesive is ready for use).<br />
• All the tiles should be laid with the grooves on the underside pointing in the same direction to facilitate the bonding process.<br />
• To cut the tiles, use a wet tile saw.<br />
• Spread the adhesive with a spatula and comb it using a notched trowel with at least 10mm teeth. Smooth it with the unnotched<br />
side of the trowel until the entire underside of the tile is covered in adhesive, leaving no gaps.<br />
• When tiles are laid outdoors, the floating and buttering method should be used, spreading a thin layer of adhesive over the<br />
underside of the tiles until they have been fully covered. The purpose of this method is to ensure a firmer bond and to avoid<br />
gaps under the tiles where rainwater might accumulate.<br />
• Position the tiles, using plastic spacers if necessary to keep the right distance between them. A 7mm tile joint should be left.<br />
Make sure that the tiles are firmly positioned and level with the rest of the tiled surface.<br />
REJUNTADO Y LIMPIEZA DEL PAVIMENTO:<br />
• Se deben dejar transcurrir 24 horas antes de pisar el pavimento.<br />
• Para el relleno de las juntas de colocación se usará mortero cementos CG2 según norma UNE-EN 13888. Esta nomenclatura<br />
es habitual entre todos los fabricantes de pastas de rejuntado significa “Mortero de juntas mejorado para su uso en exteriores”.<br />
Estos morteros existen en múltiples colores.<br />
• Preparar y aplicar la pasta de rejuntar siguiendo las instrucciones del fabricante. Debe asegurarse relleno total de las juntas<br />
entre baldosas, y no aplicar las pasta en condiciones climatológicas adversas que pueden provocar el posterior cuarteo y deterioro<br />
de la misma.<br />
• La limpieza del material de rejuntar sobrante debe hacerse sin dejar transcurrir demasiado tiempo utilizando agua limpia y<br />
una esponja.<br />
188<br />
GROUTING AND CLEANING THE TILED SURFACE:<br />
• Wait for 24 hours before treading on the tiled surface.<br />
• To fill the tile joints, use a CG2 type grouting mortar, as per standard UNE-EN 13888. This is the standard name used by<br />
grouting manufacturers to refer to “improved grouts for use outdoors”. These grouts come in numerous different colours.<br />
• Prepare and apply the grouting material, as per the manufacturer’s instructions. Make sure that the entire tile joint is filled.<br />
Do not apply the grout in adverse weather conditions that might cause it to crack or diminish its properties.<br />
• Do not wait too long before cleaning away any surplus grouting material. Use clean water and a sponge to remove it.<br />
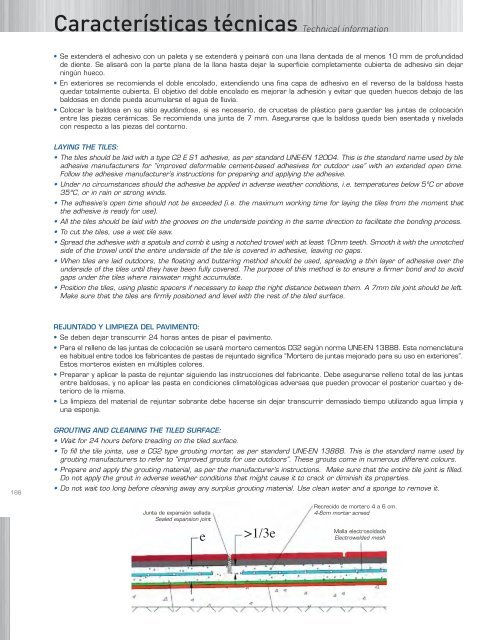
Junta de expansión sellada<br />
Sealed expansion joint<br />
e<br />
>1/3e<br />
Recrecido de mortero 4 a 6 cm.<br />
4-6cm mortar screed<br />
Malla electrosoldada<br />
Electrowelded mesh