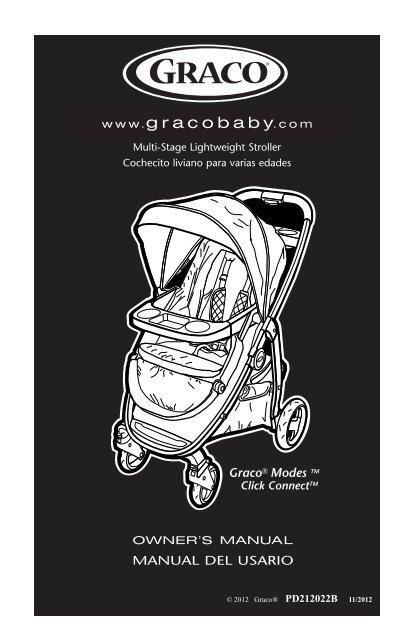
Graco® Modes TM MANUAL DEL USARIO - Toys R Us
Graco® Modes TM MANUAL DEL USARIO - Toys R Us
Graco® Modes TM MANUAL DEL USARIO - Toys R Us

Create successful ePaper yourself
Turn your PDF publications into a flip-book with our unique Google optimized e-Paper software.
Multi-Stage Lightweight Stroller<br />
Cochecito liviano para varias edades<br />
Graco ® <strong>Modes</strong> <strong>TM</strong><br />
Click Connect <strong>TM</strong><br />
<strong>MANUAL</strong> <strong>DEL</strong> <strong>USARIO</strong><br />
© 2012 Graco® PD212022B 11/2012
Failure to follow these warnings and the<br />
assembly instructions could result in serious injury or death.<br />
PLEASE SAVE OWNER’S<br />
<strong>MANUAL</strong> FOR FUTURE USE.<br />
ADULT ASSEMBLY REQUIRED.<br />
NEVER LEAVE CHILD<br />
UNATTENDED. Always keep<br />
child in view while in stroller.<br />
AVOID SERIOUS INJURY from<br />
falling or sliding out. Always use<br />
seat belt or infant carseat<br />
harness. After fastening buckles,<br />
adjust belts to get a snug fit<br />
around your child.<br />
AVOID FINGER ENTRAPMENT:<br />
<strong>Us</strong>e care when folding and<br />
unfolding the stroller. Be certain<br />
the stroller is fully erected and<br />
latched before allowing your<br />
child near the stroller.<br />
NEVER USE STROLLER ON<br />
STAIRS or escalators. You may<br />
suddenly lose control of the<br />
stroller or your child may fall out.<br />
Also, use extra care when going<br />
up or down a step or curb.<br />
AVOID STRANGULATION.<br />
DO NOT place items with a<br />
string around your child’s neck,<br />
suspend strings from this<br />
product, or attach strings to toys.<br />
USE OF THE STROLLER with a<br />
child weighing more than 50 lbs<br />
(22.7 kg) or taller than 45 in<br />
(114.3cm) will cause excessive<br />
wear and stress on the stroller.<br />
<strong>Us</strong>e the stroller with only one<br />
child at a time.<br />
ALWAYS check that the infant<br />
carseat or toddler seat is securely<br />
attached to the frame by pulling<br />
up on it.<br />
TO PREVENT A HAZARDOUS,<br />
UNSTABLE CONDITION, never<br />
place purses, shopping bags,<br />
parcels or accessory items on the<br />
handle (other than approved<br />
Graco stroller bags). Never place<br />
anything on the canopy.<br />
TO PREVENT A HAZARDOUS,<br />
UNSTABLE CONDITION, do not<br />
place more than 10 lbs (4.5 kg)<br />
in the storage basket.<br />
TO AVOID BURNS, never put<br />
hot liquids in the parent tray.<br />
TO PREVENT TIPPING, do not<br />
place more than 3lb (1.36kg) in<br />
the parent tray.<br />
DO NOT use storage basket as a<br />
child carrier.<br />
DO NOT use toddler seat in an<br />
automobile.<br />
DO NOT use toddler seat as a car<br />
bed or booster seat.<br />
DO NOT remove, reverse or carry<br />
the toddler seat while child is in<br />
it.<br />
DO NOT ALLOW your child to<br />
stand on the basket. It may<br />
collapse and cause injury.<br />
NEVER PLACE child in the<br />
toddler seat with head toward<br />
footrest.<br />
2
DO NOT use stroller frame<br />
without toddler seat or carseat<br />
attached.<br />
NEVER ALLOW YOUR<br />
STROLLER to be used as a toy.<br />
STROLLER TO BE USED only<br />
at walking speed. Product not<br />
intended for use while jogging,<br />
skating, etc.<br />
NEVER LIFT OR CARRY toddler<br />
seat by the footrest.<br />
DISCONTINUE USING YOUR<br />
STROLLER should it become<br />
damaged or broken.<br />
CAREGIVER MUST always help<br />
child get into and out of the<br />
stroller.<br />
CAREGIVER MUST always<br />
ensure the brakes are engaged<br />
when placing child into stroller.<br />
USING GRACO® INFANT<br />
CARSEAT WITH STROLLER:<br />
USE ONLY A GRACO ®<br />
SNUGRIDE ® CLICK CONNECT <br />
infant carseat with this product.<br />
(Not intended for use with<br />
SnugRide®, SnugRide® 30,<br />
SnugRide® 32, SnugRide® 35,<br />
Infant Safeseat, AUTOBABY,<br />
LOGICO S, JUNIORBABY and<br />
ASSURA infant car seats.)<br />
Improper use of this stroller with<br />
other manufacturers’ carseats<br />
may result in serious injury or<br />
death.<br />
READ THE <strong>MANUAL</strong> provided<br />
with your Graco carseat before<br />
using it with your stroller.<br />
FALL HAZARD: Always check<br />
that infant carseat is securely<br />
attached to stroller by pulling up<br />
on the carseat.<br />
TO AVOID FALLING OUT<br />
always ensure that the toddler<br />
seat is securely attached on both<br />
sides of the stroller frame.<br />
ALWAYS SECURE your child<br />
with the carseat harness when<br />
using the carseat in the stroller.<br />
If your child is already in the<br />
carseat, check that the child is<br />
secured with the harness.<br />
Improper use of this stroller with<br />
a carseat may result in serious<br />
injury or death.<br />
See Graco infant carseat owners<br />
manual for maximum size of<br />
child.<br />
3
No observar estas advertencias y las instrucciones de armado<br />
podría resultar en lesiones serias o la muerte.<br />
POR FAVOR, GUARDE EL<br />
<strong>MANUAL</strong> <strong>DEL</strong> <strong>USARIO</strong> PARA<br />
USO FUTURO.<br />
REQUIERE QUE LO ARME UN<br />
ADULTO.<br />
NUNCA DEJE A UN NIÑO SIN<br />
ATENDER. Mantenga siempre al<br />
niño a la vista mientras está en<br />
el cochecito.<br />
EVITE SERIAS LESIONES<br />
causadas por caídas o resbalos.<br />
<strong>Us</strong>e siempre el cinturón de<br />
seguridad o arnés del asiento de<br />
automóvil para el bebé. Luego<br />
de sujetar las hebillas, ajuste las<br />
correas para lograr un calce<br />
apretado alrededor de su niño.<br />
EVITE EL ATRAPAMIENTO DE<br />
LOS DEDOS: Tenga cuidado<br />
cuando pliega y despliega el<br />
cochecito. Asegúrese de que el<br />
cochecito esté completamente<br />
armado y trabado antes de<br />
permitir que el niño se acerque<br />
al mismo.<br />
NUNCA USE EL COCHECITO<br />
EN ESCALERAS o escaleras<br />
mecánicas. Podría perder<br />
repentinamente el control del<br />
cochecito o el niño podría<br />
caerse. Además, use mucho<br />
cuidado cuando sube o baja<br />
un escalón o bordillo.<br />
EVITE LA ESTRANGULACIÓN.<br />
NO ponga artículos con un<br />
cordón alrededor del cuello del<br />
niño, suspenda cordones de este<br />
producto ni ponga cordones a<br />
los juguetes.<br />
EL USO DE UN COCHECITO<br />
con un niño que pesa más de<br />
50 libras (22,7 kg) o es más alto<br />
que 45 pulgadas (114,3 cm)<br />
causará desgaste y tensión<br />
excesiva en el cochecito. <strong>Us</strong>e<br />
el cochecito solamente con un<br />
niño por vez.<br />
SIEMPRE verifique que el<br />
asiento de automóvil para bebé<br />
o asiento para niño pequeño<br />
esté sujetado con seguridad al<br />
armazón tirando de él.<br />
PARA PREVENIR UNA<br />
SITUACIÓN PELIGROSA<br />
E INESTABLE, nunca ponga<br />
carteras, bolsas, paquetes o<br />
accesorios en la manija (si no<br />
son las bolsas para cochecito<br />
aprobadas por Graco). No ponga<br />
nunca nada sobre la capota.<br />
PARA PREVENIR UNA<br />
SITUACIÓN INESTABLE Y<br />
PELIGROSA, no ponga más de<br />
10 libras (4,5 kg) en la canasta<br />
de almacenamiento.<br />
PARA EVITAR QUEMADURAS,<br />
nunca ponga líquidos calientes<br />
en la bandeja para padres.<br />
4
PARA PREVENIR QUE SE<br />
TUMBE, no ponga más de<br />
3 libras (1,36 kg) en la bandeja<br />
para padres.<br />
NO use la canasta de<br />
almacenamiento como<br />
transportador para niños.<br />
NO use el asiento para niño<br />
pequeño en un automóvil.<br />
NO use el asiento para niño<br />
pequeño como cama en un<br />
automóvil o asiento para niños.<br />
NO saque, invierta ni transporte<br />
el asiento para niño pequeño<br />
mientras el niño esté sentado.<br />
NO DEJE que el niño se pare<br />
sobre la canasta. Podría<br />
desarmarse y causar lesiones.<br />
NUNCA PONGA al niño en el<br />
asiento para niño pequeño con<br />
la cabeza hacia el apoyapiés.<br />
NO use el armazón del cochecito<br />
sin el asiento para niño pequeño<br />
o asiento de automóvil sujetado.<br />
NUNCA DEJE QUE EL<br />
COCHECITO se use como<br />
un juguete.<br />
EL COCHECITO DEBE USARSE<br />
solamente a la velocidad del<br />
caminar. El producto no debe<br />
usarse para correr, patinar, etc.<br />
NUNCA LEVANTE NI<br />
TRANSPORTE el asiento<br />
para niño pequeño agarrado<br />
del apoyapié.<br />
DEJE DE USAR SU COCHECITO<br />
si resulta dañado o roto<br />
LA PERSONA A CARGO <strong>DEL</strong><br />
CUIDADO debe ayudar siempre<br />
al niño a subirse y bajarse del<br />
cochecito.<br />
LA PERSONA A CARGO <strong>DEL</strong><br />
CUIDADO debe tener la<br />
seguridad de que los frenos<br />
estén activados cuando pone al<br />
niño en el cochecito.<br />
USO <strong>DEL</strong> ASIENTO DE<br />
AUTOMÓVIL PARA BEBÉ<br />
GRACO ® CON EL COCHECITO:<br />
USE SOLAMENTE UN<br />
ASIENTO DE AUTOMÓVIL<br />
PARA BEBÉ GRACO ®<br />
SNUGRIDE ® CLICK CONNECT <br />
con este producto. (No debe<br />
usarse con los asientos de<br />
automóvil para bebé<br />
SnugRide®, SnugRide® 30,<br />
SnugRide® 32, SnugRide® 35,<br />
Infant Safeseat, AUTOBABY,<br />
LOGICO S, JUNIORBABY y<br />
ASSURA.) El uso inadecuado de<br />
este cochecito con asientos para<br />
automóvil de otros fabricantes<br />
podría resultar en lesiones serias<br />
o la muerte.<br />
LEA EL <strong>MANUAL</strong> incluido con<br />
su asiento de automóvil Graco<br />
antes de usarlo con su cochecito.<br />
PELIGRO DE CAÍDA: Verifique<br />
siempre que el asiento de<br />
automóvil para bebé esté<br />
debidamente asegurado al<br />
cochecito tirando del asiento<br />
de automóvil hacia arriba.<br />
5
PARA EVITAR CAÍDAS,<br />
asegúrese siempre de que el<br />
asiento para niño pequeño esté<br />
sujetado en ambos costados del<br />
armazón del cochecito.<br />
ASEGURE SIEMPRE a su niño<br />
con el arnés del asiento de<br />
automóvil cuando usa el asiento<br />
de automóvil en el cochecito. Si<br />
su niño ya está en el asiento de<br />
automóvil, verifique que esté<br />
asegurado con el arnés.<br />
El uso inadecuado de este<br />
cochecito con un asiento de<br />
automóvil podría resultar en<br />
lesiones serias o la muerte.<br />
Vea el manual del propietario<br />
del asiento de automóvil para<br />
bebé Graco para determinar el<br />
tamaño máximo del niño.<br />
6
Check that you have all the parts<br />
for this model BEFORE<br />
assembling your product.<br />
If any parts are missing,<br />
call Customer Service.<br />
Verifique que tiene todas las<br />
piezas de este modelo ANTES de<br />
armar su producto. Si falta alguna<br />
pieza, llame a Servicio al Cliente.<br />
No tools required.<br />
No requiere herramientas.<br />
<br />
2X 2X 2X 2X<br />
7
To Open Stroller Cómo abrir el cochecito<br />
Before assembly be sure to place stroller on top of a piece of cardboard<br />
or other protective cover to prevent damage to floor surface.<br />
Antes de armarlo, tenga la seguridad de poner el cochecito<br />
arriba de un pedazo de cartón u otro tipo de protección<br />
para prevenir el daño a la superficie del piso.<br />
1<br />
Pull out to unlock<br />
stroller.<br />
Tire para destrabar<br />
el cochecito.<br />
2<br />
CHECK that stroller is<br />
completely latched open<br />
before continuing.<br />
VERIFIQUE que el cochecito<br />
esté completamente trabado<br />
antes de continuar.<br />
SNAP!<br />
¡CLIC!<br />
3<br />
8<br />
Fasten basket around<br />
tube as shown.<br />
Sujete la canasta alrededor<br />
del tubo como se indica.
1<br />
SNAP!<br />
¡CLIC!<br />
Brake levers point toward rear<br />
of stroller. Check that rear<br />
axle is securely attached by<br />
pulling on brake assembly.<br />
Las palancas del freno deben<br />
apuntar hacia la parte trasera<br />
del cochecito. Verifique que<br />
el eje trasero esté bien<br />
conectado tirando del<br />
equipo de frenos.<br />
2<br />
Rotate parking stand up<br />
and snap onto axle tube.<br />
Gire el soporte de<br />
estacionamiento hacia arriba<br />
y trábelo en el tubo del eje.<br />
SNAP!<br />
¡CLIC!<br />
3<br />
Fasten basket around rear axle<br />
as shown.<br />
Sujete la canasta alrededor del<br />
eje trasero como se indica.<br />
9
1<br />
SNAP!<br />
¡CLIC!<br />
SNAP!<br />
¡CLIC!<br />
<br />
1<br />
Attach wheel as shown.<br />
Repeat on other side.<br />
2X<br />
Sujete la rueda como se indica.<br />
Repita el procedimiento<br />
del otro lado.<br />
10
2<br />
2X<br />
Push straight side of pin<br />
through axle hole. Pin will<br />
separate around the axle. Curved<br />
end of pin MUST face out as<br />
shown. Repeat on other end.<br />
Empuje el lado recto de la clavija<br />
por el agujero del eje. La clavija se<br />
separará alrededor del eje. El lado<br />
curvo de la clavija DEBE mirar hacia<br />
afuera como se indica. Repita el<br />
procedimiento en el otro lado.<br />
3<br />
2X<br />
Attach hub cap as shown.<br />
Repeat on other side.<br />
CHECK that wheels are securely<br />
attached by pulling on wheels.<br />
Sujete el cubo como se indica.<br />
Repita el procedimiento<br />
del otro lado.<br />
VERIFIQUE que las ruedas estén<br />
instaladas correctamente tirando<br />
de las ruedas.<br />
11
Front Wheels Ruedas Delanteras<br />
1<br />
2X<br />
SNAP!<br />
¡CLIC!<br />
2<br />
CHECK that wheels are<br />
securely attached by pulling<br />
on front wheels.<br />
VERIFIQUE que las ruedas estén<br />
instaladas correctamente tirando<br />
de las ruedas delanteras.<br />
12
To Attach Toddler Seat Cómo sujetar el asiento<br />
para niño pequeño<br />
1<br />
To attach seat, place seat on<br />
mounts as shown until they lock<br />
into place on both sides of the<br />
stroller. Seat may be placed on<br />
stroller in either direction.<br />
See warnings for additional<br />
information.<br />
Para sujetar el asiento, ponga el<br />
asiento en los montantes como<br />
se indica hasta que se traben<br />
en su lugar en ambos costados<br />
del cochecito. Se puede colocar<br />
el asiento en el cochecito en<br />
cualquiera de las dos direcciones.<br />
Vea las advertencias para<br />
más información.<br />
2<br />
MAKE SURE seat<br />
mounts are securely<br />
attached to the stroller on both<br />
sides as shown.<br />
ASEGÚRESE de que los montantes<br />
del asiento estén debidamente<br />
sujetados al cochecito en<br />
ambos lados como se indica.<br />
SNAP!<br />
¡CLIC!<br />
13
1<br />
<br />
WARNING<br />
Always secure your child with the seat belt. The tray is not a restraint<br />
device.<br />
DO NOT lift the stroller by the child’s tray. <strong>Us</strong>e care when snapping the<br />
tray on the stroller with a child in the stroller.<br />
ADVERTENCIA<br />
Asegure siempre a su niño con el cinturón de seguridad.<br />
La bandeja no es un dispositivo de seguridad.<br />
NO levante el cochecito agarrándolo de la bandeja para el niño.<br />
<strong>Us</strong>e cuidado cuando traba la bandeja en el cochecito si hay un niño<br />
en el cochecito.<br />
Insert armrests into slots on<br />
each side of the stroller until<br />
they click into place.<br />
SNAP!<br />
¡CLIC!<br />
Pull on armrest to make<br />
sure they are attached.<br />
Ponga los apoyabrazos en las ranuras<br />
de cada costado del cochecito<br />
hasta que se traben en su lugar.<br />
2<br />
SNAP!<br />
¡CLIC!<br />
Tire firmemente de los<br />
apoyabrazos para asegurarse<br />
que estén enganchados.<br />
14
3<br />
To remove tray, squeeze<br />
button on tray and lift. up.<br />
Para sacar la bandeja, oprima el<br />
botón de la bandeja y levántela.<br />
4<br />
To remove armrest, push<br />
button as shown and remove.<br />
Para sacar el apoyabrazo, pulse<br />
el botón como se indica.<br />
15
1<br />
Fasten hook and loop tape on<br />
the rear of canopy as shown.<br />
MAKE SURE canopy is always<br />
fastened with the hook<br />
and loop tape when used<br />
with infant carseat or when<br />
toddler seat is in use.<br />
Sujete la cinta de ganchos y<br />
nudos en la parte de atrás de<br />
la capota como se indica.<br />
ASEGÚRESE que la capota esté<br />
siempre sujetada con la cinta<br />
de gancho y nudo cuando la<br />
usa con el asiento de automóvil<br />
para bebé o cuando usa el<br />
asiento para niño pequeño.<br />
16
2<br />
To open canopy.<br />
Para abrir la capota.<br />
3<br />
To close canopy.<br />
Para cerrar la capota.<br />
17
4<br />
To open canopy window.<br />
Para abrir la ventana de la capota.<br />
5<br />
To close canopy window.<br />
Para cerrar la ventana de la capota.<br />
6<br />
To open or close canopy visor.<br />
Para abrir o cerrar la<br />
visera de la capota.<br />
18
1<br />
2<br />
3<br />
4<br />
<strong>Us</strong>e slide adjuster at shoulder and waist<br />
for tighter adjustment.<br />
To change shoulder harness slots, see<br />
page 21.<br />
<strong>Us</strong>e el ajustador deslizable del hombro<br />
y la cintura para ajustarlo más<br />
apretadamente.<br />
Para cambiar las ranuras del arnés del<br />
hombro, consulte la página 21.<br />
19
1<br />
To convert to 3-pt buckle.<br />
Cómo convertirlo en una<br />
hebilla de 3 puntos.<br />
2<br />
3<br />
4<br />
<strong>Us</strong>e slide adjuster at waist<br />
for tighter adjustment.<br />
<strong>Us</strong>e el ajustador deslizable<br />
del hombro y la cintura<br />
para ajustarlo más<br />
apretadamente.<br />
5<br />
20
To Change Shoulder Harness Slots<br />
<br />
Shoulder harness anchor-larger child<br />
Anclaje del arnés del hombro – niño más grande<br />
Shoulder harness anchor—smaller child<br />
Anclaje del arnés del hombro – niño pequeño<br />
Slide adjuster<br />
Ajustador deslizable<br />
1<br />
To change shoulder harness slots,<br />
unfasten zipper on rear of seat as<br />
shown.<br />
Para cambiar las ranuras del arnés<br />
de los hombros, destrabe el cierre<br />
en la parte de atrás del asiento<br />
como se indica.<br />
2<br />
Push harness anchor through the<br />
front of seat then re-insert through<br />
desired slots at the same height<br />
level.<br />
Pase el sujetador del arnés por el<br />
frente del asiento y luego vuelva a<br />
insertarlo en las ranuras deseadas<br />
a la misma altura.<br />
21
To Recline Seat <br />
WARNING<br />
When making adjustments to the stroller seat, make sure child’s head,<br />
arms, and legs are clear of moving seat parts and stroller frame.<br />
WARNING<br />
Child may slip into leg openings and strangle. NEVER use in full recline<br />
position unless footrest is in the reclined carriage position.<br />
ADVERTENCIA<br />
Cuando realiza ajustes al asiento del cochecito, tenga la seguridad que la<br />
cabeza, brazos y piernas del niño están lejos de piezas del asiento que se<br />
muevan y el armazón del cochecito.<br />
ADVERTENCIA<br />
El niño podría caerse por las aberturas de las piernas y estrangularse.<br />
NUNCA lo use en la posición totalmente reclinada a menos que el<br />
apoyapié esté en la posición del cochecito reclinado.<br />
1<br />
To lower: Pull handle up and pull<br />
seat down.<br />
Cómo bajarlo: Tire la manija hacia<br />
arriba y tire el asiento hacia abajo.<br />
22
2<br />
Recline the toddler seat to<br />
the desired position. There<br />
are 4 recline positions.<br />
Recline el asiento para niños<br />
pequeños a la posición deseada.<br />
Hay 4 posiciones de reclinación.<br />
3<br />
To raise: Push seat up.<br />
Cómo elevarlo: Empuje el asiento<br />
hacia arriba.<br />
23
1<br />
To raise footrest, lift up as shown.<br />
Para levantar el apoyapié, levántelo<br />
hacia arriba como se indica.<br />
2<br />
To lower, push buttons as shown.<br />
Para bajarlo, oprima los botones<br />
como se indica.<br />
3<br />
To allow more room for child’s<br />
feet, push footrest down.<br />
Para permitir más espacio para los<br />
pies del niño, empuje el apoyapié<br />
hacia abajo.<br />
24
Reclined Carriage Position <br />
del cochecito<br />
WARNING<br />
<br />
and strangle.<br />
<br />
unless footrest is in the reclined<br />
carriage position.<br />
<br />
in the full recline position.<br />
<br />
strangulation, always attach side<br />
flaps when footrest is fully raised.<br />
ADVERTENCIA<br />
<br />
<br />
apoyapié esté en la posición del cochecito reclinado.<br />
<br />
<br />
laterales cuando el apoyapie está completamente levantado.<br />
1 Recline seat to full recline<br />
position and place footrest in<br />
the most upright position.<br />
Recline el asiento hasta<br />
alcanzar la posición totalmente<br />
reclinada y ponga el apoyapié<br />
en la posición más vertical.<br />
25
2 Unfasten flap from the<br />
side of seat as shown.<br />
Destrabe la aleta del costado<br />
del asiento como se indica.<br />
3<br />
Unfasten hook and loop straps from<br />
underneath the footrest as shown.<br />
Destrabe las correas de gancho<br />
y nudo desde abajo del<br />
apoyapié como se indica.<br />
Insert straps through the slots<br />
in the side panel as shown.<br />
Pase las correas de gancho<br />
y nudo por las ranuras en el<br />
panel lateral como se indica.<br />
26
4<br />
Re-fasten straps to the<br />
footrest as shown.<br />
Vuelva a sujetar las correas al<br />
apoyapié como se indica.<br />
5<br />
Assembly is complete as shown.<br />
El ensamblado está completo<br />
como se indica.<br />
27
Brakes <br />
1<br />
2<br />
SNAP!<br />
¡CLIC!<br />
SNAP!<br />
¡CLIC!<br />
WARNING<br />
Always apply the brake. CHECK that<br />
brakes are on by trying to push stroller.<br />
ADVERTENCIA<br />
<strong>Us</strong>e siempre los frenos. VERIFIQUE<br />
que los frenos estén activados<br />
tratando de empujar el cochecito.<br />
<br />
1<br />
SNAP!<br />
¡CLIC!<br />
Front swivel wheels lock for use<br />
on uneven surfaces such as grass,<br />
stones or gravel.<br />
2<br />
Las ruedas giratorias delanteras se<br />
traban para el uso en superficies<br />
desparejas tales como césped,<br />
piedras o grava.<br />
SNAP!<br />
¡CLIC!<br />
28
cochecito con el asiento para niño pequeño<br />
1<br />
1 2<br />
Before folding, remove car<br />
seat if installed, unlock brakes<br />
and unlock swivel wheels.<br />
To fold, slide button<br />
then squeeze handle.<br />
Antes de plegarlo, saque el<br />
asiento de automóvil si está<br />
instalado, destrabe los frenos<br />
y las ruedas giratorias.<br />
Para plegarlo, deslice el botón<br />
y luego apriete la manija.<br />
2<br />
3<br />
SNAP!<br />
¡CLIC!<br />
MAKE SURE storage latch is<br />
locked in place as shown.<br />
ASEGÚRESE de que la traba de<br />
almacenamiento esté trabada<br />
en su lugar como se indica.<br />
29
asiento para niño pequeño<br />
1 Squeeze buttons on both sides of<br />
the seat and pull up as shown.<br />
Oprima los botones de ambos<br />
costados del asiento y tire<br />
hacia arriba como se indica.<br />
30
To Fold Stroller Frame Cómo plegar el<br />
<br />
1<br />
1 2<br />
Before folding, remove car<br />
seat if installed, unlock brakes<br />
and unlock swivel wheels.<br />
To fold, slide button<br />
then squeeze handle.<br />
2<br />
Antes de plegarlo, saque el<br />
asiento de automóvil si está<br />
instalado, destrabe los frenos<br />
y las ruedas giratorias.<br />
Para plegarlo, deslice el botón<br />
y luego apriete la manija.<br />
3<br />
SNAP!<br />
¡CLIC!<br />
Make sure storage latch is<br />
locked in place as shown.<br />
Asegúrese de que la traba de<br />
almacenamiento esté trabada<br />
en su lugar como se indica.<br />
31
al asiento para niño pequeño<br />
For models that do not come with an infant carseat<br />
one may be purchased separately.<br />
WARNING <strong>Us</strong>e only a Graco® SnugRide®<br />
Click Connect carseat with this stroller.<br />
(Not Intended for use with SnugRide®, SnugRide® 30, SnugRide® 32,<br />
SnugRide® 35, Infant Safeseat, AUTOBABY, LOGICO S, JUNIORBABY<br />
and ASSURA infant car seats.)Improper use of this stroller with other<br />
manufacturers’ carseats may result in serious injury or death. Read the<br />
manual provided with your Graco carseat before using it with your stroller.<br />
Always secure your child with the carseat harness when using the<br />
carseat in the stroller. If your child is already in the carseat, check that<br />
the child is secured with the harness.<br />
Para los modelos que no vienen con un asiento de automóvil<br />
para bebé, se puede comprar uno por separado.<br />
ADVERTENCIA <strong>Us</strong>e solamente un asiento de automóvil<br />
Graco® SnugRide® Click Connect con este cochecito.<br />
(No debe usarse con los asientos de automóvil para bebé SnugRide®,<br />
SnugRide® 30, SnugRide® 32, SnugRide® 35, Infant Safeseat,<br />
AUTOBABY, LOGICO S, JUNIORBABY y ASSURA.) El uso inadecuado de<br />
este cochecito con asientos para automóvil de otros fabricantes podría<br />
resultar en lesiones serias o la muerte. Lea el manual incluido con su<br />
asiento para automóvil Graco antes de usarlo con su cochecito.<br />
Asegure siempre a su niño con el arnés del asiento de automóvil cuando<br />
usa el asiento de automóvil en el cochecito. Si su niño ya está en el<br />
asiento de automóvil, .<br />
1<br />
Recline the stroller seat back to<br />
its lowest position.<br />
Recline el respaldo del cochecito<br />
hacia atrás hasta la posición<br />
más baja posible.<br />
32
2 Open flaps inside seating area to<br />
expose Click Connect mounts.<br />
Mount<br />
Soporte<br />
Abra las aletas en el interior del<br />
lugar para sentarse para ver los<br />
soportes Click Connect.<br />
3<br />
SNAP!<br />
¡CLIC!<br />
Insert carseat into stroller and<br />
push down on car seat until the<br />
latches snap into the Click<br />
Connect mounts.<br />
Ponga el asiento para automóvil<br />
en el cochecito y empuje el<br />
asiento para automóvil hacia<br />
abajo hasta que se trabe en los<br />
soportes Click Connect.<br />
SNAP!<br />
¡CLIC!<br />
4<br />
Check that infant car seat is<br />
securely attached by pulling<br />
up on it.<br />
Verifique que el asiento de<br />
automóvil para bebé esté<br />
debidamente instalado tratando<br />
de tirarlo para arriba.<br />
33
5<br />
To remove car seat: squeeze<br />
release handle at back of car<br />
seat, and lift car seat out of the<br />
stroller.<br />
Para sacar el asiento de<br />
automóvil: apriete la manija de<br />
liberación de atrás del asiento de<br />
automóvil y levante el asiento de<br />
automóvil fuera del cochecito.<br />
34
To Attach Infant Carseat to Stroller Frame<br />
<br />
<br />
1<br />
SNAP!<br />
¡CLIC!<br />
Mount<br />
Soporte<br />
Insert carseat into stroller<br />
and push down on car<br />
seat until the latches<br />
snap into the Click<br />
Connect mounts.<br />
Ponga el asiento para<br />
automóvil en el<br />
cochecito y empuje el<br />
asiento para automóvil<br />
hacia abajo hasta que se<br />
trabe en los soportes<br />
Click Connect.<br />
2<br />
Check that infant car seat is<br />
securely attached by pulling up<br />
on it.<br />
Verifique que el asiento de<br />
automóvil para bebé esté<br />
debidamente instalado tratando<br />
de tirarlo para arriba.<br />
OR / O<br />
Mount<br />
Soporte<br />
35
Care and Maintenance<br />
TO CLEAN SEAT COVER, Refer to your care tag on your seat pad for<br />
washing instructions. NO BLEACH.<br />
TO CLEAN STROLLER FRAME, use only household soap and warm<br />
water. NO BLEACH or detergent.<br />
FROM TIME TO TIME CHECK YOUR STROLLER for loose screws,<br />
worn parts, torn material or stitching. Replace or repair the parts as<br />
needed. <strong>Us</strong>e only Graco replacement parts.<br />
EXCESSIVE EXPOSURE TO SUN OR HEAT could cause fading or<br />
warping of parts.<br />
IF STROLLER BECOMES WET, open canopy and allow to dry<br />
thoroughly before storing.<br />
WHEN USING YOUR STROLLER AT THE BEACH completely clean<br />
your stroller afterward to remove sand and salt from mechanisms and<br />
wheel assemblies.<br />
36
Cuidado y mantenimiento<br />
PARA LIMPIAR LA FUNDA <strong>DEL</strong> ASIENTO, consulte la etiqueta de<br />
cuidado de la almohadilla del asiento para obtener las instrucciones<br />
para el lavado. NO USE BLANQUEADOR.<br />
PARA LIMPIAR EL ARMAZÓN <strong>DEL</strong> COCHECITO, use solamente<br />
jabón de uso doméstico y agua tibia. NO USE BLANQUEADOR ni<br />
detergentes.<br />
DE VEZ EN CUANDO, INSPECCIONE EL COCHECITO para verificar si<br />
hay tornillos flojos, piezas rotas, material o puntos rotos. Reemplace o<br />
repare las piezas según sea necesario. <strong>Us</strong>e solamente piezas de repuesto<br />
Graco.<br />
EL CONTACTO EXCESIVO CON EL SOL O EL CALOR podría causar<br />
descoloramiento o torcedura de las piezas.<br />
SI EL COCHECITO SE MOJA, abra la capota y deje que se seque<br />
completamente antes de guardarlo.<br />
CUANDO USA SU COCHECITO EN LA PLAYA, limpie completamente<br />
su cochecito después de usarlo para sacar la arena y sal de los<br />
mecanismos y ensamblajes de las ruedas.<br />
37
38
39
To purchase parts or<br />
accessories or for warranty<br />
information in the United<br />
States, please contact us at the<br />
following:<br />
www.gracobaby.com<br />
or/ó<br />
1-800-345-4109<br />
<br />
accesorios o para obtener<br />
información sobre la garantía<br />
en los Estados Unidos, por favor<br />
comuníquese con nosotros en:<br />
<br />
<br />
To register your Graco product from within the U.S.A. visit us<br />
online at www.gracobaby.com/productregistration or return registration<br />
card provided with your product. We currently do not accept product<br />
registrations from those living outside the United States of America.<br />
Para registrar su producto Graco dentro de los EE.UU., visítenos en línea<br />
en www.gracobaby.com/productregistration o envíe la tarjeta de registro<br />
provista con su producto. Actualmente no aceptamos registros de los<br />
productos de quienes viven fuera de los Estados Unidos de América.<br />
40