AW 560-190
AW 560-190
AW 560-190

Create successful ePaper yourself
Turn your PDF publications into a flip-book with our unique Google optimized e-Paper software.
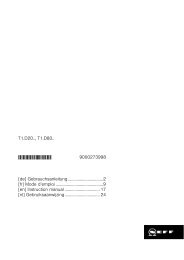
Installation<br />
7. Attach the extractor hood.<br />
Adjust the height and align horizontally<br />
with the adjusting screws.<br />
Remove air conduction plate<br />
(see Activated-carbon filter).<br />
Check that the 4 lower fixing holes<br />
have been correctly marked. If required,<br />
mark again.<br />
09. Attach the extractor hood and screw<br />
into position with the remaining<br />
4 screws.<br />
10. Stick protective film over the holes of<br />
the 2 lower mounting bolts in the<br />
protective grid.<br />
8. Remove the extractor hood. Drill the<br />
4 lower 8 mm ø fixing holes and press<br />
in the wall plugs flush with the wall.<br />
Re-insert air conduction plate<br />
(see Activated-carbon filter).<br />
11. Connect up the air outlet pipe.<br />
12. Connect the hood to the electricity<br />
supply.<br />
13. Carefully remove the protective foil.<br />
Avoid damage to the sensitive<br />
surface.<br />
14. Insert the upper flue duct (slots<br />
downwards) into the lower flue duct.<br />
Protect the cover panels from<br />
scratches, for example by laying the<br />
template used for marking the wall over<br />
the top edge of the lower section.<br />
15. Insert the complete flue duct at an<br />
angle and swivel to the rear.<br />
1.<br />
3.<br />
2.<br />
31