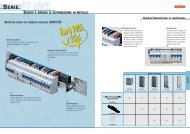
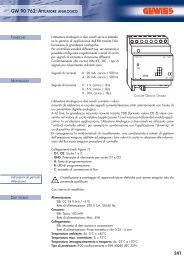
GW 10 907 Modulo Interruttore touch - Gewiss
GW 10 907 Modulo Interruttore touch - Gewiss
GW 10 907 Modulo Interruttore touch - Gewiss

You also want an ePaper? Increase the reach of your titles
YUMPU automatically turns print PDFs into web optimized ePapers that Google loves.
<strong>Modulo</strong> <strong>Interruttore</strong> <strong>touch</strong><br />
Touch one-way switch module<br />
Module interrupteur tactile<br />
Módulo interruptor táctil<br />
Touch-Schaltermodul<br />
<strong>GW</strong> <strong>10</strong> <strong>907</strong><br />
n° 1 mod<br />
Caratteristiche tecniche - Technical features - Caractéristiques techniques - Características técnicas - Technische Eigenschaften<br />
Tensione nominale:<br />
Rated voltage:<br />
Tension assignée:<br />
Tensión nominal:<br />
Nennspannung:<br />
230 V - 50 Hz<br />
Contatto di uscita NA: a relè (con potenziale 230V ac)<br />
NO output contact: relay (with potential 230V AC)<br />
Contact de sortie NO : à relais (avec potentiel de 230 V CA)<br />
Contacto de salida NA: a relé (con potencial 230V ca)<br />
Schließer-Ausgangskontakt: Relaiskontakt (mit Potential 230V AC)<br />
Tipi di carico - Load type - Type de charge - Tipos de carga - Belastungsarten<br />
Lampade ad incandescenza ed alogene<br />
Incandescent and halogen lamps<br />
Lampes à incandescence et halogènes<br />
Lámparas de incandescencia y halógenas<br />
Glüh- und Halogenlampen<br />
500W<br />
Lampade a risparmio energetico<br />
Energy savings lamps<br />
Lampes à économie d’énergie<br />
Lámparas de ahorro energético<br />
Energiesparlampen<br />
<strong>10</strong>0W (max 4 lamp.)<br />
Lampade fluorescenti senza condensatori di rifasamento<br />
Fluorescent lamps without condensers for power factor correction<br />
Lampes fluorescentes sans condensateur de compensation<br />
Lámparas fluorescentes sin condensador paralelo<br />
Leuchtstofflampen ohne Blindstromkompensation<br />
<strong>10</strong>0W<br />
NOTA: per tutti i tipi di carico non indicati nella tabella, utilizzare un relè di appoggio.<br />
NOTE: for all the load types not indicated in the table, use a support relay. - REMARQUE : pour tous les types de charge non indiqués dans le tableau, utiliser un relais d’appui.<br />
NOTA: para todos los tipos de carga no indicados en la tabla, utilizar un relé de apoyo. - ANMERKUNG: Für alle Lasttypen, die in der Tabelle nicht angegeben sind, ist ein Stützrelais zu verwenden.<br />
LED di segnalazione<br />
Signalling LED<br />
Led de signalisation<br />
LED de señalización<br />
Leuchtdiode<br />
Area sensibile <strong>touch</strong><br />
Sensitive <strong>touch</strong> area<br />
Zone tactile<br />
Área sensible táctil<br />
Berührungsempfindlicher Bereich<br />
Per attivare o disattivare (ON / OFF) il carico toccare (o sfiorare) in modo veloce la superficie (area sensibile<br />
<strong>touch</strong>) della placca. Tutte le operazioni di accensione e spegnimento del carico sono possibili anche<br />
utilizzando il modulo duplicatore di comando <strong>GW</strong><strong>10</strong>909 o mediante pulsanti normalmente aperti.<br />
To activate or deactivate (ON / OFF) the load, quickly <strong>touch</strong> the surface (sensitive <strong>touch</strong> area) of the<br />
plate. All of the operations for turning the load on or off are also possible using the <strong>GW</strong><strong>10</strong>909<br />
command duplicator module or using normally open push-buttons.<br />
Pour activer ou désactiver (ON / OFF) la charge, <strong>touch</strong>er (ou effleurer)<br />
rapidement la surface (zone tactile) de la plaque. Toutes les opérations<br />
d’allumage et de coupure de la charge sont également réalisables<br />
à l’aide du module duplicateur de commande <strong>GW</strong><strong>10</strong>909 ou à l’aide<br />
de boutons-poussoirs normalement ouverts.<br />
Para activar o desactivar (ON / OFF) la carga, pulsar (o rozar) de<br />
modo rápido la superficie (área sensible táctil) de la placa. Todas<br />
las operaciones de encendido y apagado de la carga son posibles<br />
también utilizando el módulo duplicador de mando <strong>GW</strong><strong>10</strong>909 o<br />
mediante pulsadores normalmente abiertos.<br />
Pulsante di programmazione<br />
Programming push-buttons<br />
Bouton-poussoir de programmation<br />
Pulsador de programación<br />
Programmiertaster<br />
Um die Last zu aktivieren oder zu deaktivieren (ON / OFF), die<br />
Oberfläche des Abdeckrahmens (berührungsempfindlicher<br />
Bereich) kurz (leicht) berühren. Das Ein- und Ausschalten der Last<br />
kann auch über das Repeatermodul <strong>GW</strong><strong>10</strong>909 oder<br />
Schließertasten erfolgen.
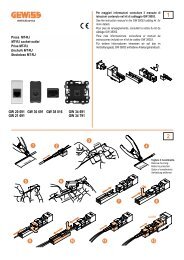
Installazione - Installation - Installation - Instalación - Installation<br />
CHORUS Touch, Placche / Plates / Plaques / Placas / Abdeckrahmen<br />
Bianco / White / Blanc / Blanco / Weiss<br />
<strong>GW</strong>16951 CB n° 1 simbolo / symbol / symbole / símbolo / Symbol<br />
<strong>GW</strong>16952 CB n° 2 simboli / symbols / symboles / símbolos / Symbole<br />
<strong>GW</strong>16953 CB n° 3 simboli / symbols / symboles / símbolos / Symbole<br />
Nero / Black / Noir / Negro / Schwartz<br />
<strong>GW</strong>16951 CN n° 1 simbolo / symbol / symbole / símbolo / Symbol<br />
<strong>GW</strong>16952 CN n° 2 simboli / symbols / symboles / símbolos / Symbole<br />
<strong>GW</strong>16953 CN n° 3 simboli / symbols / symboles / símbolos / Symbole<br />
Titanio / Titanium / Titane / Titanio / Titan<br />
<strong>GW</strong>16951 CT n° 1 simbolo / symbol / symbole / símbolo / Symbol<br />
<strong>GW</strong>16952 CT n° 2 simboli / symbols / symboles / símbolos / Symbole<br />
<strong>GW</strong>16953 CT n° 3 simboli / symbols / symboles / símbolos / Symbole<br />
Moduli <strong>touch</strong><br />
Touch modules<br />
Modules tactiles<br />
Módulos táctiles<br />
Touch-Module<br />
Aree sensibili <strong>touch</strong><br />
Sensitive <strong>touch</strong> areas<br />
Zones tactiles<br />
Áreas sensibles táctiles<br />
Berührungsempfindliche Bereiche<br />
Schemi di collegamento - Wiring diagrams - Schémas de connexion - Esquemas de conexión - Schaltpläne<br />
Comando luce da 1 punto<br />
1-point light control - Commande lumière d’un point<br />
Mando luz de un punto - Lichtsteuerung mit 1 Bedienpunkt<br />
L<br />
230 Vac<br />
N<br />
Comando luci da più punti con moduli duplicatori di comando<br />
Multiple point light control with command duplicator modules<br />
Commande des lumières depuis plusieurs points avec modules duplicateurs de commande<br />
Mando de luces de varios puntos con módulos duplicadores de mando<br />
Lichtsteuerung von mehreren Punkten mit Repeatermodulen<br />
230 Vac<br />
L N<br />
F<br />
F<br />
<strong>GW</strong><strong>10</strong><strong>907</strong><br />
Comando luci da più punti con pulsanti NA<br />
Multi-point light control with NO buttons 230 Vac<br />
Commande lumière de plusieurs points avec boutons NO L N<br />
Mando luz desde varios puntos con botones NA<br />
Lichtsteuerung von mehreren Bedienpunkten mit NO-Knöpfen F<br />
<strong>GW</strong><strong>10</strong><strong>907</strong><br />
F = Fusibile ad alto potere di interruzione tipo F 2,5AH / 250V~<br />
High power cutoff fuse F 2.5AH / 250V~<br />
Fusible à haut pouvoir d’interruption du type 2,5AH / 250V~<br />
Fusible de alto poder de interrupción tipo F 2,5AH / 250V~<br />
Sicherung mit hoher Schaltleistung Typ F 2,5AH / 250V~<br />
<strong>GW</strong><strong>10</strong><strong>907</strong><br />
<strong>GW</strong><strong>10</strong>909<br />
<strong>GW</strong><strong>10</strong>909<br />
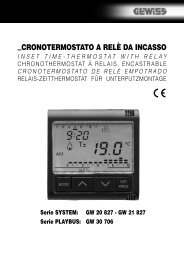
Programmazione - Programming - Programmation - Programación - Programmierung<br />
1°<br />
2°<br />
3°<br />
Parametro<br />
Parameter - Paramètre<br />
Parámetro - Parameter<br />
localizzazione (*)<br />
localisation (*) - localisation (*)<br />
localización (*) - Orientierungslicht (*)<br />
segnalazione acustica<br />
acoustic signal - signalisation acoustique<br />
señalización acústica - Akustiksignal<br />
funzionalità contatto di uscita<br />
output contact functionality - fonctionnement du contact de sortie<br />
funcionamiento contacto de salida - Funktionen des Ausgangskontakts<br />
ON<br />
abilitata<br />
enabled - habilitée<br />
habilitado - aktiviert<br />
abilitata<br />
enabled - habilitée<br />
habilitado - aktiviert<br />
bistabile<br />
latching - bistable<br />
biestable - bistabil<br />
OFF<br />
disabilitata<br />
disabled - déshabilitée<br />
deshabilitada - deaktiviert<br />
disabilitata<br />
disabled - déshabilitée<br />
deshabilitada - deaktiviert<br />
monostabile<br />
momentary - monostable<br />
monoestable - monostabil<br />
(*) Led frontale blu doppia intensità luminosa:<br />
(*) Luminous double intensity blue front LED:<br />
(*) Led bleu frontal à double intensité lumineuse :<br />
(*) Led frontal azul de doble intensidad luminosa:<br />
(*) Frontseitige blaue Led mit zweistufiger Leuchtkraft:<br />
- tenue = localizzazione<br />
- low = localisation<br />
- légère = localisation<br />
- tenue = localización<br />
- schwach = orientierungslicht<br />
- intensa = comando ricevuto<br />
- high = received control<br />
- intense = commande reçue<br />
- intensa = mando recibido<br />
- stark = empfangenen Befehl<br />
Per accedere alla Procedura di Modifica dei Parametri:<br />
Premere il pulsante di programmazione (posizione laterale), per almeno 4 secondi (utilizzare ad esempio la punta di una penna)<br />
ATTENZIONE: all'attivazione della Procedura, tutti i Parametri vengono automaticamente impostati ON<br />
1° parametro LOCALIZZAZIONE<br />
L'accesso all'impostazione del 1° parametro è indicato da una singola segnalazione, acustica (n° 1 beep) e luminosa (n° 1 lampeggio), che si ripete ciclicamente ogni 2 secondi.<br />
• Per confermare ON "Localizzazione Abilitata" (led sempre acceso con intensità tenue), premere il pulsante laterale. Si passa automaticamente al parametro successivo.<br />
• Per impostare OFF "Localizzazione Disabilitata", agire sul comando <strong>touch</strong> frontale (tocco veloce): si accende il led frontale<br />
(intensità forte) per 1 secondo. Automaticamente dopo lo spegnimento del led frontale si passa al parametro successivo.<br />
Con "Localizzazione Disabilitata" il led si accenderà solo per indicare un comando ricevuto o la funzione "Inibizione" attivata.
2° parametro SEGNALAZIONE ACUSTICA<br />
L'accesso all'impostazione del 2° parametro è indicato da una doppia segnalazione, acustica (n° 2 beep) e luminosa (n° 2 lampeggi), che si ripete ciclicamente ogni 3 secondi.<br />
• Per confermare ON "Segnalazione Acustica Abilitata" (il buzzer segnala ogni comando ricevuto), premere il pulsante laterale. Si passa automaticamente al parametro successivo.<br />
• Per impostare OFF "Segnalazione Acustica Disabilitata", agire sul comando <strong>touch</strong> frontale (tocco veloce), si accende il led frontale per 1 secondo.<br />
Automaticamente dopo lo spegnimento del led frontale si passa al parametro successivo.<br />
Con "Segnalazione Acustica Disabilitata" il buzzer segnala solo l'ingresso/uscita dalla procedura di "Impostazione parametri" e la funzione "Inibizione" attivata.<br />
Nota: In caso di comando dai moduli duplicatori il buzzer non emette alcun segnale acustico.<br />
3° parametro FUNZIONALITÀ CONTATTO DI USCITA<br />
L'accesso all'impostazione del 3° parametro è indicato da una tripla segnalazione, acustica (n° 3 beep) e luminosa (n° 3 lampeggi), che si ripete ciclicamente ogni 3 secondi.<br />
• Per confermare ON "Bistabile" (funzionamento tipo relè passo-passo), premere il pulsante laterale. Si esce automaticamente dalla procedura di modifica dei parametri.<br />
• Per impostare OFF "Monostabile", agire sul comando <strong>touch</strong> frontale (tocco veloce): si accende il led frontale per 1 secondo.<br />
Automaticamente dopo lo spegnimento del led frontale si esce dalla procedura di modifica dei parametri.<br />
Uscita<br />
Funzione<br />
inibizione<br />
Se non si effettua alcuna selezione per 30 secondi, si esce automaticamente dalla procedura di modifica dei parametri (in questo caso, vengono salvati i parametri appena impostati).<br />
L'uscita dalla procedura per time-out è segnalata da un "beep" prolungato.<br />
Per consentire la pulizia della placca frontale senza continue attivazioni del contatto di uscita, è possibile inibire temporaneamente il funzionamento del dispositivo Touch con un tocco prolungato (almeno <strong>10</strong> secondi)<br />
in corrispondenza dell'area sensibile. L'attivazione della stato di inibizione è evidenziato da una segnalazione acustica (5 beep).<br />
Lo stato di inibizione permane per 20 secondi, durante il quale il led frontale lampeggia. L'uscita dallo stato di inibizione, ed il ritorno al funzionamento ordinario, è evidenziato da una segnalazione acustica (5 beep).<br />
Nota: Ogni qualvolta viene applicata la placca al modulo Touch, il dispositivo entra in una procedura di autocalibrazione della durata di circa 30 sec. al termine della quale il modulo è pronto all’uso.<br />
To access the Parameter Modification Procedure:<br />
Press the programming push-button (side position) for at least 4 seconds (use the tip of a pen for example)<br />
ATTENTION: when the Procedure is activated, all Parameters are automatically set to ON<br />
1 st parameter LOCALISATION<br />
Access to setting the 1st parameter is indicated by a single signal, acoustic (1 beep) and luminous (1 flash) that is repeated cyclically every 2 seconds.<br />
• To confirm ON "Localisation enabled" (LED always on low), press the push-button on the side. It then automatically continues with the next parameter.<br />
• To switch to OFF "Localisation disabled", press the front <strong>touch</strong> control (quick <strong>touch</strong>): the front LED turns on (high intensity) for 1 second.<br />
After the front LED turns off, it then automatically continues with the next parameter.<br />
With "Localisation disabled", the LED turns on only to indicate a received control or that the "Inhibition" function is activated.<br />
2 nd parameter ACOUSTIC SIGNAL<br />
Access to setting the 2nd parameter is indicated by a dual signal, acoustic (2 beeps) and luminous (2 flashes) that is repeated cyclically every 3 seconds.<br />
• To confirm ON "Acoustic signalling enabled" (the buzzer signals every received control), press the push-button on the side. It then automatically continues with the next parameter.<br />
• To switch to OFF "Acoustic signalling disabled", press the front <strong>touch</strong> control (quick <strong>touch</strong>), the front LED turns on for 1 second.<br />
After the front LED turns off, it then automatically continues with the next parameter.<br />
With "Acoustic signalling disabled" the buzzer only signals entering/exiting the "Parameter setting" procedure and that the "Inhibition" function is activated.<br />
Note: In the case of a control from the duplicator modules, the buzzer will not emit an acoustic signal.<br />
3 rd parameter OUTPUT CONTACT FUNCTIONALITY<br />
Access to setting the 3rd parameter is indicated by a triple signal, acoustic (3 beeps) and luminous (3 flashes) that is repeated cyclically every 3 seconds.<br />
• To confirm ON "Latching" (stepping relay function), press the push-button on the side. You will automatically exit the parameter modification procedure.<br />
• To switch to OFF "Momentary", press the front <strong>touch</strong> control (quick <strong>touch</strong>): the front LED will turn on for 1 second.<br />
You will automatically exit the parameter modification procedure after the front LED turns off.<br />
Output<br />
Inhibition<br />
function<br />
If no selection is made for 30 seconds, you will automatically exit the parameter modification procedure (in this case, the parameters that were just set will be saved).<br />
Exiting the procedure due to time-out is signalled by a long "beep".<br />
To clean the front plate without continuously activating the output contact, the <strong>touch</strong> device can be temporarily inhibited by pressing (for at least <strong>10</strong> seconds) the sensitive area.<br />
An acoustic signal (5 beeps) will indicate that the inhibition status has been activated.<br />
The inhibition status lasts 20 seconds, during which the front LED will flash. The exit from the inhibition status, and return to normal operation, is indicated by an acoustic signal (5 beeps).<br />
Note: Each time a plate is applied to the Touch module, the device starts a auto-calibration procedure that lasts approx. 30 seconds, after which the module is ready to be used.<br />
Pour accéder à la procédure de modification des paramètres :<br />
Appuyer sur le bouton-poussoir de programmation (position latérale) 4 secondes au moins (utiliser, par exemple, la pointe d’un stylo)<br />
ATTENTION : à l’activation de la procédure, tous les paramètres sont automatiquement imposés sur ON<br />
1 er paramètre LOCALISATION<br />
L’accès au réglage du 1er paramètre est indiqué par une simple signalisation, acoustique (1 bip) et lumineuse (1 clignotement), qui se répète cycliquement toutes les 2 secondes.<br />
• Pour confirmer ON « Localisation habilitée » (Led allumé à faible intensité), appuyer sur le bouton-poussoir latéral. On passe automatiquement au paramètre suivant.<br />
• Pour imposer OFF « Localisation déshabilitée », agir sur la commande tactile frontale (<strong>touch</strong>er rapide) : le led frontal s’allume (intensité forte) 1 seconde.<br />
Après la coupure du led frontal, on passe au paramètre suivant.<br />
Avec « Localisation déshabilitée », le led ne s’allumera que pour indiquer une commande reçue ou la fonction « Inhibition » activée.<br />
2 e paramètre SIGNALISATION ACOUSTIQUE<br />
L’accès au réglage du 2e paramètre est indiqué par une double signalisation, acoustique (2 bips) et lumineuse (2 clignotements), qui se répète cycliquement toutes les 3 secondes.<br />
• Pour confirmer ON « Signalisation acoustique habilitée » (le vibreur signale chaque commande reçue), appuyer sur le bouton-poussoir latéral. On passe automatiquement au paramètre suivant.<br />
• Pour imposer OFF « Signalisation acoustique déshabilitée », agir sur la commande tactile frontale (<strong>touch</strong>er rapide). Le led frontal s’allume 1 seconde.<br />
Après la coupure du led frontal, on passe au paramètre suivant.<br />
Avec « Signalisation acoustique déshabilitée », le vibreur ne signale que l’entrée ou la sortie de la procédure de « Réglage des paramètres » et la fonction « Inhibition » activée.<br />
Remarque: En cas de commande par modules duplicateurs, le vibreur n’émet aucun signal acoustique.<br />
3 e paramètre FONCTIONNEMENT DU CONTACT DE SORTIE<br />
L’accès au réglage du 3e paramètre est indiqué par une triple signalisation, acoustique (3 bips) et lumineuse (3 clignotements), qui se répète cycliquement toutes les 3 secondes.<br />
• Pour confirmer ON « Bistable » (fonctionnement de type télérupteur), appuyer sur le bouton-poussoir latéral. On sort automatiquement de la procédure de modification des paramètres.<br />
• Pour imposer OFF « Monostable », agir sur la commande tactile frontale (<strong>touch</strong>er rapide) : le led frontal s’allume 1 seconde.<br />
Après la coupure du led frontal, on sort automatiquement de la procédure de modification des paramètres.<br />
Sortie<br />
Fonction<br />
d’inhibition<br />
Si aucune sélection n’est effectuée sur une période de 30 secondes, on sort automatiquement de la procédure de modification des paramètres (dans ce cas, les paramètres imposés sont enregistrés).<br />
La sortie de la procédure pour dépassement de temps est signalée par un bip prolongé.<br />
Afin de permettre le nettoyage de la plaque frontale sans activations continues du contact de sortie, on pourra inhiber temporairement le fonctionnement du dispositif tactile par un <strong>touch</strong>er prolongé<br />
(<strong>10</strong> secondes au moins) en correspondance de la zone sensible. L’activation de l’état d’inhibition est mise en évidence par une signalisation acoustique (5 bips).<br />
L’état d’inhibition perdure 20 secondes, durant lesquelles le led frontal clignote. La sortie de l’état d’inhibition (et le retour au fonctionnement courant) est mise en évidence par une signalisation acoustique (5 bips).<br />
Remarque: Chaque fois que la plaque est appliquée au module tactile, le dispositif entre dans une procédure d’auto-étalonnage d’une durée de 30 s environ, au terme de laquelle le module est prêt à l’emploi.<br />
Para acceder al Procedimiento de modificación de parámetros:<br />
Pulsar el pulsador de programación (posición lateral) durante al menos 4 segundos (utilizar por ejemplo la punta de un bolígrafo)<br />
ATENCIÓN: al activar el Procedimiento, todos los Parámetros se ponen automáticamente en ON<br />
1° parámetro LOCALIZACIÓN<br />
El acceso a la configuración del 1° parámetro se indica mediante una sola señalización, acústica (1 pitido) y luminosa (1 parpadeo), que se repite cíclicamente cada 2 segundos.<br />
• Para confirmar ON "Localización habilitada" (led siempre encendido con intensidad tenue), presionar el pulsador lateral. Se pasa automáticamente al parámetro siguiente.<br />
• Para configurar OFF "Localización deshabilitada", accionar el mando táctil frontal (pulsación rápida): se enciende el led frontal (intensidad fuerte) durante 1 segundo.<br />
Después del apagado del led frontal se pasa automáticamente al parámetro siguiente.<br />
Con "Localización deshabilitada", el led se encenderá sólo para indicar un mando recibido o la función "Inhibición" activada.<br />
2° parámetro SEÑALIZACIÓN ACÚSTICA<br />
El acceso a la configuración del 2° parámetro se indica mediante una doble señalización, acústica (2 pitidos) y luminosa (2 parpadeos), que se repite cíclicamente cada 3 segundos.<br />
• Para confirmar ON "Señalización acústica habilitada" (el zumbador señala cada mando recibido), presionar el pulsador lateral. Se pasa automáticamente al parámetro siguiente.<br />
• Para confirmar OFF "Señalización acústica deshabilitada", accionar el mando táctil frontal (pulsación rápida), se enciende el led frontal durante 1 segundo.<br />
Después del apagado del led frontal se pasa automáticamente al parámetro siguiente.<br />
Con "Señalización acústica deshabilitada", el zumbador señala sólo la entrada/salida del procedimiento de "Configuración de parámetros" y la función "Inhibición" activada.<br />
Nota: En caso de mando de los módulos duplicadores, el zumbador no emite ninguna señal acústica.
3° parámetro FUNCIONAMIENTO CONTACTO DE SALIDA<br />
El acceso a la configuración del 3° parámetro se indica mediante una triple señalización, acústica (3 pitidos) y luminosa (3 parpadeos), que se repite cíclicamente cada 3 segundos.<br />
• Para confirmar ON "Biestable" (funcionamiento de tipo de relé telerruptor), presionar el pulsador lateral. Se sale automáticamente del procedimiento de modificación de parámetros.<br />
• Para configurar OFF "Monoestable", accionar el mando táctil frontal (pulsación rápida): se enciende el led frontal durante 1 segundo.<br />
Después del apagado del led frontal, se sale automáticamente del procedimiento de modificación de parámetros.<br />
Salida Si no se efectúa ninguna selección durante 30 segundos, se sale automáticamente del procedimiento de modificación de parámetros (en este caso, se guardan los parámetros que se acaban de configurar).<br />
La salida del procedimiento por límite de tiempo se señala mediante un "pitido" prolongado.<br />
Función Para permitir la limpieza de la placa frontal sin activaciones continuas del contacto de salida, es posible inhibir temporalmente el funcionamiento del dispositivo táctil con una pulsación prolongada<br />
de inhibición (<strong>10</strong> segundos como mínimo) en el área sensible. La activación del estado de inhibición se indica mediante una señalización acústica (5 pitidos). El estado de inhibición permanece durante 20 segundos,<br />
durante los cuales el led frontal parpadea. La salida del estado de inhibición y el restablecimiento del funcionamiento ordinario se indican mediante una señalización acústica (5 pitidos).<br />
Nota: Cada vez que se aplica la placa al módulo táctil, el dispositivo entra en un procedimiento de autocalibración de una duración de aproximadamente 30 segundos, al término de los cuales, el módulo está preparado para su uso.<br />
Für den Zugriff auf das Verfahren für die Parameteränderung:<br />
Den Programmiertaster (seitlich) mindestens 4 Sekunden lang drücken (zum Beispiel mit der Spitze eines Stifts)<br />
ACHTUNG: bei der Aktivierung des Verfahrens werden alle Parameter automatisch auf ON gestellt<br />
1. Parameter ORIENTIERUNGSLICHT<br />
Der Zugriff auf die Einstellung des 1. Parameters wird durch einen einmaligen Piepton und ein einmaliges Blinken angezeigt, die alle 2 Sekunden zyklisch wiederholt werden.<br />
• Zur Bestätigung von ON "Orientierungslicht aktiviert" (Led leuchtet immer schwach) den seitlichen Taster drücken. Man gelangt automatisch zum darauf folgenden Parameter.<br />
• Zur Einstellung von OFF "Orientierungslicht deaktiviert" auf die frontseitige Touch-Steuerung einwirken (schnelle Berührung): Die frontseitige Led leuchtet (mit starker Leuchtkraft) 1 Sekunde lang auf.<br />
Nach Ausschalten der frontseitigen Led gelangt man zum darauf folgenden Parameter.<br />
Mit "Orientierungslicht deaktiviert" leuchtet die Led nur auf, um den Empfang eines Befehls oder die Aktivierung der Funktion "Sperre" anzuzeigen.<br />
2. Parameter AKUSTIKSIGNAL<br />
Der Zugriff auf die Einstellung des 2. Parameters wird durch einen zweimaligen Piepton und ein zweimaliges Blinken angezeigt, die alle 3 Sekunden zyklisch wiederholt werden.<br />
• Zur Bestätigung von ON "Akustiksignal aktiviert" (der Summer meldet jeden empfangenen Befehl) den seitlichen Taster drücken. Man gelangt automatisch zum darauf folgenden Parameter.<br />
• Zur Einstellung von OFF "Akustiksignal deaktiviert" auf die frontseitige Touch-Steuerung einwirken (kurze Berührung). Die frontseitige Led leuchtet 1 Sekunde lang auf.<br />
Nach Ausschalten der frontseitigen Led gelangt man zum darauf folgenden Parameter.<br />
Mit "Akustiksignal deaktiviert" meldet der Summer nur den Einstieg in / Ausstieg aus dem Verfahren der "Parametereinstellung" und die Aktivierung der Funktion "Sperre".<br />
Hinweis: Im Falle eines von den Repeatermodulen kommenden Befehls gibt der Summer kein Akustiksignal ab.<br />
3. Parameter FUNKTIONEN DES AUSGANGSKONTAKTS<br />
Der Zugriff auf die Einstellung des 3. Parameters wird durch einen dreimaligen Piepton und ein dreimaliges Blinken angezeigt, die alle 3 Sekunden zyklisch wiederholt werden.<br />
• Zur Bestätigung von ON "Bistabil" (Betrieb wie Fernschalter) den seitlichen Taster drücken. Das Verfahren für die Parameteränderung wird automatisch verlassen.<br />
• Zur Einstellung von OFF "Monostabil" auf die frontseitige Touch-Steuerung einwirken (schnelle Berührung): die frontseitige Led leuchtet 1 Sekunde lang auf.<br />
Nach dem Ausschalten der frontseitigen Led wird das Verfahren für die Parameteränderung automatisch verlassen.<br />
Ausgang<br />
Wenn 30 Sekunden lang keine Auswahl getroffen wird, wird das Verfahren für die Parameteränderung automatisch verlassen (in diesem Fall werden die eben eingestellten Parameter gespeichert).<br />
Das Verlassen des Verfahrens durch Timeout wird durch einen langen Piepton gemeldet.<br />
Sperrfunktion Um die Reinigung des Abdeckrahmens ohne andauernde Aktivierung des Ausgangskontakts zu ermöglichen, kann der Betrieb des Touch-Geräts mit einer langen Berührung des berührungsempfindlichen Bereichs<br />
(mindestens <strong>10</strong> Sekunden lang) vorübergehend gesperrt werden. Die Aktivierung des Sperre wird durch ein Akustiksignal (5 Pieptöne) gemeldet.<br />
Die Sperre bleibt 20 Sekunden lang aufrecht. Während dieser Zeit blinkt die frontseitige Led. Der Ausstieg aus der Sperre und die Rückkehr zum normalen Betrieb wird durch ein Akustiksignal (5 Pieptöne) gemeldet.<br />
Hinweis: Jedes Mal, wenn der Abdeckrahmen am Touch-Modul angebracht wird, beginnt das Gerät ein zirka 30 Sek. dauerndes Selbstkalibierungsverfahren, nach dem das Modul betriebsbereit ist.<br />
COD. 7.01.4.343.3<br />
Attenzione ! La sicurezza dell'apparecchio è garantita solo attenendosi alle istruzioni qui<br />
riportate. Pertanto è necessario leggerle e conservarle. I prodotti del programma Chorus<br />
devono essere installati conformemente a quanto previsto dalla norma CEI 64-8 per gli<br />
apparecchi per uso domestico e similare, in ambienti non polverosi ed ove non sia<br />
necessaria una protezione speciale contro la penetrazione di acqua. L'organizzazione di<br />
vendita GEWISS é a disposizione per chiarimenti e informazioni tecniche.<br />
Warning ! The safety of this appliance is only guaranteed if all the instructions given here<br />
are followed scrupulously.<br />
These should be read thoroughly and kept in a safe place. Products of the Chorus<br />
program can be installed in compliance with the requirements of HD 384 / IEC364<br />
standards covering equipment for domestic and similar uses in a dust-free environment<br />
and where no special protection against the penetration of water is required.<br />
The GEWISS sales organization is ready to provide full explanations and technical data<br />
on request.<br />
Attention ! La sécurité de l’appareil n’est garantie que si l’on respecte les instructions<br />
mentionnées ci-joint. Il est donc nécessaire de les lire avec attention et de bien les<br />
conserver. Les produits du programme Chorus doivent être installés en conformité avec<br />
les normes HD 384 / IEC364 sur les appareils à usage domestique et similaire, dans des<br />
milieux non poussiéreux et où il n'est pas nécessaire d' avoir une protection spéciale<br />
contre la pénétration d'eau.<br />
L'organisation de vente GEWISS est à votre disposition pour toute élucidation ou<br />
information technique.<br />
Atención ! La seguridad del aparato está garantizada sólo si se respetan las<br />
instrucciones aquí incluidas. Por lo tanto es necesario leerlas y conservalas.<br />
Según lo dispuesto por las normas HD 384 / IEC364 referidas a los aparatos para uso<br />
doméstico y similar, los productos del programa Chorus se pueden instalar en ambientes<br />
no polvorientos y en los lugares donde no se requiere una protección especial contra la<br />
penetración del agua.<br />
La organización de ventas GEWISS está a su disposición para aclaraciones e<br />
informaciones técnicas.<br />
Achtung ! Die Sicherheit des Geräts ist nur durch Einhalten der hier aufgeführten<br />
Anleitungen gewährleistet. Diese müssen daher aufmerksam durchgelesen und<br />
sorgfältig aufbewahrt werden.<br />
Die Produkte aus dem Chorus-Programm sind für die Installation gemäß den<br />
Bestimmungen der Normen HD 384 / IEC364 bezüglich Haushaltsgeräte u.ä. in<br />
staubfreien Räumen und in Räumen, in denen keine spezielle Absicherung gegen das<br />
Eindringen von Wasser erforderlich ist, bestimmt.<br />
Die GEWISS-Verkaufsorganisation steht Ihnen für weitere technische Informationen<br />
gerne zur Verfügung.<br />
Ai sensi dell’articolo 9 comma 2 della Direttiva Europea 2004/<strong>10</strong>8/CE e dell’articolo R2 comma 6 della Decisione 768/2008/EC si informa che responsabile dell’immissione<br />
del prodotto sul mercato Comunitario è:<br />
According to article 9 paragraph 2 of the European Directive 2004/<strong>10</strong>8/EC and to article R2 paragraph 6 of the Decision 768/2008/EC, the responsible for placing the<br />
apparatus on the Community market is:<br />
GEWISS S.p.A Via A. Volta, 1 - 24069 Cenate Sotto (BG) Italy Tel: +39 035 946 111 Fax: +39 035 945 270 E-mail: qualitymarks@gewiss.com<br />
+39 035 946 111<br />
8.30 - 12.30 / 14.00 - 18.00<br />
lunedì ÷ venerdì - monday ÷ friday<br />
24h<br />
+39 035 946 260<br />
sat@gewiss.com<br />
www.gewiss.com<br />
ULTIMA REVISIONE 05/2011