vanity combo meuble-lavabo combiné juego de tocador - Foremost
vanity combo meuble-lavabo combiné juego de tocador - Foremost
vanity combo meuble-lavabo combiné juego de tocador - Foremost

Create successful ePaper yourself
Turn your PDF publications into a flip-book with our unique Google optimized e-Paper software.
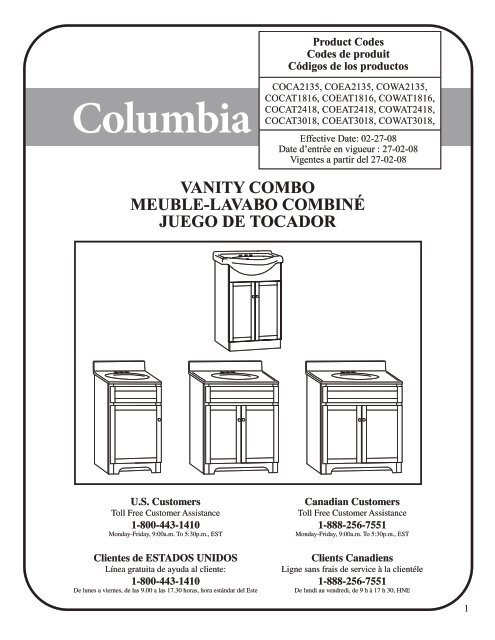
VANITY COMBO<br />
MEUBLE-LAVABO COMBINÉ<br />
JUEGO DE TOCADOR<br />
U.S. Customers<br />
Toll Free Customer Assistance<br />
1-800-443-1410<br />
Monday-Friday, 9:00a.m. To 5:30p.m., EST<br />
Clientes <strong>de</strong> ESTADOS UNIDOS<br />
Línea gratuita <strong>de</strong> ayuda al cliente:<br />
1-800-443-1410<br />
De lunes a viernes, <strong>de</strong> las 9.00 a las 17.30 horas, hora estándar <strong>de</strong>l Este<br />
Product Co<strong>de</strong>s<br />
Co<strong>de</strong>s <strong>de</strong> produit<br />
Códigos <strong>de</strong> los productos<br />
COCA2135, COEA2135, COWA2135,<br />
COCAT1816, COEAT1816, COWAT1816,<br />
COCAT2418, COEAT2418, COWAT2418,<br />
COCAT3018, COEAT3018, COWAT3018,<br />
Effective Date: 02-27-08<br />
Date d’entrée en vigueur : 27-02-08<br />
Vigentes a partir <strong>de</strong>l 27-02-08<br />
Canadian Customers<br />
Toll Free Customer Assistance<br />
1-888-256-7551<br />
Monday-Friday, 9:00a.m. To 5:30p.m., EST<br />
Clients Canadiens<br />
Ligne sans frais <strong>de</strong> service à la clientéle<br />
1-888-256-7551<br />
De lundi au vendredi, <strong>de</strong> 9 h à 17 h 30, HNE<br />
1
2<br />
1<br />
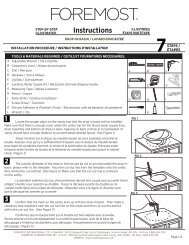
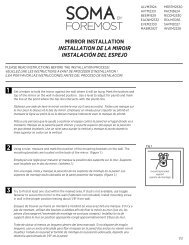
VANITY INSTALLATION<br />
Please read instructions before assembly process<br />
Figure 1<br />
1. Place <strong>vanity</strong> cabinet (A) into <strong>de</strong>sired location.<br />
Check if the <strong>vanity</strong> is level from front to back<br />
and si<strong>de</strong> to si<strong>de</strong>.<br />
2. If the <strong>vanity</strong> needs leveling, place wood shims<br />
(not inclu<strong>de</strong>d) un<strong>de</strong>r the <strong>vanity</strong> to level it.<br />
3. Check for level again.<br />
4. Using screws (not inclu<strong>de</strong>d) secure cabinet to<br />
wall.<br />
5. Trim off any exposed shims.<br />
2<br />
CHINA TOP INSTALLATION<br />
Figure 2<br />
1. Place a bead of latex caulk around the top edges<br />
of the <strong>vanity</strong>.<br />
2. Carefully place the vitreous china top (B) onto<br />
<strong>vanity</strong>. Wipe off excess caulk with a damp<br />
sponge. Allow the caulk to completely dry.<br />
3<br />
DRYING TIME<br />
Figure 3<br />
1. Avoid moving the vitreous china top and allow<br />
the top to dry for at least 24 hours to allow for<br />
proper top adhesion to the <strong>vanity</strong>.<br />
4<br />
KNOB INSTALLATION<br />
Figure 4<br />
1. Place machine screws through predrilled hole in<br />
door or drawer. Line up knob with machine screw<br />
and tighten with screw driver.<br />
2. Repeat process for all additional doors and/or<br />
drawers.<br />
A A<br />
Figure 1<br />
Figure 2<br />
Figure 3<br />
Figure 4<br />
B<br />
B
1<br />
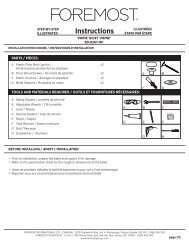
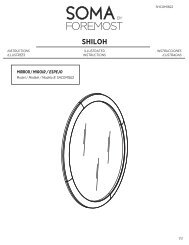
INSTALLATION DU Schéma 1<br />
MEUBLE-LAVABO<br />
1. Placez le <strong>meuble</strong>-<strong>lavabo</strong> (A) à l’endroit désiré.<br />
Vérifiez si le <strong>meuble</strong>-<strong>lavabo</strong> est <strong>de</strong> niveau <strong>de</strong><br />
l’avant vers l’arrière et <strong>de</strong> côté à côté.<br />
2. Si le <strong>meuble</strong>-<strong>lavabo</strong> a besoin d’être mis <strong>de</strong><br />
niveau, placez <strong>de</strong>s cales en bois (non comprises)<br />
en <strong>de</strong>ssous.<br />
3. Vérifiez encore s’il est droit.<br />
4. Essayez <strong>de</strong> repérer au moins un montant à<br />
l’endroit où vous désirez installer le<br />
<strong>meuble</strong>-<strong>lavabo</strong>. Fixez le <strong>meuble</strong>-<strong>lavabo</strong> au mur<br />
en faisant passer les vis à bois dans la traverse en<br />
bois supérieure (E). (Les vis, les pièces d’ancrage<br />
et l’ensemble <strong>de</strong> montage ne sont pas compris.)<br />
5. Enlevez les parties <strong>de</strong> cale qui dépassent.<br />
2<br />
INSTALLATION<br />
Schéma 1<br />
DU LAVABO<br />
1. Déposez un petit cordon <strong>de</strong> mastic d'étanchéité en<br />
latex sur les rebords supérieurs du<br />
<strong>meuble</strong>-<strong>lavabo</strong>.<br />
2. Déposez le <strong>lavabo</strong> en porcelaine vitrifiée (B) sur<br />
le <strong>meuble</strong>-<strong>lavabo</strong>. À l’ai<strong>de</strong> d’une éponge humi<strong>de</strong>,<br />
essuyez l’excès <strong>de</strong> mastic. Laissez le mastic<br />
sécher complètement.<br />
3<br />
TEMPS DE SÉCHAGE<br />
Schéma 3<br />
1. Évitez <strong>de</strong> déplacer le <strong>lavabo</strong> en porcelaine<br />
vitrifiée et permettez au <strong>de</strong>ssus <strong>de</strong> sécher pendant<br />
au moins 24 heures pour tenir compte du<br />
adhesion approprié à la vanité.<br />
4<br />
Veuillez lire les instructions avant <strong>de</strong> procé<strong>de</strong>r à l’assemblage.<br />
INSTALLATION DU Schéma 4<br />
BOUTON<br />
1. Insérez les vis à métal dans les trous prépercés <strong>de</strong><br />
la porte ou du tiroir. Alignez le bouton avec les<br />
vis à métal et serrez avec un tournevis.<br />
2. Répétez ces étapes pour toutes les portes et / ou<br />
tiroirs additionnels.<br />
A A<br />
Schéma 1<br />
Schéma 2<br />
Schéma 3<br />
Schéma 4<br />
B<br />
B<br />
3
4<br />
1<br />
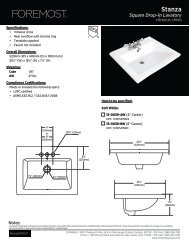
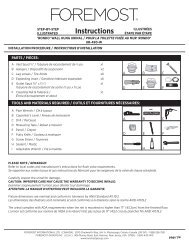
Sírvase leer las instrucciones antes <strong>de</strong> empezar el proceso <strong>de</strong> ensamblaje<br />
INSTALACIÓN DEL Ilustración 1<br />
MUEBLE DE BAÑO<br />
1. Ponga el mueble <strong>de</strong> baño (A) en el lugar que<br />
<strong>de</strong>see. Verifique si el mueble está nivelado, tanto<br />
hacia los lados como <strong>de</strong>l frente hacia atrás.<br />
2. Si necesita nivelar el mueble <strong>de</strong> baño, ponga<br />
cuñas <strong>de</strong> ma<strong>de</strong>ra (no incluidas) <strong>de</strong>bajo <strong>de</strong>l<br />
mueble <strong>de</strong> baño para nivelarlo.<br />
3. Compruebe la nivelación <strong>de</strong>l mueble otra vez.<br />
4. Usando tornillos (no incluidos), atornille el<br />
mueble a la pared.<br />
5. Recorte las partes <strong>de</strong> las cuñas que sean visibles.<br />
2<br />
INSTALACIÓN DEL Ilustración 2<br />
LAVABO DE PORCELANA<br />
1. Ponga un cordón <strong>de</strong> calafateador <strong>de</strong> látex<br />
alre<strong>de</strong>dor <strong>de</strong> los bor<strong>de</strong>s superiores <strong>de</strong>l mueble <strong>de</strong><br />
baño.<br />
2. Con cuidado ponga el lavamanos <strong>de</strong> porcelana<br />
vítrea (B) sobre el mueble <strong>de</strong> baño. Quite el<br />
exceso <strong>de</strong> calafeteo con una esponja húmeda.<br />
Deje que el calafeteo se seque por completo.<br />
3<br />
TIEMPO DE SECADO<br />
Ilustración 3<br />
1. Evite mover el lavamanos <strong>de</strong> porcelana vítrea y<br />
<strong>de</strong>je que se seque al menos por 24 horas para que<br />
se adhiera al <strong>tocador</strong> por completo.<br />
4<br />
INSTALACIÓN DE Ilustración 4<br />
LA PERILLA<br />
1. Colocar el tornillo por el orificio previamente<br />
taladrado en la puerta o en el cajon. Alinear la<br />
perilla con el tornillo y apretarla con el<br />
<strong>de</strong>stornillador.<br />
2. Repetir el proceso para todas las puertas y/o<br />
cajones adicionales.<br />
A A<br />
Ilustración 1<br />
Ilustración 2<br />
Ilustración 3<br />
Ilustración 4<br />
B<br />
B
STORAGE SHELF<br />
ÉTAGÈRE D’ARRANGEMENT<br />
REPISA DE GUARDAR COSAS<br />
U.S. Customers<br />
Toll Free Customer Assistance<br />
1-800-443-1410<br />
Monday-Friday, 9:00a.m. To 5:30p.m., EST<br />
Clientes <strong>de</strong> ESTADOS UNIDOS<br />
Línea gratuita <strong>de</strong> ayuda al cliente:<br />
1-800-443-1410<br />
De lunes a viernes, <strong>de</strong> las 9.00 a las 17.30 horas, hora estándar <strong>de</strong>l Este<br />
Product Co<strong>de</strong>s<br />
Co<strong>de</strong>s <strong>de</strong> produit<br />
Códigos <strong>de</strong> los productos<br />
COCS2408, COES2408, COWS2408<br />
Effective Date: 02-13-08<br />
Date d’entrée en vigueur : 13-02-08<br />
Vigentes a partir <strong>de</strong>l 13-02-08<br />
Canadian Customers<br />
Toll Free Customer Assistance<br />
1-888-256-7551<br />
Monday-Friday, 9:00a.m. To 5:30p.m., EST<br />
Clients Canadiens<br />
Ligne sans frais <strong>de</strong> service à la clientéle<br />
1-888-256-7551<br />
De lundi au vendredi, <strong>de</strong> 9 h à 17 h 30, HNE<br />
1
2<br />
1<br />
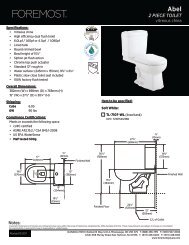
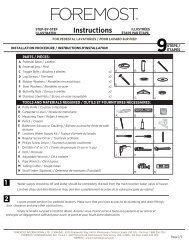
MOUNTING UNIT TO WALL<br />
FIGURE 1<br />
FIGURE 2<br />
FIGURE 3<br />
Please read instructions before assembly process.<br />
1. Locate two studs in the wall where you want to mount the shelf. Mark the<br />
area and measure the distance between them.<br />
2. Using the Wood Hanging Rail (fig 1) mark where you need the screws in or<strong>de</strong>r<br />
to line them up with the studs. The Wood Hanging Rail should be fastened to<br />
the wall approximately 3" down from the <strong>de</strong>sired height of the shelf.<br />
3. Making sure that the Wood Hanging Rail is level, fasten it to the wall as shown<br />
(fig 2) into the studs using wood screws. Try to find at least one stud within the<br />
marked area. If stud is not available use toggle fastener to secure the shelf to<br />
the wall. (Wood screws and fasteners not inclu<strong>de</strong>d)<br />
4. Shelf is now ready to be mounted to wall. Lift shelf onto Wood Hanging<br />
Rail. (fig 3)<br />
Back of unit
1<br />
Veuillez lire les instructions avant <strong>de</strong> procé<strong>de</strong>r à l'assemblage.<br />
MONTAGE DE L'ÉTAGÈRE AU MUR<br />
1. Localisez la position <strong>de</strong> <strong>de</strong>ux colombages dans le mur à l'endroit où vous<br />
voulez installer l'étagère. Faites <strong>de</strong>s traits pour i<strong>de</strong>ntifier l'endroit, puis mesurez<br />
la distance entre les colombages.<br />
2. Faites une marque sur le rail suspendu en bois (schéma 1) là où vous voulez poser<br />
les vis, <strong>de</strong> façon à les aligner vis-à-vis <strong>de</strong>s colombages. Le rail suspendu en bois<br />
doit être fixé au mur environ 3 po sous la hauteur désirée <strong>de</strong> l'étagère.<br />
SCHÉMA 1<br />
3. Assurez-vous que le rail suspendu en bois est positionné <strong>de</strong> niveau, puis fixez-le<br />
au mur tel qu'illustré (schéma 2) en insérant les vis à bois dans les colombages.<br />
Essayez <strong>de</strong> trouver au moins un colombage à l'intérieur <strong>de</strong> la zone tracée. Si<br />
aucun colombage ne peut être repéré, placez <strong>de</strong>s pièces <strong>de</strong> fixation pour assurer<br />
la solidité <strong>de</strong> l'étagère au mur (vis à bois et pièces <strong>de</strong> fixation non comprises).<br />
SCHÉMA 2<br />
4. L'étagère peut maintenant être installée au mur. Soulevez l'étagère pour la placer<br />
sur le rail suspendu en bois. (schéma 3)<br />
SCHÉMA 3<br />
Arrière <strong>de</strong> l'armoire<br />
3
4<br />
1<br />
Sírvase leer las instrucciones antes <strong>de</strong> empezar el proceso <strong>de</strong> ensamblaje <strong>de</strong>l producto.<br />
CÓMO INSTALAR LA REPISA EN LA PARED<br />
1. Ubique dos largueros en la pared don<strong>de</strong> <strong>de</strong>see instalar la repisa, márquelos<br />
y mida la distancia que hay entre ambos.<br />
2. Usando el listón <strong>de</strong> montaje (fig. 1), marque el lugar don<strong>de</strong> <strong>de</strong>ben ir los<br />
tornillos para que pueda alinearlos con los largueros. Debe fijar el listón <strong>de</strong><br />
ma<strong>de</strong>ra a la pared aproximadamente a unas 2" por <strong>de</strong>bajo <strong>de</strong>l lugar don<strong>de</strong><br />
<strong>de</strong>sea instalar la repisa.<br />
FIGURA 1<br />
3. Verifique que el listón <strong>de</strong> montage esté bien nivelado y luego fijelo en la pared<br />
como se ilustra (fig. 2), enroscando en los largueros los tornillos para ma<strong>de</strong>ra.<br />
Trate <strong>de</strong> encontrar al menos un larguero <strong>de</strong>ntro <strong>de</strong>l área marcada. Si no dispone<br />
<strong>de</strong> ningún larguero, use un ancla articulada para fijar la repisa en la pared.<br />
(No vienen con el mueble ni los tornillos para ma<strong>de</strong>ra ni los anclas).<br />
FIGURA 2<br />
4. Ahora, la repisa está listo para in stalarlo en la pared. Levante la repisa y<br />
colóquelo sobre el listón <strong>de</strong> montaje (fig. 3).<br />
FIGURA 3<br />
Detrás <strong>de</strong> la unidad