PRO SERIES
PRO SERIES
PRO SERIES

You also want an ePaper? Increase the reach of your titles
YUMPU automatically turns print PDFs into web optimized ePapers that Google loves.
Amate Electroacústica,s.l.<br />
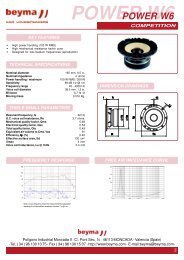
3.5.2.Soporte "U" modelo U-N10 (Opcional)<br />
Opcionalmente, puede adquirirse soporte en<br />
forma de "U" para los modelos P-26A/P-10A.<br />
El soporte debe ir siempre montado con sus<br />
correspondientes roscas y permite el colgado<br />
tanto en posición horizontal como en vertical.<br />
Colgado:<br />
1- Sitúe el soporte cerca de la pared donde<br />
vaya a colgar la caja y marque la localización<br />
de los puntos de soporte (1).<br />
2- Realice los taladros en la pared y cuelgue el<br />
soporte con tornillería adecuada (incluida en el<br />
kit).<br />
3- Cambiar el vaso para trípode que incorpora<br />
la caja de serie en la parte inferior por la<br />
pletina suministrada en el kit (2).<br />
4- Coloque la caja entre el soporte y fíjela con<br />
las dos roscas de M8 que incorpora el kit. El<br />
orden de colocación de los accesorios es el<br />
siguiente:<br />
a) Arandela de goma (3)<br />
b) Soporte U-N10<br />
c) Roscas de M8 (4)<br />
5- Ajuste la caja a la posición y ángulo<br />
deseado.<br />
Es posible añadir cable de acero de 2mm a<br />
través del punto (5) para asegurar aún más el<br />
soporte.<br />
1 2<br />
3.5.2. U-N10 Bracket (Optional)<br />
The P-26A/P-10A can optionally incorporate a<br />
"U" bracket which allows the cabinet to be<br />
mounted on a wall or ceiling. The bracket may<br />
be mounted with either nails or screws,<br />
horizontally or vertically.<br />
Mounting:<br />
1- Hold the bracket against the mounting<br />
surface, so you can mark the locations of the<br />
mounting holes (1).<br />
2- Drill corresponding pilot holes on the wall<br />
and attach the bracket with screws (included).<br />
3- Unscrew the top hat (located on the bottom<br />
of the cabinet) and place the metal plate<br />
(included on the kit) (2).<br />
4- Set the cabinet on the bracket and fix it<br />
through the two M8 bracket knobs (included<br />
on the kit). The order must be as follows:<br />
a) Rubber washer (3)<br />
b) U-N10 Bracket<br />
c) M8 bracket knobs (4)<br />
5- Adjust the cabinet for desired position and<br />
angle.<br />
It is possible to add a 2mm steel cable through<br />
(5) to make the bracket safer.<br />
3 4 1<br />
<strong>PRO</strong> Series.Version 1.1 Sep 07 23<br />
5