Manual de instrucciones
Manual de instrucciones
Manual de instrucciones

Create successful ePaper yourself
Turn your PDF publications into a flip-book with our unique Google optimized e-Paper software.
9. Part circles:<br />
Stars and other heavenly bodies are positioned in the heavens<br />
by coordinates. The place of a star is fixed in the universe by the<br />
rectascension (horary) and by the <strong>de</strong>clination.<br />
Declintion (Fig. 16 C) is the spacing of a heavenly body from the<br />
Heaven's equator, in angle <strong>de</strong>grees. To the north of the equator,<br />
the <strong>de</strong>gree number is positive. If the star is to the south of the<br />
equator, the <strong>de</strong>gree number is negative.<br />
Rectascension (Fig. 16 M) a measured distance of a star from<br />
the heavens equator in si<strong>de</strong>real (star) time. The vernal equinox is<br />
the point where the ecliptic meets the equator (Fig. 26 e) at the<br />
beginning of spring. The value of the daily heavenly revolutions is<br />
counted in the tempo of a 24 hour clock.<br />
For more accurate information look at your star maps and<br />
corresponding compartment-literature (special-accessories).<br />
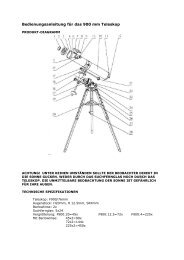
10. Accessories<br />
Your telescope is supplied with a number of accessories as standard<br />
(ill. 2). Depending on mo<strong>de</strong>l this may inclu<strong>de</strong> the following.<br />
10.1. Eyepieces<br />
Change eyepieces to change your telescope's magnification.<br />
Formula for calculating magnification:<br />
Focal length of the telescope : focal length of the eyepiece =<br />
magnification<br />
Examples<br />
700 mm: 20 mm = 35 x<br />
700 mm: 12.5 mm = 56 x<br />
700 mm: 4 mm = 175 x<br />
10.2. Zenith mirror (refraction telescope only)<br />
The zenith mirror reverses (ill. 2,19) reverses the image (mirror<br />
image) and is therefore used only for celestial observation.<br />
10.3. Inversion lens<br />
To see a vertical image the right way up an inversion lens may be<br />
used.<br />
Undo the clamping screw (ill. 25, X) and remove all accessories<br />
from the eyepiece supports (ill. 1, 6). Then insert the inversion<br />
lens (ill. 2, 20) straight in the eyepiece supports and hand tighten<br />
the clamping screws. Then insert the eyepiece (e.g. f=20 mm) in<br />
the inversion lens opening and tighten the clamping screw (ill.<br />
25, Y).<br />
10.4. Barlow lens<br />
A Barlow increases magnification three times over.<br />
10.4.1 Assembling and using refracting telescopes<br />
If you use a refracting telescope the Barlow lens should only be<br />
inserted in the zenith mirror (fig. 13a, X). Remove the eyepiece<br />
from the zenith mirror and replace it with the Barlow lens. Then<br />
first insert the eyepiece with the greatest focal length and then<br />
hand tighten the clamping screw to affix it in place (fig. 24).<br />
10.4.2 Assembling and using reflecting telescopes<br />
If you use a reflecting telescope please undo the clamping screw<br />
on the eyepiece supports (fig. 13b, X) and remove the eyepiece<br />
from those supports. Then insert the Barlow lens straight in the<br />
supports and hand tighten the clamping screw. Finally first insert<br />
the eyepiece with the greatest focal length in the Barlow lens<br />
and then fasten it in place with the clamping screw (fig. 24).<br />
11. Dismantling:<br />
After a hopefully interesting and successful observation, it is<br />
recommen<strong>de</strong>d that you store the entire telescope in a dry, well<br />
aired area. On some telescopes the tripod and mount can easily<br />
be separated. The adjustments to the mount will remain intact.<br />
Don't forget to put the dust-protection-caps onto the tube<br />
opening and onto the eyepiece connection. Also, you should<br />
stow all the eyepieces and optical accessories into their<br />
corresponding receptacles.<br />
- 54 -<br />
HINT:<br />
The erecting lens is not recommen<strong>de</strong>d for astronomical<br />
observations. Only use the diagonal mirror here. To<br />
observe landscapes, you may use the erecting lens.<br />
12. Care:<br />
Your telescope is a high-quality optical appliance. Therefore you<br />
should avoid your telescope coming into contact with dust or<br />
moisture. Avoid putting fingerprints on the lens.<br />
If dirt or dust have nevertheless accumulated on your telescope,<br />
you should first remove it with a soft brush. Then clean the<br />
soiled area with a soft, lint-free cloth.<br />
The best way to remove fingerprints from the optical surfaces is<br />
with a lint free, soft cloth, which you have previously treated with<br />
some alcohol. Even better is the use of compressed air from a<br />
can.<br />
If your telescope has collected dust or moisture internally, do not<br />
try to clean it yourself but return it directly to your local<br />
specialist.<br />
Don’t clean the telescope’s optics too often. Doing this, may<br />
result in damaged coatings. If you telescope should have<br />
become dusty from the insi<strong>de</strong>, don’t attempt to clean it on your<br />
own but consult your local <strong>de</strong>aler or Lidl centre of your country<br />
(find a list of Lidl centres in this manual).