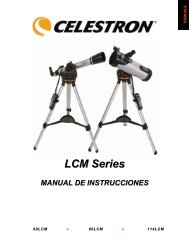
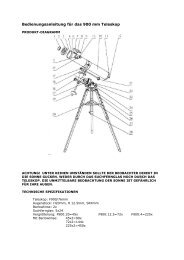
Manual de instrucciones
Manual de instrucciones
Manual de instrucciones

Create successful ePaper yourself
Turn your PDF publications into a flip-book with our unique Google optimized e-Paper software.
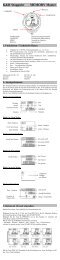
7. Assembling the fin<strong>de</strong>r scope/LED fin<strong>de</strong>r scope<br />
Note: The LED fin<strong>de</strong>r scope has a battery safeguar<strong>de</strong>d<br />
against discharge with plastic foil when shipped. This<br />
must be removed before first use (fig.1d).<br />
7.1. Fin<strong>de</strong>r scope installation (type I). Fin<strong>de</strong>r scope with threa<strong>de</strong>d<br />
mounting<br />
Fin<strong>de</strong>r scope and fin<strong>de</strong>r scope mounting (fig. 1a, 2) are inclu<strong>de</strong>d<br />
in the packaging.<br />
Undo the fastening screws of the fin<strong>de</strong>r scope mounting on the<br />
main tube (fig. 1a, X) and set it on the projecting screws on the<br />
telescope main tube. Then carefully reinsert the screws previously<br />
removed. The fin<strong>de</strong>r scope mounting is now securely fastened<br />
in place.<br />
Now undo the fin<strong>de</strong>r scope adjusting screws (fig. 1a, 3) – 3 or 6<br />
of them <strong>de</strong>pending on fin<strong>de</strong>r scope mo<strong>de</strong>l - until the fin<strong>de</strong>r<br />
scope can easily be slid into its mounting.<br />
Important. Make sure the fin<strong>de</strong>r scope lens points toward the<br />
main tube end (fig. 1, 4).<br />
The 3 or 6 screws are then to be equally tightened until the fin<strong>de</strong>r<br />
scope is securely fastened in place.<br />
7.2. Fin<strong>de</strong>r scope assembly (type II) LED fin<strong>de</strong>r scope with<br />
screw threading<br />
To assemble the LED fin<strong>de</strong>r scope (fig 1b, 2) first remove the<br />
fastening screws for the LED fin<strong>de</strong>r scope on the telescope main<br />
tube (fig. 1c, X). Now set the LED fin<strong>de</strong>r scope on the projecting<br />
screws on the telescope main tube. Then carefully reinsert the<br />
screws previously removed.<br />
Important. Make sure the LED fin<strong>de</strong>r scope lens points towards<br />
the main tube end (fig. 1, 4).<br />
7.3. Fin<strong>de</strong>r scope assembly (type III) LED fin<strong>de</strong>r scope with<br />
Quick Insert<br />
The LED fin<strong>de</strong>r scope (fig. 1b, 2) and mounting constitute a single<br />
unit. Sli<strong>de</strong> the foot of the LED fin<strong>de</strong>r scope completely into<br />
the appropriate base on the telescope main tube (fig. 10, X). The<br />
fin<strong>de</strong>r scope mounting will snap in place.<br />
Important. Make sure the LED fin<strong>de</strong>r scope lens points towards<br />
the main tube end (fig. 1, 4).<br />
7.4. Fin<strong>de</strong>r scope assembly (type IV) Fin<strong>de</strong>r scope with Quick<br />
Insert<br />
The fin<strong>de</strong>r scope and its mounting are pre-assembled and inclu<strong>de</strong>d<br />
in the packaging.<br />
Sli<strong>de</strong> the fin<strong>de</strong>r scope mounting foot entirely into the appropriate<br />
base on the telescope main tube (fig. 10, X). The fin<strong>de</strong>r scope<br />
mounting will snap in place.<br />
Important. Make sure the LED fin<strong>de</strong>r scope lens points towards<br />
the main tube end (fig. 1, 4).<br />
There are two clamping screws (fig. 1c, 3) and a spring-loa<strong>de</strong>d<br />
counter screw on the fin<strong>de</strong>r scope mounting. The clamping<br />
screws are now to be evenly screwed in until resistance is felt.<br />
This affixes the fin<strong>de</strong>r scope in place.<br />
8. Aligning the fin<strong>de</strong>r scope<br />
8.1 Aligning types I + IV (fin<strong>de</strong>r scopes)<br />
The fin<strong>de</strong>r scope must be adjusted before use. This means the<br />
fin<strong>de</strong>r scope and the telescope main tube must be aligned parallel<br />
to one another.<br />
Insert the eyepiece with the greatest focal length in the zenith<br />
mirror (13a, refracting telescopes only) or directly in the eyepiece<br />
supports (fig. 13b, reflecting telescopes only). Point the telescope<br />
at a significant object approximately 300 meters away (e.g.<br />
house gable, church tower top, etc.) and adjust until it appears in<br />
the centre of the field of vision (ill. 15, A).<br />
Look through the fin<strong>de</strong>r scope and align it by turning the 3 or 6<br />
adjustment screws until the object is visible in the middle of the<br />
crosshairs. The image you previously saw through your telescope<br />
lens must now be visible exactly in the centre of the fin<strong>de</strong>r<br />
scope (2) crosshairs too (ill. 15,C).<br />
Important. Some fin<strong>de</strong>r scopes have no integrated optical image<br />
reversion. The image in the fin<strong>de</strong>r scope is then upsi<strong>de</strong> down.<br />
This is not a fault.<br />
- 52 -<br />
8.2 Alignment, types II + III (LED fin<strong>de</strong>r scopes)<br />
The LED fin<strong>de</strong>r scope must be adjusted before use. This means<br />
that the LED fin<strong>de</strong>r scope and the telescope tube must be aligned<br />
in parallel.<br />
Insert the eyepiece with the greatest focal length in the zenith<br />
mirror (fig. 13a, refracting telescopes only) or directly in the eyepiece<br />
supports (fig. 13b, reflecting telescopes only). Point the<br />
telescope at a significant object approximately 300 meters away<br />
(e.g. house gable, church tower top, etc.) and adjust until it<br />
appears in the centre of the field of vision (ill. 15 A).<br />
Then turn the LED fin<strong>de</strong>r scope (fig. 1, 2) on using the On/Off<br />
switch (fig. 1b, Z). Select setting "2“ in daylight, setting "1" for<br />
nighttime.<br />
Look through the LED fin<strong>de</strong>r scope and align it by turning the<br />
horizontal (fig. 1b, X) and vertical (fig. 1b, Y) adjustment screws<br />
until you see the red dot in the centre of the image (ill. 15, C).<br />
Fin<strong>de</strong>r scope and telescope are now adjusted to one another.<br />
9. Protection-caps:<br />
In or<strong>de</strong>r to protect the insi<strong>de</strong> of your telescope from dust and<br />
filth, the tube opening is protected by a dust-protection-cap.<br />
For observation remove the cap from the opening.<br />
10. Flexible shafts<br />
To ease precise adjustment of the <strong>de</strong>clination and right<br />
ascension axes flexible shafts are installed in the holding <strong>de</strong>vices<br />
of both axes provi<strong>de</strong>d for the purpose (illustration 14, X).<br />
The long flexible shaft is mounted parallel to the telescope barrel<br />
(illustration 1, 14). It is secured in place with a clamping screw in<br />
the axis notch provi<strong>de</strong>d.<br />
The short flexible shaft is 1, 15) is mounted laterally. It too is<br />
secured in place with a clamping screw in the axis notch<br />
provi<strong>de</strong>d.<br />
Your telescope is now ready for use.