Use and Care Guide Manual de Uso y Cuidado
Use and Care Guide Manual de Uso y Cuidado
Use and Care Guide Manual de Uso y Cuidado

You also want an ePaper? Increase the reach of your titles
YUMPU automatically turns print PDFs into web optimized ePapers that Google loves.
EN<br />
ES<br />
<strong>Use</strong> <strong>and</strong> <strong>Care</strong> <strong>Gui<strong>de</strong></strong><br />
<strong>Manual</strong> <strong>de</strong> <strong>Uso</strong> y <strong>Cuidado</strong><br />
4<br />
326026021<br />
5<br />
3<br />
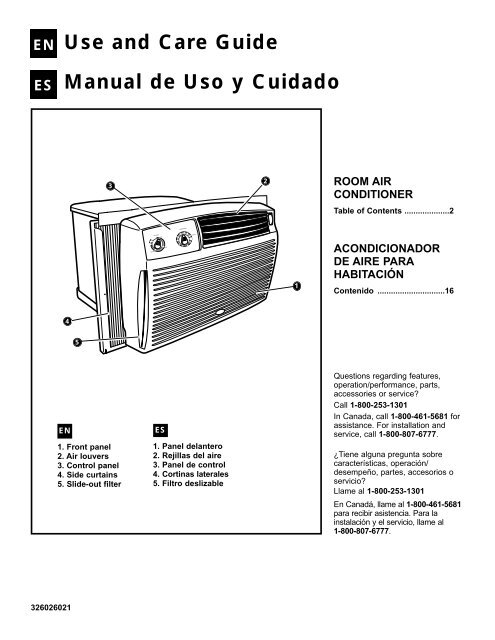
EN ES<br />
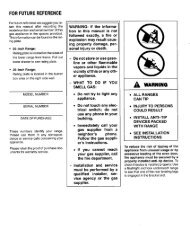
1. Front panel<br />
2. Air louvers<br />
3. Control panel<br />
4. Si<strong>de</strong> curtains<br />
5. Sli<strong>de</strong>-out filter<br />
2<br />
1. Panel <strong>de</strong>lantero<br />
2. Rejillas <strong>de</strong>l aire<br />
3. Panel <strong>de</strong> control<br />
4. Cortinas laterales<br />
5. Filtro <strong>de</strong>slizable<br />
2<br />
1<br />
ROOM AIR<br />
CONDITIONER<br />
Table of Contents ....................2<br />
ACONDICIONADOR<br />
DE AIRE PARA<br />
HABITACIÓN<br />
Contenido ..............................16<br />
Questions regarding features,<br />
operation/performance, parts,<br />
accessories or service?<br />
Call 1-800-253-1301<br />
In Canada, call 1-800-461-5681 for<br />
assistance. For installation <strong>and</strong><br />
service, call 1-800-807-6777.<br />
¿Tiene alguna pregunta sobre<br />
características, operación/<br />
<strong>de</strong>sempeño, partes, accesorios o<br />
servicio?<br />
Llame al 1-800-253-1301<br />
En Canadá, llame al 1-800-461-5681<br />
para recibir asistencia. Para la<br />
instalación y el servicio, llame al<br />
1-800-807-6777.
2<br />
EN<br />
Contents<br />
Page<br />
A Note To You ...........................................................2<br />
Air Conditioner Safety .............................................3<br />
Important Safety Instructions ..........................3<br />
Air Conditioner Installation .....................................4<br />
Installation requirements..................................4<br />
Tools nee<strong>de</strong>d......................................................4<br />
Installation parts supplied................................5<br />
Electrical requirements.....................................5<br />
Installing si<strong>de</strong> curtains .....................................6<br />
Positioning air conditioner in window ............6<br />
Completing installation.....................................7<br />
Air Conditioner <strong>Use</strong> .................................................8<br />
Starting your air conditioner............................8<br />
Changing air direction ......................................9<br />
Saving energy....................................................9<br />
Normal sounds ..................................................9<br />
Air Conditioner <strong>Care</strong> ..............................................10<br />
Cleaning the air filter ......................................10<br />
Cleaning the front panel .................................10<br />
Repairing paint damage..................................10<br />
Performing Annual Maintenance ...................10<br />
Troubleshooting .....................................................11<br />
Accessories ............................................................13<br />
Assistance or Service ...........................................14<br />
EN<br />
Thank you for buying this appliance.<br />
To ensure you enjoy years of trouble-free operation, we<br />
<strong>de</strong>veloped this <strong>Use</strong> <strong>and</strong> <strong>Care</strong> <strong>Gui<strong>de</strong></strong>. It contains valuable<br />
information about how to operate <strong>and</strong> maintain your<br />
appliance properly <strong>and</strong> safely. Please read it carefully.<br />
Also, please complete <strong>and</strong> mail the Product Registration<br />
Card provi<strong>de</strong>d with your appliance. This card helps us<br />
notify you about any new information on your appliance.<br />
Please record your mo<strong>de</strong>l’s information.<br />
Whenever you call to request service on your appliance,<br />
you need to know your complete mo<strong>de</strong>l number <strong>and</strong><br />
serial number. You can find this information on the<br />
mo<strong>de</strong>l <strong>and</strong> serial number label (located on the lower left<br />
corner of the front panel).<br />
Please record the mo<strong>de</strong>l <strong>and</strong> serial number<br />
information below. Also, record the purchase date of<br />
your appliance <strong>and</strong> the store’s name, address, <strong>and</strong><br />
telephone number.<br />
Mo<strong>de</strong>l Number<br />
Serial Number<br />
Purchase Date<br />
Store Name<br />
Store Address<br />
Store Phone<br />
A Note To You<br />
Keep this book <strong>and</strong> the sales slip together<br />
for future reference.
EN<br />
Air Conditioner Safety<br />
Your safety <strong>and</strong> the safety of others are<br />
very important.<br />
We have provi<strong>de</strong>d many important safety messages<br />
in this manual <strong>and</strong> on your appliance. Always read<br />
<strong>and</strong> obey all safety messages.<br />
This is the safety alert symbol.<br />
This symbol alerts you to potential hazards<br />
that can kill or hurt you <strong>and</strong> others.<br />
All safety messages will follow the safety alert<br />
symbol <strong>and</strong> either the word “DANGER” or<br />
“WARNING”. These words mean:<br />
You can be killed or seriously injured if you don’t<br />
immediately follow instructions.<br />
WARNING<br />
You can be killed or seriously injured if you don’t<br />
follow instructions.<br />
All safety messages will tell you what the potential<br />
hazard is, tell you how to reduce the chance of<br />
injury, <strong>and</strong> tell you what can happen if the<br />
instructions are not followed.<br />
IMPORTANT SAFETY<br />
INSTRUCTIONS<br />
WARNING<br />
Electrical Shock Hazard<br />
DANGER Plug into a groun<strong>de</strong>d 3 prong outlet.<br />
Do not remove ground prong.<br />
Do not use an adapter.<br />
Do not use an extension cord.<br />
Failure to follow these instructions can result in<br />
<strong>de</strong>ath, fire, or electrical shock.<br />
Help us help you<br />
Please:<br />
• Install your air conditioner in a window that will hold<br />
the weight, <strong>and</strong> secure the air conditioner according to<br />
the Installation Instructions.<br />
• Connect the air conditioner to the proper kind of outlet<br />
with the correct electrical supply <strong>and</strong> ground. (See the<br />
Installation Instructions.)<br />
• Make sure the air conditioner is the correct size for the<br />
area you want to cool.<br />
• <strong>Use</strong> the air conditioner only to do what a window air<br />
conditioner is <strong>de</strong>signed to do.<br />
• Make sure the air conditioner is not used by anyone<br />
unable to operate it properly.<br />
• Maintain the air conditioner properly.<br />
• Remove the Energy Label. <strong>Use</strong> a damp cloth to take<br />
off any glue residue. DO NOT use sharp instruments,<br />
flammable fluids, or abrasive cleaners. These can<br />
damage the air conditioner finish.<br />
3
EN<br />
Air Conditioner Installation<br />
Installer: Leave <strong>Use</strong> <strong>and</strong> <strong>Care</strong> <strong>Gui<strong>de</strong></strong> with the homeowner.<br />
Homeowner: Keep <strong>Use</strong> <strong>and</strong> <strong>Care</strong> <strong>Gui<strong>de</strong></strong> for future reference <strong>and</strong> for local<br />
electrical inspector’s use, if required.<br />
Location requirements<br />
IMPORTANT: Observe all governing co<strong>de</strong>s <strong>and</strong><br />
ordinances.<br />
Check the location where air conditioner will be installed.<br />
Proper installation is your responsibility. Make sure you<br />
have everything necessary for correct installation.<br />
The location should provi<strong>de</strong>:<br />
• Groun<strong>de</strong>d electrical outlet within 4 ft (122 cm) of the<br />
window. Do not use an extension cord.<br />
• Free movement of air to rooms to be cooled.<br />
• A large enough opening for the air conditioner.<br />
Installation parts are supplied for double-hung<br />
windows.<br />
• A<strong>de</strong>quate wall support for weight of air conditioner. Air<br />
conditioner weighs 56 lbs (25 kg) to 80 lbs (36 kg).<br />
Do not install the air conditioner in an area where the<br />
front panel will be exposed to heat sources that will raise<br />
the panel surface temperature above 120°F (50°C).<br />
Tools nee<strong>de</strong>d<br />
4<br />
Air Conditioner Size A B<br />
5000-6000 25" to 38" 16"<br />
Btu/h (63.5 cm to<br />
96.5 cm)<br />
(40.6 cm)<br />
A. Gloves<br />
B. Flat-bla<strong>de</strong> <strong>and</strong> Phillips screwdrivers<br />
C. Scissors<br />
D. Drill <strong>and</strong> 3/32 in. or smaller bit<br />
E. Safety glasses<br />
F. Tape measure<br />
G. Level<br />
A<br />
E<br />
Window opening measurements<br />
B<br />
A<br />
F<br />
C<br />
G<br />
D<br />
B
Installation parts supplied<br />
H. 1 Window-lock bracket<br />
I. 1 foam seal<br />
J. 6 #10 x 3/8 in. Phillips-head screws<br />
K. 3 3/4 in. slotted round-head screws<br />
L. 2 si<strong>de</strong> curtains<br />
Electrical requirements<br />
Electrical Shock Hazard<br />
Plug into a groun<strong>de</strong>d 3 prong outlet.<br />
Do not remove ground prong.<br />
Do not use an adapter.<br />
Do not use an extension cord.<br />
Failure to follow these instructions can result in<br />
<strong>de</strong>ath, fire, or electrical shock.<br />
Wiring requirements<br />
Power supply cord<br />
plug outlet<br />
WARNING<br />
Specific electrical requirements are listed in the chart.<br />
Follow the requirements for the type of plug on the<br />
power supply cord.<br />
Wiring requirements<br />
• 3-wire<br />
• Single-phase<br />
• AC only<br />
• 60 hertz<br />
• 115 volt (103.5 min. -<br />
126.5 max.)<br />
• 0-12 amperes<br />
• 15-amp time-<strong>de</strong>lay<br />
fuse or circuit breaker<br />
• 14 gauge copper<br />
wiring<br />
H<br />
J<br />
Recommen<strong>de</strong>d ground method<br />
For your personal safety, this air conditioner must be<br />
groun<strong>de</strong>d. This air conditioner is equipped with a<br />
power supply cord having a 3-prong ground plug. To<br />
minimize possible shock hazard, the cord must be<br />
plugged into a mating, 3-prong ground-type outlet,<br />
groun<strong>de</strong>d in accordance with all local co<strong>de</strong>s <strong>and</strong><br />
ordinances. If a mating outlet is not available, it is the<br />
customer’s responsibility to have a properly groun<strong>de</strong>d,<br />
3-prong outlet installed by a licensed installer.<br />
It is the customer’s responsibility:<br />
• To contact a qualified electrical installer.<br />
• To assure that the electrical installation is a<strong>de</strong>quate<br />
<strong>and</strong> in conformance with National Electrical Co<strong>de</strong>,<br />
ANSI/NFPA 70 — latest edition*, <strong>and</strong> all local co<strong>de</strong>s<br />
<strong>and</strong> ordinances.<br />
Copies of the st<strong>and</strong>ards listed may be obtained from:<br />
* National Fire Protection Association<br />
Batterymarch Park<br />
Quincy, Massachusetts 02269<br />
K<br />
I<br />
L<br />
5
6<br />
Installing si<strong>de</strong> curtains<br />
WARNING<br />
Excessive Weight Hazard<br />
<strong>Use</strong> two or more people to move <strong>and</strong> install air<br />
conditioner.<br />
Failure to do so can result in back or other<br />
injury.<br />
Attach curtains to unit before placing unit in window.<br />
1. Remove unit from packaging.<br />
2. Locate supplied bag of 6 screws.<br />
3. Insert top <strong>and</strong> then bottom of right curtain housing (A) in<br />
top <strong>and</strong> bottom curtain gui<strong>de</strong>s (B) on air conditioner.<br />
4. Extend right curtain outward so you may insert the first<br />
screw (C) through the middle hole of the curtain. Screw<br />
curtain to middle hole in air conditioner cabinet. This screw<br />
is required to correctly attach curtain (top to bottom) to the<br />
air conditioner cabinet.<br />
5. While the right curtain is still exten<strong>de</strong>d, insert another screw<br />
(C) in top slot of curtain. Screw curtain to top hole in air<br />
conditioner cabinet.<br />
6. While the right curtain is still exten<strong>de</strong>d, insert another screw<br />
(C) in bottom slot of curtain. Screw curtain to bottom hole in<br />
air conditioner cabinet.<br />
7. Sli<strong>de</strong> curtain housing into gui<strong>de</strong>s as far as it will go.<br />
8. Repeat above steps for left curtain, then go to “Positioning<br />
the air conditioner” below.<br />
A<br />
back view<br />
Positioning air conditioner in window<br />
WARNING<br />
Excessive Weight Hazard<br />
<strong>Use</strong> two or more people to move <strong>and</strong> install air<br />
conditioner.<br />
Failure to do so can result in back or other<br />
injury.<br />
1. Using two people, lift air conditioner into place.<br />
NOTES:<br />
• H<strong>and</strong>le air conditioner with care.<br />
• Air conditioner should be placed no more than 4 ft (122<br />
cm) from a groun<strong>de</strong>d outlet.<br />
2. Center air conditioner in window. Check that lower rail of<br />
air conditioner is behind <strong>and</strong> against back si<strong>de</strong> of window<br />
seal. Lower window sash (A) to hold cabinet in place.<br />
NOTES:<br />
• Do not block the louvers in the front panel.<br />
• Do not block the openings on the outsi<strong>de</strong> of the air<br />
conditioner.<br />
3. Check that air conditioner cabinet is tilted to the outsi<strong>de</strong> so<br />
that water will run to the outsi<strong>de</strong>. There should be a tilt to<br />
the outsi<strong>de</strong> of about 1/2 bubble (B). If cabinet is not<br />
properly positioned, reposition or shim cabinet to provi<strong>de</strong><br />
the proper tilt.<br />
B<br />
C<br />
A<br />
bottom view<br />
A<br />
1/2 bubble tilt<br />
B<br />
B
4. Pull left curtain (D) out until it fits into the window<br />
channel (E). Repeat with right curtain.<br />
5. Insert one of the slotted round-head screws (F)<br />
through left curtain <strong>and</strong> into the window channel or<br />
through alternate hole (G) at the top of the curtain<br />
<strong>and</strong> into the window channel to fasten the curtain to<br />
the window sash. Repeat for right curtain.<br />
Completing installation<br />
NOTE: Install window-lock bracket to prevent air<br />
conditioner from falling out of window.<br />
1. Place window-lock bracket (H) on top of lower<br />
window <strong>and</strong> against upper window sash (I).<br />
2. <strong>Use</strong> a 3/32 in. drill bit to drill a starter hole through<br />
the hole in the bracket.<br />
3. Attach window-lock bracket by inserting one of the<br />
slotted round-head screws through the window lock<br />
bracket (H) <strong>and</strong> into the upper window sash (I).<br />
4. Insert foam seal (J) behind the top of the lower<br />
window sash (K) <strong>and</strong> against the glass of the upper<br />
window.<br />
5. Plug power cord into outlet.<br />
Top view<br />
E<br />
D<br />
F<br />
G<br />
J<br />
H<br />
D<br />
E<br />
F<br />
I<br />
K<br />
7
Operating your air conditioner properly helps you to obtain the best possible results.<br />
This section explains proper air conditioner operation.<br />
IMPORTANT:<br />
• If you turn the air conditioner off, wait at least 3 minutes before turning it back on. This prevents the air conditioner from<br />
blowing a fuse or tripping a circuit breaker.<br />
• Do not try to operate your air conditioner in the cooling mo<strong>de</strong> when outsi<strong>de</strong> temperature is below 65°F (18°C). The<br />
insi<strong>de</strong> evaporator coil will freeze up, <strong>and</strong> the air conditioner will not operate properly.<br />
Starting your air conditioner<br />
8<br />
EN<br />
Air Conditioner <strong>Use</strong><br />
1. Set the FAN SPEED to the <strong>de</strong>sired setting. When<br />
the air conditioner is operating at LOW, HIGH, or<br />
TURBO (some mo<strong>de</strong>ls), the fan circulates air<br />
continuously.<br />
LOW - for sleeping comfort<br />
HIGH - for normal cooling<br />
TURBO (on some mo<strong>de</strong>ls) - for maximum cooling<br />
FAN ONLY<br />
When the FAN ONLY setting is selected, the fan will<br />
run continuously to move air, but the air will not be<br />
cooled.<br />
2. Turn the TEMPERATURE Control to a mid-setting.<br />
Adjust the air conditioner's performance by turning<br />
theTEMPERATURE Control clockwise ( ) for<br />
maximum cooling. For less cooling, turn the<br />
TEMPERATURE Control counterclockwise ( ).<br />
Experiment <strong>and</strong> find the setting that suits you best.<br />
Your air conditioner may have one of these fan controls:
Changing air direction<br />
Saving energy<br />
There are many things you can do to help save energy.<br />
• Improve your home's insulation. Seal doors <strong>and</strong><br />
windows. Close fireplace flue.<br />
• Close blinds or drapes on the sunny si<strong>de</strong> of your<br />
house. Add awnings.<br />
• Make sure drapes or furniture do not block airflow from<br />
your air conditioner.<br />
• Turn lights <strong>and</strong> appliances off when they are not<br />
nee<strong>de</strong>d.<br />
Normal sounds<br />
wheel The louvers in the top of the front<br />
panel allow you to control the<br />
direction of the cooled air. Roll the<br />
wheel up or down to direct the air<br />
left or right. <strong>Use</strong> the tabs to move<br />
the whole cartridge to direct air up,<br />
down or straight ahead.<br />
tab<br />
When your air conditioner is operating normally, you may hear sounds such as:<br />
• Droplets of water hitting the con<strong>de</strong>nser, causing a<br />
“pinging” or “clicking” sound. The water droplets<br />
help cool the con<strong>de</strong>nser.<br />
• Air movement from the fan.<br />
• Clicks from the thermostat cycle.<br />
• Ventilate your attic. High temperatures in the attic add<br />
to the air conditioner's cooling load.<br />
• Try not to use heat-producing appliances during the<br />
hottest part of the day.<br />
• Keep heat registers <strong>and</strong> cool-air returns closed.<br />
• <strong>Use</strong> exhaust vent fans while cooking, doing laundry, or<br />
bathing.<br />
• Vibrations or noise due to poor wall or window<br />
construction.<br />
• A high-pitched hum or pulsating noise caused by the<br />
mo<strong>de</strong>rn high-efficiency compressor cycling on <strong>and</strong> off.<br />
9
EN<br />
Your new air conditioner is <strong>de</strong>signed to give you many years of <strong>de</strong>pendable service. This section tells you how to clean<br />
<strong>and</strong> care for your air conditioner properly. Call your local authorized <strong>de</strong>aler for an annual checkup. Remember… the cost<br />
of this service call is your responsibility.<br />
10<br />
Air Conditioner <strong>Care</strong><br />
Cleaning the air filter<br />
The air filter is removable from either si<strong>de</strong> of the unit for easy<br />
cleaning. A clean filter helps remove dust, lint, <strong>and</strong> other<br />
particles from the air <strong>and</strong> is important for best cooling<br />
operating efficiency. Check the filter every 2 weeks to see if it<br />
needs cleaning. Do not operate the air conditioner without the<br />
filter in place.<br />
1. Unplug air conditioner or disconnect power.<br />
2. Sli<strong>de</strong> air filter out from either si<strong>de</strong> of unit.<br />
3. <strong>Use</strong> a vacuum cleaner to clean air filter. If air filter is very<br />
dirty, wash it in warm water with a mild <strong>de</strong>tergent. Do not<br />
wash air filter in the dishwasher or use any chemical<br />
cleaners. Air dry filter completely before replacing to ensure<br />
maximum efficiency.<br />
4. Sli<strong>de</strong> air filter back into either si<strong>de</strong> of unit.<br />
5. Plug in air conditioner or reconnect power.<br />
Cleaning the front panel<br />
1. Unplug air conditioner or disconnect power.<br />
2. Wipe the front panel with a soft, damp cloth.<br />
3. Air dry front panel completely.<br />
4. Plug in air conditioner or reconnect power.<br />
Repairing paint damage<br />
Check once or twice a year for paint damage. This is<br />
very important, especially in areas near oceans or<br />
where rust is a problem. If nee<strong>de</strong>d, touch up with a<br />
good gra<strong>de</strong> enamel paint.<br />
Performing annual maintenance<br />
Your air conditioner needs annual maintenance to help<br />
ensure steady, top performance throughout the year.<br />
Call your local authorized <strong>de</strong>aler to schedule an<br />
annual checkup. The expense of an annual inspection<br />
is your responsibility.<br />
Filter may be removed from either si<strong>de</strong>.<br />
NOTE: To reduce paint damage during the winter,<br />
install a heavy-duty cover over air conditioner cabinet.<br />
For information on or<strong>de</strong>ring a heavy-duty cover, see<br />
“Accesories.”
EN<br />
Troubleshooting<br />
You can solve many common air conditioner problems easily, saving you the cost of a service call. Try the suggestions<br />
below to see if you can solve your problem without outsi<strong>de</strong> help.<br />
Air conditioner will not operate.<br />
Check if ...<br />
The power supply<br />
cord is unplugged.<br />
A household fuse<br />
has blown or circuit<br />
breaker has tripped.<br />
The FAN SPEED is<br />
turned to the off<br />
position (some<br />
mo<strong>de</strong>ls).<br />
The local power has<br />
failed.<br />
Then ...<br />
Firmly plug the power supply cord into a live outlet with proper voltage.<br />
Replace the fuse or reset the circuit breaker. Make sure the air conditioner is plugged into a<br />
properly groun<strong>de</strong>d outlet as <strong>de</strong>scribed in the Installation Instructions.<br />
Turn the FAN SPEED to an active setting.<br />
Wait for power to be restored.<br />
Air conditioner blows fuses or trips circuit breakers.<br />
Check if ...<br />
Then ...<br />
Too many appliances Unplug or relocate appliances that share the same circuit.<br />
are being used on the<br />
same circuit.<br />
Time-<strong>de</strong>lay fuse or Replace with a 15-amp time-<strong>de</strong>lay fuse or circuit breaker of the correct capacity. See<br />
circuit breaker of the “Electrical requirements” in the Installation Instructions for the correct capacity.<br />
wrong capacity is<br />
being used.<br />
An extension cord is Do not use an extension cord with this or any other appliance.<br />
being used.<br />
You are trying to Wait at least 3 minutes after turning FAN SPEED off before trying to restart the<br />
restart the air air conditioner.<br />
conditioner too soon<br />
after turning FAN<br />
SPEED off (or<br />
unplugging air<br />
conditioner on some<br />
mo<strong>de</strong>ls).<br />
Air conditioner seems to run too much.<br />
Check if ...<br />
The current air<br />
conditioner replaced<br />
an ol<strong>de</strong>r mo<strong>de</strong>l.<br />
The air conditioner is<br />
in a heavily occupied<br />
room or heatproducing<br />
appliances are in<br />
use in the room.<br />
Then ...<br />
The use of more efficient components may cause the air conditioner to run longer than<br />
an ol<strong>de</strong>r mo<strong>de</strong>l, but the total energy consumption will be less. Newer air conditioners do not<br />
emit the “blast” of cold air you may be accustomed to from ol<strong>de</strong>r units, but this IS NOT an<br />
indication of lesser cooling capacity or efficiency. Refer to the efficiency rating (EER) <strong>and</strong><br />
capacity rating (in BTUs/hr.) marked on the air conditioner.<br />
<strong>Use</strong> exhaust vent fans while cooking or bathing <strong>and</strong> try not to use heat-producing appliances<br />
during the hottest part of the day. A higher capacity air conditioner may be required<br />
<strong>de</strong>pending on the size of the room being cooled.<br />
11
Air conditioner cycles on <strong>and</strong> off too much.<br />
12<br />
Check if ...<br />
The air conditioner is not<br />
properly sized for your room.<br />
The filter is dirty or<br />
obstructed by <strong>de</strong>bris.<br />
There is excessive heat or<br />
moisture (open container<br />
cooking, showers, etc.)<br />
in the room.<br />
The louvers are blocked.<br />
The outsi<strong>de</strong> temperature is<br />
below 65°F (18°C).<br />
The temperature of the room<br />
you are trying to cool<br />
is extremely hot.<br />
Windows or doors to the<br />
outsi<strong>de</strong> are open.<br />
The TEMERATURE Control<br />
is not at a cool enough setting.<br />
The air conditioner is<br />
installed on the sunny<br />
si<strong>de</strong> of your house.<br />
Then ...<br />
Check the cooling capabilities of your room air conditioner. Room air conditioners are<br />
not <strong>de</strong>signed to cool multiple rooms.<br />
Clean the filter. See “Cleaning the air filter.”<br />
<strong>Use</strong> a fan to exhaust heat or moisture from the room. Try not to use heat-producing<br />
appliances during the hottest part of the day.<br />
Install the air conditioner in a location where the louvers are free from curtains, blinds,<br />
furniture, etc.<br />
Do not try to operate your air conditioner in the cooling mo<strong>de</strong> when the outsi<strong>de</strong><br />
temperature is below 65°F (18°C).<br />
Allow extra time for the air conditioner to cool off a very hot room.<br />
Close all windows <strong>and</strong> doors.<br />
Adjust the TEMPERATURE Control to a cooler setting by turning the knob clockwise.<br />
Turn FAN SPEED to TURBO COOL (some mo<strong>de</strong>ls).<br />
Install your air conditioner in a more sha<strong>de</strong>d window.<br />
Water drips from cabinet into your house.<br />
Check if ...<br />
Then ...<br />
The air conditioner is not Level the air conditioner to provi<strong>de</strong> a downward slope toward the outsi<strong>de</strong> (1⁄ 2 bubble<br />
properly leveled. The air on a carpenter’s level) to ensure proper drainage. See the Installation Instructions.<br />
conditioner should slope Reposition or shim the cabinet as necessary.<br />
slightly downward toward<br />
the outsi<strong>de</strong>.<br />
NOTE: Do NOT drill a hole in the bottom of the metal base <strong>and</strong> con<strong>de</strong>nsate pan.
EN<br />
Accessories<br />
You can or<strong>de</strong>r the following accessories for your air<br />
conditioner from your local authorized <strong>de</strong>aler or by<br />
calling the numbers below.<br />
In the U.S.A.<br />
To or<strong>de</strong>r accessories, call the Customer Interaction<br />
Center toll-free at 1-800-531-1301 or visit our website at<br />
www.applianceaccessories.com. You will hear a<br />
recording. Follow the instructions to place an or<strong>de</strong>r.<br />
In Canada<br />
To or<strong>de</strong>r accessories, call toll-free at 1-800-807-6777.<br />
Replacement air filters<br />
A good, clean air filter is important for best cooling with<br />
least energy consumption. Your air filter should be<br />
cleaned regularly. See “Air Conditioner <strong>Care</strong>” section for<br />
cleaning instructions.<br />
Heavy-duty cover<br />
If you <strong>de</strong>ci<strong>de</strong> to leave your air conditioner installed<br />
during the winter, a heavy-duty cover will help protect<br />
your air conditioner <strong>and</strong> reduce drafts. The cover<br />
protects against cold drafts through the unit’s air<br />
passages <strong>and</strong> protects the cabinet from snow, rain,<br />
sleet, rust, <strong>and</strong> dust.<br />
13
EN<br />
Assistance or Service<br />
To avoid unnecessary service calls, please check the “Troubleshooting” section. It may save you the cost of a service<br />
call. If you still need help, follow the instructions below.<br />
If you need assistance or service<br />
In the U.S.A.:<br />
Call the Customer Interaction Center telephone number.<br />
Dial toll-free 1-800-253-1301. Our consultants are<br />
available to assist you.<br />
In Canada:<br />
For assistance, call the Customer Interaction Center<br />
telephone number toll-free at 1-800-461-5681 Monday to<br />
Friday 8:00 a.m. - 6:00 p.m. (EST), Saturday 8:30 a.m. -<br />
4:30 p.m. (EST).<br />
For service, call 1-800-807-6777. Designated service<br />
technicials are trained to fulfill the product warranty <strong>and</strong><br />
provi<strong>de</strong> after-warranty service, anywhere in Canada.<br />
When calling: Please know the purchase date,<br />
<strong>and</strong> the complete mo<strong>de</strong>l <strong>and</strong> serial number of<br />
your appliance (see the "A Note to You"<br />
section).<br />
This information will help us better respond to<br />
your request.<br />
If you need replacement parts<br />
If you need to or<strong>de</strong>r replacement parts, we<br />
recommend that you only use factory-authorized parts.<br />
These parts will fit right <strong>and</strong> work right, because they<br />
are ma<strong>de</strong> to the same exacting specifications used to<br />
build every new appliance.<br />
For further assistance<br />
14<br />
If you need further assistance, you can write to ask<br />
any questions or tell us about your concerns to:<br />
Customer Interaction Center<br />
553 Benson Road<br />
Benton Harbor, MI 49022-2692<br />
Our consultants provi<strong>de</strong> assistance with:<br />
• Features <strong>and</strong> specifications on our full line of<br />
appliances<br />
• Installation information<br />
• <strong>Use</strong> <strong>and</strong> maintenance procedures<br />
• Accessory <strong>and</strong> repair parts sales<br />
• Specialized customer assistance (Spanish speaking,<br />
hearing impaired, limited vision, etc.)<br />
• Referrals to local <strong>de</strong>alers, service companies, <strong>and</strong><br />
repair parts distributors<br />
Our service technicians are trained to fulfill the product<br />
warranty <strong>and</strong> provi<strong>de</strong> after-warranty service, anywhere in<br />
the United States.<br />
To locate the authorized service company in your area,<br />
you can also look in your telephone directory Yellow<br />
Pages.<br />
To locate factory-authorized parts in your area, call our<br />
Customer Interaction Center telephone number, your<br />
nearest authorized service center, or Factory Service<br />
at 1-800-253-1301, or in Canada, 1-800-807-6777.<br />
Or in Canada:<br />
Customer Interaction Center<br />
1901 Minnesota Court<br />
Mississauga, Ontario L5N 3A7<br />
Please inclu<strong>de</strong> a daytime phone number in your<br />
correspon<strong>de</strong>nce.
ES Contenido<br />
Página<br />
Una Nota Para Usted .............................................15<br />
Seguridad <strong>de</strong>l Acondicionador <strong>de</strong> Aire ...............16<br />
Instrucciones Importantes <strong>de</strong> Seguridad .....16<br />
Instalación <strong>de</strong>l Acondicionador <strong>de</strong> Aire ..................17<br />
Requisitos para la ubicación..........................17<br />
Herramientas necesarias ................................17<br />
Piezas suministradas para la instalación .....18<br />
Requisitos eléctricos.......................................18<br />
Instalación <strong>de</strong> cortinas laterales ....................19<br />
Colocación <strong>de</strong>l acondicionador <strong>de</strong><br />
aire en la ventana ............................................19<br />
Para completar la instalación.........................20<br />
Cómo Usar Su Acondicionador <strong>de</strong> Aire...............21<br />
Cómo poner en marcha su<br />
acondicionador <strong>de</strong> aire ...................................21<br />
Cómo cambiar la dirección <strong>de</strong>l aire...............22<br />
Ahorro <strong>de</strong> energía ...........................................22<br />
Ruidos normales ............................................22<br />
Cómo Cuidar su Acondicionador <strong>de</strong> Aire............23<br />
Limpieza <strong>de</strong>l filtro <strong>de</strong> aire ...............................23<br />
Limpieza <strong>de</strong>l panel <strong>de</strong>lantero ........................23<br />
Reparación <strong>de</strong> la pintura dañada ..................23<br />
Mantenimiento anual ......................................23<br />
Diagnóstico <strong>de</strong> Problemas ...................................24<br />
Accesorios .............................................................26<br />
Ayuda o Servicio Técnico ....................................27<br />
ES<br />
Gracias por seleccionar este aparato.<br />
Para asegurarnos que este aparato funcione durante muchos<br />
años sin problemas, hemos diseñado este <strong>Manual</strong> <strong>de</strong> <strong>Uso</strong> y<br />
<strong>Cuidado</strong>. Contiene valiosa información sobre cómo operar y<br />
dar mantenimiento a su aparato <strong>de</strong>bidamente y sin peligro.<br />
Por favor, léalo <strong>de</strong>tenidamente. Asimismo, llene por favor y<br />
envíe por correo la Tarjeta <strong>de</strong> Registro <strong>de</strong>l Producto que viene<br />
con su aparato. Esta tarjeta nos ayudará a notificarle<br />
cualquier información nueva sobre su aparato.<br />
Por favor anote la información sobre su<br />
mo<strong>de</strong>lo.<br />
Siempre que llame para solicitar servicio <strong>de</strong>l aparato,<br />
necesitará saber el número <strong>de</strong>l mo<strong>de</strong>lo y el número <strong>de</strong> serie<br />
completos. Esta información la encuentra en la placa <strong>de</strong><br />
número <strong>de</strong>l mo<strong>de</strong>lo y número <strong>de</strong> serie.<br />
Por favor anote la información sobre el número <strong>de</strong>l mo<strong>de</strong>lo y<br />
el número <strong>de</strong> serie que se incluye abajo. Anote también la<br />
fecha <strong>de</strong> compra <strong>de</strong>l aparato, así como el nombre, la<br />
dirección y el teléfono <strong>de</strong> la tienda.<br />
Número <strong>de</strong>l mo<strong>de</strong>lo<br />
Número <strong>de</strong> serie<br />
Una Nota Para<br />
Usted<br />
Fecha <strong>de</strong> compra<br />
Nombre <strong>de</strong> la tienda<br />
Dirección <strong>de</strong> la tienda<br />
Teléfono <strong>de</strong> la tienda<br />
Guar<strong>de</strong> este manual y la nota <strong>de</strong> compra juntos,<br />
para referencia futura.<br />
15
ES<br />
16<br />
Seguridad <strong>de</strong>l Acondicionador<br />
<strong>de</strong> Aire<br />
Su seguridad y la seguridad <strong>de</strong> los <strong>de</strong>más<br />
es muy importante.<br />
Hemos incluido muchos mensajes importantes <strong>de</strong><br />
seguridad en este manual y en su electrodoméstico.<br />
Lea y obe<strong>de</strong>zca siempre todos los mensajes <strong>de</strong><br />
seguridad<br />
Este es el símbolo <strong>de</strong> advertencia <strong>de</strong><br />
seguridad.<br />
Este símbolo le llama la atención sobre<br />
peligros potentiales que pue<strong>de</strong>n ocasionar la muerte<br />
o una lesión a usted y a los <strong>de</strong>más.<br />
Todos los mensajes <strong>de</strong> seguridad irán a continuación<br />
<strong>de</strong>l símbolo <strong>de</strong> advertencia <strong>de</strong> seguridad<br />
y <strong>de</strong> la palabra “PELIGRO” o “ADVERTENCIA”.<br />
Estas palabras significan:<br />
PELIGRO<br />
Si no sigue las instrucciones <strong>de</strong> inmediato,<br />
usted pue<strong>de</strong> morir o sufrir una lesión grave.<br />
ADVERTENCIA<br />
Si no sigue las instrucciones, usted pue<strong>de</strong><br />
morir o sufrir una lesión grave.<br />
Todos los mensajes <strong>de</strong> seguridad le dirán el peligro<br />
potencial, le dirán cómo reducir las posibilida<strong>de</strong>s <strong>de</strong><br />
sufrir una lesión y lo que pue<strong>de</strong> suce<strong>de</strong>r si no se<br />
siguen las instrucciones.<br />
INSTRUCCIONES<br />
IMPORTANTES<br />
DE SEGURIDAD<br />
ADVERTENCIA<br />
Peligro <strong>de</strong> Choque Eléctrico<br />
Conecte a un contacto <strong>de</strong> pared <strong>de</strong> conexión a<br />
tierra <strong>de</strong> 3 terminales.<br />
No quite el terminal <strong>de</strong> conexión a tierra.<br />
No use un adaptador.<br />
No use un cable eléctrico <strong>de</strong> extensión.<br />
No seguir estas instrucciones pue<strong>de</strong> ocasionar<br />
la muerte, incendio o choque eléctrico.<br />
Ayú<strong>de</strong>nos a ayudarlo<br />
Por favor:<br />
• Instale el acondicionador <strong>de</strong> aire en una ventana que<br />
soporte el peso y asegúrelo <strong>de</strong> acuerdo con las<br />
instrucciones <strong>de</strong> instalación.<br />
• Conecte la unidad al tipo apropiado <strong>de</strong> tomacorriente<br />
con el suministro eléctrico y puesta a tierra correctos.<br />
(Ver la Instrucciones <strong>de</strong> Instalación.)<br />
• Asegúrese <strong>de</strong> que la unidad tenga el tamaño correcto<br />
para el área que usted <strong>de</strong>sea enfriar.<br />
• Utilice la unidad únicamente para los fines para los<br />
que está diseñado un acondicionador <strong>de</strong> aire para<br />
ventana.<br />
• Asegúrese <strong>de</strong> que la unidad sea usada únicamente<br />
por personas capacitadas para operarla <strong>de</strong>bidamente.<br />
• Dé a la unidad el mantenimiento <strong>de</strong>bido.<br />
• Quite también la etiqueta <strong>de</strong> energía. Utilice un paño<br />
húmedo para eliminar cualquier resto <strong>de</strong> goma. NO<br />
use instrumentos afilados, líquidos inflamables o<br />
limpiadores abrasivos. Estos pue<strong>de</strong>n dañar el acabado<br />
<strong>de</strong>l acondicionador <strong>de</strong> aire.
ES<br />
Instalación <strong>de</strong>l Acondicionador <strong>de</strong> Aire<br />
Instalador: Deje el manual <strong>de</strong> uso y cuidado con el propietario.<br />
Propietario: Conserve este manual <strong>de</strong> uso y cuidado para referencia futura y para uso <strong>de</strong>l<br />
inspector eléctrico <strong>de</strong> su localidad, si fuera necesario.<br />
Requisitos para la ubicación<br />
IMPORTANTE: Observe todos los códigos y reglamentos<br />
aplicables.<br />
Verifique el lugar don<strong>de</strong> se instalará el acondicionador <strong>de</strong><br />
aire. La instalación correcta es su responsabilidad.<br />
Asegúrese <strong>de</strong> que usted tiene todo lo necesario para una<br />
instalación correcta.<br />
El lugar <strong>de</strong>be tener:<br />
• Tomacorriente puesto a tierra a cuatro pies (122 cm) <strong>de</strong><br />
la ventana. No use un cordón <strong>de</strong> extensión.<br />
• Libertad <strong>de</strong> movimiento <strong>de</strong>l aire a las habitaciones que<br />
<strong>de</strong>sea enfriar.<br />
• Una abertura con la amplitud suficiente para el<br />
acondicionador <strong>de</strong> aire. Se incluyen piezas <strong>de</strong> instalación<br />
para ventanas <strong>de</strong> guillotina.<br />
• Soporte a<strong>de</strong>cuado en la pared para el peso <strong>de</strong>l<br />
acondicionador <strong>de</strong> aire. El acondicionador <strong>de</strong> aire pesa<br />
<strong>de</strong> 56 libras (25 kg) a 80 libras (36 kg).<br />
No instale el acondicionador <strong>de</strong> aire en un área don<strong>de</strong> el<br />
panel <strong>de</strong>lantero esté expuesto a fuentes <strong>de</strong> calor que<br />
aumenten la temperatura <strong>de</strong> la superficie <strong>de</strong>l panel a un<br />
nivel superior a los 120°F (50°C).<br />
Herramientas necesarias<br />
A. Guantes<br />
B. Destornilladores Phillips y <strong>de</strong> hoja plana<br />
C. Tijera<br />
D. Taladro y una broca <strong>de</strong> 3/32 pulg. o más<br />
pequeña<br />
E. Anteojos protectores<br />
F. Cinta para medir<br />
G. Nivel<br />
A<br />
Dimensiones <strong>de</strong>l<br />
acondicionador <strong>de</strong> aire<br />
A B<br />
5000-6000 25" a 38" 16"<br />
Btu/h (63,5 cm a<br />
96,5 cm)<br />
(40,6 cm)<br />
Medidas <strong>de</strong> la abertura <strong>de</strong> la ventana<br />
E<br />
B<br />
A<br />
F<br />
C<br />
G<br />
D<br />
B<br />
17
Piezas suministradas para la instalación<br />
18<br />
H. 1 Soporte <strong>de</strong> seguridad para la ventana<br />
I. 1 obturador <strong>de</strong> espuma<br />
J. 6 Tornillos Phillips, <strong>de</strong> #10 x 3/8 pulg.<br />
K. 3 Tornillos <strong>de</strong> cabeza redonda ranurados <strong>de</strong><br />
3/4 pulg.<br />
L. 2 cortinas laterales<br />
Requisitos eléctricos<br />
ADVERTENCIA<br />
Peligro <strong>de</strong> Choque Eléctrico<br />
Conecte a un contacto <strong>de</strong> pared <strong>de</strong> conexión a<br />
tierra <strong>de</strong> 3 terminales.<br />
No quite el terminal <strong>de</strong> conexión a tierra.<br />
No use un adaptador.<br />
No use un cable eléctrico <strong>de</strong> extensión.<br />
No seguir estas instrucciones pue<strong>de</strong> ocasionar<br />
la muerte, incendio o choque eléctrico.<br />
Requisitos <strong>de</strong> cableado<br />
Los requerimientos eléctricos específicos se indican<br />
en la tabla. Siga los requerimientos para el tipo <strong>de</strong><br />
enchufe en el cordón <strong>de</strong> alimentación eléctrica.<br />
Tomacorriente para la<br />
clavija <strong>de</strong>l cordón eléctrico<br />
Requisitos <strong>de</strong> cableado<br />
• De 3 alambres<br />
• Monofásico<br />
• CA solamente<br />
• 60 hertzios<br />
• 115 voltios (103,5 mín. -<br />
126,5 máx.)<br />
• 0-12 amperios<br />
• Fusible <strong>de</strong> retardo <strong>de</strong><br />
15 amperios o disyuntor<br />
• Alambre <strong>de</strong> cobre<br />
calibre #14<br />
H<br />
J<br />
Método recomendado para la puesta a<br />
tierra<br />
Para su seguridad personal, este acondicionador <strong>de</strong><br />
aire <strong>de</strong>be ser puesto a tierra. Este acondicionador <strong>de</strong><br />
aire está equipado con un cordón eléctrico provisto <strong>de</strong><br />
un enchufe con clavija tripolar <strong>de</strong> conexión a tierra.<br />
Para reducir a un mínimo el riesgo posible <strong>de</strong> un<br />
choque eléctrico, el cordón <strong>de</strong>be enchufarse en un<br />
tomacorriente mural para clavija con 3 terminales que<br />
coincidan con los polos <strong>de</strong> la clavija, puesto a tierra <strong>de</strong><br />
acuerdo con todos los códigos y reglamentos locales.<br />
Si no se dispone <strong>de</strong> un tomacorriente para clavija<br />
tripolar, es responsabilidad <strong>de</strong>l cliente hacer instalar un<br />
tomacorriente para clavija con tres terminales<br />
<strong>de</strong>bidamente puesto a tierra por un electricista con<br />
licencia.<br />
Es responsabilidad <strong>de</strong>l cliente:<br />
• Llamar a un instalador eléctrico calificado.<br />
• Asegurarse <strong>de</strong> que la instalación eléctrica sea<br />
a<strong>de</strong>cuada y esté hecha <strong>de</strong> acuerdo con el Código<br />
Nacional <strong>de</strong> Energía, ANSI/NFPA 70, última edición*,<br />
y todos los códigos y reglamentos locales.<br />
Pue<strong>de</strong>n obtenerse copias <strong>de</strong> las normas señaladas <strong>de</strong>l:<br />
* National Fire Protection Association<br />
Batterymarch Park<br />
Quincy, Massachusetts 02269<br />
K<br />
I<br />
L
Instalación <strong>de</strong> las cortinas laterales<br />
ADVERTENCIA<br />
Peligro <strong>de</strong> Peso Excesivo<br />
Se necesitan dos personas o más para mover e<br />
instalar al acondicionador <strong>de</strong> aire.<br />
No seguir esta instrucción pue<strong>de</strong> ocasionar una<br />
lesión en la espalda u otro tipo <strong>de</strong> lesión.<br />
Sujete las cortinas a la unidad antes <strong>de</strong> colocar la unidad en<br />
la ventana.<br />
1. Quite la unidad <strong>de</strong>l embalaje.<br />
2. Ubique la bolsa provista con 6 tornillos.<br />
3. Inserte la parte superior y luego la parte inferior <strong>de</strong>l<br />
alojamiento <strong>de</strong> la cortina <strong>de</strong>recha (A) en las guías superior<br />
e inferior para cortinas (B) en el acondicionador <strong>de</strong> aire.<br />
4. Extienda la cortina <strong>de</strong>recha hacia fuera <strong>de</strong> manera que<br />
pueda insertar el primer tornillo (C) a través <strong>de</strong>l orificio <strong>de</strong>l<br />
medio <strong>de</strong> la cortina. Atornille la cortina al orificio <strong>de</strong>l medio<br />
en el gabinete <strong>de</strong>l acondicionador <strong>de</strong> aire. Se requiere este<br />
tornillo para ajustar correctamente la cortina (<strong>de</strong> arriba<br />
hacia abajo) al gabinete <strong>de</strong>l acondicionador <strong>de</strong> aire.<br />
5. Con la cortina <strong>de</strong>recha todavía extendida, inserte otro<br />
tornillo (C) en la ranura superior <strong>de</strong> la cortina. Atornille la<br />
cortina al orificio superior en el gabinete <strong>de</strong>l acondicionador<br />
<strong>de</strong> aire.<br />
6. Con la cortina <strong>de</strong>recha todavía extendida, inserte otro<br />
tornillo (C) en la ranura inferior <strong>de</strong> la cortina. Atornille la<br />
cortina al orificio inferior en el gabinete <strong>de</strong>l acondicionador<br />
<strong>de</strong> aire.<br />
7. Deslice el alojamiento <strong>de</strong> la cortina en las guías lo más<br />
lejos posible.<br />
8. Repita los pasos anteriores para la cortina izquierda, luego<br />
vaya a “Colocación <strong>de</strong>l acondicionador <strong>de</strong> aire” más abajo.<br />
A<br />
vista posterior<br />
B<br />
C<br />
A<br />
vista inferior<br />
Colocación <strong>de</strong>l acondicionador <strong>de</strong> aire en la ventana<br />
ADVERTENCIA<br />
Peligro <strong>de</strong> Peso Excesivo<br />
Se necesitan dos personas o más para mover e<br />
instalar al acondicionador <strong>de</strong> aire.<br />
No seguir esta instrucción pue<strong>de</strong> ocasionar una<br />
lesión en la espalda u otro tipo <strong>de</strong> lesión.<br />
1. Se necesitarán dos personas para levantar el<br />
acondicionador <strong>de</strong> aire y colocarlo en su lugar.<br />
NOTAS:<br />
• Trate el acondicionador <strong>de</strong> aire con cuidado.<br />
• El acondicionador <strong>de</strong> aire <strong>de</strong>be colocarse a no más <strong>de</strong><br />
cuatro pies (122 cm) <strong>de</strong> un tomacorriente puesto a tierra.<br />
2. Centre el acondicionador <strong>de</strong> aire en la ventana. Verifique<br />
que el riel inferior <strong>de</strong>l acondicionador <strong>de</strong> aire se encuentre<br />
<strong>de</strong>trás y contra la parte posterior <strong>de</strong>l obturador <strong>de</strong> la<br />
ventana. Baje el marco <strong>de</strong> la ventana (A) para sostener el<br />
gabinete en su lugar.<br />
A<br />
B<br />
19
20<br />
NOTAS:<br />
• No bloquee las rejillas que están en el panel <strong>de</strong>lantero.<br />
• No bloquee las aberturas que están en el exterior <strong>de</strong>l<br />
acondicionador <strong>de</strong> aire.<br />
3. Verifique que el acondicionador <strong>de</strong> aire esté inclinado<br />
hacia el exterior <strong>de</strong> manera que el agua corra hacia<br />
afuera. El gabinete <strong>de</strong>be inclinarse hacia afuera<br />
aproximadamente 1/2 nivel (B). Si el gabinete no está<br />
<strong>de</strong>bidamente inclinado, inclínelo correctamente o<br />
coloque una planchita <strong>de</strong> relleno <strong>de</strong>bajo <strong>de</strong>l gabinete<br />
para asegurar la <strong>de</strong>bida inclinación.<br />
4. Jale la cortina izquierda (D) hacia afuera hasta que<br />
encaje en la ranura <strong>de</strong> la ventana (E). Repita el<br />
procedimiento con la contina <strong>de</strong>recha.<br />
Inserte uno <strong>de</strong> los tornillos <strong>de</strong> cabeza redonda (F) a<br />
través <strong>de</strong> la cortina izquierda y <strong>de</strong>ntro <strong>de</strong> la ranura <strong>de</strong><br />
la ventana o a través <strong>de</strong> un orificio alternativo (G) en<br />
la parte superior <strong>de</strong> la cortina y <strong>de</strong>ntro <strong>de</strong> la ranura <strong>de</strong><br />
la ventana para asegurar la cortina al marco <strong>de</strong> la<br />
ventana. Repita el procedimiento para la cortina<br />
<strong>de</strong>recha<br />
Para completar la instalación<br />
NOTA: Instale un soporte <strong>de</strong> seguridad para la ventana<br />
para evitar que el acondicionador <strong>de</strong> aire se caiga <strong>de</strong> la<br />
ventana.<br />
1. Coloque el soporte <strong>de</strong> seguridad para la ventana (H) en<br />
la parte superior <strong>de</strong> la ventana inferior y contra el marco<br />
<strong>de</strong> la ventana superior (I).<br />
2. Utilice una broca <strong>de</strong> barrena <strong>de</strong> 3/32" para perforar el<br />
primer orificio a través <strong>de</strong>l orificio en el soporte.<br />
3. Fije el soporte <strong>de</strong> seguridad para la ventana insert<strong>and</strong>o<br />
uno <strong>de</strong> los tornillos <strong>de</strong> cabeza redonda ranurada a<br />
través <strong>de</strong>l soporte <strong>de</strong> seguridad para la ventana (H)<br />
<strong>de</strong>ntro <strong>de</strong>l marco superior <strong>de</strong> la ventana (I).<br />
4. Inserte el obturador <strong>de</strong> espuma (J) <strong>de</strong>trás <strong>de</strong> la parte<br />
superior <strong>de</strong>l marco <strong>de</strong> la ventana inferior (K) y contra el<br />
cristal <strong>de</strong> la ventana superior.<br />
5. Enchufe el cable <strong>de</strong> suministro en el tomacorriente.<br />
Vista<br />
superior<br />
E<br />
D<br />
F<br />
G<br />
H<br />
Inclinación <strong>de</strong> 1/2<br />
burbuja<br />
D<br />
I<br />
E<br />
J<br />
F<br />
B<br />
K
ES<br />
Cómo Usar Su Acondicionador<br />
<strong>de</strong> Aire<br />
Operar <strong>de</strong>bidamente su acondicionador <strong>de</strong> aire le permite obtener los mejores resultados posibles.<br />
Esta sección le explica cómo operar su acondicionador <strong>de</strong> aire <strong>de</strong>bidamente.<br />
IMPORTANTE:<br />
• Si usted apaga el acondicionador <strong>de</strong> aire, espere por lo menos 3 minutos antes <strong>de</strong> volver a ponerlo en marcha. Esto<br />
evita que se queme un fusible <strong>de</strong>l hogar o se dispare un disyuntor <strong>de</strong> circuito a causa <strong>de</strong>l acondicionador <strong>de</strong> aire.<br />
• No trate <strong>de</strong> operar su acondicionador <strong>de</strong> aire en el modo <strong>de</strong> enfriamiento cu<strong>and</strong>o la temperatura exterior sea menor<br />
<strong>de</strong> 65°F (18°C). El serpentín interior <strong>de</strong>l evaporador se congelará y el acondicionador <strong>de</strong> aire no funcionará<br />
<strong>de</strong>bidamente.<br />
Cómo poner en marcha su acondicionador <strong>de</strong> aire<br />
1. Fije FAN SPEED (Velocidad <strong>de</strong> ventilación) en la posición<br />
que <strong>de</strong>see. Cu<strong>and</strong>o el acondicionador <strong>de</strong> aire está<br />
funcion<strong>and</strong>o a temperaturas LOW (“Baja”), HIGH (“Alta”) o<br />
TURBO (en algunos mo<strong>de</strong>los), el ventilador hace circular el<br />
aire continuamente.<br />
LOW - para dormir cómodo<br />
HIGH - para enfriamiento normal<br />
TURBO (en algunos mo<strong>de</strong>los) - para enfriamiento máximo<br />
FAN ONLY (“SÓLO VENTILACIÓN”)<br />
Cu<strong>and</strong>o se selecciona el modo <strong>de</strong> FAN ONLY (“Sólo<br />
ventilación”), el ventilador funciona continuamente para hacer<br />
circular el aire, pero el aire no se enfriará.<br />
2. Coloque el Control <strong>de</strong> TEMPERATURE (“Temperatura”)<br />
(según el mo<strong>de</strong>lo) en una posición intermedia. Ajuste el<br />
funcionamiento <strong>de</strong>l acondicionador <strong>de</strong> aire gir<strong>and</strong>o el<br />
Control <strong>de</strong> TEMPERATURE en la dirección <strong>de</strong> las<br />
manecillas <strong>de</strong>l reloj ( ) para obtener el máximo nivel <strong>de</strong><br />
enfriamiento. Para un nivel <strong>de</strong> enfriamiento menor, gire el<br />
Control <strong>de</strong> THERMOSTAT o TEMPERATURE en dirección<br />
contraria a las manecillas <strong>de</strong>l reloj ( ). Usted <strong>de</strong>berá<br />
experimentar hasta encontrar el ajuste que más le<br />
convenga.<br />
Su acondicionador <strong>de</strong> aire podría tener uno <strong>de</strong> estos<br />
controles:<br />
21
Cómo cambiar la dirección <strong>de</strong>l aire<br />
Ahorro <strong>de</strong> energía<br />
22<br />
ruedita Las rejillas en la parte superior <strong>de</strong>l panel<br />
<strong>de</strong>lantero le permitten controlar la dirección <strong>de</strong>l<br />
aire enfriado. Gire la rueda hacia arriba o hacia<br />
abajo para dirigir el aire hacia la <strong>de</strong>recha, o hacia<br />
la izquierda. <strong>Use</strong> las lengüetas para mover el<br />
cartucho completo para dirigir el aire hacia arriba,<br />
hacia abajo o directamente hacia a<strong>de</strong>lante.<br />
lengüeta<br />
Usted pue<strong>de</strong> hacer muchas cosas para ayudar a ahorrar energía:<br />
• Mejore el aislamiento <strong>de</strong> su hogar. Selle las puertas y<br />
ventanas. Cierre el tiro <strong>de</strong> la chimenea.<br />
• Cierre las persianas o cortinas en el lado soleado <strong>de</strong> su<br />
hogar. Coloque toldos.<br />
• Asegúrese <strong>de</strong> que las cortinas o los muebles no<br />
bloqueen el aire que sale <strong>de</strong>l acondicionador <strong>de</strong> aire.<br />
• Apague las luces y los aparatos electrodomésticos<br />
cu<strong>and</strong>o no los esté us<strong>and</strong>o.<br />
Ruidos normales<br />
• Ventile el <strong>de</strong>sván. Las temperaturas altas en el <strong>de</strong>sván<br />
aumentan la carga <strong>de</strong> enfriamiento <strong>de</strong> su<br />
acondicionador <strong>de</strong> aire.<br />
• Trate <strong>de</strong> no usar aparatos que producen calor en las<br />
horas más calurosas <strong>de</strong>l día.<br />
• Mantenga cerrados los registros <strong>de</strong> calor y las tomas<br />
<strong>de</strong> retorno <strong>de</strong>l aire frío.<br />
• <strong>Use</strong> ventiladores aspiradores cu<strong>and</strong>o esté cocin<strong>and</strong>o,<br />
lav<strong>and</strong>o la ropa o bañándose.<br />
Cu<strong>and</strong>o el acondicionador <strong>de</strong> aire está funcion<strong>and</strong>o normalmente, usted podrá escuchar sonidos como:<br />
• Gotas <strong>de</strong> agua que caen sobre el con<strong>de</strong>nsador,<br />
produciendo “tintineos” o “chasquidos”. Las gotas <strong>de</strong><br />
agua ayudan a enfriar el con<strong>de</strong>nsador.<br />
• El movimiento <strong>de</strong>l aire que sale <strong>de</strong>l ventilador.<br />
• Chasquidos <strong>de</strong>l ciclo <strong>de</strong>l termostato.<br />
• Vibraciones o ruidos <strong>de</strong>bidos a <strong>de</strong>ficiencias en la<br />
construcción <strong>de</strong> la pared o ventana.<br />
• Un zumbido agudo o un ruido pulsante producido por<br />
la alternación <strong>de</strong> los ciclos <strong>de</strong>l mo<strong>de</strong>rno compresor <strong>de</strong><br />
alta eficiencia.
ES<br />
Cómo Cuidar Su Acondicionador <strong>de</strong><br />
Aire<br />
Su nuevo acondicionador <strong>de</strong> aire está diseñado para darle muchos años <strong>de</strong> servicio confiable. Esta sección le da la<br />
información acerca <strong>de</strong> la limpieza a<strong>de</strong>cuada y el cuidado <strong>de</strong> su acondicionador <strong>de</strong> aire. Llame al ven<strong>de</strong>dor autorizado <strong>de</strong><br />
su localidad para un chequeo anual. Acuér<strong>de</strong>se…el precio <strong>de</strong> esta llamada <strong>de</strong> servicio es su responsabilidad.<br />
Limpieza <strong>de</strong>l filtro <strong>de</strong> aire<br />
El filtro <strong>de</strong> aire pue<strong>de</strong> quitarse <strong>de</strong> cualquiera <strong>de</strong> los lados <strong>de</strong> la<br />
unidad para una limpieza fácil. Un filtro limpio ayuda a quitar el<br />
polvo, las pelusas y otras partículas <strong>de</strong>l aire, y es importante para<br />
que el aparato enfríe más eficientemente. Revise el filtro cada dos<br />
semanas para ver si necesita limpieza. No haga funcionar el<br />
acondicionador <strong>de</strong> aire si el filtro no está colocado en su lugar.<br />
1. Desenchufe el acondicionador <strong>de</strong> aire o <strong>de</strong>sconecte el suministro<br />
<strong>de</strong> energía.<br />
2. Deslice el filtro <strong>de</strong> aire hacia afuera <strong>de</strong>s<strong>de</strong> cualquiera <strong>de</strong> los lados<br />
<strong>de</strong> la unidad.<br />
3. Limpie el filtro <strong>de</strong> aire us<strong>and</strong>o una aspiradora. Si está muy sucio,<br />
lave el filtro <strong>de</strong> aire con agua tibia y un <strong>de</strong>tergente suave. No lave<br />
el filtro <strong>de</strong> aire en la lavavajillas ni use limpiadores químicos.<br />
Seque bien el filtro al aire antes <strong>de</strong> colocarlo nuevamente para<br />
asegurarse la máxima eficiencia.<br />
4. Deslice el filtro <strong>de</strong> aire hacia a<strong>de</strong>ntro en cualquiera <strong>de</strong> los lados<br />
<strong>de</strong> la unidad.<br />
5. Enchufe el acondicionador <strong>de</strong> aire o vuelva a conectar el<br />
suministro <strong>de</strong> energía.<br />
Limpieza <strong>de</strong>l panel <strong>de</strong>lantero<br />
1. Desenchufe el acondicionador <strong>de</strong> aire o <strong>de</strong>sconecte el suministro <strong>de</strong> energía.<br />
2. Limpie el panel <strong>de</strong>lantero con un paño suave y húmedo.<br />
3. Seque el panel <strong>de</strong>lantero al aire completamente.<br />
4. Enchufe el acondicionador <strong>de</strong> aire o vuelva a conectar el suministro <strong>de</strong> energía.<br />
Reparación <strong>de</strong> la pintura dañada<br />
Revise una o dos veces al año si hay daños en la<br />
pintura. Esto es muy importante, especialmente en<br />
lugares que están cerca <strong>de</strong> los océanos o don<strong>de</strong> la<br />
herrumbre es un problema. Si es necesario, retoque<br />
con un esmalte <strong>de</strong> buena calidad.<br />
Mantenimiento anual<br />
Su acondicionador <strong>de</strong> aire necesita mantenimiento anual<br />
para ayudar a asegurar un rendimiento constante <strong>de</strong> la<br />
mejor calidad durante todo el año. Llame al ven<strong>de</strong>dor<br />
El filtro pue<strong>de</strong> quitarse <strong>de</strong> cualquiera <strong>de</strong> los lados.<br />
NOTA: Para reducir el daño a la pintura durante el<br />
invierno, instale una cubierta resistente sobre el<br />
gabinete <strong>de</strong>l acondicionador <strong>de</strong> aire. Para información<br />
sobre cómo pedir una cubierta resistente, vea la<br />
sección <strong>de</strong> “Accesorios”.<br />
autorizado <strong>de</strong> su localidad para hacer una cita para el<br />
chequeo anual. El precio <strong>de</strong>l chequeo anual es su<br />
responsabilidad.<br />
23
ES<br />
Diagnóstico <strong>de</strong> Problemas<br />
Usted pue<strong>de</strong> resolver fácilmente muchos problemas frecuentes <strong>de</strong>l acondicionador <strong>de</strong> aire ahorrándose el costo <strong>de</strong><br />
una llamada <strong>de</strong> servicio. Pruebe las sugerencias que se incluyen a continuación para ver si pue<strong>de</strong> resolver el problema<br />
sin ayuda.<br />
Su acondicionador <strong>de</strong> aire no funcionará.<br />
Verifique si ...<br />
Solución ...<br />
El cable <strong>de</strong> alimentación Conecte firmemente el cable <strong>de</strong> alimentación eléctrica en un tomacorriente activo con<br />
eléctrica está <strong>de</strong>sconectado. el <strong>de</strong>bido voltaje.<br />
Se ha fundido un fusible <strong>de</strong> la Reemplace el fusible o reposicione el disyuntor. Asegúrese <strong>de</strong> que el acondicionador<br />
casa o disparado un disyuntor. <strong>de</strong> aire esté conectado a un tomacorriente activo <strong>de</strong>bidamente puesto a tierra como<br />
se <strong>de</strong>scribe en las instrucciones <strong>de</strong> instalación.<br />
El FAN SPEED (Velocidad <strong>de</strong> Fije el FAN SPEED en una posición activa.<br />
ventilación) se ha fijado en la<br />
posición <strong>de</strong> apagado (en<br />
algunos mo<strong>de</strong>los).<br />
Se ha interrumpido la energía Espere que se restablezca la energía eléctrica.<br />
eléctrica en su localidad.<br />
El acondicionador <strong>de</strong> aire fun<strong>de</strong> los fusibles o dispara los disyuntores.<br />
Verifique si ...<br />
Se están us<strong>and</strong>o muchos<br />
aparatos en el mismo<br />
circuito.<br />
Se está us<strong>and</strong>o un fusible<br />
<strong>de</strong> retardo o un disyuntor<br />
con la capacidad incorrecta.<br />
Se está us<strong>and</strong>o un cordón<br />
<strong>de</strong> extensión.<br />
Usted está trat<strong>and</strong>o <strong>de</strong><br />
volver a poner en marcha<br />
el acondicionador <strong>de</strong> aire<br />
muy poco tiempo <strong>de</strong>spués<br />
<strong>de</strong> apagar el FAN SPEED (o<br />
<strong>de</strong>sconectar el<br />
acondicionador <strong>de</strong> aire en<br />
algunos mo<strong>de</strong>los).<br />
Solución ...<br />
Desconecte o ponga en otro lugar los aparatos que estén us<strong>and</strong>o el mismo circuito.<br />
Reemplácelo con un fusible <strong>de</strong> retardo <strong>de</strong> 15 amperios o un disyuntor con la<br />
capacidad correcta. Verifique la capacidad correcta en la sección <strong>de</strong> “Requisitos<br />
eléctricos”, <strong>de</strong> las instrucciones <strong>de</strong> instalación.<br />
No use un cordón <strong>de</strong> extensión con este ni cualquier otro aparato.<br />
Espere por lo menos 3 minutos antes <strong>de</strong> poner en marcha el acondicionador <strong>de</strong> aire<br />
<strong>de</strong>spués <strong>de</strong> apagar el FAN SPEED.<br />
Parece que el acondicionador <strong>de</strong> aire funciona excesivamente.<br />
Verifique si ...<br />
Su actual acondicionador<br />
<strong>de</strong> aire reemplazó un<br />
mo<strong>de</strong>lo viejo.<br />
24<br />
La unidad se encuentra en<br />
una habitación muy congestionada<br />
o se están us<strong>and</strong>o<br />
en la misma habitación<br />
aparatos que generan calor.<br />
Solución ...<br />
El uso <strong>de</strong> componentes más eficientes pue<strong>de</strong> hacer que el acondicionador <strong>de</strong> aire<br />
funcione por más tiempo que su antiguo mo<strong>de</strong>lo, pero el consumo total <strong>de</strong> energía<br />
será menor. Los acondicionadores <strong>de</strong> aire más nuevos no emiten las “ráfagas” <strong>de</strong><br />
aire frío a las que usted estaba acostumbrado con sus unida<strong>de</strong>s anteriores, pero<br />
esto NO ES indicio <strong>de</strong> menor capacidad o eficiencia en el enfriamiento. Verifique el<br />
régimen <strong>de</strong> eficiencia (EER) y el régimen <strong>de</strong> capacidad (en BTU/hr.) que se indican<br />
en el acondicionador <strong>de</strong> aire.<br />
<strong>Use</strong> ventiladores aspiradores cu<strong>and</strong>o esté cocin<strong>and</strong>o o bañándose y trate <strong>de</strong> no<br />
usar aparatos que generan calor durante las horas más calurosas <strong>de</strong>l día. Podría<br />
necesitar un acondicionador <strong>de</strong> aire con más capacidad, <strong>de</strong>pendiendo <strong>de</strong>l tamaño<br />
<strong>de</strong> la habitación que se <strong>de</strong>sea enfriar.
La unidad se encien<strong>de</strong> y se apaga <strong>de</strong>masiado.<br />
Verifique si ...<br />
El acondicionador <strong>de</strong> aire no<br />
tiene el tamaño a<strong>de</strong>cuado para<br />
su habitación.<br />
El filtro está sucio u obstruido<br />
por escombros.<br />
Hay <strong>de</strong>masiado calor o<br />
humedad (se está cocin<strong>and</strong>o<br />
en recipientes abiertos,<br />
duchas, etc.) en la habitación.<br />
Las rejillas están boqueadas.<br />
La temperatura exterior es<br />
inferior a los 65°F (18°C).<br />
La temperatura <strong>de</strong> la habitación<br />
que está trat<strong>and</strong>o <strong>de</strong> enfriar<br />
está <strong>de</strong>masiado caliente.<br />
Están abiertas ventanas o<br />
puertas que dan al exterior.<br />
El Control <strong>de</strong> TEMPERATURE<br />
(Temperatura) no está en una<br />
posición lo suficientemente<br />
fría.<br />
El acondicionador <strong>de</strong> aire está<br />
instalado en el lado soleado <strong>de</strong><br />
su casa.<br />
Solución ...<br />
Se filtra agua <strong>de</strong>l gabinete a su casa.<br />
Verifique si ...<br />
El acondicionador <strong>de</strong> aire no<br />
está <strong>de</strong>bidamente nivelado.<br />
El acondicionador <strong>de</strong> aire<br />
<strong>de</strong>be inclinarse ligeramente<br />
hacia abajo, hacia el exterior.<br />
Verifique la capacidad <strong>de</strong> enfriamiento <strong>de</strong> su acondicionador <strong>de</strong> aire. Los<br />
acondicionadores <strong>de</strong> aire para habitaciones no están diseñados para enfriar varias<br />
habitaciones.<br />
Limpie el filtro. Ver “Limpieza <strong>de</strong>l filtro <strong>de</strong> aire”.<br />
<strong>Use</strong> un ventilador para eliminar el calor o la humedad <strong>de</strong> la habitación. Trate <strong>de</strong> no<br />
usar aparatos que generan calor durante las horas más calurosas <strong>de</strong>l día.<br />
Instale el acondicionador <strong>de</strong> aire en un lugar don<strong>de</strong> las rejillas no estén bloqueadas<br />
por cortinas, persianas, muebles, etc.<br />
No trate <strong>de</strong> poner en marcha el acondicionador <strong>de</strong> aire en el modo <strong>de</strong> enfriamiento<br />
cu<strong>and</strong>o la temperatura exterior sea inferior a los 65°F (18°C).<br />
Deje pasar más tiempo para que el acondicionador <strong>de</strong> aire enfríe una habitación<br />
muy caliente.<br />
Cierre todas las puertas y ventanas.<br />
Ajuste el Control <strong>de</strong> TEMPERATURE a una posición más fría gir<strong>and</strong>o la perilla en la<br />
dirección <strong>de</strong> las manecillas <strong>de</strong>l reloj. Ponga el FAN SPEED en TURBO COOL (en<br />
algunos mo<strong>de</strong>los).<br />
Instale su acondicionador <strong>de</strong> aire en una ventana con más sombra.<br />
Solución ...<br />
Nivele el acondicionador <strong>de</strong> aire <strong>de</strong> manera que tenga una inclinación hacia abajo,<br />
hacia el exterior (1⁄ 2 burbuja en un nivel <strong>de</strong> carpintero) para asegurar el <strong>de</strong>bido<br />
<strong>de</strong>sagüe. Vea las instrucciones <strong>de</strong> instalación. Mueva el gabinete o ponga un<br />
calce, según sea necesario.<br />
NOTA: NO perfore agujeros en la parte inferior <strong>de</strong> la base <strong>de</strong> metal y <strong>de</strong>l colector<br />
<strong>de</strong> con<strong>de</strong>nsado.<br />
25
ES<br />
Usted pue<strong>de</strong> or<strong>de</strong>nar los siguientes accesorios para su<br />
acondicionador <strong>de</strong> aire en la tienda <strong>de</strong> aparatos electrodomésticos<br />
<strong>de</strong> su localidad o llam<strong>and</strong>o a los números<br />
indicados a continuación.<br />
En los Estados Unidos<br />
Para pedir accesorios, llame al número gratuito <strong>de</strong>l<br />
Centro <strong>de</strong> interacción con el cliente al 1-800-531-1301 o<br />
visite nuestro sitio en la red:<br />
www.applianceaccessories.com. Escuchará una<br />
grabación. Siga las instrucciones para hacer un pedido.<br />
En Canadá<br />
Para pedir accesorios, llame sin costo al 1-800-807-6777.<br />
Filtros <strong>de</strong> aire <strong>de</strong> reemplazo<br />
Un filtro <strong>de</strong> aire limpio y <strong>de</strong> buena calidad es importante<br />
para obtener el mejor enfriamiento con el menor<br />
consumo <strong>de</strong> energía. Limpie regularmente el filtro <strong>de</strong><br />
aire. Vea las instrucciones <strong>de</strong> limpieza en la sección <strong>de</strong><br />
“Cómo Cuidar su Acondicionador <strong>de</strong> Aire.”<br />
Cubierta resistente<br />
Si usted <strong>de</strong>ci<strong>de</strong> <strong>de</strong>jar instalado su acondicionador <strong>de</strong><br />
aire durante el invierno, una cubierta resistente ayudará<br />
a proteger su aparato y reducir las corrientes <strong>de</strong> aire. La<br />
cubierta protege contra las corrientes <strong>de</strong> aire frío a<br />
través <strong>de</strong> los orificios <strong>de</strong> paso <strong>de</strong> aire <strong>de</strong> la unidad y<br />
protege el gabinete contra la nieve, la lluvia, el agua<br />
nieve, la oxidación y el polvo.<br />
26<br />
Accesorios
ES<br />
Ayuda o Servicio Técnico<br />
Para evitar llamadas <strong>de</strong> servicio innecesarias, revise la sección <strong>de</strong> “Diagnóstico <strong>de</strong> problemas”. Podría ahorrarle el costo<br />
<strong>de</strong> una llamada <strong>de</strong> servicio. Si aún necesita ayuda, siga las siguientes instrucciones.<br />
Si necesita ayuda o servicio técnico<br />
En los Estados Unidos:<br />
Nuestros consultores le proporcionan ayuda para:<br />
Llame al Centro <strong>de</strong> Interacción con el Cliente. Llame • Características y especificaciones para nuestra línea<br />
gratis al 1-800-253-1301. Nuestros consultores están completa <strong>de</strong> aparatos electrodomésticos<br />
disponibles para ayudarlo.<br />
• Información sobre instalación<br />
En Canadá:<br />
• Procedimientos <strong>de</strong> uso y mantenimiento<br />
Para obtener ayuda, llame al número gratuito <strong>de</strong>l Centro • Ventas <strong>de</strong> accesorios y refacciones<br />
<strong>de</strong> interacción con el cliente al 1-800-461-5681 <strong>de</strong> lunes<br />
a viernes, <strong>de</strong> 8.00 AM a 6.00 PM (Hora estándar <strong>de</strong>l este),<br />
• Asistencia especializada al cliente (asistencia en<br />
y los sábados <strong>de</strong> 8.30 AM a 4.30 PM (Hora estándar <strong>de</strong>l<br />
español, para personas con problemas auditivos,<br />
este).<br />
problemas <strong>de</strong> la vista, etc.)<br />
Para obtener servicio, llame al 1-800-807-6777. Los<br />
• Direcciones <strong>de</strong> ven<strong>de</strong>dores, compañías <strong>de</strong> servicio y<br />
técnicos <strong>de</strong> servicio <strong>de</strong>signados están capacitados para<br />
distribuidores <strong>de</strong> refacciones en su localidad.<br />
hacer cumplir la garantía <strong>de</strong>l producto y proporcionar Nuestros técnicos en servicio están capacitados para<br />
servicio posterior a la garantía, en cualquier parte <strong>de</strong> satisfacer la garantía <strong>de</strong>l producto y proporcionar servicios<br />
Canadá.<br />
posteriores a la garantía, en cualquier parte <strong>de</strong> los<br />
Cu<strong>and</strong>o llame, tenga a mano la fecha <strong>de</strong><br />
Estados Unidos.<br />
compra y el número <strong>de</strong> mo<strong>de</strong>lo y el número <strong>de</strong> Para localizar a una compañía <strong>de</strong> servicios autorizada<br />
serie completos <strong>de</strong> su aparato (ver la sección en su área, pue<strong>de</strong> buscar en las páginas amarillas <strong>de</strong> su<br />
“Una nota para usted”). Esta información nos Guía Telefónica.<br />
ayudará a aten<strong>de</strong>r mejor a su pedido.<br />
Si necesita refacciones<br />
Si necesita pedir refacciones, le recomendamos que<br />
utilice únicamente partes autorizadas por la fábrica.<br />
Estas partes se adaptarán y funcionarán<br />
correctamente porque han sido hechas siguiendo las<br />
mismas rigurosas especificaciones utilizadas para<br />
construir todas los nuevos aparatos<br />
electrodomésticos.<br />
Para asistencia adicional<br />
Si necesita asistencia adicional pue<strong>de</strong> escribir para<br />
hacernos cualquier pregunta o comunicarnos sus<br />
problemas, a:<br />
Customer Interaction Center<br />
553 Benson Road<br />
Benton Harbor, MI 49022-2692<br />
Para localizar partes autorizadas por la fábrica en su<br />
localidad, llame al Centro <strong>de</strong> Interacción con el<br />
Cliente, al centro <strong>de</strong> servicio autorizado más cercano<br />
o Servicio <strong>de</strong> Fábrica al 1-800-253-1301, o en<br />
Canadá,<br />
1-800-807-6777.<br />
O en Canadá:<br />
Customer Interaction Center<br />
1907 Minnesota Court<br />
Mississauga, Ontario L5N 3A7<br />
Por favor incluya en su correspon<strong>de</strong>ncia un número<br />
<strong>de</strong> teléfono en el que se le pueda localizar durante<br />
el día.<br />
27
326026021<br />
© 2002 All rights reserved<br />
Todos los <strong>de</strong>rechos reservados<br />
Printed in Brazil<br />
Impreso en Brasil