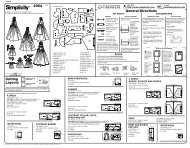
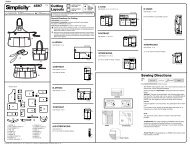
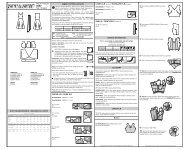
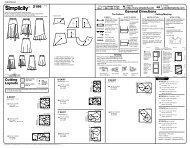
2773 Cutting Layouts General Directions - PrintSew
2773 Cutting Layouts General Directions - PrintSew
2773 Cutting Layouts General Directions - PrintSew

Create successful ePaper yourself
Turn your PDF publications into a flip-book with our unique Google optimized e-Paper software.
English/Spanish<br />
<strong>Cutting</strong><br />
<strong>Layouts</strong><br />
®<br />
pattern printed<br />
side down<br />
pattern printed<br />
side up<br />
<strong>2773</strong><br />
© Copyright 2008—Simplicity Pattern Co., Inc. / Printed in U.S.A. / Simplicity is a registered trademark of Simplicity Pattern Co., Inc.<br />
★<br />
✻<br />
1 / 4<br />
Thank you for purchasing this Simplicity pattern.<br />
We have made every effort to provide you with a high quality product.<br />
Gracias por haber comprado este patrón de Simplicity.<br />
Hemos hecho todos los esfuerzos para ofrecerle un producto de alta calidad.<br />
A<br />
C<br />
See<br />
SPECIAL<br />
CUTTING<br />
NOTES<br />
POSITION OF PATTERN PIECES MAY VARY SLIGHTLY ACCORDING<br />
TO YOUR PATTERN SIZE<br />
A,B ARE SIZED FOR STRETCH KNITS ONLY<br />
C SKIRT- DETERMINE FINISHED LENGTH BEFORE CUTTING<br />
A TOP<br />
USE PIECES 1 2 3 4 5 6<br />
1A 58" 60" (150CM) WITH NAP<br />
ALL SIZES<br />
INTERFACING<br />
USE PIECE 4<br />
1B20"<br />
TO 25" (51CM TO 64CM) FUSIBLE<br />
ALL SIZES<br />
3<br />
5<br />
D<br />
A<br />
2<br />
6<br />
B<br />
SELVAGE<br />
2<br />
FOLD<br />
C<br />
SEL.<br />
B<br />
SINGLE THICKNESS<br />
D<br />
4<br />
1<br />
SELVAGE<br />
1<br />
SELVAGE<br />
SELVAGE<br />
4<br />
FOLD<br />
SEL.<br />
15 pieces given<br />
12<br />
7<br />
1<br />
4<br />
10<br />
2<br />
11<br />
13<br />
14<br />
1-BODICE FRONT AND SLEEVE -A<br />
2-BODICE BACK AND SLEEVE -A<br />
3-NECK FACING -A<br />
4-SLEEVE BAND -A<br />
5-FRONT -A<br />
6-BACK -A<br />
7-FRONT AND BACK -B<br />
8-SLEEVE -B<br />
9-BAND -B<br />
10-SKIRT FRONT AND BACK -C<br />
11-SKIRT SIDE FRONT AND SIDE BACK -C<br />
12-UPPER FLOUNCE -C<br />
13-LOWER FLOUNCE -C<br />
14-PANTS FRONT -D<br />
15-PANTS BACK -D<br />
8<br />
B JACKET<br />
USE PIECES 7 8 9<br />
2 58" 60" (150CM)<br />
WITH NAP<br />
ALL SIZES<br />
C SKIRT<br />
USE PIECES 10 11 12 13<br />
3A 44" 45" (115CM) WITH NAP<br />
ALL SIZES<br />
9<br />
5<br />
11<br />
10<br />
9<br />
6<br />
15<br />
3<br />
U.S. & Canada Toll-Free<br />
1-888-588-2700<br />
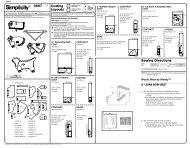
The Pattern<br />
SYMBOLS<br />
GRAIN LINE Place on<br />
straight grain of fabric<br />
parallel to selvage<br />
PLACE SOLID LINE on<br />
fold of fabric.<br />
CENTER FRONT OR<br />
BACK of garment.<br />
NOTCHES<br />
DOTS<br />
CUTTING LINE<br />
LENGTHEN OR<br />
SHORTEN LINES<br />
SEAM ALLOWANCE: 5/8" (1.5cm)<br />
unless otherwise stated is included but<br />
not printed on MULTI-SIZE PATTERNS.<br />
Mark your size with colored felt tip pen.<br />
See chart on tissue for how to use MULTI-<br />
SIZE PATTERNS.<br />
Web Site<br />
http://www.simplicity.com<br />
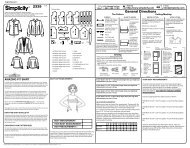
<strong>General</strong> <strong>Directions</strong><br />
ADJUST IF NEEDED<br />
Make adjustments before placing<br />
pattern on fabric.<br />
TO LENGTHEN:<br />
Cut pattern<br />
between<br />
lengthen or<br />
shorten lines.<br />
Spread pattern<br />
evenly, the<br />
amount needed<br />
and tape to<br />
paper.<br />
TO SHORTEN:<br />
At lengthen or<br />
shorten lines,<br />
make an even<br />
pleat taking up<br />
amount needed.<br />
Tape in place.<br />
When lengthen or shorten lines are<br />
not given, make adjustments at<br />
lower edge of pattern.<br />
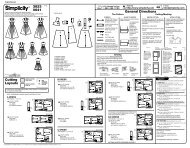
Sewing<br />
• SEW garment following Sewing <strong>Directions</strong>.<br />
• PIN or machine-baste seams matching notches.<br />
• STITCH 5/8" (1.5 cm) seams unless otherwise stated.<br />
• PRESS seams open unless otherwise indicated clipping when necessary so<br />
seams will lie flat.<br />
• TRIM seams to reduce bulk, as shown below.<br />
SELVAGES<br />
7<br />
9 8<br />
DOUBLE THICKNESS ✻<br />
11<br />
12<br />
11<br />
10<br />
FOLD<br />
SELVAGE<br />
13<br />
FOLD<br />
SELVAGES<br />
SELVAGES<br />
Trim enclosed<br />
seams into layers<br />
SEL.<br />
11<br />
Trim corners<br />
11<br />
Clip inner<br />
curves<br />
3B 58" 60" (150CM) WITH NAP<br />
ALL SIZES<br />
D PANTS<br />
USE PIECES 14 15<br />
4A 44" 45" (115CM)<br />
WITH NAP<br />
ALL SIZES<br />
4B 58" 60" (150CM)<br />
WITH NAP<br />
ALL SIZES<br />
FOLD<br />
Notch outer<br />
curves<br />
e<br />
E-mail<br />
info@simplicity.com<br />
<strong>Cutting</strong>/Marking<br />
BEFORE CUTTING:<br />
PRESS pattern pieces with a warm dry<br />
iron. PRE-SHRINK fabric by pre-washing<br />
washables or steam-pressing nonwashables.<br />
CIRCLE your cutting layout.<br />
PIN pattern to fabric as shown in <strong>Cutting</strong><br />
<strong>Layouts</strong>.<br />
• FOR DOUBLE THICKNESS: Fold<br />
fabric with RIGHT sides together.<br />
• FOR SINGLE THICKNESS: Place<br />
fabric RIGHT side up.<br />
• FOR PILE, SHADED OR ONE WAY<br />
DESIGN FABRICS: Use “with nap”<br />
layouts<br />
★ If layout<br />
shows a piece<br />
extending past<br />
fold, cut out all<br />
pieces except<br />
piece that<br />
extends.<br />
Open out<br />
fabric to single<br />
thickness. Cut<br />
extending<br />
piece on<br />
RIGHT side of<br />
fabric in<br />
position<br />
shown.<br />
SELVAGES FOLD<br />
12<br />
10<br />
13 13<br />
✻<br />
DOUBLE THICKNESS<br />
15<br />
10<br />
12<br />
FOLD<br />
SELVAGES<br />
15<br />
14<br />
SELVAGES<br />
SELVAGES<br />
14<br />
FOLD<br />
SELS.<br />
Español<br />
AFTER CUTTING:<br />
Transfer markings to WRONG side<br />
of fabric before removing pattern.<br />
Use pin and chalk method or<br />
dressmaker’s tracing paper and<br />
wheel.<br />
To Quick Mark:<br />
• Snip edge of fabric to mark<br />
notches, ends of fold lines and<br />
center lines.<br />
• Pin mark dots.<br />
SPECIAL CUTTING NOTES<br />
✻ Mark small<br />
arrows along both<br />
selvages indicating<br />
direction of nap or<br />
design. Fold fabric<br />
crosswise with<br />
RIGHT sides<br />
together, and cut<br />
along fold (a).<br />
Turn one fabric<br />
layer around so<br />
arrows on both<br />
layers go in the<br />
same direction.<br />
Place RIGHT sides<br />
together (b).<br />
a.<br />
CROSSWISE FOLD<br />
✁<br />
A,B EN MALLAS ESTIRABLES SOLAMENTE<br />
b.<br />
A BLUSA USE LAS PIEZAS 1 2 3 4 5 6<br />
SELVAGE<br />
SELVAGE<br />
SELVAGES<br />
SELVAGE<br />
SELVAGES<br />
C FALDA- DETERMINE EL LARGO FINAL ANTES DE CORTAR<br />
1A 58" 60" (150CM) CON PELUSA / TODAS LAS TALLAS<br />
ENTRETELA USE LA PIEZA 4<br />
1B 20" A 25" (51CM A 64CM) ADHESIVA /TODAS LAS TALLAS<br />
B CHAQUETA USE LAS PIEZAS 7 8 9<br />
2 58" 60" (150CM) CON PELUSA / TODAS LAS TALLAS<br />
C FALDA USE LAS PIEZAS 10 11 12 13<br />
3A 44" 45" (115CM) CON PELUSA / TODAS LAS TALLAS<br />
3B 58" 60" (150CM) CON PELUSA / TODAS LAS TALLAS<br />
D PANTALÓN USE LAS PIEZAS 14 15<br />
4A 44" 45" (115CM) CON PELUSA / TODAS LAS TALLAS<br />
4B 58" 60" (150CM) CON PELUSA /TODAS LAS TALLAS<br />
SELVAGE (S) / SEL. (S) = ORILLO(S)<br />
FOLD =DOBLEZ<br />
SINGLE THICKNESS = ESPESOR SENCILLO<br />
DOUBLE THICKNESS = ESPESOR DOBLE
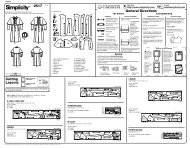
English/Spanish<br />
2 / 4<br />
<strong>2773</strong><br />
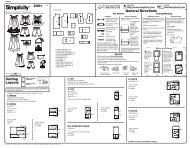
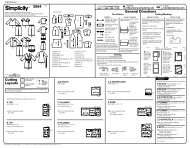
Sewing <strong>Directions</strong><br />
2<br />
FABRIC<br />
KEY<br />
Read <strong>General</strong> <strong>Directions</strong> on page 1 before you begin.<br />
SIMPLY THE BEST TECHNIQUES FOR<br />
SEWING KNITS<br />
NEEDLES<br />
• Use a ball point or stretch needle in a medium-weight size.<br />
MACHINE SETTINGS<br />
• Narrow zigzag stitch or a stretch stitch.<br />
• Decrease pressure on presser foot for heavy sweater knits;<br />
increase pressure for lingerie knits.<br />
SEAMS<br />
• Stretch knits need seams that are supple enough to “give”<br />
with the fabric. You can sew them with straight stitches,<br />
zigzag stitches or one of the stretch stitches built into many<br />
conventional machines, or on your serger.<br />
3<br />
RIGHT SIDE WRONG SIDE INTERFACING LINING<br />
1<br />
© Copyright 2008—Simplicity Pattern Co., Inc. / Printed in U.S.A. / Simplicity is a registered trademark of Simplicity Pattern Co., Inc.<br />
SIMPLY THE BEST TECHNIQUES FOR<br />
OVERLOCK SERGER<br />
The Serger can be used alone or as a supplement to your conventional<br />
sewing machine as a Fast, Efficient, Functional way to sew these<br />
garments.<br />
CHECK FIT: Because, Overlock sewing stitches, trims and finishes all in<br />
one operation, it is VERY important to Check Fit before stitching seams.<br />
Using matching color thread, hilvane seams and try garment on. If no<br />
adjustments are needed, overlock seams along basting.<br />
TWO THREAD THREE THREAD FOUR THREAD<br />
W/ SAFETY STITCH<br />
Seams: The three thread overlock is ideal for major seams such<br />
as...shoulder, side, underarm and sleeve seams.<br />
For stress areas such as crotch seams and armholes, the four thread<br />
overlock/safety stitch is best...OR, use a three thread overlock, and<br />
stitch along seam with a conventional machine to reinforce.<br />
Edge Finishes: The two or three thread overlock stitch is a perfect finish<br />
for edges of facings and hems...and a fast, easy Clean Finish for seam<br />
allowances in unlined garments where seams are pressed open.<br />
Rolled Hem: A great, Narrow Hem alternative for finishing circular skirts,<br />
ruffles, shawls and lingerie. See your sewing machine manual for<br />
instructions.<br />
TOP A<br />
ROLLED HEM<br />
1. To gather lower edge of bodice front between notches, stitch<br />
along seam line and 1/4" (6mm) INSIDE seam line, using a<br />
long machine-stitch.<br />
2. Stitch/Serge center back seam of bodice back sections.<br />
Stitch/Serge front to back at shoulder seams.<br />
Stitch/Serge front to back at entire underarm seam.<br />
For conventional machine- to reinforce curve at underarm,<br />
stitch again over first stitching. Clip curves.<br />
3. Press under 1/4" (6mm) on unnotched edge of neck facing.<br />
With RIGHT sides together, pin facing to neck edge of<br />
bodice, matching centers back and outer small dots, placing<br />
remaining small dots at shoulder seams.<br />
Stitch in 3/8" (1cm) seam, stretching facing to fit. Trim seam.<br />
7<br />
9<br />
5<br />
11<br />
10<br />
4<br />
6<br />
8<br />
4. Turn facing to INSIDE; press. Baste close to inner pressed<br />
edge.<br />
On OUTSIDE, stitch as basted. Remove basting.<br />
5. StitchSerge center front seam.<br />
6. To make pleats in lower edge of sleeve, on OUTSIDE, fold<br />
along solid lines.<br />
Bring folds to broken lines; pin. Baste across raw edge.<br />
7. Apply fusible interfacing to WRONG side of sleeve band,<br />
following manufacturer’s directions.<br />
With RIGHT sides together, stitch notched ends of sleeve<br />
band.<br />
8. Fold sleeve band in half, with WRONG sides together and<br />
raw edges even; press.<br />
On OUTSIDE, pin band to lower edge of sleeve, matching<br />
underarm seams, placing small dot at shoulder seam and<br />
having raw edges even.<br />
Stitch/Serge.<br />
For conventional machine- stitch again 1/4" (6mm) from<br />
first stitching within the seam allowance. Trim close to second<br />
stitching.<br />
9. Press seam toward sleeve, pressing band out.<br />
10. Stitch/Serge front to back at side seams. With RIGHT sides<br />
together, pin front and back to lower edge of bodice,<br />
matching centers and side seams. Pull up gathering stitches<br />
to fit. Baste. Stitch/Serge.<br />
Press seam down.<br />
11. Press under hem allowance on lower edge of top.<br />
To form narrow hem, tuck under raw edge to meet crease.<br />
Press.<br />
Stitch hem in place.
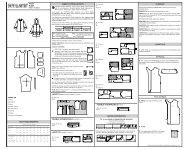
English/Spanish<br />
<strong>2773</strong><br />
2<br />
1<br />
5<br />
3<br />
6<br />
3 / 4<br />
4<br />
JACKET B<br />
© Copyright 2008—Simplicity Pattern Co., Inc. / Printed in U.S.A. / Simplicity is a registered trademark of Simplicity Pattern Co., Inc.<br />
1. To make darts in jacket, with RIGHT sides together, fold the<br />
fabric through the center of the dart, bringing broken lines<br />
and small dots together. On INSIDE, place pins at RIGHT<br />
angles to the broken lines. Stitch the dart from wide end to<br />
point.<br />
TIP- To prevent a “bubble” at the point, make the last few<br />
stitches right on the fold and leave the thread ends long<br />
enough to tie a knot. DO NOT back-stitch at the point.<br />
Press the dart flat along the stitching to “blend” the stitches,<br />
then press darts toward center back.<br />
2. To stitch front seam, fold front and back in half, lengthwise,<br />
with RIGHT sides together, matching single notches and<br />
small dots, having side edges even. Stitch side edge from<br />
lower edge to lower small dot; back-stitch at small dot to<br />
reinforce seam.<br />
3. Stitch/Serge underarm seam of sleeve.<br />
Press up sleeve hem.<br />
Stitch OR zig-zag 1/4" (6mm) from raw edge.<br />
4. Turn sleeve RIGHT side out.<br />
Hold garment WRONG side out with armhole toward you.<br />
With RIGHT sides together, pin sleeve to armhole edge,<br />
matching small dots and seams. Stitch/Serge.<br />
For conventional machine- stitch again 1/8" (3mm) from<br />
first stitching. Trim seam below notches close to stitching.<br />
Press seam toward garment.<br />
5. Stitch center back seam s of band sections.<br />
Fold band in half, lengthwise, with WRONG sides together;<br />
press. Machine-baste raw edges together.<br />
6. On OUTSIDE, pin band to outer edge of jacket, matching<br />
centers back, having raw edges even. Stitch/Serge.<br />
For conventional machine- stitch again 1/4” (6mm) from<br />
first stitching within the seam allowance. Trim close to second<br />
stitching. Press band out, pressing seam toward garment.<br />
When wearing jacket, turn down band at neck and front,<br />
forming a shawl collar, as shown on front of envelope.<br />
3<br />
5<br />
2<br />
1<br />
6<br />
4<br />
SKIRT C<br />
NOTE: Determine finished length before sewing.<br />
1. Stitch/Serge skirt side front sections to skirt front.<br />
Stitch/Serge skirt side back sections to skirt back.<br />
Stitch/Serge skirt front to skirt back at side seams.<br />
2. To keep elastic from getting stuck in the seam allowances as<br />
it’s inserted, use fusible web or machine-basting to anchor<br />
them to garment within the casing area. Be sure to remove<br />
basting after casing is finished.<br />
3. Press 1" (2.5cm) on upper edge to INSIDE, forming casing.<br />
Press under 1/4" (6mm) on raw edge.<br />
Stitch close to lower edge of casing, leaving an opening to<br />
insert elastic.<br />
4. Cut a piece of elastic to fit waist, plus 1" (2.5cm).<br />
Insert elastic through casing.<br />
Overlap ends and hold with a safety pin.<br />
Try on garment and adjust to fit.<br />
5. Stitch ends of elastic together securely.<br />
Stitch opening closed.<br />
Distribute fullness evenly.<br />
Remove basting.<br />
TIP-To secure elastic so it won’t twist in wearing, stitch<br />
through all thicknesses of casing in the groove of each seam.<br />
6. With RIGHT sides together, pin upper flounce sections<br />
together at side seams, forming a circle. Stitch/Serge seam.<br />
To make narrow hem, press under 1/4" (6mm) on lower edge.<br />
Stitch close to pressed edge.<br />
Trim close to stitching.<br />
Then stitch under another 1/8" (3mm).
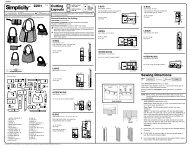
English/Spanish<br />
<strong>2773</strong><br />
7<br />
1<br />
3<br />
8<br />
INNER<br />
LEG<br />
SEAM<br />
SIDE<br />
SEAM<br />
4 / 4<br />
4<br />
2<br />
CENTER<br />
BACK<br />
CENTER<br />
FRONT<br />
© Copyright 2008—Simplicity Pattern Co., Inc. / Printed in U.S.A. / Simplicity is a registered trademark of Simplicity Pattern Co., Inc.<br />
7. Prepare lower flounce in same manner as upper flounce.<br />
Pin WRONG side of upper flounce to RIGHT side of lower<br />
flounce, matching centers and side seams, having raw edges<br />
even.<br />
Machine-stitch along seam line on notched edge.<br />
8. Clip flounce to stitching if necessary, being careful not to clip<br />
through stitching.<br />
With RIGHT sides together, pin flounce to lower edge of skirt,<br />
matching centers and side seams. Stitch/Serge seam. Press<br />
seam up, pressing flounce down.<br />
PANTS D<br />
1. Pin front to back at inner leg seams, matching notches and<br />
small dots. Stitch/Serge seam, stretching back to fit.<br />
2. With RIGHT sides together, pin center seam, matching inner<br />
leg seams and notches. Stitch/Serge.<br />
For conventional machine- to reinforce seam, stitch again<br />
over first stitching. Trim seam in curved area to 1/4" (6mm).<br />
Press remaining seam open.<br />
3. Stitch/Serge front to back at side seams.<br />
Continue same as for View C, see steps 2 through 5.<br />
4. Mark length. Press up hem along marking.<br />
Mark depth of hem; trim evenly.<br />
To EDGE FINISH the raw edge... stitch under 1/4" (6mm) on<br />
raw edge, zig-zag, OR overlock/serge.<br />
Slip-stitch hem in place.<br />
If you prefer to crease pants, fold leg edges together,<br />
matching side and inner leg seam; press.<br />
Español<br />
BLUSA A<br />
1. Para fruncir el borde inferior del frente, entre las muescas, cosa con<br />
puntadas largas cerca de la línea de costura y a 1/4” (6mm) en<br />
INTERIOR de la línea de costura<br />
2. Cosa/Sobrehile la costura del centro trasero del corpiño.<br />
Cosa/Sobrehile el frente en la espalda por las costuras de los<br />
hombros.<br />
Cosa/Sobrehile el frente en la espalda por las costursa del debajo del<br />
brazo.<br />
Para la máquina corriente- Para reforzar la curva del debajo del brazo,<br />
vuelva a coser sobre el primer pespunte. Haga cortes en las curvas.<br />
3. Planche un doblez de 1/4" (6mm) en el borde sin muescas de la vista<br />
del escote. DERECHO CON DERECHO, prenda con alfileres la vista<br />
en el borde del escote del corpiño, casando los centros y los puntos<br />
pequeños exteriores y colocando los puntos pequeños en las costuras<br />
de los hombros.<br />
Cosa con una costura de 3/8" (1cm) estirando la vista para ajustar.<br />
Recorte la costura.<br />
4. Vuelva la vista hacia el INTERIOR; planche. Hilvane cerca del borde<br />
interior planchado.<br />
En el EXTERIOR, cosa siguiendo el hilván. Quite el hilván.<br />
5. Cosa/Sobrehile la costura del centro delantero.<br />
6. Para hacer los pliegues en el borde inferior de la manga, en el<br />
EXTERIOR, doble a lo largo de las líneas continuas.<br />
Coloque los dobleces en las líneas interrumpidas; prenda con alfileres.<br />
Hilvane a través del borde no terminado.<br />
7. Coloque la entretela adhesiva en el REVÉS de la banda de la manga<br />
siguiendo las instrucciones del fabricante.<br />
DERECHO CON DERECHO, cosa juntos los extremos con muescas de<br />
la banda de la manga.<br />
8. Doble la banda de la manga por la mitad, REVÉS CON REVÉS<br />
casando los bordes no terminados; planche.<br />
En el EXTERIOR, prenda con alfileres la banda en el borde inferior de<br />
la manga, casando la costuras del debajo de los brazos, colocando el<br />
punto pequeño en la costura del hombro y alineando los bordes no<br />
terminados. Cosa/Sobrehile.<br />
Para la máquina corriente - Vuelva a coser a 1/4" (6mm) del primer<br />
pespunte, en el margen de la costura. Recorte a ras del segundo<br />
pespunte.<br />
9. Planche la costura hacia la manga volviendo la banda hacia el exterior.<br />
10. Cosa/Sobrehile el frente en la espalda por las costuras de los lados.<br />
DERECHO CON DERECHO, prenda con alfileres el frente en la<br />
espalda por el borde inferior del corpiño, casando los centros y las<br />
costuras de los lados. Tire de los hilos de frunce para ajustar. Hilvane.<br />
Cosa/Sobrehile. Planche la costura hacia abajo.<br />
11. Planche el dobladillo hacia dentro en el borde inferior de la blusa. Para<br />
formar el dobladillo angosto, vuelva el borde no terminado hacia dentro<br />
colocándolo en el doblez. Planche.<br />
Cosa el dobladillo.<br />
CHAQUETA B<br />
1. Para hacer las pinzas en la chaqueta, DERECHO CON DERECHO,<br />
doble la tela por el centro de la pinza casando las líneas interrumpidas<br />
y los puntos pequeños. Por el INTERIOR, coloque los alfileres en<br />
ángulo RECTO con las líneas interrumpidas. Cosa la pinza desde el<br />
extremo ancho hasta la punta.<br />
CONSEJO- Para evitar que se forme una arruga en la punta, haga las<br />
últimas puntadas en el doblez y deje sobrepasar hilos bastante largos<br />
para anudar. NO RETROCEDA el PESPUNTE en la punta.<br />
Planche la pinza plana a lo largo del pespunte para esconder las<br />
puntadas volviéndola hacia el centro trasero.<br />
2. Para coser la costura del frente, doble el frente y la espalda por la mitad<br />
y por su largo, DERECHO CON DERECHO, casando las muescas<br />
sencillas, los puntos pequeños y los lados. Cosa el lado desde el borde<br />
inferior hasta el punto pequeño inferior; retroceda el pespunte en el<br />
punto pequeño para reforzar la costura.<br />
3. Cosa/Sobrehile la costura del debajo del brazo de la magna. Planche<br />
el dobladillo de la manga.<br />
Cosa con puntadas rectas O de zig-zag a 1/4" (6mm) del borde no<br />
terminado.<br />
4. Vuelva la manga al DERECHO.<br />
Mantenga la prenda al REVÉS, con la sisa hacia usted. DERECHO<br />
CON DERECHO, prenda con alfileres la manga en la sisa casando los<br />
puntos pequeños y las costuras. Cosa/Sobrehile.<br />
Para la máquina corriente - Vuelva a coser a 1/8” (3mm) del primer<br />
pespunte. Debajo de las muescas, recorte la costura a ras del<br />
pespunte.<br />
Planche la costura hacia la prenda.<br />
5. Cosa la costura del centro trasero de la banda.<br />
Doble la banda por la mitad y por su largo, REVÉS CON REVÉS;<br />
planche. Hilvane juntos los bordes no terminados.<br />
6. En el EXTERIOR, prenda con alfileres la banda en el borde exterior de<br />
la chaqueta, casando los centros traseros y los bordes no terminados.<br />
Cosa/Sobrehile.<br />
Para la máquina corriente - Vuelva a coser a 1/4” (6mm) del primer<br />
pespunte en el margen de la costura. Recorte a ras del segundo<br />
pespunte. Planche la banda hacia el exterior y la costura hacia la<br />
prenda.<br />
Para llevar la chaqueta, vuelva la banda hacia abajo en el escote y el<br />
frente, para formar el cuello chal, como se muestra en el sobre del<br />
patrón.<br />
FALDA C<br />
NOTA: Determine el largo final antes de coser.<br />
1. Cosa/Sobrehile las partes laterales del frente en el frente de la falda.<br />
Cosa/Sobrehile las partes laterales traseras en la parte trasera de la<br />
falda.<br />
Cosa/Sobrehile el frente en la parte trasera de la falda por las costuras<br />
de los lados.<br />
2. Para evitar que el elástico quede atrapado bajo los margénes de la<br />
costura al insertarlo en la jareta, péguelos en la prenda con materia<br />
adhesiva o hilvánelos en la sección de la jareta. No olvide de quitar el<br />
hilván una vez la prenda esté terminada.<br />
3. Planche 1" (2.5cm) hacia el INTERIOR, en el borde superior, para<br />
formar la jareta.<br />
Planche une doblez de 1/4" (6mm) en el borde no terminado.<br />
Cosa cerca del borde inferior de la jareta, dejando una abertura para<br />
insertar el elástico.<br />
4. Corte un pedazo de elástico a la medida de la cintura más 1" (2.5cm).<br />
Inserte el elástico en la jareta. Cruce los extremos con un alfiler.<br />
Pruébese la prenda y ajústela.<br />
5. Cosa juntos los extremos del elástico con un imperdible. Cierre la<br />
abertura cosiéndola.<br />
Distribuya la amplitud uniformemente. Quite el hilván.<br />
CONSEJO - Para fijar el elástico de tal manera que no se enrolle con el<br />
uso, cosa a través de todos los espesores de la jareta en el surco de las<br />
costuras.<br />
6. DERECHO CON DERECHO, prenda juntas con alfileres las secciones<br />
del volante en las costuras de los lados, para formar un circulo. Cosa/<br />
Sobrehile la costura.<br />
Para hacer el dobladillo angosto, planche un doblez de 1/4" (6mm) en el<br />
borde inferior. Cosa cerca del borde planchado.<br />
Recorte à ras del pespunte. Luego cosa un otro doblez de 1/8" (3mm).<br />
7. Prepare el volante inferior como el volante superior.<br />
Prenda con alfileres el REVÉS del volante superior en el DERECHO del<br />
volante inferior, casando los centros y las costuras de los lados, con los<br />
bordes no terminados parejos.<br />
Cosa a máquina a lo largo de la línea de la costura del borde con<br />
muescas.<br />
8. Haga cortes en el volante hasta el pespunte si es necesario, teniendo<br />
cuidado de no cortar el pespunte. DERECHO CON DERECHO, prenda<br />
con alfileres el volante en el borde inferior de la falda, casando los<br />
centros y las costuras de los lados. Cosa/Sobrehile la costura. Planche<br />
la costura hacia arriba y el volante hacia abajo.<br />
PANTALÓN D<br />
1. Prenda con alfileres el frente en la parte trasera por las costuras<br />
interiores de las piernas casando las muescas y los puntos pequeños.<br />
Cosa/Sobrehile la costura estirando la parte trasera para ajustar.<br />
2. DERECHO CON DERECHO, prenda con alfileres la costura del centro,<br />
casando las costuras interiores de las piernas.Cosa/Sobrehile.<br />
Para la máquina corriente - Para reforzar la costura, vuelva a coser<br />
sobre el primer pespunte. Recorte la costura a 1/4" (6mm) a lo largo de<br />
la curva. Planche abierta la costura restante.<br />
3. Cosa/Sobrehile el frente en la parte trasera por las costuras de los<br />
lados.<br />
Continúe como sigue para los Modelos C, etapas 2 a 5.<br />
4. Marque el largo. Planche el dobladillo a lo largo de la marca. Marque el<br />
ancho del dobladillo; recorte uniformemente.<br />
Para hacer el ACABADO del borde sin muescas....cosa a<br />
1/4" (6mm) del borde, vuelva el borde hacia dentro a lo largo del<br />
pespunte y cosa con puntadas de zig-zag O de overlock/sobrehilado<br />
por encima del borde. Cosa el dobladillo con puntadas falsas.<br />
Si Ud. quiere hacer rayas en el pantalón, doble los bordes de la piernas,<br />
casando las costuras interiores y de los lados; planche.