2186 Cutting Layouts General Directions - PrintSew
2186 Cutting Layouts General Directions - PrintSew
2186 Cutting Layouts General Directions - PrintSew

Create successful ePaper yourself
Turn your PDF publications into a flip-book with our unique Google optimized e-Paper software.
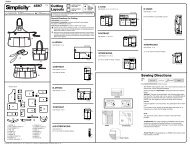
English/Spanish<br />
2 / 3<br />
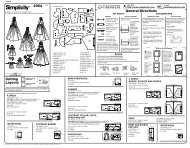
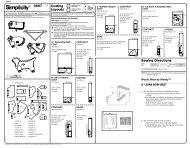
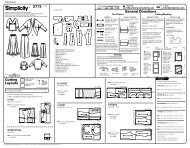
<strong>2186</strong> Sewing <strong>Directions</strong><br />
4<br />
6<br />
3<br />
LEFT FRONT<br />
AND BACK<br />
2<br />
1<br />
PANEL RIGHT<br />
FRONT<br />
AND<br />
BACK<br />
5<br />
7<br />
FABRIC<br />
KEY<br />
© Copyright 2011—Simplicity Pattern Co., Inc. / Printed in U.S.A. / Simplicity is a registered trademark of Simplicity Pattern Co., Inc.<br />
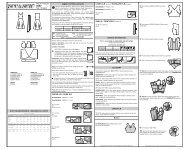
RIGHT SIDE WRONG SIDE INTERFACING LINING<br />
Read <strong>General</strong> <strong>Directions</strong> on page 1 before you begin.<br />
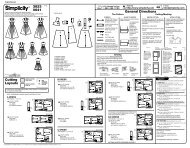
SKIRT A, B<br />
1. Machine-baste 5/8” (1.5cm) along outer edges of yoke front<br />
and back sections.<br />
2. Press under hem allowance on lower edge of one front and<br />
back panel. To form narrow hem, tuck under raw edge to<br />
meet crease. Press. Stitch hem in place.<br />
3. With RIGHT sides together, pin panel to one right front and<br />
back section matching large and small dots. Stitch between<br />
dots, back-stitching at dots to reinforce seams. Press seams<br />
toward right front and back.<br />
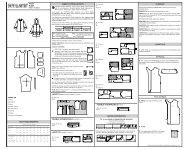
4. Stitch one left front and back section to remaining edge of<br />
panel same as for right front and back.<br />
Press seam toward left front and back.<br />
5. With RIGHT sides together, pin one yoke front and back to<br />
upper edge of skirt section, matching large and small dots.<br />
Stitch. Press seam up, pressing skirt down.<br />
6. Press under seam allowance on remaining raw edge of right<br />
front and back below small dot.<br />
To form narrow hem, tuck under raw edge to meet crease.<br />
Press. Stitch close to seam allowance making sure to square<br />
stitching at small dot, as shown.<br />
Narrowly hem left front and back seam allowance same as for<br />
right front and back.<br />
7. Press under hem allowance on lower edge of right front and<br />
back.<br />
To form narrow hem, tuck under raw edge to meet crease.<br />
Press. Stitch hem in place.<br />
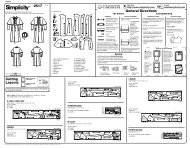
9<br />
12<br />
10<br />
1<br />
11<br />
8<br />
13<br />
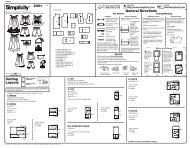
8. Press under hem allowance for left front and back same as<br />
for right front and back. This is now the skirt front.<br />
Prepare skirt back same as for skirt front. Refer to steps<br />
2 through 8.<br />
9. With RIGHT sides together, stitch front to back at side seams<br />
matching seams.<br />
Turn under ends diagonally at lower end of seam and slipstitch<br />
in place.<br />
10. To keep elastic from getting stuck in the seam allowances as<br />
it’s inserted, use fusible web or machine-basting to anchor<br />
them to garment within the casing area.<br />
Be sure to remove basting after casing is finished.<br />
11. Press 1-1/4" (3.2cm) on upper edge to INSIDE, forming<br />
casing. Press under 1/4" (6mm) on raw edge.<br />
Stitch close to lower edge of casing, leaving an opening to<br />
insert elastic.<br />
12. Cut a piece of elastic to fit waist, plus 1" (2.5cm).<br />
Insert elastic through casing.<br />
Overlap ends and hold with a safety pin.<br />
Try on garment and adjust to fit.<br />
13. Stitch ends of elastic together securely.<br />
Stitch opening closed.<br />
Distribute fullness evenly. Remove basting.<br />
To secure elastic so it won’t twist in wearing, stitch through all<br />
thicknesses of casing in the groove of each seam.<br />
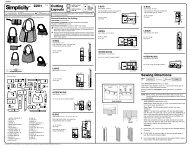
SKIRT C<br />
1. With RIGHT sides together, pin flounce to lower edge of front<br />
and back section, matching notches and having raw edges<br />
even.