2186 Cutting Layouts General Directions - PrintSew
2186 Cutting Layouts General Directions - PrintSew
2186 Cutting Layouts General Directions - PrintSew

Create successful ePaper yourself
Turn your PDF publications into a flip-book with our unique Google optimized e-Paper software.
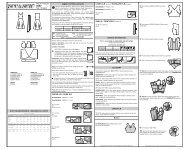
English/Spanish<br />
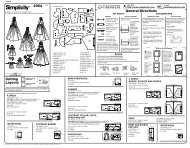
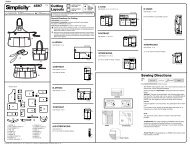
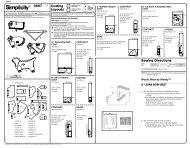
<strong>Cutting</strong><br />
<strong>Layouts</strong><br />
®<br />
pattern printed<br />
side down<br />
pattern printed<br />
side up<br />
<strong>2186</strong><br />
© Copyright 2011—Simplicity Pattern Co., Inc. / Printed in U.S.A. / Simplicity is a registered trademark of Simplicity Pattern Co., Inc.<br />
★<br />
✻<br />
1 / 3<br />
Thank you for purchasing this Simplicity pattern.<br />
We have made every effort to provide you with a high quality product.<br />
Gracias por haber comprado este patrón de Simplicity.<br />
Hemos hecho todos los esfuerzos para ofrecerle un producto de alta calidad.<br />
A<br />
A<br />
See<br />
SPECIAL<br />
CUTTING<br />
NOTES<br />
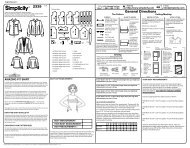
POSITION OF PATTERN PIECES MAY VARY SLIGHTLY ACCORDING<br />
TO YOUR PATTERN SIZE<br />
A SKIRT<br />
USE PIECES 1 2 3 4<br />
1A 44" 45" (115CM)<br />
WITH NAP<br />
SIZES 6 8 10 12<br />
1B 44" 45" (115CM)<br />
WITH NAP<br />
SIZES 14 16 18 20 22 24<br />
1C 58" 60" (150CM)<br />
WITH NAP<br />
ALL SIZES<br />
B<br />
B<br />
D<br />
C<br />
2<br />
✻<br />
DOUBLE<br />
THICKNESS<br />
✻<br />
DOUBLE<br />
THICKNESS<br />
3<br />
C<br />
3<br />
1<br />
D<br />
2<br />
SELVAGES<br />
1<br />
4<br />
SELVAGES<br />
SELVAGES<br />
2 3<br />
1<br />
4<br />
SELVAGES<br />
SELVAGES<br />
4<br />
FOLD<br />
6 pieces given<br />
1<br />
1-YOKE FRONT AND BACK -A,B<br />
2-RIGHT FRONT AND BACK -A,B<br />
3-LEFT FRONT AND BACK -A,B<br />
4-FRONT AND BACK PANEL -A,B<br />
5-FRONT AND BACK -C,D<br />
6-FRONT AND BACK FLOUNCE-C<br />
B SKIRT<br />
USE PIECES 1 2 3 4<br />
2A 44" 45" (115CM)<br />
WITH NAP<br />
ALL SIZES<br />
2B 58" 60" (150CM)<br />
WITH NAP<br />
ALL SIZES<br />
C SKIRT<br />
USE PIECES 5 6<br />
3A<br />
5<br />
44" 45" (115CM)<br />
WITH NAP<br />
ALL SIZES<br />
3B 58" 60" (150CM)<br />
WITH NAP<br />
ALL SIZES<br />
2 3<br />
4<br />
✻<br />
DOUBLE<br />
THICKNESS<br />
6<br />
DOUBLE THICKNESS ✻<br />
✻<br />
DOUBLE<br />
THICKNESS<br />
2<br />
3<br />
6<br />
3<br />
2<br />
U.S. & Canada Toll-Free<br />
1-888-588-2700<br />
The Pattern<br />
SYMBOLS<br />
GRAIN LINE Place on<br />
straight grain of fabric<br />
parallel to selvage<br />
PLACE SOLID LINE on<br />
fold of fabric.<br />
CENTER FRONT OR<br />
BACK of garment.<br />
NOTCHES<br />
DOTS<br />
CUTTING LINE<br />
LENGTHEN OR<br />
SHORTEN LINES<br />
SEAM ALLOWANCE: 5/8" (1.5cm)<br />
unless otherwise stated is included but<br />
not printed on MULTI-SIZE PATTERNS.<br />
Mark your size with colored felt tip pen.<br />
See chart on tissue for how to use MULTI-<br />
SIZE PATTERNS.<br />
Web Site<br />
http://www.simplicity.com<br />
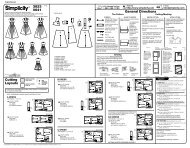
<strong>General</strong> <strong>Directions</strong><br />
ADJUST IF NEEDED<br />
Make adjustments before placing<br />
pattern on fabric.<br />
TO LENGTHEN:<br />
Cut pattern<br />
between<br />
lengthen or<br />
shorten lines.<br />
Spread pattern<br />
evenly, the<br />
amount needed<br />
and tape to<br />
paper.<br />
TO SHORTEN:<br />
At lengthen or<br />
shorten lines,<br />
make an even<br />
pleat taking up<br />
amount needed.<br />
Tape in place.<br />
When lengthen or shorten lines are<br />
not given, make adjustments at<br />
lower edge of pattern.<br />
Sewing<br />
• SEW garment following Sewing <strong>Directions</strong>.<br />
• PIN or machine-baste seams matching notches.<br />
• STITCH 5/8" (1.5 cm) seams unless otherwise stated.<br />
• PRESS seams open unless otherwise indicated clipping when necessary so<br />
seams will lie flat.<br />
• TRIM seams to reduce bulk, as shown below.<br />
SELVAGES<br />
1<br />
4<br />
SELVAGES<br />
SELVAGES<br />
1<br />
5<br />
4<br />
FOLD<br />
SELVAGES<br />
SELVAGES<br />
SELVAGES<br />
6<br />
5<br />
SELVAGES<br />
Trim enclosed<br />
seams into layers<br />
Trim corners<br />
D SKIRT<br />
USE PIECE 5<br />
4A 44" 45" (115CM)<br />
WITH NAP<br />
ALL SIZES<br />
4B 58" 60" (150CM)<br />
WITH NAP<br />
ALL SIZES<br />
Clip inner<br />
curves<br />
Notch outer<br />
curves<br />
SINGLE THICKNESS<br />
SINGLE THICKNESS<br />
e<br />
E-mail<br />
info@simplicity.com<br />
<strong>Cutting</strong>/Marking<br />
BEFORE CUTTING:<br />
PRESS pattern pieces with a warm dry<br />
iron. PRE-SHRINK fabric by pre-washing<br />
washables or steam-pressing nonwashables.<br />
CIRCLE your cutting layout.<br />
PIN pattern to fabric as shown in <strong>Cutting</strong><br />
<strong>Layouts</strong>.<br />
5<br />
• FOR DOUBLE THICKNESS: Fold<br />
fabric with RIGHT sides together.<br />
• FOR SINGLE THICKNESS: Place<br />
fabric RIGHT side up.<br />
• FOR PILE, SHADED OR ONE WAY<br />
DESIGN FABRICS: Use “with nap”<br />
layouts<br />
★ If layout<br />
shows a piece<br />
extending past<br />
fold, cut out all<br />
pieces except<br />
piece that<br />
extends.<br />
Open out<br />
fabric to single<br />
thickness. Cut<br />
extending<br />
piece on<br />
RIGHT side of<br />
fabric in<br />
position<br />
shown.<br />
5<br />
SELVAGE<br />
5<br />
SELVAGE<br />
SELVAGE<br />
5<br />
SELVAGE<br />
Español<br />
AFTER CUTTING:<br />
Transfer markings to WRONG side<br />
of fabric before removing pattern.<br />
Use pin and chalk method or<br />
dressmaker’s tracing paper and<br />
wheel.<br />
To Quick Mark:<br />
• Snip edge of fabric to mark<br />
notches, ends of fold lines and<br />
center lines.<br />
• Pin mark dots.<br />
SPECIAL CUTTING NOTES<br />
✻ Mark small<br />
arrows along both<br />
selvages indicating<br />
direction of nap or<br />
design. Fold fabric<br />
crosswise with<br />
RIGHT sides<br />
together, and cut<br />
along fold (a).<br />
Turn one fabric<br />
layer around so<br />
arrows on both<br />
layers go in the<br />
same direction.<br />
Place RIGHT sides<br />
together (b).<br />
a.<br />
CROSSWISE FOLD<br />
✁<br />
b.<br />
SELVAGE<br />
A FALDA USE LAS PIEZAS 1 2 3 4<br />
1A 44" 45" (115CM) CON PELUSA /<br />
TALLAS 6 8 10 12<br />
1B<br />
44" 45" (115CM) CON PELUSA<br />
TALLAS 14 16 18 20 22 24<br />
1C 58" 60" (150CM) CON PELUSA<br />
TODAS LAS TALLAS<br />
B FALDA USE LAS PIEZAS 1 2 3 4<br />
2A 44" 45" (115CM) CON PELUSA<br />
2B<br />
TODAS LAS TALLAS<br />
58" 60" (150CM) CON PELUSA<br />
TODAS LAS TALLAS<br />
C FALDA USE LAS PIEZAS 5 6<br />
3A<br />
44" 45" (115CM) CON PELUSA<br />
TODAS LAS TALLAS<br />
3B 58" 60" (150CM) CON PELUSA<br />
TODAS LAS TALLAS<br />
D FALDA USE LA PIEZA 5<br />
4A 44" 45" (115CM) CON PELUSA<br />
TODAS LAS TALLAS<br />
4B 58" 60" (150CM) CON PELUSA<br />
TODAS LAS TALLAS<br />
SELVAGE<br />
SELVAGES<br />
SELVAGE<br />
SELVAGES<br />
SELVAGE(S) = ORILLO(S)<br />
FOLD = DOBLEZ<br />
DOUBLE THICKNESS = ESPESOR DOBLE<br />
SINGLE THICKNESS = ESPESOR SENCILLO
English/Spanish<br />
2 / 3<br />
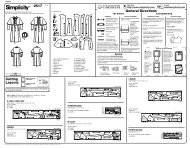
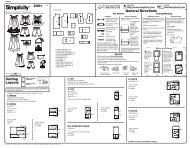
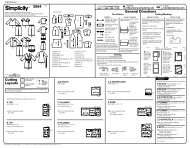
<strong>2186</strong> Sewing <strong>Directions</strong><br />
4<br />
6<br />
3<br />
LEFT FRONT<br />
AND BACK<br />
2<br />
1<br />
PANEL RIGHT<br />
FRONT<br />
AND<br />
BACK<br />
5<br />
7<br />
FABRIC<br />
KEY<br />
© Copyright 2011—Simplicity Pattern Co., Inc. / Printed in U.S.A. / Simplicity is a registered trademark of Simplicity Pattern Co., Inc.<br />
RIGHT SIDE WRONG SIDE INTERFACING LINING<br />
Read <strong>General</strong> <strong>Directions</strong> on page 1 before you begin.<br />
SKIRT A, B<br />
1. Machine-baste 5/8” (1.5cm) along outer edges of yoke front<br />
and back sections.<br />
2. Press under hem allowance on lower edge of one front and<br />
back panel. To form narrow hem, tuck under raw edge to<br />
meet crease. Press. Stitch hem in place.<br />
3. With RIGHT sides together, pin panel to one right front and<br />
back section matching large and small dots. Stitch between<br />
dots, back-stitching at dots to reinforce seams. Press seams<br />
toward right front and back.<br />
4. Stitch one left front and back section to remaining edge of<br />
panel same as for right front and back.<br />
Press seam toward left front and back.<br />
5. With RIGHT sides together, pin one yoke front and back to<br />
upper edge of skirt section, matching large and small dots.<br />
Stitch. Press seam up, pressing skirt down.<br />
6. Press under seam allowance on remaining raw edge of right<br />
front and back below small dot.<br />
To form narrow hem, tuck under raw edge to meet crease.<br />
Press. Stitch close to seam allowance making sure to square<br />
stitching at small dot, as shown.<br />
Narrowly hem left front and back seam allowance same as for<br />
right front and back.<br />
7. Press under hem allowance on lower edge of right front and<br />
back.<br />
To form narrow hem, tuck under raw edge to meet crease.<br />
Press. Stitch hem in place.<br />
9<br />
12<br />
10<br />
1<br />
11<br />
8<br />
13<br />
8. Press under hem allowance for left front and back same as<br />
for right front and back. This is now the skirt front.<br />
Prepare skirt back same as for skirt front. Refer to steps<br />
2 through 8.<br />
9. With RIGHT sides together, stitch front to back at side seams<br />
matching seams.<br />
Turn under ends diagonally at lower end of seam and slipstitch<br />
in place.<br />
10. To keep elastic from getting stuck in the seam allowances as<br />
it’s inserted, use fusible web or machine-basting to anchor<br />
them to garment within the casing area.<br />
Be sure to remove basting after casing is finished.<br />
11. Press 1-1/4" (3.2cm) on upper edge to INSIDE, forming<br />
casing. Press under 1/4" (6mm) on raw edge.<br />
Stitch close to lower edge of casing, leaving an opening to<br />
insert elastic.<br />
12. Cut a piece of elastic to fit waist, plus 1" (2.5cm).<br />
Insert elastic through casing.<br />
Overlap ends and hold with a safety pin.<br />
Try on garment and adjust to fit.<br />
13. Stitch ends of elastic together securely.<br />
Stitch opening closed.<br />
Distribute fullness evenly. Remove basting.<br />
To secure elastic so it won’t twist in wearing, stitch through all<br />
thicknesses of casing in the groove of each seam.<br />
SKIRT C<br />
1. With RIGHT sides together, pin flounce to lower edge of front<br />
and back section, matching notches and having raw edges<br />
even.
English/Spanish<br />
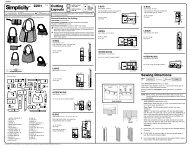
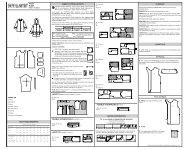
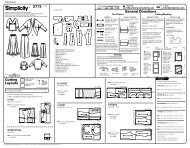
<strong>2186</strong><br />
3<br />
7<br />
2<br />
1<br />
4<br />
2<br />
3 / 3<br />
5 6<br />
© Copyright 2011—Simplicity Pattern Co., Inc. / Printed in U.S.A. / Simplicity is a registered trademark of Simplicity Pattern Co., Inc.<br />
2. With RIGHT sides together, stitch front to back at side seams<br />
matching seams.<br />
3. To keep elastic from getting stuck in the seam allowances as<br />
it’s inserted, use fusible web or machine-basting to anchor<br />
them to garment within the casing area. Be sure to remove<br />
basting after casing is finished.<br />
4. Press 1-1/4" (3.2cm) on upper edge to INSIDE, forming<br />
casing. Press under 1/4" (6mm) on raw edge.<br />
Stitch close to lower edge of casing, leaving an opening to<br />
insert elastic.<br />
5. Cut a piece of elastic to fit waist, plus 1" (2.5cm).<br />
Insert elastic through casing.<br />
Overlap ends and hold with a safety pin.<br />
Try on garment and adjust to fit.<br />
6. Stitch ends of elastic together securely.<br />
Stitch opening closed.<br />
Distribute fullness evenly. Remove basting.<br />
To secure elastic so it won’t twist in wearing, stitch through all<br />
thicknesses of casing in the groove of each seam.<br />
7. Allow garment to hang overnight.<br />
Mark length.<br />
Trim depth of hem evenly allowing 5/8" (1.5cm) for hem.<br />
Machine stitch 5/8" (1.5cm) from lower edge.<br />
Press up hem along stitching.<br />
To form narrow hem, tuck under raw edge to meet stitching.<br />
Press. Stitch hem in place.<br />
SKIRT D<br />
1. With RIGHT sides together, stitch front to back at side seams.<br />
Prepare casing same as for View C. Refer to steps 3<br />
through 6.<br />
2. Allow garment to hang overnight. Mark length.<br />
Trim depth of hem evenly allowing 5/8" (1.5cm) for hem.<br />
Machine stitch 5/8" (1.5cm) from lower edge.<br />
Press up hem along stitching.<br />
To form narrow hem, tuck under raw edge to meet stitching.<br />
Press. Stitch hem in place.<br />
Español<br />
FALDAS A, B<br />
1. Hilvane a máquina a 5/8” (1.5cm) de los bordes exteriores de las<br />
partes superiores delantera y trasera.<br />
2. Planche el dobladillo en el borde inferior de un paño delantero y<br />
trasero. Para formar el dobladillo angosto, vuelva el borde no<br />
terminado hacia dentro colocándolo en el doblez. Planche. Cosa<br />
el dobladillo.<br />
3. DERECHO CON DERECHO, prenda con alfileres el paño en<br />
una seccion derecha del paño delantero y trasero casando los<br />
puntos pequeños y grandes. Cosa entre los puntos,<br />
retrocediendo el pespunte para reforzar las costuras. Planche<br />
las costuras de las secciones delantera y trasera derechas<br />
4. Cosa las secciones delantera y trasera izquierdas en el otro<br />
borde del paño procediendo como para las secciones delantera<br />
y trasera derechas.<br />
5. DERECHO CON DERECHO, prenda con alfileres una parte<br />
superior delantera y trasera en la falda, casando los puntos<br />
pequeños y grandes. Cosa. Planche la costura hacia arriba y la<br />
falda hacia abajo.<br />
6. Planche el dobladillo en el otro borde no terminado de las<br />
secciones delantera y trasera derechas, debajo del punto<br />
pequeño. Para formar el dobladillo angosto, vuelva el borde no<br />
terminado hacia dentro colocándolo en el doblez. Planche. Cosa<br />
cerca del margen de la costura girando en ángulo recto en el<br />
punto pequeño, como se muestra.<br />
Haga el dobladillo angosto procediendo como para el frente y<br />
las partes delantera y trasera derechas.<br />
7. Planche el dobladillo en el borde inferior de las secciones<br />
delantera y trasera derechas. Para formar el dobladillo angosto,<br />
vuelva el borde no terminado hacia dentro colocándolo en el<br />
doblez. Planche. Cosa el dobladillo.<br />
8. Planche el dobladillo en las secciones delantera y trasera<br />
izquierdas procediendo como para el lado derecho. Esto es el<br />
frente de la falda.<br />
Prepare la parte trasera de la falda procediendo como para<br />
el frente. Vea las etapas 2 a 8.<br />
9. DERECHO CON DERECHO, cosa el frente en la parte trasera<br />
por las costuras de los lados casando las costuras.<br />
Vuelva los margénes de la costura hacia dentro y en diagonal en<br />
el extremo inferior de la costura y cósalos con puntadas falsas.<br />
10. Para evitar que el elástico quede atrapado bajo los margénes de<br />
la costura al insertarlo en la jareta, péguelos en la prenda con<br />
materia adhesiva o hilvánelos en la sección de la jareta. No<br />
olvide de quitar el hilván una vez la jareta esté terminada.<br />
No olvide de quitar el hilván después de haber terminado la<br />
jareta.<br />
11. Planche 1-1/4" (3.2cm) hacia el INTERIOR en el borde superior,<br />
para formar la jareta. Planche 1/4" (6mm) hacia dentro en el<br />
borde no terminado.<br />
Cosa cerca del borde inferior de la jareta dejando una abertura<br />
para insertar el elástico.<br />
12. Corte un pedazo de elástico a la medida de la cintura más 1"<br />
(2.5cm).<br />
Inserte el elástico en la jareta.<br />
Cruce los extremos y manténgalos juntos con alfileres.<br />
Pruébese la prenda y ajústela.<br />
13. Cosa juntos los extremos del elástico firmemente.<br />
Cierre la abertura cosiéndola.<br />
Distribuya la amplitud uniformemente. Quite el hilván.<br />
Para fijar el elástico de tal manera que no se enrolle con el uso,<br />
cosa en el surco de las costuras a través de todos los espesores<br />
de la jareta.<br />
FALDA C<br />
1. DERECHO CON DERECHO, prenda con alfileres el volante en<br />
el borde inferior del frente y de la parte trasera, casando las<br />
muescas y los bordes no terminados.<br />
2. DERECHO CON DERECHO, cosa el frente en la parte trasera<br />
por las costuras de los lados casando las costuras.<br />
3. Para evitar que el elástico quede atrapado bajo los margénes de<br />
la costura al insertarlo en la jareta, péguelos en la prenda con<br />
materia adhesiva o hilvánelos en la sección de la jareta. No<br />
olvide de quitar el hilván una vez la jareta esté terminada.<br />
4. Planche 1-1/4" (3.2cm) hacia el INTERIOR en el borde superior,<br />
para formar la jareta. Planche 1/4" (6mm) hacia dentro en el<br />
borde no terminado.<br />
Cosa cerca del borde inferior de la jareta dejando una abertura<br />
para insertar el elástico.<br />
5. Corte un pedazo de elástico a la medida de la cintura más 1"<br />
(2.5cm).<br />
Inserte el elástico en la jareta.<br />
Cruce los extremos y manténgalos con un imperdible.<br />
Pruébese la prenda y ajústela.<br />
6. Cosa juntos los extremos del elástico firmemente.<br />
Cierre la abertura cosiéndola.<br />
Distribuya la amplitud uniformemente. Quite el hilván.<br />
Para fijar el elástico de tal manera que no se enrolle con el uso,<br />
cosa en el surco de las costuras a través de todos los espesores<br />
de la jareta.<br />
7. Deje la prenda colgada toda la noche.<br />
Marque el largo.<br />
Recorte la prenda dejando 5/8" (1.5cm) para el dobladillo.<br />
Cosa a máquina a 5/8" (1.5cm) del borde inferior.<br />
Marque el ancho del dobladillo a lo largo del pespunte.<br />
Para formar el dobladillo angosto, vuelva el borde no terminado<br />
hacia dentro colocándolo en el doblez. Planche. Cosa el<br />
dobladillo.<br />
FALDA D<br />
1. DERECHO CON DERECHO, cosa juntos el frente y la parte<br />
trasera por las costuras de los lados.<br />
Prepare la jareta procediendo como para el Modelo C. Vea<br />
las etapas 3 a 6.<br />
2. Deje la prenda colgada toda la noche.<br />
Marque el largo.<br />
Recorte la prenda dejando 5/8" (1.5cm) para el dobladillo.<br />
Cosa a máquina a 5/8" (1.5cm) del borde inferior.<br />
Planche el dobladillo a lo largo del pespunte.<br />
Para formar el dobladillo angosto, vuelva el borde no terminado<br />
hacia dentro colocándolo en el doblez. Planche. Cosa el<br />
dobladillo.