TEG-448WS Quick Installation Guide - Downloads - TRENDnet
TEG-448WS Quick Installation Guide - Downloads - TRENDnet
TEG-448WS Quick Installation Guide - Downloads - TRENDnet

You also want an ePaper? Increase the reach of your titles
YUMPU automatically turns print PDFs into web optimized ePapers that Google loves.
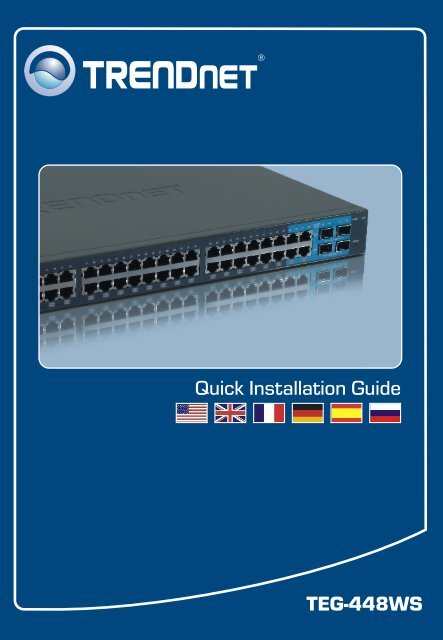
<strong>Quick</strong> <strong>Installation</strong> <strong>Guide</strong><br />
<strong>TEG</strong>-<strong>448WS</strong>
Table of of Contents Contents<br />
Español ..................................................................................................... 1<br />
1. Antes de iniciar .................................................................................. 1<br />
2. Instalación del Hardware ........................ ........................................... 2<br />
3. Herramienta de gestión Web .................... ......................................... 3<br />
Troubleshooting ........................................................................................<br />
6<br />
Version 01.10.2007
1. Antes de iniciar<br />
Requisitos del sistema<br />
Aplicación<br />
1<br />
Español<br />
Contenidos del paquete<br />
<strong>TEG</strong>-<strong>448WS</strong><br />
Guía de instalación rápida<br />
Herramienta y CD-ROM para la<br />
guía del usuario<br />
2 abrazaderas para cable con<br />
tornillos<br />
Protectores de goma<br />
Cable de alimentación AC<br />
Navegador Web: Internet Explorer (5.0 ó superior)<br />
PC con adaptador de red instalado<br />
Opcional 4 Mini-módulos GBIC (P. ej. <strong>TEG</strong>-MGBSX, <strong>TEG</strong>-MGBS10)<br />
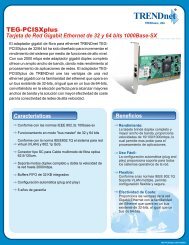
48-Port 10/100/1000Mbps Gigabit Web Smart Switch<br />
(<strong>TEG</strong>-<strong>448WS</strong>)<br />
1000Mbps<br />
Serverss with<br />
Copper Gigabit PCI Adapter<br />
(<strong>TEG</strong>-PCITXR)<br />
VLAN Group 1<br />
Workstations with 10/100Mbps<br />
Fast Ethernet PCI Adapter<br />
(TE100-PCIWN)<br />
Cable/DSL 4-Port<br />
Broadband Router<br />
(TW100-S4W1CA)<br />
Internet<br />
Cable/DSL<br />
Modem<br />
26-Port Gigabit Web Smart Switch<br />
(<strong>TEG</strong>-224WSplus)<br />
VLAN Group 2<br />
Multi-Mode Mini<br />
GBIC Module<br />
(<strong>TEG</strong>-MGBSX)<br />
Multi-Mode Mini<br />
GBIC Module<br />
(<strong>TEG</strong>-MGBSX)<br />
Workstations with<br />
Copper Gigabit PCI Adapter<br />
(<strong>TEG</strong>-PCITXR)<br />
LC Type Cable
2. Instalación del Hardware<br />
Nota: Tras finalizar la instalación del hardware, utilice la herramienta Smart<br />
basada en Web para configurar el <strong>TEG</strong>-<strong>448WS</strong>. Para acceder a la herramienta<br />
Smart basada en Web, abra su navegador Web, después introduzca la<br />
dirección IP http://192.168.0.1<br />
y la contraseña por defecto “admin”.<br />
Compruebe que su PC y el <strong>TEG</strong>-<strong>448WS</strong> están configurados en el mismo<br />
segmento de red.<br />
1. Conecte el Power Cord (Cable de<br />
alimentación) en la parte trasera<br />
del <strong>TEG</strong>-<strong>448WS</strong> y después a la<br />
toma corriente.<br />
2. Conecte un cable de red CAT-5 del<br />
PC a un puerto Ethernet disponible<br />
del <strong>TEG</strong>-<strong>448WS</strong>.<br />
2<br />
Español
3. Herramienta de gestión Web<br />
Nota: Si desea encontrar con facilidad todos los conmutadores de gestión Web<br />
en la red asigne una dirección IP, cambie la contraseña, actualice la nueva<br />
versión del firmware, y después instale la herramienta de gestión Web. Siga<br />
los siguientes pasos.<br />
Para usuarios de Windows<br />
1. Introduzca el CD-ROM del<br />
controlador y de la herramienta<br />
en la unidad de CD-ROM de su<br />
PC y luego haga clic en Install<br />
Utility (Instalar herramienta).<br />
2. Siga las instrucciones del<br />
<strong>Installation</strong> Wizard (Asistente de<br />
instalación). Haga click OK.<br />
3. Haga clic en Start (Inicio), después<br />
en Programs (Programas), luego<br />
en web_management_utility<br />
(Herramienta de gestión Web) y<br />
después haga clic en<br />
web_management_utility<br />
(Herramienta de gestión Web).<br />
3<br />
Español
4. Haga clic en Discovery<br />
(Descubrir) y después haga doble<br />
clic en el Switch (Enrutador) que<br />
aparece en la “Discovery List”.<br />
5. Haga clic en el Switch<br />
(conmutador) que aparece en la<br />
Monitor List y después haga clic<br />
en Configuration setting.<br />
6. Establezca la configuración de la<br />
IP Address (Dirección IP), Subnet<br />
mask (Máscara de subred),<br />
Gateway y Password<br />
(Contraseña). Haga clic en Set<br />
(Establecer).<br />
4<br />
Español
7. Haga clic en OK.<br />
8. Haga clic en Access Web (Acceso<br />
Web).<br />
9. Introduzca la contraseña, y luego<br />
haga clic en LOGIN (Inicio).<br />
Contraseña: admin<br />
Para obtener información más detallada sobre la configuración así como de las<br />
configuraciones avanzadas del <strong>TEG</strong>-<strong>448WS</strong> , por favor consulte la sección de<br />
resolución de problemas, el CD-ROM de la Guía del Usuario, o el sitio Web de<br />
Trendnet en http://www.trendnet.com.<br />
5<br />
Español
Troubleshooting<br />
Q1: After connecting the <strong>TEG</strong>-<strong>448WS</strong> to a power outlet, the LEDs do not turn on.<br />
A1: Check the connection of the power cord to the <strong>TEG</strong>-<strong>448WS</strong> and the power<br />
outlet. Also check that the power outlet is receiving power.<br />
Q2: After installing the Web-Management Utility, I clicked Discovery and the Utility<br />
is unable to discover the <strong>TEG</strong>-<strong>448WS</strong>. What should I do?<br />
A2: Make sure that the <strong>TEG</strong>-<strong>448WS</strong> is powered on and that all connections are<br />
secure. Also check that your computer's IP address is on the same network<br />
segment as the <strong>TEG</strong>-<strong>448WS</strong>. The default IP address of the <strong>TEG</strong>-<strong>448WS</strong> is<br />
http://192.168.0.1 and the default password is "admin".<br />
Q3: When I access the <strong>TEG</strong>-<strong>448WS</strong> using a web browser, I get a screen that tells<br />
me “only one user can login”. What should I do?<br />
A3: Another computer is configuring the <strong>TEG</strong>-<strong>448WS</strong>. Please wait until the user<br />
logs off. If the other user has already logged off and you still get the same screen,<br />
then disconnect the power cord from the <strong>TEG</strong>-<strong>448WS</strong>, wait for 5 seconds,<br />
reconnect the power cord to the <strong>TEG</strong>-<strong>448WS</strong>, allow 5 seconds for the Switch to<br />
power on, and then attempt to access the web configuration page to login.<br />
Q4: I forgot the administration password. How do I reset my <strong>TEG</strong>-<strong>448WS</strong>?<br />
A4: Press on the reset button using a pen or paperclip for 10 seconds. The<br />
default password is admin.<br />
If you still encounter problems or have any questions regarding the <strong>TEG</strong>-<strong>448WS</strong>, please<br />
refer to the User's <strong>Guide</strong> included on the Utility CD-ROM or contact <strong>TRENDnet</strong>'s<br />
Technical Support Department.<br />
6
Certifications<br />
This equipment has been tested and found to comply with FCC and CE Rules.<br />
Operation is subject to the following two conditions:<br />
(1) This device may not cause harmful interference.<br />
(2) This device must accept any interference received. Including interference that may<br />
cause undesired operation.<br />
Waste electrical and electronic products must not<br />
be disposed of with household waste. Please<br />
recycle where facilities exist. Check with you Local<br />
Authority or Retailer for recycling advice.<br />
NOTE: THE MANUFACTURER IS NOT RESPONSIBLE FOR ANY RADIO OR TV<br />
INTERFERENCE CAUSED BY UNAUTHORIZED MODIFICATIONS TO THIS<br />
EQUIPMENT. SUCH MODIFICATIONS COULD VOID THE USER’S AUTHORITY TO<br />
OPERATE THE EQUIPMENT.<br />
ADVERTENCIA<br />
En todos nuestros equipos se mencionan claramente las caracteristicas del adaptador de<br />
alimentacón necesario para su funcionamiento. El uso de un adaptador distinto al<br />
mencionado puede producir daños fisicos y/o daños al equipo conectado. El adaptador<br />
de alimentación debe operar con voltaje y frecuencia de la energia electrica domiciliaria<br />
existente en el pais o zona de instalación.
<strong>TRENDnet</strong> Technical Support<br />
US . Canada<br />
Toll Free Telephone: 1(866) 845-3673<br />
24/7 Tech Support<br />
Europe (Germany France Italy Spain Switzerland UK)<br />
Toll Free Telephone: +00800 60 76 76 67<br />
English/Espanol - 24/7<br />
Francais/Deutsch - 11am-8pm, Monday - Friday MET<br />
Worldwide<br />
Telephone: +(31) (0) 20 504 05 35<br />
. . . . .<br />
English/Espanol - 24/7<br />
Francais/Deutsch - 11am-8pm, Monday - Friday MET<br />
Product Warranty Registration<br />
Please take a moment to register your product online.<br />
Go to <strong>TRENDnet</strong>’s website at http://www.trendnet.com<br />
20675 Manhattan Place<br />
Torrance, CA 90501<br />
USA<br />
Copyright ©2007. All Rights Reserved. <strong>TRENDnet</strong>.