Nissan multi-kit 2007-2012 99-7613 - Metra Electronics
Nissan multi-kit 2007-2012 99-7613 - Metra Electronics
Nissan multi-kit 2007-2012 99-7613 - Metra Electronics

You also want an ePaper? Increase the reach of your titles
YUMPU automatically turns print PDFs into web optimized ePapers that Google loves.
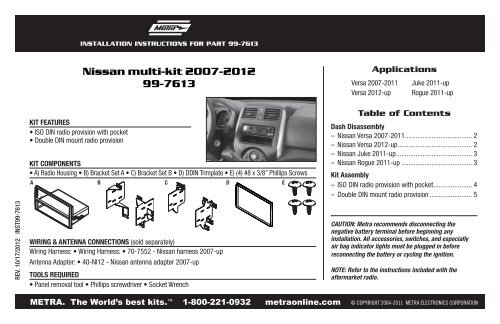
REV. 10/17/<strong>2012</strong> INST<strong>99</strong>-<strong>7613</strong><br />
KIT FEATURES<br />
• ISO DIN radio provision with pocket<br />
• Double DIN mount radio provision<br />
INSTALLATION INSTRUCTIONS FOR PART <strong>99</strong>-<strong>7613</strong><br />
<strong>Nissan</strong> <strong>multi</strong>-<strong>kit</strong> <strong>2007</strong>-<strong>2012</strong><br />
<strong>99</strong>-<strong>7613</strong><br />
KIT COMPONENTS<br />
• A) Radio Housing • B) Bracket Set A • C) Bracket Set B • D) DDIN Trimplate • E) (4) #8 x 3/8” Phillips Screws<br />
A B C<br />
D E<br />
WIRING & ANTENNA CONNECTIONS (sold separately)<br />
Wiring Harness: • Wiring Harness: • 70-7552 - <strong>Nissan</strong> harness <strong>2007</strong>-up<br />
Antenna Adapter: • 40-NI12 - <strong>Nissan</strong> antenna adapter <strong>2007</strong>-up<br />
TOOLS REQUIRED<br />
• Panel removal tool • Phillips screwdriver • Socket Wrench<br />
Applications<br />
Versa <strong>2007</strong>-2011<br />
Versa <strong>2012</strong>-up<br />
Juke 2011-up<br />
Rogue 2011-up<br />
Table of Contents<br />
Dash Disassembly<br />
– <strong>Nissan</strong> Versa <strong>2007</strong>-2011 ...................................... 2<br />
– <strong>Nissan</strong> Versa <strong>2012</strong>-up .......................................... 2<br />
– <strong>Nissan</strong> Juke 2011-up ........................................... 3<br />
– <strong>Nissan</strong> Rogue 2011-up ........................................ 3<br />
Kit Assembly<br />
– ISO DIN radio provision with pocket ...................... 4<br />
– Double DIN mount radio provision ........................ 5<br />
CAUTION: <strong>Metra</strong> recommends disconnecting the<br />
negative battery terminal before beginning any<br />
installation. All accessories, switches, and especially<br />
air bag indicator lights must be plugged in before<br />
reconnecting the battery or cycling the ignition.<br />
NOTE: Refer to the instructions included with the<br />
aftermarket radio.<br />
METRA. The World’s best <strong>kit</strong>s. 1-800-221-0932 metraonline.com © COPYRIGHT 2004-2011 METRA ELECTRONICS CORPORATION
<strong>Nissan</strong> Versa <strong>2007</strong>-2011<br />
1. Unclip and remove the panel above<br />
the radio. (Figures A and B)<br />
2. Unclip and remove the entire trim<br />
panel surrounding the radio and<br />
a/c controls. (Figure C)<br />
3. Remove (4) Phillips screws<br />
securing the radio. (Figure D)<br />
Continue to <strong>kit</strong> assembly<br />
(Figure A)<br />
(Figure B)<br />
(Figure C)<br />
(Figure D)<br />
LOAD<br />
PRESET A-B-C<br />
SCRL 1<br />
SEEK<br />
TRACK AUDIO 2<br />
FILE<br />
SCAN 3<br />
CAT<br />
<strong>99</strong>-<strong>7613</strong><br />
Dash Disassembly<br />
CD<br />
DISP CLOCK<br />
PUSH<br />
PWR<br />
VOL<br />
RADIO<br />
6CD CHANGER<br />
RPT<br />
4 RDM<br />
TUNE<br />
5 AUX FF-REW<br />
FOLDER<br />
6<br />
CH<br />
2<br />
<strong>Nissan</strong> Versa <strong>2012</strong><br />
1. Unclip and remove the entire panel<br />
surrounding the radio including the<br />
a/c vents. (Figure A)<br />
2. Remove (4) Phillips screws<br />
securing the radio. (Figure B)<br />
Continue to <strong>kit</strong> assembly<br />
(Figure A)<br />
(Figure B)
<strong>Nissan</strong> Juke 2011-up<br />
1. Unclip and remove the climate<br />
control panel. (Figure A)<br />
2. Remove (2) Phillips screws<br />
securing the radio trim panel.<br />
(Figure B)<br />
3. Remove (4) Philips screws<br />
securing the radio. (Figure C)<br />
Continue to <strong>kit</strong> assembly<br />
(Figure A)<br />
(Figure B)<br />
(Figure C)<br />
<strong>99</strong>-<strong>7613</strong><br />
Dash Disassembly<br />
3<br />
<strong>Nissan</strong> Rogue 2011-up<br />
1. If equipped with center speaker:<br />
Unclip and remove the grille then<br />
remove (4) Phillips screws to<br />
remove the speaker. (Figure A)<br />
2. Unclip and remove the panel below<br />
the radio including the a/c controls.<br />
(Figure B)<br />
3. Unclip the radio trim including the<br />
a/c vents then unplug the hazard<br />
switch and remove the panel.<br />
(Figure C)<br />
4. Remove (4) Phillips screws securing<br />
the radio. (Figure D)<br />
Continue to <strong>kit</strong> assembly<br />
(Figure A)<br />
(Figure B)<br />
(Figure C)<br />
(Figure D)
ISO DIN radio with pocket<br />
Note: You will need to remove the<br />
aftermarket radio’s trim ring if<br />
equipped.<br />
1. Choose the appropriate bracket set<br />
for your application then cut and<br />
remove the tabs not necessary for<br />
your application. (Figures A.1<br />
and A.2)<br />
2. Mount the brackets to the housing<br />
with the supplied (4) 3/8” Phillips<br />
Screws. (Figure B)<br />
3. Slide the aftermarket radio into<br />
the bracket/housing assembly and<br />
secure using the screws supplied<br />
with the radio. (Figure B)<br />
4. Locate the factory wiring harness<br />
and antenna plug in the dash. <strong>Metra</strong><br />
recommends using the proper<br />
mating adapters from <strong>Metra</strong> and/or<br />
AXXESS.<br />
5. Reassemble dash in reverse order<br />
of disassembly.<br />
<strong>99</strong>-<strong>7613</strong><br />
Kit Assembly<br />
(Figure A.1) (Figure A.2)<br />
(Figure B)<br />
Rogue<br />
Bracket A<br />
07-11 Versa<br />
Rogue<br />
4<br />
Juke<br />
Bracket B<br />
<strong>2012</strong> Versa<br />
Juke
Double DIN radio mount provision<br />
1. Mount the factory brackets to the<br />
sides of the aftermarket radio<br />
using the screws supplied with the<br />
radio. (Figure A)<br />
NOTE: <strong>99</strong>-<strong>7613</strong> brackets can<br />
be used in place of factory<br />
brackets. Refer to previous page<br />
for tab instructions.<br />
2. Locate the factory wiring harness<br />
and antenna plug in the dash.<br />
<strong>Metra</strong> recommends using the<br />
proper mating adapters from <strong>Metra</strong><br />
and/or AXXESS.<br />
3. Place the DDIN trim plate on the<br />
front of the DDIN radio. (Figure B)<br />
4. Reassemble dash in reverse order<br />
of disassembly.<br />
<strong>99</strong>-<strong>7613</strong><br />
Kit Assembly<br />
(Figure A) (Figure B)<br />
5
<strong>99</strong>-<strong>7613</strong><br />
6
<strong>99</strong>-<strong>7613</strong><br />
7
REV. 10/17/<strong>2012</strong> INST<strong>99</strong>-<strong>7613</strong><br />
INSTALLATION INSTRUCTIONS FOR PART <strong>99</strong>-<strong>7613</strong><br />
KNOWLEDGE IS POWER<br />
Enhance your installation and fabrication skills by<br />
enrolling in the most recognized and respected<br />
mobile electronics school in our industry.<br />
Log onto www.installerinstitute.com or call<br />
800-354-6782 for more information and take steps<br />
toward a better tomorrow.<br />
<strong>Metra</strong> recommends MECP<br />
certified technicians<br />
METRA. The World’s best <strong>kit</strong>s. 1-800-221-0932 metraonline.com © COPYRIGHT 2004-2011 METRA ELECTRONICS CORPORATION
REV. 10/17/<strong>2012</strong> INST<strong>99</strong>-<strong>7613</strong><br />
INSTRUCCIONES DE INSTALACIÓN PARA LA PIEZA <strong>99</strong>-<strong>7613</strong><br />
<strong>Nissan</strong> <strong>multi</strong>-<strong>kit</strong> <strong>2007</strong>-<strong>2012</strong><br />
<strong>99</strong>-<strong>7613</strong><br />
CaraCterístiCas del <strong>kit</strong><br />
• Provisión de unidad central ISO DIN con cavidad<br />
• Provisión de radio de montaje doble DIN<br />
Componentes del <strong>kit</strong><br />
• A) Carcasa del radio • B) Juego de soportes A • C) Juego de soportes B • D) Placa de moldura DDIN<br />
• E) (4) tornillos Phillips de 3/8”<br />
A B C<br />
D E<br />
CaBleado Y ConeXiones de antena (se venden por separado)<br />
Arnés de cableado: • Arnés 70-7552 para <strong>Nissan</strong> <strong>2007</strong> y más recientes<br />
Adaptador de antena: • Adaptador de antena 40-NI12 para <strong>Nissan</strong> <strong>2007</strong> y más recientes<br />
Herramientas requeridas<br />
• Herramienta para quitar paneles • Destornillador Phillips • Llave para dados<br />
<strong>Nissan</strong> Versa <strong>2007</strong>-2011<br />
<strong>Nissan</strong> Versa <strong>2012</strong><br />
Aplicaciones<br />
<strong>Nissan</strong> Juke 2011 y mas<br />
<strong>Nissan</strong> Rogue 2011 y mas<br />
Indice<br />
Desmontaje del tablero<br />
– <strong>Nissan</strong> Versa <strong>2007</strong>-2011 ...................................... 2<br />
– <strong>Nissan</strong> Versa <strong>2012</strong> ............................................... 2<br />
– <strong>Nissan</strong> Juke 2011 y mas ...................................... 3<br />
– <strong>Nissan</strong> Rogue 2011 y mas.................................... 3<br />
Ensamble del <strong>kit</strong><br />
– Provisión de unidad central ISO DIN ....................... 4<br />
– Provisión de radio de montaje doble DIN ................ 5<br />
PRECAUCIÓN: <strong>Metra</strong> recomienda desconectar el terminal<br />
negativo de la batería antes de comenzar cualquier<br />
instalación. Todos los accesorios, interruptores y,<br />
especialmente, las luces indicadoras de airbag deben<br />
estar enchufados antes de volver a conectar la batería o<br />
comenzar el ciclo de ignición.<br />
Nota: Remítase a las instrucciones incluidas con el radio<br />
de posventa.<br />
METRA. The World’s best <strong>kit</strong>s. 1-800-221-0932 metraonline.com © COPYRIGHT 2004-2011 METRA ELECTRONICS CORPORATION
<strong>Nissan</strong> Versa <strong>2007</strong>-2011<br />
1. Desenganche y quite el panel<br />
de moldura de arriba del radio.<br />
(Figura A, Figura B)<br />
2. Desenganche y quite todo el panel<br />
de moldura que rodea el radio y los<br />
controles del aire acondicionado.<br />
(Figura C)<br />
3. Quite los (4) tornillos Phillips que<br />
sujetan el radio. (Figura D)<br />
Continuará la ensamble del <strong>kit</strong><br />
(Figura A)<br />
(Figura B)<br />
(Figura C)<br />
(Figura D)<br />
LOAD<br />
<strong>99</strong>-<strong>7613</strong><br />
Desmontaje del tablero<br />
PRESET A-B-C<br />
SCRL 1<br />
SEEK<br />
TRACK AUDIO 2<br />
FILE<br />
SCAN 3<br />
CAT<br />
CD<br />
DISP CLOCK<br />
PUSH<br />
PWR<br />
VOL<br />
RADIO<br />
6CD CHANGER<br />
RPT<br />
4 RDM<br />
TUNE<br />
5 AUX FF-REW<br />
FOLDER<br />
6<br />
CH<br />
2<br />
<strong>Nissan</strong> Versa <strong>2012</strong><br />
1. Desenganche y quite todo el panel<br />
de moldura que rodea la pantalla,<br />
incluyendo los controles del aire<br />
acondicionado. (Figura A)<br />
2. Quite los (4) tornillos Phillips que<br />
sujetan el radio. (Figura B)<br />
Continuará la ensamble del <strong>kit</strong><br />
(Figura A)<br />
(Figura B)
<strong>Nissan</strong> Juke 2011 y mas<br />
1. Desenganche y quite el panel del<br />
control del clima. (Figura A)<br />
2. Quite los (2) tornillos Phillips que<br />
sujetan el panel de la moldura del<br />
radio. (Figura B)<br />
3. Quite los (4) tornillos Phillips que<br />
sujetan el radio. (Figura C)<br />
Continuará la ensamble del <strong>kit</strong><br />
(Figura A)<br />
(Figura B)<br />
(Figura C)<br />
<strong>99</strong>-<strong>7613</strong><br />
Desmontaje del tablero<br />
3<br />
<strong>Nissan</strong> Rogue 2011 y mas<br />
1. Si hay una bocina central:<br />
desenganche y quite la rejilla, luego<br />
quite (4) tornillos Phillips para quitar<br />
la bocina. (Figura A)<br />
2. Desenganche y quite el panel de<br />
abajo del radio, incluyendo los<br />
controles del aire acondicionado.<br />
(Figura B)<br />
3. Desenganche la moldura del radio,<br />
incluyendo las rejillas del aire<br />
acondicionado, luego desconecte el<br />
interruptor de las luces intermitentes<br />
y quite el panel. (Figura C)<br />
4. Quite los (4) tornillos Phillips que<br />
sujetan el radio. (Figura D)<br />
Continuará la ensamble del <strong>kit</strong><br />
(Figura A)<br />
(Figura B)<br />
(Figura C)<br />
(Figura D)
Provisiones de unidad central ISO DIN.<br />
NOTA: Tendrá que quitar el anillo<br />
de moldura del radio de mercado<br />
secundario si se incluye.<br />
1. Elija el juego de soportes adecuado para<br />
su aplicación, luego corte y quite las<br />
pestañas que no sean necesarias para<br />
su aplicación. (Figura A.1, Figura A.2)<br />
2. Monte los soportes en la carcasa<br />
con los (4) tornillos Phillips de 3/8”<br />
suministrados. (Figura B)<br />
3. Deslice la unidad central en el ensamble<br />
del soporte/carcasa y sujete utilizando<br />
los tornillos suministrados con la unidad.<br />
(Figura B)<br />
4. Ubique el arnés de cableado de<br />
fábrica y el conector de la antena<br />
en el tablero. <strong>Metra</strong> recomienda el<br />
uso de adaptadores adecuados de<br />
acoplamiento de <strong>Metra</strong> y/o de AXXESS.<br />
5. Vuelva a armar el tablero al revés de<br />
como lo desarmó.<br />
<strong>99</strong>-<strong>7613</strong><br />
Ensamble del <strong>kit</strong><br />
(Figura A.1) (Figura A.2)<br />
(Figura B)<br />
Rogue<br />
Soporte A<br />
07-11 Versa<br />
Rogue<br />
4<br />
Juke<br />
Soporte B<br />
<strong>2012</strong> Versa<br />
Juke
Provisiones de unidad central DDIN<br />
1. Monte los soportes de fábrica a los<br />
lados del radio doble DIN con los<br />
tornillos que vienen con el radio<br />
doble DIN. (Figura A)<br />
NOTA: <strong>99</strong>-<strong>7613</strong> soportes pueden<br />
ser utilizados en lugar de los<br />
soportes de fábrica. Consulte<br />
la página anterior para ver las<br />
instrucciones de tabulación.<br />
2. Ubique el arnés de cableado de<br />
fábrica y el conector de la antena<br />
en el tablero. <strong>Metra</strong> recomienda<br />
el uso de adaptadores adecuados<br />
de acoplamiento de <strong>Metra</strong> y/o de<br />
AXXESS.<br />
3. Coloque la placa de moldura DDIN<br />
en la parte de enfrente del radio<br />
DDIN. (Figura B)<br />
4. Vuelva a armar el tablero al revés<br />
de como lo desarmó.<br />
<strong>99</strong>-<strong>7613</strong><br />
Ensamble del <strong>kit</strong><br />
(Figura A) (Figura B)<br />
5
<strong>99</strong>-<strong>7613</strong><br />
6
<strong>99</strong>-<strong>7613</strong><br />
7
REV. 10/17/<strong>2012</strong> INST<strong>99</strong>-<strong>7613</strong><br />
INSTRUCCIONES DE INSTALACIÓN PARA LA PIEZA <strong>99</strong>-<strong>7613</strong><br />
KNOWLEDGE EL CONOCIMIENTO IS POWER<br />
ES PODER<br />
Enhance Mejore sus your habilidades installation de and instalación fabrication y fabricación skills by<br />
enrolling inscribiéndose in the en most la escuela recognized de dispositivos and respected electrónicos<br />
mobile móviles electronics más reconocida school y respetada in our industry. de nuestra industria.<br />
Log<br />
Regístrese<br />
onto www.installerinstitute.com<br />
en www.installerinstitute.com<br />
or call<br />
o llame al<br />
800-354-6782 for more information and take steps<br />
800-354-6782 para obtener más información y avance<br />
toward a better tomorrow.<br />
hacia un futuro mejor.<br />
<strong>Metra</strong> recomienda técnicos<br />
con certificación del Programa<br />
de Certificación en Electrónica<br />
Móvil (Mobile <strong>Electronics</strong><br />
Certification Program, MECP).<br />
METRA. The World’s best <strong>kit</strong>s. 1-800-221-0932 metraonline.com © COPYRIGHT 2004-2011 METRA ELECTRONICS CORPORATION