

2-in-1 Fabric Steamer & Iron - Air & Water
2-in-1 Fabric Steamer & Iron - Air & Water
2-in-1 Fabric Steamer & Iron - Air & Water

Create successful ePaper yourself
Turn your PDF publications into a flip-book with our unique Google optimized e-Paper software.
ENGLISH<br />
10<br />
CONNECTING FABRIC/LINT BRUSH<br />
USING THE<br />
2-IN-1 FABRIC STEAMER & IRON<br />
The <strong>Fabric</strong>/L<strong>in</strong>t Brush is designed to work with steam to<br />
remove l<strong>in</strong>t and other loose particles from fabrics.<br />
CAUTION: <strong>Iron</strong><strong>in</strong>g Plate becomes extremely hot dur<strong>in</strong>g<br />
use. In order to avoid burns or other <strong>in</strong>jury, <strong>Fabric</strong>/L<strong>in</strong>t<br />
Brush should only be connected before <strong>Iron</strong><strong>in</strong>g Plate has<br />
heated. Do not attempt to connect <strong>Fabric</strong> Brush while unit<br />
is emitt<strong>in</strong>g steam.<br />
Do not attempt to remove <strong>Fabric</strong>/L<strong>in</strong>t Brush until <strong>Iron</strong><strong>in</strong>g<br />
Plate has fully cooled (at least 30 m<strong>in</strong>utes).<br />
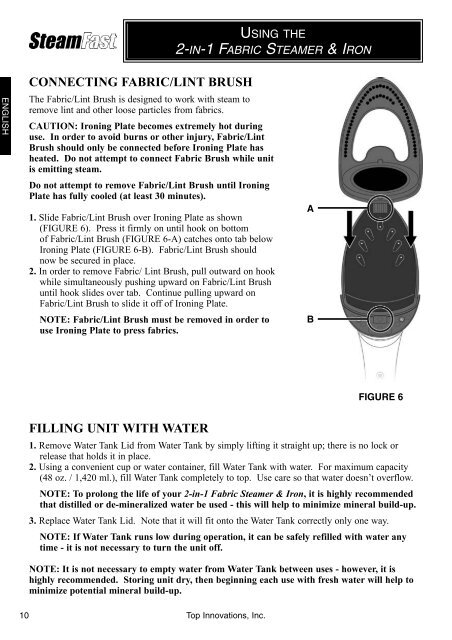
1. Slide <strong>Fabric</strong>/L<strong>in</strong>t Brush over <strong>Iron</strong><strong>in</strong>g Plate as shown<br />
(FIGURE 6). Press it firmly on until hook on bottom<br />
of <strong>Fabric</strong>/L<strong>in</strong>t Brush (FIGURE 6-A) catches onto tab below<br />
<strong>Iron</strong><strong>in</strong>g Plate (FIGURE 6-B). <strong>Fabric</strong>/L<strong>in</strong>t Brush should<br />
now be secured <strong>in</strong> place.<br />
2. In order to remove <strong>Fabric</strong>/ L<strong>in</strong>t Brush, pull outward on hook<br />
while simultaneously push<strong>in</strong>g upward on <strong>Fabric</strong>/L<strong>in</strong>t Brush<br />
until hook slides over tab. Cont<strong>in</strong>ue pull<strong>in</strong>g upward on<br />
<strong>Fabric</strong>/L<strong>in</strong>t Brush to slide it off of <strong>Iron</strong><strong>in</strong>g Plate.<br />
NOTE: <strong>Fabric</strong>/L<strong>in</strong>t Brush must be removed <strong>in</strong> order to<br />
use <strong>Iron</strong><strong>in</strong>g Plate to press fabrics.<br />
FILLING UNIT WITH WATER<br />
1. Remove <strong>Water</strong> Tank Lid from <strong>Water</strong> Tank by simply lift<strong>in</strong>g it straight up; there is no lock or<br />
release that holds it <strong>in</strong> place.<br />
2. Us<strong>in</strong>g a convenient cup or water conta<strong>in</strong>er, fill <strong>Water</strong> Tank with water. For maximum capacity<br />
(48 oz. / 1,420 ml.), fill <strong>Water</strong> Tank completely to top. Use care so that water doesn’t overflow.<br />
NOTE: To prolong the life of your 2-<strong>in</strong>-1 <strong>Fabric</strong> <strong>Steamer</strong> & <strong>Iron</strong>, it is highly recommended<br />
that distilled or de-m<strong>in</strong>eralized water be used - this will help to m<strong>in</strong>imize m<strong>in</strong>eral build-up.<br />
3. Replace <strong>Water</strong> Tank Lid. Note that it will fit onto the <strong>Water</strong> Tank correctly only one way.<br />
NOTE: If <strong>Water</strong> Tank runs low dur<strong>in</strong>g operation, it can be safely refilled with water any<br />
time - it is not necessary to turn the unit off.<br />
NOTE: It is not necessary to empty water from <strong>Water</strong> Tank between uses - however, it is<br />
highly recommended. Stor<strong>in</strong>g unit dry, then beg<strong>in</strong>n<strong>in</strong>g each use with fresh water will help to<br />
m<strong>in</strong>imize potential m<strong>in</strong>eral build-up.<br />
Top Innovations, Inc.<br />
A<br />
B<br />
FIGURE 6


