Hydraulic Disc Brake Hose Length Adjustment ... - Bike-Manual.com
Hydraulic Disc Brake Hose Length Adjustment ... - Bike-Manual.com
Hydraulic Disc Brake Hose Length Adjustment ... - Bike-Manual.com

You also want an ePaper? Increase the reach of your titles
YUMPU automatically turns print PDFs into web optimized ePapers that Google loves.
English<br />
6<br />
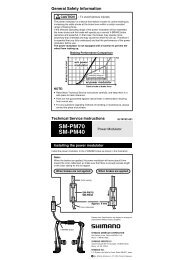
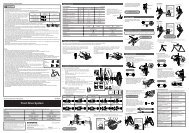
4 instALL new fittinGs<br />
<strong>Hydraulic</strong> <strong>Disc</strong> <strong>Brake</strong> <strong>Hose</strong> <strong>Length</strong> <strong>Adjustment</strong> & Bleed Guide<br />
A. Apply DOT <strong>com</strong>patible grease to hosebarb threads, <strong>com</strong>pression fitting outer surfaces and <strong>com</strong>pression nut threads.<br />
B. While holding the hose firmly, thread a new hosebarb into the end of the hose using a T-10 Torx wrench.<br />
C. Slide a new <strong>com</strong>pression fitting over the end of the hose with the new hosebarb.<br />
5<br />
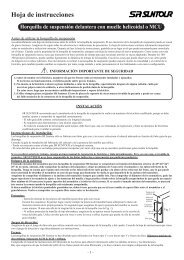
re-instALL tHe <strong>Hose</strong><br />
A. Push the hose firmly into the lever until it stops.<br />
B. While holding the hose in place, slide the <strong>com</strong>pression fitting and <strong>com</strong>pression<br />
nut up to the lever or hose stop.<br />
Elixir CR Mag, Elixir CR: Hold the hose stop in place and finger-tighten the<br />
<strong>com</strong>pression nut until you feel it bottom out.<br />
Elixir R, Elixir 5, Code, Juicy 3: Finger-tighten the <strong>com</strong>pression nut until you<br />
feel it bottom out.<br />
C. Elixir CR Mag, Elixir CR: While continuing to push the hose into the hose stop,<br />
use an 11 mm open ended wrench to hold the hose stop in place and use an<br />
8 mm open ended wrench to tighten the <strong>com</strong>pression nut to the proper torque.<br />
Elixir R, Elixir 5, Code, Juicy 3: While continuing to push the hose into the<br />
lever body, use an 8 mm open ended wrench to tighten the <strong>com</strong>pression nut to<br />
the proper torque.<br />
• If your <strong>com</strong>pression fitting is alloy, tighten to 5 N•m (47 in-lb).<br />
• If your <strong>com</strong>pression fitting is steel, tighten to 7.8 N•m (70 in-lb).<br />
D. Slide the boot (if applicable) back into place.<br />
No gap Ready to install<br />
time to BLeeD tHe BrAKes<br />
Cutting the hose introduces a small amount of air into the system, so at this point it<br />
is necessary to bleed the brakes for optimal performance. See the next section,<br />
“Bleed Guide” for instructions.<br />
ELIXIR<br />
<br />
95-5015-019-000 Rev B<br />
<strong>Hydraulic</strong> <strong>Disc</strong> <strong>Brake</strong> <strong>Hose</strong> <strong>Length</strong> <strong>Adjustment</strong> & Bleed Guide<br />
BLeeD GuiDe<br />
introDuction to BLeeDinG<br />
When bleeding Avid brakes, keep in mind that you are simply chasing bubbles out of the system. Avid re<strong>com</strong>mends that<br />
you bleed your brakes at least once a year to ensure optimal performance. If you ride frequently or in aggressive terrain,<br />
you should bleed your brakes more often.<br />
ProceDure oVerView<br />
You will perform 3 basic operations when bleeding Avid brakes:<br />
1. Bleed the hose<br />
2. Bleed the caliper<br />
3. Bleed the lever<br />
fLusH<br />
When bleeding brakes, you may notice discoloration of the old fluid as it exits the system into the syringe at the lever. If<br />
the fluid is severely discolored, this indicates that the fluid is very old. In this case, bleeding the system twice in order to<br />
<strong>com</strong>pletely remove the old fluid is re<strong>com</strong>mended.<br />
Following this procedure gives you a perfectly bled, optimally performing brake. Enjoy!<br />
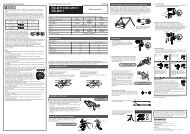
1 PrePAre tHe syrinGes<br />
A. Fill one syringe 1/2 full with Avid Hi-Performance DOT Fluid and fill the other<br />
syringe 1/4 full.<br />
B. Hold each syringe with the tip pointed up and tap the side of the syringe with your<br />
finger to bring any air bubbles to the top. Place a towel around the tip and slowly<br />
push the air bubbles out of the syringe.<br />
C. Take a moment to de-gas the fluid in the 1/2 full syringe. Removing as many<br />
of the gas bubbles as you can from the fluid now, before pushing them into the<br />
system, will make for a better bleed. Leave the hose clamp shut and pull on the<br />
plunger. Bubbles will appear to form and enlarge. While the plunger is still pulled<br />
down, lightly tap the syringe to release the bubbles sticking to the sides and the<br />
bottom so that they can rise to the top of the fluid. When the bubbles stop forming<br />
and have all risen to the top, release the plunger, open the clamp and carefully<br />
push the air out. Repeat several times.<br />
Note: You will not be able to remove all the bubbles.<br />
English<br />
Copyright © 2009 SRAM, LLC 7