Installation Instructions - Mabe
Installation Instructions - Mabe Installation Instructions - Mabe
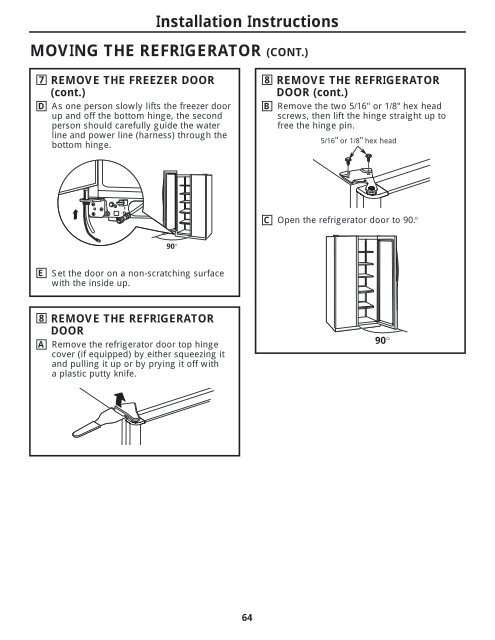
Installation Instructions MOVING THE REFRIGERATOR (CONT.) 7 D E 8 A REMOVE THE FREEZER DOOR (cont.) As one person slowly lifts the freezer door up and off the bottom hinge, the second person should carefully guide the water line and power line (harness) through the bottom hinge. 90° Set the door on a non-scratching surface with the inside up. REMOVE THE REFRIGERATOR DOOR Remove the refrigerator door top hinge cover (if equipped) by either squeezing it and pulling it up or by prying it off with a plastic putty knife. 64 8 B C REMOVE THE REFRIGERATOR DOOR (cont.) Remove the two 5/16" or 1/8" hex head screws, then lift the hinge straight up to free the hinge pin. 5/16" or 1/8" hex head Open the refrigerator door to 90.° 90°
8 D E REMOVE THE REFRIGERATOR DOOR (cont.) Lift the refrigerator door up and off the bottom hinge. If the refrigerator has a refreshment center, one person should slowly lift the door up and off the bottom hinge and the second person should carefully guide the electrical lines (harnesses) through the bottom hinge. 90° Refreshment Center Models only Set the door on a non-scratching surface with the inside up. Installation Instructions 65 9 REPLACING THE DOORS To replace the doors, simply reverse steps 3 through 8. However, please note the following: • When lowering the doors onto the bottom hinges, make sure the second person carefully guides the tube and harnesses through the holes in the hinges. • When connecting the water line, make sure you insert the tubing all the way to the mark. Mark • Do not pinch the tubing and harnesses when placing the doors on the bottom hinges. • When connecting the power line and the electrical lines (refreshment center models only), be sure that the connectors are seated together fully.
- Page 15 and 16: El dispensador de agua y de hielo.
- Page 17 and 18: Atrás del refrigerador Se deberá
- Page 19 and 20: Molduras y paneles decorativos. Par
- Page 21 and 22: Cómo insertar los paneles de la pu
- Page 23 and 24: Instrucciones para la instalación
- Page 25 and 26: Instrucciones para la instalación
- Page 27 and 28: Instrucciones para la instalación
- Page 29 and 30: Instrucciones para la instalación
- Page 31 and 32: Instrucciones para la instalación
- Page 33 and 34: CÓMO INSTALAR LA TUBERÍA DEL AGUA
- Page 35 and 36: Antes de solicitar un servicio… S
- Page 37 and 38: Antes de solicitar un servicio… P
- Page 39 and 40: Garantía del Refrigerador. (Para c
- Page 41 and 42: Notas. Importado por MABE COLOMBIA
- Page 43 and 44: DANGER! RISK OF CHILD ENTRAPMENT PR
- Page 45 and 46: About the temperature controls. Per
- Page 47 and 48: About CustomCool . ExpressThaw Ex
- Page 49 and 50: About the water filter. (on some mo
- Page 51 and 52: Press tab and pull shelf forward to
- Page 53 and 54: About the crispers and pans. Not al
- Page 55 and 56: About the ice and water dispenser.
- Page 57 and 58: Behind the Refrigerator Be careful
- Page 59 and 60: Trim kits and decorator panels. For
- Page 61 and 62: Inserting the door panels. Read the
- Page 63 and 64: Installation Refrigerator Instructi
- Page 65: 4 DISCONNECT THE POWER COUPLING (on
- Page 69 and 70: 1 A B CONNECTING THE REFRIGERATOR T
- Page 71 and 72: 7 8 REPLACE THE BASE GRILLE Replace
- Page 73 and 74: WHAT YOU WILL NEED (CONT.) NOTE: Th
- Page 75 and 76: Normal operating sounds. Newer refr
- Page 77 and 78: Problem Possible Causes What To Do
- Page 79 and 80: Manufactured for: General Electric
- Page 81 and 82: 4 Tel. sin costo: 01800 90 29 900 I
<strong>Installation</strong> <strong>Instructions</strong><br />
MOVING THE REFRIGERATOR (CONT.)<br />
7<br />
D<br />
E<br />
8<br />
A<br />
REMOVE THE FREEZER DOOR<br />
(cont.)<br />
As one person slowly lifts the freezer door<br />
up and off the bottom hinge, the second<br />
person should carefully guide the water<br />
line and power line (harness) through the<br />
bottom hinge.<br />
90°<br />
Set the door on a non-scratching surface<br />
with the inside up.<br />
REMOVE THE REFRIGERATOR<br />
DOOR<br />
Remove the refrigerator door top hinge<br />
cover (if equipped) by either squeezing it<br />
and pulling it up or by prying it off with<br />
a plastic putty knife.<br />
64<br />
8<br />
B<br />
C<br />
REMOVE THE REFRIGERATOR<br />
DOOR (cont.)<br />
Remove the two 5/16" or 1/8" hex head<br />
screws, then lift the hinge straight up to<br />
free the hinge pin.<br />
5/16" or 1/8" hex head<br />
Open the refrigerator door to 90.°<br />
90°


