Instalación - Mabe
Instalación - Mabe
Instalación - Mabe

Create successful ePaper yourself
Turn your PDF publications into a flip-book with our unique Google optimized e-Paper software.
TOOLS YOU WILL NEED<br />
Installation Instructions<br />
REVERSING THE DOOR SWING (Single Door Refrigerator Models only)<br />
IMPORTANT NOTES<br />
When reversing the door swing:<br />
NOTE: Door swing is not reversible on stainless<br />
steel models.<br />
• Read the instructions all the way through before<br />
starting.<br />
• Parts are included in the door hinge kit.<br />
• Handle parts carefully to avoid scratching paint.<br />
• Set screws down by their related parts to avoid<br />
using them in the wrong places.<br />
• Provide a non-scratching work surface for<br />
the doors.<br />
IMPORTANT: Once you begin, do not move the<br />
cabinet until door-swing reversal is completed.<br />
These instructions are for changing the hinges<br />
from the right side to the left side―if you ever want<br />
to change the hinges back to the right side, follow<br />
these same instructions and reverse all references<br />
to left and right.<br />
• Once door swing is finalized, ensure the logo<br />
badge is properly aligned and permanently<br />
secured to the door by removing the adhesive<br />
cover on the back side. NOTE: A replacement<br />
logo badge is included in the hinge kit.<br />
Unplug the refrigerator from its electrical outlet.<br />
Empty all door shelves, including the dairy<br />
compartment.<br />
Adjustable Wrench<br />
Masking Tape<br />
Phillips Screwdriver<br />
5/16ʺ Socket<br />
Ratchet/Driver<br />
Thin-blade Screwdriver<br />
Torx T-20 Driver<br />
62<br />
1<br />
A<br />
B<br />
C<br />
D<br />
E<br />
F<br />
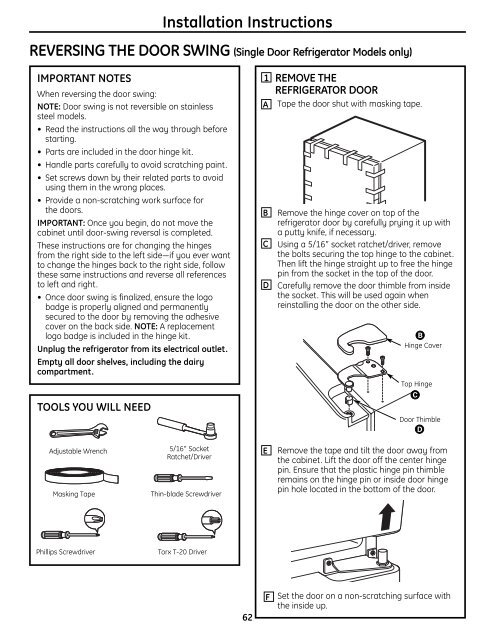
REMOVE THE<br />
REFRIGERATOR DOOR<br />
Tape the door shut with masking tape.<br />
Remove the hinge cover on top of the<br />
refrigerator door by carefully prying it up with<br />
a putty knife, if necessary.<br />
Using a 5/16ʺ socket ratchet/driver, remove<br />
the bolts securing the top hinge to the cabinet.<br />
Then lift the hinge straight up to free the hinge<br />
pin from the socket in the top of the door.<br />
Carefully remove the door thimble from inside<br />
the socket. This will be used again when<br />
reinstalling the door on the other side.<br />
Hinge Cover<br />
Top Hinge<br />
Door Thimble<br />
Remove the tape and tilt the door away from<br />
the cabinet. Lift the door off the center hinge<br />
pin. Ensure that the plastic hinge pin thimble<br />
remains on the hinge pin or inside door hinge<br />
pin hole located in the bottom of the door.<br />
Set the door on a non-scratching surface with<br />
the inside up.