Instalación - Mabe
Instalación - Mabe
Instalación - Mabe

Create successful ePaper yourself
Turn your PDF publications into a flip-book with our unique Google optimized e-Paper software.
10<br />
A<br />
B<br />
C<br />
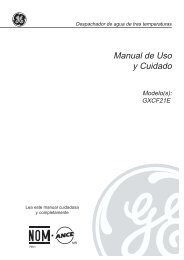
LEVEL THE REFRIGERATOR<br />
The leveling legs have 2 purposes:<br />
1) Leveling legs adjust so the refrigerator is<br />
firmly positioned on the floor and does not<br />
wobble.<br />
2) Leveling legs serve as a stabilizing brake<br />
to hold the refrigerator securely in position<br />
during operation and cleaning. The leveling<br />
legs also prevent the refrigerator from<br />
tipping.<br />
Remove the grille by removing the two Phillips<br />
head screws.<br />
Turn the leveling legs clockwise to raise<br />
the refrigerator, counterclockwise to lower it.<br />
CAUTION: To avoid possible<br />
personal injury or property damage,<br />
the leveling legs must be firmly touching<br />
the floor.<br />
Replace the base grille by inserting the two<br />
Phillips head screws.<br />
Installation Instructions<br />
59<br />
11<br />
12<br />
SET THE CONTROLS<br />
Set the controls to the recommended setting.<br />
REMOVE PACKAGING, START<br />
ICEMAKER (icemaker models)<br />
A) Remove all tape, foam and protective<br />
packing from shelves and drawers.<br />
B) Remove the tie downs from the freezer<br />
baskets.<br />
C) Place half width basket onto drawer slides.<br />
See About the freezer section for instructions.<br />
Set the icemaker power switch to the I (on) position.<br />
The icemaker will not begin to operate until it<br />
reaches its operating temperature of 15°F (–9°C) or<br />
below. It will then begin operation automatically. It<br />
will take 2–3 days to fill the ice bin.<br />
Power<br />
switch<br />
NOTE: In lower water pressure conditions, the<br />
water valve may turn on up to 3 times to<br />
deliver enough water to the icemaker.