Descargar - Haier
Descargar - Haier
Descargar - Haier

Create successful ePaper yourself
Turn your PDF publications into a flip-book with our unique Google optimized e-Paper software.
El Manual de Dos Puertas Descongela el<br />
Refrigeradore<br />
Two-Door Frost Free Refrigerator<br />
Manual del Usuario (Las caracteristicas Pueden Variar por el Modelo)<br />
Para Modelo de # HRF08WND, HRF10WND, HRF12WND<br />
User Manual (Features may vary by model)<br />
Model # HRF08WND, HRF10WND, HRF12WND<br />
Quality ß Innovation ß Style
Espa Español ñol<br />
INSTRUCCIONES<br />
PRECAUTORIAS<br />
Lea todas las instrucciones antes de utilizar este aparato. Cuando utilice<br />
este aparato, siempre ejerza las precauciones de seguridad básicas,<br />
incluyendo las siguientes:<br />
1) Utilice este aparato exclusivamente para su uso especificado, según se<br />
describe en esta guía de uso y cuidados.<br />
2) Este refrigerador debe ser instalado adecuadamente siguiendo las<br />
instrucciones de instalación antes de utilizarse. Observe las instrucciones<br />
para conectarlo a tierra en la sección de instalación.<br />
3) Nunca desconecte su refrigerador tirando del cordón eléctrico. Sujete<br />
siempre la clavija firmemente y retírela del contacto evitando torcerla.<br />
4) Repare o reemplace inmediatamente cualquier cordón eléctrico que<br />
muestre raspaduras o daños. No utilice ningún cordón que muestre<br />
señales de abrasión o grietas en su extensión, clavija o terminal<br />
de conexión.<br />
5) Desconecte su congelador antes de limpiarlo o antes de hacer cualquier<br />
reparación. Nota: Si por alguna razón este producto necesita ser<br />
reparado, recomendamos fuertemente que la reparación se lleve a<br />
cabo por un técnico calificado.<br />
6) No emplee ningún aparato eléctrico o instrumento punzocortante para<br />
descongelar su refrigerador.<br />
7) Si su antiguo refrigerador no está siendo utilizado, recomendamos<br />
quitarle las puertas y dejar los estantes en su localización original.<br />
Esto reducirá los riesgos de accidentes infantiles.<br />
8) Una vez que su refrigerador se encuentre operando, no toque las<br />
superficies frías en el compartimento del congelador, especialmente<br />
si sus manos se encuentran húmedas o mojadas. Su piel puede<br />
adherirse a estas superficies extremadamente frías.<br />
1
9) No congele alimentos que hayan sido previamente descongelados en<br />
su totalidad. El Departamento de Agricultura de los Estados Unidos, en<br />
su Boletín de Casa y Jardín No. 69 indica que: "…Usted puede volver<br />
a congelar, sin correr ningún riesgo, aquellos alimentos congelados que<br />
hayan sido descongelados y que aún contengan cristales de hielo o que<br />
aún se encuentren fríos con una temperatura por debajo de los 4,5°C<br />
(40°F)".<br />
"…Carnes molidas, aves, o pescados descongelados que despidan olor<br />
extraño o muestren decoloración no deben volver a congelarse y no<br />
deben consumirse. El helado descongelado debe desecharse. Si el olor<br />
o color de cierto alimento es deficiente o cuestionable, deséchelo. Tal<br />
alimento podría resultar peligroso si lo ingiriese."<br />
"…Incluso el descongelar parcialmente y volver a congelar los alimentos<br />
disminuye su calidad de consumo, especialmente si se trata de frutas,<br />
verduras y alimentos preparados. La calidad de consumo de las carnes<br />
rojas es menormente afectada en comparación a la de muchos otros<br />
alimentos. Utilice los alimentos que hayan vuelto a congelarse lo más<br />
pronto posible para evitar que sufran mayor deterioro en su calidad de<br />
consumo."<br />
10) Este refrigerador no debe de ser empotrado o colocado dentro<br />
de un gabinete de cocina. Ha sido diseñado exclusivamente<br />
para ser instalado por separado.<br />
11) No opere su congelador en la presencia de gases explosivos.<br />
GUARDE ESTAS INSTRUCCIONES<br />
para el uso futuro<br />
Español Espa ñol<br />
2
Español<br />
Espa ñol<br />
PELIGRO<br />
Existe el riesgo de que los niños puedan quedar atrapados<br />
dentro. Antes de tirar su refrigerador o congelador, quite las<br />
puertas. Deje los anaqueles en su lugar para que los niños<br />
no puedan entrar fácilmente en el interior."<br />
Gracias por utilizar nuestro<br />
producto <strong>Haier</strong>. Este sencillo<br />
manual le orientará con respecto al<br />
mejor uso que puede darle a<br />
su refrigerador.<br />
Recuerde tomar nota del modelo y<br />
número de serie. Ambos se<br />
encuentran impresos en una<br />
etiqueta en la parte posterior del<br />
refrigerador.<br />
Número de Modelo<br />
Número de Serie<br />
Fecha de Compra<br />
Agrafer le ticket de caisse au guide. Il devra être présenté pour tout<br />
service après-vente sous garantie.<br />
3
Indice<br />
PAGINA<br />
Instrucciones Precautorias ............................................................1<br />
Partes y Funciones..........................................................................5<br />
Instalación de su Refrigerador....................................................6<br />
Desempaquetado de su Refrigerador ..................................................... 6<br />
Ajustamiento de su Refrigerador............................................................ 6<br />
Circulación Adecuada del Aire.............................................................. 6<br />
Requerimientos Eléctricos....................................................................... 7<br />
Alineación de la Puerta ......................................................................... 8<br />
Cómo Invertir las Manijas de la Puerta .................................................. 9<br />
Uso y Funciones del Refrigerador ............................................11<br />
Funciones Generales ...........................................................................11<br />
Entrepaños Interiores del Refrigerador .................................................11<br />
Cajón para Frutas y Verduras y Cubierta.............................................12<br />
Información sobre el Almacenamiento de Alimentos ............................13<br />
Ruidos de Operación Normales...........................................................14<br />
Cuidados y Limpieza Adecuada del Refrigerador ...............15<br />
Limpieza y Mantenimiento...................................................................15<br />
Reemplazo del Foco ............................................................................16<br />
Interrupciones de Energía....................................................................16<br />
Vacaciones y Mudanza .......................................................................16<br />
Verificación de Problemas ..........................................................17<br />
Información de la Garantía .......................................................19<br />
Español<br />
Espa ñol<br />
4
Espa ñol<br />
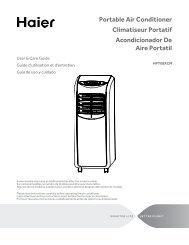
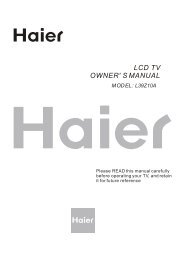
Partes y Funciones<br />
10<br />
9<br />
8<br />
7<br />
6<br />
5<br />
1. Bandejas para cubos de hielo<br />
2. Estantes de la puerta del ancho<br />
completo del congelador<br />
3. Estante de la puerta del ancho<br />
completo<br />
4. Patas de nivelación ajustables para<br />
la parte delantera (no se muestran)<br />
5. Cajón transparente para verduras y<br />
frutas<br />
6. Tapa del cajón para frutas y<br />
verduras de vidrio transparente<br />
7. Estantes ajustables de alambre del<br />
ancho completo de la unidad<br />
8. Control mecánico para ajuste de<br />
temperatura<br />
9. Luz interior automática<br />
5<br />
1<br />
4<br />
17<br />
11<br />
16<br />
13<br />
12<br />
15<br />
10. Estante del congelador<br />
14<br />
11. Compartimiento de almacenamiento<br />
de un galón<br />
12. Sistema de almacenamiento de latas<br />
Can<br />
13. Compartimiento para<br />
almacenamiento con estante<br />
de la mitad del ancho<br />
14. Estante de la mitad del ancho,<br />
compartimiento para almacenamiento<br />
de botellas de 2 litros<br />
15. Control de humedad para frutas y<br />
verduras<br />
16. Control de flujo de aire<br />
17. Estante para almacenamiento de<br />
condimentos (únicamente en HRF12)<br />
2<br />
3
Instalación de su<br />
Refrigerador<br />
Desempaquetado de su Refrigerador<br />
1. Retire todo el material de embalaje. Esto incluye la base de espuma y<br />
toda la cinta adhesiva que sostiene los accesorios del refrigerador en el<br />
interior y exterior. Deslice y saque la protección de plástico o espuma<br />
usada para proteger al compresor de daños durante el envío debido a<br />
la vibración y los golpes.<br />
2. Inspeccione y retire cualesquier restos del embalaje, la cinta adhesiva o<br />
los materiales impresos antes de encender el refrigerador.<br />
Ajustamiento de su Refrigerador<br />
Nivelación de su Refrigerador:<br />
• Su refrigerador tiene dos patas niveladoras que están ubicadas en las<br />
esquinas frontales de su refrigerador. Después de colocar correctamente<br />
su refrigerador en la posición definitiva, puede nivelarlo.<br />
• Puede ajustar las patas niveladoras girándolas a la derecha para elevar<br />
el refrigerador y girándolas a la izquierda para bajarlo.<br />
La puerta del refrigerador cerrará con más facilidad cuando<br />
las patas niveladoras se elevan.<br />
Circulación Adecuada del Aire<br />
• Para asegurar que su refrigerador funcione con la eficiencia<br />
máxima para la que fue diseñado, éste debe ser instalado en<br />
un lugar donde haya una circulación de aire adecuada,<br />
conexiones eléctricas y de tubería.<br />
• Estas son las distancias recomendadas que deben dejarse<br />
alrededor del refrigerador:<br />
Lados…………........19 mm<br />
Parte Superior……..25 mm<br />
Parte Posterior……..25 mm<br />
Español<br />
Espa ñol<br />
6
Espa Español ñol<br />
Requerimientos Eléctricos<br />
• Asegúrese de que haya un tomacorriente apropiado (115 V, 15 A) con<br />
una conexión a tierra apropiada para hacer funcionar el refrigerador.<br />
• Evite el uso de adaptadores de tres patas o el cortar la tercer pata de<br />
conexión a tierra para poder conectar en un tomacorriente bifásico.<br />
Esto sería una práctica muy peligrosa ya que no proveería al<br />
refrigerador con una conexión a tierra adecuada y podría resultar un<br />
riesgo de descarga eléctrica.<br />
Limitaciones de Instalación<br />
• No instale su refrigerador en ningún lugar que no tenga el<br />
aislamiento o la calefacción apropiada, por ejemplo una cochera,<br />
etc. Su refrigerador no fue diseñado para funcionar en temperaturas<br />
abajo de los 12°Centígrados (55°F).<br />
• Seleccione un lugar adecuado para el refrigerador sobre una superficie<br />
sólida y nivelada alejado de los rayos directos del sol o de una fuente<br />
de calor como la de los radiadores, rejillas de calefacción, estufas, etc.<br />
Cualquier desnivelación del piso debe ser corregido con las patas<br />
niveladoras ubicadas en las esquinas inferiores frontales<br />
del refrigerador.<br />
Uso de Alargues<br />
7<br />
• Evite el uso de una cuerda de la extensión debido a peligros de<br />
seguridad potenciales bajo ciertas condiciones. Si es necesario utilizar<br />
una cuerda de la extensión, utilice solamente una cuerda 3-wire de la<br />
extensión que tenga un 3-blade el poner a tierra del enchufe y de un<br />
enchufe 3-slot que validarán el enchufe. El grado marcado de la cuerda<br />
de la extensión debe ser igual o mayor que al grado eléctrico de la<br />
aplicación.
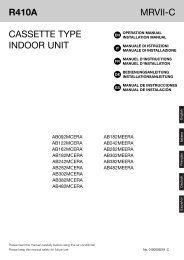
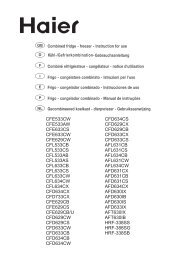
Alineación de la Puerta<br />
cubierta de<br />
la bisagra<br />
Puerta del congelador: (vea fig. # 1)<br />
1. Quite la cubierta de los tornillos.<br />
2. Quite la cubierta de la bisagra superior.<br />
3. Afloje los tornillos de la bisagra superior usando un<br />
destornillador de punta de cruz.<br />
4. Ajuste la puerta o coloque un espaciador entremedio<br />
y luego vuelva a apretar los tornillos.<br />
5. Vuelva a colocar la cubierta de la bisagra superior.<br />
bisagra superior<br />
fig. # 1<br />
Cómo Invertir las Manijas de la Puerta<br />
Método de apertura de la puerta izquierda/derecha:<br />
Este producto le ofrece la opción de invertir la apertura de la puerta<br />
izquierda/derecha. Puede seleccionar su preferencia de apertura de la<br />
puerta siguiendo el procedimiento para hacer el cambio.<br />
Desmantelamiento: (Vea fig. # 1 y # 2)<br />
1. Fije las puertas del refrigerador y congelador pegando cinta<br />
adhesiva en ambos lados para mantener las puertas en su lugar.<br />
2. Como se muestra en la figura 1, desmantele la cubierta de la<br />
bisagra en la parte superior de la puerta del congelador con un<br />
destornillador de punta de cruz. Después retire los dos tornillos<br />
de la bisagra. Saque la bisagra jalándola verticalmente<br />
y guárdela en un lugar seguro.<br />
3. Quite la cinta adhesiva de la puerta del congelador, levante y<br />
quite la puerta y póngala cuidadosamente adentro.<br />
4. Como se muestra en la figura 2, desmonte dos tornillos de la bisagra<br />
central, levante y tome abajo la bisagra y la pista centrales,<br />
y manténgalas un lugar seguro. (vea fig # 2)<br />
5. Quite la cinta adhesiva en puerta del refrigerador y del congelador,<br />
levante y tome abajo la puerta del refrigerador, y póngala<br />
cuidadosamente a un lado.<br />
6. Quite los doorstoppers de las puertas del refrigerador y<br />
del congelador.<br />
7. Inserte el doorstopper del lado izquierdo (proporcionado en su<br />
embalaje) en el agujero del fondo del lado izquierdo de la puerta<br />
del refrigerador y en el agujero del fondo del lado izquierdo de la<br />
puerta del congelador. Sujete con los tornillos<br />
8<br />
Espa ñol
Espa ñol<br />
9<br />
agujeros del tornillo<br />
fijación en el centro<br />
tapón para la puerta del congelador<br />
pasador- pivote en el<br />
centro<br />
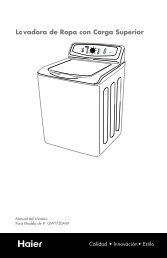
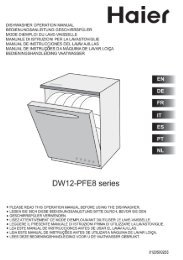
Reinstallation: (see fig. # 3 and fig. # 4)<br />
1. Remueva el inferior para el pasador- pivote del soporte del gozne<br />
inferior, girándolo en la dirección opuesta a las manecillas del reloj.<br />
Coloque luego el perno en el agujero opuesto y apriételo.<br />
fig. # 3<br />
fondo de la<br />
unidad<br />
bisagra inferior<br />
2. Remueva los tornillos que sostienen el soporte del<br />
gozne inferior y quite el soporte.<br />
NOTA: Dos Personas Requirieron.<br />
baje el pasador- pivote
3. Remueva los tornillos que sostienen el soporte del<br />
gozne inferior y quite el soporte.<br />
4. Afloje los tornillos que sostienen la bisagra inferior y quítelos.<br />
5. Alinee los agujeros del soporte del gozne inferior con los<br />
agujeros correspondientes en el costado opuesto del gabinete,<br />
para luego insertar y apretar sus tornillos.<br />
6. Instale la puerta del refrigerador: haga que el orificio izquierdo de<br />
la puerta del compartimento del refrigerador caiga sobre el eje de la<br />
bisagra inferior, mueva la puerta hacia atrás y hacia adelante para<br />
enderezarla y alinearla con la bisagra central. Instale la bisagra<br />
central de nuevo, gire el eje de la bisagra hasta que entre<br />
completamente al cuerpo de la puerta, luego fije con los tornillos.<br />
(see fig. 4)<br />
NOTA: Quite los enchufes de doorframe e instálelos en la otra cara.<br />
doorstopper<br />
(lado izquierdo)<br />
pasador- pivote<br />
en el centro<br />
agujeros del tornillo<br />
fig. # 4<br />
fijación en el centro<br />
7. Para instalar la puerta del congelador: haga que el agujero del fondo<br />
izquierdo de puerta del congelador cae sobre el árbol central de la<br />
bisagra; levante la bisagra superior, para poder instalar el árbol de<br />
la bisagra en el agujero superior de la parte superior de la puerta del<br />
congelador; ajuste la puerta para hacerla recta y llana.<br />
Espa ñol<br />
10
Espa ñol<br />
Uso y Funciones del<br />
Refrigerador<br />
Características<br />
generales<br />
Dial para el ajuste de la<br />
temperatura:<br />
El refrigerador mantendrá automáticamente<br />
el nivel de temperatura que seleccione.<br />
El dial de control de temperatura tiene 7<br />
configuraciones además del apagado.<br />
1 es la más cálida. 7 es la más fría.<br />
Si se gira el dial a la posición OFF<br />
(APAGADO), se detiene el enfriamiento<br />
tanto en la sección de refrigerador<br />
como de congelador. En un primer<br />
momento, configure el dial en 4 y deje<br />
pasar 24 horas antes de ajustar la<br />
temperatura como lo desee.<br />
Para ajustar el rango de temperatura en<br />
la configuración fría, gire el dial de la<br />
temperatura hacia la derecha. En<br />
condiciones de funcionamiento<br />
normales, mantenga el dial en el medio<br />
entre la configuración fría y la más fría.<br />
Para su comodidad, en fábrica se<br />
pre-configura el control según las<br />
condiciones funcionamiento normales.<br />
(Nota: Si el refrigerador se<br />
ha ubicado en una posición<br />
horizontal o inclinada durante<br />
cualquier lapso de tiempo,<br />
espere 24 horas antes de<br />
enchufar la unidad).<br />
Entrepaños Interiores del Refrigerador<br />
(Los estantes pueden variar por el Modelo)<br />
11<br />
11<br />
Luz interior de la sección del<br />
refrigerador<br />
Su refrigerador está equipado con una<br />
luz interior automática en la sección de<br />
alimentos frescos para que ubique los<br />
alimentos con facilidad.<br />
El compartimiento del congelador está<br />
equipado con un control ajustable del<br />
flujo de aire. Para su comodidad, el<br />
flujo de aire se pre-configura de fábrica<br />
en la configuración normal. También<br />
está la opción de regular las<br />
configuraciones, ya sea congelamiento<br />
bajo o congelamiento alto.<br />
Su refrigerador puede estar equipado<br />
con un control deslizable para subir o<br />
bajar los niveles de humedad de sus<br />
cajones para frutas y verduras. Esta función<br />
aumenta la vida de almacenamiento<br />
de frutas y vegetales. Simplemente<br />
ajuste los controles en la configuración<br />
adecuada para los elementos que está<br />
almacenando en los cajones para frutas<br />
y verduras. Las configuraciones bajas<br />
permiten que el aire húmedo salga<br />
del cajón, son óptimas para el almacenamiento<br />
de frutas o vegetales que<br />
tienen cáscara. Las configuraciones altas<br />
retienen el aire húmedo en el cajón,<br />
son óptimas para el almacenamiento de<br />
vegetales frescos.<br />
Los entrepaños del refrigerador fueron diseñados pensando en usted. Su<br />
variada ajustabilidad le permite satisfacer sus necesidades personales de<br />
almacenaje. Su modelo puede incluir entrepaños de alambre, vidrio o<br />
vidrio antiderrames. Su modelo puede incluir entrepaños de ancho<br />
completo o ancho medio. Solo el tipo de modelo y su imaginación<br />
limitan las posibilidades.
Para sacar o ajustar un entrepaño deslizable no<br />
voladizo de ancho completo: (vea la figura # 5)<br />
1. Levante ligeramente el entrepaño y deslícelo hacia el frente hasta<br />
sacarlo completamente.<br />
2. Para volver a colocar el entrepaño, seleccione la ubicación deseada y<br />
deslice cuidadosamente el entrepaño hasta que quede enganchado.<br />
Para sacar e instalar el cajón para frutas y verduras:<br />
(vea fig. # 6)<br />
1. Sujete firmemente el cajón y deslícelo hacia afuera completamente.<br />
2. Vuelva a meter el cajón colocándolo correctamente dentro de las guías<br />
y deslizándolo cuidadosamente a su lugar.<br />
Para sacar e volver el cajón para frutas y verduras:<br />
(vea fig. # 7)<br />
1. Sujete cuidadosamente la cubierta del cajón y deslícela<br />
hacia afuera para sacarla.<br />
2. Vuelva a colocar los cajones para frutas y verduras<br />
como se indica anteriormente.<br />
fig. # 5<br />
Cajón para Frutas y Verduras y Cubierta<br />
fig. # 6<br />
fig. # 7<br />
Espa ñol<br />
12<br />
12
Espa ñol<br />
Información sobre el<br />
Almacenamiento de Alimentos<br />
Alimentos Frescos<br />
• Cuando almacene alimentos frescos que no estén preempacados,<br />
asegúrese de envolver o almacenar los alimentos en un material<br />
hermético y a prueba de humedad a menos que se indique de otra<br />
manera. Esto asegurará la vida útil de los entrepaños y prevendrá la<br />
contaminación de olores y sabores.<br />
• Limpie los contenedores antes de almacenarlos para evitar<br />
derrames innecesarios.<br />
• Los huevos deben ser almacenados en su caja original para<br />
aumentar la vida útil del entrepaño.<br />
• Las frutas deben ser lavadas y secadas y luego almacenadas en el<br />
cajón para frutas y verduras en el ajuste de baja humedad para<br />
mantener su frescura. Si no tiene cajones con control de humedad,<br />
coloque las frutas en bolsas plásticas selladas antes de<br />
almacenarlas en el cajón.<br />
• Los vegetales con piel deben ser almacenadas en bolsas o contenedores<br />
de plástico y luego ser almacenadas en el cajón para frutas y verduras<br />
con un ajuste de baja humedad.<br />
• Los vegetales frondosos deben ser lavados y escurridos y luego<br />
almacenados en bolsas o contenedores de plástico en el cajón<br />
para frutas y verduras con un ajuste de alta humedad.<br />
• Debe esperar a que los alimentos calientes se enfríen antes de<br />
almacenarlos en el refrigerador. Esto prevendrá el uso<br />
innecesario de energía.<br />
• Los mariscos frescos deben ser usados el mismo día que se compren.<br />
• Cuando almacene carnes en la sección de alimentos frescos,<br />
manténgala en el paquete original o vuélvala a empacar<br />
conforme sea necesario. Siga las sugerencias de abajo para un<br />
almacenamiento seguro:<br />
• Pollo 1-2 Días<br />
• Carne Molida de Res 1-2 Días<br />
• Carnes Frías 3-5 Días<br />
• Bistecs/Asados 3-5 Días<br />
• Carnes Ahumadas/Curadas 7-10 Días<br />
• Todas las demás 1-2 Días<br />
Si se requieren periodos de almacenamiento más largos, almacénelas<br />
inmediatamente en la sección del congelador.<br />
13
Alimentos Congelados<br />
• Un almacenamiento adecuado en el congelador requiere un embalaje<br />
correcto. Todos los alimentos deben estar en paquetes que no permitan<br />
el flujo de aire o la humedad interior o exterior. Un almacenamiento<br />
incorrecto resultará en la contaminación de olores y sabores y hará que<br />
los alimentos empacados inapropiadamente se sequen.<br />
• Siga las instrucciones del paquete o contenedor para un<br />
almacenamiento adecuado.<br />
• Recomendaciones de Empacamiento:<br />
Contenedores plásticos con tapas herméticas<br />
Papel de aluminio reforzado<br />
Envoltura plástica hecha de una capa de saran<br />
Bolsas plásticas resellables<br />
• No vuelva a congelar los alimentos descongelados.<br />
• Se recomienda anotar la fecha de congelación en el paquete.<br />
Ruidos de Operación Normales<br />
• El ventilador circulando el aire en el interior de su unidad para<br />
mantener la temperatura que ha seleccionado.<br />
• Agua hirviendo, ruidos gorgoteantes o ligeras vibraciones que son el<br />
resultado del gas refrigerante circulando a través del serpentín<br />
de enfriamiento.<br />
• Ambos el temporizador de descongelación y el control del<br />
termostato harán "clic" cuando se enciendan y se apaguen.<br />
Espa ñol<br />
14
Espa ñol<br />
Cuidados y Limpieza<br />
Asecuada<br />
Limpieza y Mantenimiento<br />
Advertencia: Para evitar una descarga eléctrica siempre<br />
desenchufe su refrigerador antes de limpiarlo.<br />
El ignorar esta advertencia puede causar<br />
esiones o la muerte.<br />
Antes de usar productos de limpieza, siempre lea y<br />
Precaución: siga las instrucciones y advertencias del fabricante<br />
para evitar lesiones personales o daños al producto.<br />
En general:<br />
Empaques de la puerta:<br />
15<br />
• Prepare una solución de limpieza de 3-4<br />
cucharadas de bicarbonato de sodio mezclado<br />
con agua tibia. Use una esponja o un trapo<br />
suave, humedecidos con la solución de limpieza,<br />
para limpiar su refrigerador.<br />
• Enjuague con agua limpia tibia y seque con un<br />
trapo suave.<br />
• No use químicos fuertes, abrasivos, amoniaco,<br />
cloro, detergentes concentrados, disolventes o<br />
estropajos metálicos. ALGUNOS de estos<br />
químicos pueden disolver, dañar y/o<br />
decolorar su refrigerador.<br />
• Limpie los empaques de la puerta cada tres meses<br />
de acuerdo a las instrucciones generales. Los<br />
empaques deben mantenerse limpios y flexibles<br />
para asegurar un sellado apropiado.<br />
• El aplicar un poco de vaselina en el lado<br />
articulado de los empaques mantendrá el<br />
empaque flexible y asegurará un<br />
sellado apropiado.
Reemplazo del Foco<br />
1. Apague el interruptor del refrigerador.<br />
2. Saque el entrepaño más alto.<br />
3. Permita que el foco se enfríe antes de quitarlo.<br />
4. Pellizque la cubierta plástica entre dedos y pulgar y estire suavemente<br />
a la izquierda.<br />
5. Quite el foco destornillándolo hacia la izquierda.<br />
6. Siempre reemplácelo con el tipo de foco incluido con la unidad,<br />
que tenga una capacidad de 40 watts o de menor potencia.<br />
7. Nunca exceda los 40 watts de potencia.<br />
8. Para reemplazar la cubierta, la adición clipes traseros en primero y<br />
suavemente clip de frente de empujón en hasta los cierres de la<br />
cubierta en el lugar.<br />
Interrupciones de Energía<br />
• Pueden ocurrir ocasionalmente interrupciones de energía debido a<br />
tormentas eléctricas u otras causas. Desenchufe el cable eléctrico del<br />
tomacorriente de corriente alterna cuando ocurra una interrupción en<br />
el sistema eléctrico. Cuando la electricidad haya regresado, vuelva a<br />
conectar el cable eléctrico a un tomacorriente de corriente alterna. Si<br />
ocurre una interrupción en el sistema eléctrico durante un periodo<br />
prolongado, inspeccione y deseche los alimentos descongelados o<br />
echados a perder en el refrigerador o congelador. Limpie el<br />
refrigerador antes de volver a usarlo.<br />
Vacaciones y Mudanza<br />
• Durante ausencias largas o vacaciones, vacíe la comida del<br />
refrigerador y congelador, coloque el DIAL de temperatura a la posición<br />
de "OFF" (apagado) y limpie el refrigerador y los empaques de la<br />
puerta de acuerdo a la sección de "Limpieza general". Mantenga<br />
las puertas abiertas para que el aire pueda circular en el interior. Al<br />
mudarse, siempre traslade el refrigerador verticalmente. No lo traslade<br />
con la unidad colocada horizontalmente. Pudiera ocurrir un posible<br />
daño el sistema sellado.<br />
Espa ñol<br />
16
Espa ñol<br />
Verificación de Problemas<br />
17<br />
17<br />
El Refrigerador no Funciona:<br />
• Revise que el control del termostato no esté en la posición de "OFF"<br />
(apagado).<br />
• Revise que el refrigerador esté conectado.<br />
• Revise que haya corriente eléctrica en el tomacorriente de<br />
corriente alterna, revisando el interruptor de circuito.<br />
La temperatura de los alimentos parece estar<br />
demasiado tibia:<br />
• Apertura constante de la puerta.<br />
• Dele tiempo a los alimentos tibios para que puedan alcanzar una<br />
temperatura fresca o de congelación.<br />
• Revise que los empaques estén bien sellados.<br />
• Ajuste el control de temperatura al ajuste más frío.<br />
La temperatura de los alimentos es demasiado fría:<br />
• Si el ajuste del control de temperatura es muy frío, ajústelo a una<br />
temperatura más cálida y permita que pasen varias horas hasta<br />
que la temperatura se ajuste.<br />
El refrigerador se enciende frecuentemente:<br />
• Esto puede ser normal para mantener una temperatura constante durante<br />
temperaturas altas y días húmedos.<br />
• Las puertas pudieron haberse abierto frecuentemente o durante un<br />
largo periodo de tiempo.<br />
• Revise que el empaque esté bien sellado.<br />
• Revise que las puertas estén completamente cerradas.<br />
Acumulación de humedad en el interior o exterior<br />
del refrigerador:<br />
• Esto es normal durante periodos de alta humedad.<br />
• Apertura constante o prolongada de la puerta.<br />
• Revise que los empaques de la puerta estén bien sellados.<br />
El refrigerador despide un olor:<br />
• Necesita limpiar el interior.<br />
• Los alimentos envueltos o sellados inadecuadamente están<br />
despidiendo los olores.<br />
La luz del refrigerador no funciona:<br />
• Revise el suministro eléctrico.<br />
• Apriete el foco en el zócalo.<br />
• Reemplace el foco fundido.<br />
La puerta del refrigerador/congelador no<br />
cierra correctamente:<br />
• Nivele el refrigerador.<br />
• Vuelva a alinear la puerta del refrigerador/congelador.<br />
• Revise que no haya obstrucciones como contenedores de alimentos, la<br />
cubierta del cajón para frutas y verduras, entrepaños, recipientes, etc.
Garantía Limitado<br />
¿Qué está cubierto y por<br />
cuánto tiempo?<br />
Esta garantía cubre cualquier defecto en<br />
la manufactura o empleo de materiales<br />
por un plazo de:<br />
12 meses de mano de obra<br />
12 meses en componentes<br />
5 años en el sistema sellado<br />
La garantía comienza en la fecha de<br />
compra del artículo, y la factura original<br />
de compra debe presentarse al centro<br />
de servicio autorizado para poder<br />
efectuar cualquier reparación que esté<br />
bajo garantía.<br />
EXCEPCIONES: Garantía por Uso<br />
Comercial o Bajo Arrendamiento<br />
90 meses en mano de obra<br />
(únicamente en taller)<br />
90 días en componentes<br />
Ninguna otra garantía es válida<br />
¿Qué está cubierto?<br />
1. Los componentes mecánicos y<br />
eléctricos que cumplen con alguna<br />
función de este aparato durante un<br />
plazo de 12 meses. Esto incluye<br />
cualquier componente con excepción<br />
acabados y molduras.<br />
2. Los componentes del sistema sellado,<br />
como por ejemplo: compresor<br />
hermético, condensador, y<br />
evaporador, por defectos de<br />
manufactura durante un plazo de 5<br />
años a partir de la fecha de compra.<br />
Cualesquier daños a tales<br />
componentes causados por abuso<br />
mecánico o manejo o transportación<br />
inadecuada no serán cubiertos.<br />
¿Qué se hará?<br />
1. Repararemos o reemplazaremos, a<br />
discreción nuestra, cualquier<br />
componente mecánico o eléctrico que<br />
se muestre defectuoso por uso normal<br />
durante el plazo así especificado.<br />
2. No habrá cargos para el comprador<br />
por las partes y la mano de obra<br />
en cualesquier artículos cubiertos<br />
durante el periodo inicial de 12<br />
meses. Al término de este periodo<br />
solo las partes son cubiertas en la<br />
garantía restante. La mano de obra<br />
no está provista y debe ser cubierta<br />
por el cliente.<br />
ESTA GARANTIA CUBRE<br />
APARATOS DENTRO DEL<br />
TERRITORIO CONTINENTAL DE<br />
LOS ESTADOS UNIDOS, PUERTO<br />
RICO Y CANADÁ.<br />
Daños por instalación inadecuada.<br />
Daños por transportación.<br />
Defectos que no sean por manufactura.<br />
Daños por negligencia, abuso,<br />
accidente, alteraci-ón, falta de cuidado<br />
adecuado y de mantenimiento, o<br />
conexión a tensión eléctrica incorrecta.<br />
Daños que no sean por uso doméstico.<br />
Daños por servicio que no sea<br />
proporcionado a través de un<br />
distribuidor o centro de servicio<br />
autorizado. Molduras decorativas o<br />
focos reemplazables.<br />
Envío y transportación.<br />
Mano de obra (después de los primeros<br />
12 meses).<br />
ESTA GARANTIA LIMITADA ES<br />
PROVISTA EN SUSTITUCION A<br />
CUALQUIER OTRA GARANTIA<br />
EXPRESADA O QUE IMPLIQUE LAS<br />
GARANTIAS MERCANTILES SUJETAS A<br />
CIERTO PROPOSITO.<br />
El amparo provisto por esta garantía es<br />
de uso exclusivo y se otorga en<br />
sustitución a cualquier otro amparo.<br />
Esta garantía no cubre daños<br />
incidentales o sus derivados, por lo que<br />
las anteriores restricciones pueden serle<br />
ajenas. En ciertos estados no se<br />
permiten restricciones en lo que se<br />
refiere a la duración implícita de una<br />
garantía, por lo que las anteriores<br />
restricciones pueden serle ajenas.<br />
Esta garantía le otorga ciertos derechos<br />
legales y es posible que usted goce de<br />
otros derechos, los cuales varían de<br />
estado a estado.<br />
Espa ñol<br />
18<br />
18
English<br />
SAFETY PRECAUTIONS<br />
Read all of the instructions before using this appliance. When using this<br />
appliance, always exercise basic safety precautions, including the<br />
following:<br />
1) Use this appliance only for its intended purpose as described in this use<br />
and care guide.<br />
2) This refrigerator must be properly installed in accordance with the<br />
installation instructions before it is used. See grounding instructions in the<br />
installation section.<br />
3) Never unplug your refrigerator by pulling on the power cord. Always<br />
grasp the plug firmly and pull straight out from the outlet.<br />
4) Repair or replace immediately, all electric service cords that have become<br />
frayed or otherwise damaged. Do not use a cord that shows cracks or<br />
abrasion damage along its length, the plug or the connector end.<br />
5) Unplug your refrigerator before cleaning or before making any repairs.<br />
Note: If for any reason this product requires service, we strongly<br />
recommend that a certified technician performs the service.<br />
6) Do not use any electrical device or any sharp instrument in defrosting your<br />
refrigerator.<br />
7) If your old refrigerator is not being used, we recommend that you remove<br />
the doors and leave the shelves in place. This will reduce the possibility of<br />
danger to children.<br />
8) After your refrigerator is in operation, do not touch the cold surfaces in<br />
the freezer compartment, particularly when hands are damp or wet. Skin<br />
may adhere to these extremely cold surfaces.<br />
9) Do not refreeze foods which have been thawed completely. The United<br />
States Department of Agriculture in Home and Garden Bulletin No. 69<br />
reads: "…You may safely refreeze frozen foods that have thawed if they<br />
still contain ice crystals or if they are still cold-below 40˚F".<br />
1<br />
"…Thawed ground meats, poultry, or fish that have any off-odor or<br />
off-color should not be refrozen and should not be eaten. Thawed ice<br />
cream should be discarded. If the odor or color of any food is poor or<br />
questionable, discard it. The food may be dangerous to eat."<br />
"…Even partial thawing and re-freezing reduce the eating quality of<br />
foods, particularly fruits, vegetables, and prepared foods. The eating<br />
quality of red meats is affected less than that of many other foods. Use<br />
refrozen foods as soon as possible, to save as much of its eating quality<br />
as you can."
10) This refrigerator should not be recessed or built-in in an enclosed<br />
cabinet. It is designed for freestanding installation only.<br />
11) Do not operate your refrigerator in the presence of explosive fumes.<br />
SAVE THESE INSTRUCTIONS<br />
for future use<br />
Thank you for using our <strong>Haier</strong><br />
product. This easy-to-use manual will<br />
guide you in getting the best use of<br />
your refrigerator.<br />
Remember to record the model and<br />
serial number. They are on a label in<br />
back of the refrigerator.<br />
DANGER<br />
Risk of child entrapment. Before you throw away your old<br />
refrigerator or freezer, take off the doors. Leave the shelves<br />
in place so that children may not easily climb inside.<br />
Model number<br />
Serial number<br />
Date of purchase<br />
Staple your receipt to your manual. You will need it to obtain<br />
warranty service.<br />
English<br />
2
English<br />
Table Of Contents<br />
PAGE<br />
Safety Precautions...........................................................................1<br />
Parts And Features..........................................................................4<br />
Installing Your Refrigerator ...........................................................5<br />
Unpacking Your Refrigerator...................................................................5<br />
Adjusting Your Refrigerator.....................................................................5<br />
Proper Air Circulation ............................................................................5<br />
Electrical Requirements ...........................................................................6<br />
Door Alignment .....................................................................................7<br />
Reversing the Door Swing.......................................................................8<br />
Refrigerator Features And Use .................................................. 10<br />
General Features................................................................................. 10<br />
Refrigerator Interior Shelves ................................................................. 10<br />
Crisper and Crisper Cover................................................................... 11<br />
Food Storage Information .................................................................... 12<br />
Normal Operating Sounds................................................................... 13<br />
Proper Refrigerator Care and Cleaning ................................... 14<br />
Cleaning and Maintenance.................................................................. 14<br />
Light Bulb Replacement........................................................................ 15<br />
Power Interruptions ............................................................................. 15<br />
Vacation and Moving Care.................................................................. 15<br />
Troubleshooting............................................................................. 16<br />
Warranty Information.................................................................. 18<br />
3
Parts And Features<br />
10<br />
9<br />
8<br />
7<br />
6<br />
5<br />
(Features may vary per model)<br />
1. Ice Cube Trays<br />
2. Full-Width Freezer Door Shelves<br />
3. Full-Width Door Shelf<br />
4. Adjustable Front Leveling Legs<br />
(not shown)<br />
5. Clear Crisper<br />
6. Clear Glass Crisper Cover<br />
7. Adjustable Full-Width Wire Shelves<br />
(number will vary by model)<br />
8. Adjustable Mechanical<br />
Temperature Control<br />
9. Interior Light<br />
1<br />
4<br />
10. Freezer Shelf<br />
11<br />
16<br />
13<br />
12<br />
17<br />
15<br />
14<br />
11. Gallon Storage Compartment<br />
12. Can Storage (not on all models)<br />
13. 1/2 Width Shelf Storage<br />
Compartment (not on all models)<br />
14. Half-Width Shelf, 2 Liter Bottle<br />
Storage Compartment<br />
15. Crisper Humidity Control<br />
16. Air Flow Control<br />
17. Condiments Storage Shelf<br />
(not on all models)<br />
2<br />
3<br />
English<br />
4<br />
4
English<br />
Installing Your Refrigerator<br />
Unpacking Your Refrigerator<br />
1. Remove all packaging material. This includes the foam base and<br />
all adhesive tape holding the refrigerator accessories inside an<br />
outside. Slide out and remove plastic or foam guard used to<br />
secure the compressor from shipping damage due to vibration<br />
and shock.<br />
2. Inspect and remove any remains of packing, tape or printed<br />
materials before powering on the refrigerator.<br />
Adjusting Your Refrigerator<br />
Leveling Your Refrigerator:<br />
• Your refrigerator has two leveling legs which are located in the<br />
front corners of your refrigerator. After properly placing your<br />
refrigerator in its final position, you can level your refrigerator.<br />
• Leveling legs can be adjusted by turning them counterclockwise to raise<br />
your refrigerator or by turning them clockwise to lower<br />
your refrigerator. The refrigerator door will close easier when the<br />
leveling legs are raised.<br />
Proper Air Circulation<br />
5<br />
• To ensure that your refrigerator works at the maximum efficiency it was<br />
designed for, you should install it in a location where there is proper air<br />
circulation, plumbing and electrical connections.<br />
• The following are recommended clearances around the<br />
refrigerator:<br />
Sides……………3/4 "(19mm)<br />
Top....................1" (25mm)<br />
Back..................1" (25mm)
Electrical Requirement<br />
• Make sure there is a suitable power outlet (115 volts, 15 amps outlet)<br />
with proper grounding to power the refrigerator.<br />
• Avoid the use of three-plug adapters or cutting off the third grounding<br />
in order to accommodate a two-plug outlet. This is a dangerous practice<br />
since it provides no effective grounding for the refrigerator and may<br />
result in shock hazard.<br />
Installation Limitations<br />
• Do not install your refrigerator in any location not properly insulated or<br />
heated, e.g. garage etc. Your refrigerator was not designed to operate<br />
in temperature settings below 55˚ Fahrenheit.<br />
• Select a suitable location for the refrigerator on a hard, even<br />
surface away from direct sunlight or heat source, e.g. radiators,<br />
baseboard heaters, cooking appliances etc. Any floor unevenness<br />
should be corrected with the leveling legs located on the front bottom<br />
corners of the refrigerator.<br />
Use of Extension Cords<br />
• Avoid the use of an extension cord because of potential safety hazards<br />
under certain conditions. If it is necessary to use an extension cord, use<br />
only a 3-wire extension cord that has a 3-blade grounding plug and a<br />
3-slot outlet that will accept the plug. The marked rating of the extension<br />
cord must be equal to or greater than the electrical rating of the<br />
appliance.<br />
English<br />
6
English<br />
Door Alignment<br />
Hinge<br />
cover<br />
Freezer Door: (see fig. # 1)<br />
1. Remove hinge cover screw.<br />
2. Remove the top hinge cover.<br />
3. Loosen the top hinge screws using a Phillips head screwdriver.<br />
4. Adjust the door or put a spacer in between and then tighten the screws.<br />
5. Replace the top hinge cover.<br />
Top hinge<br />
Reversing the Door Swing<br />
7<br />
fig. # 1<br />
Left/right door opening method:<br />
This product allows you to reverse the door opening from left to right and<br />
back. You can select your preference of door opening by following the<br />
procedure to make the change.<br />
Dismantling: (see fig. # 1 and fig. # 2)<br />
1. Affix refrigerator and freezer door by sticking adhesive tape on both<br />
sides to hold doors in place.<br />
2. As shown in fig. 1, dismantle the hinge cover on the upper part of<br />
freezer door with a Phillips head screwdriver. Then remove the three<br />
screws that hold the hinge. Take out the hinge by pulling it vertically,<br />
and keep it in a safe place.<br />
3. Remove the adhesive tape on freezer door, lift it and take off the door,<br />
and carefully put it aside.<br />
4. Dismantle two screws of the central hinge, lift it and take off the central<br />
hinge, and keep them in a safe place. (see fig # 2)<br />
5. Remove the adhesive tape on refrigerator door, lift it and take<br />
refrigerator door, and carefully put it aside.<br />
6. Remove the doorstoppers from the refrigerator and freezer doors.<br />
7. Insert left side doorstopper (provided in your packing) on the left side<br />
bottom hole of the refrigerator door and on the left side bottom hole of<br />
the freezer door. Fasten with screws provided.
screw holes<br />
central hinge<br />
doorstopper (right side)<br />
middle pivot pin<br />
fig. # 2<br />
Reinstallation: (see fig. # 3 and fig. # 4)<br />
1. Remove the lower pivot pin from the lower hinge by turning counter<br />
clockwise. Move the pin to the opposite hole and tighten. (see below)<br />
fig. # 3<br />
bottom of unit<br />
bottom hinge<br />
lower pivot pin<br />
2. Tilt refrigerator on a 45-degree angle to have access to the<br />
bottom front.<br />
NOTE: Two People Required.<br />
English<br />
8
English<br />
3. Remove both left and right front feet from bottom.<br />
4. Loosen the screws holding the bottom hinge<br />
and remove it.<br />
5. Align the holes in the bottom hinge to the corresponding holes on the<br />
opposite side of the cabinet. Insert and tighten the screws. Reinstall both<br />
front feet.<br />
6. To install refrigerator door: Line up the left bottom hole of the<br />
refrigerator compartment door over the bottom hinge pin. Move<br />
door forward to make it straight and align with central hinge.<br />
Install the central hinge again, and turn the hinge axle until it<br />
completely enters the door body. Secure it with the screws provided.<br />
(see fig. 4)<br />
NOTE: Remove plugs from doorframe and install on other side.<br />
doorstopper (left side)<br />
9<br />
middle pivot pin<br />
screw holes<br />
central hinge<br />
fig. # 4<br />
7. To install freezer door: Lineup left bottom hole of the door over the<br />
central hinge middle pin. Move door forward to make it straight<br />
and align with freezer compartment. Place over left side the top hinge,<br />
align holes with hole on the refrigerator top and tighten with the<br />
screws provided.
Refrigerator Features And Use<br />
General Features<br />
Adjustable temperature dial:<br />
Your refrigerator will automatically<br />
maintain the temperature level you<br />
select. The temperature control dial has<br />
7 settings plus off. 1 is the warmest. 7<br />
is the coldest. Turning the dial to OFF<br />
stops cooling in both the refrigeration<br />
and freezer sections. At first, set the<br />
dial to 4 and allow 24 hours to pass<br />
before adjusting the temperature to your<br />
needs.<br />
To adjust the temperature range in the<br />
cold setting, turn the temperature dial in<br />
a clockwise direction. For normal<br />
operating conditions, keep the dial<br />
halfway between cold and coldest. For<br />
your convenience, the factory presets the<br />
control at normal operating conditions.<br />
(Note: If the refrigerator has<br />
been placed in a horizontal or<br />
tilted position for any period<br />
of time wait 24 hours before<br />
plugging the unit in.)<br />
Refrigerator Interior Shelves<br />
(Shelves May vary by Model)<br />
The refrigerator shelves of your refrigerator were designed with you<br />
in mind. Their varied adjustability allows you to satisfy your personal<br />
storage needs.<br />
To remove or adjust a full-width<br />
slide-out shelf: (see fig. # 5)<br />
Refrigerator Section<br />
Interior Light:<br />
Your refrigerator is equipped with an<br />
interior light in the fresh food section for<br />
you to easily locate your food.<br />
Your freezer compartment is equipped<br />
with adjustable airflow control. For<br />
your convenience, airflow is preset by<br />
the factory to the colder setting. There<br />
is also an option to adjust the settings,<br />
either to cold or to coldest.<br />
Your refrigerator may be equipped with<br />
slide control to raise or lower the<br />
humidity levels or your crispers. This<br />
feature will increase the storage life of<br />
your fruits and vegetables. Simply adjust<br />
the controls to the appropriate setting<br />
for setting for items you are storing in<br />
the crispers. Low settings allow moist air<br />
to exit the crisper, for optimum storage<br />
of fruit and/or vegetables that have<br />
skins. High settings retains moist air in<br />
the crisper, for optimum storage of fresh<br />
vegetables.<br />
1. Gently tilt the shelf up and slide forward until the shelf has been<br />
completely removed.<br />
2. To replace the shelf, select the desired setting and gently slide the<br />
shelf back until it rests in the locking position.<br />
fig. # 5<br />
English<br />
10<br />
10
English<br />
Crisper and Crisper Cover<br />
11<br />
To remove and install the crisper: (see fig. # 6)<br />
1. Grip the crisper firmly and slide out completely.<br />
2. Replace the crisper by placing the crisper properly in position and<br />
gently sliding it back into place.<br />
fig. # 6<br />
Removing or replacing the crisper cover: (see fig. # 7)<br />
1. Carefully grasp the crisper cover and slide out to remove.<br />
fig. # 7<br />
2. To replace, slide the rear of the crisper cover into the right and left slots<br />
above the crisper area and gently slide back into place.
Food Storage Information<br />
Fresh Food<br />
• When storing fresh food that is not prepackaged, be sure to wrap or<br />
store food in airtight and moisture-proof material unless otherwise<br />
noted. This will ensure proper shelf life and prevent the transfer of<br />
odors and tastes.<br />
• Wipe containers before storing to avoid needless spills.<br />
• Eggs should be stored in an upright position in their original<br />
carton to maximize shelf life.<br />
• Fruit should be washed and dried, then stored in sealed plastic bags<br />
before storing in the refrigerator.<br />
• Vegetables with skins should be stored in plastic bags or<br />
containers.<br />
• Leafy vegetables should be washed and dried, then stored in<br />
plastic bags or containers.<br />
• Hot food should be allowed to cool before storing in the<br />
refrigerator. This will prevent unnecessary energy use.<br />
• Fresh seafood should be used the same day as purchased.<br />
• When storing meats in the fresh food section, keep in the original<br />
packaging or rewrap as necessary. Follow the suggestions below for<br />
safe storage:<br />
• Chicken 1-2 Days<br />
• Ground Beef 1-2 Days<br />
• Cold Cuts 3-5 Days<br />
• Steaks/Roasts 3-5 Days<br />
• Smoked/Cured Meats 7-10 Days<br />
• All others 1-2 Days<br />
If longer periods of storage are required, store immediately in the freezer<br />
section.<br />
English<br />
12
English English<br />
Frozen Food<br />
• Proper freezer storage requires correct packaging. All foods must be<br />
in packages that do not allow the flow of air or moisture in or out.<br />
Improper storage will result in odor and taste transfer and will result in<br />
the drying out of the improperly packaged food.<br />
• Follow package or container instructions for proper storage.<br />
• Packaging Recommendations:<br />
Plastic containers with air tight lids<br />
Heavy duty aluminum foil<br />
Plastic wrap made from saran film<br />
Self-sealing plastic bags<br />
• Do not refreeze defrosted/thawed foods.<br />
• It is recommended that the freezing date be marked on the<br />
packaging.<br />
Normal Operating Sounds You May Hear<br />
13<br />
• The fan circulating air inside the interior of your unit to maintain the<br />
temperature you have selected.<br />
• Boiling water, gurgling sounds or slight vibrations that are the result of<br />
the refrigerant circulating through the cooling coils.<br />
• The thermostat control will click when it cycles on and off.
Proper Refrigerator Care<br />
and Cleaning<br />
Cleaning and Maintenance<br />
Warning: To avoid electric shock always unplug your<br />
refrigerator before cleaning. Ignoring this warning<br />
may result in death or injury.<br />
Caution: Before using cleaning products, always read and<br />
follow manufacturer’s instructions and warnings to<br />
avoid personal injury or product damage.<br />
General:<br />
• Prepare a cleaning solution of 3-4 tablespoons of<br />
baking soda mixed with warm water. Use sponge or<br />
soft cloth, dampened with the cleaning<br />
solution, to wipe down your refrigerator.<br />
• Rinse with clean warm water and dry with a soft cloth.<br />
• Do not use harsh chemicals, abrasives, ammonia,<br />
chlorine bleach,concentrated detergents, solvents or<br />
metal scouring pads. Some of these chemicals may<br />
dissolve, damage and/or discolor your<br />
refrigerator.<br />
Door Gaskets:<br />
• Clean door gaskets every three months according to<br />
general instructions. Gaskets must be kept clean and<br />
pliable to ensure a proper seal.<br />
• Petroleum jelly applied lightly on the hinge side of<br />
gaskets will keep the gasket pliable and ensure a good<br />
seal.<br />
Refrigerators: HRF08WND/HRF10WND/HRF12WND<br />
We recommend that you clean the rear of the refrigerator at least twice a year.<br />
Some operating environments may require more frequent cleaning.<br />
• Slowly pull the refrigerator straight out away from the wall.<br />
Note: Do not move the refrigerator sideways as this may cause damage to the<br />
floor covering of your refrigerator.<br />
• Unplug the refrigerator.<br />
• Use a vacuum or a brush to clean coils.<br />
• When cleaning has been completed, plug the cord back into the outlet and slide<br />
the refrigerator straight back to its original position.<br />
Note: When pushing it back, be sure not to roll over the power cord.<br />
English<br />
English<br />
14
English English<br />
Light Bulb Replacement<br />
1. Switch off power to refrigerator.<br />
2. Remove the highest shelf.<br />
3. Allow light bulb to cool before removing.<br />
4. Pinch the plastic cover between fingers and<br />
thumb and gently pull to the left.<br />
5. Remove the bulb by screwing it counter-clockwise.<br />
6. Always replace with appliance-type light bulb rated at 15 watts<br />
or lesser wattage.<br />
7. Do not exceed the 15 watts rating at any time.<br />
8. To replace cover, insert rear clips in first and gently push front<br />
clip in until the cover snaps into place.<br />
Power Interruptions<br />
• Occasionally there may be power interruptions due to<br />
thunderstorms or other causes. Remove the power cord from AC outlet<br />
when a power outage occurs. When power has been restored, replug<br />
power cord to AC outlet. If outage is for a prolonged period, inspect<br />
and discard spoiled or thawed food in freezer and refrigerator. Clean<br />
refrigerator before reusing.<br />
Vacation and Moving Care<br />
15<br />
• For long vacations or absences, empty food from refrigerator and<br />
freezer, move the temperature to the OFF position and clean the<br />
refrigerator and door gaskets according to "General cleaning"<br />
section. Prop doors open, so air can circulate inside.When moving<br />
always move the refrigerator vertically. Do not move with the unit lying<br />
down. Possible damage to the sealed system could occur.
Troubleshooting<br />
Refrigerator Does Not Operate<br />
• Check if thermostat control is not in the “OFF” position.<br />
• Check if refrigerator is plugged in.<br />
• Check if there is power at the AC outlet, by checking the circuit breaker.<br />
Food temperature appears too warm<br />
• Frequent door openings.<br />
• Allow time for recently added warm food to reach fresh food or<br />
freezer temperature.<br />
• Check gaskets for proper seal.<br />
• Adjust temperature control to colder setting.<br />
Food temperature is too cold<br />
• If temperature control setting is too cold, adjust to a warmer<br />
setting and allow several hours for temperature to adjust.<br />
Refrigerator runs too frequently<br />
• This may be normal to maintain constant temperature during<br />
high temperature and humid days.<br />
• Doors may have been opened frequently or for an extended<br />
period of time.<br />
• Check gasket for proper seal.<br />
• Check to see if doors are completely closed.<br />
English<br />
English<br />
16
English English<br />
17<br />
Moisture build-up on interior or exterior<br />
of the refrigerator:<br />
• This is normal during high humidity periods.<br />
• Prolonged or frequent door openings.<br />
• Check door gaskets for proper seal.<br />
Refrigerator has an odor:<br />
• Interior needs cleaning.<br />
• Foods improperly wrapped or sealed are giving off odors.<br />
Refrigerator light does not work:<br />
• Check power supply.<br />
• Tighten bulb in socket.<br />
• Replace burned-out bulb.<br />
Refrigerator/Freezer door does not shut properly:<br />
• Level the refrigerator.<br />
• Realign refrigerator/freezer door.<br />
• Check for blockages e.g. food containers, crisper cover,<br />
shelves, bins etc.
Limited Warranty<br />
What is covered and for how<br />
long?<br />
This warranty covers all defects in<br />
workmanship or materials for a<br />
period of:<br />
12 months labor (In-Home Service)<br />
12 months parts<br />
5 years sealed system<br />
The warranty commences on the date<br />
the item was purchased and the original<br />
purchase receipt must be presented to<br />
the authorized service center before<br />
warranty repairs are rendered.<br />
EXCEPTIONS: Commercial or<br />
Rental Use warranty<br />
90 days labor (carry-in only)<br />
90 days parts<br />
No other warranty applies<br />
What is covered.<br />
1. The mechanical and electrical parts,<br />
which serve as a functional, purpose<br />
of this appliance for a period of 12<br />
months. This includes all parts except<br />
finish, and trim.<br />
2. The components of the sealed system<br />
e.g. hermetic compressor, condenser<br />
and evaporator from manufacturing<br />
defects for a period of 5 years from<br />
the date of purchase. Any damages<br />
to such components caused by<br />
mechanical abuse or improper<br />
handling or shipping will not be<br />
covered.<br />
What will be done?<br />
1. We will repair or replace, at our<br />
discretion any mechanical or<br />
electrical part which proves to be<br />
defective in normal usage during the<br />
warranty period so specified.<br />
2. There will be no charge to the<br />
purchaser for parts and labor on any<br />
covered items during the initial 12<br />
month period. Beyond this period only<br />
parts are covered in the remaining<br />
warranty. Labor is not provided and<br />
must be paid by the customer.<br />
THIS WARRANTY COVERS<br />
APPLIANCES WITHIN THE<br />
CONTINENTAL UNITED STATES,<br />
PUERTO RICO AND CANADA.<br />
IT DOES NOT COVER<br />
THE FOLLOWING:<br />
Damages from improper installation.<br />
Damages in shipping.<br />
Defects other than manufacturing.<br />
Damage from misuse, abuse, accident,<br />
alteration, lack of proper care and<br />
maintenance or incorrect current or<br />
voltage.<br />
Damage from other than household use.<br />
Damage from service by other than an<br />
authorized dealer or service center.<br />
Decorative trims or replaceable<br />
light bulbs.<br />
Transportation and shipping.<br />
Labor (after the initial 12 months).<br />
THIS LIMITED WARRANTY IS GIVEN<br />
IN LIEU OF ALL OTHER WARRANTIES,<br />
EXPRESSED OR, INCLUDING THE<br />
WARRANTIES OF MERCHANTABILITY<br />
AND FITNESS FOR A PARTICULAR<br />
PURPOSE<br />
The remedy provided in this warranty<br />
is exclusive and is granted in lieu of all<br />
other remedies.<br />
This warranty does not cover incidental<br />
or consequential damages, so the above<br />
limitations may not apply to you. Some<br />
States do not allow limitations on how<br />
long an implied warranty lasts, so the<br />
above limitations may not apply to you.<br />
This warranty gives you specific legal<br />
rights, and you may have other rights,<br />
which vary, from state to state.<br />
English<br />
English<br />
18<br />
18
115V, 60 Hz<br />
Hecho en China<br />
Made in China