Mini Kreg Jig Instructions - Kreg Tool
Mini Kreg Jig Instructions - Kreg Tool
Mini Kreg Jig Instructions - Kreg Tool

Create successful ePaper yourself
Turn your PDF publications into a flip-book with our unique Google optimized e-Paper software.
Model MKJ / MKJK <strong>Instructions</strong><br />
Thank you for purchasing the <strong>Mini</strong> <strong>Kreg</strong> <strong>Jig</strong>. This guide will provide you with the instructions and techniques for using the<br />
tool. Please review the following information to become familiarized with the tool before actual use.<br />
1. General<br />
If you are new to pocket hole joinery there are three simple elements that apply to every pocket hole joint. To get<br />
the most out of your <strong>Mini</strong> pocket hole tool you need to know how these elements work together:<br />
A. Positioning the jig<br />
B. Setting the drilling depth<br />
C. Choosing the right thread pitch and screw length<br />
A. Positioning the <strong>Jig</strong><br />
There are three standard material thicknesses widely used in woodworking today. They are...<br />
1. 3/4" (19mm) material found in furniture and cabinetry<br />
2. 1/2" (13mm) material commonly used in drawer box construction<br />
3. 1-1/2" (38mm) material used in light frame construction (i.e. decks, patio furniture, home improvements)<br />
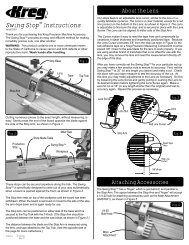
The primary design of this tool is to place a pocket hole so that when the screw is driven, it emerges at or near the<br />
midpoint of the material thickness being drilled. As the standard material thickness changes, so does the position of the jig to successfully center the screw and achieve maximum joint<br />
strength. As shown in Fig. 1, the jig is positioned for standard 3/4" (19mm) thick material. Simply align the edge of the jig flush with the end of the workpiece and clamp to position it<br />
correctly. To set the jig for working with 1/2" (13mm) material position the edge of the jig 1/4" (6mm) beyond the edge of the workpiece and clamp. To center a screw in 1-1/2" (38mm)<br />
material, set the end of the jig back from the edge of the workpiece 1-1/4" (32mm).<br />
B. Setting the Drilling Depth (Depth Collar Adjustment)<br />
Each jig position has its recommended drilling depth. To drill in 3/4" (19mm) material for example, set the Depth Collar 3-1/2" (89mm) from the Step of the drill bit (see figure 1A) using a<br />
folding rule or tape measure. This will place the tip of the bit approximately 1/8" (3mm) from the edge of the workpiece. Adjust the depth collar to 3-5/16" (84mm) from the step of the bit<br />
for 1/2" (13mm) material and 4-1/4" (108mm) from the step of the bit for 1-1/2" (38mm) material. To set the depth, simply slide the Depth Collar onto the loose drill bit shank (the bit should<br />
not be chucked into the drill). Measure and position the Depth Collar the desired distance from the Step of the drill. Tighten the setscrew with the Allen wrench provided. Now chuck the<br />
KJD bit/collar into your drill.<br />
NOTE: For best results we recommend using a corded electric drill rated at 2,000 rpm or above.<br />
C. Thread Pitch and Screw Length<br />
You’ll want to use a self-tapping screw when assembling pocket hole joints. The self-tapping feature of the screw eliminates the need to pre-drill the second workpiece when joining two<br />
pieces of material. For each material thickness you will want to select the correct thread pitch and screw length. Use a fine thread screw in hardwoods such as oak, maple, hickory, cherry,<br />
walnut and birch. Use a coarse thread screw in softer materials such as pine, plywood, particle board and MDF. Recommended screw lengths for each thickness are shown below.<br />
- For 3/4" (19mm) material -- use a 1-1/4" (32mm) screw - For 1/2" (13mm) material -- use a 1" (25mm) screw - For 1-1/2" (38mm) material -- use a 2-1/2" (64mm) screw<br />
2. Drilling the First Holes<br />
To drill your first pocket holes, first clamp the jig to the workpiece with a Face Clamp or a similar woodworking clamp. Second, use a woodworkers clamp to secure the material with the jig<br />
attached to your workbench. Insert the tip of the drill bit half way into the Drill Guide. Start the drill to full speed, and plunge the drill into the guide until the Depth Collar contacts the rim<br />
of the Drill Guide. Back the drill out and let the bit stop turning. (Note: When drilling your first few holes you may notice some blue plastic chips. This is normal and is a result of the tight<br />
tolerances placed on the KJD bit and drill guide.)<br />
CAUTION: NEVER ATTEMPT TO HOLD THE JIG IN YOUR HAND WHEN DRILLING. THE TOOL MUST BE CLAMPED TO THE WOOD FOR THIS STEP.<br />
FAILURE TO FOLLOW THESE INSTRUCTIONS COULD RESULT IN PERSONAL INJURY AND/OR DAMAGE TO THE TOOL(S).<br />
3. Assembly / Driving Pocket Hole Screws (face frame example)<br />
If you are using a Face Clamp to assemble the joint place the large pad of the clamp on the face side of the joint. Be sure that both pads are equally balanced over each workpiece at the<br />
joint line. Adjust the closure pressure until the two parts are firmly secured. The Face Clamp will keep the face surface of the two pieces flush with each other during assembly. It is<br />
recommended to drive the screws with a cordless drill/driver that has an adjustable clutch. Start with a light clutch setting and adjust torque as necessary to seat the pocket hole screw.<br />
Because the hardness varies among wood species, plywood and composites, drive a few “test” screws to select the proper clutch setting on your drill for the material you are assembling.<br />
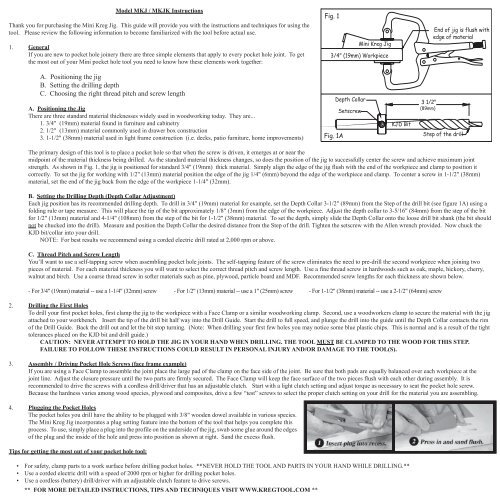
4. Plugging the Pocket Holes<br />
The pocket holes you drill have the ability to be plugged with 3/8" wooden dowel available in various species.<br />
The <strong>Mini</strong> <strong>Kreg</strong> <strong>Jig</strong> incorporates a plug setting feature into the bottom of the tool that helps you complete this<br />
process. To use, simply place a plug into the profile on the underside of the jig, swab some glue around the edges<br />
of the plug and the inside of the hole and press into position as shown at right. Sand the excess flush.<br />
Tips for getting the most out of your pocket hole tool:<br />
• For safety, clamp parts to a work surface before drilling pocket holes. **NEVER HOLD THE TOOL AND PARTS IN YOUR HAND WHILE DRILLING.**<br />
• Use a corded electric drill with a speed of 2000 rpm or higher for drilling pocket holes.<br />
• Use a cordless (battery) drill/driver with an adjustable clutch feature to drive screws.<br />
** FOR MORE DETAILED INSTRUCTIONS, TIPS AND TECHNIQUES VISIT WWW.KREGTOOL.COM **<br />
Fig. 1<br />
<strong>Mini</strong> <strong>Kreg</strong> <strong>Jig</strong><br />
3/4" (19mm) Workpiece<br />
Depth Collar<br />
Setscrew<br />
Fig. 1A<br />
KJD Bit<br />
3 1/2"<br />
(89mm)<br />
End of jig is flush with<br />
edge of material<br />
Step of the drill
Instrucciones para el modelo MKJ / MKJK<br />
Gracias por adquirir el <strong>Mini</strong> <strong>Kreg</strong> <strong>Jig</strong>. Esta guía le ofrecerá las instrucciones y técnicas necesarias para usar la herramienta. Revise<br />
por favor la información siguiente para familiarizarse con la herramienta antes de usarla.<br />
1. General<br />
Si no ha practicado antes la ebanistería a base de agujeros de bolsada, debemos aclararle que en este tipo de ebanistería todo<br />
empalme involucra tres sencillos elementos, y que es preciso saber cómo éstos trabajan juntos si desea aprovechar al máximo la<br />
miniherramienta para agujeros de bolsada:<br />
A. Colocando la guía en posición<br />
B. Fijando la profundidad de la perforación<br />
C. Eligiendo el espaciado correcto de rosca y la longitud correcta de tornillo<br />
A. Colocando la guía en posición<br />
Tres grosores estándares de material suelen usarse hoy en ebanistería:<br />
1. Materiales de 19 mm (3/4”) en mobiliario y armarios<br />
2. Materiales de 13 mm (1/2”) para elaborar cajones de armario<br />
3. Materiales de 38 mm (1-1/2”) para construir armazones livianas (por ejemplo terrazas, mobiliario de patio, mejoras para el hogar).<br />
Esta herramienta está diseñada principalmente para hacer un agujero de bolsada de manera que al introducir un tornillo, éste quede<br />
lo más cerca posible del punto medio en el grosor del material perforado. Cada vez que cambia el grosor del material cambia la posición de la guía para centrar el tornillo y lograr la máxima fortaleza<br />
de empalme. En la Gráfica 1 la guía está en la posición correcta para materiales de 19 mm (3/4”). Alinee el borde de la guía de manera que quede a ras con el borde de la pieza de trabajo y sujételo.<br />
Para trabajar materiales de 13 mm (1/2”), coloque el borde de la guía 6 mm (1/4”) más allá del borde la pieza de trabajo y sujétela. Si desea centrar un tornillo para trabajar materiales de 38 mm (1-<br />
1/2”), fije el extremo de la guía 32 mm (1-1/4”) antes de llegar al borde de la pieza de trabajo.<br />
B. Fijando la profundidad de perforación (ajuste del anillo de profundidad)<br />
Para cada posición de la guía hay una profundidad de perforación recomendada. Si desea perforar materiales de 19 mm (3/4”) por ejemplo, fije el Anillo de Profundidad a 89 mm (3-1/2”) del Escalón<br />
de la broca (ver Gráfica 1A) usando un metro plegadizo o una cinta métrica. Esto colocará la punta de la broca a aproximadamente 3 mm (1/8”) del borde de la pieza de trabajo. Para materiales de 13<br />
mm (1/2”), ajuste el anillo de profundidad a 84 mm (3-5/16”) con relación al escalón de la broca, y para materiales de 38 mm (1-1/2”), a 108 mm (4-1/4”) con relación al escalón de la broca. Para fijar<br />
la profundidad, deslice simplemente el Anillo de Profundidad en la espiga de la broca suelta (la broca NO deberá estar sujetada al taladro). Mida y coloque el Anillo de Profundidad a la distancia<br />
deseada respecto al Escalón de la broca. Apriete los tornillos fijadores usando la llave Allen suministrada. Fije después la broca/anillo KJD en el taladro.<br />
NOTA: Para obtener los mejores resultados, recomendamos usar un taladro eléctrico con cordón, cuya velocidad nominal de rotación sea de 2.000 rpm o más.<br />
C. Espaciado de rosca y longitud de tornillo<br />
Le convendrá usar tornillos autorroscadores al montar empalmes con agujeros de bolsada. La característica autorroscadora del tornillo evita tener que pretaladrar la segunda pieza de trabajo al empalmar<br />
dos piezas de material. Para cada grosor de material convendrá seleccionar el espaciado de rosca correcto y la longitud de tornillo correcta. Use un tornillo de rosca fina en maderas duras tales como el<br />
roble, el arce, el nogal americano, el cerezo, el nogal y el abedul. Use un tornillo de rosca gruesa en materiales más suaves como la madera de pino, la madera contraplacada laminada (plywood), las<br />
tablas a base de trozos comprimidos y MDF. Abajo se indican las longitudes de tornillo recomendadas para cada grosor.<br />
- Para materiales de 19 mm (3/4”), use un tornillo de 32 mm (1-1/4”) - Para materiales de 13 mm (1/2”), use un tornillo de 25 mm (1”) - Para materiales de 38 mm (1-1/2”), use un tornillo de 64 mm (2-1/2”)<br />
2. Perforando los primeros agujeros<br />
Para perforar los primeros agujeros de bolsada, sujete primero la guía a la pieza de trabajo usando una Abrazadera de Cara u otra similar para madera. Segundo, use una abrazadera de ebanista para<br />
asegurar el material al banco de trabajo con la guía sujetada. Inserte la punta de la broca hasta la mitad en la Guía de Taladro. Arranque el taladro a máxima velocidad y clave el taladro en la guía hasta<br />
que el Anillo de Profundidad toque el borde de la Guía de Taladro. Retroceda el taladro hasta sacarlo y deje que la broca cese de rotar. (Nota: Al perforar los primeros agujeros observará virutas de<br />
plástico azul. Esto es normal, pues resultan de las estrechas tolerancias aplicadas a la broca KJD y a la guía de perforación).<br />
CUIDADO: AL PERFORAR, NO INTENTE SOSTENER LA GUÍA EN LA MANO. EN ESTE PASO, LA HERRAMIENTA DEBERÁ SUJETARSE A LA MADERA. NO OBSERVAR<br />
ESTAS INSTRUCCIONES PUEDE PRODUCIR LESIONES PERSONALES O DAÑOS A LAS HERRAMIENTAS.<br />
3. Ensamble / Introducción de los tornillos para agujeros de bolsada (ejemplo de armazón delantera)<br />
Si usa una Abrazadera de Cara para ensamblar el empalme, ponga la plataforma grande de la abrazadera en la parte delantera del empalme. Asegúrese de que en cada pieza de trabajo ambas plataformas<br />
están equilibradas en la línea de empalme. Ajuste la presión de cierre hasta que las dos piezas queden firmemente sujetadas. La Abrazadera de Cara mantendrá a ras la superficie delantera de<br />
ambas piezas durante el ensamble. Recomendamos meter los tornillos con un taladro sin cordones que tenga un embrague ajustable. Comience con un ajuste de embrague liviano y al asentar el tornillo<br />
ajuste el par torsor según convenga. Dado que la dureza varía con la especie de madera, con el plywood y con los compuestos, meta tornillos “de prueba” con vistas a seleccionar el ajuste de embrague<br />
apropiado para el material que está ensamblando.<br />
4. Taponando los agujeros de bolsada<br />
Los agujeros de bolsada que perfore podrán taponarse con clavijas de madera de 3/8” disponibles en diferentes especies. El <strong>Mini</strong><br />
<strong>Kreg</strong> <strong>Jig</strong> incorpora un ajuste de obturación en la parte inferior de la herramienta que ayuda completar este proceso. Para usar esta<br />
característica, coloque una clavija en el perfil de la parte inferior de la guía, encole los bordes de la clavija y la parte interior del<br />
agujero y ejerza presión para ponerlo en su lugar como se muestra a la derecha. Lije cualquier reborde saliente.<br />
Sugerencias para sacar el máximo partido de su herramienta para agujeros de bolsada:<br />
• Para mayor seguridad, sujete las piezas a una superficie de trabajo antes de perforar los agujeros de bolsada. ** AL PERFORAR, NUNCA SOSTENGA LA HERRAMIENTA Y LAS PIEZAS EN<br />
LA MANO.**<br />
• Para perforar los agujeros de bolsada, use un taladro eléctrico con cordones, cuya velocidad de rotación sea de 2000 rpm o más.<br />
• Para meter los tornillos, use un taladro sin cordones (de batería) con embrague ajustable.<br />
**PARA INSTRUCCIONES, SUGERENCIAS Y TÉCNICAS MÁS DETALLADAS, VISITE WWW.KREGTOOL.COM *<br />
Gr·. 1<br />
<strong>Mini</strong> <strong>Kreg</strong> <strong>Jig</strong><br />
Pieza de trabajo 19 mm (3/4")<br />
Anillo de profundidad<br />
Tornillo fijador<br />
Gr·. 1A<br />
KJD Bit<br />
El borde de la guÌa est·<br />
a ras con el del material<br />
89 mm<br />
(3,5")<br />
EscalÛn de la broca