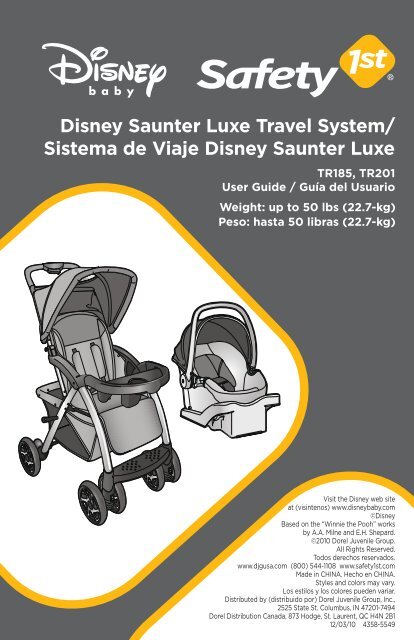
Disney Saunter Luxe Travel System - Safety 1st - Dorel Juvenile Group
Disney Saunter Luxe Travel System - Safety 1st - Dorel Juvenile Group
Disney Saunter Luxe Travel System - Safety 1st - Dorel Juvenile Group

You also want an ePaper? Increase the reach of your titles
YUMPU automatically turns print PDFs into web optimized ePapers that Google loves.
<strong>Disney</strong> <strong>Saunter</strong> <strong>Luxe</strong> <strong>Travel</strong> <strong>System</strong>/<br />
Sistema de Viaje <strong>Disney</strong> <strong>Saunter</strong> <strong>Luxe</strong><br />
TR185, TR201<br />
User Guide / Guía del Usuario<br />
Weight: up to 50 lbs (22.7-kg)<br />
Peso: hasta 50 libras (22.7-kg)<br />
Visit the <strong>Disney</strong> web site<br />
at (visintenos) www.disneybaby.com<br />
©<strong>Disney</strong><br />
Based on the “Winnie the Pooh” works<br />
by A.A. Milne and E.H. Shepard.<br />
©2010 <strong>Dorel</strong> <strong>Juvenile</strong> <strong>Group</strong>.<br />
All Rights Reserved.<br />
Todos derechos reservados.<br />
www.djgusa.com (800) 544-1108 www.safety<strong>1st</strong>.com<br />
Made in CHINA. Hecho en CHINA.<br />
Styles and colors may vary.<br />
Los estilos y los colores pueden variar.<br />
Distributed by (distribuido por) <strong>Dorel</strong> <strong>Juvenile</strong> <strong>Group</strong>, Inc.,<br />
2525 State St. Columbus, IN 47201-7494<br />
<strong>Dorel</strong> Distribution Canada, 873 Hodge, St. Laurent, QC H4N 2B1<br />
12/03/10 4358-5549
i<br />
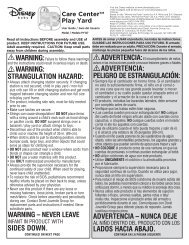
WARNING: For the safety of your child, please read<br />
the following warnings and assembly instructions and keep for future<br />
reference.<br />
• Adult assembly required.<br />
• CAUTION: Keep small parts away from children during assembly.<br />
• NEVER LEAVE CHILD UNATTENDED. ALWAYS keep child in view<br />
when in stroller.<br />
• AVOID SERIOUS INJURY from falling or sliding out. ALWAYS use seat<br />
belt. Check frequently to make sure it is secure.<br />
• ALWAYS keep fingers away from moving parts, when folding,<br />
unfolding or adjusting stroller to prevent finger entrapment.<br />
• ALWAYS make sure stroller is FULLY OPEN AND LOCKED before<br />
using.<br />
• ALWAYS use the brakes when stroller is stopped.<br />
• ALWAYS remove protective material and poly bags and dispose<br />
before assembly.<br />
• NEVER put hot liquids in the cup holder.<br />
• NEVER use stroller on stairs or escalators.<br />
• NEVER rollerblade with stroller.<br />
• NEVER allow children to play with or hang onto the stroller.<br />
• NEVER allow children to climb into the stroller unassisted. Stroller<br />
may tip over and injure child.<br />
• NEVER place or hang parcels, bags or accessories on the handle or<br />
canopy. The stroller may tip over or the canopy may collapse.<br />
• This product will become unstable if a parcel bag or rack is used<br />
when there is no provision for one.<br />
• This product may become unstable if a parcel bag, other than the one<br />
recommended by the manufacturer is used.<br />
• This product will become unstable if the manufacturer’s<br />
recommended load is exceeded.<br />
• DO NOT carry additional children, goods or accessories in or on this<br />
product except as recommended in the manufacturer’s instructions.<br />
• NEVER place more than 2-lbs. (0.91-kg) in parent’s tray to prevent<br />
tipping.<br />
• NEVER place more than 10-lbs. (4.5-kg) in the storage basket. If<br />
weight is exceeded, hazardous unstable conditions may exist.<br />
• STROLLER is only for use with children up to 50-lbs (22.7-kg), and<br />
WHEN SEATED, the midpoint of the child’s head is at or below the<br />
top of the stroller seat.<br />
• ONLY use this stroller with ONE child at a time.<br />
• STROLLER is for use with children who can sit up unassisted, and is<br />
NOT recommended for newborns.
1<br />
ADVERTENCIA: Por la seguridad de su hijo, por favor lea<br />
las siguientes advertencias e instrucciones de ensamble, y guárdelas para<br />
consulta futura.<br />
• El montaje debe realizarlo un adulto.<br />
• PRECAUCIÓN: Durante el armado, mantenga las piezas pequeñas fuera del<br />
alcance de los niños.<br />
• NUNCA DEJE AL NIÑO SIN SUPERVISIÓN. SIEMPRE mantenga al niño a la<br />
vista cuando esté en la carriola.<br />
• EVITE UNA LESIÓN GRAVE por caída o resbalamiento. SIEMPRE use el cinturón de<br />
seguridad. Revise con frecuencia para asegurarse que esté asegurado.<br />
• SIEMPRE mantenga los dedos alejados de las partes móviles cuando pliegue,<br />
despliegue o ajuste la carriola, para evitar atrapárselos.<br />
• SIEMPRE asegúrese de que la carriola esté COMPLETAMENTE ABIERTA Y<br />
BLOQUEADA antes de usarla.<br />
• SIEMPRE use los frenos cuando la carriola esté parada.<br />
• SIEMPRE quite el material de protección y las bolsas de plástico y deséchelos<br />
antes de ensamblar.<br />
• NUNCA ponga líquidos calientes en el apoyavasos.<br />
• NUNCA use la carriola en escaleras ni escaleras eléctricas.<br />
• NUNCA patine junto con la carriola.<br />
• NUNCA deje que los niños jueguen con ni se cuelguen de la carriola.<br />
• NUNCA deje que los niños se suban a la carriola sin ayuda. La carriola podría<br />
volcarse y lesionar al niño.<br />
• NUNCA coloque ni cuelgue paquetes, bolsas ni accesorios en el asa ni en la<br />
capota. La carriola podría volcarse o la capota podría colapsarse.<br />
• Este producto se volverá inestable si se usa una bolsa de paquetes o una<br />
rejilla cuando no hay provisión para ello.<br />
• Este producto puede volverse inestable si se usa una bolsa de paquetes<br />
diferente a la recomendada por el fabricante.<br />
• Este producto se volverá inestable si se excede la carga recomendada por el<br />
fabricante.<br />
• NO cargue a otros niños, artículos ni accesorios dentro o sobre este producto<br />
excepto lo recomendado en las instrucciones del fabricante.<br />
• NUNCA lleve más de 0.91-kg (2 libras) en la charola para los padres, para<br />
impedir que se vuelque la carriola.<br />
• NUNCA lleve más de 4.5-kg (10 libras) en la cesta de carga. Pueden crearse<br />
problemas peligrosos de inestabilidad si se excede ese límite de carga.<br />
• La CARRIOLA es sólo para niños que pesen hasta 50 libras (22.7-kg), y que<br />
AL ESTAR SENTADOS, el punto medio de la cabeza del niño está al nivel o<br />
más abajo que el borde superior del asiento de la carriola.<br />
• NUNCA debe llevar más de UN niño en está carriola.<br />
• La CARRIOLA debe utilizarse con niños que puedan sentarse por sí solos y<br />
NO se recomienda para llevar a niños recién nacidos.
Parts / Lista de piezas<br />
parent tray<br />
charola para los padres<br />
child tray<br />
charola para el niño<br />
1 rear axle<br />
1 eje trasero<br />
2 rear wheels<br />
2 ruedas traseras<br />
2 cotter pins<br />
2 pasadores de<br />
chaveta<br />
2 hubcaps<br />
2 tapas de cubos 4 washers<br />
4 arandelas<br />
Keep These Instructions For Future Use<br />
• Hardware for rear wheel assembly is located on axle.<br />
• Read all instructions before assembly and use.<br />
• Do not return this product to the place of purchase. If any parts are missing,<br />
please contact Consumer Relations by telephone at (800) 544-1108, e-mail at<br />
consumer@djgusa.com, or fax at (800) 207-8182. You can also visit our web site<br />
at www.safety<strong>1st</strong>.com. Have the model number (TR185, TR201) and date code<br />
(manufacture date) located on the back of stroller.<br />
Guarde estas instrucciones para su uso futuro<br />
• Los elementos de ferretería para el armado de las ruedas traseras se encuentran en<br />
el eje.<br />
• Antes de armar y usar la puerta, lea detenidamente todas las instrucciones.<br />
• No devuelva este producto al lugar donde lo compró. Si falta alguna pieza, por favor<br />
comuníquese por teléfono con Relaciones con el Consumidor al (800) 544-1108,<br />
envíe un mensaje de correo electrónico a consumer@djgusa.com, o envíe un fax al<br />
(800) 207-8182. También puede visitar nuestro sitio web en www.safety<strong>1st</strong>.com. Tenga a<br />
mano el número de modelo (TR185, TR201) y el código de fecha (fecha de fabricación),<br />
ubicado en la parte posterior de la carriola.<br />
2<br />
2 front wheels<br />
2 ruedas delanteras<br />
canopy<br />
capota<br />
car seat with base<br />
(not shown)<br />
autoasiento con base<br />
(no se muestra)
Assembly / Armado<br />
1 Unfold Stroller<br />
Unlatch the lock on the side<br />
(Figure 1). Slide and squeeze the<br />
button on handlebar. Stroller will<br />
“click” when completely open<br />
and locked (Figure 1a).<br />
Abra la carriola<br />
Libere la traba en la parte lateral<br />
(Figura 1). Agarre y suba el asa<br />
del manubrio. La carriola hará<br />
“clic” cuando esté completa-<br />
mente abierta y bloqueada<br />
(Figura 1a).<br />
2 Front Wheels<br />
Slide front wheel onto frame<br />
tube. Wheel will “click” when<br />
installed properly (Figure 2).<br />
Repeat for other front wheel.<br />
Ruedas delanteras<br />
Deslice la rueda delantera en el<br />
tubo del armazón. La rueda hará<br />
“clic” cuando quede bien instalada<br />
(Figura 2). Repita el procedimiento<br />
para la otra rueda delantera.<br />
3<br />
1<br />
1a<br />
2<br />
Front Wheels<br />
Ruedas<br />
delanteras
Assembly / Armado<br />
3<br />
Rear Wheels<br />
NOTE: Hardware for rear wheel<br />
assembly is located on axle.<br />
Helpful Hint: For ease of removal<br />
and assembly of cotter pin use<br />
needle nose pliers.<br />
Remove cotter pin and one washer<br />
from axle leaving one washer on<br />
the axle.<br />
With the spokes facing out, slide<br />
a wheel onto the axle. Slide on a<br />
second washer (Figure 3).<br />
Insert straight side of cotter pin<br />
through hole in axle (Figure 3a).<br />
Ensure cotter pin snaps into place<br />
and can not be easily removed.<br />
Repeat steps on other rear wheel.<br />
Pull wheel so it is flush with cotter<br />
pin. Snap hub caps onto both<br />
wheels (Figure 3b).<br />
Turn stroller upside down. Hold<br />
the axle assembly with the brakes<br />
toward the handlebar. Push axle<br />
assembly onto frame until two<br />
posts snap out of the bottom hole<br />
under each brake (Figure 3c).<br />
Ruedas traseras<br />
NOTA: Los elementos de ferretería<br />
para el armado de las ruedas<br />
traseras se encuentran en el eje.<br />
Sugerencia útil: Para retirar y armar<br />
fácilmente el pasador de chaveta,<br />
utilice la pinza de punta aguja.<br />
Quite el pasador de chaveta y<br />
una arandela del eje de modo que<br />
quede sólo una arandela en el eje.<br />
Con los rayos de la rueda hacia<br />
fuera, deslice la rueda en el eje.<br />
Deslice la otra arandela (Figura 3).<br />
Inserte el lado recto del pasador<br />
de chaveta a través del orificio<br />
del eje (Figura 3a). Asegúrese de<br />
que el pasador de chaveta encaje<br />
en posición y no pueda retirarse<br />
fácilmente. Repita el procedimiento<br />
para la otra rueda trasera.<br />
4<br />
3<br />
3a<br />
3b<br />
Secured<br />
as shown<br />
Asegurado<br />
tal como<br />
se muestra<br />
3c<br />
2 Washers<br />
2 Arandelas<br />
Posts<br />
Arandela<br />
Tire de la rueda para que quede al nivel del pasador de chaveta. Encaje los tapones<br />
de los cubos en ambas ruedas (Figura 3b).<br />
Voltee la carriola boca abajo. Sostenga el ensamble del eje con los frenos hacia las asas<br />
del manubrio. Empuje el conjunto del eje en el armazón hasta que los dos puntales<br />
sobresalgan por el orificio inferior ubicado debajo de cada freno (Figura 3c). Encaje los<br />
tapones de los cubos en ambas ruedas (Figura 3c).
Assembly / Armado<br />
4 Parent Tray<br />
Open canopy (Figure 4). Align<br />
posts with holes on parent<br />
tray. Snap parent tray onto<br />
handlebar tubes (Figure 4a).<br />
Charola para los<br />
padres)<br />
Abra la capota (Figura 4). Alinee<br />
los puntales con los orificios<br />
en la charola para los padres.<br />
Encaje la charola para los<br />
padres en los tubos del asa del<br />
manubrio (Figura 4a).<br />
4<br />
5<br />
4a
To Use / Para Uso<br />
Tip: Child tray can be opened<br />
and closed without removing.<br />
5 Child Tray<br />
To assemble: Align tray pin with<br />
notch on stroller and slide post<br />
into hole (Figure 5).<br />
To close: Rotate tray into slot<br />
near release lever and press<br />
down until tray “clicks” into place.<br />
To open: Squeeze release lever<br />
and rotate tray all the way over<br />
(Figures 5a and 5b).<br />
Consejo: La charola para el niño<br />
puede abrirse y cerrarse sin ser<br />
retirada.<br />
Charola para el niño<br />
Para armar: Alinee la clavija de<br />
la charola con la muesca en la<br />
carriola y deslice el puntal en el<br />
orificio (Figura 5).<br />
Para cerrarla: Gire la charola en<br />
la ranura del brazo opuesto de<br />
la carriola. Presione la charola<br />
hacia abajo hasta que encaje en<br />
posición con un “clic.”<br />
Para abrir: Apriete la palanca de<br />
liberación y dé vuelta la bandeja<br />
completamente (Figuras 5a y<br />
5b).<br />
6<br />
5<br />
Bottom of tray<br />
Parte inferior de la bandeja<br />
5a<br />
5b<br />
Release lever<br />
Palanca de<br />
liberación
To Use / Para Uso<br />
6<br />
7<br />
Brakes<br />
Lock Brakes: Step down onto<br />
brake levers on both rear wheels<br />
(Figure 6). To park stroller, BOTH<br />
BRAKES MUST BE LOCKED.<br />
Unlock Brakes: Lift up levers to<br />
unlock brakes.<br />
Engage Swivel Locks<br />
Press down on levers to keep<br />
dual wheels from swiveling. Flip<br />
up to swivel (Figure 6a).<br />
NOTE: Locked position is ideal for<br />
travel over rocky or uneven surfaces.<br />
7<br />
Frenos<br />
Trabe los frenos: Pise las palancas de los frenos en las dos ruedas traseras (Figura<br />
6). Para estacionar la carriola, AMBOS FRENOS DEBEN ESTAR BLOQUEADOS.<br />
Trabado los frenos: Levante las palancas para soltar los frenos.<br />
Seguros de giro<br />
Presione las palancas para que las ruedas dobles no giren. Súbalas para que<br />
giren (Figura 6a).<br />
Recline<br />
To Lower Seat Back:<br />
Locate release clip behind<br />
backrest. Squeeze release clip,<br />
pull away from the stroller and<br />
lower seat back (Figure 7).<br />
To Raise Seat Back: Holding<br />
the ring on the strap, squeeze<br />
release clip and push toward the<br />
seat back (Figure 7a).<br />
Reclinación<br />
Para bajar el respaldo del<br />
asiento: Localice el sujetador<br />
de liberación que se encuentra<br />
detrás del respaldo. Apriete el<br />
sujetador de liberación, jálelo<br />
alejándolo de la carriola y baje el<br />
respaldo (Figura 7).<br />
6<br />
6a<br />
NOTA: La posición de traba es ideal para llevar la carriola sobre superficies<br />
desparejas o con piedras.<br />
NOTE: Do not adjust the seat<br />
when your child is in the stroller.<br />
NOTA: No ajuste el asiento<br />
mientras el niño está en la carriola.<br />
7<br />
7a<br />
Para subir el respaldo del asiento: Sosteniendo el anillo de la correa, apriete el<br />
sujetador de liberación y empuje hacia el respaldo del asiento (Figura 7a).
To Use / Para Uso<br />
8<br />
Restraint <strong>System</strong><br />
Place your child in the stroller,<br />
with the crotch strap between<br />
the child’s legs. Fasten both<br />
buckles (Figure 8). Tighten<br />
straps snugly around your child<br />
(Figure 8a).<br />
To tighten strap, lift tab and pull<br />
down strap end (A) (Figure 8b).<br />
To loosen strap, lift tab and pull<br />
down on center of strap (B)<br />
(Figure 8b). NOTE: If the straps<br />
should come out of the buckle,<br />
rethread A - C as shown (Figure<br />
8b).<br />
Cinturón de retención<br />
Siente a su niño en la carriola,<br />
con la correa de la entrepierna<br />
entre las piernas y las correas<br />
del hombro sobre los hombros.<br />
Enganche ambas hebillas (Figura<br />
8). Apriete las correas ceñidamente<br />
al niño (Figura 8a).<br />
Para ajustar la correa, levante la<br />
lengüeta y tire hacia abajo del extremo de la correa (A) (Figura 8b).<br />
8<br />
8<br />
8b<br />
NOTE: Straps must be<br />
threaded in direction<br />
of arrows shown.<br />
Tab<br />
Lengüeta<br />
Para aflojar la correa, levante la lengüetay tire hacia abajo del centro de la<br />
correa (B) (Figura 8b). NOTA: Si las correas se salen de la hebilla, vuelva a pasar<br />
A a C tal como se muestra (Figura 8b).<br />
WARNING<br />
• NEVER LEAVE CHILD UNATTENDED. ALWAYS keep child in view<br />
when in stroller.<br />
• AVOID SERIOUS INJURY from falling or sliding out. ALWAYS use seat<br />
belt. Check frequently to make sure it is secure.<br />
• Belts must be threaded exactly as shown (Figure 8b).<br />
• Failure to follow these instructions could result in the serious injury or<br />
death of your child.<br />
ADVERTENCIA<br />
• NUNCA DEJE AL NIÑO SIN SUPERVISIÓN. SIEMPRE mantenga al niño a<br />
la vista cuando esté en la carriola.<br />
• EVITE UNA LESIÓN GRAVE por caída o resbalamiento. SIEMPRE use el cinturón<br />
de seguridad. Revise con frecuencia para asegurarse que esté asegurado.<br />
• Los cinturones deben pasarse exactamente como se muestra (Figura 8b).<br />
• El no seguir estas instrucciones podría resultar en lesiones graves o la<br />
muerte del niño.<br />
B<br />
C<br />
A<br />
8a<br />
NOTA: Las correas deben<br />
enhebrarse en la dirección<br />
indicada por las flechas.
To Use / Para Uso<br />
9 Fold<br />
9<br />
Prior to folding, lock rear brakes<br />
and remove your baby. Close<br />
canopy.<br />
Slide and squeeze the button on<br />
handlebar (Figure 9).<br />
Push down until stroller is flat<br />
(Figure 9a). Ensure side lock<br />
is engaged to prevent stroller<br />
from opening.<br />
Stroller will stand alone.<br />
Plegar<br />
Antes de abrirla, ponga los<br />
frenos traseros y saque al bebé.<br />
Cierre la capota.<br />
Deslice y apriete el botón del<br />
asa del manubrio (Figura 9).<br />
Empuje hacia abajo hasta que<br />
la carriola quede plana (Figura<br />
9a). Asegúrese de que la traba<br />
lateral esté cerrada para evitar<br />
que la carriola se abra.<br />
La carriola se parará sola.<br />
9<br />
9a<br />
Fold<br />
Plegar
To Use / Para Uso<br />
10 To Install Infant Car Seat<br />
Para instalar los autoasientos de bebé<br />
WARNING<br />
To avoid serious injury:<br />
• Use ONLY <strong>Safety</strong> <strong>1st</strong> Comfy Carry Elite, Cosco Comfy Carry,<br />
<strong>Safety</strong> <strong>1st</strong> OnBoard, OnBoard 35, OnBoard 35 air,<br />
Eddie Bauer SureFit, SureFit 35 infant car seats with this stroller.<br />
• Please refer to the manufacturer’s instructions for the use of your<br />
infant car seat.<br />
• ALWAYS use child tray when car seat is installed.<br />
• ALWAYS install car seat facing to the rear of the stroller.<br />
• ALWAYS use the restraint system in the car seat.<br />
ADVERTENCIA<br />
Para evitar lesiones graves:<br />
• SÓLO use con esta carriola los autoasientos para bebé <strong>Safety</strong> <strong>1st</strong><br />
Comfy Carry Elite, Cosco Comfy Carry, <strong>Safety</strong> <strong>1st</strong> OnBoard,<br />
OnBoard 35, OnBoard 35 air, Eddie Bauer SureFit, SureFit 35.<br />
• Consulte las instrucciones del fabricante para el uso del autoasiento<br />
de bebé.<br />
• SIEMPRE use la charola para el niño cuando el autoasiento está<br />
instalado.<br />
• SIEMPRE instale el autoasiento mirando hacia atrás de la carriola.<br />
• SIEMPRE use el sistema de cinturones del autoasiento.<br />
NOTE: Infant car seat is included<br />
with <strong>Saunter</strong> <strong>Travel</strong> <strong>System</strong>.<br />
Recline seat back to lowest<br />
position (Figure 10). Close<br />
canopy.<br />
NOTA: El autoasiento de bebé<br />
incluido con el Sistema de Viaje<br />
<strong>Saunter</strong>.<br />
Recline el respaldo del asiento a<br />
la posición más baja (Figura 10).<br />
Cierre la capota.<br />
10<br />
10
To Use / Para Uso<br />
10<br />
(continued)<br />
Car seat must be positioned<br />
so child faces the stroller<br />
handle.<br />
Position car seat over the stroller, touch<br />
rear flat vertical surface of car seat A<br />
against rear vertical surface of the child<br />
tray B and lower straight down into<br />
stroller and push down on handle. Car<br />
seat will click into place when fully nested<br />
(Figures 10a and 10b).<br />
10a 10b<br />
When properly installed, car seat will come<br />
to rest on child tray and stroller frame<br />
(Figure 10c).<br />
Pull up on car seat to make sure it is<br />
securely installed (Figure 10d).<br />
10c<br />
11<br />
A<br />
B<br />
(continuación)<br />
El autoasiento debe quedar<br />
colocado de modo que el niño<br />
mire hacia la manija del carriola.<br />
Coloque el autoasiento sobre la carriola<br />
de manera que la superficie plana vertical<br />
trasera del autoasiento A se apoye en la<br />
superficie vertical trasera de la charola del<br />
niño B. Baje el autoasiento directamente<br />
sobre la carriola y empuje la manija<br />
hacia abajo. El autoasiento se encajará<br />
en posición cuando esté colocado por<br />
completo (Figuras 10a y 10b).<br />
Una vez instalado correctamente, el<br />
autoasiento descansará sobre charola<br />
para el niño y el armazón de la carriola<br />
(Figura 10c).<br />
Tire del autoasiento hacia arriba para<br />
asegurarse de que esté firmemente<br />
instalado (Figura 10d).<br />
10d
To Use / Para Uso<br />
11<br />
12<br />
To Remove Infant Car<br />
Seat<br />
To remove the car seat, pull<br />
the release lever as shown<br />
(Figure 11). Lift car seat.<br />
Para quitar el<br />
autoasiento<br />
Para quitar el autoasiento,<br />
tire de la palanca de<br />
liberación, como se muestra<br />
(Figura 11). Levante el<br />
autoasiento.<br />
To Adjust Restraint<br />
Height<br />
Push each anchor through seat<br />
back and into the desired slot<br />
(Figure 12). Be sure anchors lay<br />
flat against seat back.<br />
11<br />
12<br />
12<br />
Anchors<br />
Anclajes<br />
Para ajustar la altura del<br />
sistema de retención<br />
Haga pasar los anclajes a través<br />
del respaldo del asiento, a<br />
través de la ranura deseada<br />
(Figura 12). Asegúrese de que<br />
los anclajes queden planos<br />
contra el respaldo del asiento.<br />
WARNING<br />
• For proper installation of the restraint system, make sure both anchors lay flat<br />
against the back board.<br />
• NEVER use stroller without BOTH restraint and crotch straps.<br />
ADVERTENCIA<br />
• Para la instalación correcta del sistema de correas, asegúrese de que<br />
ambos anclajes queden planos contra la tablilla del respaldo.<br />
• NUNCA utilice la carriola sin LAS correas de seguridad y de la entrepierna.
13<br />
Replaceable Parts<br />
To order parts call (800) 544-1108. Include the model number and manufacture date<br />
(found on the stroller) and a brief description of the part.<br />
• Dual wheels<br />
• Single wheels<br />
• Axle<br />
• Hardware bag for rear wheel assembly<br />
• Child tray<br />
• Parent tray<br />
Piezas de repuesto<br />
Para pedir piezas, llame al (800) 544-1108. Incluya el número de modelo y la fecha<br />
de fabricación (se encuentra en la carriola) junto con una breve descripción<br />
de la pieza.<br />
• Ruedas dobles<br />
• Ruedas sencillas<br />
• Eje<br />
• Bolsa de tornillería para el ensamble de las ruedas traseras<br />
• Charola para el niño<br />
• Charola para los padres<br />
Stroller Care and Maintenance<br />
• To clean stroller fabric and seat pad, use a sponge or damp cloth with cold water<br />
and mild soap. Air dry only. Do not use harsh household cleaners or bleach to<br />
clean stroller.<br />
• Restraint and crotch straps should be surface washed and air dried only. Do not<br />
place in washing machine or dryer.<br />
• Periodically, check for loose screws, worn parts, torn material or loose stitching.<br />
Tighten or replace parts as needed.<br />
Cuidado y mantenimiento de la carriola<br />
• Para limpiar la tela de la carriola y la almohadilla del asiento utilice una esponja<br />
o paño húmedo, agua fría y jabón suave. Secar al aire únicamente. No utilice<br />
limpiadores para el hogar abrasivos o blanqueadores para limpiar la carriola.<br />
• Las correas de retención y de la entrepierna deben limpiarse en su superficie<br />
únicamente y debe dejarlas secar al aire. No colocar en la lavadora ni en la<br />
secadora.<br />
• De vez en cuando revise que no haya tornillos flojos, piezas desgastadas, material<br />
rasgado ni costuras sueltas. Apriete o cambie las piezas según sea necesario.
14<br />
One-Year Limited Warranty<br />
<strong>Dorel</strong> <strong>Juvenile</strong> <strong>Group</strong>, Inc. warrants to the original purchaser that this product (<strong>Disney</strong> <strong>Saunter</strong><br />
<strong>Luxe</strong> <strong>Travel</strong> <strong>System</strong>), is free from material and workmanship defects when used under normal<br />
conditions for a period of one (1) year from the date of purchase. Should the product contain<br />
defects in material or workmanship <strong>Dorel</strong> <strong>Juvenile</strong> <strong>Group</strong>, Inc., will repair or replace the product,<br />
at our option, free of charge. Purchaser will be responsible for all costs associated with packaging<br />
and shipping the product to <strong>Dorel</strong> <strong>Juvenile</strong> <strong>Group</strong> Consumer Relations Department at the<br />
address noted on front page and all other freight or insurance costs associated with the return.<br />
<strong>Dorel</strong> <strong>Juvenile</strong> <strong>Group</strong> will bear the cost of shipping the repaired or replaced product to the purchaser.<br />
Product should be returned in its original package accompanied by a proof of purchase,<br />
either a sales receipt or other proof that the product is within the warranty period. This warranty<br />
is void if the owner repairs or modifies the product or the product has been damaged as a result<br />
of misuse.<br />
This warranty excludes any liability other than that expressly stated previously, including but not<br />
limited to, any incidental or inconsequential damages.<br />
SOME STATES DO NOT ALLOW THE EXCLUSION OR LIMITATION OF INCIDENTAL OR CONSE-<br />
QUENTIAL DAMAGES, SO THE ABOVE LIMITATION OR EXCLUSION MAY NOT APPLY TO YOU.<br />
THIS WARRANTY GIVES YOU SPECIFIC LEGAL RIGHTS, AND YOU MAY ALSO HAVE OTHER<br />
RIGHTS THAT MAY VARY FROM STATE TO STATE.<br />
Garantía limitada de un año<br />
<strong>Dorel</strong> <strong>Juvenile</strong> <strong>Group</strong>, Inc. garantiza al comprador original que este producto (Sistema de Viaje<br />
<strong>Disney</strong> <strong>Saunter</strong> <strong>Luxe</strong>) estará libre de defectos de material y mano de obra cuando se utilice<br />
bajo condiciones normales durante un periodo de un (1) año a partir de la fecha de compra. Si<br />
el producto tuviese defectos de material o mano de obra, <strong>Dorel</strong> <strong>Juvenile</strong> <strong>Group</strong>, Inc. reparará o<br />
reemplazará el producto, a nuestra opción, sin cargo. El comprador será responsable de todos<br />
los costos asociados con embalar y enviar el producto al Departamento de Relaciones con el<br />
Consumidor de <strong>Dorel</strong> <strong>Juvenile</strong> <strong>Group</strong> a la dirección indicada en la primera página y de todos los<br />
otros costos de envío o seguro asociados con la devolución. <strong>Dorel</strong> <strong>Juvenile</strong> <strong>Group</strong> correrá con<br />
los gastos de enviar el producto reparado o reemplazado al comprador. El producto se debe<br />
devolver en su embalaje original acompañado de la constancia de compra, ya sea un recibo<br />
de compra u otra prueba que demuestre que el producto está dentro del periodo de garantía.<br />
Esta garantía es nula si el propietario repara o modifica el producto o si éste sufrió daño como<br />
resultado de uso incorrecto.<br />
Esta garantía excluye cualquier responsabilidad que no sea la expresamente indicada anteriormente,<br />
incluyendo pero sin limitarse a daños incidentales o consecuentes.<br />
ALGUNOS ESTADOS NO PERMITEN LA EXCLUSIÓN O LIMITACIÓN DE DAÑOS INCIDENTALES<br />
O CONSECUENTES, POR LO TANTO LA LIMITACIÓN O EXCLUSIÓN ANTERIOR PODRÍA NO<br />
APLICARSE EN SU CASO.<br />
ESTA GARANTÍA LE OTORGA DERECHOS LEGALES ESPECÍFICOS Y USTED PODRÍA TENER<br />
TAMBIÉN OTROS DERECHOS QUE PUEDEN VARIAR DE UN ESTADO A OTRO.