Manual de instrucciones - Philips
Manual de instrucciones - Philips
Manual de instrucciones - Philips

You also want an ePaper? Increase the reach of your titles
YUMPU automatically turns print PDFs into web optimized ePapers that Google loves.
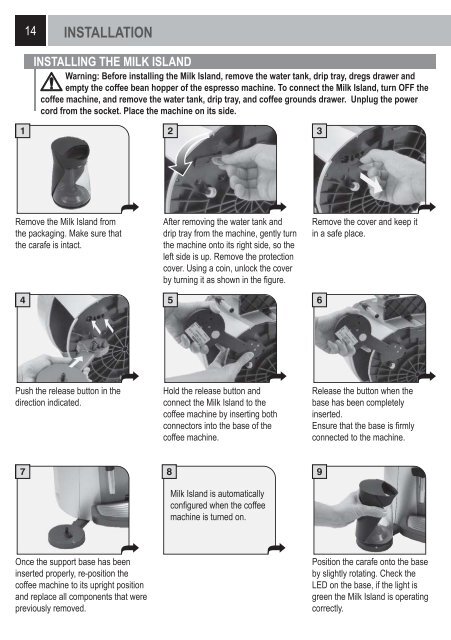
14 INSTALLATION<br />
INSTALLING THE MILK ISLAND<br />
Warning: Before installing the Milk Island, remove the water tank, drip tray, dregs drawer and<br />
empty the coffee bean hopper of the espresso machine. To connect the Milk Island, turn OFF the<br />
coffee machine, and remove the water tank, drip tray, and coffee grounds drawer. Unplug the power<br />
cord from the socket. Place the machine on its si<strong>de</strong>.<br />
1 2 3<br />
Remove the Milk Island from<br />
the packaging. Make sure that<br />
the carafe is intact.<br />
Push the release button in the<br />
direction indicated.<br />
After removing the water tank and<br />
drip tray from the machine, gently turn<br />
the machine onto its right si<strong>de</strong>, so the<br />
left si<strong>de</strong> is up. Remove the protection<br />
cover. Using a coin, unlock the cover<br />
by turning it as shown in the fi gure.<br />
4 5 6<br />
7<br />
Once the support base has been<br />
inserted properly, re-position the<br />
coffee machine to its upright position<br />
and replace all components that were<br />
previously removed.<br />
Hold the release button and<br />
connect the Milk Island to the<br />
coffee machine by inserting both<br />
connectors into the base of the<br />
coffee machine.<br />
8<br />
Milk Island is automatically<br />
confi gured when the coffee<br />
machine is turned on.<br />
Remove the cover and keep it<br />
in a safe place.<br />
Release the button when the<br />
base has been completely<br />
inserted.<br />
Ensure that the base is fi rmly<br />
connected to the machine.<br />
9<br />
Position the carafe onto the base<br />
by slightly rotating. Check the<br />
LED on the base, if the light is<br />
green the Milk Island is operating<br />
correctly.