Ventura INtime Instruction Manual pdf - Kuhnke
Ventura INtime Instruction Manual pdf - Kuhnke
Ventura INtime Instruction Manual pdf - Kuhnke

You also want an ePaper? Increase the reach of your titles
YUMPU automatically turns print PDFs into web optimized ePapers that Google loves.
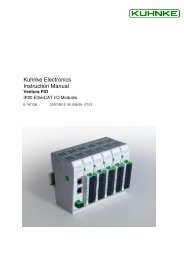
<strong>Kuhnke</strong> Electronics<br />
<strong>Instruction</strong> <strong>Manual</strong><br />
<strong>Ventura</strong> <strong>INtime</strong><br />
EtherCAT-Master IPC<br />
E 674-6 GB 02/12/2011
This technical information is directed primarily to specialists involved in the conception, design and construction of machines. It does<br />
not indicate any information about availability of products. The technical specifications stated herein are only of descriptive nature and<br />
do not represent a guarantee as to the ability or usability of a product in a legal sense. Such specific assurances are subject to individual<br />
contractual agreements. We do not accept any claims for compensation of damages for whatever reason, unless substantial proof<br />
of intention or gross negligence is provided. Complete or partial reproduction of this document requires the written consent of the<br />
author. All rights concerning changes, omissions and misconceptions are reserved. Ilustrations similar.<br />
Microsoft® Windows® and the Windows logo are registered trademarks of Microsoft Corporation in the USA and other countries.<br />
EtherCAT® is a registered trademark and patented technology, licensed from Beckhoff Automation GmbH, Germany.<br />
Additional information on the PLCopen organization can be found at www.plcopen.org.<br />
CiA® and CANopen® are registered community trade marks of CAN in Automation e.V.<br />
All rights reserved by the individual copyright holders.<br />
Reproduction even of extracts only with the editor's express and written prior consent.
Table of Contents<br />
Table of Contents<br />
1 Introduction......................................................................................................................................................5<br />
1.1 EtherCAT® — Ethernet Control Automation Technology....................................................................5<br />
1.2 <strong>Ventura</strong> — the automation platform.....................................................................................................5<br />
1.3 <strong>Ventura</strong> <strong>INtime</strong> — CoDeSys 2.3 PLC with EtherCAT-Master .............................................................5<br />
2 Reliability, Safety.............................................................................................................................................7<br />
2.1 Intended Use........................................................................................................................................7<br />
2.2 Target Group........................................................................................................................................7<br />
2.3 Reliability..............................................................................................................................................7<br />
2.4 Symbols ...............................................................................................................................................7<br />
2.4.1 Danger................................................................................................................................................7<br />
2.4.2 Attention .............................................................................................................................................8<br />
2.4.3 Note....................................................................................................................................................8<br />
2.4.4 Under Construction ............................................................................................................................8<br />
2.4.5 <strong>Instruction</strong>...........................................................................................................................................8<br />
2.5 Safety ...................................................................................................................................................9<br />
2.5.1 Project Planning and Installation........................................................................................................9<br />
2.5.2 Maintenance and Servicing................................................................................................................9<br />
2.6 Electromagnetic Compatibility............................................................................................................10<br />
2.6.1 Definition ..........................................................................................................................................10<br />
2.6.2 Interference Emission ......................................................................................................................10<br />
2.6.3 General Notes on Installation...........................................................................................................10<br />
2.6.4 Electrical Immission Safeguard........................................................................................................10<br />
2.6.5 Cable Routing and Wiring ................................................................................................................11<br />
2.6.6 Location of Installation .....................................................................................................................11<br />
2.6.7 Particular Sources of Interference....................................................................................................11<br />
3 Getting Started ..............................................................................................................................................12<br />
3.1 Target System <strong>Ventura</strong> <strong>INtime</strong>...........................................................................................................12<br />
3.2 Programming PC................................................................................................................................12<br />
3.2.1 CoDeSys ..........................................................................................................................................12<br />
3.2.2 Target ...............................................................................................................................................13<br />
3.2.3 EtherCAT Configurator.....................................................................................................................13<br />
3.2.4 Connection between programming PC and <strong>INtime</strong>RTS ..................................................................13<br />
4 User Interface ................................................................................................................................................15<br />
4.1 Win<strong>INtime</strong>RTS Main Window.............................................................................................................15<br />
4.2 Section '<strong>INtime</strong> Kernel'' ......................................................................................................................15<br />
4.3 Section 'EtherCAT Master'.................................................................................................................16<br />
4.3.1 EtherCAT Master Configuration.......................................................................................................16<br />
4.4 Section 'CoDeSys SP 32bit full' .........................................................................................................21<br />
4.4.1 CoDeSys SP Configuration..............................................................................................................21<br />
4.5 Section 'CoDeSys Project' .................................................................................................................23<br />
4.6 Autostart.............................................................................................................................................23<br />
5 Programming with CoDeSys .........................................................................................................................24<br />
5.1 Target system ....................................................................................................................................24<br />
5.2 PLC Configuration..............................................................................................................................24<br />
5.2.1 Options .............................................................................................................................................25<br />
5.2.2 EtherCAT-Master Options................................................................................................................25<br />
5.2.3 EtherCAT Configurator State ...........................................................................................................25<br />
5.2.4 Update Task.....................................................................................................................................26<br />
6 EtherCAT-Configuration ................................................................................................................................27<br />
E 674-6 GB 3<br />
02/12/2011
Table of Contents<br />
6.1 Offline Configuration ..........................................................................................................................27<br />
6.2 Online Configuration ..........................................................................................................................30<br />
7 <strong>Ventura</strong><strong>INtime</strong>.lib ...........................................................................................................................................31<br />
7.1 CHECKLICENSE ...............................................................................................................................32<br />
7.2 Activating and deactivating of Slaves ................................................................................................33<br />
7.2.1 EC2_ACTIVATESLAVES.................................................................................................................33<br />
7.2.2 EC2_DEACTIVATESLAVES............................................................................................................34<br />
7.2.3 Example ...........................................................................................................................................34<br />
7.3 EC2_GETSTATE ...............................................................................................................................36<br />
7.4 EC2_GETSTATEEX ..........................................................................................................................37<br />
7.5 EC2_INITMASTER ............................................................................................................................39<br />
7.6 EC2_READCONMBX ........................................................................................................................40<br />
7.7 EC2_SDOREAD ................................................................................................................................41<br />
7.8 EC2_SDOWRITE...............................................................................................................................43<br />
7.9 EC2_WRITECMDMBX.......................................................................................................................45<br />
7.10 ECAT_GETSTATE.........................................................................................................................46<br />
7.11 ECAT_INITMASTER ......................................................................................................................47<br />
7.12 GETNAMEDSHMADDRESS..........................................................................................................48<br />
7.13 RELEASENAMEDSHMADDRESS ................................................................................................49<br />
8 Appendix........................................................................................................................................................50<br />
8.1 Sales & Service..................................................................................................................................50<br />
8.1.1 Main factory in Malente ....................................................................................................................50<br />
8.1.2 Customer service .............................................................................................................................50<br />
8.2 References.........................................................................................................................................50<br />
9 Index..............................................................................................................................................................51<br />
4 E 674-6 GB<br />
02/12/2011
1 Introduction<br />
1.1 EtherCAT® 1 — Ethernet Control Automation Technology<br />
1.2 <strong>Ventura</strong> — the automation platform<br />
Introduction<br />
EtherCAT is the most powerful Ethernet-based fieldbus system currently<br />
available on the market. EtherCAT puts up the top speed mark, and its flexible<br />
topology and simple configuration make it the perfect means of controlling<br />
extremely fast processes. To give you a clue: 1000 I/Os can be addressed<br />
in 30 µs.<br />
Because of its high performance, the simple wiring and its open protocol<br />
support, EtherCAT is often used as a fast motion control and I/O bus driven<br />
by an industrial PC or in conjunction with control technology on a smaller<br />
scale. EtherCAT moves beyond the limits of conventional fieldbus systems.<br />
Its interconnections between the controller at one end and both the I/O modules<br />
and drives at the other are as fast as those of a backplane bus. Ether-<br />
CAT controllers thus nearly act like centralised control systems, overcoming<br />
the issue of bus transfer times that conventional fieldbus systems are burdened<br />
with.<br />
The <strong>Ventura</strong> automation platform has been specifically engineered with applications<br />
near to the machine in mind. <strong>Ventura</strong> provides flexible automation<br />
solutions including hardware and software PLCs based around industrial<br />
PCs, remote I/Os, remote PLCs and decentralised drives. EtherCAT, PRO-<br />
FIBUS-DP, CANopen and AS interface are supported for networking.<br />
<strong>Ventura</strong> industrial PCs used as EtherCAT Masters feature hard-coded realtime<br />
response and a CoDeSys PLC.<br />
1.3 <strong>Ventura</strong> <strong>INtime</strong> — CoDeSys 2.3 PLC with EtherCAT-Master<br />
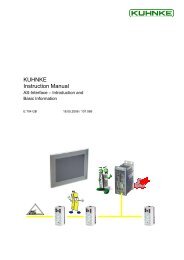
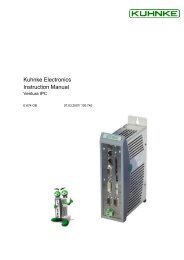
<strong>Ventura</strong> <strong>INtime</strong> is a control solution for the <strong>Ventura</strong> IPC.<br />
The IPC is equipped with the real time operating system <strong>INtime</strong> 2 , a CoDe-<br />
Sys 3 Soft-PLC and an EtherCAT-Master from <strong>Kuhnke</strong>.<br />
PLC und EtherCAT-Master run directly under <strong>INtime</strong>, i.e. in hard real time.<br />
<strong>INtime</strong> can be operated as Remote Node (Stand alone) or in combination<br />
with WINDOWS XP 4 .<br />
In case of WINDOWS XP the configuration and operation of <strong>INtime</strong>, Ether-<br />
CAT-Master and CoDeSys PLC can be made by a graphical user interface.<br />
1 EtherCAT® is a registered trademark and patented technology, licensed from Beckhoff Automation GmbH, Germany.<br />
2 <strong>INtime</strong> is a product of TenAsys Corporation, Beaverton, OR 97006 / USA<br />
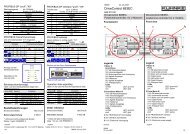
Figure 1: <strong>Ventura</strong> Intime IPC with <strong>Ventura</strong> FIO<br />
3 CoDeSys is a product of 3S - Smart Software Solutions GmbH, 87439 Kempten / Germany<br />
4 WINDOWS XP is a product of Microsoft Corporation, Redmond, WA 98052 / USA<br />
E 674-6 GB 5<br />
02/12/2011
Introduction<br />
The PLCs are programmed by CoDeSys 2.3, which was extended by an interface<br />
to the Beckhoff 5 EtherCAT-Configurator.<br />
5 The EtherCAT Configurator is a product of Beckhoff Automation GmbH in 33415 Verl / Germany<br />
6 E 674-6 GB<br />
02/12/2011
2 Reliability, Safety<br />
2.1 Intended Use<br />
2.2 Target Group<br />
2.3 Reliability<br />
2.4 Symbols<br />
2.4.1 Danger<br />
Reliability, Safety<br />
<strong>Kuhnke</strong> products are designed as resources for use in industrial environments.<br />
All other applications need to be discussed with the factory first. The manufacturer<br />
shall neither be liable for any other than the intended use of our<br />
products nor for any ensuing damages. The risk shall be borne by the operator<br />
alone. The use as intended includes that you read and apply all information<br />
and instructions contained in this manual.<br />
This instruction manual contains all information necessary for the use of the<br />
described product (control device, control terminal, software, etc.) according<br />
to instructions. It is written for design, project planning, servicing and commissioning<br />
experts. For proper understanding and error-free application of<br />
technical descriptions, instructions for use and particularly of notes of danger<br />
and warning, extensive knowledge of automation technology is compulsory.<br />
Reliability of <strong>Kuhnke</strong> products is brought to the highest possible standards<br />
by extensive and cost-effective means in their design and manufacture. These<br />
include:<br />
• selecting high-quality components,<br />
• quality agreements with our suppliers,<br />
• actions to avoid static charges when handling MOS circuits,<br />
• worst case planning and design of all circuits,<br />
• inspections at various stages of fabrication,<br />
• computer-aided tests of all assemblies and their interaction in the circuit,<br />
• statistical assessment of the quality of fabrication and of all returned<br />
goods for the immediate taking of appropriate corrective actions.<br />
Despite the actions described in section 2.3, the occurrence of faults or errors<br />
in electronic control units - even if most highly improbable - must be taken<br />
into consideration.<br />
Please pay particular attention to the additional notices which we have<br />
marked by symbols throughout this instruction manual. While some of these<br />
notices make you aware of possible dangers, others are intended as a<br />
means of orientation. They are described further down below in descending<br />
order of importance.<br />
This symbol warns you of dangers which may cause death or grievous bodily<br />
harm if operators fail to implement the precautions described.<br />
E 674-6 GB 7<br />
02/12/2011
Reliability, Safety<br />
2.4.2 Attention<br />
2.4.3 Note<br />
2.4.4 Under Construction<br />
2.4.5 <strong>Instruction</strong><br />
This symbol draws your attention to information you must take a look at to<br />
avoid malfunctions, possible material damage or dangerous states.<br />
This symbol draws your attention to additional information concerning the<br />
use of the described product. It may also cross-reference you to information<br />
to be found elsewhere (e.g. in other manuals).<br />
This symbol tells you that the function described was not or not fully available<br />
at the time this document went to press.<br />
Wherever you see these symbols in the left margin, you will find a list of<br />
steps instructing you to take the appropriate computer or hardware actions.<br />
They are intended as a means of orientation wherever working steps and<br />
background information alternate (e.g. in tutorials).<br />
8 E 674-6 GB<br />
02/12/2011
2.5 Safety<br />
2.5.1 Project Planning and Installation<br />
2.5.2 Maintenance and Servicing<br />
Reliability, Safety<br />
Our products normally become part of larger systems or installations. The information<br />
below is intended to help you integrate the product into its environment<br />
without dangers to humans or material/equipment.<br />
To achieve a high degree of conceptual safety in planning and installing an<br />
electronic controller, it is essential to exactly follow the instructions given in<br />
the manual because wrong handling could lead to rendering measures against<br />
dangers ineffective or to creating additional dangers.<br />
• 24 VDC power supply: generate as electrically safely separated low voltage.<br />
Suitable devices are, for example, split transformers constructed in<br />
compliance with European Standard EN 60742 (corresponds to VDE<br />
0551).<br />
• Power breakdowns or power fades: the program structure is to ensure<br />
that a defined state at restart excludes all dangerous states.<br />
• Emergency switch-off installations must comply with EN 60204/IEC 204<br />
(VDE 0113). They must be effective at any time.<br />
• Safety and precautions regulations for qualified applications have to be<br />
complied with.<br />
• Please pay particular attention to the notices of warning which, at relevant<br />
places, will make you aware of possible sources of dangerous mistakes<br />
or faults.<br />
• Relevant standards and VDE regulations are to be complied with in every<br />
case.<br />
• Control elements are to be installed in such a way as to exclude unintended<br />
operation.<br />
• Lay control cables such that interference (inductive or capacitive) is excluded<br />
if this interference could influence controller operation or its functionality.<br />
• Precautions regulation VBG 4.0 must be observed when measuring or<br />
checking a controller in a power-up condition. This applies to section 8<br />
(Admissible deviations when working on parts) in particular.<br />
• Repairs must be carried out by specially trained <strong>Kuhnke</strong> staff only (usually<br />
in the main factory in Malente). Warranty expires in every other case.<br />
• Spare parts:<br />
• Only use parts approved of by <strong>Kuhnke</strong>. Only genuine <strong>Kuhnke</strong> modules<br />
must be used in modular controllers.<br />
• Modular systems: always plug or unplug modules in a power-down state.<br />
You might otherwise damage the modules or (possibly not immediately<br />
recognisably!) inhibit their functionality.<br />
• Always dispose of any batteries and accumulators as hazardous waste.<br />
E 674-6 GB 9<br />
02/12/2011
Reliability, Safety<br />
2.6 Electromagnetic Compatibility<br />
2.6.1 Definition<br />
2.6.2 Interference Emission<br />
2.6.3 General Notes on Installation<br />
2.6.4 Electrical Immission Safeguard<br />
Electromagnetic compatibility is the ability of a device to function satisfactorily<br />
in its electromagnetic environment without itself causing any electromagnetic<br />
interference that would be intolerable to other devices in this environment.<br />
Of all known phenomena of electromagnetic noise, only a certain range occurs<br />
at the location of a given device. It is defined in the relevant product<br />
standards.<br />
The design and immunity to interference of programmable logic controllers<br />
are internationally governed by standard<br />
IEC 61131-2 which, in Europe, has been the basis for European Standard<br />
EN 61131-2.<br />
Refer to IEC 61131-4, User's Guideline, for general installation instructions<br />
to be complied with to ensure that hardware interface factors and the ensuing<br />
noise voltages are limited to tolerable levels.<br />
Interfering emission of electromagnetic fields, HF<br />
compliant to EN 55011, limiting value class A, Group 1<br />
If the controller is designed for use in residential areas, high-frequency emissions<br />
must comply with limiting value class B as described in EN 55011.<br />
Fitting the controller into earthed metal cabinets and in-stalling filters in the<br />
supply lines may produce a shielding compliant to the above standard.<br />
As component parts of machines, facilities and systems, electronic control<br />
systems must comply with valid rules and regulations, depending on their<br />
field of application.<br />
General requirements concerning the electrical equipment of machines and<br />
aiming at the safety of these machines are contained in Part 1 of European<br />
Standard EN 60204 (same as VDE 0113).<br />
For safe installation of your control system please observe the information<br />
contained in the next chapters (� 2.6.4 ff).<br />
Connect the control system to the protective earth conductor to eliminate electromagnetic<br />
interference. Practice best cable routing.<br />
10 E 674-6 GB<br />
02/12/2011
2.6.5 Cable Routing and Wiring<br />
2.6.6 Location of Installation<br />
2.6.6.1 Temperature<br />
2.6.6.2 Contamination<br />
2.6.6.3 Impact and Vibration<br />
2.6.6.4 Electromagnetic Interference<br />
Keep power circuits separate from control circuits:<br />
• DC voltages 60 V ... 400 V<br />
• AC voltages 25 V ... 400 V<br />
Joint laying of control circuits is allowed for:<br />
• shielded data signals<br />
• shielded analogue signals<br />
• unshielded digital I/O lines<br />
• unshielded DC voltages < 60 V<br />
• unshielded AC voltages < 25 V<br />
2.6.7 Particular Sources of Interference<br />
2.6.7.1 Inductive Actuators<br />
Reliability, Safety<br />
Exclude any and all impediments due to temperature, dirt, impact, vibration<br />
or electromagnetic interference.<br />
Consider heat sources such as general heating of rooms, sunlight, and heat<br />
accumulation in assembly rooms or control cabinets.<br />
Use suitable casings to avoid possible negative influences due to humidity,<br />
corrosive gas, liquid or conducting dust.<br />
Consider possible influences caused by motors, compressors, transfer lines,<br />
presses, ramming machines and vehicles.<br />
Consider electromagnetic interference from various local sources: motors,<br />
switching devices, switching thyristors, radio-controlled devices, welding equipment,<br />
arcing, switched-mode power supplies, converters / inverters.<br />
Switching off inductances (such as from relays, contactors, solenoids or<br />
switching magnets) produces surge voltages. It is necessary to reduce these<br />
extra voltages to a minimum.<br />
Reducing elements may be diodes, Z-diodes, varistors or RC elements. To<br />
find the best adapted elements, we recommend that you contact the manufacturer<br />
or supplier of the corresponding actuators for the relevant information.<br />
E 674-6 GB 11<br />
02/12/2011
Getting Started<br />
3 Getting Started<br />
3.1 Target System <strong>Ventura</strong> <strong>INtime</strong><br />
3.2 Programming PC<br />
3.2.1 CoDeSys<br />
In this chapter you will find the prerequisites for the operation of the Ether-<br />
CAT Master.<br />
<strong>Ventura</strong> <strong>INtime</strong> is a <strong>Ventura</strong> IPC control solution.<br />
<strong>Ventura</strong> <strong>INtime</strong> IPCs are delivered <strong>Ventura</strong> with software preinstalled according<br />
to specification.<br />
Software components and licenses are on compact flash cards.<br />
<strong>INtime</strong> Realtime operating system.<br />
You can operate <strong>INtime</strong> as Remote Node (Stand alone)<br />
or in combination with WINDOWS XP.<br />
<strong>INtime</strong>ECM EtherCAT Master<br />
EC1: Version 1.x (limited functions)<br />
EC2: Version 2.x<br />
<strong>INtime</strong>RTS KUHNKE Soft PLC. It is a derivate of the CoDeSys SP<br />
32 bit full / <strong>INtime</strong> Runtime System.<br />
Win<strong>INtime</strong>RTS the graphical user interface (GUI) under WINDOWS-XP<br />
for <strong>INtime</strong>, <strong>INtime</strong>ECM und <strong>INtime</strong>RTS.<br />
EtherCAT Master version 1.x and EtherCAT Master version 2.x are different<br />
in principle.<br />
LAN1, LAN2 <strong>Ventura</strong> has two physical ethernet ports LAN1 and LAN2<br />
eth0, eth1 <strong>INtime</strong> hat has any number of logical ports, beginning<br />
with eth0.<br />
EtherCAT always must be connected to LAN2 to ensure the use of the appropriate<br />
NIC driver (NIC = "network interface card").<br />
By default LAN1 is assigned to Windows and LAN2 is assigned to IN-time.<br />
So LAN2 becomes <strong>INtime</strong>'s eth0.<br />
� Install CoDeSys 2.3.x on your programming PC.<br />
CoDeSys can be downloaded from www.3s-software.com.<br />
CoDeSys is free of license.<br />
• You will need the CoDeSys programming system version 2.3.8.0 or<br />
higher to work with <strong>INtime</strong>RTS.<br />
• You will need the CoDeSys programming system version 2.3.9.9 or<br />
higher to use the latest features of CoDeSys target "<strong>Kuhnke</strong> <strong>Ventura</strong><strong>INtime</strong>"<br />
Version 15 (final version).<br />
• You will need the CoDeSys programming system version 2.3.9.13 or<br />
higher to use the latest features of CoDeSys target "<strong>Kuhnke</strong> <strong>Ventura</strong>EC2"<br />
Version 8 (Sept. 2010).<br />
• <strong>INtime</strong>RTS is not compatible with CoDeSys version 3.x.<br />
12 E 674-6 GB<br />
02/12/2011
3.2.2 Target<br />
3.2.3 EtherCAT Configurator<br />
Getting Started<br />
� In addition to CoDeSys 2.3.x on your programming system you will need<br />
to install the CoDeSys target for the <strong>INtime</strong>RTS.<br />
Use the CoDeSys program "Install Target".<br />
The current target can be downloaded free of charge from<br />
www.kuhnke.com.<br />
• For EtherCAT-Master Version 1.x: "Target_<strong>Ventura</strong><strong>INtime</strong>_Vxx.<br />
• For EtherCAT-Master Version 2.x: "Target_<strong>Ventura</strong>EC2_Vxx.<br />
� Install the "Beckhoff EtherCAT Configurator" Version 2.10 Build 1348 or<br />
higher.<br />
You can download the current Beckhoff EtherCAT Configurator from<br />
http://www.beckhoff.de .<br />
The configurator has to be licensed. Among others you can get licenses<br />
from <strong>Kuhnke</strong>.<br />
3.2.4 Connection between programming PC and <strong>INtime</strong>RTS<br />
3.2.4.1 <strong>Ventura</strong> IPC<br />
� Connect your programming system and the <strong>Ventura</strong> via an Ethernet cable.<br />
(Patch cable when in case of a network connection, cross over cable<br />
in case of a direct connection.<br />
Please use LAN1 on the <strong>Ventura</strong>.<br />
� Be sure to have appropriate IP addresses and netmasks on your programming<br />
PC and on your <strong>Ventura</strong> IPC to login with CoDeSys in the<br />
<strong>INtime</strong> RTS.<br />
Example :<br />
<strong>Ventura</strong> IPC and programming PC are connected in a corporate network via<br />
Ethernet. The IP addresses are assigned with DHCP.<br />
� Find out the assigned IP address in the IPC by checking the status of<br />
the network connections of LAN1.<br />
E 674-6 GB 13<br />
02/12/2011
Getting Started<br />
3.2.4.2 Programming PC<br />
CoDeSys on your programming PC must be configured to use the gateway<br />
server on the <strong>Ventura</strong> and the communication driver Shm<strong>INtime</strong><br />
� Define a gateway in CoDeSys using Online� Communication<br />
Parameters. Type in the IP address of LAN1 of the <strong>Ventura</strong> IPC.<br />
� Create the communication channel by "New". Select "ShmI<strong>INtime</strong>".<br />
14 E 674-6 GB<br />
02/12/2011
4 User Interface<br />
4.1 Win<strong>INtime</strong>RTS Main Window<br />
4.2 Section '<strong>INtime</strong> Kernel''<br />
The Win<strong>INtime</strong>RTS main window has the following four sections:<br />
• <strong>INtime</strong> Kernel<br />
• EtherCAT Master<br />
• CoDeSys Runtime System (<strong>INtime</strong>RTS)<br />
User Interface<br />
• CoDeSys Project<br />
You learn in the next chapters how to control the respective components and<br />
what the announced information means<br />
<strong>INtime</strong>® is the real time operating system (RTOS), which adds hard real time<br />
to Microsoft® Windows® XP embedded.<br />
"Start Kernel" starts <strong>INtime</strong>. That means:<br />
• Intime takes control of the most important IPC resources. These are<br />
particularly timer and EtherCAT-Port LAN2<br />
• Windows® XP embedded gets assigned runtime by Intime.<br />
"Stop Kernel" finishes <strong>INtime</strong>. That means:<br />
• Intime finishes.<br />
• Windows® XP embedded takes control over all IPC resources<br />
again.<br />
E 674-6 GB 15<br />
02/12/2011
User Interface<br />
4.3 Section 'EtherCAT Master'<br />
4.3.1 EtherCAT Master Configuration<br />
4.3.1.1 Section "Dependency"<br />
• "Configure" opens the dialog for adjusting the EtherCAT-Master<br />
• "Start ECM" starts the EtherCAT-Master.<br />
• "Stop ECM" stops the EtherCAT-Master.<br />
After being started, there are two possible states:<br />
• "EtherCAT Master is running" (yellow indicator) means the<br />
EtherCAT Master has been started, but there are no valid EtherCAT<br />
devices found.<br />
• "EtherCAT Master is ready" (green indicator) means the EtherCAT<br />
Master has been started, and there are valid EtherCAT devices<br />
found.<br />
"EtherCAT Master controlled by Runtime System"<br />
Select this option to start the EtherCAT Master automatically before the<br />
CoDeSys runtime system is started and to stop it automatically after the<br />
CoDeSys runtime system has shut down.<br />
This is highly recommended for applications, which use the fast SDO transfer.<br />
If this option is checked, buttons "Start ECM" and "Stop ECM" in the<br />
Win<strong>INtime</strong>RTS main window will be disabled.<br />
16 E 674-6 GB<br />
02/12/2011
4.3.1.2 Section 'Configuration Path' (Future use)<br />
4.3.1.3 Section "Speed"<br />
4.3.1.3.1 "Triggered"<br />
SEMA<br />
User Interface<br />
At the moment the configuration path must be the path of the CoDeSys Runtime<br />
System. It can not be changed.<br />
The EtherCAT Master can be run in two modes:<br />
The EtherCAT Master is synchronized by the CoDeSys Runtime System.<br />
Inputs are read at the beginning of each PLC cycle, outputs are written at<br />
the end. This is the default mode.<br />
Read<br />
Inputs<br />
Win<strong>INtime</strong>-RTS<br />
PLC_PRG<br />
Task-Watchdog<br />
Inputs Outputs<br />
Shared Memory<br />
EtherCAT-Master<br />
ECM-Timeout<br />
Write<br />
Outputs<br />
Figure 2: Synchronization of RTS and ECM in "Triggered" mode<br />
• Timeout [ms]:<br />
Working in triggered mode, the EtherCAT Master could cause a<br />
deadlock, when the EtherCAT cable is broken or if devices are<br />
switched off. In this case the CoDeSys Runtime System waits for the<br />
trigger for the specified time. If there is a timeout, CoDeSys continues<br />
execution without reading inputs.<br />
Caution!<br />
The ECM time out value must be smaller than the watchdog value of the<br />
CoDeSys task.<br />
If this is not so, an interruption of the EtherCAT cable causes a responding<br />
of the watchdog of the CoDeSys task<br />
• "External Trigger" (special purposes):<br />
This option can be used to prevent the EtherCAT Master from being<br />
triggered by the CoDeSys Runtime System. This can be useful, if<br />
the EtherCAT Master must be synchronized with a foreign application.<br />
E 674-6 GB 17<br />
02/12/2011<br />
SEMA
User Interface<br />
4.3.1.3.2 "Cyclic"<br />
4.3.1.4 Section "Options"<br />
4.3.1.4.1 eth0 / eth1<br />
4.3.1.4.2 Advanced (special purposes)<br />
The EtherCAT Master sends EtherCAT-telegrams in defined intervals.<br />
The cycle time is the <strong>INtime</strong> kernel tick multiplied by the "Kernel Tick multiplier",<br />
e.g. if your <strong>INtime</strong> kernel tick is 500µs and your Kernel Tick multiplier<br />
is 2, the EtherCAT Master cycle time will be 1ms.<br />
There is no synchronization with the CoDeSys Runtime System.<br />
In default configuration, <strong>INtime</strong> has control over one ethernet port ("eth0",<br />
which is physically LAN2).<br />
EtherCAT always must be connected to LAN2.<br />
Anyway, special applications could have a need for a second ethernet port<br />
under <strong>INtime</strong>'s control.<br />
In this case LAN1 becomes eth0 and LAN2 becomes eth1.<br />
Opens a dialog box "EtherCAT Priorities":<br />
Here you can define priorities for the EtherCAT Driver and the EtherCAT<br />
Master as well as different timeouts and the NIC driver.<br />
Caution!<br />
With respect to the priorities a smaller value indicates a higher priority!<br />
Normally there is no need to change the following priorities. However, special<br />
applications might have a need to change them.<br />
Please use all these options with care and be aware that changing the priorities<br />
and/or the timeouts might change the behavior of the whole system.<br />
18 E 674-6 GB<br />
02/12/2011
4.3.1.4.2.1 Section "ECATDrv.rta" (EtherCAT Driver)<br />
The EtherCAT Driver creates three tasks:<br />
• RX Task (receive)<br />
• TX Task (transmit)<br />
• Statistic Task (calculate statistics)<br />
4.3.1.4.2.2 Section "ECM.rta" (EtherCAT Master)<br />
User Interface<br />
Each task can be run with an individual priority.<br />
Valid priorities are 100...255, default priorities are 135 (RX), 134 (TX), 150<br />
(Statistic).<br />
• EtherCAT Master Task<br />
The EtherCAT Master is a single task. It can be run with an<br />
individual priority. Valid priorities are 100...255, default priority is<br />
130.<br />
4.3.1.4.2.3 Section "Timeouts" (troubleshooting and special purposes)<br />
These timeouts in milliseconds control the interaction of <strong>INtime</strong>RTS and the<br />
EtherCAT Master.<br />
• Wait for "EtherCAT Master Ready"<br />
The EtherCAT Master may take some time from being started until it<br />
signals "Ready". This timeout is the maximum waiting time of<br />
<strong>INtime</strong>RTS.<br />
• Wait for "EtherCAT Master Ready" after Reinizialization<br />
The EtherCAT Master may take some time from being reset until it<br />
signals "Ready". This timeout is the maximum waiting time of<br />
<strong>INtime</strong>RTS.<br />
• Wait for initial reply to trigger (Triggered mode only)<br />
Running in triggered mode, the EtherCAT Master may take some<br />
time until it replies to the trigger. If the connected EtherCAT network<br />
does not match the configuration, the EtherCAT master does not<br />
reply to the trigger.<br />
In this case this timeout is the waiting time before an error message<br />
is displayed.<br />
4.3.1.4.2.4 Sektion "NIC Driver" (troubleshooting and special purposes)<br />
A NIC driver is the software driver for a hardware "Network Interface Chip".<br />
(Ethernet Hardware)<br />
LAN2 of the <strong>Kuhnke</strong> <strong>Ventura</strong> is driven by a Realtek RTL 8139 NIC.<br />
Generally the default driver of the <strong>INtime</strong> operating system (RTL8139.rta) will<br />
be the best choice, but special applications might have a need to use a different<br />
NIC driver.<br />
4.3.1.4.3 Section "Additional Parameters" (test purposes)<br />
The EtherCAT Master has optional features which can be activated by typing<br />
parameters in a command line.<br />
Multiple parameters are possible. Multiple parameters are separated by<br />
spaces, e.g. '-v -l -i 8000'.<br />
Valid parameters are:<br />
-v "Verbose Mode"<br />
In this mode, the EtherCAT master dumps information about its activities into<br />
an <strong>INtime</strong> console window.<br />
Please see hint at page 20.<br />
-l "Log Mode"<br />
(only in combination with '-v')<br />
E 674-6 GB 19<br />
02/12/2011
User Interface<br />
in addition to the dump in a console window a log file ECATLOG.LOG will be<br />
generated.<br />
Please see hint at page 20.<br />
-o "Old Cyclic Start Mode"<br />
The cyclic communication task will not be started before all slaves are in<br />
state "Operational".<br />
Default: The cyclic communication task is already started when all slaves are<br />
in state "Preoperational".<br />
-d "Telegram Dump"<br />
In this mode, the EtherCAT master dumps all telegrams into an <strong>INtime</strong> console<br />
window.<br />
Please see hint at page 20.<br />
-s xx "Send Retries"<br />
Number of send retries before a re-initialization is performed.<br />
Default: 3.<br />
-t xx "Timeout"<br />
Receive timeout [ms].<br />
Default: 15, Minimum: 10.<br />
-i xx "Re-initialization delay"<br />
Delay [ms] for re-initialization after an initialization error occurred.<br />
'-i 0' means "No re-initialization".<br />
Default: 5000.<br />
-p xx "SDO timeout"<br />
Receive timeout [ms] for SDO transfer.<br />
Default: 1000.<br />
Hint!<br />
Please use '-v', '-l' and '-d' with care! They are intended to get unknown<br />
EtherCAT devices working.<br />
Dumping data to a console window and/or a log file does heavily interfere<br />
with the time critical processes of the EtherCAT Master.<br />
So running the EtherCAT Master in triggered mode or fast cyclic mode (<br />
time base < 4ms) together with '-v', '-l' or '-d' could lead to unforeseeable<br />
behavior.<br />
Please note that '-l' does not control the available disk space!<br />
Example of a typical use of these options:<br />
4.3.1.5 Button "Cleanup Config" (troubleshooting)<br />
You have an unknown device and do not succeed in making it work, i.e. it<br />
does not reach state "Operational".<br />
� Switch your EtherCAT Master to cyclic mode and chose a moderate<br />
time base, e.g. 4ms or higher.<br />
Switch on "Verbose Mode" and analyze the dump to find out what is going<br />
wrong while the EtherCAT Master is trying to initialize the device.<br />
A system crash might leave invalid EtherCAT configuration files. "Cleanup<br />
Config" deletes all EtherCAT configuration files from the configuration path.<br />
After this operation, a valid EtherCAT configuration must be downloaded<br />
from the programming system.<br />
20 E 674-6 GB<br />
02/12/2011
4.4 Section 'CoDeSys SP 32bit full'<br />
4.4.1 CoDeSys SP Configuration<br />
4.4.1.1 Section "CoDeSys I/O-Drivers"<br />
The <strong>INtime</strong> RTS (Soft PLC) can be started and stopped in the section<br />
"CoDeSys SP 32bit full".<br />
User Interface<br />
"Configure" starts a dialog window for the configuration of the CoDeSys SP<br />
RTS.<br />
Caution!<br />
Start and stop corresponds to the switching on/off of the RTS. The start of<br />
the RTS is carried out with the bootproject. The project perhaps loaded before<br />
by the programming PC is deleted. .<br />
The part "CoDeSys Drivers" shows which driver software have been loaded.<br />
In this section I/O drivers of the CoDeSys Runtime System (RTS) can be<br />
switched on or off. These drivers and their purposes are:<br />
• "<strong>Kuhnke</strong> I/O": Communication between RTS and programming system,<br />
communication between RTS and GUI, control of <strong>Ventura</strong>'s<br />
LEDs, system health and watchdog. This driver should never be<br />
switched off.<br />
• "CAN": CAN driver.<br />
• "PROFIBUS": PROFIBUS DP driver.<br />
• "EtherCAT": EtherCAT Driver.<br />
There is no real need to switch off any drivers, but you can safe system resources,<br />
if your application does not need all of them.<br />
E 674-6 GB 21<br />
02/12/2011
User Interface<br />
4.4.1.2 Section "PLC Load Control" (testing, troubleshooting)<br />
PLC Load Control throws an exception, if the average CPU time used by the<br />
RTS is greater than the pre-selected value.<br />
PLC Load Control can be switched on and off. If switched on, the number of<br />
cycles to check and the maximal load can be selected.<br />
If your application causes such exceptions, you will have to adjust it's timing<br />
in the "task configuration" of the CoDeSys programming system.<br />
Example:<br />
In a program shall be a cyclical task is, which is started every 1ms. The runtime<br />
of the task is unknown, however it could be nearly 1 ms under certain<br />
conditions, i.e. a runtime reserve is needed.<br />
� Define "Maximum Load" to 50% and restart the RTS.<br />
At a runtime > 0.5 ms the RTS stops and reports "PLC load higher than configured<br />
maximum load".<br />
If your programming PC is logged in, you get the following message:<br />
If your application causes such an exception, you must adjust its timing in<br />
the "Task configuration" of the CoDeSys program newly. The task could be<br />
started e.g. every 2 ms.<br />
22 E 674-6 GB<br />
02/12/2011
4.4.1.3 Section "Options"<br />
4.4.1.4 Section "Start Visualization after Autostart"<br />
4.4.1.5 Section "IP Address"<br />
4.4.1.6 Button "Delete Bootproject"<br />
4.5 Section 'CoDeSys Project'<br />
4.6 Autostart<br />
User Interface<br />
• "Use SysLibCom.lib":<br />
This option reserves the serial port(s) for your CoDeSys project and<br />
loads an additional <strong>INtime</strong> driver.<br />
In this section you can automatically start any executable your application<br />
might need. The main purpose of this option is 3rd party visualization software.<br />
This section displays the IP address of the Windows ethernet port. You will<br />
need this address to establish a connection from your programming system<br />
to the RTS. Please use it as the address of the remote Gateway Server.<br />
Deletes the CoDeSys bootproject.<br />
The CoDeSys project can be started, stopped and put to RESET in the section<br />
"CoDeSys Project".<br />
Furthermore information about the loaded project and its state is displayed.<br />
The <strong>INtime</strong>RTS can be started automatically after booting the <strong>Ventura</strong>.<br />
Therefore the following steps are necessary:<br />
� Create a batch file in a Windows start folder, e.g.<br />
C:\Documents and Settings\Administrator\Start Menu\\Programs\Startup<br />
At first edit the lines<br />
C:<br />
CD \3S<br />
� Then edit the line<br />
winintimerts /autostart<br />
to start <strong>INtime</strong>, <strong>INtime</strong>RTS and its bootproject or<br />
winintimerts /autostart /ecm<br />
to start <strong>INtime</strong>, network and EtherCAT Driver, EtherCAT Master, <strong>INtime</strong>RTS<br />
and its bootproject<br />
E 674-6 GB 23<br />
02/12/2011
Programming with CoDeSys<br />
5 Programming with CoDeSys<br />
5.1 Target system<br />
5.2 PLC Configuration<br />
In this section you learn the unusual features at the programming of the target<br />
system "<strong>Ventura</strong> <strong>INtime</strong> EC2". You find the necessary prerequisites in<br />
section 3.2 at page12.<br />
The programming in CoDeSys starts in the usual way.<br />
� After File, new select the target system "<strong>Kuhnke</strong> <strong>Ventura</strong> EC2".<br />
� Select PLC Configuration on the "Resources" tab.<br />
� Select Insert, Append Subelement, EtherCAT Master.<br />
Then the following dialog window appears:<br />
24 E 674-6 GB<br />
02/12/2011
5.2.1 Options<br />
5.2.2 EtherCAT-Master Options<br />
Programming with CoDesys<br />
The "Configurator" button is still not active, since the project was not saved<br />
before.<br />
� Save the project by File, Save!<br />
The specification of the variable format made on basis of the definition in the<br />
XML device description file.<br />
• Pack Bit I/O as BYTEs<br />
If the option is activated, bit variables are packed into byte variables<br />
at the change from the EtherCAT configurator to CoDeSys.<br />
• ANY_BIT I/O with bit-channels<br />
If the option is activated, additional bit variables are created from<br />
ANY_BIT-variables at the change from the EtherCAT configurator to<br />
CoDeSys.<br />
• Use group names<br />
The group names of the variables from the XML file are used for the<br />
CoDeSys variables.<br />
Start automatically<br />
5.2.3 EtherCAT Configurator State<br />
• When the option is activated, the EtherCAT-Master starts<br />
automatically..<br />
The start can be done alternatively by using a library function.<br />
(see page 39)<br />
• Message window<br />
Here are displayed messages which concern the process of the<br />
EtherCAT-Configuration.<br />
• Save XML Stream as file<br />
The data transfer from the EtherCAT configurator to CoDeSys is<br />
E 674-6 GB 25<br />
02/12/2011
Programming with CoDeSys<br />
5.2.4 Update Task<br />
executed as a XML stream. The file can be helpful at the analysis of<br />
problems.<br />
• Export Text<br />
The contents of the message window are written into a text file. The<br />
file can be helpful at the analysis of problems.<br />
The EtherCAT Master can run in the Triggered Mode or in the Cyclic Mode.<br />
See p. 17<br />
You can decide when the data are exchanged between the EtherCAT master<br />
and the CoDeSys runtime system by editing the task name. ( "All" means<br />
all tasks.)<br />
Only the variables which are used in the task are swapped, the input variables<br />
at the beginning of the task and the output variables at the end of the<br />
task.<br />
• Cyclic Mode<br />
Refreshing the variables in CoDeSys is done asynchronously to the<br />
EtherCAT cycle.<br />
To get data consistency, all matching variables must be used in one task.<br />
• Triggered Mode<br />
CoDeSys startet am Ende der Task einen EtherCAT-Zyklus. Dabei<br />
werden die Ausgangsdaten an den EtherCAT-Master übergeben.<br />
Der EtherCAT-Master schickt ein EtherCAT-Telegramm mit diesen<br />
Ausgangsdaten und erhält die Eingangsdaten zurück. Diese werden<br />
an CoDeSys übergeben. Erst dann wird die nächste CoDeSys-Task<br />
gestartet.<br />
Beachten Sie, dass eine ausreichende Watchdogzeit für die Task (größer<br />
als die ECM-Timeoutzeit) eingestellt sein muss. Siehe auch S. 17.<br />
26 E 674-6 GB<br />
02/12/2011
6 EtherCAT-Configuration<br />
6.1 Offline Configuration<br />
EtherCAT Configuration<br />
The EtherCAT Master needs a configuration for operating the EtherCAT<br />
network.<br />
The details of the joining EtherCAT slaves are an essential component of the<br />
configuration.<br />
There are two possibilities, to document the features of an EtherCAT slave.<br />
1. The base features are left in an EEPROM of the slave further are<br />
described in a XML device file.<br />
2. The features are complete left in an EEPROM of the slave.<br />
(This method is not supported by every manufacturer.)<br />
By the XML device files EtherCAT configurators get convenient possibilities.<br />
EtherCAT makes possible both the offline configuration and the scanning of<br />
the participants in an Ethernet line (online configuration).<br />
In the following examples the standard configurator of the ETG 6 (EtherCAT<br />
configurator of Beckhoff Automation GmbH) was used. This one uses both<br />
offline and online the XML device files.<br />
For <strong>Ventura</strong> FIO it is the file "<strong>Kuhnke</strong>EtherCATModules.xml".<br />
� Copy the file "<strong>Kuhnke</strong>EtherCATModules.xml" into the directory<br />
C:\Programme\EtherCAT Configurator\EtherCAT or into the directory<br />
specified for the used configurator.<br />
In the following example an EtherCAT configuration for an I/O block, consisting<br />
of a <strong>Ventura</strong> FIO bus coupler and a <strong>Ventura</strong> FIO DI16/DO16 module<br />
shall be created offline.<br />
� Start the EtherCAT configurator.<br />
� File, New creates a new I/O-Configuration.<br />
6 ETG is the EtherCAT Technology Group www.ethercat.org<br />
� Highlight "I/O Devices" and execute "Append Devices". That way you<br />
insert a "Device 1 (EtherCAT)", which corresponds to an EtherCAT line.<br />
� Than highlight "Device 1 (EtherCAT)" and execute "Append Box".<br />
� Expand the view on the group "<strong>Kuhnke</strong> Automation GmbH & Co. KG"<br />
and the subgroup "<strong>Ventura</strong> Fast IO (VFIO) und then select "Buskoppler<br />
(694.400.00)".<br />
E 674-6 GB 27<br />
02/12/2011
EtherCAT Configuration<br />
� The configurator suggests "Term1" as the name. Edit names and<br />
comments according to your needs.<br />
� Then mark "Term 1 (<strong>Ventura</strong> FIO Buskoppler)" and execute "Append<br />
box".<br />
� Expand the view on the group "<strong>Kuhnke</strong> Automation GmbH & Co KG"<br />
and the subgroup "Digitale IO Module" and then select<br />
"DI16/DO16 5ms 0.5A (694.450.01)".<br />
� Repeat the last step until the configuration is complete.<br />
28 E 674-6 GB<br />
02/12/2011
EtherCAT Configuration<br />
Thus the configuration for the EtherCAT Master is produced and a *.esm file<br />
can be saved. For a <strong>Ventura</strong> EtherCAT Master project it is the file<br />
"KuECAT.esm".<br />
If your PC is connected with the EtherCAT I/O modules via Ethernet, the<br />
<strong>Ventura</strong> FIO modules can be already tested online.<br />
� By "Toggle Free Run State" (Ctrl+F5) the EtherCAT I/O modules are<br />
switched in the "Operational mode".<br />
� Highlight the variable which you want to test. Read inputs and set outputs!<br />
Set outputs only when no danger can arise by this.<br />
E 674-6 GB 29<br />
02/12/2011
EtherCAT Configuration<br />
6.2 Online Configuration<br />
EtherCAT supports scanning the devices in an Ethernet line. In the following<br />
example the configuration for an I/O block consisting of a <strong>Ventura</strong> FIO bus<br />
coupler and a <strong>Ventura</strong> FIO DI16/DO16 module shall be found out.<br />
� Connect the <strong>Ventura</strong> FIO bus coupler with the <strong>Ventura</strong> FIO DI16/DO16<br />
module and switch on the power supply.<br />
� Connect the ethernet interface of your PC with the <strong>Ventura</strong> FIO-bus<br />
coupler over a CAT5 cable.<br />
(The cable can be both a patch cable and a crossover cable.)<br />
� Start the EtherCAT configurator?<br />
� File, New creates a new I/O Configuration?<br />
� Highlight "I/O Devices" and execute "Scan Devices".<br />
(If your PC has several Ethernet interfaces, select the one that you use<br />
for connecting the EtherCAT I/O modules.)<br />
� Reply the following question "Scan for boxes?" by "Yes".<br />
� Thus the configuration for the EtherCAT Master is produced and a<br />
*.esm file can be saved. For a <strong>Ventura</strong> EtherCAT Master project it is the<br />
file "KuECAT.esm".<br />
� If you also reply "Activate Free Run?" by "yes", you can already test the<br />
<strong>Ventura</strong> FIO modules online.<br />
Set outputs only when no danger can arise by this.<br />
30 E 674-6 GB<br />
02/12/2011
7 <strong>Ventura</strong><strong>INtime</strong>.lib<br />
31<br />
<strong>Ventura</strong><strong>INtime</strong>.lib<br />
Together with the Target installation data (see page 13) CoDeSys is sent a<br />
function library for the target system <strong>Ventura</strong> EC2 resp. <strong>Ventura</strong> ECAT for<br />
the former release EC1.<br />
(Versions see page 12)<br />
<strong>Ventura</strong><strong>INtime</strong>.lib hosts functions affecting the operating system and the<br />
EtherCAT Master. They can be used to adapt program execution to specific<br />
conditions.<br />
Table 1<br />
below summarises the functions and function blocks contained in <strong>Ventura</strong><strong>INtime</strong>.lib.<br />
to be explained on the following pages:<br />
Name Purpose<br />
CHECKLICENSE Checks an individual license key<br />
EC2_ACTIVATESLAVES<br />
EC2_DEACTIVATESLAVES<br />
Activates a range of configured slave<br />
devices<br />
Deactivates a range of configured slave<br />
devices.<br />
EC2_GETSTATE Information about EtherCAT state<br />
EC2_GETSTATEEX Information about EtherCAT state<br />
EC2_INITMASTER Re-initialization of the EtherCAT Master<br />
EC2_READCONMBX<br />
Reads from the control mailbox of the<br />
EtherCAT master<br />
EC2_SDOREAD SDOREAD operation<br />
EC2_SDOWRITE SDOWRITE operation<br />
EC2_WRITECMDMBX<br />
ECAT_GETSTATE<br />
ECAT_INITMASTER<br />
Writes a command and parameters to the<br />
command mailbox of the EtherCAT master<br />
Information about EtherCAT state in version<br />
EC1<br />
Re-initialization of the EtherCAT Master in<br />
Version EC1<br />
GETNAMEDSHMADDRESS Access to a named shared memory<br />
RELEASENAMEDSHMADDRESS Release of a named shared memory<br />
Table 1<br />
Pay attention that the library modules for installing and creating of the special<br />
program units do not run permanently. Use the return value for locking. Otherwise<br />
unforeseeable program flows could arise.
<strong>Ventura</strong><strong>INtime</strong>.lib<br />
7.1 CHECKLICENSE<br />
FUNCTION CHECKLICENSE: BOOL<br />
VAR_INPUT<br />
SZ_LICENSECODE: STRING;<br />
END_VAR<br />
B_USEMAC: BOOL;<br />
B_USEVENDORINFO: BOOL;<br />
B_USEDISKID: BOOL;<br />
The function CHECKLICENSE checks an individual license key, which can<br />
be generated from at least one of the following items:<br />
- MAC address<br />
- Vendor information<br />
- Disk ID<br />
It can be used to protect the CoDeSys project against being copied to another<br />
system.<br />
Function Type Value Meaning<br />
FALSE The license key does not fit with the system.<br />
CHECKLICENSE BOOL TRUE The license key fits with the system.<br />
Parameter Type Value Meaning<br />
SZ_LICENSECODE STRING License key<br />
B_USEMAC BOOL TRUE Use MAC address<br />
B_USEVENDORINFO BOOL TRUE Use Vendor information<br />
B_USEDISKID BOOL TRUE Use Disk ID<br />
You will need additional software from KUHNKE to generate system specific<br />
license keys.<br />
32 E 674-6 GB<br />
02/12/2011
7.2 Activating and deactivating of Slaves<br />
7.2.1 EC2_ACTIVATESLAVES<br />
A flexible (modular) machine requires a flexible (modular) control.<br />
<strong>Ventura</strong><strong>INtime</strong>.lib<br />
Between minimum solution and maximum solution different stages of development<br />
are to be possible.<br />
I.e. for the control there is a full equipment with a maximum number of EtherCAT<br />
Slaves and reduced variants with a subset of EtherCAT Slaves.<br />
A master control is necessary in each case. Ideal way the same control program<br />
can be used.<br />
How is that possible, if the EtherCAT master finds different Ether CAT configurations<br />
nevertheless and the addresses of the inputs and outputs are assigned<br />
in accordance with the topological order at the EtherCAT cable?<br />
With the help of the method "Deactivating Slaves from the maximal configuration"<br />
described in the following individual Slaves, which are physically<br />
missing, can also be removed logically from the configuration.<br />
• The CoDeSys project remains unchanged, new configuring is not<br />
necessary.<br />
• The diagnostic possibilities remain unrestricted.<br />
• The EtherCAT functions remain unrestricted.<br />
FUNCTION EC2_ACTIVATESLAVES: BOOL<br />
VAR_INPUT<br />
END_VAR<br />
uiIdx: UINT;<br />
uiCount: UINT;<br />
The function EC2_ACTIVATESLAVES activates a range of configured slave<br />
devices.<br />
Function Type Value Meaning<br />
FALSE Activation is failed<br />
EC2_ ACTIVATESLAVES BOOL TRUE Activation was successful<br />
Parameter Type Value Meaning<br />
uiIdx UINT<br />
1 based index of the first device to<br />
be activated<br />
uiCount UINT Number of devices to be activated.<br />
E 674-6 GB 33<br />
02/12/2011
<strong>Ventura</strong><strong>INtime</strong>.lib<br />
7.2.2 EC2_DEACTIVATESLAVES<br />
7.2.3 Example<br />
FUNCTION EC2_DEACTIVATESLAVES: BOOL<br />
VAR_INPUT<br />
END_VAR<br />
uiIdx: UINT;<br />
uiCount: UINT;<br />
The function EC2_DEACTIVATESLAVES deactivates a range of configured<br />
slave devices.<br />
Function Type Value Meaning<br />
FALSE Deactivation is failed<br />
EC2_ DEACTIVATESLAVES BOOL TRUE Deactivation was successful<br />
Parameter Type Value Meaning<br />
uiIdx UINT<br />
1 based index of the first device to be<br />
deactivated<br />
uiCount UINT Number of devices to be deactivated.<br />
EC-Master<br />
EC-Master<br />
Maximal configuration<br />
In a machine variant the EtherCAT Slave T3 is not needed.<br />
This partial configuration is to be operated from a maximal configuration.<br />
The following steps in CoDeSys are necessary:<br />
� Select the "Resources" tab and there the PLC configuration<br />
� Append the Subelement "EtherCAT Master".<br />
34 E 674-6 GB<br />
02/12/2011<br />
T1<br />
T1<br />
T2<br />
T2<br />
T3<br />
Partial configuration<br />
T4<br />
T4<br />
T5<br />
T5<br />
T6<br />
T6
<strong>Ventura</strong><strong>INtime</strong>.lib<br />
� Deactivate first the checkbox for " Automatischer Start" in the EtherCAT<br />
master options.<br />
� Configure then the maximal configuration with the EtherCAT<br />
Konfigurator (see section 6, S. 27)<br />
�<br />
� Insert the following instruction lines for the deactivation of the Slave T3<br />
into your CoDeSys program:<br />
IF bDeact_T3 THEN<br />
EC2_DEACTIVATESLAVES(3,1);<br />
bDeact_T3:=FALSE;<br />
END_IF<br />
� Insert the following instruction lines for the start of the EtherCAT Master<br />
into your CoDeSys program:<br />
IF bInitMaster_T3 THEN<br />
EC2_INITMASTER;<br />
bInitMaster:=FALSE;<br />
END_IF<br />
E 674-6 GB 35<br />
02/12/2011
<strong>Ventura</strong><strong>INtime</strong>.lib<br />
7.3 EC2_GETSTATE<br />
FUNCTION_BLOCK EC2_GETSTATE<br />
VAR_OUTPUT<br />
EC2_State: EC2_STATE;<br />
END_VAR<br />
This function block returns information about EtherCAT.<br />
Parameter Type Value Meaning<br />
EC2_State EC2_STATE Structure defined in this library<br />
Structure members:<br />
bECATMasterReady BOOL<br />
uiECATSlaveCount UINT<br />
wECATDevState WORD*)<br />
Master state<br />
TRUE EtherCAT Master is ready and working<br />
FALSE EtherCAT Master is not working<br />
1..<br />
65535<br />
Number of EtherCAT slaves found by the<br />
master<br />
Device states of all connected EtherCAT slaves,<br />
combined by arithmetic OR<br />
1 (Bit0) Init<br />
2 (Bit1) Pre-Operational<br />
4 (Bit2) Safe-Operational<br />
8 (Bit3) Operational<br />
*) Example:<br />
uiECATDevState = 9 can be read as:<br />
At least one device is in state 'Init' and at least one device is in state 'Operational'.<br />
PROGRAM WatchEtherCATState<br />
VAR<br />
EtherCATState: EC2_GETSTATE;<br />
END_VAR<br />
EtherCATState(EC2_State=> );<br />
EtherCATState.EC2_State.bECATMasterReady;<br />
EtherCATState.EC2_State.uiECATSlaveCount;<br />
EtherCATState.EC2_State.wECATDevState;<br />
36 E 674-6 GB<br />
02/12/2011
7.4 EC2_GETSTATEEX<br />
FUNCTION_BLOCK EC2_GETSTATEEX<br />
VAR_OUTPUT<br />
END_VAR<br />
EC2_StateEx: EC2_STATEEX;<br />
This function block returns detailed information about EtherCAT.<br />
Parameter Type Value Meaning<br />
EC2_StateEx EC2_STATEEX Structure defined in this library<br />
Structure members:<br />
wMasterMode WORD<br />
<strong>Ventura</strong><strong>INtime</strong>.lib<br />
Bit coded modes of the EtherCAT master, combined<br />
by arithmetic OR.<br />
1 (Bit0) EtherCAT Master is ready<br />
2 (Bit1) Automatic start configured<br />
4 (Bit2) Master is initializing slaves<br />
8 (Bit3) Error occurred while initializing slaves<br />
16(Bit4) Cyclic mode is running<br />
wTransmitState WORD At present not supported.<br />
wReceiveState WORD At present not supported.<br />
ulCycleTime UDINT Cycle time in kernel ticks.<br />
ulCycleCount UDINT Cycle count.<br />
szECMVer STRING (15) ECM Version<br />
szBuildDate STRING (15) ECM Release Date<br />
szBuildTime STRING (15) ECM Release Time<br />
uiSlavesConfigured UINT Number of slaves configured.<br />
uiSlavesDeactivated UINT Number of slaves deactivated.<br />
uiSlaveCount UINT Number of slaves found.<br />
wAllSlavesState WORD<br />
Device States of all connected EtherCAT slaves,<br />
combined by arithmetic OR<br />
1 (Bit0) Init<br />
2 (Bit1) Pre-Operational<br />
4 (Bit2) Safe-Operational<br />
8 (Bit3) Operational<br />
Error codes and vendor specific information<br />
in the upper bits<br />
E 674-6 GB 37<br />
02/12/2011
<strong>Ventura</strong><strong>INtime</strong>.lib<br />
byMasterState BYTE<br />
bySlaveStateArr<br />
*) Example:<br />
ARRAY<br />
[1..4007] OF<br />
BYTE<br />
Master State<br />
1 (Bit0) Init<br />
2 (Bit1) Pre-Operational<br />
4 (Bit2) Safe-Operational<br />
8 (Bit3) Operational<br />
Device State of each connected EtherCAT slave<br />
separately.<br />
<strong>Kuhnke</strong> specific information in the bits 4..7, combined<br />
by arithmetic OR *)<br />
1 (Bit0) Init<br />
2 (Bit1) Pre-Operational<br />
4 (Bit2) Safe-Operational<br />
8 (Bit3) Operational<br />
16 (Bit4) Error occurred while switching state<br />
Bit 5..7<br />
uiECATDevState = 9 can be read as:<br />
Error code<br />
0 No error<br />
2 Receive timeout<br />
3 Working counter error<br />
4 Validating error<br />
5 Invalid vendor ID<br />
6 Invalid product code<br />
7 Invalid revision<br />
255 The slave has been deactivated<br />
At least one device is in state 'Init' and at least one is in state 'Operational'.<br />
PROGRAM WatchEtherCATStatusEx<br />
VAR<br />
EtherCATStateEX: EC2_GETSTATEEX;<br />
END_VAR<br />
EtherCATStateEX(EC2_StateEx=> );<br />
EtherCATStateEX.EC2_StateEx.byMasterState;<br />
EtherCATStateEX.EC2_StateEx.bySlaveStateArr;<br />
EtherCATStateEX.EC2_StateEx.szBuildDate;<br />
EtherCATStateEX.EC2_StateEx.szBuildTime;<br />
EtherCATStateEX.EC2_StateEx.szECMVer;<br />
EtherCATStateEX.EC2_StateEx.uiSlaveCount;<br />
EtherCATStateEX.EC2_StateEx.uiSlavesConfigured;<br />
EtherCATStateEX.EC2_StateEx.uiSlavesDeactivated;<br />
EtherCATStateEX.EC2_StateEx.ulCycleCount;<br />
EtherCATStateEX.EC2_StateEx.ulCycleTime;<br />
EtherCATStateEX.EC2_StateEx.wAllSlavesState;<br />
EtherCATStateEX.EC2_StateEx.wMasterMode;<br />
EtherCATStateEX.EC2_StateEx.wReceiveState;<br />
EtherCATStateEX.EC2_StateEx.wTransmitState;<br />
38 E 674-6 GB<br />
02/12/2011
7.5 EC2_INITMASTER<br />
FUNCTION EC2_INITMASTER : BOOL<br />
VAR_INPUT<br />
END_VAR<br />
<strong>Ventura</strong><strong>INtime</strong>.lib<br />
The function EC2_INITMASTER forces the EtherCAT Master to perform a<br />
re-initialization.<br />
Function Type Value Meaning<br />
FALSE Re-initialization is failed<br />
EC2_INITMASTER BOOL TRUE Re-initialization was successful<br />
The EtherCAT master can be started automatically (pre-setting) or manually,<br />
i.e. from the PLC program.<br />
The selection is made in CoDeSys in the Resources tab and there in the<br />
PLC Configuration for the EtherCAT Master.<br />
If the option " Start automatically" is deactivated, the start of the EtherCAT<br />
Masters can be done by the function call<br />
EC2_INITMASTER();<br />
(see also p. 34)<br />
Further a re-initialization can be useful, if EC2_GetState has encountered an<br />
EtherCAT problem, e.g. byECATDevState8 and byECATSlaveCount is<br />
less than the estimated number of connected EtherCAT devices.<br />
E 674-6 GB 39<br />
02/12/2011
<strong>Ventura</strong><strong>INtime</strong>.lib<br />
7.6 EC2_READCONMBX<br />
FUNCTION EC2_READCONMBX : UINT<br />
VAR_INPUT<br />
pbyParam : POINTER TO ARRAY [0..127] OF BYTE;<br />
END_VAR<br />
udWait : UDINT;<br />
The function EC2_READCONMBX reads from the control mailbox of the<br />
EtherCAT master.<br />
Function Type Value Meaning<br />
EC2_READCONMBX UINT<br />
Parameter Type Value Meaning<br />
pbyParam<br />
udWait UDINT<br />
POINTER TO ARRAY<br />
[0..127] OF BYTE<br />
Number of relevant bytes in pbyParam<br />
16#FFFF Error, e.g. "Mailbox does not exist".<br />
0 No data in the Control-Mailbox<br />
Pointer to an array to store the mailbox<br />
data<br />
Time to wait for data in the Control-Mailbox<br />
-1 Wait forever<br />
0 Do not wait<br />
1..<br />
655349<br />
Milliseconds to wait<br />
Since waiting can cause serious problems in a PLC environment, it is<br />
highly recommended to use udWait =0 !<br />
40 E 674-6 GB<br />
02/12/2011
7.7 EC2_SDOREAD<br />
FUNCTION_BLOCK EC2_SDOREAD<br />
VAR_INPUT<br />
uiAddress: UINT;<br />
uiIdx: UINT;<br />
usSubIdx: USINT;<br />
bExecute: BOOL;<br />
END_VAR<br />
VAR_OUTPUT<br />
END_VAR<br />
bDone: BOOL;<br />
bError: BOOL;<br />
dErrorId: DINT;<br />
byArrData: ARRAY [1..123] OF BYTE;<br />
usLen: USINT;<br />
<strong>Ventura</strong><strong>INtime</strong>.lib<br />
The function block EC2_SDOREAD performs a SDOREAD operation.<br />
Function Type Value Meaning<br />
Inputs<br />
uiAddress UINT Device index<br />
uiIdx UINT Object index<br />
usSubIdx USINT Object subindex<br />
bExecute BOOL Execution flag<br />
Outputs<br />
bDone BOOL Execution finished flag<br />
bError BOOL Error flag<br />
dErrorId DINT *) Error identifier<br />
byArrData<br />
ARRAY<br />
[1..123] OF<br />
BYTE<br />
Data array<br />
usLen USINT Number of bytes read<br />
Execution of the function block:<br />
• Execution is started with a rising edge of bExecute.<br />
• Execution finished is signalled by bDone.<br />
If operation fails, bDone and bError will be TRUE and dErrorId will contain a<br />
4 Byte error identifier.<br />
E 674-6 GB 41<br />
02/12/2011
<strong>Ventura</strong><strong>INtime</strong>.lib<br />
Outputs will be valid while bExecute remains TRUE. They are reset by a falling<br />
edge of bExecute.<br />
*) Error identifier<br />
Value<br />
Decimal Hexadecimal<br />
<strong>Kuhnke</strong> specific error identifiers<br />
Meaning<br />
-12 16#FFFFFFF4 TX mailbox blocked or not existing<br />
-14 16#FFFFFFF2 RX mailbox timeout<br />
-15 16#FFFFFFF1 RX mailbox telegram lost<br />
-17 16#FFFFFFEF unknown response<br />
-18 16#FFFFFFEE no COE device<br />
-19 16#FFFFFFED SDO mode not supported<br />
CAN Error Identifier<br />
>1
7.8 EC2_SDOWRITE<br />
FUNCTION_BLOCK EC2_SDOWRITE<br />
VAR_INPUT<br />
uiAddress: UINT;<br />
uiIdx: UINT;<br />
usSubIdx: USINT;<br />
usLen: USINT;<br />
END_VAR<br />
VAR_OUTPUT<br />
END_VAR<br />
byArrData: ARRAY [1..4] OF BYTE;<br />
bExecute: BOOL;<br />
bDone: BOOL;<br />
bError: BOOL;<br />
dErrorId: DINT;<br />
<strong>Ventura</strong><strong>INtime</strong>.lib<br />
The function block EC2_SDOWRITE performs a SDOWRITE operation.<br />
Function Type Value Meaning<br />
Inputs<br />
uiAddress UINT Device index<br />
uiIdx UINT Object index<br />
usSubIdx USINT Object subindex<br />
usLen USINT Number of bytes to write<br />
byArrData<br />
ARRAY<br />
[1..123] OF<br />
BYTE<br />
Data array<br />
bExecute BOOL Execution flag<br />
Outputs<br />
bDone BOOL Execution finished flag<br />
bError BOOL Error flag<br />
dErrorId DINT *) Error identifier<br />
Execution of the function block:<br />
• Execution is started with a rising edge of bExecute.<br />
• Execution finished is signalled by bDone.<br />
If operation fails, bDone and bError will be TRUE and dErrorId will contain a<br />
4 Byte error identifier.<br />
E 674-6 GB 43<br />
02/12/2011
<strong>Ventura</strong><strong>INtime</strong>.lib<br />
Outputs will be valid while bExecute remains TRUE. They are reset by a falling<br />
edge of bExecute.<br />
*) Error identifier<br />
Value<br />
Decimal Hexadecimal<br />
<strong>Kuhnke</strong> specific error identifiers<br />
Meaning<br />
-12 16#FFFFFFF4 TX mailbox blocked or not existing<br />
-14 16#FFFFFFF2 RX mailbox timeout<br />
-15 16#FFFFFFF1 RX mailbox telegram lost<br />
-17 16#FFFFFFEF unknown response<br />
-18 16#FFFFFFEE no COE device<br />
-19 16#FFFFFFED SDO mode not supported<br />
CAN Error Identifier<br />
>1
7.9 EC2_WRITECMDMBX<br />
FUNCTION EC2_WRITECMDMBX : BOOL<br />
VAR_INPUT<br />
szCmd : STRING (1);<br />
END_VAR<br />
pbyParam : POINTER TO ARRAY [0..125] OF BYTE;<br />
byParamLen : BYTE;<br />
<strong>Ventura</strong><strong>INtime</strong>.lib<br />
The function EC2_WRITECMDMBX writes a command and parameters to<br />
the command mailbox of the EtherCAT master.<br />
Function Type Value Meaning<br />
EC2_WRITECMDMBX BOOL<br />
FALSE Write was not successful<br />
TRUE Write was successful<br />
Parameter Type Value Meaning<br />
szCmd STRING (1)<br />
pbyParam<br />
POINTER TO ARRAY<br />
[0..125] OF BYTE<br />
EtherCAT master command,<br />
e.g. 'I' for initialization.<br />
Pointer to the parameters of the<br />
EtherCAT master command.<br />
byParamLen BYTE Number of relevant bytes in pbyParam.<br />
E 674-6 GB 45<br />
02/12/2011
<strong>Ventura</strong><strong>INtime</strong>.lib<br />
7.10 ECAT_GETSTATE<br />
ECAT_GETSTATE is suitable only for the version EC1.<br />
For EC2 EC2_GETSTATE is to be used. (To version see p.12)<br />
FUNCTION_BLOCK ECAT_GETSTATE<br />
VAR_OUTPUT<br />
END_VAR<br />
bECATMasterReady: BOOL;<br />
byECATSlaveCount: BYTE;<br />
byECATDevState: BYTE;<br />
The function block ECAT_GETSTATE returns information about EtherCAT.<br />
Parameter Type Value Meaning<br />
bECATMasterReady BOOL<br />
byECATSlaveCount BYTE<br />
byECATDevState BYTE *)<br />
*) Example:<br />
Master state<br />
TRUE EtherCAT Master is ready and working<br />
FALSE EtherCAT Master is not working<br />
46 E 674-6 GB<br />
02/12/2011<br />
1..<br />
255<br />
Number of EtherCAT slaves found by the<br />
master<br />
Device states of all connected EtherCAT slaves,<br />
combined by arithmetic OR<br />
1 (Bit0) Init<br />
2 (Bit1) Pre-Operational<br />
4 (Bit2) Safe-Operational<br />
8 (Bit3) Operational<br />
uiECATDevState = 9 can be read as:<br />
At least one device is in state 'Init' and at least one device is in state 'Operational'.<br />
PROGRAM WatchEtherCATState<br />
VAR<br />
EtherCATState: ECCAT_GETSTATE;<br />
END_VAR<br />
EtherCATState(bECATMasterReady=> , byECATSlaveCount=> ,<br />
byECATDevState=> );<br />
EtherCATState.bECATMasterReady;<br />
EtherCATState.byECATDevState;<br />
EtherCATState.byECATSlaveCount;
7.11 ECAT_INITMASTER<br />
ECAT_ INITMASTER is suitable only for the version EC1.<br />
For EC2 EC2_INITMASTER is to be used. (To version see p.12)<br />
FUNCTION ECAT_INITMASTER : BOOL<br />
VAR_INPUT<br />
END_VAR<br />
<strong>Ventura</strong><strong>INtime</strong>.lib<br />
The function ECAT_INITMASTER forces the EtherCAT Master to perform a<br />
re-initialization.<br />
Function Type Value Meaning<br />
FALSE Re-initialization is failed<br />
ECAT_INITMASTER BOOL TRUE Re-initialization was successful<br />
Re-initialization can be useful, if EC2_GetState has encountered an<br />
EtherCAT problem, e.g. byECATDevState8 and byECATSlaveCount is<br />
less than the estimated number of connected EtherCAT devices.<br />
ECAT_INITMASTER may take some time. So the watchdog is disabled,<br />
while ECAT_INITMASTER is running.<br />
E 674-6 GB 47<br />
02/12/2011
<strong>Ventura</strong><strong>INtime</strong>.lib<br />
7.12 GETNAMEDSHMADDRESS<br />
FUNCTION GETNAMEDSHMADDRESS : DWORD<br />
VAR_INPUT<br />
END_VAR<br />
SZ_SHM_NAME : STRING;<br />
The function GETNAMEDSHMADDRESS allows access to a named shared<br />
memory, which has been allocated by a different application.<br />
Function Type Value Meaning<br />
GETNAMEDSHMADDRESS DWORD<br />
0 Function is failed.<br />
Parameter Type Value Meaning<br />
Pointer to the shared memory<br />
SZ_SHM_NAME STRING (80) Name of the shared memory<br />
Please call RELEASENAMEDSHMADDRESS to finalize access to the<br />
shared memory.<br />
48 E 674-6 GB<br />
02/12/2011
7.13 RELEASENAMEDSHMADDRESS<br />
FUNCTION RELEASENAMEDSHMADDRESS : BOOL<br />
VAR_INPUT<br />
END_VAR<br />
SZ_SHM_NAME : STRING;<br />
<strong>Ventura</strong><strong>INtime</strong>.lib<br />
The function RELEASENAMEDSHMADDRESS finalizes access to a named<br />
shared memory.<br />
Function Type Value Meaning<br />
RELEASENAMEDSHMADDRESS BOOL<br />
0 Function is failed.<br />
Parameter Type Value Meaning<br />
Releasing was successful<br />
SZ_SHM_NAME STRING (80) Name of the shared memory<br />
Releasing named shared memory may take some time. So the watchdog is<br />
disabled, while RELEASENAMEDSHMADDRESS is running.<br />
E 674-6 GB 49<br />
02/12/2011
8 Appendix<br />
8.1 Sales & Service<br />
8.1.1 Main factory in Malente<br />
8.1.2 Customer service<br />
8.2 References<br />
50<br />
Appendix<br />
Please visit our Internet site to find a comprehensive overview of our sales<br />
and service network including all the relevant addresses. You are, of course,<br />
always welcome to contact our staff at the main factory in Malente:<br />
<strong>Kuhnke</strong> Automation GmbH & Co. KG<br />
Lütjenburger Str. 101<br />
D-23714 Malente<br />
Phone +49-45 23-402-0<br />
Fax +49-45 23-402 247<br />
Email sales@kuhnke.de<br />
Internet www.kuhnke.de<br />
<strong>Kuhnke</strong> Automation GmbH & Co. KG<br />
Lütjenburger Str. 101<br />
D - 23714 Malente<br />
Phone +49-4523 402 200<br />
Email service@kuhnke.de<br />
Internet www.kuhnke.de<br />
Title / Subject Number Source<br />
<strong>Instruction</strong> manual <strong>Ventura</strong> IPC E 674 GB http://www.kuhnke.com<br />
Technical Information <strong>Ventura</strong> FIO E 740 GB http://www.kuhnke.com<br />
EtherCAT, technology, FAQs, downloads http://www.ethercat.org<br />
Bedienungsanleitung <strong>Ventura</strong> SlotPLC<br />
SPS, PROFIBUS-DP- und CANopen-Master<br />
Technische Information <strong>Ventura</strong> Slot FB<br />
PROFIBUS-DP-Feldbuskarte für<br />
CoDeSys SP RTE<br />
E 697 D http://www.kuhnke.de<br />
E 697-1 D http://www.kuhnke.de<br />
Bedienungsanleitung EtherCAT I/O IP65 E761 D http://www.kuhnke.de<br />
EtherCAT, Technology, FAQs, Downloads http://www.ethercat.org
9 Index<br />
Attention 8<br />
Autostart<br />
Batch file 23<br />
Cable routing and wiring 11<br />
CoDeSys<br />
Communication parameters 14<br />
Installation 12<br />
CoDeSys I/O-Drivers<br />
Dialog 21<br />
CoDeSys Project<br />
find out 23<br />
CoDeSys SP 32 bit full<br />
Runtime System 12<br />
CoDeSys SP 32bit full<br />
Dialog 21<br />
Configuration<br />
EtherCAT 27<br />
Offline 27<br />
Online 30<br />
Contamination 11<br />
Danger 7<br />
Electromagnetic compatibility 10<br />
Electromagnetic interference 11<br />
eth0 / eth1 18<br />
EtherCAT<br />
Technology 5<br />
EtherCAT Configurator<br />
Installation 13<br />
EtherCAT Master<br />
Configuration 16<br />
Cyclic mode 18<br />
Dialog 16<br />
Start 35, 39<br />
Triggered mode 17<br />
Example<br />
Communication connection 13<br />
Offline configuration 27<br />
Online configuration 30<br />
PC Load Control 22<br />
Exception 22<br />
Function library 31<br />
Impact and vibration 11<br />
Inductive actuators 11<br />
Installation<br />
CoDeSys 12<br />
EtherCAT-Configurator 13<br />
Hardware 9<br />
Target 13<br />
Installation instructions 10<br />
<strong>Instruction</strong> 8<br />
Interference emission 10<br />
<strong>INtime</strong> Kernel<br />
Dialog 15<br />
<strong>INtime</strong> RTS<br />
Communication connection 13<br />
Dialog 21<br />
IP address<br />
find out 13, 23<br />
LAN1/LAN2 18<br />
Limiting value class 10<br />
Location of installation 11<br />
Note 8<br />
PLC Load Control<br />
Dialog 22<br />
Preventive maintenance 9<br />
Project planning 9<br />
Reliability 7<br />
Safety 9<br />
Sales & Service 50<br />
Servicing 9<br />
System description 12<br />
Target<br />
Installation 13<br />
Target group 7<br />
Temperature 11<br />
under construction 8<br />
<strong>Ventura</strong><br />
Platform 5<br />
<strong>Ventura</strong> <strong>INtime</strong><br />
What's that? 5<br />
Version 12<br />
Win<strong>INtime</strong>RTS<br />
Dialog Window 15<br />
Working steps 8<br />
XML device file 27<br />
Index<br />
E 674-6 GB 51<br />
02/12/2011