ADSL Routers Configuration How to configure Internet on ... - Etisalat
ADSL Routers Configuration How to configure Internet on ... - Etisalat
ADSL Routers Configuration How to configure Internet on ... - Etisalat

Create successful ePaper yourself
Turn your PDF publications into a flip-book with our unique Google optimized e-Paper software.
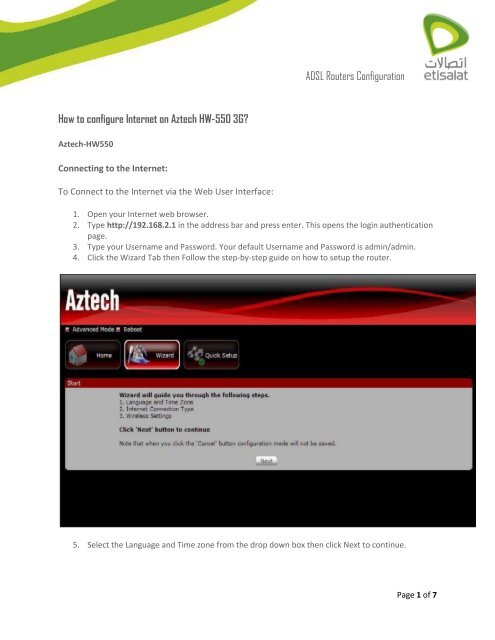
<str<strong>on</strong>g>How</str<strong>on</strong>g> <str<strong>on</strong>g>to</str<strong>on</strong>g> <str<strong>on</strong>g>c<strong>on</strong>figure</str<strong>on</strong>g> <str<strong>on</strong>g>Internet</str<strong>on</strong>g> <strong>on</strong> Aztech HW-550 3G?<br />
Aztech-HW550<br />
C<strong>on</strong>necting <str<strong>on</strong>g>to</str<strong>on</strong>g> the <str<strong>on</strong>g>Internet</str<strong>on</strong>g>:<br />
To C<strong>on</strong>nect <str<strong>on</strong>g>to</str<strong>on</strong>g> the <str<strong>on</strong>g>Internet</str<strong>on</strong>g> via the Web User Interface:<br />
<str<strong>on</strong>g>ADSL</str<strong>on</strong>g> <str<strong>on</strong>g>Routers</str<strong>on</strong>g> <str<strong>on</strong>g>C<strong>on</strong>figurati<strong>on</strong></str<strong>on</strong>g><br />
1. Open your <str<strong>on</strong>g>Internet</str<strong>on</strong>g> web browser.<br />
2. Type http://192.168.2.1 in the address bar and press enter. This opens the login authenticati<strong>on</strong><br />
page.<br />
3. Type your Username and Password. Your default Username and Password is admin/admin.<br />
4. Click the Wizard Tab then Follow the step-by-step guide <strong>on</strong> how <str<strong>on</strong>g>to</str<strong>on</strong>g> setup the router.<br />
5. Select the Language and Time z<strong>on</strong>e from the drop down box then click Next <str<strong>on</strong>g>to</str<strong>on</strong>g> c<strong>on</strong>tinue.<br />
Page 1 of 7
6. Select the <str<strong>on</strong>g>Internet</str<strong>on</strong>g> C<strong>on</strong>necti<strong>on</strong> type then click Next <str<strong>on</strong>g>to</str<strong>on</strong>g> C<strong>on</strong>tinue.<br />
If you choose UMTS (3G), you are required <str<strong>on</strong>g>to</str<strong>on</strong>g> have the following:<br />
- USB Modem Stick<br />
- Broadband data SIM card<br />
If you choose WAN, you are required <str<strong>on</strong>g>to</str<strong>on</strong>g> have the following:<br />
- DSL or cable modem.<br />
Active <str<strong>on</strong>g>Internet</str<strong>on</strong>g> Account<br />
<str<strong>on</strong>g>ADSL</str<strong>on</strong>g> <str<strong>on</strong>g>Routers</str<strong>on</strong>g> <str<strong>on</strong>g>C<strong>on</strong>figurati<strong>on</strong></str<strong>on</strong>g><br />
Page 2 of 7
7. UMTS 3G c<strong>on</strong>necti<strong>on</strong><br />
<str<strong>on</strong>g>ADSL</str<strong>on</strong>g> <str<strong>on</strong>g>Routers</str<strong>on</strong>g> <str<strong>on</strong>g>C<strong>on</strong>figurati<strong>on</strong></str<strong>on</strong>g><br />
Please c<strong>on</strong>nect your USB modem stick <str<strong>on</strong>g>to</str<strong>on</strong>g> HW550-3G and make sure that your data SIM<br />
card is properly inserted in<str<strong>on</strong>g>to</str<strong>on</strong>g> the modem.<br />
- Access Point Settings – Choose between List and Manual. List will provide the APN set<br />
by your <str<strong>on</strong>g>Internet</str<strong>on</strong>g> Service Provider. Choose your Country, <str<strong>on</strong>g>Internet</str<strong>on</strong>g> Service Opera<str<strong>on</strong>g>to</str<strong>on</strong>g>r and<br />
the APN. Manual you need <str<strong>on</strong>g>to</str<strong>on</strong>g> manually key in the APN provided by your ISP. Some ISP<br />
may require a different name for your APN. Please c<strong>on</strong>tact your ISP if you d<strong>on</strong>’t have<br />
this informati<strong>on</strong>.<br />
- Username and Password – Some ISP may require a Username and Password set by the<br />
Opera<str<strong>on</strong>g>to</str<strong>on</strong>g>rs. Please c<strong>on</strong>tact your ISP if you d<strong>on</strong>’t have this informati<strong>on</strong> Choose your<br />
preferred C<strong>on</strong>necti<strong>on</strong> Method.<br />
Page 3 of 7
<str<strong>on</strong>g>ADSL</str<strong>on</strong>g> <str<strong>on</strong>g>Routers</str<strong>on</strong>g> <str<strong>on</strong>g>C<strong>on</strong>figurati<strong>on</strong></str<strong>on</strong>g><br />
- C<strong>on</strong>nect Manually – This c<strong>on</strong>necti<strong>on</strong> method requires you <str<strong>on</strong>g>to</str<strong>on</strong>g> manually press the<br />
‘C<strong>on</strong>nect’ but<str<strong>on</strong>g>to</str<strong>on</strong>g>n each time <str<strong>on</strong>g>Internet</str<strong>on</strong>g> c<strong>on</strong>necti<strong>on</strong> is required. Please note that the<br />
<str<strong>on</strong>g>Internet</str<strong>on</strong>g> c<strong>on</strong>necti<strong>on</strong> will not be disc<strong>on</strong>nected unless you manually press the ‘Disc<strong>on</strong>nect’<br />
but<str<strong>on</strong>g>to</str<strong>on</strong>g>n.<br />
Always c<strong>on</strong>nected – This c<strong>on</strong>necti<strong>on</strong> method allows your <str<strong>on</strong>g>Internet</str<strong>on</strong>g> c<strong>on</strong>necti<strong>on</strong> <str<strong>on</strong>g>to</str<strong>on</strong>g> be<br />
always ON. You need <str<strong>on</strong>g>to</str<strong>on</strong>g> manually press the ‘Disc<strong>on</strong>nect’ but<str<strong>on</strong>g>to</str<strong>on</strong>g>n when <str<strong>on</strong>g>Internet</str<strong>on</strong>g><br />
c<strong>on</strong>necti<strong>on</strong> is not required.<br />
8. WAN C<strong>on</strong>necti<strong>on</strong><br />
Please c<strong>on</strong>nect your DSL or Cable modem <str<strong>on</strong>g>to</str<strong>on</strong>g> HW550-3G WAN port using an Ethernet<br />
cable, make sure that you have an active <str<strong>on</strong>g>Internet</str<strong>on</strong>g> account. C<strong>on</strong>necti<strong>on</strong> Type<br />
Static IP – select this if your ISP provides you the IP address, Subnet mask, Gateway and<br />
DNS server addresses.<br />
- DHCP - if you select this your HW550-3G will au<str<strong>on</strong>g>to</str<strong>on</strong>g>matically get an IP address from the<br />
DHCP server or from your ISP.<br />
Page 4 of 7
<str<strong>on</strong>g>ADSL</str<strong>on</strong>g> <str<strong>on</strong>g>Routers</str<strong>on</strong>g> <str<strong>on</strong>g>C<strong>on</strong>figurati<strong>on</strong></str<strong>on</strong>g><br />
PPPoE – select this if your ISP provides you the Username and Password for you <str<strong>on</strong>g>to</str<strong>on</strong>g><br />
c<strong>on</strong>nect <str<strong>on</strong>g>to</str<strong>on</strong>g> the <str<strong>on</strong>g>Internet</str<strong>on</strong>g>.<br />
9. Setup your wireless c<strong>on</strong>necti<strong>on</strong>, tick Wireless Enabled <str<strong>on</strong>g>to</str<strong>on</strong>g> activate your wireless c<strong>on</strong>necti<strong>on</strong> and<br />
set the SSID for your HW550-3G. Click Next <str<strong>on</strong>g>to</str<strong>on</strong>g> c<strong>on</strong>tinue.<br />
Page 5 of 7
<str<strong>on</strong>g>ADSL</str<strong>on</strong>g> <str<strong>on</strong>g>Routers</str<strong>on</strong>g> <str<strong>on</strong>g>C<strong>on</strong>figurati<strong>on</strong></str<strong>on</strong>g><br />
10. Under Summary page verify the settings made then click ‘Apply’ for the settings <str<strong>on</strong>g>to</str<strong>on</strong>g> take effect.<br />
Page 6 of 7
<str<strong>on</strong>g>ADSL</str<strong>on</strong>g> <str<strong>on</strong>g>Routers</str<strong>on</strong>g> <str<strong>on</strong>g>C<strong>on</strong>figurati<strong>on</strong></str<strong>on</strong>g><br />
Page 7 of 7