Adventure 1 Plus - Horizon Fitness
Adventure 1 Plus - Horizon Fitness
Adventure 1 Plus - Horizon Fitness

You also want an ePaper? Increase the reach of your titles
YUMPU automatically turns print PDFs into web optimized ePapers that Google loves.
Read the TREADMILL gUIDE before using this OWNER’S MANUAL.<br />
<strong>Adventure</strong> 1 <strong>Plus</strong><br />
TREADMILL OWNER’S MANUAL
ASSEMBLY<br />
WARNINg<br />
There are several areas during the assembly process that special attention must be paid. It is very important to follow the assembly<br />
instructions correctly and to make sure all parts are firmly tightened. If the assembly instructions are not followed correctly, the<br />
treadmill could have frame parts that are not tightened and will seem loose and may cause irritating noises. To prevent damage<br />
to the treadmill, the assembly instructions must be reviewed and corrective actions should be taken.<br />
Before proceeding, find your treadmill’s serial number located on the front stabilizer tube and enter it in the space provided<br />
below. Also locate the model name which is next to the serial number.<br />
ENTER YOUR SERIAL NUMBER AND MODEL NAME IN THE BOXES BELOW:<br />
SERIAL NUMBER:<br />
MODEL NAME: HORIzON TREADMILL<br />
3
<strong>Adventure</strong><br />
1 <strong>Plus</strong><br />
4<br />
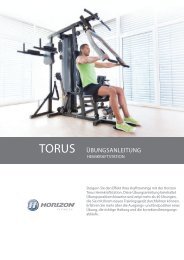
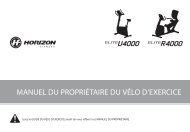
WATER BOTTLE HOLDER<br />
GRIP PULSE HANDRAILS<br />
ON/OFF SWITCH<br />
CIRCUIT BREAKER<br />
POWER CORD<br />
TRANSPORT WHEEL<br />
RUNNING BELT / RUNNING DECK<br />
TOUCH PAD PANEL AND DISPLAY WINDOWS<br />
CONSOLE<br />
SUPPORT BAR<br />
SAFETY KEY PLACEMENT<br />
IPOD/MP3 PLAYER POCKET<br />
CONSOLE MAST<br />
FOOT LOCK LATCH (UNDERNEATH DECK)<br />
MOTOR COVER<br />
SIDE RAIL<br />
ROLLER END CAP<br />
REAR ROLLER ADJUSTMENT BOLTS
TOOLS INCLUDED:<br />
F 6 mm T-Wrench<br />
F 5 mm L-Wrench<br />
F 4 mm L-wrench<br />
F 1 Philip Tip Screwdriver<br />
PARTS INCLUDED:<br />
F 1 Console Assembly<br />
F 2 Console Masts<br />
F 1 Support Bar<br />
F 5 Hardware Bags<br />
F 1 Safety Key<br />
F 1 Bottle of Silicone Lubricant<br />
(for 2 applications)<br />
F 1 Power Cord<br />
F 1 Audio Adapter Cable<br />
PRE ASSEMBLY<br />
UNPACKINg<br />
Place the treadmill carton on a level flat surface. It is recommended that you place a<br />
protective covering on your floor. Take CAUTION when handling and transporting this<br />
unit. Never open box when it is on its side. Once the banding straps have been removed,<br />
do not lift or transport this unit unless it is fully assembled and in the upright folded<br />
position, with the lock latch secure. Unpack the unit where it will be used. The enclosed<br />
treadmill is equipped with high-pressure shocks and may spring open if mishandled.<br />
Never grab hold of any portion of the incline frame and attempt to lift or move the treadmill.<br />
WARNINg<br />
DO NOT ATTEMPT TO LIFT THE TREADMILL! Do not move or lift treadmill<br />
from packaging until specified to do so in the assembly instructions. You may<br />
remove the plastic wrap from console masts.<br />
WARNINg<br />
FAILURE TO FOLLOW THESE INSTRUCTIONS COULD RESULT IN INJURY!<br />
NOTE: During each assembly step, ensure that ALL nuts and bolts are in place and<br />
partially threaded in before completely tightening any ONE bolt.<br />
NOTE: A light application of grease may aid in the installation of hardware. Any grease,<br />
such as lithium bike grease is recommended.<br />
<strong>Adventure</strong><br />
1 <strong>Plus</strong><br />
5
<strong>Adventure</strong><br />
1 <strong>Plus</strong><br />
6<br />
ASSEMBLY STEP 1<br />
BOLT (A)<br />
20 mm<br />
Qty: 4<br />
LEFT<br />
CONSOLE MAST<br />
HARDWARE BAg 1 CONTENTS :<br />
RUNNING DECK<br />
FLAT WASHERS (C)<br />
SPRING WASHERS (B)<br />
BOLTS (A)<br />
SPRING WASHER (B)<br />
15 mm<br />
Qty: 4<br />
BASE FRAME<br />
FLAT WASHER (C)<br />
15 mm<br />
Qty: 4<br />
FOOT LATCH<br />
A Cut the yellow banding straps and lift the<br />
RUNNINg DECK upward until the FOOT<br />
LATCH locks. Remove all contents from<br />
underneath the RUNNINg DECK.<br />
B Open HARDWARE BAg 1.<br />
C With the RUNNINg DECK in the raised<br />
position, attach the LEFT CONSOLE MAST<br />
to the BASE FRAME using 4 BOLTS (A),<br />
4 SPRINg WASHERS (B) and 4 FLAT<br />
WASHERS (C).
ASSEMBLY STEP 2<br />
RUNNING DECK<br />
BOLT (A)<br />
20 mm<br />
Qty: 4<br />
HARDWARE BAg 2 CONTENTS :<br />
BASE FRAME<br />
SPRING WASHER (B)<br />
15 mm<br />
Qty: 4<br />
CONSOLE CABLE<br />
LEAD WIRE<br />
FLAT WASHER (C)<br />
15 mm<br />
Qty: 4<br />
RIGHT CONSOLE MAST<br />
SPRING WASHERS (B)<br />
FLAT WASHERS (C)<br />
CONSOLE CABLE<br />
A Open HARDWARE BAg 2.<br />
B Pull LEAD WIRE through RIgHT CONSOLE<br />
MAST. After pulling the LEAD WIRE through<br />
the mast, the top of the CONSOLE CABLE<br />
should be located at the top of the mast. Detach<br />
and discard the LEAD WIRE.<br />
C With the RUNNINg DECK in the raised<br />
position, attach the RIgHT CONSOLE<br />
MAST to the BASE FRAME using 4 BOLTS<br />
(A), 4 SPRINg WASHERS (B) and 4 FLAT<br />
WASHERS (C).<br />
NOTE: Be careful not to pinch any cables<br />
while attaching the RIgHT CONSOLE<br />
MAST.<br />
<strong>Adventure</strong><br />
1 <strong>Plus</strong><br />
7
<strong>Adventure</strong><br />
1 <strong>Plus</strong><br />
8<br />
ASSEMBLY STEP 3<br />
ASSEMBLE<br />
LEFT SIDE<br />
FIRST<br />
BOLT (D)<br />
25 mm<br />
Qty: 2<br />
HARDWARE BAg 3 CONTENTS :<br />
CONSOLE<br />
FLAT WASHER (E)<br />
16 mm<br />
Qty: 2<br />
CONSOLE CABLES<br />
FLAT WASHER (E)<br />
BOLT (D)<br />
CONSOLE MAST<br />
* NOTE: Be careful<br />
not to pinch any<br />
wires while<br />
attaching the<br />
console.<br />
A Disengage the deck LOCK LATCH with your<br />
foot to lower the RUNNINg DECK.<br />
B Open HARDWARE BAg 3.<br />
C gently place the CONSOLE on top of the<br />
CONSOLE MASTS. Attach the LEFT SIDE first<br />
using 1 BOLT (D), and 1 FLAT WASHER (E).<br />
NOTE: Do not completely tighten BOLT<br />
(D) until STEP 4.<br />
D Connect the CONSOLE CABLES, carefully<br />
tucking wires in masts to avoid damage.<br />
E Attach the RIgHT SIDE of the CONSOLE<br />
using 1 BOLT (D), and 1 FLAT WASHER (C).
ASSEMBLY STEP 4<br />
BOLT (F)<br />
15 mm<br />
Qty: 4<br />
HARDWARE BAg 4 CONTENTS :<br />
BOLT (F)<br />
CONSOLE<br />
SUPPORT BAR<br />
CONSOLE MAST<br />
A Open HARDWARE BAg 4.<br />
B Align SUPPORT BAR with holes in CONSOLE<br />
MASTS.<br />
C Insert BOLTS (F) into all 4 holes of the<br />
SUPPORT BAR.<br />
NOTE: Look into holes in the right mast<br />
before inserting bolts to avoid pinching<br />
cables.<br />
F Tighten all console bolts (Step 3) and support<br />
bar bolts (Step C above) completely.<br />
<strong>Adventure</strong><br />
1 <strong>Plus</strong><br />
9
<strong>Adventure</strong><br />
1 <strong>Plus</strong><br />
10<br />
ASSEMBLY STEP 5<br />
SCREW (G)<br />
15 mm<br />
Qty: 4<br />
HARDWARE BAg 5 CONTENTS :<br />
CONSOLE<br />
BOTTOM CONSOLE COVER<br />
SCREWS (G)<br />
CONSOLE MAST<br />
A Open HARDWARE BAg 5.<br />
B Slide right BOTTOM CONSOLE COVER up<br />
CONSOLE MASTS and align screw holes.<br />
Attach BOTTOM CONSOLE COVER to<br />
CONSOLE using 2 SCREWS (g).<br />
C Repeat on other side.<br />
D Before the first use, lubricate the treadmill deck<br />
by following the instructions in the Maintenance<br />
section.
ASSEMBLY STEP 6<br />
YOU ARE FINISHED!<br />
<strong>Adventure</strong><br />
1 <strong>Plus</strong><br />
11
TREADMILL OPERATION<br />
This section explains how to use your treadmill’s console and programming. The BASIC OPERATION section in the<br />
TREADMILL gUIDE has instructions for the following:<br />
• LOCATION OF THE TREADMILL<br />
• USINg THE SAFETY KEY<br />
• FOLDINg THE TREADMILL<br />
• MOVINg THE TREADMILL<br />
• LEVELINg THE TREADMILL<br />
• TENSIONINg THE RUNNINg BELT<br />
• CENTERINg THE RUNNINg BELT<br />
• USINg THE HEART RATE FUNCTION<br />
13
<strong>Adventure</strong><br />
1 <strong>Plus</strong><br />
14<br />
A<br />
B<br />
D<br />
o o<br />
L G E K I N J F H M<br />
P<br />
C
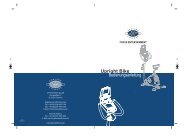
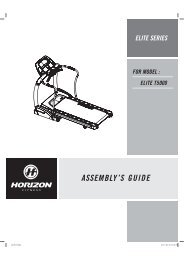
ADVENTURE 1 PLUS OPERATION<br />
Note: There is a thin protective sheet of clear plastic on the overlay of the console that should be removed.<br />
A) LARgE LED WINDOWS: Time & Distance.<br />
B) LCD WINDOW: Calories, Heart Rate, Incline, Speed, %Complete, and Scan.<br />
C) FEEDBACK LEDS: Indicate what workout feedback is currently being displayed in the LCD window.<br />
D) PROgRAM LEDS: Indicate what program is currently selected.<br />
E) START: Press start to begin exercising, starts your workout, or resume exercising after pause.<br />
F) STOP: Press to pause/end your workout. Hold for 3 seconds to reset the treadmill.<br />
g) INCLINE / KEYS: Used to adjust incline in small increments (0.5% increments).<br />
H) SPEED + / - KEYS: Used to adjust speed in small increments (+ / - 0.1 mph or 0.1kmph.)<br />
I) ENTER: Used to select programs and confirm settings.<br />
J) SELECT WORKOUT KEY: Used to scroll through programs.<br />
K) CHANgE DISPLAY: Press to change display feedback during workout.<br />
L) INCLINE MYKEYS: Used to reach desired incline more quickly. See next page for details.<br />
M) SPEED MYKEYS: Used to reach desired speed more quickly. See next page for details.<br />
N) SAFETY KEY POSITION: Enables treadmill when safety key is inserted.<br />
O) WATER BOTTLE POCKETS: Holds personal workout equipment.<br />
P) ENERgY SAVER: after entering stand-by mode for 10 mins energy saver will run automatically to minimize energy consumption.<br />
* Maximum user’s body weight = 125 kg / 275 lbs.<br />
<strong>Adventure</strong><br />
1 <strong>Plus</strong><br />
15
16<br />
CONSOLE OPERATION<br />
MYKEYS<br />
You can program the MyKeys to your desired speed or incline values.<br />
The SPEED MYKEYS defaults are: The INCLINE MYKEYS defaults are:<br />
Slow = 1 mph or 1 kmph Low = 0%<br />
Med = 3 mph or 5 kmph Med = 3%<br />
Fast = 5 mph or 9 kmph High = 6%<br />
To change the default value of any MyKEY, while in a program, first select the speed or incline level you would like to save, then press<br />
and hold the MyKEY you wish to change for 3 seconds. The current speed or incline level will flash on the console and beep three<br />
times indicating that the new level has been saved successfully. To use a Speed MyKEY during a workout, it is necessary to press<br />
ENTER after pressing the MyKEY to confirm the speed. This is only necessary for the Speed MyKEYs and not the Incline MyKEYs.<br />
NOTE: Slow/Low cannot be set higher than Med and Med cannot be set higher than Fast/High. The console will beep once if the<br />
values are incorrect and the value will not be saved.<br />
HEART RATE<br />
PULSE gRIPS<br />
Place the palm of your hands directly on the grip pulse handlebars. Both hands must grip the bars for your heart rate to register. It<br />
takes 5 consecutive heart beats (15-20 seconds) for your heart rate to register. When gripping the pulse handlebars, do not grip<br />
tightly. Holding the grips tightly may elevate your blood pressure. Keep a loose, cupping hold. You may experience an erratic readout<br />
if consistently holding the grip pulse handlebars. Make sure to clean the pulse sensors to ensure proper contact can be maintained.<br />
IMPORTANT: The heart rate function on this product is not a medical device. While heart rate grips can provide a relative<br />
estimation of your actual heart rate, they should not be relied on when accurate readings are necessary. Some people, including<br />
those in a cardiac rehab program, may benefit from using an alternate heart rate monitoring system like a chest or wrist strap.<br />
Various factors, including movement of the user, may affect the accuracy of your heart rate reading. The heart rate reading is<br />
intended only as an exercise aid in determining heart rate trends in general. Please consult your physician.
QUICK START<br />
Use this mode if you wish to begin working out immediately.<br />
1) Turn on the treadmill (the switch is located at the bottom-front of motor cover).<br />
2) Press START key and begin exercising.<br />
3) Program will automatically count time up from 0:00, the speed will default to 0.5 mph, and the incline will default to 0%.<br />
4) The incline and speed level can be adjusted during the workout.<br />
SELECTINg PROgRAMS<br />
1) Press SELECT WORKOUT to scroll through programs.<br />
2) Press ENTER to select a program.<br />
3) Use the + / - KEYS to set level.<br />
4) Press ENTER to confirm selection.<br />
5) Use the + / - KEYS to set time.<br />
6) Press ENTER to confirm selection.<br />
7) Press the START button to begin program.<br />
17
18<br />
PROgRAM INFORMATION<br />
PROgRAM:MANUAL<br />
Customized workout, with no default time.<br />
PROgRAM:INTERVALS<br />
Speed changes; time defaults to 30 minutes.<br />
INTERVALS PROgRAM (Metric)<br />
(WARM-UP and COOL-DOWN last 4:00 minutes each and are included in program times)<br />
(British)
PROgRAM:ROLLINg<br />
Speed changes; time defaults to 30 minutes.<br />
ROLLINg PROgRAM SEgMENTS (Metric)<br />
(WARM-UP and COOL-DOWN last 4:00 minutes each and are included in program times)<br />
(British)<br />
19
20<br />
PROgRAM INFORMATION<br />
PROgRAM:WEIgHT LOSS<br />
Elevation changes; time defaults to 30 minutes.<br />
WEIgHT LOSS PROgRAM SEgMENTS<br />
(WARM-UPandCOOL-DOWN last 4:00 minutes each and are included in program times)<br />
(Metric)<br />
(British)
PROgRAM:HILLS<br />
Elevation and speed changes; time defaults to 30 minutes.<br />
HILL RUN PROgRAM SEgMENTS<br />
(WARM-UPandCOOL-DOWN last 4:00 minutes each and are included in program times)<br />
(Metric)<br />
(British)<br />
21
22<br />
CONDITIONINg gUIDELINES<br />
Always consult your physician before beginning an exercise program.<br />
HOW OFTEN? (FREQUENCY OF WORKOUTS)<br />
The American Heart Association recommends that you exercise at least 3 to 4 days per week to maintain cardiovascular fitness. If<br />
you have other goals such as weight or fat loss, you will achieve your goal faster with more frequent exercise. Whether it’s 3 days or 6<br />
days, remember that your ultimate goal should be to make exercise a lifetime habit. Many people are successful staying with a fitness<br />
program if they set aside a specific time of day to exercise. It doesn’t matter whether it’s in the morning before breakfast, during lunch<br />
hour or while watching the evening news. What’s more important is that it’s a time that allows you to keep a schedule, and a time<br />
when you won’t be interrupted. To be successful with your fitness program, you have to make it a priority in your life. So decide on a<br />
time, pull out your day planner and pencil in your exercise times for the next month!<br />
HOW LONg? (DURATION OF WORKOUTS)<br />
For aerobic exercise benefits, it’s recommended that you exercise from between 24 and 60 minutes per session. But start slowly and<br />
gradually increase your exercise times. If you’ve been sedentary during the past year, it may be a good idea to keep your exercise<br />
times to as little as five minutes initially. Your body will need time to adjust to the new activity. If your goal is weight loss, a longer<br />
exercise session at lower intensities has been found to be most effective. A workout time of 48 minutes or more is recommended for<br />
best weight loss results.<br />
HOW HARD? (INTENSITY OF WORKOUTS)<br />
How hard you workout is also determined by your goals. If you use your treadmill to prepare for a 5K run, you will probably work out<br />
at a higher intensity than if your goal is general fitness. Regardless of your long term goals, always begin an exercise program at low<br />
intensity. Aerobic exercise does not have to be painful to be beneficial! There are two ways to measure your exercise intensity. The<br />
first is by monitoring your heart rate (using the grip pulse handlebars or a wireless chest transmitter - may be sold separately), and the<br />
second is by evaluating your perceived exertion level (this is simpler than it sounds!).<br />
PERCEIVED EXERTION LEVEL<br />
A simple way to gauge your exercise intensity is to evaluate your perceived exertion level. While exercising, if you are too winded to<br />
maintain a conversation without gasping, you are working out too hard. A good rule of thumb is to work to the point of exhilaration,<br />
not exhaustion. If you cannot catch your breath, it’s time to slow down. Always be aware of these warning signs of overexertion.
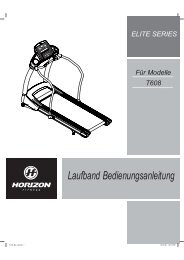
TARgET HEART RATE zONE CHART<br />
WHAT IS TARgET HEART RATE zONE?<br />
Target Heart Rate zone tells you the number of times per minute your<br />
heart needs to beat to achieve a desired workout effect. It is represented<br />
as a percentage of the maximum number of times your heart can beat<br />
per minute. Target zone will vary for each individual, depending on age,<br />
current level of conditioning, and personal fitness goals. The American<br />
Heart Association recommends working-out at a Target Heart Rate zone of<br />
between 60% and 75% of your maximum heart rate. A beginner will want<br />
to workout in the 60% range while a more experienced exerciser will want<br />
to workout in the 70-75% range. See chart for reference.<br />
EXAMPLE:<br />
For a 42-year-old user: Find age along the bottom of the chart (round to<br />
40), follow age column up to the target zone bar. Results: 60% of maximum<br />
Heart Rate = 108 Beats Per Minute, 75% of maximum Heart Rate = 135<br />
Beat Per Minute.<br />
Always consult your physician before beginning an exercise program.<br />
23
24<br />
STRETCHINg<br />
STRETCH FIRST<br />
Before using your product, it is best to take a few minutes to do a few gentle stretching exercises. Stretching prior to exercise will<br />
improve flexibility and reduce chances of exercise related injury. Ease into each of these stretches with a slow gentle motion. Do not<br />
stretch to the point of pain. Make sure not to bounce while doing these stretches.<br />
1. STANDINg CALF MUSCLE STRETCH<br />
Stand near a wall with the toes of your left foot about 18” from the wall, and the right foot about 12”<br />
behind the other foot. Lean forward, pushing against the wall with your palms. Keep your heels flat and<br />
hold this position for a count of 15 seconds. Make sure that you do not bounce while stretching. Repeat<br />
on the other side.<br />
2. STANDINg QUADRICEP STRETCH<br />
Using a wall to provide balance, grasp your left ankle<br />
with your left hand and hold your foot against the<br />
back of your thigh for 15 seconds. Repeat with your<br />
right ankle and hand.<br />
3. SITTINg HAMSTRINg & LOWER BACK MUSCLE STRETCH<br />
Sit on the floor with your legs together and straight out in front of you. Do not lock your knees. Extend<br />
your fingers towards your toes and hold for a count of 15 seconds. Make sure that you do not bounce<br />
while stretching. Sit upright again. Repeat one time.
THE IMPORTANCE OF WARM UP & COOL DOWN<br />
WARM UP<br />
The first 2 to 5 minutes of a workout should be devoted to warming up. The warm-up will limber your muscles and prepare them for<br />
more strenuous exercise. Make sure that you warm-up on your product at a slow pace. The warm up should gradually bring your heart<br />
rate into your Target Heart Rate zone.<br />
COOL DOWNN<br />
Never stop exercising suddenly! A cool-down period of 3-5 minutes allows your heart to readjust to the decreased demand. Make<br />
sure that your cool down period consists of a very slow pace to allow your heart rate to lower. After the cool-down, repeat the<br />
stretching exercises listed above to loosen and relax your muscles.<br />
ACHIEVINg YOUR FITNESS gOALS<br />
An important step in developing a long term fitness program is to determine your goals. Is your primary goal for exercising to lose<br />
weight? Improve muscle? Reduce stress? Prepare for the spring racing schedule? Knowing what your goals are will help you<br />
develop a more successful exercise program. Below are some common exercise goals:<br />
• Weight Loss - lower intensity, longer duration workouts<br />
• Improve Body Shape and Tone - interval workouts, alternate between high and low intensities<br />
• Increased Energy Level - more frequent daily workouts<br />
• Improved Sports Performance - high intensity workouts<br />
• Improved Cardiovascular Endurance - moderate intensity, longer duration workouts<br />
If possible try to define your personal goals in precise, measurable terms, and then put your goals in writing. The more specific you<br />
can be, the easier it will be to track your progress. If your goals are long term, divide them up into monthly and weekly segments.<br />
Longer term goals can lose some of the immediate motivation benefits. Short term goals are easier to achieve. Your console provides<br />
you with several readouts that can be used to record your progress. You can track Distance, Calories or Time.<br />
KEEPINg AN EXERCISE DIARY<br />
To make your personal exercise log book, photocopy the weekly and monthly log sheets, which are located on the following pages.<br />
As your fitness improves, you can look back and see how far you’ve come!<br />
25
TREADMILL OWNER’S MANUAL<br />
<strong>Adventure</strong> 1 <strong>Plus</strong> Treadmill Owner’s Manual 052311 Rev1.0 © 2011 <strong>Horizon</strong> <strong>Fitness</strong>