Equipment Recommendations : GAUIHobby - HeliFleet.com
Equipment Recommendations : GAUIHobby - HeliFleet.com
Equipment Recommendations : GAUIHobby - HeliFleet.com

You also want an ePaper? Increase the reach of your titles
YUMPU automatically turns print PDFs into web optimized ePapers that Google loves.
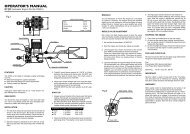
Tail servo and the heading hold gyro setup<br />
1. Install the Gyro and the tail servo.<br />
2. Connect the tail pushrod to the servo.<br />
Make sure the servo arm is 90 degrees<br />
to the tail pushrod. The ball link<br />
should be set at the second hole on<br />
the servo arm (as shown on left).<br />
3. Slide the servo mount and the tail<br />
servo along the tail boom until the<br />
tail pitch lever is parallel to the<br />
tail output shaft or slightly<br />
forward.<br />
4. Set the Gyro limit properly, make<br />
sure the tail pitch yoke do not touch<br />
the tail pitch lever mount and the<br />
tail rotor hub when the tail servo<br />
moves to the left and the right<br />
maximum travel volumn. If the Gyro<br />
you used do not have the function<br />
of Limit , set the function of ATV /<br />
End Point / Travel Adjust on<br />
transmitter to adjust the proper<br />
travel volumn of the tail servo.<br />
5. If the tail oscillates or wags at<br />
less than 60% gain,you will need to<br />
move the ball link to the hole which<br />
is closer to the serve Gyro<br />
limit properly. The ideal gain setting<br />
is around 70%.<br />
Important:<br />
Do not touch the<br />
tail pitch lever<br />
mount and the<br />
tail rotor hub.


![Spartan Quark Gyro Installation Guide [Doc. v1.0] - Spartan RC](https://img.yumpu.com/53147979/1/190x196/spartan-quark-gyro-installation-guide-doc-v10-spartan-rc.jpg?quality=85)