Equipment Recommendations : GAUIHobby - HeliFleet.com
Equipment Recommendations : GAUIHobby - HeliFleet.com
Equipment Recommendations : GAUIHobby - HeliFleet.com
Create successful ePaper yourself
Turn your PDF publications into a flip-book with our unique Google optimized e-Paper software.
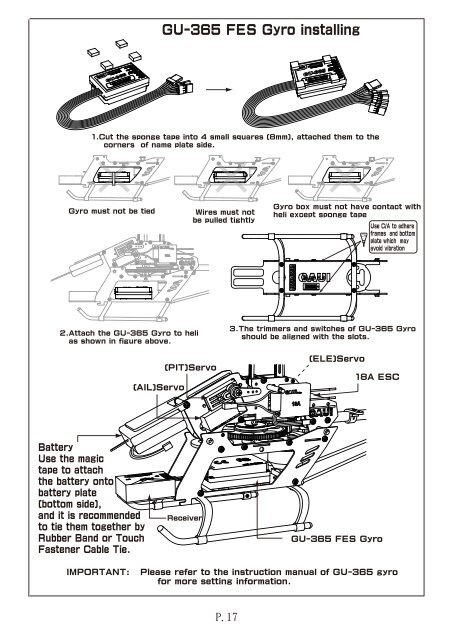
GU-365 FES Gyro installing<br />
1.Cut the sponge tape into 4 small squares (8mm), attached them to the<br />
corners of name plate side.<br />
Gyro must not be tied<br />
2.Attach the GU-365 Gyro to heli<br />
as shown in figure above.<br />
Battery<br />
Use the magic<br />
tape to attach<br />
the battery onto<br />
battery plate<br />
(bottom side),<br />
and it is re<strong>com</strong>mended<br />
to tie them together by<br />
Rubber Band or Touch<br />
Fastener Cable Tie.<br />
(AIL)Servo<br />
(PIT)Servo<br />
Receiver<br />
Wires must not<br />
be pulled tightly<br />
Gyro box must not have contact with<br />
heli except sponge tape<br />
3.The trimmers and switches of GU-365 Gyro<br />
should be aligned with the slots.<br />
CA<br />
(ELE)Servo<br />
18A ESC<br />
GU-365 FES Gyro<br />
Use C/A to adhere<br />
frames and bottom<br />
plate which may<br />
avoid vibration<br />
IMPORTANT: Please refer to the instruction manual of GU-365 gyro<br />
for more setting information.








![Spartan Quark Gyro Installation Guide [Doc. v1.0] - Spartan RC](https://img.yumpu.com/53147979/1/190x196/spartan-quark-gyro-installation-guide-doc-v10-spartan-rc.jpg?quality=85)

