catalogue - Düker GmbH & Co KGaA
catalogue - Düker GmbH & Co KGaA
catalogue - Düker GmbH & Co KGaA
- TAGS
- catalogue
- kgaa
- www.dueker.de

You also want an ePaper? Increase the reach of your titles
YUMPU automatically turns print PDFs into web optimized ePapers that Google loves.
Laying instructions for ductile cast iron pressure pipes and<br />
fittings, equipped with thrust-resisting joint <strong>Düker</strong> SPEZIAL,<br />
particulary for flanged sockets and collars<br />
2486<br />
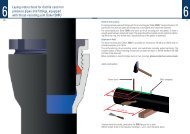
Assembling steps:<br />
• Clean spigot/s in the area of sealing moves and mark the installation depth.<br />
• Insert screw ring, locking ring/s (DN 80 – 250) or element rubber ring/s (DN 300 + 400), SPEZIAL<br />
screw-ring/s, gliding ring/s (DN 80 – 400, t = 3 mm) and gasket/s (lubricate inside) in this<br />
sequence onto the spigot and pay attention to the correct position (see mounting drawing).<br />
• Lubricate spigot/s, thrust-face/s and outside surface/s of gasket/s, gliding ring/s and locking<br />
ring/s (element rubber ring/s), the thrust-face/s and thread of screw rings as well as sealing<br />
chambers and the thread of the sockets with lubricant.<br />
• Insert spigot into the socket and check the installation depth. In case of installing a collar<br />
lubricate sealing chambers and thread of screw, too and insert them onto a spigot. After the<br />
axial positioning of spigots to each other (avoid deflection and observe installation depth), put<br />
the collar in centre to the spigots and adjust centrical.<br />
• Impress gasket equable into the sealing chambers. Push gliding ring until it touches the gasket.<br />
Screw down screw ring by hand as far as possible and tighten it with the help of a hammer or<br />
ram. Here, avoid the turning of the socket.<br />
In case of installation a collar tighten both sides alternately. The turning of the socket can be<br />
avoided by using a second hook wrench (see illustration). Because of the setting behaviour of<br />
the gasket, a post hammering after 5-10 Minutes is recommended.<br />
• Turn in the locking rings (element rubber rings) until it touches the SPEZIAL screw ring. Insert<br />
the screw rings by hand and tighten them with hammer blows.<br />
• Deflection: After finishing the connection in centrical position, pipes can be deflected up to 3°.<br />
For mounting the connection, the following parts are necessary:<br />
Pos. 1: Screw ring made of ductile cast iron, inside chamfered<br />
Pos. 2: Element rubber-ring with segments made of steel<br />
Pos. 3: gasket<br />
Pos. 4: Special screw ring made of ductile cast iron, with internal- and external screw thread<br />
Pos. 5: Simple gliding ring made of steel<br />
Mounting drawing for collars with thrust-resisting joint <strong>Düker</strong> SPEZIAL<br />
6249