Nostalgia Electrics KRS-2100 Keg-O - BeverageFactory.com
Nostalgia Electrics KRS-2100 Keg-O - BeverageFactory.com
Nostalgia Electrics KRS-2100 Keg-O - BeverageFactory.com

You also want an ePaper? Increase the reach of your titles
YUMPU automatically turns print PDFs into web optimized ePapers that Google loves.
1621 Beacon Place<br />
Oxnard, CA 93033<br />
Phone (805) 487-7772<br />
Fax (805) 487-9975<br />
Visit us online at<br />
www.helmangroup.<strong>com</strong><br />
KEGORATOR<br />
MODEL# <strong>KRS</strong>-2000 SERIES<br />
INSTRUCTION MANUAL<br />
FOR HOUSEHOLD USE ONLY<br />
READ THESE INSTRUCTIONS BEFORE USING THIS UNIT!<br />
SAVE THESE INSTRUCTIONS!
Safety Precautions<br />
Read all of the instructions before using this appliance. When using this appliance, always<br />
exercise basic safety precautions, including the following:<br />
1. Use this appliance only for its intended purpose as described in this operation manual.<br />
2. This appliance must be properly installed in accordance with the installation<br />
instructions before it is used. See the installation section for more details.<br />
3. This appliance must be connected to a proper electrical outlet with the correct<br />
electrical supply.<br />
4. Proper grounding must be ensured to reduce the risk of shock and fire. Do not cut or<br />
remove the grounding plug! If you do not have a three-prong electric receptacle outlet<br />
in the wall, have a certified electrician install the proper outlet. The wall receptacle<br />
must be properly grounded.<br />
5. Never unplug your appliance by pulling on the power cord. Always grasp the plug<br />
firmly and pull straight out from the outlet.<br />
6. Immediately replace worn power cords, loose plugs and power outlets.<br />
7. To reduce the risk of electric shock or fire, do not use extension cords or adapters to<br />
connect the unit to an electrical power source.<br />
8. Unplug your appliance before cleaning or making any repairs.<br />
9. We suggest that a certified technician perform the service if for any reason this<br />
product requires service.<br />
10. If your old appliance is being discarded, we re<strong>com</strong>mend that you remove the door and<br />
leave the shelves in place. This will reduce the possibility of danger to children.<br />
11. This appliance should not be recessed or built into an enclosed cabinet. It is designed<br />
for freestanding installation only.<br />
12. Do not operate your appliance in the presence of explosive fumes.<br />
13. Do not tamper with the controls.<br />
14. Do not operate this appliance when parts are missing or broken.<br />
15. Do not use this appliance for <strong>com</strong>mercial use.<br />
16. This appliance is designed for indoor use only and should not be used outdoors.<br />
17. To reduce is the risk of injury, do not allow children to play in or on the appliance.<br />
Close supervision is necessary when the appliance is used near children.<br />
18. The appliance door must be closed during operation. Do not leave the door open when<br />
children are near the dispenser.<br />
19. DO NOT not attempt to operate this unit with a damaged cord or plug.<br />
20. DO NOT roll the <strong>Keg</strong>orator with loaded beer kegs on carpet floor.<br />
21. This appliance is not intended for use by young children or infirm persons without<br />
supervision.<br />
22. This appliance is NOT A TOY!<br />
23. Young children should be supervised to ensure that they do not play with this<br />
appliance.<br />
10/30/2007 rev.<br />
Important Safety Precautions of CO2<br />
(Carbon Dioxide) Gas<br />
1. CO 2 gas can be dangerous! CO 2 cylinders contain high-pressure <strong>com</strong>pressed gas,<br />
which can be hazardous if not handled properly. Make sure you read and understand<br />
all the procedures for the CO 2 cylinders before installation.<br />
2. Always connect the CO 2 cylinder to a regulator! Failure to do so may cause an<br />
explosion resulting in possible death or injury when the cylinder valve is opened,<br />
3. Never connect the CO2 cylinder directly to the product container.<br />
4. Always follow the correct procedures when changing cylinders.<br />
5. Never drop or throw a CO 2 cylinder.<br />
6. Always keep CO 2 cylinders away from heat. Store extra cylinders in a cool place<br />
(preferably 70° F). Secure fasten with a chain in an upright position when storing.<br />
7. Always ventilate and leave the area immediately if CO 2 leakage has occurred!<br />
8. There are two safety devices in the pressure system in the form of a valve. One safety<br />
feature is on the CO 2 bottle. The second is on the regulator.<br />
9. Never attempt to refill CO 2 cylinder yourself. CO2 tanks can be refilled at locations<br />
such as welding supply shops, party stores, fire supply shops, or where kegs are<br />
purchased.<br />
10. See attached.<br />
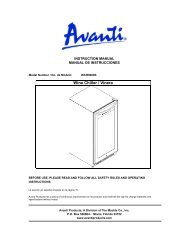
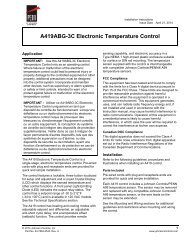
<strong>Keg</strong><br />
Coupler<br />
Beer Line<br />
Beer <strong>Keg</strong><br />
(Not Included)<br />
Beer<br />
Dispenser<br />
Tower<br />
CO ² Line<br />
Single-Gauge<br />
CO ² Regulator<br />
Low Pressure<br />
Valve<br />
1 2<br />
High-Pressure Valve<br />
CO ² Bottle<br />
Shut Off Safely<br />
CO ² Tank<br />
8.5"<br />
9"<br />
15.5"<br />
15.5"<br />
24.75"<br />
23"<br />
13.5"<br />
23"
SAVE THESE INSTRUCTIONS<br />
For Future Use<br />
DANGER!<br />
Risk of child entrapment! Before throwing away your<br />
old appliance, remove the door so that children may<br />
not easily be<strong>com</strong>e trapped inside.<br />
(Note: If the refrigerator has been placed in a horizontal or tilted position for any period of<br />
time wait 24 hours before plugging the unit in.)<br />
Proper Location<br />
• To ensure that your <strong>Keg</strong>orator works to the maximum efficiency it was designed for,<br />
keep it in a location where there is proper air circulation and electrical outlets.<br />
• Choose a location where the <strong>Keg</strong>orator will be away from heat and will not be exposed<br />
to direct sunlight.<br />
• This <strong>Keg</strong>orator is designed for indoor use only -- it should not be used outdoors.<br />
• This <strong>Keg</strong>orator is a freestanding design and should not be placed in a built-in or<br />
recessed area.<br />
• <strong>Keg</strong>orator unit dimensions:<br />
20.3” W x 32.10” H x 26.20” D<br />
• The following dimensions are re<strong>com</strong>mended for clearances around the <strong>Keg</strong>orator:<br />
Sides …………………… ¾” (19 mm)<br />
Back ……………………. 1” (25 mm)<br />
Use of Extension Cords<br />
• Avoid using an extension cord because of potential safety hazards in certain<br />
conditions. If it is necessary to use an extension cord, use only a 3-wire extension<br />
cord that has a 3-blade grounding plug. The cord must be equal to or greater than the<br />
electrical rating of the appliance.<br />
Assembly Instructions<br />
Read assembly instructions carefully to ensure that you understand all installation<br />
instructions before installing the <strong>Keg</strong>orator. If after <strong>com</strong>pleting the process you are still<br />
unsure whether the <strong>Keg</strong>orator has been properly installed, we re<strong>com</strong>mend that you contact<br />
a qualified installer.<br />
Note: Allow the <strong>Keg</strong>orator to stand in an upright position for about 8 hours before turning<br />
on the power. This is very important! Once the unit is laid on it’s side, the Freon in the<br />
refrigeration unit is shifted. The Freon in the refrigeration unit needs to stabilize before<br />
the power is turned on.<br />
Installing the Casters<br />
Follow the steps below to install the casters.<br />
1. Empty the inside of the cabinet <strong>com</strong>pletely and lay the <strong>Keg</strong>orator down on it’s side. We<br />
re<strong>com</strong>mend that you place a piece of cardboard or cloth underneath the cabinet to<br />
prevent dents or scratches.<br />
2. Insert the casters into the holes on the bottom<br />
corners of the cabinet. Tighten each caster<br />
by turning the nut clockwise with a wrench<br />
(not provided in the kit).<br />
3. Once all four casters have been tightened,<br />
stand the cabinet in its upright position.<br />
Note: Two of the casters include locking mechanisms<br />
to ensure the unit does not slide on hard floors. These<br />
two locking casters should be fastened at the front<br />
end of the unit, with the unlocked casters fasted on<br />
the rear end.<br />
Installing the Beer Tap<br />
Follow the steps below to install the beer tap.<br />
1. Remove the cabinet plug located on the work<br />
top. Firmly grasp the cabinet plug, twist and pull<br />
upward.<br />
Note: Keep this plug in a safe place -- it will be<br />
required when using the <strong>Keg</strong>orator as a refrigerator<br />
without a beer keg in use.<br />
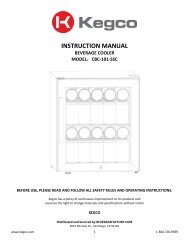
2. There are notches on the bottom of the draft<br />
arm assembly that line up with grooves inside<br />
the opening in the top of the <strong>Keg</strong>orator. Align<br />
the draft arm with the opening in the top of the<br />
unit, then place inside and twist until secure. No<br />
screws are necessary, it locks into place simply.<br />
The thin black gasket is not mandatory for<br />
assembly. (See Illustrations C & D on page 8)<br />
Also, See Illustrations E & F on page 9, showing<br />
the hose connections to CO2 regulator and the<br />
regulator to the beer tap.<br />
3 4<br />
Guard Rail<br />
Beer<br />
Dispenser<br />
Tower<br />
Beer Duct<br />
Handle
Installing the Guardrail<br />
Follow these steps below to install the guardrail.<br />
1. Place the guardrail on top of the cabinet.<br />
2. Align all holes of the guardrail with the holes of the cabinet.<br />
3. Secure the guardrail to the cabinet by placing inside corresponding rubber holes.<br />
Installing the CO2 Regulator and the CO2 Cylinder<br />
Follow these steps to safely install the CO 2 regulator and CO 2 cylinder. You must read and<br />
understand the following procedures for the CO 2 cylinders before installation.<br />
NOTE: If all your rubber washers & O-rings<br />
are not pre-installed, please refer to your<br />
parts list (attached).<br />
NOTE: Your CO 2 cylinder has DOT (USA<br />
Department of Transportation) approval,<br />
however the cylinder has been shipped<br />
empty to avoid any possible accidents during<br />
transportation. When you purchase the first<br />
keg of beer, you must also have your CO 2<br />
cylinder filled at your local supplier. (See<br />
page 2, item 9 for suggested locations within<br />
your <strong>com</strong>munity.)<br />
1. Install the CO2 gas line tube to the<br />
regulator by attaching one end of the<br />
tube to the hose barb connection on the<br />
CO 2 regulator.<br />
CO 2<br />
Gas Line<br />
Shut-Off<br />
Valve<br />
CO 2<br />
Regulator<br />
Rubber<br />
Strap<br />
2. Be sure to insert the high pressure<br />
washer (provided with the kit) into the<br />
regulator to cylinder attachment nut. (See Illustration A on page 6)<br />
Connect to<br />
CO 2 Cylinder<br />
CO 2<br />
3. Attach the CO 2 regulator to the CO 2 cylinder by screwing the regulator nut onto the<br />
cylinder valve and tightening with an adjustable wrench. (See Illustration B on page 6).<br />
4. Wrap the rubber strap that is attached to the interior of <strong>Keg</strong>orator unit around the CO 2<br />
bottle to secure the bottle in place (as shown above).<br />
5. Position the cylinder so that you would be able to read the numbers on the gauges<br />
and have easy access to shut-off valves.<br />
DANGER!<br />
CO2 can be dangerous! CO2 cylinders contain<br />
high-pressured gas, which can be hazardous if handled<br />
improperly. They must be handled with care.<br />
Rubber<br />
Washer<br />
CO 2<br />
Cylinder<br />
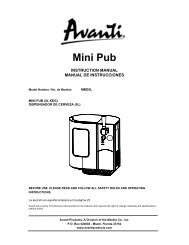
Tapping the Beer <strong>Keg</strong> – Installing <strong>Keg</strong> Tap<br />
(Single-Valve Type Barrel)<br />
Follow these steps below to tap the beer keg.<br />
1. Make sure the black pull handle of the tap is in the closed (up) position before<br />
installing it on the keg (Fig. 1 - below). Insert the keg coupler into the locking neck of<br />
the beer keg and turn clockwise ¼ to lock it into position (Fig. 2 - below). This means<br />
that it is secured to the keg.<br />
2. When connecting the beer line to the top of the tap, it is very important that the wing<br />
nut tighten down <strong>com</strong>pletely so that the metal tube in the center of the wingnut is<br />
pushed up tightly by the top of the plastic marble choke, which is inserted into the top<br />
of the tap. Hand fighten firmly.<br />
3. Before attaching the CO 2 line, be sure too insert the rubber directional washer into the<br />
side of the tap. Attach the CO 2 line (Fig. 3 - below) and hand-tighten firmly. Secure the<br />
tank with CO 2 tank strap.<br />
4. Make sure the beer tower faucet is in the closed (handle pointing straight back)<br />
position before connecting the tap to the keg. To secure the tank connection, pull the<br />
tapping handle out and push down until it locks into position. Listen for the “click” of<br />
the pull handle when it shifts into the final downward position (Fig. 4 - below). This will<br />
open the beer and CO2 gas valves. The keg is now tapped.<br />
5. Carefully tilt the keg and rest the edge on the keg base board on the bottom of the<br />
interior cabinet. Slide the beer keg slowly, ensuring that it is properly located<br />
(Fig. 5 - below) and carefully close the door.<br />
6. Your <strong>Keg</strong>orator <strong>com</strong>es with a 2.5 lb. CO 2 bottle, which should be able to dispense four<br />
15 gallon kegs of beer.<br />
Connect to the<br />
Beer Line Tube<br />
Black pull handle<br />
<strong>Keg</strong> Coupler<br />
Connect to<br />
CO2 Gas<br />
Line Tube<br />
TURN CLOCKWISE<br />
Beer <strong>Keg</strong> Neck<br />
fig. 1 fig. 2 fig. 3<br />
fig. 4 fig. 5<br />
Illustration A<br />
High Pressure Washer Installed into CO2 Regulator<br />
5 6<br />
<strong>Keg</strong> Support<br />
Beer <strong>Keg</strong><br />
Lift Upright<br />
Illustration B<br />
Then Attach to CO 2 Tank Connector
Operating Your <strong>Keg</strong>orator<br />
Dispensing Beer<br />
Follow the steps below to dispense beer.<br />
1. Make sure that the <strong>Keg</strong>orator is plugged in properly to a 120V, 60Hz, 15Amps grounded<br />
AC outlet.<br />
2. Place the drip tray under the beer faucet to avoid messes from excess beer.<br />
3. Open the beer faucet by pulling the tap towards you to dispense the beer.<br />
Note: If for any reason the beer does not <strong>com</strong>e out of the tap, please refer to the “Tapping the<br />
Beer <strong>Keg</strong> - Installing <strong>Keg</strong> Tap” section.<br />
4. Increase the pressure if the beer runs too slowly.<br />
5. Hold the glass steady at a 45° angle. When it is 2/3 full, straighten the glass. Proper<br />
foam should be a tight creamy head and the collar on an average glass should be ¾”<br />
to 1” high, ideally.<br />
Note: It is normal to see condensation form on the faucet. It is caused by the difference in<br />
temperature between the cold beer and the inside of the faucet when beer is flowing through<br />
the line.<br />
Cleaning & Maintenance<br />
Flushing the tubes<br />
Follow the steps below to clean the keg tap<br />
and hoses. (See Illustration the right)<br />
1 Detach beer line<br />
1. Turn off CO2 <strong>com</strong>pletely before attempting<br />
to clean.<br />
2. Remove the hose from the coupler and<br />
carefully twist the dispenser faucet off<br />
the top of the <strong>Keg</strong>orator.<br />
3. Ensure that the dispenser handle is in the<br />
down position before flushing the hose. If<br />
this is not set correctly, water cannot flow<br />
through. Hold the open end of the hose<br />
under running water for 3-5 minutes,<br />
while the beer dispenser faucet drains<br />
into the sink. This will clear any excess<br />
beer that is trapped inside, helping to<br />
prevent any bacteria or mold that could<br />
accumulate inside.<br />
4. In order to clean and remove any excess beer that may leak into the unit space inside<br />
the door, remove theblack rubber insulation and wipe with a wet towel as needed.<br />
Storage & Care<br />
Follow the guidelines below to care for your <strong>Keg</strong>orator when not in use.<br />
• Please adjust the temperature control dial to MID or LOW in colder environments<br />
because this unit does not self-defrost and ice may build up inside the unit. The<br />
temperature control dial is located on the back side of the <strong>Keg</strong>orator, inside the cut<br />
out area at the bottom, lower left.<br />
• Always rinse the beer line if you do not intend to use your <strong>Keg</strong>orator for a period<br />
of time. First, turn off the CO 2 and dispense beer until it stops. This will release<br />
pressure in the keg so that the coupler can safely be detached.<br />
• To avoid permanent damage to the unit, never use sharp objects inside<br />
the <strong>Keg</strong>orator.<br />
2<br />
Flush hose with water<br />
SPECIAL SAFETY INFORMATION<br />
Important Safety Message for Draft Beer Dispensing<br />
Your <strong>Keg</strong>orator system has two safety devices already provided in the CO 2 pressure line.<br />
The coupler for this <strong>Keg</strong>orator is <strong>com</strong>patible with the ¼ Pony <strong>Keg</strong> sized barrel and the ½<br />
Barrel full size (US <strong>Keg</strong>s). While the <strong>Keg</strong>orator can hold both the 5 gallon Cornelius <strong>Keg</strong> and<br />
the 5 gallon D System <strong>Keg</strong>, should you decided to run either one of these 5 gallon kegs, you<br />
may need to obtain a alternate keg connector.<br />
Safety devices should be installed in the following places:<br />
A. On or directly downstream from the CO 2 regulator.<br />
B. On the tapping device.<br />
C. In-line in the pressure system<br />
Note: Locations A and B noted above are preferable. If possible, they should be built into the<br />
CO 2 regulator and tapping device so that they cannot be removed or by-passed.<br />
Illustration C<br />
Illustration D<br />
7 8
Beer Tap<br />
Shown connected<br />
to Regulator<br />
by Hose<br />
Beer Tap Handle<br />
Large Butterfly<br />
Nut Secures Hose<br />
to Beer Tap<br />
Part Shown in<br />
Illustration E,<br />
Connects to <strong>Keg</strong><br />
Illustration E<br />
Hose #1<br />
Connecting Beer Tap to<br />
Regulator & CO 2 Bottle<br />
Hose #2<br />
Connects Dispenser<br />
Assembly to Beer Tap CO 2 Bottle<br />
Illustration F<br />
Hose #1<br />
Connecting<br />
Beer Tap to<br />
Regulator<br />
& CO 2 Bottle<br />
CO 2 Bottle<br />
Regulator<br />
RETURNS & WARRANTY INFORMATION<br />
Should your unit not work or is damaged when you first take it out of the box, please return<br />
the unit immediately to the place of purchase. Should you have any other questions about<br />
the unit, please contact us at the numbers below between the hours of 8:00 am to 5:00 PM,<br />
Monday through Friday, Pacific Standard Time.<br />
Distributed by:<br />
The Helman Group, Ltd.<br />
1621 Beacon Place<br />
Oxnard, CA 93033<br />
805.487.7772 - phone<br />
805.487.9975 - fax<br />
info@helmangroup.<strong>com</strong><br />
Visit Us Online at www.helmangroup.<strong>com</strong><br />
<strong>Keg</strong>orator (Model# <strong>KRS</strong>-2000 Series)<br />
Limited Warranty<br />
This appliance is designed and built to provide many years of satisfactory performance<br />
under normal household use. The distributor pledges to the original owner that should<br />
there be any defects in material or workmanship during the first 90 days of purchase, we<br />
will repair or replace the unit at our option. Our pledge does not apply to damages caused<br />
by shipping, mishandling or unit being dropped.<br />
A product deemed defective either from manufacturing or being mishandled is up to the<br />
distributors discretion. To obtain service under this warranty, return this unit to The Helman<br />
Group, Ltd. at the address above, shipping prepaid. You must also include a copy of the<br />
original receipt along with your name, address and phone number. Include a description of<br />
the defect along with the date you purchased the product.<br />
Please read these instructions carefully. Failure to <strong>com</strong>ply with these instructions, damages<br />
caused by improper replacement parts, abuse or misuse will void this pledge to you and is<br />
being made in place of all other expressed warranties.<br />
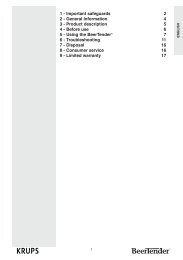
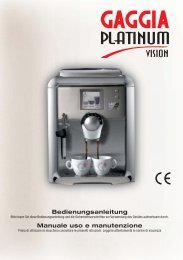
Compatible <strong>Keg</strong> Types<br />
The <strong>Keg</strong>orator can hold one Full Size <strong>Keg</strong>, or one Pony <strong>Keg</strong>, or Two 5 Gallon <strong>Keg</strong>s.<br />
9 10<br />
13.5”<br />
24.75” 23” 23”<br />
15.5” 8.5” 9” 15.5”<br />
1/4 Barel Pony Size 5 Gallon Cornelius <strong>Keg</strong> 5 Gallon D System 1/2 Barrel Full Size