VW MKII A2 MK2 Golf Jetta Fox Service Manual - VAGLinks.com
VW MKII A2 MK2 Golf Jetta Fox Service Manual - VAGLinks.com VW MKII A2 MK2 Golf Jetta Fox Service Manual - VAGLinks.com
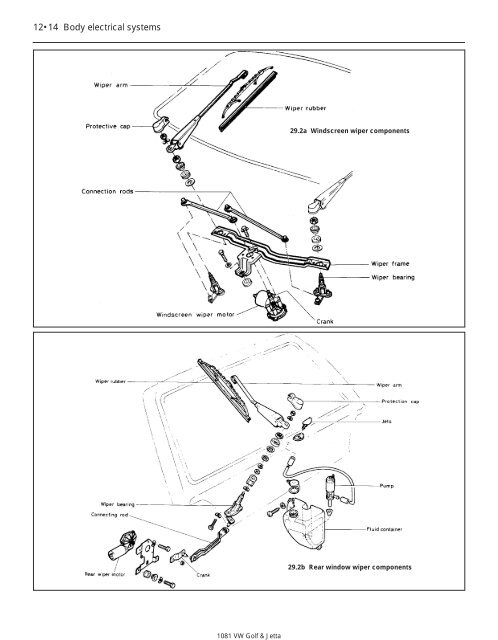
12•14 Body electrical systems 1081 VW Golf & Jetta 29.2a Windscreen wiper components 29.2b Rear window wiper components
29 Windscreen wiper linkage - removal and refitting 2 1 Disconnect the battery negative lead. 2 Remove the wiper arms, then unscrew the bearing nuts and remove the spacers (see illustrations). 3 Pull the weatherstrips from the front of the plenum chamber and remove the plastic cover. 4 Disconnect the wiring multi-plug. 5 Unscrew the frame mounting bolt, then withdraw the assembly from the bulkhead. 6 Prise the pullrods from the motor crank and bearing levers. 7 Unbolt the wiper motor from the frame. 8 Refitting is a reversal of removal. Lubricate the bearing units and pullrod joints with molybdenum disulphide grease. 30 Windscreen and headlamp washer system - pump renewal 2 Pre 1986 1 The windscreen washer fluid reservoir is located on the left-hand side of the engine compartment. The pump is fitted to the side of the reservoir (see illustration). 2 The rear window washer reservoir is located on the right-hand side rear corner of the luggage compartment. The pump is attached to the side of the reservoir (see illustration). 3 In either case, remove the pump by disconnecting its electrical connection and pulling the pump upwards out of the reservoir orifice. Be prepared for loss of water from the reservoir. 4 To fit the pump, locate a new seal in the reservoir orifice and push the pump into it so that it is firmly home. Reconnect the electrical connection. From 1986 5 From early 1986, the washer system is modified and now has a single reservoir and pump located in the engine compartment, with a plastic tube to the rear window incorporated in the rear wiring loom. The wiper motor switch incorporates two sets of contacts which energise the pump with opposite polarities, causing rotation of the pump vane in two alternative directions. Using in-line non-return valves, water is directed either to the windscreen or rear window according to which direction the pump is rotating. Body electrical systems 12•15 30.1 Windscreen washer pump and wire connector 30.2 Rear window washer reservoir unit location 31 Radio/cassette player - removal and refitting 2 1 Disconnect the battery earth lead. 2 To withdraw the radio/cassette unit from its aperture, you will need to fabricate a pair of U-shaped extractors from wire rod of suitable gauge to insert into the withdrawal slots on each side of the unit (see illustration). 3 Insert the withdrawal tools then, pushing each outwards simultaneously, pull them evenly to withdraw the radio/cassette unit. It is important that an equal pressure is applied to each tool as the unit is withdrawn. 4 Once withdrawn from its aperture, disconnect the aerial cable, the power lead, the aerial feed, the speaker plugs, the earth lead and the light and memory feed (where applicable). 5 Push the retaining clips inwards to remove the removal tool from each side (see illustration). 6 The radio/cassette container box is secured by locking tabs. To remove the container box, bend back the tabs and withdraw the box (see illustration). 7 Refit in the reverse order of removal. The withdrawal tools do not have to be used, simply push the unit into its aperture until the securing clips engage in their slots. 31.2 Radio/cassette extractor tool 31.5 Releasing radio extractor tool 31.6 Radio/cassette container removal 1081 VW Golf & Jetta 12
- Page 175 and 176: 13 Refit the hydraulic pipe and tig
- Page 177 and 178: 19 This method is particularly effe
- Page 179 and 180: Chapter 10 Suspension and steering
- Page 181 and 182: 1081 VW Golf & Jetta 1.1 Front susp
- Page 183 and 184: 3.2 Front suspension camber adjustm
- Page 185 and 186: 8.4 Removing rear suspension strut
- Page 187 and 188: 11.3b Removing steering wheel centr
- Page 189 and 190: 14.4 Steering tie-rod bellows and r
- Page 191 and 192: 1081 VW Golf & Jetta Suspension and
- Page 193 and 194: Removal 2 To remove the pump unit,
- Page 195 and 196: Chapter 11 Bodywork and fittings Co
- Page 197 and 198: Repair of rust holes or gashes in b
- Page 199 and 200: hand. A largish screwdriver will ju
- Page 201 and 202: 14 Door trim panel - removal and re
- Page 203 and 204: 15.3 Removing interior door handle
- Page 205 and 206: 22.4 Front bumper bracket securing
- Page 207 and 208: 6 Renew any retaining screw locatio
- Page 209 and 210: 28.9 Sunroof adjustment dimensions
- Page 211 and 212: 31.8 Front seat guide fixing - from
- Page 213 and 214: Chapter 12 Body electrical systems
- Page 215 and 216: k) Never use an ohmmeter of the typ
- Page 217 and 218: 6 Headlamp range control - removal
- Page 219 and 220: 4 If the indicators do not function
- Page 221 and 222: 17.2a Instrument panel unit compone
- Page 223 and 224: Component testing Voltage stabilise
- Page 225: 3 Ease the wiper arm from the spind
- Page 229 and 230: 1081 VW Golf & Jetta Wiring diagram
- Page 231 and 232: 1081 VW Golf & Jetta Wiring diagram
- Page 233 and 234: Relays (typical) 1 Vacant 2 Intake
- Page 235 and 236: 1081 VW Golf & Jetta Diagram 3 Ligh
- Page 237 and 238: 1081 VW Golf & Jetta Diagram 7 Brak
- Page 239 and 240: 1081 VW Golf & Jetta 12 Diagram 12
- Page 241 and 242: 1081 VW Golf & Jetta 12 Diagram 16
- Page 243 and 244: 1081 VW Golf & Jetta Diagram 20 Ele
- Page 245 and 246: 1081 VW Golf & Jetta 12 Diagram 24
- Page 247 and 248: 1081 VW Golf & Jetta 12 Diagram 29
- Page 249 and 250: 1081 VW Golf & Jetta 12 Diagram 33
- Page 251 and 252: 1081 VW Golf & Jetta 12 Diagram 37
- Page 253 and 254: 1081 VW Golf & Jetta 12 Diagram 41
- Page 255 and 256: 1081 VW Golf & Jetta 12 Diagram 45
- Page 257 and 258: 1081 VW Golf & Jetta 12 Diagram 49
- Page 259 and 260: 1081 VW Golf & Jetta 12 Diagram 53
- Page 261 and 262: 1081 VW Golf & Jetta Diagram 57 Glo
- Page 263 and 264: 1081 VW Golf & Jetta 12 Diagram 61
- Page 265 and 266: 1081 VW Golf & Jetta 12 Diagram 65
- Page 267 and 268: 1081 VW Golf & Jetta 12 Diagram 69
12•14 Body electrical systems<br />
1081 <strong>VW</strong> <strong>Golf</strong> & <strong>Jetta</strong><br />
29.2a Windscreen wiper <strong>com</strong>ponents<br />
29.2b Rear window wiper <strong>com</strong>ponents


