VW MKII A2 MK2 Golf Jetta Fox Service Manual - VAGLinks.com
VW MKII A2 MK2 Golf Jetta Fox Service Manual - VAGLinks.com
VW MKII A2 MK2 Golf Jetta Fox Service Manual - VAGLinks.com
You also want an ePaper? Increase the reach of your titles
YUMPU automatically turns print PDFs into web optimized ePapers that Google loves.
13 Refit the hydraulic pipe and tighten the<br />
union. Remove the hose clamp or polythene<br />
sheet.<br />
14 Refit the brake shoes.<br />
15 Top-up the brake fluid reservoir and bleed<br />
the valves.<br />
8 Rear brake drum -<br />
examination and renovation 2<br />
1 Whenever the brake drums are removed,<br />
they should be checked for wear and<br />
damage. Light scoring of the friction surface is<br />
normal but if excessive, the drums must either<br />
be renewed as a pair or reground provided<br />
that the maximum internal diameter specified<br />
is not exceeded.<br />
2 After a high mileage, the drums may<br />
be<strong>com</strong>e warped and oval. Run-out can be<br />
checked with a dial gauge and, if in excess of<br />
the maximum amount specified, the drums<br />
should be renewed as a pair.<br />
3 The inner oil seal should be checked for<br />
condition and if necessary, renewed. Prise out<br />
the old seal using a screwdriver (see<br />
illustration). Drive the new seal into position<br />
so that it is flush with the boss face.<br />
8.3 Prising out brake drum oil seal<br />
9 Master cylinder - removal and<br />
refitting 3<br />
Removal<br />
1 Disconnect the battery negative lead.<br />
2 Disconnect the wiring from the fluid level<br />
switches on the master cylinder and fluid<br />
reservoir filler cap.<br />
3 On carburettor models, remove the air<br />
cleaner.<br />
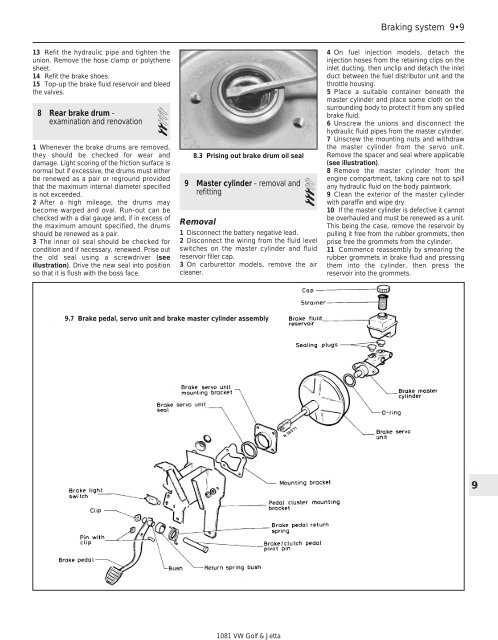
9.7 Brake pedal, servo unit and brake master cylinder assembly<br />
1081 <strong>VW</strong> <strong>Golf</strong> & <strong>Jetta</strong><br />
Braking system 9•9<br />
4 On fuel injection models, detach the<br />
injection hoses from the retaining clips on the<br />
inlet ducting, then unclip and detach the inlet<br />
duct between the fuel distributor unit and the<br />
throttle housing.<br />
5 Place a suitable container beneath the<br />
master cylinder and place some cloth on the<br />
surrounding body to protect it from any spilled<br />
brake fluid.<br />
6 Unscrew the unions and disconnect the<br />
hydraulic fluid pipes from the master cylinder.<br />
7 Unscrew the mounting nuts and withdraw<br />
the master cylinder from the servo unit.<br />
Remove the spacer and seal where applicable<br />
(see illustration).<br />
8 Remove the master cylinder from the<br />
engine <strong>com</strong>partment, taking care not to spill<br />
any hydraulic fluid on the body paintwork.<br />
9 Clean the exterior of the master cylinder<br />
with paraffin and wipe dry.<br />
10 If the master cylinder is defective it cannot<br />
be overhauled and must be renewed as a unit.<br />
This being the case, remove the reservoir by<br />
pulling it free from the rubber grommets, then<br />
prise free the grommets from the cylinder.<br />
11 Commence reassembly by smearing the<br />
rubber grommets in brake fluid and pressing<br />
them into the cylinder, then press the<br />
reservoir into the grommets.<br />
9


