VW MKII A2 MK2 Golf Jetta Fox Service Manual - VAGLinks.com
VW MKII A2 MK2 Golf Jetta Fox Service Manual - VAGLinks.com
VW MKII A2 MK2 Golf Jetta Fox Service Manual - VAGLinks.com
You also want an ePaper? Increase the reach of your titles
YUMPU automatically turns print PDFs into web optimized ePapers that Google loves.
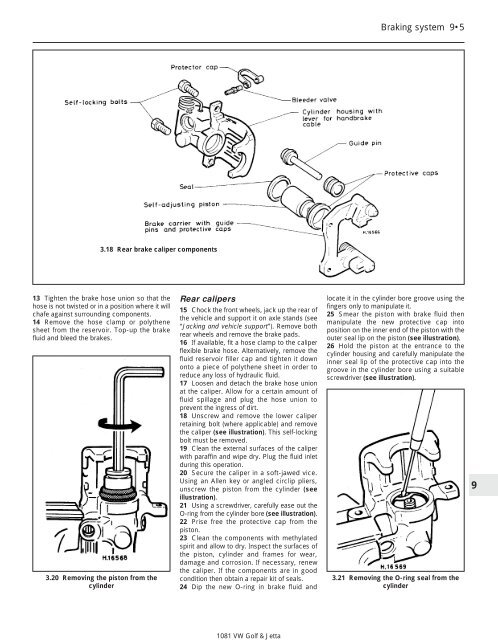
3.18 Rear brake caliper <strong>com</strong>ponents<br />
13 Tighten the brake hose union so that the<br />
hose is not twisted or in a position where it will<br />
chafe against surrounding <strong>com</strong>ponents.<br />
14 Remove the hose clamp or polythene<br />
sheet from the reservoir. Top-up the brake<br />
fluid and bleed the brakes.<br />
3.20 Removing the piston from the<br />
cylinder<br />
Rear calipers<br />
15 Chock the front wheels, jack up the rear of<br />
the vehicle and support it on axle stands (see<br />
“Jacking and vehicle support”). Remove both<br />
rear wheels and remove the brake pads.<br />
16 If available, fit a hose clamp to the caliper<br />
flexible brake hose. Alternatively, remove the<br />
fluid reservoir filler cap and tighten it down<br />
onto a piece of polythene sheet in order to<br />
reduce any loss of hydraulic fluid.<br />
17 Loosen and detach the brake hose union<br />
at the caliper. Allow for a certain amount of<br />
fluid spillage and plug the hose union to<br />
prevent the ingress of dirt.<br />
18 Unscrew and remove the lower caliper<br />
retaining bolt (where applicable) and remove<br />
the caliper (see illustration). This self-locking<br />
bolt must be removed.<br />
19 Clean the external surfaces of the caliper<br />
with paraffin and wipe dry. Plug the fluid inlet<br />
during this operation.<br />
20 Secure the caliper in a soft-jawed vice.<br />
Using an Allen key or angled circlip pliers,<br />
unscrew the piston from the cylinder (see<br />
illustration).<br />
21 Using a screwdriver, carefully ease out the<br />
O-ring from the cylinder bore (see illustration).<br />
22 Prise free the protective cap from the<br />
piston.<br />
23 Clean the <strong>com</strong>ponents with methylated<br />
spirit and allow to dry. Inspect the surfaces of<br />
the piston, cylinder and frames for wear,<br />
damage and corrosion. If necessary, renew<br />
the caliper. If the <strong>com</strong>ponents are in good<br />
condition then obtain a repair kit of seals.<br />
24 Dip the new O-ring in brake fluid and<br />
1081 <strong>VW</strong> <strong>Golf</strong> & <strong>Jetta</strong><br />
Braking system 9•5<br />
locate it in the cylinder bore groove using the<br />
fingers only to manipulate it.<br />
25 Smear the piston with brake fluid then<br />
manipulate the new protective cap into<br />
position on the inner end of the piston with the<br />
outer seal lip on the piston (see illustration).<br />
26 Hold the piston at the entrance to the<br />
cylinder housing and carefully manipulate the<br />
inner seal lip of the protective cap into the<br />
groove in the cylinder bore using a suitable<br />
screwdriver (see illustration).<br />
3.21 Removing the O-ring seal from the<br />
cylinder<br />
9


