

VW MKII A2 MK2 Golf Jetta Fox Service Manual - VAGLinks.com
VW MKII A2 MK2 Golf Jetta Fox Service Manual - VAGLinks.com
VW MKII A2 MK2 Golf Jetta Fox Service Manual - VAGLinks.com

You also want an ePaper? Increase the reach of your titles
YUMPU automatically turns print PDFs into web optimized ePapers that Google loves.
13 Wipe clean the distributor cap and make<br />
sure that the carbon brush moves freely<br />
against the tension of the spring. Clean the<br />
metal segments in the distributor cap but do<br />
not scrape away any metal, otherwise the HT<br />
spark at the spark plugs will be reduced. Also<br />
clean the HT leads and coil tower.<br />
14 Refit the distributor cap and interference<br />
screen.<br />
15 Start the engine and check that the dwell<br />
angle is as specified, both at idling and higher<br />
engine speeds. A decrease in dwell angle at<br />
high engine speeds indicates a weak spring<br />
on the moving contact points.<br />
16 After making any adjustment to the<br />
contact breaker points, check and adjust the<br />
ignition timing.<br />
17 Ignition timing check<br />
Contact breaker system<br />
3<br />
Note: Accurate ignition timing is only possible<br />
using a stroboscopic timing light, although on<br />
some models a DC sender unit is located on<br />
the top of the gearbox casing and may be<br />
Every 10 000 miles or 12 months 1•15<br />
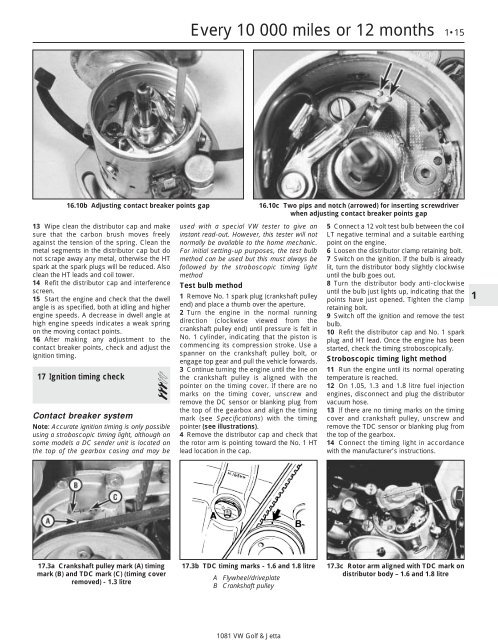
16.10b Adjusting contact breaker points gap 16.10c Two pips and notch (arrowed) for inserting screwdriver<br />
when adjusting contact breaker points gap<br />
17.3a Crankshaft pulley mark (A) timing<br />
mark (B) and TDC mark (C) (timing cover<br />
removed) - 1.3 litre<br />
used with a special <strong>VW</strong> tester to give an<br />
instant read-out. However, this tester will not<br />
normally be available to the home mechanic.<br />
For initial setting-up purposes, the test bulb<br />
method can be used but this must always be<br />
followed by the stroboscopic timing light<br />
method<br />
Test bulb method<br />
1 Remove No. 1 spark plug (crankshaft pulley<br />
end) and place a thumb over the aperture.<br />
2 Turn the engine in the normal running<br />
direction (clockwise viewed from the<br />
crankshaft pulley end) until pressure is felt in<br />
No. 1 cylinder, indicating that the piston is<br />
<strong>com</strong>mencing its <strong>com</strong>pression stroke. Use a<br />
spanner on the crankshaft pulley bolt, or<br />
engage top gear and pull the vehicle forwards.<br />
3 Continue turning the engine until the line on<br />
the crankshaft pulley is aligned with the<br />
pointer on the timing cover. If there are no<br />
marks on the timing cover, unscrew and<br />
remove the DC sensor or blanking plug from<br />
the top of the gearbox and align the timing<br />
mark (see Specifications) with the timing<br />
pointer (see illustrations).<br />
4 Remove the distributor cap and check that<br />
the rotor arm is pointing toward the No. 1 HT<br />
lead location in the cap.<br />
17.3b TDC timing marks - 1.6 and 1.8 litre<br />
A Flywheel/driveplate<br />
B Crankshaft pulley<br />
1081 <strong>VW</strong> <strong>Golf</strong> & <strong>Jetta</strong><br />
5 Connect a 12 volt test bulb between the coil<br />
LT negative terminal and a suitable earthing<br />
point on the engine.<br />
6 Loosen the distributor clamp retaining bolt.<br />
7 Switch on the ignition. If the bulb is already<br />
lit, turn the distributor body slightly clockwise<br />
until the bulb goes out.<br />
8 Turn the distributor body anti-clockwise<br />
until the bulb just lights up, indicating that the<br />
points have just opened. Tighten the clamp<br />
retaining bolt.<br />
9 Switch off the ignition and remove the test<br />
bulb.<br />
10 Refit the distributor cap and No. 1 spark<br />
plug and HT lead. Once the engine has been<br />
started, check the timing stroboscopically.<br />
Stroboscopic timing light method<br />
11 Run the engine until its normal operating<br />
temperature is reached.<br />
12 On 1.05, 1.3 and 1.8 litre fuel injection<br />
engines, disconnect and plug the distributor<br />
vacuum hose.<br />
13 If there are no timing marks on the timing<br />
cover and crankshaft pulley, unscrew and<br />
remove the TDC sensor or blanking plug from<br />
the top of the gearbox.<br />
14 Connect the timing light in accordance<br />
with the manufacturer’s instructions.<br />
17.3c Rotor arm aligned with TDC mark on<br />
distributor body – 1.6 and 1.8 litre<br />
1


