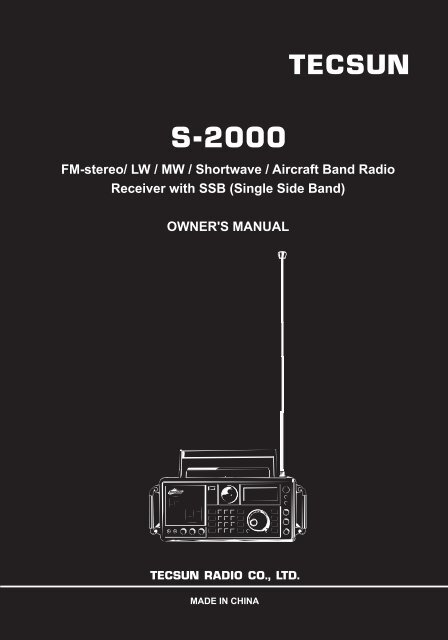
S-2000 TECSUN FM-stereo/ LW / MW / Shortwave / Aircraft Band ...
S-2000 TECSUN FM-stereo/ LW / MW / Shortwave / Aircraft Band ...
S-2000 TECSUN FM-stereo/ LW / MW / Shortwave / Aircraft Band ...

Create successful ePaper yourself
Turn your PDF publications into a flip-book with our unique Google optimized e-Paper software.
S-<strong>2000</strong><br />
<strong>TECSUN</strong><br />
<strong>FM</strong>-<strong>stereo</strong>/ <strong>LW</strong> / <strong>MW</strong> / <strong>Shortwave</strong> / <strong>Aircraft</strong> <strong>Band</strong> Radio<br />
Receiver with SSB (Single Side <strong>Band</strong>)<br />
OWNER'S MANUAL<br />
<strong>TECSUN</strong> RADIO CO., LTD.<br />
MADE IN CHINA
FEATURES<br />
Thank you for purchasing the <strong>TECSUN</strong> S-<strong>2000</strong>. Its features and capabilities are shown<br />
below:<br />
n <strong>MW</strong> 522-1620 kHz ( 9k Tuning Step)<br />
520-1710 kHz (10k Tuning Step)<br />
<strong>LW</strong> 100-519 kHz<br />
SW 1711-29999 kHz<br />
AIR 118-137 MHz<br />
<strong>FM</strong> 87-108 MHz<br />
88-108 MHz (America)<br />
76-108 MHz (Japan)<br />
n <strong>FM</strong> <strong>stereo</strong> via Earphones or Headphones.<br />
n Dual Conversion for <strong>LW</strong>, <strong>MW</strong> & SW<br />
n Single Side <strong>Band</strong> (SSB) with USB & LSB<br />
n Auto/Manual Frequency Tuning or Station Memory Tuning or Direct Frequency Key-in<br />
Function<br />
n Auto Tuning Storage (ATS) Function for <strong>FM</strong> / <strong>MW</strong> & <strong>LW</strong> (5s Pre-listening while Auto<br />
Tuning)<br />
n 1000 Station Memories (100 each for <strong>FM</strong>, SW, SSB & Air <strong>Band</strong>; 50 each for <strong>MW</strong> & <strong>LW</strong>;<br />
500 for Mixed <strong>Band</strong>)<br />
n 24 Hrs Clock & Dual Alarm Clock Function (Alarm by either Radio or Buzzer)<br />
n Sleep Timer Function<br />
n Extra Long Telescopic Antenna for <strong>FM</strong>, SW, Air <strong>Band</strong>.<br />
n 360 Degrees Rotating <strong>MW</strong> Antenna<br />
n External or Internal <strong>FM</strong> / <strong>MW</strong> Antenna Switch<br />
n Antenna Attenuation to Enhance Reception.<br />
n Squelch Control for Quality <strong>FM</strong> and Air <strong>Band</strong> Listening.<br />
n Wide / Narrow <strong>Band</strong>width Selection<br />
n RF Gain Control Knob<br />
n 455 kHz IF Output Jack for DIY (Synchronous Detection, DSP Demodulator, DRM<br />
Converter)<br />
n High Quality Built-in 4" Speaker with Excellent Sound Effect.<br />
n Line in Socket (can be used as speaker for MP3)<br />
n Line out Socket (radio broadcast can be transferred to other device).<br />
n Power Sources: 4D Alkaline Batteries<br />
220V AC Power<br />
6V DC Jack (Adaptor is not included)<br />
n Dimensions: 372 x 183 x 153 mm (W x H x D)<br />
n Weight: 5.95 lbs (2.7 kg)
TABLE OF CONTENTS<br />
LCD DISPLAY INDICATION .................................... ........................... ................................. 2<br />
QUICK START....................................................................... ................... .............................. 3<br />
<strong>TECSUN</strong> S-<strong>2000</strong> PRODUCT ASSEMBLY DIAGRAM .................. ................... ..................... 4<br />
S-<strong>2000</strong> QUICK START GUIDE........................................................................................... 5-7<br />
S-<strong>2000</strong> OPERATION MANUAL<br />
POWER SUPPLY..................................................................................................................<br />
8<br />
LISTEN TO THE RADIO.......................................................................................................<br />
9<br />
STORING FREQUENCIES INTO MEMORY.................................................................<br />
10~11<br />
LISTENING TO WHAT'S STORED. ..................................................................................... 12<br />
DELETE MEMORY..............................................................................................................<br />
13<br />
CLOCK SETTING...............................................................................................................<br />
14<br />
ALARM SETTING.........................................................................................................<br />
SLEEP TIMER. .................................................................................................................... 16<br />
BW (BANDWIDTH) BUTTON .............................................................................................. 17<br />
<strong>FM</strong> ST. (<strong>FM</strong> STEREO) BUTTON. ........................................................................................ 17<br />
SW METER BAND SELECTION.........................................................................................<br />
17<br />
LINE-IN SOCKET...............................................................................................................<br />
RF GAIN CONTROL...........................................................................................................<br />
20<br />
CHECK THE SYSTEM CODE SETTING............................................................................<br />
22<br />
TROUBLESHOOTING........................................................................................................<br />
23<br />
SPECIFICATIONS. ......................................................................................................... 24-25<br />
MESSAGE ALERT STATUS...........................................................................................<br />
26-28<br />
1<br />
Page<br />
14-15<br />
USING THE LIGHT BUTTON.............................................................................................<br />
17<br />
TUNING STEP....................................................................................................................<br />
18<br />
LOCK THE TUNING KNOB................................................................................................<br />
18<br />
RESET BUTTON................................................................................................................<br />
18<br />
SSB (SINGLE SIDE BAND) TUNING.................................................................................<br />
18<br />
LINE OUT SOCKETS.........................................................................................................<br />
19<br />
455kHZ AM IF OUTLET......................................................................................................<br />
19<br />
ANTENNA ATEENUATOR (ANT. ATT.) BUTTON.............................................................<br />
20<br />
SQUELCH CONTROL........................................................................................................<br />
20<br />
EXTERNAL ANTENNA SOCKETS.....................................................................................<br />
21<br />
SYSTEM CODE SETTING.................................................................................................<br />
22<br />
19
LCD DISPLAY INDICATION<br />
Signal Strength Attenuation<br />
Internal or External aerials<br />
INT :internal aerials<br />
EXT :external aerials<br />
Sleep: Auto Turn off Timer for Radio<br />
Alarm mode<br />
" " Alarm by radio<br />
" " Alarm by buzzer<br />
PAGE: Memory Page PRESET: Memory Address<br />
<strong>Shortwave</strong> Meter <strong>Band</strong><br />
Alarm Time<br />
4 Digits (small size)<br />
OFF status: to display the alarm time or system<br />
code<br />
ON status: to display the time, memory page<br />
and address, SW meter band,<br />
alarm time counter down<br />
Key Lock<br />
<strong>FM</strong> Stereo<br />
SLEEP<br />
Single Side <strong>Band</strong><br />
USB: Upper Side <strong>Band</strong><br />
LSB: Lower Side <strong>Band</strong><br />
IF <strong>Band</strong>width<br />
NARROW: narrow bandwidth<br />
WIDE: wide bandwidth<br />
kHz: frequency of <strong>MW</strong>, <strong>LW</strong>, SW<br />
MHz: frequency of <strong>FM</strong>, Air <strong>Band</strong><br />
Battery Meter<br />
" " Full capacity<br />
" " Low battery (Replacement is required)<br />
Tuning Step<br />
" " Fast tuning<br />
" " Fine tuning<br />
<strong>Band</strong> Indication<br />
Master Digits<br />
OFF status: to display the clock or system code<br />
ON status: to display frequency or ERR status<br />
2
The swivel <strong>MW</strong>/<strong>LW</strong> antenna is located at the top of the radio; swivel it for best <strong>MW</strong>/<strong>LW</strong> reception.<br />
LIGHT/SNOOZE<br />
LIGHT<br />
- 3 seconds lighting: short press the LIGHT button.<br />
- Always lighting: long press the LIGHT button.<br />
SNOOZE<br />
When the alarm is activated, press the LIGHT/SNOOZE button to temporarily deactivate the timer for 10 minutes.<br />
TIME<br />
Clock set<br />
CLOCK SETTING<br />
1. Long press the TIME button, HOUR flashes, turn the TUNING knob to adjust<br />
the hour.<br />
2. Shortly press the TIME button, MINUTE flashes then turns the TUNING knob<br />
to adjust the minute.<br />
3. Press the TIME button to confirm.<br />
* One can set the clock either when the radio is on or off.<br />
Alarm by radio or by buzzer<br />
The alarm time setting is same as the clock setting. After the alarm time setting,<br />
there is one more playing time (1~90minutes) needs to adjust and it will active<br />
the alarm by radio. Press the TIMER A ON/OFF button over and over to deactivate<br />
the alarm note that “ “ or “ “ disappeared.<br />
※The operation method is same as TIMER A.<br />
EAR Earphone Socket<br />
LINE IN Line in Socket<br />
BW<br />
Short press BW button to choose wide or narrow selectivity. This may help reduce interference on<br />
some frequencies. Using WIDE usually results in better audio fidelity, while using narrow limits the<br />
audio fidelity somewhat.<br />
SSB<br />
Turn on the radio and go into <strong>Shortwave</strong>. Press the SSB button and tune in signals on USB, press<br />
the SSB button again to LSB. To return to SW band press the SSB button once more.<br />
<strong>FM</strong> ST.<br />
Press the <strong>FM</strong> ST. button when in the <strong>FM</strong> band to take the radio in or out of <strong>stereo</strong> reception mode.<br />
As long as you are not using headphones or earphones, it can be left in mono mode.<br />
DELETE<br />
QUICK START<br />
ROTATABLE AM ANTENNA<br />
<strong>MW</strong>/<strong>LW</strong><br />
ROTATABLE ANTENNA<br />
<strong>MW</strong>/<strong>LW</strong><br />
ROTATABLE ANTENNA<br />
TIMER A ON/OFF<br />
TIMER B ON/OFF<br />
<strong>Band</strong> width selector<br />
Single Side <strong>Band</strong><br />
<strong>FM</strong> Stereo<br />
Alarm by radio or by buzzer<br />
- Plug in earphones and headphones using<br />
a 3.5 mm (1/8 inch) <strong>stereo</strong> plug.<br />
The LINE-IN socket is on the lower left front of the radio and allows<br />
you to route the sound from another device to the <strong>TECSUN</strong> S-<strong>2000</strong>.<br />
Use a cord with a 3.5 mm (1/8 inch) <strong>stereo</strong> plug.<br />
BASS / TREBLE / VOLUME Adjusting knobs<br />
DELETE ONE MEMORY<br />
-Turn on the radio and press the VM/VF button, causing PAGE and PRESET to appear in the display's<br />
upper right corner.<br />
-Use the numeric keypad, the TUNING knob or the up/down tuning buttons ( / ) to select the<br />
memory that you want to delete. To delete the memory press the DELETE button and release after a<br />
“B”sounds, note that “ “starts blinking on the LCD, then press DELETE button again to confirm.<br />
Please refer to the <strong>TECSUN</strong> S-<strong>2000</strong> manual for QUICK DELETING and DELETING A PAGE.<br />
MEMORY<br />
-Turn on the radio and tune to a station that you want<br />
to store into memory.<br />
-Shortly press the MEMORY button note that PRESET<br />
will flash in the right corner of the LCD.<br />
Press the MEMORY button to confirm it (or it will<br />
automatically confirm after 3 seconds).<br />
0~9 Numeric keys<br />
- Frequency mode: direct key in a station frequency.<br />
- Memory mode: direct key in a memory number to listen to what's<br />
stored.<br />
<strong>FM</strong><br />
- Short press <strong>FM</strong> button: to select <strong>FM</strong> band.<br />
- Long press <strong>FM</strong> button: to start <strong>FM</strong> ATS.<br />
<strong>MW</strong>/<strong>LW</strong><br />
- Short press <strong>MW</strong>/<strong>LW</strong> button: to select <strong>MW</strong> or <strong>LW</strong> band.<br />
- Long press on <strong>MW</strong> band: to start <strong>MW</strong> ATS.<br />
- Long press on <strong>LW</strong> band: to start <strong>LW</strong> ATS.<br />
SW Short-wave band<br />
- Short press SW button: to select SW band.<br />
- Sequentially press SW button: to select a SW meter band.<br />
AIR <strong>Aircraft</strong> band<br />
- Short press AIR button: to select AIR band.<br />
3<br />
STEP/FAST-SLOW/LOCK Tuning step/lock<br />
- Short press SETP/FAST-SLOW/LOCK button: to select<br />
either FAST or SLOW tuning step.<br />
- Long press SETP/FAST-SLOW/LOCK button: to lock the<br />
TUNING knob.<br />
TUNING Tuning knob<br />
One can use the TUNING knob to adjust the clock, tune<br />
to a station, select a memory address and a memory<br />
page.<br />
- Frequency mode: short press for a station tuning and long press for Auto tuning.<br />
- Memory mode: short press for a recalling of preset and long press for auto<br />
tuning of memory.<br />
PAGE<br />
Memory Page<br />
- Turn on the radio and short press the PAGE button (the address page will<br />
flash in the right corner of the LCD.<br />
- Turn the TUNING knob or use the “ / “ buttons to select the page<br />
that you want go to; shortly press PAGE again to confirm.<br />
VM / VF<br />
Up and Down button<br />
Memory mode/ Frequency mode<br />
VF= Variable-Frequency Oscillator mode, VM= memory mode<br />
Short press the VM/VF button to change VM/VF mode.<br />
RESET<br />
Press the RESET only when the radio seems to stop functioning properly.<br />
Telescope Antenna for <strong>FM</strong>/SW/AIR band<br />
Pull out the telescope antenna and change its length or direction to get better reception when<br />
tuning on <strong>FM</strong>/SW/AIR band.<br />
POWER<br />
Short press the POWER button to turn on or turn off the radio.<br />
SL EEP Sleep Timer<br />
- The sleep timer enables the radio to play any length of time from 1~120 minutes and then turn off.<br />
- Press the SL EEP button to turn on the sleep timer.<br />
Notice that the number of minutes to play appears in the display. While they appear there, press the<br />
SL EEP button over and over and it sequences through 1 to 120 minutes .<br />
ANT. ATT Antenna Attenuator<br />
The ANT.ATT button, located on the upper right front of the radio, is used to attenuate a signal.<br />
RF GAIN Radio Frequency Gain<br />
The RF (radio frequency) gain controller is used manually to improve the radio's rejection of<br />
interference from adjacent frequencies that may interfere, especially on <strong>Shortwave</strong>.<br />
SQUELCH<br />
Using the squelch control eliminates background noise.<br />
SSB BFO Beat Frequency Oscillator<br />
BFO stands for Beat Frequency Oscillator. This control knob is used to fine tune a sideband signal.<br />
NOTE: it will cut off the internal AM antenna<br />
when an external AM antenna is connected.<br />
GND<br />
INT. ANT.<br />
EXT ANT.<br />
50<br />
500<br />
L R<br />
<strong>FM</strong><br />
ANT.<br />
SW<br />
ANT.<br />
SW<br />
ANT.<br />
455kHz AM IF OUT<br />
L R<br />
ATT. TUNE<br />
External ring type AM antenna Connect to external AM antenna<br />
AM antenna tuner<br />
INT./EXT. antenna select switch<br />
INT. ANT. :Use of internal telescopic antenna<br />
EXT. ANT.:Use of external antenna<br />
Right side<br />
S-<strong>2000</strong> Rear<br />
50 ohm <strong>FM</strong> external antenna<br />
50 ohm SW external antenna<br />
500 ohm high-impedance external SW antenna<br />
Synchronous demodulator, SSB demodulator<br />
Software radio (DSP) demodulator<br />
DRM 455/12kHz converter etc<br />
To an amplifier or a recorder.<br />
To the LINE IN sockets<br />
To the LINE IN sockets<br />
To the computer
18<br />
19<br />
20<br />
21<br />
22<br />
23<br />
<strong>TECSUN</strong> S-<strong>2000</strong> PRODUCT ASSEMBLY DIAGRAM<br />
24<br />
25<br />
26<br />
27<br />
28<br />
29<br />
30<br />
31<br />
17<br />
32<br />
16<br />
15<br />
14<br />
13<br />
33<br />
12<br />
4<br />
10<br />
10<br />
34<br />
9<br />
35<br />
8<br />
7<br />
36<br />
6<br />
5<br />
4<br />
3 2<br />
1. Battery compartment<br />
2. Batteries<br />
3. AC power cord compartment<br />
4. Battery contact springs<br />
5. Back cabinet<br />
6. 220VAC power cord<br />
7. Transformer<br />
8. Line out unit<br />
9. Line out unit holder<br />
10. Main PC board<br />
11. Main board fix holder<br />
12. Control board<br />
13. Silica gel pad for buttons<br />
14. LCD light guide<br />
15. Amplifier board<br />
16. Signal strength indicate meter<br />
17. Speaker<br />
18. Handle<br />
Note: Assembly to be matched on the products, color, specifications and data<br />
are subject to change without notice.<br />
1<br />
19. AM aerial upper cover<br />
20. AM aerial lower cover<br />
21. Magnetic rod with coil<br />
22. AM aerial plug<br />
23. Handle fixer<br />
24. Handgrip<br />
25. Handgrip gasket<br />
26. Handgrip screw nut<br />
27. Knobs<br />
28. Buttons<br />
29. Speaker grill<br />
30. Plastic ring for signal meter<br />
31. LCD plastic lens<br />
32. Front cabinet<br />
33. Control board<br />
34. External antenna connect board<br />
35. Plastic cover<br />
36. Telescopic antenna
S-<strong>2000</strong> QUICK START GUIDE<br />
TIME SETTING<br />
S-<strong>2000</strong>'s clock is in 24 hours format and can be set with the radio on or off. When the radio is<br />
turned off, the clock shows in mid-display. When the radio is turned on, the clock shows in the<br />
upper right corner of the LCD.<br />
To set the clock:<br />
1. Press the TIME button with a "B" sound until the hour is flashing.<br />
2. While it's flashing turn the TUNING knob to set the correct number of hours; then press the<br />
TIME button again with a "BB" sound and the minutes are flashing.<br />
3. While it's flashing turn the TUNING knob to set the correct number of minutes; then press TIME<br />
to confirm and a long "B--" sounds.<br />
Note:<br />
1. After setting the hour or minutes, you can simply let the flashing number time-out, without<br />
pressing the TIME button to confirm the setting.<br />
2. You can use the / buttons or direct input the numbers to set the clock.<br />
ALARM SETTING<br />
There are two independently programmable alarm timers (TIMER A ON/OFF & TIMER B ON/OFF)<br />
to turn it on and off at the specified time.<br />
To set for TIMER A ON/OFF:<br />
1. Press the TIMER A ON/OFF button with a "B" sound until you see the alarm hour flashing. While<br />
it's flashing adjust the hour with the TUNING knob and press the TIMER A ON/OFF button with a<br />
"BB" sound. Notice that the alarm minutes are flashing.<br />
2. While it's flashing adjust the alarm minutes with the TUNING knob and press the TIMER A<br />
ON/OFF button. Notice the sleep timer flashing in the box at the top of the display.<br />
3. While it's flashing turn the TUNING knob to adjust the time that the radio is to play(1~90 minutes).<br />
4. Press the TIMER A ON/OFF button again to confirm setting, or simply let the flashing number<br />
time-out to confirm it automatically meanwhile a long "B--" sounds.<br />
5. To set for TIMER B ON/OFF is the same as for TIMER A ON/OFF.<br />
Note:<br />
Once the alarm is on (by radio or buzzer), only the POWER, SLEEP, LIGHT/SNOOZE, and RESET<br />
buttons can be operated. Press the POWER or SLEEP buttons to turn off the alarm.<br />
Alarm by Buzzer or Radio:<br />
Press on TIMER A ON/OFF key to select “ “ in TIMER A section. Now the alarm will be on by<br />
buzzer.<br />
Note:<br />
In TIMER A or B section, “ “ means TIMER is set by radio; “ “ means TIMER is set by<br />
buzzer, and [ ] means TIMER is off.<br />
5
LISTEN TO THE RADIO<br />
1. Press the POWER button to turn on/off the radio.<br />
2. Select <strong>FM</strong> by pressing the <strong>FM</strong> button, <strong>MW</strong>(AM) and <strong>LW</strong> by pressing the <strong>MW</strong>/<strong>LW</strong> button (press it<br />
twice for <strong>LW</strong>), SW by pressing the SW button sequentially until you have selected the desired<br />
meter band (meter band number flashes in the upper right corner of the display) and the <strong>Aircraft</strong><br />
band by pressing the AIR button.<br />
3. Turn the TUNING knob to your desired radio station.<br />
4. You can also direct key-in the frequency numbers.<br />
5. Adjust the volume, bass and treble tuning knobs for better sound.<br />
Note:<br />
Be sure to fully extend the telescopic antenna when listening to SW, <strong>FM</strong> and AIR. The swivel AM<br />
antenna is located at the top of the radio; swivel it for best AM (<strong>MW</strong>/<strong>LW</strong>) reception.<br />
ATS (AUTO TUNING STORAGE) for <strong>FM</strong>, <strong>MW</strong> / <strong>LW</strong><br />
To automatically store the strongest <strong>LW</strong>, <strong>MW</strong> or <strong>FM</strong> stations into Page 0.<br />
To activate the ATS function, turn on the radio and fully extend the antenna, then long press the<br />
<strong>FM</strong> button with a "B" sound and until the frequency number is running on the display. Notice that<br />
page 0 (P0) appears in the display's upper right corner with the presets to the right increasing as<br />
the band is scanned and frequencies are stored into the memory. Once it is done, turn the<br />
TUNING knob to select those stored stations.<br />
<strong>MW</strong>/<strong>LW</strong> ATS is same as the <strong>FM</strong> ATS.<br />
STORING FREQUENCIES INTO MEMORY<br />
To store a frequency into the next available memory on the page that you've selected, press the<br />
MEMORY button with a "B" sound. Note that PRESET flashes with the next available memory<br />
number. Press the MEMORY button with a long "B --" sound to automatically store it into the next<br />
available memory or when it stops flashing it's stored into the memory number that was flashing.<br />
LISTENING TO WHAT'S STORED<br />
1. Turn on the radio, press and release the VM/VF button with a "BB" sound and notice that the<br />
PAGE and PRESET show in the display's upper right corner.<br />
2. Turn the TUNING knob to listen to what's you stored.<br />
6
DELETE MEMORY<br />
1. Delete one memory<br />
- Turn on the radio and press the VM/VF button, causing PAGE and PRESET to appear in the<br />
display's upper right corner.<br />
- Use the numeric keypad, the tuning knob, or the / buttons to select the memory that you<br />
want to delete.<br />
- To delete the memory, press DELETE button with a "B" sound and notice that DEL flashes in the<br />
display. Press the DELETE button again with a long "B --" sound to confirm.<br />
2. Delete a memory page<br />
- Turn on the radio and select the page that you want to delete by pressing PAGE, note that PAGE<br />
flashes in the display's upper right. While it's flashing use the numeric keypad, the tuning knob<br />
or the / buttons to select the page that you wish to delete.<br />
- Press and release the VM/VF button so that PAGE and PRESET appear in the display's upper<br />
corner. If [ - - ] appears above PRESET in the display's upper right corner, the page is already<br />
deleted and you don't have to continue.<br />
- Press DELETE for about 3 seconds with a "BB" sound or until starts blinking on the LCD,<br />
press the DELETE button again with a long "B--" sound to confirm.<br />
AUTO SCAN STATION AND PRESET MEMORY<br />
AUTO SCAN STATION<br />
To auto scan station, turn on the radio and select your desired band.<br />
Long press one of the / buttons with a "B" sound to activate the<br />
Auto Scan function. In Auto Scan the radio scans from one station to<br />
the next, stays on the new station for 5 seconds and then moves on.<br />
You can press any button with a "BB" sound to stop the Auto Scan<br />
function.<br />
AUTO SCAN MEMORY<br />
Turn on the radio and press VM/VF with a "BB" sound, then press one<br />
of the / buttons for about 2 seconds with a "B" sound and notice<br />
that PRESET flashes. The radio scans from one memory to another,<br />
staying on each memory for about 5 seconds.<br />
You can press any button with a "BB" sound to stop Auto Scan and<br />
listen to your favorite broadcast.<br />
7<br />
Frequency<br />
Time<br />
Frequency status<br />
Frequency<br />
Page and Preset<br />
Memory status
S-<strong>2000</strong> OPERATION MANUAL<br />
POWER SUPPLY<br />
USING BATTERIES<br />
- Open the battery compartment cover and insert<br />
4 x UM 1 (D size) batteries according to the polarity<br />
diagram imprinted on the battery compartment floor.<br />
- The S-<strong>2000</strong> has a battery power indicator in the<br />
LCD. Fresh batteries will show a full power level<br />
of 3 bars. If the indicator shows one bar or the<br />
sound becomes weak and distorted, replace the<br />
batteries.<br />
- The radio will turn off automatically if the batteries<br />
become too weak.<br />
- Check the batteries periodically for leakage. As a<br />
precaution, remove the batteries to prevent possible<br />
leakage if it is to be stored for long periods without<br />
use.<br />
POWER BY AC (For Asia market)<br />
Open the AC power cord compartment, pull out the<br />
220V AC cord and plug it into the wall outlet.<br />
USING DC ADAPTER (For Europe market)<br />
Connect the adaptor, first to the wall outlet, then to<br />
the S-<strong>2000</strong> (Assure the unit is turned off).<br />
NOTE:<br />
- Adapter: DC 6V/500mA, negative polarity<br />
- If there's a power failure with the AC or the AC<br />
adaptor and batteries installed, the batteries will<br />
take over and supply power to the radio.<br />
8<br />
~220V AC CORD<br />
~220V AC CORD<br />
Batteries insertion
LISTEN TO THE RADIO<br />
Press the POWER button to turn on the radio, select your band by pressing the <strong>FM</strong>, <strong>MW</strong>/<strong>LW</strong>, SW,<br />
or AIR button.<br />
There are three methods to tune in the radio station:<br />
USING TUNING KNOB<br />
The TUNING knob can be used to tune stations. Select FAST or SLOW tuning with the STEP<br />
button, under the tuning knob. FAST/SLOW tuning is shown in the chart below for each band.<br />
If you want to LOCK the tuning knob press the STEP button for about 3 seconds. Do a quick,<br />
short press to unlock it.<br />
<strong>FM</strong> <strong>MW</strong> <strong>LW</strong><br />
FAST 0.1MHz 9/10kHz<br />
SLOW 0.01MHz 1kHz<br />
9kHz<br />
1kHz<br />
9<br />
SW AIR SSB<br />
5kHz 0.025MHz 5kHz<br />
1kHz 0.001MHz 1kHz/BFO<br />
Note: Be sure to fully extend the telescopic antenna when listening to SW, <strong>FM</strong> and AIR. The<br />
swivel AM (<strong>MW</strong>/<strong>LW</strong>) antenna is located at the top of the radio; swivel it for best AM (<strong>MW</strong>/<strong>LW</strong>)<br />
reception.<br />
USING / BUTTON TUNING<br />
Quick, short, sequential presses of the / buttons enables tuning up or down frequency. A<br />
longer press engages Auto Tuning. During Auto tuning, the radio scans from one station to the<br />
next, stays on the new station for 5 seconds and then moves on.<br />
To stop Auto Tuning, press any key.<br />
DIRECT FREQUENCY ENTRY<br />
Use this method when the desired frequency of a radio station is known. <strong>MW</strong> and SW frequencies<br />
are entered in kilohertz (kHz), e.g. 567 kHz or 15100 kHz; <strong>FM</strong> and AIR frequencies are entered in<br />
megahertz (MHz), e.g. 100.8 MHz, ignoring the decimal point. Use the numeric keypad to enter<br />
the frequency directly.<br />
Note:<br />
No need to enter decimal point for <strong>FM</strong> and Air <strong>Band</strong> when input the frequency numbers. For<br />
example, <strong>FM</strong> 89.0 MHz, Just ENTER 8 9 0 or <strong>FM</strong> 104.0 MHz, ENTER 1 0 4 0. (or press 8 9<br />
ENTER, and 1 0 4 ENTER).
STORING FREQUENCIES INTO MEMORY<br />
There are 1000 memories with S-<strong>2000</strong>. 500 memories fixed within P0 page, and 500 memories<br />
set for other storage space. Please see bellows:<br />
<strong>Band</strong><br />
<strong>FM</strong><br />
SW<br />
SSB<br />
AIR<br />
<strong>MW</strong><br />
<strong>LW</strong><br />
Store<br />
Storage space in P0 page<br />
P0 (page)<br />
100<br />
100<br />
100<br />
100<br />
50<br />
50<br />
ATS<br />
Memory PAGE 0, noted as 'P0', consists of 500 memories, 100 assigned for <strong>FM</strong>, SW, SSB and<br />
Air <strong>Band</strong>; 50 memories each assigned for <strong>MW</strong> and <strong>LW</strong>.<br />
Memory PAGE 1 -10, noted as 'P1', 'P2', etc., consists of 50 memories per page, 500 memories<br />
total. You can change the pages following as the system setting.<br />
10<br />
Other storage space<br />
500 MEMORIES<br />
10 pages each with 50 memories<br />
20 pages each with 25 memories<br />
25 pages each with 20 memories<br />
50 pages each with 10 memories<br />
(See the system setting chart to<br />
change above pages)<br />
1) ATS (AUTO TUNING STORAGE)<br />
One can automatically store the strongest <strong>LW</strong>, <strong>MW</strong> or <strong>FM</strong> stations into its own Page 0.<br />
Turn on the radio and select the band that you want ATS to take place in, either <strong>MW</strong>/<strong>LW</strong> or <strong>FM</strong>.<br />
Press the <strong>MW</strong>/<strong>LW</strong> or <strong>FM</strong> and release after a "B" sounds. Notice that page 0 (P0) appears in the<br />
display's upper right corner with the presets to the right increasing asthe band is scanned and<br />
frequencies are stored into the memory. It will stop when<br />
ATS finishes with a long "B --" sound and listen to the radio<br />
station stored in P0:01.<br />
Then you can use the TUNING knob or the / buttons<br />
to select and listen to what's stored.<br />
Frequency changing flashing<br />
Note:<br />
Some noise-stations and blank-stations may also store into page 0 during ATS process<br />
cause by the interference. Please try the ATS again by lower down the telescopic<br />
antenna for <strong>FM</strong> stations or rotate the <strong>MW</strong>/<strong>LW</strong> antenna for <strong>MW</strong> & <strong>LW</strong> stations or press ANT.<br />
ATT. button to lower the ATT. (dB) level.<br />
If the interference is very bad for ATS, please change to manual storage.<br />
2) MANUAL STORAGE<br />
To manually store a frequency into a memory, turn on the radio and tune to a station that you<br />
want to store into memory, then either long press the MEMORY button / short press it twice /<br />
short press it and wait for 3 seconds until a long B sound, as for storage confirmation.
3) AUTO SCAN (QUICK) STORAGE<br />
- Press and release the VM/VF button with a "B" sound and notice the time shows in the upper<br />
right corner of display.<br />
- Press / buttons for about 2 seconds, a "B" will sound,<br />
and the radio scans from one station to another, staying on<br />
each station for about 5 seconds. Quick press the MEMORY<br />
button with a long "B --" sound to store your desired station<br />
before the frequency running to the next available station.<br />
To stop the scan, press any buttons except the MEMORY<br />
button.<br />
Frequency changing flashing<br />
Note: This function is not available for Air <strong>Band</strong> and SW SSB.<br />
4) STORE A STAION INTO ANOTHER PAGE<br />
To store a frequency into a memory in another page, first choose the page, then the memory<br />
location and then store the frequency.<br />
- Turn on the radio and tune to your desired station.<br />
- Shortly press the MEMORY button with a "B" sound, note<br />
that PRESET will flash in the right corner of the LCD.<br />
- Shortly press the PAGE button with another "B" sound and<br />
PAGE will flash in the right corner of the LCD.<br />
- While the PAGE is flashing, use the / buttons or turn<br />
the TUNING knob or key in the number of a page to select<br />
the page that you want to store into.<br />
11<br />
flashing<br />
- Press the [MEMORY] button to confirm it with a long "B --" sound (or it will automatically confirm<br />
after 3 seconds with a long "B --" sound.)<br />
flashing<br />
PAGE changing
LISTENING TO WHAT'S STORED<br />
- Turn on the radio and go to the correct page by pressing PAGE and entering it with the numeric<br />
keypad or using the TUNING knob or / button.<br />
PAGE / PRESET<br />
- Press and release the VM/VF button with a "BB" sound and<br />
notice that the PAGE and PRESET show in the display's<br />
upper right corner.<br />
- To go from one memory to another give a quick, short press<br />
to either the / button, or rotate the TUNING knob.<br />
- To auto-scan memory press one of the / buttons for<br />
about 2 seconds with a "B" sound and notice that<br />
flashes in the upper right corner. The radio scans from one<br />
memory to another, staying on each memory for about 5<br />
seconds. To stop the scan, short press any button with a<br />
"B" sound.<br />
To go to a memory you know, direct key in two digits of the memory location.<br />
NOTE:<br />
1. There is no auto-scan memory function in AIR and SW SSB band.<br />
2. If the page is 50, only key in 1-9 of the memory location.<br />
3. When " - - - - " appeared in the display with a "BB" sound after you key in a number of the<br />
memory, means there is nothing stored.<br />
4. When " " appeared with a long "B" sound, means the number keying in excess.<br />
12<br />
PRESET changing<br />
flashing
DELETE MEMORY<br />
DELETE PRESET MEMORY<br />
- Turn on the radio and press the VM/VF button with a "BB"<br />
sound, causing PAGE and PRESET to appear in the display's<br />
upper right corner.<br />
- Use the numeric keypad, the TUNING knob or the up/down<br />
buttons ( / ) to select the memory that you want to delete.<br />
- To delete the memory press the DELETE button for about<br />
1 second and release after a "B" sound, note that the PRESET<br />
and are blinking on the display. Then quickly short press<br />
the DELETE button again to confirm with a long "B" sounds.<br />
If you do not press DELETE to confirm in 3 seconds while the<br />
PRESET and are blinking, the deleting process will be quitted.<br />
13<br />
PAGE / PRESET<br />
DELETE A MEMORY PAGE<br />
- Turn on the radio and select the page that you want to delete by pressing PAGE with a "B"<br />
sound, note that page flashes in the display's upper right. While it's flashing use the numeric<br />
keypad, the TUNING knob or the up or down buttons ( / ) to select the page that you<br />
wish to delete.<br />
- Press and release the VM/VF button with a "BB" sound, so that PAGE and PRESET appear<br />
in the display's upper right corner.<br />
If " - - " appears above PRESET in the display's upper right corner, the page is already<br />
deleted and you don't have to continue.<br />
- Press DELETE for about 3 seconds with a "BB" sound or until<br />
PAGE and start blinking and press DELETE again with a long<br />
"B --" sound. If you do not press DELETE to confirm in 3<br />
seconds while the PAGE and are blinking, it will quit<br />
deleting.<br />
flashing<br />
QUICK DELETE WITH AUTO SCAN<br />
- Press and release the VM/VF button with a "BB" sound and notice the PAGE and PRESET<br />
appear in the upper right corner of display.<br />
- To auto scan memory, press one of the / buttons for about<br />
2 seconds with a "B" sound. The radio scans from one memory<br />
to another, staying on each memory for about 5 seconds. To<br />
delete the memory give the DELETE button a quick, short press<br />
(shows on the display) and a long "B--" sounds.<br />
QUICK DELETE<br />
flashing
CLOCK SETTING<br />
The <strong>TECSUN</strong> S-<strong>2000</strong>'s clock is in 24-hour format and can be set with the radio on or off. When<br />
the radio is turned off, the clock shows in mid-display. When the radio is turned on, the clock<br />
shows in the upper right corner of the LCD display.<br />
To set the clock:<br />
Press the TIME button for about a second with a "B" sound until you see the hour flashing.<br />
1. While it's flashing turn the TUNING knob to set it to the<br />
correct hour, then press TIME again with a "BB" sound<br />
to confirm and note that the minutes are flashing. Turn<br />
the TUNING knob to set it to the correct minutes; then<br />
press TIME with a long "B" sound to confirm.<br />
2. Another way to set the clock is by direct enter hour and<br />
minutes with numbers.<br />
(For example, 14:50pm, just enter 1 4 5 0)<br />
Note:<br />
1. After setting the hour or minutes you can simply let the<br />
flashing number time-out, without pressing the TIME<br />
button to confirm the setting.<br />
2. You can also use the / buttons to adjust the hour<br />
and minute instead of using the TUNING knob.<br />
ALARM SETTING<br />
14<br />
flashing<br />
The clock shows in the center<br />
of the LCD when the radio is<br />
off.<br />
flashing<br />
The clock shows in the upper<br />
right corner of the LCD when<br />
the radio is on.<br />
There are two independently programmable alarm timers (TIMER A or TIMER B ON/OFF) to<br />
turn it on and off at a specified time.<br />
To set an alarm:<br />
1. Turn off the radio and press the TIMER A or B ON/OFF<br />
button with a "B" sound or until you see the alarm hour<br />
flashing in the upper right corner of the display. While<br />
it's flashing adjust the hour with the TUNING knob and<br />
press the TIMER A or B ON/OFF button with a "BB"<br />
sound and notice that the alarm minutes are flashing.<br />
2. While it's flashing, adjust the alarm minutes with the<br />
TUNING knob and press the TIMER A or B ON/OFF<br />
button with another "BB" sound and notice the sleep<br />
timer flashing in the box at the top of the display.<br />
flashing<br />
SLEEP<br />
flashing
3. While it's flashing, adjust the time that the radio is to play (1~90 minutes) with the TUNING<br />
knob and press the TIMER A or B ON/OFF button with a long "B--"sound or simply let the<br />
flashing number time-out to confirm it automatically.<br />
To activate the alarm by radio<br />
After the alarm setting, it will auto start the alarm by radio<br />
note that " " appears on the display.<br />
Note:<br />
You can also use the up or down ( / ) buttons to adjust the hour and minute or direct key in<br />
hour and minute instead of the TUNING knob.<br />
SELECT ALARM BY RADIO OR BY BUZZER<br />
The <strong>TECSUN</strong> S-<strong>2000</strong> has two alarm modes, alarm by radio<br />
or by buzzer.<br />
1. To activate the alarm by radio, press TIMER A or B ON/OFF<br />
once with a "B" sound and notice that the " " symbol shows<br />
up in the TIMER A or B display section.<br />
2. To activate the alarm by buzzer, press again the TIMER A or B<br />
ON/OFF with a "BB" sound and notice that the " " symbol<br />
appears in the TIMER A or B display section.<br />
3. Press again the TIMER A or B ON/OFF button with a long "B--"<br />
sound and notice nothing appears in the TIMER A or B display<br />
section to turn off the alarm.<br />
15<br />
To activate the alarm by radio<br />
To activate the alarm by buzzer<br />
Note:<br />
1. Once the alarm is activated, no matter whether the radio is on or off, the alarm will force to<br />
listen to the station that stored in TIMER A or TIMER B, or to make a sequential sound by the<br />
buzzer, and turn off the radio in the time presetting in TIMER A or TIMER B.<br />
2. In "Timer A" or "Timer B" section:<br />
" " Means timer is set by radio<br />
" " Means timer is set by buzzer.<br />
" " Means Timer is off.<br />
TO TURN OFF THE ALARM<br />
Once the alarm is on by radio or buzzer, only the POWER, SLEEP, LIGHT/SNOOZE, and RESET<br />
buttons can be operated. Press the POWER or SLEEP buttons to turn off the alarm.
STORING A STATION TO TIMER A OR TIMER B<br />
- Turn on the radio and tune to a station that you want to store into<br />
TIMER A or B.<br />
- Long press TIMER A or B ON/OFF button with a "B" sound, note<br />
that " " will flash in the top of the display and then stays in<br />
section TIMER A or B.<br />
Note:<br />
If there is no station stored into TIMER A or TIMER B or the station being stored is out, noises<br />
will be heard when the alarm is activated by radio.<br />
SNOOZE<br />
When the alarm is activated, press the SNOOZE button to<br />
temporarily deactivate the timer for 10 minutes, notice that<br />
" " or " " is blinking on the display before the alarm is<br />
activated again. You allow to use 3 times of the SNOOZE<br />
function within the alarm period, after that you can turn off<br />
the alarm by press it again and " " or " " stays.<br />
SLEEP TIMER<br />
16<br />
flashing<br />
flashing<br />
flashing<br />
" " or " " is blinking on<br />
the display when snooze is on.<br />
The sleep timer enables the <strong>TECSUN</strong> S-<strong>2000</strong> to play any length of play time from 1-120 minutes<br />
and then turn off automatically.<br />
To turn on the sleep timer, press the SLEEP button under the<br />
POWER button. Notice that the number of minutes to play<br />
appears in the display, then you can either rotate the TUNING<br />
knob or press / buttons or keep pressing the SLEEP<br />
button to adjust your desired sleep timer. Press again the<br />
SLEEP button or just leave it for about 3 seconds with a long<br />
"B -- " sound to confirm your setting.
USING THE LIGHT BUTTON<br />
A quick press of the LIGHT button which gives about 3 seconds of illumination to the SIGNAL<br />
strength indicator and the display. A long press lights these for as long as the radio is turned on,<br />
so be careful if you're operating on batteries, because it will make them drain faster. If your AC<br />
adapter is connected, it's fine to keep the light on while the radio plays. To turn off it by short<br />
pressing the LIGHT button again.<br />
BW (BANDWIDTH) BUTTON<br />
Use the BANDWIDTH button to choose wide or narrow<br />
selectivity, which is shown in the lower right corner of the<br />
display as WIDE or NARROW. This may help reduce<br />
interference on some frequencies. Using WIDE usually<br />
results in better audio fidelity, while using narrow limits the<br />
audio fidelity somewhat. You can use it in <strong>FM</strong>, <strong>MW</strong>, <strong>LW</strong>,<br />
SW and SW SSB band.<br />
<strong>FM</strong> ST. (<strong>FM</strong> STEREO) BUTTON<br />
17<br />
WIDE bandwidth<br />
NARROW bandwidth<br />
Press the <strong>FM</strong> ST. button when in the <strong>FM</strong> band to take the radio<br />
in or out of <strong>stereo</strong> reception mode. When it's in <strong>stereo</strong> mode,<br />
STEREO appears under the left side of the frequency in the<br />
display, next to <strong>FM</strong>. As long as you are not using headphones<br />
or earphones, it can be left in mono mode. Stereo shows<br />
SW METER BAND SELECTION<br />
Meter band shows<br />
There are three ways to select SW meter band:<br />
1. A sequence of short press of SW button, a digit of meter band<br />
with [mb] flashes on the top right corner of the display and the<br />
lowest frequency of the meter band shows in the center of the<br />
display.<br />
2. Short press the SW button, notice that the meter band flashes on the top right corner of the<br />
display and then use the / buttons to select your desired meter.<br />
3. Short press the SW button, notice that the meter band flashes on the top right corner of the<br />
display and then directly input the number of meter band, press again the SW button to confirm.<br />
For example, when it is in SW band, key in number 19, it goes to 19 meter band note that 19 mb<br />
is on the top right corner of the display and 15000 kHz shows in the center.<br />
Note:<br />
It goes to the lowest frequency of each meter band after your selection.
TUNING STEP<br />
When you use the TUNING knob and the / buttons to tune in stations you can select<br />
FAST/SLOW tuning with the STEP button under the tuning knob. Short press the STEP button<br />
with a "B" sound, the tuning step goes SLOW " "; short press the STEP button again with a<br />
"BB" sound, the tuning step goes FAST " ".<br />
FAST/SLOW tuning is shown in the chart below for each band.<br />
STEP<br />
(FAST) (SLOW)<br />
BAND TUNING<br />
TUNING<br />
<strong>FM</strong> 0.1 MHz 1MHz 0.01 MHz 0.1MHz<br />
<strong>MW</strong> 9 /10kHz 100kHz<br />
1kHz 9 /10kHz<br />
<strong>LW</strong><br />
9 kHz 100kHz<br />
1 kHz 9kHz<br />
SW<br />
5 kHz 100kHz<br />
1 kHz 5kHz<br />
AIR 0.025MHz 0.1MHz 0.001MHz 0.025MHz<br />
LOCK THE TUNING KNOB<br />
RESET BUTTON<br />
18<br />
STEP button<br />
If you want to LOCK the TUNING knob, press the STEP<br />
button for about 3 seconds with a long "B--" sound, note<br />
that " " shows on the display followed " " or " ".<br />
Press again the STEP button with a "B" sound to unlock<br />
it and notice that " " disappears. " " shows on the display<br />
The reset button is located in the left under the TUNING knob. Press it only when the radio seems<br />
to stop functioning properly to reboot the unit.<br />
SSB (SINGLE SIDE BAND) TUNING<br />
SSB enables listening to shortwave two way communications using the single sideband mode<br />
such as amateur radio, Morse code, Weather-fax transmissions and other signals often referred<br />
to as 'utility' signals.<br />
To use the SSB control, turn on the <strong>TECSUN</strong> S-<strong>2000</strong> and go into Short-wave. Press the SSB<br />
button with a "B" sound and notice that USB appears in the display, to the right of SW.<br />
Press the SSB button again with a "BB" sound and notice that LSB appears to the right of SW.<br />
Press the SSB button with a long "B--" sound, it goes to AM mode and USB or LSB disappears.<br />
USB is the abbreviation for Upper Sideband; LSB is the abbreviation for Lower Sideband. You<br />
can now direct key in the SSB frequency you know to tune in<br />
signals. Also notice that on the lower right front of the radio is<br />
a control knob labeled SSB BFO. BFO stands for Beat<br />
Frequency Oscillator. This control knob is used to fine tune<br />
a sideband signal frequency.<br />
USB or LSB shows
LINE OUT SOCKETS<br />
On the back of the radio are the left and right sockets labeled LINE OUT. You can use a<br />
connector with 3.5mm plug to transfer the audio sound to another device.<br />
Rear<br />
Note: The line-out output sound level is not controlled by the radio's VOLUME knob.<br />
LINE-IN SOCKET<br />
455kHZ AM IF OUTLET<br />
L<br />
To an amplifier or a recorder.<br />
The LINE-IN socket is on the lower left front of the radio and allows you to route the sound from<br />
another device to the <strong>TECSUN</strong> S-<strong>2000</strong>. Use a cord with a 3.5 mm (1/8 inch) <strong>stereo</strong> plug.<br />
MP3 player<br />
19<br />
LINE-IN socket<br />
There is a 455 kHz AM IF outlet on the back of the radio next to the LINE OUT sockets. It is used<br />
for radio amateurs to connect some devices by DIY (Do It Yourself), ie, synchronous demodulator,<br />
SSB demodulator, software radio (DSP) demodulator, DRM 455/12kHz converter etc.<br />
L R<br />
S-<strong>2000</strong> Rear<br />
Synchronous demodulator, SSB demodulator<br />
Software radio (DSP) demodulator<br />
DRM 455/12kHz converter etc<br />
To the LINE IN sockets<br />
To the LINE IN sockets<br />
To the computer<br />
S-<strong>2000</strong> Front
ANTENNA ATEENUATOR (ANT. ATT.) BUTTON<br />
The ANT.ATT. button, located on the upper right front of the radio, is used to attenuate a signal.<br />
Tune into a station, then press the ANT.ATT. button and notice that the signal strength indicator,<br />
located on the left side of the display, changes at three levels. The maximum level is the highest<br />
gain and the lowest level is minimum gain. Use the lowest level (-20dB) if the signal is extremely<br />
strong and local. Use the intermediate level (-10dB) for average signals and use the highest level<br />
(0dB) for weak signals.<br />
A message alert tone helps you to know which level you select.<br />
Sequentially short press the ANT.ATT. button, a "B" sound<br />
signifies it is lowest level; a "BB" sound signifies it is interm<br />
ediate level; a long "B--" sound signifies it is the maximum level.<br />
Antenna Attenuation Indication<br />
RF GAIN CONTROL<br />
On the right front of the radio is the RF Gain control knob. You can leave it fully counterclockwise<br />
in the AUTO position, where it will function automatically, or you can turn it clockwise and use it<br />
manually to control the RF (radio frequency) gain. Using it manually may improve the radio's<br />
rejection of interference from adjacent frequencies that may interfere, especially on <strong>Shortwave</strong>.<br />
This function does not work in <strong>FM</strong>.<br />
SQUELCH CONTROL<br />
Using the Squelch control eliminates background noise. This control is used mainly in the <strong>FM</strong><br />
and the aircraft band. This control is on the lower right front of the radio. To engage it, turn it on<br />
by turning the knob clockwise. Turn it off by clicking the knob fully counterclockwise.<br />
20
EXTERNAL ANTENNA SOCKETS<br />
The external antenna sockets are used to connect the <strong>TECSUN</strong> S-<strong>2000</strong> to advanced performance<br />
antennas.<br />
FOR <strong>MW</strong>/<strong>LW</strong><br />
On the rotated AM antenna, at the top of radio, is a socket for 50 or 75 Ohm plug-in AM antenna.<br />
A loop antenna or an antenna tuner can be connected to the radio to improve the reception of<br />
<strong>MW</strong>/<strong>LW</strong>.<br />
LINE OUT<br />
L R<br />
21<br />
ATT. TUNE<br />
External ring type AM antenna Connect to external AM antenna<br />
AM antenna tuner<br />
NOTE: it will cut off the internal AM antenna when an external AM antenna is connected.<br />
FOR <strong>FM</strong>/SW<br />
On the right side of the radio are the 50 Ohm BNC sockets for <strong>FM</strong> and <strong>Shortwave</strong>. 50 or 75 Ohm<br />
coaxial cable can be used to feed the properly designed antenna.<br />
There is also a black and red socket, labeled 500 Ohms, designed to work with a high impedance<br />
<strong>Shortwave</strong> Antenna, 500 Ohms, such as a long wire antenna. Plug a long piece of wire, 10 to 35<br />
meters or 30 to 100 feet, into the red socket and position it above ground, running in as much a<br />
straight line as possible, not touching any other metal objects. If you do this indoors, position the<br />
wire as close to windows as possible. Plug a 10 to 20 meter or 30 to 60 feet wire into the black<br />
socket and let it run on the floor or ground. Or attach the black socket to a cold water pipe with as<br />
short a piece of wire as possible.<br />
When using external sockets, select EXT. ANT. with the selector switch on the right side of the radio.<br />
When using the internal antennas of the radio, switch it to INT. ANT.<br />
INT./EXT. antenna select switch<br />
INT. ANT. :Use of internal telescopic antenna<br />
EXT. ANT.:Use of external antenna<br />
GND<br />
INT. ANT.<br />
EXT ANT.<br />
50<br />
500<br />
Right side<br />
<strong>FM</strong><br />
ANT.<br />
SW<br />
ANT.<br />
SW<br />
ANT.<br />
50 ohm <strong>FM</strong> external antenna<br />
50 ohm SW external antenna<br />
500 ohm high-impedance external SW antenna<br />
WARNING:<br />
Always unplug all antennas that are mounted outside when a lightning storm is predicted.
SYSTEM CODE SETTING<br />
To enter different system codes turn off the radio and perform a quick, short press of the ENTER<br />
button with a "B" sound. " " appears on the upper right corner of the display. Enter the<br />
system code as below, then push ENTER to confirm the system code while a long "B--" sounds.<br />
CODE For memory page setting (500 memories)<br />
00 * 10 pages; each page 50 memories<br />
20 20 pages; each page 25 memories<br />
25 25 pages; each page 20 memories<br />
50 50 pages; each page 10 memories<br />
Step (<strong>MW</strong>)<br />
09 * 9 kHz<br />
10 10 kHz (North America)<br />
Type of batteries<br />
29 * Normal D size batteries (1.5V each battery)<br />
28 Rechargeable batteries (1.2V each battery)<br />
<strong>FM</strong> frequency range<br />
76 76-108 MHz (Japan)<br />
87 * 87-108 MHz<br />
88 87.5-108 MHz(North America)<br />
Note: " * " means default setting by the manufacturer.<br />
CHECK THE SYSTEM CODE SETTING<br />
Turn off the radio and long press the ENTER button for about 3 seconds, the system settings<br />
show in the display in sequence as "Memory page setting Step (<strong>MW</strong>) <strong>FM</strong> frequency range<br />
Time setting and the frequency designated of Timer A and Timer B Type of batteries".<br />
22
TROUBLESHOOTING<br />
PROBLEM PROBABLE CAUSE SOLUTION<br />
Can't turn on the radio<br />
or no display or light.<br />
The radio auto turns off<br />
while listening.<br />
Noises or nothing<br />
stored into memory<br />
when ATS.<br />
No reception when<br />
using external antenna.<br />
Only noises is heard<br />
when alarm by radio.<br />
No <strong>stereo</strong> when using<br />
earphones.<br />
(A) Power connection.<br />
(B) Batteries are discharged<br />
or not installed for portable<br />
operation, no AC power.<br />
(A) Batteries are discharged.<br />
(B) Activate the alarm by radio.<br />
(C) Sleep time is over.<br />
(A) The signal is too weak.<br />
(B) Strong interference nearby.<br />
The antenna selection switch<br />
is on INT. ANT.<br />
There is no station stored into<br />
TIMER A or TIMER B or the<br />
station is sleep when alarm by<br />
radio.<br />
(A) <strong>FM</strong> signal is too weak.<br />
(B) <strong>FM</strong> ST. is set to MONO.<br />
(C) The broadcast is MONO.<br />
23<br />
(A) Check power supply cables.<br />
(B) Check/re-install batteries for<br />
portable operation.<br />
(A) Check/re-install batteries.<br />
(B) Turn on the radio again.<br />
(C) Turn on the radio again.<br />
(A) Manually tuning or direct key<br />
in frequency.<br />
(B) Use the ANT.ATT or shorten<br />
the telescope antenna, then<br />
ATS.<br />
Switch it to EXT. ANT. position.<br />
Store a station into TIMER A or<br />
TIMER B.<br />
(A) Try to change the antenna's<br />
direction and its length, or use<br />
an external antenna.<br />
(B) Set the <strong>FM</strong> ST. to <strong>stereo</strong>.<br />
No function. The MCU is in accident. Use the RESET button to reboot<br />
the unit.
SPECIFICATIONS<br />
Frequency range<br />
<strong>LW</strong><br />
<strong>MW</strong><br />
SW<br />
AIR<br />
<strong>FM</strong><br />
Sensitivity<br />
<strong>LW</strong> (S/N=26dB)<br />
<strong>MW</strong> (S/N=26dB)<br />
SW (S/N=26dB)<br />
SSB (S/N=10dB)<br />
AIR (S/N=10dB)<br />
<strong>FM</strong> (S/N=30dB)<br />
Selectivity<br />
<strong>FM</strong> Stereo crosstalk<br />
IF Frequency<br />
100-519kHz<br />
522-1620kHz ----------------- system code "09"<br />
520-1710 kHz (America) -- system code "10"<br />
1711-29999kHz<br />
118-137MHz<br />
87-108MHz<br />
76-108MHz (Japan)<br />
87.5-108MHz (America)<br />
Less than 3mV/m<br />
Less than 0.35mV/m<br />
Less than 18μV<br />
Less than 1μV<br />
Less than 5μV<br />
Less than 3μV<br />
AM Wideband ±10kHz, Greater than 40dB<br />
Narrowband ±5kHz, Greater than 60dB<br />
Signal to Noise Ratio<br />
<strong>MW</strong><br />
SW<br />
<strong>FM</strong><br />
Image Rejection<br />
<strong>MW</strong>/<strong>LW</strong>/SW<br />
AIR<br />
<strong>FM</strong><br />
IF Rejection<br />
AM<br />
<strong>FM</strong><br />
Better than 30dB<br />
Greater than 45dB<br />
Greater than 50dB<br />
Greater than 60dB<br />
SSB, AM: 1st IF : 55.845MHz<br />
2nd IF: 455kHz<br />
<strong>FM</strong>: 1st IF: 10.7MHz (Single Conversion)<br />
55.845MHz: Greater than 90dB<br />
455kHz: Greater than 80dB<br />
Greater than 90dB<br />
Greater than 60dB<br />
55.845MHz: Greater than 60dB<br />
455kHz: Greater than 60dB<br />
10.7MHz: Greater than 100dB<br />
24
AGC Performance AGC range: Wider than 80dB<br />
Threshold : 12μV<br />
RF GAIN 20dB<br />
Antenna Attenuation Three levels: 0dB,-10dB,-20dB<br />
Internal Antennal 1200mm telescoping whip (for use on <strong>FM</strong>, AIR, SW and SSB<br />
bands)<br />
lFerrite rod antenna φ10X120mm(HQ) (for use from 100kHz<br />
through 1800kHz)<br />
External Antenna<br />
Input<br />
IF Output<br />
SW<br />
<strong>FM</strong><br />
AIR<br />
50Ω (BNC type), 500Ω<br />
50Ω (BNC type)<br />
IF: 455kHz<br />
Signals output greater than 60mV when input greater than 3μV<br />
Line Audio Outputs Stereo left and right 300Mv, 4.7kΩ for each output.<br />
Earphone Jack φ3.5mm, 8~32Ω, <strong>stereo</strong> type<br />
Internal Speaker 8Ω / 2W, φ100mm<br />
Power supply<br />
DC Jack<br />
Current Consumption<br />
Operating<br />
Temperature<br />
Batteries : D size, UM1 (alkaline) x 4<br />
AC ~220V/50Hz (AC power cord included for Asia market)<br />
DC 6V / 500mA, negative polarity<br />
Outside diameter: φ5.5mm,Core diameter: φ2mm<br />
(DC adaptor included for Europe market)<br />
Quiescent Current<br />
Dynamic Current<br />
o o<br />
-5 C to +50 C<br />
Weight 2.7kg (batteries NOT included)<br />
Size<br />
25<br />
Standby Current less than 85uA<br />
<strong>FM</strong> less than 70mA<br />
<strong>MW</strong> less than 80mA<br />
SW less than 90mA<br />
SSB less than 95mA<br />
Rated Current 350mA<br />
(Output 650mW, Distortion less than 1%)<br />
Maximum Current less than 500mA<br />
(Output 1500mW)<br />
372 (W) X 183 (H) X 153 (D) mm (front handle included)
MESSAGE ALERT STATUS<br />
FUNCTION BUTTON OPERATION TONE DISPLAY<br />
Light On/Off<br />
Time setting<br />
Alarm setting<br />
<strong>Band</strong>width<br />
SSB Signal<br />
Listening*<br />
<strong>FM</strong> <strong>stereo</strong><br />
LIGHT/SNOOZE<br />
TIME<br />
TIMER A (B)<br />
BW<br />
SSB<br />
<strong>FM</strong> ST.<br />
NARROW<br />
WIDE<br />
USB - Upper Side <strong>Band</strong><br />
LSB - Lower Side <strong>Band</strong><br />
AM<br />
MONO.<br />
STEREO<br />
26<br />
B<br />
B--<br />
BB<br />
B<br />
BB<br />
B<br />
BB<br />
BB<br />
B<br />
BB<br />
B<br />
BB<br />
B<br />
BB<br />
B<br />
BB<br />
SLEEP<br />
Playing time, “√” and ” “ flash<br />
“ ” appears<br />
Delete Digits DEL ETE Every time B Delete a digit.<br />
Delete one<br />
memory or a<br />
memory page<br />
Store a frequency<br />
into memory<br />
DEL ETE<br />
MEMORY<br />
Light temporarily<br />
Light always<br />
Light off<br />
Hour adjusting<br />
Minute adjusting<br />
Confirm or Auto confirm<br />
Alarm hour adjusting<br />
Alarm minute adjusting<br />
Playing time adjusting<br />
Confirm or Auto confirm<br />
Activate radio alarm<br />
Activate buzzer alarm<br />
Deactivate the alarm<br />
Start to delete one memory<br />
Start to delete a memory page<br />
Confirm deleting<br />
Storing<br />
Confirm or auto confirm<br />
Quick store MEMORY During the auto tuning, every<br />
storing.<br />
B--<br />
B--<br />
B--<br />
B<br />
BB<br />
B--<br />
B<br />
BB<br />
B<br />
Light for 3 seconds.<br />
Light until no power.<br />
Turn off the light.<br />
Hour flashes<br />
Minute flashes<br />
Nothing flashes<br />
Hour flashes<br />
Minute flashes<br />
“ ” appears<br />
“ ” appears<br />
Both “ ” and ” “ display<br />
“ ” appears<br />
“ ” appears<br />
“ ” appears<br />
Both“ ” and “ ” display<br />
“ ” is not on<br />
“ ” is on when a <strong>stereo</strong><br />
broadcast is received<br />
PRESET and “ ” flash<br />
PAGE and “ ” flash<br />
Deleting finished.<br />
PRESET flashes in the upper right<br />
corner.<br />
PRESET stays.<br />
PRESET flashes in the upper right<br />
corner.
MESSAGE ALERT STATUS<br />
FUNCTION BUTTON OPERATION TONE DISPLAY<br />
Confirm or system<br />
setting<br />
ATS(Auto tuning<br />
storage)<br />
<strong>FM</strong> band selection<br />
<strong>MW</strong>/<strong>LW</strong> band<br />
selection<br />
ETEER<br />
SW band selection SW<br />
Go in/out the<br />
range of a meter<br />
band<br />
AIR band selection<br />
Tuning step and<br />
lock<br />
Auto scaning<br />
Auto-scan memory<br />
<strong>FM</strong><br />
<strong>MW</strong>/<strong>LW</strong><br />
SW,<br />
TUNING knob,<br />
UP/DOWN<br />
Every operation<br />
An error occurred<br />
Complete the system code<br />
setting<br />
To start<br />
Stop ATS by pressing any key<br />
End of ATS<br />
<strong>FM</strong> <strong>FM</strong> B<br />
<strong>MW</strong>/<strong>LW</strong><br />
<strong>MW</strong><br />
<strong>LW</strong><br />
SW<br />
Select a SW meter band<br />
Go in<br />
Go out<br />
AIR AIR<br />
STEP/LOCK<br />
UP/DOWN<br />
UP/DOWN<br />
Slow tuning<br />
Fast tuning<br />
Lock the tuning konb<br />
Unlock<br />
Start scaning<br />
Stop scaning by pressing<br />
any key<br />
Start auto-scan<br />
Stop scaning by pressing any<br />
key<br />
27<br />
B<br />
B--<br />
B--<br />
B<br />
BB<br />
B--<br />
B<br />
BB<br />
B<br />
B<br />
B<br />
B<br />
B<br />
B<br />
BB<br />
B--<br />
B<br />
B<br />
BB<br />
B<br />
BB<br />
Start or finish its operation.<br />
” “ appears<br />
Frequency and PRESET changed<br />
Frequency stays<br />
P0:01 shows in the upper right<br />
corner and its frequency displays<br />
” “ appears and a <strong>FM</strong> frequency<br />
displays<br />
” “ appears and a <strong>MW</strong> frequency<br />
displays<br />
” “ appears and a <strong>LW</strong> frequency<br />
displays<br />
” “ appears and a <strong>MW</strong> frequency<br />
displays<br />
A meter band flashes in the upper<br />
right corner<br />
A meter band flashes in the upper<br />
right corner<br />
Time displays in the upper right<br />
corner<br />
AIR appears and a AIR frequency<br />
displays<br />
“ “ is on<br />
“ “ is on<br />
“ “ appears<br />
“ “ disappears<br />
“ “ flashes and frequency changed<br />
“ “ and the frequency stay<br />
“ “ flashes and the memory<br />
number changes<br />
“ “ and the memory number<br />
stay
MESSAGE ALERT STATUS<br />
FUNCTION BUTTON OPERATION TONE DISPLAY<br />
Mode alternation<br />
frequency and<br />
memory<br />
VM/VF<br />
Page selection PAGE<br />
Sleep timer setting SL EEP<br />
Antenna attenuator ANT.ATT.<br />
VF: frequency tuning mode<br />
VM: memory mode<br />
Start to select B<br />
Confirm/Auto confirm B<br />
28<br />
B<br />
Time shows in the upper right corner<br />
PAGE and PRESET show in the upper<br />
right corner<br />
PAGE flashes<br />
PAGE stays<br />
Choose 30 minutes B 30 is on<br />
Choose 90 minutes BB 90 is on<br />
Auto confirm<br />
B-- Frequency shows<br />
Maximum level B - - Att. indicates: 0 dB<br />
Intermediate level BB Att. indicates: -10dB<br />
Lowest level B Att. indicates: -20dB<br />
Note: it will be the same “ B “ sound when you press the SSB button to select USB, LSB or AM band at the beginning and the<br />
ending of a meter band, ie, either 11500 kHz or 12150 kHz of 25 meter band.
<strong>TECSUN</strong><br />
www.tecsun.com.cn<br />
<strong>TECSUN</strong> RADIO CO., LTD.<br />
Unit 11, 13/F, Block A, Hoi Luen Ind. Ctr., 55 Hoi Yuen Road, Kwun Tong, HK TEL: 852-2895 1586 FAX: 852-2895 5617 tecsun@on-nets.com<br />
Factory:189 GuanChang Road, DongCheng District, DongGuan, GuangDong, P.R.China www.tecsun.com.cn www.tecsun.b2s.com<br />
VER.1 01-2009