Mini H-type PCs: C20H, C28H, C40H, and C60H Programmable ...
Mini H-type PCs: C20H, C28H, C40H, and C60H Programmable ...
Mini H-type PCs: C20H, C28H, C40H, and C60H Programmable ...

You also want an ePaper? Increase the reach of your titles
YUMPU automatically turns print PDFs into web optimized ePapers that Google loves.
<strong>Mini</strong> H-<strong>type</strong> <strong>PCs</strong>:<br />
<strong>C20H</strong>, <strong>C28H</strong>, <strong>C40H</strong>, <strong>and</strong> <strong>C60H</strong><br />
<strong>Programmable</strong> Controllers<br />
Operation Manual<br />
Revised July 1994
Notice:<br />
OMRON products are manufactured for use according to proper procedures by a qualified operator<br />
<strong>and</strong> only for the purposes described in this manual.<br />
The following conventions are used to indicate <strong>and</strong> classify precautions in this manual. Always heed<br />
the information provided with them. Failure to heed precautions can result in injury to people or damage<br />
to the product.<br />
DANGER! Indicates information that, if not heeded, is likely to result in loss of life or serious<br />
injury.<br />
WARNING Indicates information that, if not heeded, could possibly result in loss of life or<br />
serious injury.<br />
Caution Indicates information that, if not heeded, could result in relative serious or minor<br />
injury, damage to the product, or faulty operation.<br />
OMRON Product References<br />
All OMRON products are capitalized in this manual. The word “Unit” is also capitalized when it refers<br />
to an OMRON product, regardless of whether or not it appears in the proper name of the product.<br />
The abbreviation “Ch,” which appears in some displays <strong>and</strong> on some OMRON products, often means<br />
“word” <strong>and</strong> is abbreviated “Wd” in documentation in this sense.<br />
The abbreviation “PC” means <strong>Programmable</strong> Controller <strong>and</strong> is not used as an abbreviation for anything<br />
else.<br />
Visual Aids<br />
The following headings appear in the left column of the manual to help you locate different <strong>type</strong>s of<br />
information.<br />
Note Indicates information of particular interest for efficient <strong>and</strong> convenient operation<br />
of the product.<br />
1, 2, 3... 1. Indicates lists of one sort or another, such as procedures, checklists, etc.<br />
© OMRON, 1990<br />
��� ������ ��������� �� ���� �� ���� ����������� ��� �� ����������� ������ �� � ��������� ������� �� ������������ �� ���<br />
����� �� �� ��� ������ ����������� ����������� ������������� ���������� �� ���������� ������� ��� ����� ������� �������<br />
���� �� ������<br />
�� ������ ��������� �� ������� ���� ������� �� ��� ��� �� ��� ����������� ��������� ������� ��������� ������� ����� ��<br />
���������� �������� �� ������� ��� ������������� ��������� ��� ����������� ��������� �� ���� ������ �� ������� �� ������<br />
������� ������� ����� ���������� ��� ���� ����� �� ��� ����������� �� ���� ������� ������������� ����� ������� ��<br />
�������������� ��� ������ �� ���������� ������� �� ��� ��������� ������� ��� ������� ��������� ���� ��� ��� �� ��� ��������<br />
���� ��������� �� ���� ������������
��� �������� ��������������������������������������������������������������� �<br />
��� ��� ������� �� �� ����� ��������������������������������������������������� �<br />
��� �� ����������� ���������������������������������������������������������� �<br />
��� ����� ������������������ ���������������������������������������������� �<br />
��� �������� �� �� ��������� �������������������������������������������������� �<br />
��� ���������� ������� �������������������������������������������������������� �<br />
��� ��������� ������� �������������������������������������������������������� �<br />
��� ���������� ��������������������������������������������������������������� �<br />
��� �� ������������� ��������������������������������������������������������� �<br />
! "<br />
��� ������������ ������������������������������������������������������������� ��<br />
��� ���� ���� ��������� ������������������������������������������������������� ��<br />
��� �� ��������� ������ ���� ���������������������������������������������������� ��<br />
��� �� �������� ������ ���� ��������������������������������������������������� ��<br />
��� �� ���������� ������ ���� ������������������������������������������������� ��<br />
��� �� ����� ������� ���� ��������������������������������������������������� ��<br />
��� �� �������� ������ ���� �������������������������������������������������� ��<br />
��� �� ��������������� ���� ��������������������������������������������������� ��<br />
��� �� ����� ������ ���� ����������������������������������������������������� ��<br />
���� ������� ������ ��������������������������������������������������������� ��<br />
���� �� ���������� ������ ���� ������������������������������������������������ ��<br />
#<br />
$ % % & % #'<br />
��� ����� ��������� ���������������������������������������������������������� ��<br />
��� ����������� ����������� ���������������������������������������������������� ��<br />
��� ����� ������ �������� ���������������������������������������������������� ��<br />
��� ��� ����������� ������� ������������������������������������������������� ��<br />
��� ����������� ��� ��������� ��������������������������������������������������� ��<br />
��� ���������� ���������� ��� �������� ��� ������� �������������������������������� ��<br />
��� ����������� ��� ������ ������������������������������������������������������ ��<br />
��� ���� ���� ��������� ������� ������������������������������������������������� ��<br />
��� ����������� ����������� �������������������������������������������������� ��<br />
���� ������� ��������� ��������������������������������������������������������<br />
��
'<br />
��� �������� ���������������������������������������������������������������� ��<br />
��� ����������� ������ �������������������������������������������������������� ��<br />
��� ���� ������ ������� ������� ��� ����� ����������������������������������������� ��<br />
��� �������������� ������������ �������������������������������������������������� ��<br />
��� ������ ������� ������������ ������������������������������������������������ ���<br />
��� ��� ������� ������������ ���������������������������������������������������� ���<br />
��� ��������� ��� ��������� ����� �� ������ ��� ������� �������������������� ���<br />
��� ���� ��� ���� ��� �� ������� ��� ������� �������������������������������� ���<br />
��� ��� �� ������� ���������������������������������������������������������� ���<br />
���� ����� ��� ������� ������������ ���������������������������������������������� ���<br />
���� ���� �������� ������������������������������������������������������������ ���<br />
���� ���� �������� ���������������������������������������������������������� ���<br />
���� ���� ���������� ��������������������������������������������������������� ���<br />
���� ���� ���������� ���������������������������������������������������������� ���<br />
���� ��� ������������ ��������������������������������������������������������� ���<br />
���� ������ ������������ ������������������������������������������������������� ���<br />
���� ����� ������������ ��������������������������������������������������������� ���<br />
���� ����������� �������������������������������������������������������������� ���<br />
���� ���� ������������ ���������������������������������������������������������� ���<br />
���� ������� ������������ ������������������������������������������������������� ���<br />
& %<br />
(<br />
) %<br />
��� ����� ���� �������������������������������������������������������������� ���<br />
��� ����������� ����� ���� ���������������������������������������������������� ���<br />
��� ����������� ��������� ����� ������������������������������������������������ ���<br />
��� ��� �������� ���� �������������������������������������������������������� ���<br />
��� �������� �������� ���� �������������������������������������������������� ���<br />
& % * + %% % )<br />
��� ���������� ��� �������� ����� �������� ��������������������������������������� ���<br />
��� ���������� ��������� ��� ��������� ���� ������������������������������������� ���<br />
,<br />
- . / ''<br />
��� ������� ��������� ����� �������������������������������������������������� ���<br />
��� �� ��� �� ���� �������� �������������������������������������������������� ���<br />
��� �� ���� ���� ��� ����� ���������������������������������������������������� ���<br />
��� ���� ���� �������������� �������� ������������������������������������������ ���<br />
��� �������� �������� ��� ��������� ����������������������������������������� ���<br />
��� ������� ������ ��������������������������������������������������������� ���<br />
"<br />
+0 1 % ,'<br />
��� ����� ���������� ���������������������������������������������������������� ���<br />
��� ���������� ������ ��� ����� �������� �������������������������������������� ���<br />
��� ������� ��� �������� ������ ��� �������� ������������������������������������� ���<br />
��� ����� �������� ����������������������������������������������������������� ���<br />
��� ����� ������� �������� ����������������������������������������������������� ���<br />
��� �������� ����� ���������� �������������������������������������������������<br />
���<br />
"'
22 "<br />
�� �������� ������ ���������������������������������������������������������� ���<br />
�� ����������� ������������ �������������������������������������������������� ���<br />
�� ����������� ������� ���������� �������������������������������������������� ���<br />
�� ����� ��� ���������� ���� ��������� ������������������������������������������ ���<br />
�� ������ ����� ����������������������������������������������������������� ���<br />
�� ���� ������������������� ������ ������������������������������������������ ���<br />
�� ������� ������ ��������<br />
�����������������������������������������������������<br />
�� ���� ���������� ����� ����������������������������������������������������� ���<br />
�� �������� ����� ���������������������������������������������������������� ���<br />
�� ����������� ������� ��� ����� �������������������������������������������� ���<br />
�� ��������� ���� ������ ������ ����������������������������������������������� ���<br />
30 ! '<br />
) (<br />
- !<br />
)
About this Manual:<br />
The OMRON <strong>C20H</strong>, <strong>C28H</strong>, <strong>C40H</strong>, <strong>and</strong> <strong>C60H</strong> offer a simple but effective way to automate processing.<br />
Manufacturing, assembly, packaging, <strong>and</strong> many other processes can be automated to save time <strong>and</strong><br />
money.<br />
This manual describes the characteristics <strong>and</strong> abilities of the <strong>PCs</strong>, as well as programming operations<br />
<strong>and</strong> instructions <strong>and</strong> other aspects of operation <strong>and</strong> preparation. Before attempting to operate the PC,<br />
thoroughly familiarize yourself with the information contained herein. Hardware information is provided<br />
in detail in the <strong>Mini</strong> H-<strong>type</strong> <strong>PCs</strong>: <strong>C20H</strong>/<strong>C28H</strong>/<strong>C40H</strong>/<strong>C60H</strong> Installation Guide. A table of other<br />
manuals that can be used in conjunction with this manual is provided at the end of Section 1 Introduction.<br />
Section 1 Introduction explains the background <strong>and</strong> some of the basic terms used in ladder-diagram<br />
programming. It also provides an overview of the process of programming <strong>and</strong> operating a PC <strong>and</strong><br />
explains basic terminology used with OMRON <strong>PCs</strong>. Descriptions of Peripheral Devices used with the<br />
<strong>Mini</strong> H-<strong>type</strong> <strong>PCs</strong> <strong>and</strong> a table of other manuals available to use with this manual for special PC applications<br />
are also provided.<br />
Section 2 Hardware Considerations explains basic aspects of the overall PC configuration <strong>and</strong> describes<br />
the indicators that are referred to in other sections of this manual.<br />
Section 3 Memory Areas takes a look at the way memory is divided <strong>and</strong> allocated <strong>and</strong> explains the<br />
information provided there to aid in programming. It explains how I/O is managed in memory <strong>and</strong> how<br />
bits in memory correspond to specific I/O points. It also provides information on System DM, a special<br />
area in <strong>Mini</strong> H-<strong>type</strong> <strong>PCs</strong> that provides the user with flexible control of PC operating parameters.<br />
Section 4 Writing <strong>and</strong> Entering Programs explains the basics of ladder-diagram programming,<br />
looking at the elements that make up the parts of a ladder-diagram program <strong>and</strong> explaining how execution<br />
of this program is controlled. It also explains how to convert ladder diagrams into mnemonic<br />
code so that the programs can be entered using a Programming Console.<br />
Section 5 Instruction Set describes all of the instructions used in programming.<br />
Section 6 Program Execution Timing explains the cycling process used to execute the program<br />
<strong>and</strong> tells how to coordinate inputs <strong>and</strong> outputs so that they occur at the proper times.<br />
Section 7 Program Debugging <strong>and</strong> Execution explains the Programming Console procedures used<br />
to input <strong>and</strong> debug the program <strong>and</strong> to monitor <strong>and</strong> control operation.<br />
Section 8 RS-232C Interface describes the modes, settings, <strong>and</strong> procedures essential for making<br />
use of the built-in RS-232C interface. It also list all of the comm<strong>and</strong>s that can be downloaded from a<br />
host computer connected to the RS-232C interface.<br />
Finally, Section 9 Troubleshooting provides information on error indications <strong>and</strong> other means of reducing<br />
down-time. Information in this section is also useful when debugging programs.<br />
The Appendices provide tables of st<strong>and</strong>ard OMRON products available for the <strong>Mini</strong> H-<strong>type</strong> <strong>PCs</strong>, reference<br />
tables of instructions <strong>and</strong> Programming Console operations, coding sheet to help in programming<br />
<strong>and</strong> parameter input, <strong>and</strong> other information helpful in PC operation.<br />
WARNING Failure to read <strong>and</strong> underst<strong>and</strong> the information provided in this manual may result in<br />
personal injury or death, damage to the product, or product failure. Please read each<br />
section in its entirety <strong>and</strong> be sure you underst<strong>and</strong> the information provided in the section<br />
<strong>and</strong> related sections before attempting any of the procedures or operations given.<br />
)
���� ������� ����� � ����� �������� �� ��� ������� �� ������������ ����������� ��� �������� ����� �������� ���� ��<br />
�������������� ������������ �� ���� �������� �� �������� �� ��� ������� �� ����������� ��� ��������� � �� ��� ���<br />
������ ����� ����������� ���� ���� ����� ���� ���� �������� ��� ������������ �� ���������� ������� ���� ���� ���<br />
���� ������ ���� ��� � ����� �� ����� ������� ��������� �� ��� ���� ���� ������ ��� ������� �� �������������<br />
��� �������� ��������������������������������������������������������������� �<br />
��� ��� ������� �� �� ����� ��������������������������������������������������� �<br />
��� �� ����������� ���������������������������������������������������������� �<br />
��� ����� ������������������ ���������������������������������������������� �<br />
��� �������� �� �� ��������� �������������������������������������������������� �<br />
��� ���������� ������� �������������������������������������������������������� �<br />
��� ��������� ������� ��������������������������������������������������������<br />
�
1-1 Overview<br />
1-2 The Origins of PC Logic<br />
1-3 PC Terminology<br />
Section 1-3<br />
A PC (<strong>Programmable</strong> Controller) is basically a CPU (Central Processing Unit)<br />
containing a program <strong>and</strong> connected to input <strong>and</strong> output (I/O) devices. The<br />
program controls the PC so that when an input signal from an input device<br />
turns ON, the appropriate response is made. The response normally involves<br />
turning ON an output signal to an output device. The input devices could be<br />
photoelectric sensors, pushbuttons on control panels, limit switches, or any<br />
other device that can produce a signal that can be input into the PC. The output<br />
devices could be solenoids, switches activating indicator lamps, relays<br />
turning on motors, or any other devices that can be activated by signals output<br />
from the PC.<br />
For example, a sensor detecting a passing product turns ON an input to the<br />
PC. The PC responds by turning ON an output that activates a pusher that<br />
pushes the product onto another conveyor for further processing. Another<br />
sensor, positioned higher than the first, turns ON a different input to indicate<br />
that the product is too tall. The PC responds by turning on another pusher<br />
positioned before the pusher mentioned above to push the too-tall product<br />
into a rejection box.<br />
Although this example involves only two inputs <strong>and</strong> two outputs, it is typical of<br />
the <strong>type</strong> of control operation that <strong>PCs</strong> can achieve. Actually even this example<br />
is much more complex than it may at first appear because of the timing<br />
that would be required, i.e., “How does the PC know when to activate each<br />
pusher?” Much more complicated operations, however, are also possible.<br />
The problem is how to get the desired control signals from available inputs at<br />
appropriate times.<br />
To achieve proper control, the <strong>Mini</strong> H-<strong>type</strong> <strong>PCs</strong>, like the other C-series <strong>PCs</strong>,<br />
use a form of PC logic called ladder-diagram programming. This manual is<br />
written to explain ladder-diagram programming <strong>and</strong> to prepare the reader to<br />
program <strong>and</strong> operate the <strong>Mini</strong> H-<strong>type</strong> <strong>PCs</strong>.<br />
<strong>PCs</strong> historically originate in relay-based control systems. Although the integrated<br />
circuits <strong>and</strong> internal logic of the PC have taken the place of the discrete<br />
relays, timers, counters, <strong>and</strong> other such devices, actual PC operation<br />
proceeds as if those discrete devices were still in place. PC control, however,<br />
also provides computer capabilities <strong>and</strong> accuracy to achieve a great deal<br />
more flexibility <strong>and</strong> reliability than is possible with relays.<br />
The symbols <strong>and</strong> other control concepts used to describe PC operation also<br />
come from relay-based control <strong>and</strong> form the basis of the ladder-diagram programming<br />
method. Most of the terms used to describe these symbols <strong>and</strong><br />
concepts, however, have come in from computer terminology.<br />
Although also provided in the Glossary at the back of this manual, the following<br />
terms are crucial to underst<strong>and</strong>ing PC operation <strong>and</strong> are thus explained<br />
here.<br />
Inputs <strong>and</strong> Outputs A device connected to the PC that sends a signal to the PC is called an input<br />
device; the signal it sends is called an input signal. A signal enters the PC<br />
through terminals or through pins on a connector on a Unit. The place where<br />
a signal enters the PC is called an input point. This input point is allocated a<br />
location in memory that reflects its status, i.e., either ON or OFF. This memory<br />
location is called an input bit. The CPU, in its normal processing cycle,
Controlled System <strong>and</strong><br />
Control System<br />
1-4 OMRON Product Terminology<br />
1-5 Overview of PC Operation<br />
Section 1-5<br />
monitors the status of all input points <strong>and</strong> turns ON or OFF corresponding<br />
input bits accordingly.<br />
There are also output bits in memory that are allocated to output points on<br />
Units through which output signals are sent to output devices, i.e., an output<br />
bit is turned ON to send a signal to an output device through an output point.<br />
The CPU periodically turns output points ON or OFF according to the status<br />
of the output bits.<br />
These terms are used when describing different aspects of PC operation.<br />
When programming, one is concerned with what information is held in memory,<br />
<strong>and</strong> so I/O bits are referred to. When talking about the Units that connect<br />
the PC to the controlled system <strong>and</strong> the places on these Units where signal<br />
enter <strong>and</strong> leave the PC, I/O points are referred to. When wiring these I/O<br />
points, the physical counterparts of the I/O points, either terminals or connector<br />
pins, are referred to. When talking about the signals that enter or leave<br />
the PC, one refers to input signals <strong>and</strong> output signals, or sometimes just inputs<br />
<strong>and</strong> outputs. It all depends on what aspect of PC operation is being<br />
talked about.<br />
The Control System includes the PC <strong>and</strong> all I/O devices it uses to control an<br />
external system. A sensor that provides information to achieve control is an<br />
input device that is clearly part of the Control System. The controlled system<br />
is the external system that is being controlled by the PC program through<br />
these I/O devices. I/O devices can sometimes be considered part of the controlled<br />
system, e.g., a motor used to drive a conveyor belt.<br />
OMRON products are divided into several functional groups that have generic<br />
names. Appendix A St<strong>and</strong>ard Models list products according to these<br />
groups. The term Unit is used to refer to all of the OMRON PC products.<br />
Product groups include Programming Devices, Peripheral Devices, <strong>and</strong> DIN<br />
Rail Products.<br />
The following are the basic steps involved in programming <strong>and</strong> operating a<br />
<strong>C20H</strong>-<strong>type</strong> PC. Assuming you have already purchased one or more of these<br />
<strong>PCs</strong>, you would be familiar with steps one <strong>and</strong> two, which are discussed<br />
briefly below. This manual is written to explain steps three through six, eight,<br />
<strong>and</strong> nine. The relevant sections of this manual that provide more information<br />
are listed with each of these steps.<br />
1, 2, 3... 1. Determine what the controlled system must do, in what order, <strong>and</strong> at<br />
what times.<br />
2. Determine what Units will be required <strong>and</strong> whether your system configuration<br />
will require an Expansion I/O Units. Refer to the <strong>Mini</strong> H-<strong>type</strong> PC<br />
Installation Guide.<br />
3. On paper, assign all input <strong>and</strong> output devices to I/O points on Units <strong>and</strong><br />
determine which I/O bits will be allocated to each.<br />
4. Using relay ladder symbols, write a program that represents the sequence<br />
of required operations <strong>and</strong> their inter-relationships. Be sure to<br />
also program appropriate responses for all possible emergency situations.<br />
(Refer to Section 4 Writing <strong>and</strong> Entering Programs, Section5Instruction<br />
Set, <strong>and</strong> Section 6 Program Execution Timing)<br />
5. Input the program <strong>and</strong> all required operating parameters into the PC.<br />
(Refer to Section 7 Program Debugging <strong>and</strong> Execution)
6. Debug the program, first to eliminate any syntax errors, <strong>and</strong> then to find<br />
execution errors. (Refer to Section 7 Program Debugging <strong>and</strong> Execution<br />
<strong>and</strong> Section 9 Troubleshooting)<br />
7. Wire the PC to the controlled system. This step can actually be started<br />
as soon as step 3 has been completed. Refer to the <strong>C20H</strong>, <strong>C28H</strong>, <strong>C40H</strong><br />
Installation Guide <strong>and</strong> to Operation Manuals <strong>and</strong> System Manuals for<br />
details on individual Units.<br />
8. Test the program in an actual control situation <strong>and</strong> carry out fine tuning<br />
as required. (Refer to Section 7 Program Debugging <strong>and</strong> Execution <strong>and</strong><br />
Section 9 Troubleshooting)<br />
Control System Design Designing the Control System is the first step in automating any process. A<br />
PC can be programmed <strong>and</strong> operated only after the overall Control System is<br />
fully understood. Designing the Control System requires, first of all, a thorough<br />
underst<strong>and</strong>ing of the system that is to be controlled. The first step in<br />
designing a Control System is thus determining the requirements of the controlled<br />
system.<br />
Input/Output Requirements The first thing that must be assessed is the number of input <strong>and</strong> output points<br />
that the controlled system will require. This is done by identifying each device<br />
that is to send an input signal to the PC or which is to receive an output signal<br />
from the PC. Keep in mind that the number of I/O points available depends<br />
on the configuration of the PC. Refer to 3-3 IR Area for details on I/O<br />
capacity <strong>and</strong> the allocation of I/O bits to I/O points.<br />
Sequence, Timing, <strong>and</strong><br />
Relationships<br />
1-6 Peripheral Devices<br />
#<br />
Next, determine the sequence in which control operations are to occur <strong>and</strong><br />
the relative timing of the operations. Identify the physical relationships between<br />
the I/O devices as well as the kinds of responses that should occur<br />
between them.<br />
For instance, a photoelectric switch might be functionally tied to a motor by<br />
way of a counter within the PC. When the PC receives an input from a start<br />
switch, it could start the motor. The PC could then stop the motor when the<br />
counter has received a specified number of input signals from the photoelectric<br />
switch.<br />
Each of the related tasks must be similarly determined, from the beginning of<br />
the control operation to the end.<br />
The following peripheral devices can be used in programming, either to input/<br />
debug/monitor the PC program or to interface the PC to external devices to<br />
output the program or memory area data. Model numbers for all devices<br />
listed below are provided in Appendix A St<strong>and</strong>ard Models. OMRON product<br />
names have been placed in bold when introduced in the following descriptions.<br />
Programming Console A Programming Console is the simplest form of programming device for OM-<br />
RON <strong>PCs</strong>. It is connected directly to the CPU without requiring a separate<br />
interface. Programming Console operations are described later in this manual.<br />
The Programming Console cannot be used when a Peripheral Interface<br />
Unit or CPU-mounting Host Link Unit is connected.<br />
Graphic Programming<br />
Console: GPC<br />
Section 1-6<br />
The GPC allows you to perform all the operations of the Programming Console<br />
as well as many additional ones. PC programs can be written on-screen<br />
in ladder-diagram form as well as in mnemonic form. As the program is written,<br />
it is displayed on a liquid crystal display, making confirmation <strong>and</strong> modification<br />
quick <strong>and</strong> easy. Syntax checks may also be performed on the programs<br />
before they are downloaded to the PC. Many other functions are available,<br />
depending on the Memory Pack used with the GPC.
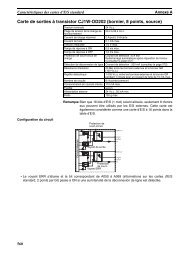
Ladder Support Software:<br />
LSS<br />
Factory Intelligent Terminal:<br />
FIT<br />
The GPC also functions as an interface to copy programs directly to a st<strong>and</strong>ard<br />
cassette tape recorder. A PROM Writer, Floppy Disk Interface Unit, or<br />
Printer Interface Unit can be directly mounted to the GPC to output programs<br />
directly to an EPROM chip, floppy disk drive, or printing device, respectively.<br />
The GPC is connected to a <strong>Mini</strong> H-<strong>type</strong> PC via a Peripheral Interface Unit.<br />
LSS is designed to run on IBM AT/XT compatibles to enable all of the operations<br />
available on the GPC.<br />
The LSS is connected to a <strong>Mini</strong> H-<strong>type</strong> PC via a Peripheral Interface Unit or<br />
the RS-232C interface.<br />
The FIT is an OMRON computer with specially designed software that allows<br />
you to perform all of the operations that are available with the GPC or LSS.<br />
Programs can also be output directly to an EPROM chip, floppy disk drive, or<br />
printing device without any additional interface. The FIT has an EPROM<br />
writer <strong>and</strong> two 3.5” floppy disk drives built in.<br />
The FIT is connected to a <strong>Mini</strong> H-<strong>type</strong> PC via a Peripheral Interface Unit or<br />
the RS-232C interface.<br />
PROM Writer Use only the GPC with the PROM Writer to write programs to EPROM chips.<br />
Printer Interface Unit Use only the GPC with the Printer Interface Unit connected to a printer or<br />
X--Y plotter to print out programs in either mnemonic or ladder-diagram form.<br />
Data Access Console The Data Access Console can be used to monitor or change data in the TC,<br />
IR <strong>and</strong> SR areas. It has two levels of operations, one of which protects certain<br />
areas from being changed. It also provides certain special functions,<br />
such as keyboard mapping to data areas. (The PC must be set to either Japanese<br />
or English to use the Data Access Console.)<br />
1-7 Available Manuals<br />
Section 1-7<br />
The following table lists other manuals that may be required to program <strong>and</strong>/<br />
or operate the <strong>Mini</strong> H-<strong>type</strong> <strong>PCs</strong>. Operation Manuals <strong>and</strong>/or Operation Guides<br />
are also provided with individual Units <strong>and</strong> are required for wiring <strong>and</strong> other<br />
specifications.<br />
Name Cat. No. Contents<br />
<strong>C20H</strong>, <strong>C28H</strong>, <strong>C40H</strong>, <strong>C60H</strong> PC Installation Guide W175 Hardware specifications<br />
Data Access Console Operation Guide W173 Operating <strong>and</strong> installation procedures for the Data<br />
Access Console<br />
GPC Operation Manual W84 Programming procedures for the GPC (Graphics<br />
Programming Console)<br />
FIT Operation Manual W150 Programming procedures for using the FIT (Factory<br />
Intelligent Terminal<br />
LSS Operation Manual W237 Programming procedures for using LSS (Ladder Support<br />
Software)<br />
Printer Interface Unit Operation Guide W107 Procedures for interfacing a PC to a printer<br />
PROM Writer Operation Guide W155 Procedures for writing programs to EPROM chips<br />
Floppy Disk Interface Unit Operation Guide W119 Procedures for interfacing a PC to a floppy disk drive<br />
Host Link Unit System Manual W143 Procedures for creating Host Link Systems combining<br />
<strong>PCs</strong> <strong>and</strong> host computers.<br />
'
���� ������� �������� ����������� �� �������� ������� �� ��� ���� ������ ��� ���� ��� �������� �� ����������� ���<br />
�������� ���������� ����� ������� ���������� �� ��� ��� ��� ����� �� �������������� ���� ����������� �� ������� �� ���<br />
���� �� ��� ���� ������ ���� ������������������� ������������ ������<br />
��� ���������� ��������������������������������������������������������������� �<br />
��� �� ������������� ���������������������������������������������������������<br />
�
2-1 Indicators<br />
CPU Indicators<br />
2-2 PC Configuration<br />
RS-232C <strong>and</strong> Peripheral<br />
Device Interfaces<br />
,<br />
Section 2-2<br />
CPU indicators provide visual information on the general operation of the PC.<br />
Although not substitutes for proper error programming using the flags <strong>and</strong><br />
other error indicators provided in the data areas of memory, these indicators<br />
provide ready confirmation of proper operation.<br />
CPU indicators are described in the following table. Indicators are the same<br />
for all <strong>Mini</strong> H-<strong>type</strong> <strong>PCs</strong>.<br />
Indicator Function<br />
POWER Lights when power is supplied to the CPU.<br />
RUN Lights when the CPU is operating normally.<br />
ALM/ERR ALARM: Flashes when a non-fatal error is discovered in error<br />
diagnosis operations. PC operation will continue.<br />
ERROR:Lights when a fatal error is discovered in error diagnosis<br />
operations. When this indicator lights, the RUN indicator will go<br />
off, CPU operation will be stopped, <strong>and</strong> all outputs from the PC<br />
will be turned OFF.<br />
OUTPUT Lights when the Unit should turn on an output.<br />
INPUT Lights when the Unit has an input signal.<br />
With a <strong>Mini</strong> H-<strong>type</strong> PC System, you can set up a configuration utilizing anywhere<br />
from 20 to 240 I/O points. Depending on the number of I/O points you<br />
need, you can choose any of the four <strong>PCs</strong> (<strong>C20H</strong>, <strong>C28H</strong>, <strong>C40H</strong>, or <strong>C60H</strong>)<br />
<strong>and</strong> combine it with up to three Expansion I/O Units for a total of four Units in<br />
a PC System.<br />
For example, if you only need a very simple system, a <strong>C20H</strong> PC alone will<br />
provide 12 input <strong>and</strong> 8 output points. For more sophisticated operations, a<br />
<strong>C60H</strong> PC can be connected with three <strong>C60H</strong> Expansion I/O Units to provide<br />
128 input <strong>and</strong> 112 output points. You can select any other combination of<br />
Units within this range, which will provide exactly the capacity you require for<br />
your Control System.<br />
For detailed explanations of possible system configurations, refer to the appropriate<br />
sections of the <strong>Mini</strong> H-<strong>type</strong> <strong>PCs</strong>: <strong>C20H</strong>, <strong>C28H</strong>, <strong>C40H</strong>, <strong>C60H</strong> Installation<br />
Guide.<br />
The <strong>Mini</strong> H-<strong>type</strong> <strong>PCs</strong> have a built-in RS-232C interface, which allows them to<br />
connect directly to an FA Computer, Display Terminal, commercially available<br />
printers, <strong>and</strong> other devices which employ an RS-232C interface. <strong>Mini</strong> H-<strong>type</strong><br />
<strong>PCs</strong> equipped with an E-V1-version CPU can transfer data with similarly<br />
equipped <strong>Mini</strong> H-<strong>type</strong> PC’s through the RS-232C interface.<br />
In addition, the built-in Peripheral Interface Unit connector allows connection<br />
to an FA Computer via a CPU-mounting Host Link Unit, <strong>and</strong> the built-in Peripheral<br />
Device (Console) interface allows connection to a Programming<br />
Console or a Data Access Console.
������� ����� �� ���� ��� �������� �� ������� ��������� ��� ������� �������� �� ���������� �������� ���� ����� ��� �� �� ����<br />
����� ���� ������� ������ ������ ���� ���� � ��������� ��������� ��� ����� ��������� ���������� �� ��� ���� �� ��������<br />
���� ��� ���������� �� ���� ������ ��� ����� ������ ���� �� ��� ������� ������� ����� ��� ������ ������� �� ��������<br />
������� ���� ������� ��������� ����� ����� ������������ ��� �������� ����������� ���� ���� �� ��������� �� ��� �����<br />
��� ������������ �������������������������������������������������������������������� ��<br />
��� ���� ���� ��������� �������������������������������������������������������������� ��<br />
��� �� ��������� ������ ���� ����������������������������������������������������������� ��<br />
��� �� �������� ������ ���� ���������������������������������������������������������� ��<br />
����� �������������������� ���� ���� ���� ����� ��� ������� ���� ������������������� ��<br />
����� ��������� ������ ������ ��� ������������������������������������������������ ��<br />
����� ������ ������ ���� ��� ���������������������������������������������������� ��<br />
����� ��� ������ ���� ��� ������������������������������������������������������� ��<br />
����� ��� �������� ������ ���� ������������������������������������������������� ��<br />
����� ������� ����� ���� ������������������������������������������������������� ��<br />
����� ����� ���� ����� ���� ���������������������������������������������������� ��<br />
����� ����� ����� ���� ��������������������������������������������������������� ��<br />
����� ����� ����� ���� ��������������������������������������������������������� ��<br />
������ ���� ���� ��������������������������������������������������������������� ��<br />
������ ����������� ��������� ����� ����� �� ����������������������������������������� ��<br />
������ ���������� ����� ��������������������������������������������������������� ��<br />
��� �� ���������� ������ ���� �������������������������������������������������������� ��<br />
����� ���������� ���� ������� ���� ���������������������������������������������� ��<br />
����� ���������� ������� ���� �������������������������������������������������� ��<br />
����� ������� �������������� ����� ���� ��������������������������������������� ��<br />
����� ������� �������������� ����� �������������������������������������������� ��<br />
����� ������� �������������� �������� ����������������������������������������� ��<br />
����� ������� ����� �������� ���� ��������������������������������������������� ��<br />
����� �������� ���� ����� ������ ��� ����������������������������������������� ��<br />
����� ����� ������� ���� �������������������������������������������������������� ��<br />
����� ������� ����� ����� ���� ������������������������������������������������� ��<br />
������ ������ ��������� ����� ��������������������������������������������������� ��<br />
������ ������ ������� ���� ���������������������������������������������������� ��<br />
������ ������� ��������� ���� ��������������������������������������������������� ��<br />
������ ������� ���� ���� ������������������������������������������������������� ��<br />
������ �������������� ���� ��� ���� ���������������������������������������������� ��<br />
������ �������� ���� ��� ���� ����������������������������������������������� ��<br />
������ ��������� ������� ������������������������������������������������������� ��<br />
������ �������� ����� ���� ���� ������������������������������������������������ ��<br />
������ ����������� ������������������ ��������� ���� ������� ���� �������������������� ��<br />
������ ��������������� ������� ������������������������������������������������� ��<br />
������ ����� ���� ���������� ���������������������������������������������������� ��<br />
��� �� ����� ������� ���� ���������������������������������������������������������� ��<br />
����� ������� ���� ����� ������������������������������������������������������ ��<br />
����� ��������� ��� ��������� ������ ����� �������������������������������������� ��<br />
����� ����� ������� ���� ������������������������������������������������������� ��<br />
����� ���� ������� ������ ���� ������������������������������������������������ ��<br />
��� �� �������� ������ ���� ��������������������������������������������������������� ��<br />
��� �� ��������������� ���� ���������������������������������������������������������� ��<br />
����� ���������� ������� ������������������������������������������������������ ��<br />
����� ������ �� ���������� ������� ���������� ����������������������������������� ��<br />
����� ��������� ���� ������� ��������������������������������������������������� ��<br />
��� �� ����� ������ ���� ������������������������������������������������������������ ��<br />
���� ������� ������ ���������������������������������������������������������������� ��<br />
���� �� ���������� ������ ���� �������������������������������������������������������<br />
��<br />
!<br />
"
3-1 Introduction<br />
4<br />
Details, including the name, acronym, range, <strong>and</strong> function of each area are<br />
summarized in the following table. All but the last three of these areas are<br />
data areas. Data <strong>and</strong> memory areas are normally referred to by their acronyms.<br />
Area Acronym Range Function<br />
Internal Relay IR Words: 000 to 246<br />
Bits: 0000 to 24615<br />
Special Relay SR Words: 247 to 255<br />
Bits: 24700 to 25507<br />
Auxiliary Relay AR Words: AR 00 to AR 27<br />
Bits: AR 00 to AR 2715<br />
Data Memory DM Read/write: DM 0000 to DM 0999<br />
Read only: DM 1000 to DM 1999<br />
Holding Relay HR Words: HR 00 to HR 99<br />
Bits: HR 0000 to HR 9915<br />
Link Relay LR Words: LR 00 to LR 63<br />
Bits: LR 0000 to 6315<br />
Timer/Counter TC TC 000 to TC 511 (TC numbers used<br />
to access other information)<br />
Used to control I/O points, other bits, timers,<br />
<strong>and</strong> counters, <strong>and</strong> to temporarily store data.<br />
Contains system clocks, flags, control bits, <strong>and</strong><br />
status information.<br />
Contains flags <strong>and</strong> bits for special functions.<br />
Retains status during power failure.<br />
Used for internal data storage <strong>and</strong><br />
manipulation.<br />
Used to store data <strong>and</strong> to retain the data values<br />
when the power to the PC is turned off.<br />
Available for use as work bits.<br />
Used to define timers <strong>and</strong> counters, <strong>and</strong> to<br />
access completion flags, PV, <strong>and</strong> SV. In<br />
general, when used as a bit oper<strong>and</strong>, a TC<br />
number accesses the completion flag for the<br />
timer or counter defined using the TC number.<br />
When used as a word oper<strong>and</strong>, the TC number<br />
accesses the present value of the timer or<br />
counter.<br />
Temporary Relay TR TR 00 to TR 07 (bits only) Used to temporarily store <strong>and</strong> retrieve<br />
execution conditions. These bits can only be<br />
used in the Load <strong>and</strong> Output instructions.<br />
Storing <strong>and</strong> retrieving execution conditions is<br />
necessary when programming certain <strong>type</strong>s of<br />
branching ladder diagrams.<br />
Program Memory UM UM: Depends on Memory Unit used. Contains the program executed by the CPU.<br />
Work Bits <strong>and</strong> Words When some bits <strong>and</strong> words in certain data areas are not being used for their<br />
intended purpose, they can be used in programming as required to control<br />
other bits. Words <strong>and</strong> bits available for use in this fashion are called work<br />
words <strong>and</strong> work bits. Most, but not all, unused bits can be used as work bits.<br />
Those that can be used are described area-by-area in the remainder of this<br />
section. Actual application of work bits <strong>and</strong> work words is described in Section<br />
4 Writing <strong>and</strong> Entering Programs.<br />
Flags <strong>and</strong> Control Bits Some data areas contain flags <strong>and</strong>/or control bits. Flags are bits that are<br />
automatically turned ON <strong>and</strong> OFF to indicate particular operation status. Although<br />
some flags can be turned ON <strong>and</strong> OFF by the user, most flags are<br />
read only; they cannot be controlled directly.<br />
Control bits are bits turned ON <strong>and</strong> OFF by the user to control specific aspects<br />
of operation. Any bit given a name using the word bit rather than the<br />
word flag is a control bit, e.g., Restart bits are control bits.<br />
3-2 Data Area Structure<br />
Section 3-2<br />
When designating a data area, the acronym for the area is always required<br />
for all but the IR <strong>and</strong> SR areas. Although the acronyms for the IR <strong>and</strong> SR<br />
areas are often given for clarity in text explanations, they are not required,<br />
<strong>and</strong> not entered, when programming. Any data area designation without an<br />
acronym is assumed to be in either the IR or SR area. Because IR <strong>and</strong> SR
Bit number<br />
Section 3-2<br />
addresses run consecutively, the word or bit addresses are sufficient to differentiate<br />
these two areas.<br />
An actual data location within any data area but the TC area is designated by<br />
its address. The address designates the bit or word within the area where the<br />
desired data is located. The TC area consists of TC numbers, each of which<br />
is used for a specific timer or counter defined in the program. Refer to 3-8 TC<br />
(Timer/Counter) Area for more details on TC numbers <strong>and</strong> to 5-10 Timer <strong>and</strong><br />
Counter Instructions for information on their application.<br />
The rest of the data areas (i.e., the IR, SR, HR, DM, AR, <strong>and</strong> LR areas) consist<br />
of words, each of which consists of 16 bits numbered 00 through 15 from<br />
right to left. IR words 000 <strong>and</strong> 001 are shown below with bit numbers. Here,<br />
the content of each word is shown as all zeros. Bit 00 is called the rightmost<br />
bit; bit 15, the leftmost bit.<br />
The term least significant bit is often used for rightmost bit; the term most<br />
significant bit, for leftmost bit. These terms are not used in this manual because<br />
a single data word is often split into two or more parts, with each part<br />
used for different parameters or oper<strong>and</strong>s. When this is done, the rightmost<br />
bits of a word may actually become the most significant bits, i.e., the leftmost<br />
bits in another word,when combined with other bits to form a new word.<br />
15 14 13 12 11 10 09 08 07 06 05 04 03 02 01 00<br />
IR word 000 0 0 0 0 0 0 0 0 0 0 0 0 0 0 0 0<br />
IR word 001 0 0 0 0 0 0 0 0 0 0 0 0 0 0 0 0<br />
The DM area is accessible by word only; you cannot designate an individual<br />
bit within a DM word. Data in the IR, SR, HR, AR, <strong>and</strong> LR areas is accessible<br />
either by word or by bit, depending on the instruction in which the data is being<br />
used.<br />
To designate one of these areas by word, all that is necessary is the acronym<br />
(if required) <strong>and</strong> the two-, three-, or four-digit word address. To designate an<br />
area by bit, the word address is combined with the bit number as a single<br />
four- or five-digit address. The following table show examples of this. The two<br />
rightmost digits of a bit designation must indicate a bit between 00 <strong>and</strong> 15,<br />
i.e., the rightmost digit must be 5 or less, <strong>and</strong> the next digit to the left must be<br />
either 0 or 1.<br />
The same TC number can be used to designate either the present value (PV)<br />
of the timer or counter, or a bit that functions as the Completion Flag for the<br />
timer or counter. This is explained in more detail in 3-8 TC (Timer/Counter)<br />
Area.<br />
Area Word designation Bit designation<br />
IR 000 00015 (leftmost bit in word 000)<br />
SR 252 25200 (rightmost bit in word 252)<br />
DM DM 1250 Not possible<br />
TC TC 215 (designates PV) TC 215 (designates completion flag)<br />
LR LR 45 LR 1200
Data Structure Word data input as decimal values is stored in binary-coded decimal (BCD);<br />
word data entered as hexadecimal is stored in binary form. Each four bits of<br />
a word represents one digit, either a hexadecimal or decimal digit, numerically<br />
equivalent to the value of the binary bits. One word of data thus contains<br />
four digits, which are numbered from right to left. These digit numbers<br />
<strong>and</strong> the corresponding bit numbers for one word are shown below.<br />
Digit number 3 2 1 0<br />
Bit number<br />
15 14 13 12 11 10 09 08 07 06 05 04 03 02 01 00<br />
Contents 0 0 0 0 0 0 0 0 0 0 0 0 0 0 0 0<br />
Converting Different Forms<br />
of Data<br />
Section 3-2<br />
When referring to the entire word, the digit numbered 0 is called the rightmost<br />
digit; the one numbered 3, the leftmost digit.<br />
When entering data into data areas, it must be input in the proper form for<br />
the intended purpose. This is no problem when designating individual bits,<br />
which are merely turned ON (equivalent to a binary value of 1) or OFF (a binary<br />
value of 0). When entering word data, however, it is important to input it<br />
either as decimal or as hexadecimal, depending on what is called for by the<br />
instructionitistobeusedfor.Section 5 Instruction Set specifies when a particular<br />
form of data is required for an instruction.<br />
Binary <strong>and</strong> hexadecimal can be easily converted back <strong>and</strong> forth because<br />
each four bits of a binary number is numerically equivalent to one digit of a<br />
hexadecimal number. The binary number 0101111101011111 is converted to<br />
hexadecimal by considering each set of four bits in order from the right. Binary<br />
1111 is hexadecimal F; binary 0101 is hexadecimal 5. The hexadecimal<br />
equivalent would thus be 5F5F, or 24,415 in decimal (16 3 x5+16 2 x15+16<br />
x5+15).<br />
Decimal <strong>and</strong> BCD are easily converted back <strong>and</strong> forth. In this case, each<br />
BCD digit (i.e., each group of four BCD bits) is numerically equivalent of the<br />
corresponding decimal digit. The BCD bits 0101011101010111 are converted<br />
to decimal by considering each four bits from the right. Binary 0101 is decimal<br />
5; binary 0111 is decimal 7. The decimal equivalent would thus be 5,757.<br />
Note that this is not the same numeric value as the hexadecimal equivalent<br />
of 0101011101010111, which would be 5757 hexadecimal, or 22,359 in decimal<br />
(16 3 x5+16 2 x7+16x5+7).<br />
Because the numeric equivalent of each four BCD binary bits must be numerically<br />
equivalent to a decimal value, any four bit combination numerically<br />
greater then 9 cannot be used, e.g., 1011 is not allowed because it is numerically<br />
equivalent to 11, which cannot be expressed as a single digit in decimal<br />
notation. The binary bits 1011 are of course allowed in hexadecimal are a<br />
equivalent to the hexadecimal digit C.<br />
There are instructions provided to convert data either direction between BCD<br />
<strong>and</strong> hexadecimal. Refer to 5-14 Data Conversion for details. Tables of binary<br />
equivalents to hexadecimal <strong>and</strong> BCD digits are provided in the appendices<br />
for reference.<br />
Decimal Points Decimal points are used in timers only. The least significant digit represents<br />
tenths of a second. All arithmetic instructions operate on integers only.
3-3 IR (Internal Relay) Area<br />
CPUs<br />
Expansion I/O Units<br />
Section 3-3<br />
The IR area is used both as data to control I/O points, <strong>and</strong> as work bits to<br />
manipulate <strong>and</strong> store data internally. It is accessible both by bit <strong>and</strong> by word.<br />
In the <strong>C20H</strong>/<strong>C28H</strong>/<strong>C40H</strong>/<strong>C60H</strong>, the IR area is comprised of words 000 to<br />
246.<br />
Words in the IR area that are used to control I/O points are called I/O words.<br />
Bits in I/O words are called I/O bits. Bits in the IR area which are not assigned<br />
as I/O bits can be used as work bits. IR area work bits are reset when<br />
power is interrupted or PC operation is stopped.<br />
I/O words are allocated to CPUs <strong>and</strong> Expansion I/O Units as follows. The<br />
CPU is allocated the first four words, beginning with 000, <strong>and</strong> each Expansion<br />
I/O Unit connected is allocated four words beginning with, in order, 010,<br />
020, <strong>and</strong> 030. (Although each Unit is allocated four words, the number of bits<br />
actually used depends on the <strong>type</strong> of Unit, i.e., <strong>C20H</strong>, <strong>C28H</strong>, or <strong>C40H</strong>.) The<br />
first two words are allocated for inputs <strong>and</strong> the other two are allocated for<br />
outputs. The following table illustrates I/O allocation for CPUs <strong>and</strong> Expansion<br />
I/O Units.<br />
Connected Unit Designation <strong>C20H</strong> or <strong>C28H</strong> <strong>C40H</strong> or <strong>C60H</strong><br />
CPU Input words IR 000 IR 000 to IR 001<br />
Output words IR 002 IR 002 to IR 003<br />
1st Expansion I/O Unit Input words IR 010 IR 010 to IR 011<br />
Output words IR 012 IR 012 to IR 013<br />
2nd Expansion I/O Unit Input words IR 020 IR 020 to IR 021<br />
Output words IR 022 IR 022 to IR 023<br />
3rd Expansion I/O Unit Input words IR 030 IR 030 to IR 031<br />
Output words IR 032 IR 032 to IR 033<br />
The following tables show the I/O bits used by each of the CPUs <strong>and</strong> Expansion<br />
I/O Units. For the Expansion I/O Units, n = IR 010, IR 020, or IR 030,<br />
depending on the order of connection. Unused bits in input words cannot be<br />
used in the program. Unused bits in output words can be used as work bits,<br />
as shown below.<br />
Model Input bits Output bits Work bits<br />
<strong>C20H</strong> IR 00000 to IR 00011 IR 00200 to IR 00207 IR 00208 to IR 00215<br />
<strong>C28H</strong> IR 00000 to IR 00015 IR 00200 to IR 00211 IR 00212 to IR 00215<br />
<strong>C40H</strong> IR 00000 to IR 00015 IR 00200 to IR 00211 IR 00212 to IR 00215<br />
IR 00100 to IR 00107 IR 00300 to IR 00303 IR 00304 to IR 00315<br />
<strong>C60H</strong> IR 00000 to IR 00015 IR 00200 to IR 00211 IR 00212 to IR 00215<br />
IR 00100 to IR 00115 IR 00300 to IR 00315<br />
Model Input bits Output bits Work bits<br />
<strong>C20H</strong> Bits 00 to 11 of IR n Bits 00 to 07 of IR n+2 Bits 08 to 15 of IR n+2<br />
<strong>C28H</strong> Bits 00 to 15 of IR n Bits 00 to 11 of IR n+2 Bits 12 to 15 of IR n+2<br />
<strong>C40H</strong> Bits 00 to 15 of IR n Bits 00 to 11 of IR n+2 Bits 12 to 15 of IR n+2<br />
Bits 00 to 07 of IR n+1 Bits 00 to 03 of IR n+3 Bits 04 to 15 of IR n+3<br />
<strong>C60H</strong> Bits 00 to 15 of IR n Bits 00 to 11 of IR n+2 Bits 12 to 15 of IR n+2<br />
Bits 00 to 15 of IR n+1 Bits 00 to 15 of IR n+3<br />
High-speed Counter When the High-speed Counter instruction is used, IR 00000 is used as a<br />
count input <strong>and</strong> IR 00001 is used as a hardware reset/disable bit.
#<br />
Section 3-4<br />
I/O Words If a Unit brings an input into the PC, the bit assigned to it is an input bit; if the<br />
Unit sends an output from the PC, the bit is an output bit. To turn on an output,<br />
the output bit assigned to it must be turned ON. When an input is turned<br />
ON, the input bit assigned to it is turned ON also. These facts can be used in<br />
the program to access input status <strong>and</strong> control output status through I/O bits.<br />
I/O bits that are not assigned to I/O points can be used as work bits.<br />
Input Bit Usage<br />
Output Bit Usage<br />
3-4 SR (Special Relay) Area<br />
Input bits can be used to directly input external signals to the PC <strong>and</strong> can be<br />
used in any order in programming. Each input bit can also be used in as<br />
many instructions as required to achieve effective <strong>and</strong> proper control. They<br />
cannot be used in instructions that control bit status, e.g., the Output, Differentiation<br />
Up, <strong>and</strong> Keep instructions.<br />
Output bits are used to output program execution results <strong>and</strong> can be used in<br />
any order in programming. Because outputs are refreshed only once during<br />
each cycle (i.e., once each time the program is executed), any output bit can<br />
be used in only one instruction that controls its status, including OUT,<br />
KEEP(11), DIFU(13), DIFD(14) <strong>and</strong> SFT(10). If an output bit is used in more<br />
than one such instruction, only the status determined by the last instruction<br />
will actually be output from the PC.<br />
See 5-11-1 SHIFT REGISTER - SFT(10) for an example that uses an output<br />
bit in two ‘bit-control’ instructions.<br />
IR 00200 to IR 00207 are used as interrupt outputs. For an explanation of<br />
these, refer to 3-8 TC (Timer/Counter) Area.<br />
The SR area contains flags <strong>and</strong> control bits used for monitoring PC operation,<br />
accessing clock pulses, <strong>and</strong> signalling errors. SR area word addresses<br />
range from 247 through 255; bit addresses, from 24700 through 25515.<br />
The following table lists the functions of SR area flags <strong>and</strong> control bits. Most<br />
of these bits are described in more detail following the table. Descriptions are<br />
in order by bit address except that Link System bits are grouped together<br />
first.<br />
Unless otherwise stated, flags are OFF until the specified condition arises,<br />
when they are turned ON. Restart bits are usually OFF, but when the user<br />
turns one ON then OFF, the specified Link Unit will be restarted. Other control<br />
bits are OFF until set by the user.<br />
SR 25209 through 25213 are all control bits. They can be turned ON <strong>and</strong><br />
OFF from the program, i.e., they can be manipulated with the Output <strong>and</strong><br />
Output NOT instructions. Any of these bits not assigned specific functions<br />
should be left OFF. Bits in words SR 247 through SR 250, only, can be used<br />
as work bits if the Systems for which these bits are dedicated are not used by<br />
the PC.<br />
Word(s) Bit(s) Function<br />
247 to 250 00 to 07 Reserved.<br />
08 to 15 Reserved.<br />
251 00 to 15 Not used.<br />
252 00 to 07 Not used.<br />
08 Dual-usage as:<br />
RS-232C Communications Error Flag <strong>and</strong> CPU-mounting<br />
Host Link Unit Communications Error Flag<br />
09 Dual-usage as:<br />
RS-232C Interface Restart Bit <strong>and</strong> CPU-mounting Host<br />
Link Unit Restart Bit
Word(s) Bit(s)<br />
Function<br />
10 Interrupt Output Enable Bit<br />
11 Forced Status Hold Bit<br />
12 I/O Status Hold Bit<br />
13 Reserved<br />
14 to 15 Not used.<br />
253 00 to 07 FAL number output area.<br />
08 Battery Alarm Flag<br />
09 Cycle Time Error Flag<br />
10 to 12 Not used.<br />
13 Always ON Flag<br />
14 Always OFF Flag<br />
15 First Cycle<br />
254 00 1-minute clock pulse bit<br />
01 0.02-second clock pulse bit<br />
02 to 06 Reserved<br />
07 Step Flag<br />
08 to 15 Reserved<br />
255 00 0.1-second clock pulse bit<br />
01 0.2-second clock pulse bit<br />
02 1.0-second clock pulse bit<br />
03 Instruction Execution Error (ER) Flag<br />
04 Carry (CY) Flag<br />
05 Greater Than (GR) Flag<br />
06 Equals (EQ) Flag<br />
07 Less Than (LE) Flag<br />
Section 3-4<br />
3-4-1 RS-232C/CPU-mounting Host Link Unit Flags <strong>and</strong> Control Bits<br />
3-4-2 Interrupt Output Enable Bit<br />
The RS-232C Interface <strong>and</strong> CPU-mounting Host Link Unit share an Error<br />
Flag <strong>and</strong> a Restart Bit, as shown in the following table.<br />
SR bit Functions<br />
25208 1. RS-232C Interface Error Flag<br />
2. CPU-mounting Host Link Unit Communications Error Flag<br />
25209 1. RS-232C Restart Bit<br />
2. CPU-mounting Host Link Unit Restart Bit<br />
The Error Flag is turned ON when an error has occurred either in communications<br />
via the RS-232 Interface or between the CPU <strong>and</strong> the CPU-mounting<br />
Host Link Unit. When the Restart Bit is turned ON <strong>and</strong> then OFF, both the<br />
RS-232C Interface <strong>and</strong> the CPU-mounting Host Link Unit will be restarted.<br />
Turn ON SR 25210 to enable interrupt outputs used with the high-speed<br />
counter. SR 25210 is automatically turned OFF when power is turned ON,<br />
<strong>and</strong> must be turned ON from the program of from a Programming Device. SR<br />
25210 can be turned ON during operation. No interrupt outputs will be made<br />
while SR 25210 is OFF.<br />
'
3-4-3 Forced Status Hold Bit<br />
Maintaining Status during<br />
Startup<br />
3-4-4 I/O Status Hold Bit<br />
(<br />
Section 3-4<br />
SR 25211 determines whether or not the status of bits that have been forceset<br />
or force-reset is maintained when switching between PROGRAM <strong>and</strong><br />
MONITOR mode to start or stop operation. If SR 25211 is on, bit status will<br />
be maintained; if SR 25211 is off, all bits will return to default status when<br />
operation is started or stopped. Unless the system operation instruction<br />
(SYS(49)) is used to prevent it (see below), SR 25211 is turned off when<br />
power to the PC is turned on. If power is interrupted while force-setting/resetting<br />
bits, it will be necessary to repeat the operation.<br />
SR 25211 is not effective when switching to run mode.<br />
SR 25211 should be manipulated from a Peripheral Device, e.g., a Programming<br />
Console or FIT.<br />
The status of SR 25211 <strong>and</strong> thus the status of force-set/force-reset bits can<br />
be maintained when power is turned off <strong>and</strong> on by inserting the System Operation<br />
instruction (SYS(49)) into the program with the proper oper<strong>and</strong>. If<br />
SYS(49) is used in this way, the status of SR 25211 will be preserved when<br />
power is turned off <strong>and</strong> on. If this is done <strong>and</strong> SR 25211 is ON, then the status<br />
of force-set/force-reset bits will also be preserved, as shown in the following<br />
table. The use of SYS(49) does not affect operation when switching to<br />
run mode, i.e., force-set/force-reset bits always return to default status when<br />
switching to RUN mode.<br />
Status before shutdown Status at next startup<br />
SR 25211 SYS(49) SR 25211 Force-set/reset bits<br />
ON Executed ON Status maintained<br />
Not executed OFF Default status<br />
OFF Executed OFF Default status<br />
Not executed OFF Default status<br />
Refer to Section 5 Instruction Set for details on SYS(49).<br />
The System Operation instruction (SYS(49)) can be used to turn off the operation<br />
of the battery alarm if desired, e.g., when DM 1000 to DM 1999 is<br />
placed in ROM <strong>and</strong> a battery is not used in operation. Refer to Section5Instruction<br />
Set for details.<br />
SR 25212 determines whether or not the status of IR <strong>and</strong> LR area bits is<br />
maintained when operation is started or stopped. If SR 25212 is on, bit status<br />
will be maintained; if SR 25212 is off, all IR <strong>and</strong> LR area bits will be reset.<br />
Unless the system operation instruction (SYS(49)) is used to prevent it (see<br />
below), SR 25212 is turned off when power to the PC is turned on.<br />
SR 25212 can be turned ON from the program using the Output instruction,<br />
or it can be turned ON from a Peripheral Device.
Maintaining Status during<br />
Startup<br />
3-4-5 FAL (Failure Alarm) Area<br />
3-4-6 Battery Alarm Flag<br />
3-4-7 Cycle Time Error Flag<br />
3-4-8 First Cycle Flag<br />
3-4-9 Clock Pulse Bits<br />
Section 3-4<br />
The status of SR 25212 <strong>and</strong> thus the status of IR <strong>and</strong> LR area bits can be<br />
maintained when power is turned off <strong>and</strong> on by inserting the System Operation<br />
instruction (SYS(49)) into the program with the proper oper<strong>and</strong>. If<br />
SYS(49) is used in this way, the status of SR 25212 will be preserved when<br />
power is turned off <strong>and</strong> on. If this is done <strong>and</strong> SR 25212 is ON, then the status<br />
of IR <strong>and</strong> LR area bits will also be preserved, as shown in the following<br />
table.<br />
Status before shutdown Status at next startup<br />
SR 25212 SYS(49) SR 25212 IR <strong>and</strong> LR bits<br />
ON Executed ON Status maintained<br />
Not executed OFF Reset<br />
OFF Executed OFF Reset<br />
Not executed OFF Reset<br />
Refer to Section 5 Instruction Set for details on SYS(49).<br />
A 2-digit BCD FAL code is output to bits 25300 to 25307 when the FAL or<br />
FALS instruction is executed. These codes are user defined for use in error<br />
diagnosis, although the PC also outputs FAL codes to these bits, such as one<br />
caused by battery voltage drop.<br />
This area can be reset by executing the FAL instruction with an oper<strong>and</strong> of<br />
00 or by performing a Failure Read Operation from the Programming Console.<br />
SR bit 25308 is turned ON if the voltage of the CPU battery drops. The ALM<br />
indicator on the front of the CPU will also flash.<br />
This bit can be programmed to activate an external warning for a low battery<br />
voltage.<br />
The System Operation instruction (SYS(49)) can be used to turn off the operation<br />
of the battery alarm if desired, e.g., when DM 1000 to DM 1999 is<br />
placed in ROM <strong>and</strong> a battery is not used in operation. Refer to Section5Instruction<br />
Set for details.<br />
SR bit 25309 is turned ON if the cycle time exceeds 100 ms. The ALM indicator<br />
on the front of the CPU will also flash. Program execution will not stop,<br />
however, unless the maximum time limit set for the watchdog timer is exceeded.<br />
Timers may become inaccurate after the cycle time exceeds 100<br />
ms.<br />
If the Cycle Time Set Enable Bit in the system parameter area is ON, the<br />
time used to determine a cycle time error, also in the system parameter area,<br />
can be set. Refer to 3-6 DM (Data Memory) Area for details.<br />
SR bit 25315 is turned ON when PC operation begins <strong>and</strong> then turns OFF<br />
after one cycle of the program. The First Cycle Flag is useful in initializing<br />
counter values <strong>and</strong> other operations. An example of this is provided in 5-10<br />
Timer <strong>and</strong> Counter Instructions.<br />
Five clock pulses are available to control program timing. Each clock pulse<br />
bit is ON for the first half of the rated pulse time, then OFF for the second<br />
half, i.e., each clock pulse has a duty factor of 50%.
3-4-10 Step Flag<br />
,<br />
Section 3-4<br />
These clock pulse bits are often used with counter instructions to create timers.<br />
Refer to 5-10 Timer <strong>and</strong> Counter Instructions for an example of this.<br />
Pulse width 1min 0.02 s 0.1 s 0.2 s 1.0 s<br />
Bit 25400 25401 25500 25501 25502<br />
Bit 25400<br />
1-min clock pulse<br />
30 s 30 s<br />
1min.<br />
Bit 25500<br />
0.1-s clock pulse<br />
0.05 s 0.05 s<br />
0.1 s<br />
Bit 25502<br />
1.0-s clock pulse<br />
0.5 s 0.5 s<br />
1.0 s<br />
Bit 25401<br />
0.02-s clock pulse<br />
0.01 s 0.01 s<br />
0.02 s<br />
Bit 25501<br />
0.2-s clock pulse<br />
0.1 s 0.1 s<br />
0.2 s<br />
Caution:<br />
Because the 0.1-second <strong>and</strong><br />
0.02-second clock pulse bits have<br />
ON times of 50 <strong>and</strong> 10 ms, respectively,<br />
the CPU may not be able to<br />
accurately read the pulses if program<br />
execution time is too long.<br />
SR bit 25407 is turned ON for one cycle when step execution is started with<br />
the STEP(08) instruction.<br />
3-4-11 Instruction Execution Error Flag, ER<br />
3-4-12 Arithmetic Flags<br />
SR bit 25503 is turned ON if an attempt is made to execute an instruction<br />
with incorrect oper<strong>and</strong> data. Common causes of an instruction error are<br />
non-BCD oper<strong>and</strong> data when BCD data is required, or an indirectly addressed<br />
DM word that is non-existent. WhentheERFlagisON,thecurrent<br />
instruction will not be executed.<br />
The following flags are used in data shifting, arithmetic calculation, <strong>and</strong> comparison<br />
instructions. They are generally referred to only by their two-letter<br />
abbreviations.<br />
Caution These flags are all reset when the End instruction is executed, <strong>and</strong> therefore<br />
cannot be monitored from a programming device.<br />
Refer to 5-11 Data Shifting, 5-13 Data Comparison, 5-15 BCD Calculations,<br />
<strong>and</strong> 5-16 Binary Calculations for details.<br />
Carry Flag, CY SR bit 25504 is turned ON when there is a carry in the result of an arithmetic<br />
operation or when a rotate or shift instruction moves a “1” into CY. The content<br />
of CY is also used in some arithmetic operations, e.g., it is added or subtracted<br />
along with other oper<strong>and</strong>s. This flag can be set <strong>and</strong> cleared from the<br />
program using the Set Carry <strong>and</strong> Clear Carry instructions.
! Section 3-5<br />
Greater Than Flag, GR SR bit 25505 is turned ON when the result of a comparison shows the first of<br />
two oper<strong>and</strong>s to be greater than the second.<br />
Equal Flag, EQ SR bit 25506 is turned ON when the result of a comparison shows two oper<strong>and</strong>s<br />
to be equal or when the result of an arithmetic operation is zero.<br />
Less Than Flag, LE SR bit 25507 is turned ON when the result of a comparison shows the first of<br />
two oper<strong>and</strong>s to be less than the second.<br />
Note The four arithmetic flags are turned OFF when END(01) is executed.<br />
3-5 AR (Auxiliary Relay) Area<br />
AR word addresses extend from AR 00 to AR 27; AR bit addresses extend<br />
from AR 0000 to AR 2715. Most AR area words <strong>and</strong> bits are dedicated to<br />
specific uses, such as transmission counters, flags, <strong>and</strong> control bits, <strong>and</strong> cannot<br />
be used for any other purpose. The few bits that are not currently assigned<br />
cannot be accessed by the user for any purpose. An overview of the<br />
AR area is provided in the following table. Details are provided in order of<br />
address thereafter. Words/bits not listed in the following table are not used<br />
<strong>and</strong> cannot be accessed by the program.<br />
The AR area retains status during power interruptions or when changing to<br />
PROGRAM mode.<br />
AR Area Overview<br />
Word(s) Bit(s) Function<br />
02 00 to 10 Reversible Drum Counter (RDM(60)) Reset Bits<br />
11 High-speed Counter Reset Bit<br />
12 High-speed Counter Reset Flag<br />
03 00 to 10 Reversible Drum Counter (RDM(60)) Direction Bits<br />
11 High-speed Counter Bank Bit<br />
04 00 to 07 RS-232C Communications Error Code<br />
13 RS-232C Reception Impossible Flag<br />
14 RS-232C Reception Completed Flag<br />
15 RS-232C Transmission Possible Flag<br />
05 00 to 07 RS-232C Reception Counter<br />
08 to 15 RS-232C Transmission Counter<br />
06 00 to 15 RS-232C Bytes Received Area<br />
07 08 TERMINAL Mode Input Cancel Bit<br />
13 Error History Overwrite Bit<br />
14 Error History Reset Bit<br />
15 Error History Enable Bit<br />
08 00 to 15 RS-232C Bytes Input Area<br />
12 00 to 15 System Parameter Warning Flags<br />
13 00 to 13 System Parameter Warning Flags<br />
14 System Parameter Backup Flag<br />
15 System Parameter/Backup Area Checksum Flag<br />
14 00 to 03 System Comm<strong>and</strong> Response Code<br />
04 to 06 Not used<br />
07 System Comm<strong>and</strong> Completion Flag<br />
08 to 11 System Comm<strong>and</strong> Comm<strong>and</strong> Code<br />
12 to 14 Not used<br />
15 System Comm<strong>and</strong> Execution Bit<br />
15 00 to 07 Startup Operating Mode<br />
17 00 to 15 Current Time Area<br />
"
4<br />
! Section 3-5<br />
Word(s) Bit(s)<br />
Function<br />
18 to 21 00 to 15 Calendar/clock Area (AR 2113: Seconds Round-off Bit; AR 2114: Stop Bit; AR 2115: Set Bit)<br />
22 00 to 15 TERMINAL Mode Key Bits<br />
23 00 to 15 Power-off Counter<br />
24 05 SCAN(18) Cycle Time Flag<br />
15 Programming Console or Peripheral Interface Unit Mounted Flag<br />
25 00 to 15 FALS-generating Address<br />
26 00 to 15 Maximum Cycle Time Area<br />
27 00 to 15 Current Cycle Time Area<br />
3-5-1 Reversible Drum Counter Bits<br />
3-5-2 High-speed Counter Bits<br />
AR 0200 to AR 0210 (Reversible Drum Counter (RDM(60)) Reset Bits) are<br />
turn ON by the user to reset reversible counters created using RDM(60). The<br />
number of the bit corresponds to the last two digits of the TC area bit used to<br />
define the counter, i.e., AR 0200 resets CNT 500, AR 0201 resets CNT 501,<br />
etc.<br />
AR 0300 to AR 0310 (Reversible Drum Counter (RDM(60)) Direction Bits)<br />
are turn ON <strong>and</strong> OFF by the user to set the direction that the reversible<br />
counters operate. The number of the bit corresponds to the last two digits of<br />
the TC area bit used to define the counter, i.e., AR 0200 resets CNT 500, AR<br />
0201 resets CNT 501, etc. If a bit is OFF, the corresponding counter will increment<br />
(count up); if a bit is ON, the corresponding counter will decrement.<br />
These bits are refreshed each cycle in MONITOR or RUN mode.<br />
AR 0211 (High-speed Counter Reset Bit) is used to reset the high-speed<br />
counter created using HDM(61) or using the interrupt drum output function.<br />
The number of the bit corresponds to the last two digits of the TC area bit<br />
used to define the counter, i.e., AR 0211 resets CNT 511.<br />
AR 0212 (High-speed Counter Reset Flag) is turned ON for one cycle after<br />
the high-speed counter created with HDM(61) or with the interrupt drum output<br />
function is reset via the hardware reset input (i.e., not with AR 0211).<br />
AR 0311 (High-speed Counter Bank Bit) is turned ON or OFF by the user to<br />
designate the counter table bank to be used for the high-speed counter. If AR<br />
0311 is ON, bank 1 will be used; if AR 0311 is OFF, bank 0 will be used.<br />
These bits are refreshed each cycle while in MONITOR or RUN mode. Refer<br />
to Section 5 Instruction Set for details on HDM(61) <strong>and</strong> Section 3 Memory<br />
Areas for details on the interrupt drum output function.<br />
3-5-3 RS-232C Communications Error Code<br />
When an error has occurred in RS-232C communications, the RS-232C Interface<br />
Communications Error Flag is turned ON, <strong>and</strong> a code that indicates<br />
the <strong>type</strong> of error is output to AR 0400 to AR 0407. These codes are in hexadecimal<br />
<strong>and</strong> are as follows:<br />
00: Parity error<br />
01: Framing error<br />
02: Overrun error<br />
03: FCS error<br />
These bits are refreshed each cycle while using the RS-232C interface.
! Section 3-5<br />
3-5-4 RS-232C Communications Flags<br />
These 3 flags indicate the current status of RS-232C communications. These<br />
bits are refreshed each cycle while the RS-232C interface is being used in<br />
ASCII I/O Mode.<br />
Reception Impossible Flag The RS-232C Reception Impossible Flag (AR 0413) is turned ON when newly<br />
received data cannot be input. There are two possible reasons that the<br />
new data cannot be input:<br />
1, 2, 3... 1. The previously received data has not yet been input by PIN(64), the<br />
RS-232C PORT INPUT instruction.<br />
2. An error occurred during the previous reception.<br />
Reception Completed Flag The RS-232C Reception Completed Flag (AR 0414) is turned ON when an<br />
end code or 200 bytes of data have been received at the RS-232C interface.<br />
Transmission Possible Flag The RS-232C Transmission Possible Flag (AR 0415) is turned ON when data<br />
can be transmitted from the RS-232C interface (i.e., when data is not being<br />
transmitted).<br />
3-5-5 RS-232C Communications Counters<br />
When a transmission is received on the RS-232C interface, the number of<br />
characters is counted in hexadecimal <strong>and</strong> then output to AR 0500 to AR<br />
0507 (RS-232C Reception Counter) to assist the user in debugging RS-232C<br />
interface communications. This counter is used for all RS-232C interface operating<br />
modes, as well as for error characters. The counter can be reset by<br />
turning SR 25209 ON <strong>and</strong> then OFF.<br />
AR 0508 to AR 0515 (RS-232C Transmission Counter) operates the same as<br />
AR 0500 to AR 0507, except that it operates for transmisions sent from the<br />
PC through the RS-232C interface.<br />
These counters are refreshed every cycle.<br />
3-5-6 RS-232C Bytes Received Area<br />
3-5-7 TERMINAL Mode Input Cancel Bit<br />
When a transmission is received in ASCII I/O Mode at the RS-232C interface,<br />
the number of bytes of data is counted in BCD <strong>and</strong> then output to AR<br />
06. The start <strong>and</strong> end codes are not counted.<br />
Counting stops when the RS-232C Reception Completed Flag (AR 0414) is<br />
turned ON. The value stored in AR 06 will not be updated after this flag is<br />
turned on even if new data is received at the RS-232C interface. The content<br />
of AR 06 is reset to 0 when PIN(64), the RS-232C PORT INPUT instruction,<br />
is executed.<br />
AR 06 is refreshed every cycle while the RS-232C interface is being used in<br />
ASCII I/O Mode.<br />
AR 0708 is turned ON by the user to cancel a key equivalent during TERMI-<br />
NAL mode Programming Console operation. (Refer to Section 7 Program<br />
Debugging <strong>and</strong> Execution for details on terminal mode operation.)<br />
This bit is refreshed each cycle.
! Section 3-5<br />
3-5-8 Error History Bits<br />
3-5-9 RS-232C Bytes Input Area<br />
AR 0713 (Error History Overwrite Bit) is turned ON or OFF by the user to<br />
control overwriting of records in the Error History Area in the DM area. Turn<br />
AR 0713 ON to overwrite the oldest error record each time an error occurs<br />
after 10 have been recorded. Turn OFF AR 0713 to store only the first 10<br />
records that occur each time after the history area is cleared.<br />
AR 0714 (Error History Reset Bit) is turned ON <strong>and</strong> then OFF by the user to<br />
reset the Error Record Pointer (DM 0969) <strong>and</strong> thus restart recording error<br />
records at the beginning of the history area.<br />
AR 0715 (Error History Enable Bit) is turned ON by the user to enable error<br />
history storage <strong>and</strong> turned OFF to disable error history storage.<br />
Refer to 3-6 DM (Data Memory) Area for details on the Error History Area.<br />
Error history bits are refreshed each cycle.<br />
While AR 06 contains the number of bytes received in ASCII I/O Mode at the<br />
RS-232C interface, AR 08 contains the number of bytes of data (BCD) actually<br />
input to the PC by PIN(64), the RS-232C PORT INPUT instruction.<br />
Normally, the bytes input will equal the bytes received, but in some cases the<br />
numbers will differ. The two most likely cases are described below.<br />
1, 2, 3... 1. One oper<strong>and</strong> of PIN(64) specifies the number of bytes to input. If the value<br />
of this oper<strong>and</strong> is less than the content of AR 06, then the bytes input<br />
will not equal the bytes received.<br />
2. PIN(64) might be executed before the RS-232C Reception Completed<br />
Flag (AR 0414) is turned ON. In this case, the number of bytes received<br />
would continue increasing as more data was received.<br />
The content of AR 08 is updated each time that PIN(64) is executed.<br />
3-5-10 System Parameter Flags<br />
System Parameter Warning<br />
Flags<br />
System Parameter Backup<br />
Flag<br />
The system parameters are checked for errors when the system comm<strong>and</strong> is<br />
executed or the system parameters are reset at start-up. If a word in the system<br />
parameters has an unacceptable value, its corresponding System Parameter<br />
Warning Flag will be turned ON.<br />
The 30 bits from AR 1200 through AR 1313 correspond to the 30 words of<br />
the Parameter Area (DM 0900 to DM 0929) as shown below.<br />
AR 1200: DM 0900 AR 1201: DM 0901 AR 1202: DM 0902<br />
AR 1203: DM 0903 AR 1204: DM 0904 AR 1205: DM 0905<br />
AR 1206: DM 0906 AR 1207: DM 0907 AR 1208: DM 0908<br />
AR 1209: DM 0909 AR 1210: DM 0910 AR 1211: DM 0911<br />
AR 1212: DM 0912 AR 1213: DM 0913 AR 1214: DM 0914<br />
AR 1215: DM 0115 AR 1300: DM 0916 AR 1301: DM 0917<br />
AR 1302: DM 0918 AR 1303: DM 0919 AR 1304: DM 0920<br />
AR 1305: DM 0921 AR 1306: DM 0922 AR 1307: DM 0923<br />
AR 1308: DM 0924 AR 1309: DM 0925 AR 1310: DM 0926<br />
AR 1311: DM 0927 AR 1312: DM 0928 AR 1313: DM 0929<br />
If a Warning Flag is turned ON, the default value for the system parameter<br />
will be used. Bits assigned to unused DM words are always OFF.<br />
AR 1314 is turned ON when the System Comm<strong>and</strong> Execute Bit has been<br />
force-set <strong>and</strong> remains ON until reset by the execution of a system comm<strong>and</strong><br />
with a comm<strong>and</strong> code of 3.
! Section 3-5<br />
Parameter/Backup Area<br />
Checksum Flag<br />
3-5-11 System Comm<strong>and</strong> Bits<br />
System Comm<strong>and</strong><br />
Response Code<br />
System Comm<strong>and</strong><br />
Completion Flag<br />
System Comm<strong>and</strong><br />
Comm<strong>and</strong> Code<br />
AR 1315 is turned ON to indicate an error in the Parameter <strong>and</strong> Backup<br />
Areas checksum.<br />
Refer to 3-5-11 System Comm<strong>and</strong> Bits for details on system comm<strong>and</strong> bits<br />
<strong>and</strong> to 3-6 DM (Data Memory) Area for details on the Parameter <strong>and</strong> Backup<br />
Areas.<br />
These bits are refreshed when PC power is turned on <strong>and</strong> when the System<br />
Comm<strong>and</strong> Execute Bit is force-set.<br />
When the system comm<strong>and</strong> has been executed, a response code is placed<br />
in AR 1400 to AR 1403 to indicate the completion status of the comm<strong>and</strong>.<br />
The System Comm<strong>and</strong> Completion Flag (AR 1407) should be checked to<br />
confirm that system comm<strong>and</strong> execution has been completed before reading<br />
these codes. The response codes are as follows:<br />
Response<br />
code<br />
Name Meaning<br />
0 Normal completion The system comm<strong>and</strong> has been successfully<br />
executed.<br />
1 Undefined<br />
comm<strong>and</strong> error<br />
The system comm<strong>and</strong> was executed with an<br />
undefined comm<strong>and</strong> code.<br />
2 Write-enable error Memory is either write-protected (i.e., the write<br />
enable switch is ON) or the memory is EPROM.<br />
3 Sum check error The checksum for the Parameter Area was not<br />
set when the system comm<strong>and</strong> was executed,<br />
i.e., a system comm<strong>and</strong> with a comm<strong>and</strong> code<br />
of 1 has not been executed.<br />
AR 1407 is turned ON to indicate that the system comm<strong>and</strong> has completed<br />
execution. This Flag is turned ON even if the system comm<strong>and</strong> was not successfully<br />
executed.<br />
A comm<strong>and</strong> code is set by the user in AR 1408 to AR 1411 to indicate how<br />
the system comm<strong>and</strong> is to be executed while the System Comm<strong>and</strong> Execution<br />
Bit is turned ON. The comm<strong>and</strong> code must be written into AR 1408 to AR<br />
1411 using the Hex/BCD Data Change or the Binary Data Change from the<br />
Programming Console or other Peripheral Device. A system comm<strong>and</strong> will<br />
not be executed if the comm<strong>and</strong> code is set using any other operation or if<br />
set from the program.<br />
The comm<strong>and</strong> codes are as follows:<br />
Comm<strong>and</strong><br />
code<br />
Name Meaning<br />
1 Parameter set The contents of the Parameter Area (DM 0900<br />
to DM 0929) are set into the system, the value of<br />
each parameter is checked for validity, all invalid<br />
values are replaced with the default values, <strong>and</strong><br />
a checksum is generated.<br />
2 Parameter backup The contents of the Parameter Area (DM 0900<br />
to DM 0929) is transferred to the Parameter<br />
Backup Area (DM 1900 to 1929), a checksum is<br />
generated, the data in the Parameter Backup<br />
Area is enabled, <strong>and</strong> AR 1314 (System<br />
Parameter Backup Flag) is turned ON. Because<br />
the Parameter Backup Area is contained in the<br />
Memory Unit, parameter backup will not be<br />
possible if the Memory Unit is write-protected or<br />
EPROM.<br />
3 Backup disable The data contained in the Parameter Backup<br />
Area is disabled <strong>and</strong> AR 1314 (System<br />
Parameter Backup Flag) is turned OFF.
#<br />
! Section 3-5<br />
System Comm<strong>and</strong> Execute<br />
Bit<br />
Comm<strong>and</strong><br />
code<br />
Name<br />
Meaning<br />
4 Parameter clear All words in the Parameter Area (DM 0900 to<br />
DM 0929) are turned OFF (i.e., set to zero).<br />
5 General parameter<br />
set<br />
6 High-speed counter<br />
parameter set<br />
7 RS-232C<br />
parameter set<br />
Works in the same way as 01, but only DM 0900<br />
to DM 0905 are set.<br />
Works in the same way as 01, but only DM 0905<br />
to DM 0919 are set.<br />
Works in the same way as 01, but only DM 0920<br />
to DM 0929 are set.<br />
AR 1415 is turned ON by the execution of a system comm<strong>and</strong>. The system<br />
comm<strong>and</strong> is actually executed when the Programming Console or other Peripheral<br />
Device is used to change the contents of AR 1408 to AR 1414 (System<br />
Comm<strong>and</strong> Comm<strong>and</strong> Code).<br />
To enable system comm<strong>and</strong> execution, AR 1415 must be force-set from a<br />
Peripheral Device (e.g., using the Force Set/Reset operation from the Programming<br />
Console). System comm<strong>and</strong> execution will not be enable is AR<br />
1415 is set using any other operation or if set from the program. A system<br />
comm<strong>and</strong> will also not be executed if the comm<strong>and</strong> code is written by any<br />
method other than the Hex/BCD Data Change or the Binary Data Change<br />
operation from the Programming Console or equivalent operation from another<br />
Peripheral Device.<br />
AR 1415 is automatically turned OFF by the system unless force-set from a<br />
programming device.<br />
Refreshing AR 14 is refreshed when a system comm<strong>and</strong> is executed.<br />
Executing the System Comm<strong>and</strong><br />
The system comm<strong>and</strong> can be executed by manipulating the content of AR 14<br />
with a Programming Device, or by executing SYS(49), the SET SYSTEM instruction.<br />
The following examples demonstrate how to execute a system comm<strong>and</strong> by<br />
manipulating the content of AR 14 with Programming Devices.<br />
Example 1: Programming Console<br />
1, 2, 3... 1. Set the PC to either PROGRAM or MONITOR mode. (Press CLR,<br />
MONTR, <strong>and</strong> turn the mode switch to PROGRAM or MONITOR.)<br />
2. Use the Hexadecimal/BCD Data Modification operation to change any<br />
system parameters that need to be changed. (Refer to 7-2-4 Hexadecimal/BCD<br />
Data Modification for details.)<br />
3. Execute the system comm<strong>and</strong> to put the new system parameters into<br />
effect.<br />
a) Force-set AR 1415 (System Comm<strong>and</strong> Execute Bit).<br />
SHIFT<br />
CONT<br />
#<br />
SHIFT HR<br />
B<br />
1<br />
E<br />
4<br />
B<br />
1<br />
F<br />
5 MONTR SHIFT SET<br />
b) Write the desired comm<strong>and</strong> code into AR 1408 to AR 1411 using the<br />
Hex/BCD Data Change or the Binary Data Change operation.<br />
c) Verify that the content of AR 14 is 8x80 (x is the comm<strong>and</strong> code entered<br />
in step 3b), indicating a successful execution.<br />
d) Cancel the force-set status of AR 1415.
Example 2: GPC<br />
Example 3: FIT<br />
! Section 3-5<br />
1, 2, 3... 1. Connect the PC to the GPC.<br />
2. Set the PC to either PROGRAM or MONITOR mode.<br />
CTRL PC CON CTRL PROG or MONTR<br />
3. Switch to the monitor screen <strong>and</strong> use the Hexadecimal/BCD Data Modification<br />
operation to change any system parameters that need to be<br />
changed.<br />
A CMNT<br />
O<br />
0 CHG<br />
SFT FUN SFT HR<br />
A<br />
L<br />
CH<br />
SFT S<br />
O<br />
SFT HR<br />
L<br />
DM<br />
P<br />
Address ENT WRITE New setting ENT<br />
4. Execute the system comm<strong>and</strong> to put the new system parameters into<br />
effect.<br />
a) Force-set AR 1415 (System Comm<strong>and</strong> Execute Bit).<br />
B<br />
1<br />
1<br />
E<br />
4<br />
4<br />
B<br />
1<br />
1<br />
F<br />
5<br />
5<br />
ENT SFT SET<br />
b) Write the desired comm<strong>and</strong> code into AR 1408 to AR 1411 using the<br />
Hex/BCD Data Change or the Binary Data Change operation. Enter<br />
the comm<strong>and</strong> code (1 to 7) at the Δ in the key sequence below.<br />
B<br />
1<br />
1<br />
CONT<br />
SFT #<br />
R<br />
SFT HR<br />
L<br />
E<br />
4<br />
4<br />
A<br />
ENT WRITE O<br />
0<br />
A<br />
O<br />
0<br />
c) Verify that the content of AR 14 is 8Δ80 (Δ is the comm<strong>and</strong> code entered<br />
in step 4b), indicating a successful execution.<br />
d) Cancel the force-set status of AR 1415.<br />
B<br />
1<br />
1<br />
E<br />
4<br />
4<br />
B<br />
1<br />
1<br />
F<br />
5<br />
5<br />
1, 2, 3... 1. In the FIT System Setup, set the PC model to C200H <strong>and</strong> the PC interface<br />
to either Peripheral Interface or Host LInk depending on how the FIT<br />
is connected. Switch to the monitor screen. Refer to the FIT Operation<br />
Manual for details.<br />
2. Connect the PC to the FIT <strong>and</strong> set the PC to either PROGRAM or MONI-<br />
TOR mode.<br />
SHIFT PC CON SHIFT PROG or MONTR<br />
3. Select Data Monitor <strong>and</strong> use the data modification operation to change<br />
any system parameters that need to be changed.<br />
ENT<br />
NOT<br />
C<br />
MENU ENTER LR Address ENTER F9 New setting ENTER<br />
K<br />
4. Execute the system comm<strong>and</strong> to put the new system parameters into<br />
effect.<br />
a) Force-set AR 1415 (System Comm<strong>and</strong> Execute Bit).<br />
CONT<br />
B<br />
SHIFT # SHIFT HR 1<br />
R<br />
L<br />
1<br />
CH<br />
B<br />
SHIFT S SHIFT HR 1<br />
O<br />
L<br />
1<br />
E<br />
4<br />
4<br />
B<br />
1<br />
1<br />
F<br />
5<br />
5<br />
ENTER<br />
ENT<br />
SHIFT SET<br />
b) Write the desired comm<strong>and</strong> code into AR 1408 to AR 1411 using the<br />
data modification operation. Enter the comm<strong>and</strong> code (1 to 7) at the Δ<br />
in the key sequence below.<br />
E<br />
4<br />
4<br />
A A<br />
ENTER F9<br />
O O ENTER<br />
0<br />
0<br />
'
3-5-12 Startup Operating Mode<br />
3-5-13 Current Time Area<br />
(<br />
! Section 3-5<br />
c) Verify that the content of AR 14 is 8Δ80 (Δ is the comm<strong>and</strong> code entered<br />
in step 4b), indicating a successful execution.<br />
d) Cancel the force-set status of AR 1415.<br />
F3<br />
AR 1500 to AR 1507 contain a code in hexadecimal that indicate the operating<br />
mode that will be used when the PC is started if the Preserve Mode code<br />
(01) is set in bits 08 through 15 of DM 0900 (backup: DM 1900). These<br />
codes are as follows:<br />
00: PROGRAM mode<br />
01: MONITOR mode<br />
02: RUN mode<br />
These bits are refreshed each cycle.<br />
3-5-14 Calendar/Clock Area <strong>and</strong> Bits<br />
AR 17 contains the current time in hours <strong>and</strong> minutes that is used when<br />
times are compared with BCMP(68). AR 1700 to AR 1703 contain the minutes;<br />
AR 1704 to AR 1707 contain the tens of minutes; AR 1708 to AR 1711<br />
contain the hours; <strong>and</strong> AR 1712 to AR 1715 contain the tens of hours.<br />
The current time area is available only on the following models:<br />
C��H-C5��-�, C��H-C6��-�, C��H-C7��-�.<br />
Refer to Section 5 Instruction Set for programming details.<br />
The Current Time Area is refreshed each cycle while it is operational.<br />
Calendar/clock Area If AR 2114 (Stop Bit) is OFF, then the date, day, <strong>and</strong> time will be available in<br />
BCD in AR 18 to AR 20 <strong>and</strong> AR 2100 to AR 2108 as shown below. This area<br />
can also be controlled with AR 2113 (Seconds Round-off Bit) <strong>and</strong> AR 2115<br />
(Set Bit).<br />
AR word AR bits Contents Possible values<br />
18 00 to 07 Seconds 00 to 99<br />
08 to 15 Minutes 00 to 59<br />
19 00 to 07 Hours 00 to 23 (24-hour system)<br />
08 to 15 Day of month 01 to 31 (adjusted by month <strong>and</strong> for leap year)<br />
20 00 to 07 Month 1to12<br />
08 to 15 Year 00 to 99 (Rightmost two digits of year)<br />
21 00 to 07 Day of week 00 to 06 (00: Sun.; 01: Mon.; 02: Tues.;<br />
03: Wed.; 04: Thurs.; 05: Fri.; 06: Sat.)<br />
Seconds Round-off Bit AR 2113 is turned ON to round the seconds of the Calendar/clock Area to<br />
zero, i.e., if the seconds is 29 or less, it is merely set to 00; if the seconds is<br />
30 or greater, the minutes is incremented by 1 <strong>and</strong> the seconds is set to 00.<br />
Stop Bit AR 2114 is turned OFF to enable the operation of the Calendar/clock Area<br />
<strong>and</strong> ON to stop the operation.
! Section 3-5<br />
Set Bit AR 2115 is used to set the Calendar/clock Area as described below. This<br />
data must be in BCD <strong>and</strong> must be set within the limits for the Calendar/clock<br />
Area given above.<br />
1, 2, 3... 1. Turn ON AR 2114 (Stop Bit).<br />
2. Set the desired date, day, <strong>and</strong> time, being careful not to turn OFF AR<br />
2114 (Stop Bit) when setting the day of the week (they’re in the same<br />
word). (On the Programming Console, the Bit/Digit Monitor <strong>and</strong> Force<br />
Set/Reset Operations are the easiest ways to set this data.)<br />
3. Turn ON AR 2115 (Set Bit). The Calendar/clock will automatically start<br />
operating with the designated settings <strong>and</strong> AR 2114 <strong>and</strong> AR 2115 will<br />
both be turned OFF.<br />
The Calendar/clock Area <strong>and</strong> Bits are refreshed each cycle while operational.<br />
3-5-15 TERMINAL Mode Key Bits<br />
3-5-16 Power-off Counter<br />
3-5-17 SCAN(18) Cycle Time Flag<br />
If the Programming Console is mounted to the PC <strong>and</strong> is in TERMINAL<br />
mode, any inputs on keys 0 through 9 (including characters A through F, i.e,<br />
keys 0 through 5 with SHIFT) will turn on a corresponding bit in AR 22. TER-<br />
MINAL mode is entered either through Programming Console operations or<br />
by executing KEY(62).<br />
The bits in AR 22 correspond to Programming Console inputs as follows:<br />
Bit Programming Console input<br />
AR 2200 0<br />
AR 2201 1<br />
AR 2202 2<br />
AR 2203 3<br />
AR 2204 4<br />
AR 2205 5<br />
AR 2206 6<br />
AR 2207 7<br />
AR 2208 8<br />
AR 2209 9<br />
AR 2210 A<br />
AR 2211 B<br />
AR 2212 C<br />
AR 2213 D<br />
AR 2214 E<br />
AR 2215 F<br />
Refer to Section 5 Instruction Set for details on KEY(62) <strong>and</strong> to Section 7<br />
Program Debugging <strong>and</strong> Execution for details on the TERMINAL mode.<br />
AR 22 is refreshed each cycle.<br />
AR 23 provides in 4-digit BCD the number of times that the PC power has<br />
been turned off. This counter can be reset as necessary using the Hex/BCD<br />
Change operating from the Programming Console or other Peripheral Device.<br />
The Power-off Counter is refreshed every time the power is turned OFF.<br />
AR 2405 is turned ON when the cycle time set with SCAN(18) is shorter than<br />
the actual cycle time.<br />
AR 2405 is refreshed every cycle while the PC is in RUN or MONITOR<br />
mode.
3-5-18 Programming Console/Peripheral Interface Unit Mounted Flag<br />
3-5-19 FALS-generating Address<br />
3-5-20 Cycle Time Indicators<br />
3-6 DM (Data Memory) Area<br />
,<br />
AR 2415 is turned ON to indicate that a Programming Console or Peripheral<br />
Interface Unit is mounted to the CPU.<br />
AR 2415 is refreshed each cycle.<br />
AR 25 contains (in 4-digit BCD) the address generating a user-programmed<br />
FALS code or a system FALS code 9F (cycle time error). Refer to 5-20-1<br />
FAILURE ALARM - FAL(06) <strong>and</strong> SEVERE FAILURE ALARM - FALS(07) for<br />
details on FALS codes.<br />
AR 25 is refreshed each cycle while an FALS code is being generated.<br />
AR 26 (Maximum Cycle Time Area) contains the maximum cycle time that<br />
has occurred since program execution was begun <strong>and</strong> AR 27 (Current Cycle<br />
Time Area) contains the present cycle time. Both of these times are to the<br />
tenths of a millisecond in 4-digit BCD.<br />
AR 26 <strong>and</strong> AR 27 are refreshed each cycle.<br />
The DM area is divided into various parts as described in the following table.<br />
Addresses User program<br />
read/write<br />
Usage<br />
DM 0000 to DM 0899 Read/write General User Area<br />
DM 0900 to DM 0929 Read/write Parameter Area<br />
DM 0930 to DM 0968 --- Not used.<br />
DM 0969 to DM 0999 Read/write Error History Area<br />
DM 1000 to DM 1899 Read only General User Area<br />
DM 1900 to DM 1929 Read only Parameter Backup Area<br />
DM 1930 to DM 1989 --- Not used.<br />
DM 1990 to DM 1999 Read only User Program Header<br />
Section 3-6<br />
Only the General User Areas can be used for general data storage <strong>and</strong> manipulation.<br />
Other DM words are used to control various aspects of PC operation<br />
<strong>and</strong> should never be used for any purposes other than their designed<br />
purposes. These words (DM 0900 to DM 0999 <strong>and</strong> DM 1900 to DM 1999)<br />
are known as System DM <strong>and</strong> are not cleared by the Data Clear operation.<br />
Although composed of 16-bit words like any other data area, all data in any<br />
part of the DM area cannot be specified by bit for use in instructions with bit<br />
oper<strong>and</strong>s, such as LD, OUT, AND, <strong>and</strong> OR, nor can DM words be used with<br />
the Shift instruction.<br />
The DM area retains status during power interruptions.<br />
Note When writing System DM to PROM via the GPC or to ROM via the FIT or<br />
LSS, use the DM Data Transfer operation to transfer System DM to the Peripheral<br />
Device before writing it to the chip.<br />
Indirect Addressing Normally, when the content of a data area word is specified for an instruction,<br />
the instruction is performed directly on the content of that word. For example,<br />
suppose MOV(21) is performed with DM 0100 as the first oper<strong>and</strong> <strong>and</strong> LR 20<br />
as the second oper<strong>and</strong>. When this instruction is executed, the content of DM<br />
0100 is moved to LR 20.
3-6-1 General User Areas<br />
It is possible, however, to use indirect DM addresses as the oper<strong>and</strong>s for<br />
many instructions. To indicate an indirect DM address, �DM is input with the<br />
address of the oper<strong>and</strong>. With an indirect address, the content of the oper<strong>and</strong><br />
does not contain the actual data to be used. Instead, it contains the address<br />
of another DM word, the content of which will actually be used in the instruction.<br />
If �DM 0100 was used in our example above <strong>and</strong> the content of DM<br />
0100 is 0324, then �DM 0100 actually means that the content of DM 0324 is<br />
to be used as the oper<strong>and</strong> in the instruction, <strong>and</strong> the content of DM 0324 will<br />
be moved to LR 20.<br />
MOV(21)<br />
�DM 0100<br />
LR 00<br />
Indirect<br />
address<br />
Word Content<br />
DM 0099 4C59<br />
DM 0100 0324<br />
DM 0101 F35A<br />
DM 0324 5555<br />
DM 0325 2506<br />
DM 0326 D541<br />
Indicates<br />
DM 0324<br />
5555 moved<br />
to LR 00.<br />
There are two sections of the DM area available for use in programming.<br />
DM 0000 to DM 0899 <strong>and</strong> DM 1000 to DM 1899 can be used for manipulation<br />
<strong>and</strong> storage of data. DM 1000 to DM 1899 are in the read-only area, <strong>and</strong><br />
cannot be written to from the program, i.e., they must be written to from a<br />
Programming device.<br />
3-6-2 Parameter <strong>and</strong> Parameter Backup Areas<br />
Section 3-6<br />
The Parameter Area (DM 0900 to DM 0929) <strong>and</strong> the Parameter Backup Area<br />
(DM 1900 to DM 1929) are used together to control various aspects of PC<br />
operation, enabling greater system flexibility.<br />
The Parameter Backup Area is contained in the Memory Unit <strong>and</strong> can be<br />
written only by using the system comm<strong>and</strong> in the AR area. Also, to use the<br />
system comm<strong>and</strong> to write data into the Parameter Backup Area, the Memory<br />
Unit must be writeable, i.e., not write-protected <strong>and</strong> not EPROM.<br />
System Comm<strong>and</strong> The system comm<strong>and</strong> executes the 7 basic operations that control the Parameter<br />
Area. There are two ways to execute the system comm<strong>and</strong>:<br />
1, 2, 3... 1. Manipulating the content of AR 14 with a Programming Device. Refer to<br />
3-5-11 System Comm<strong>and</strong> Bits for details.<br />
2. Executing SYS(49), the SET SYSTEM instruction. Refer to 5-20-5 SET<br />
SYSTEM - SYS(49) for details.<br />
Basic Operation The Parameter Backup Area is allocated exactly like the Parameter Area <strong>and</strong><br />
is used to back up Parameter Area settings. The procedure for using these<br />
areas is as follows:<br />
1, 2, 3... 1. Data is first set into the Parameter Area from a Peripheral Device or via<br />
programming instructions.<br />
2. The system comm<strong>and</strong> is used to make these new settings effective (i.e.,<br />
write them into the system) <strong>and</strong> generate a checksum for them. The<br />
checksum is used to check the accuracy of data in later operations. Each<br />
value is checked when it is set into the system <strong>and</strong> if an invalid value is<br />
discovered, the default value is used.<br />
"
4<br />
3. The system comm<strong>and</strong> is next used to transfer Parameter Area settings to<br />
the Parameter Backup Area <strong>and</strong> make it the valid area.<br />
4. To change parameters once they have been set into the Parameter<br />
Backup Area, the Parameter Backup Area is disabled using the system<br />
comm<strong>and</strong> <strong>and</strong> then settings in the Parameter are changed <strong>and</strong> the operation<br />
is repeated.<br />
The system comm<strong>and</strong> can also be used to clear the contents of the Parameter<br />
Area.<br />
Caution Input data into the Parameter Area carefully. If parameter settings are incorrect,<br />
the PC may not operate correctly. If a setting is found to be invalid, the<br />
default setting is used.<br />
Checksum Whenever the system comm<strong>and</strong> is used to enable data in the Parameter<br />
Area or transfer data to the Parameter Backup Area, a checksum is generated.<br />
This checksum is a numeric value computed from the contents of the<br />
area <strong>and</strong> copied along with it. The copy (or the original file) can then be<br />
checked later to see if the same value (i.e., the checksum) results from the<br />
same computations. If the checksum disagrees with the previous one, it is<br />
assumed that data has changed <strong>and</strong> is no longer valid.<br />
The checksums for the Parameter <strong>and</strong> Parameter Backup Areas are checked<br />
whenever new data is set, including data set at startup. If a checksum is<br />
found to be incorrect, the data is not used <strong>and</strong> alternate measures are taken<br />
(see next section for details).<br />
Operation On Startup When the PC is started, the parameters must be reset into the system. If the<br />
Parameter Backup Area is the valid area <strong>and</strong> it’s checksum is okay, its contents<br />
are transferred to the Parameter Area <strong>and</strong> from there it is set into the<br />
system.<br />
Parameter <strong>and</strong> Parameter<br />
Backup Area Allocations<br />
Section 3-6<br />
If the Parameter Backup Area is not valid or if its checksum is incorrect, the<br />
data in the Parameter Area is set into the system, assuming its checksum is<br />
okay.<br />
If the checksum for the Parameter Backup Area is incorrect, the default values<br />
for all settings in the Parameter Area are set into the system <strong>and</strong> an 9F<br />
FAL number is output <strong>and</strong> AR 1315 (Parameter/Backup Area Checksum<br />
Flag) is turned ON.<br />
When parameters are finally set into the system, they are each checked for<br />
validity <strong>and</strong> default parameters are set for any invalid ones regardless of the<br />
method used to set parameters.<br />
The following table shows the allocations of words <strong>and</strong> bits in the Parameter<br />
<strong>and</strong> Parameter Backup Areas. The first DM address is the Parameter Area<br />
address. The contents of these words can be changed either via programming<br />
instructions or via a Peripheral Device (e.g., Programming Console).<br />
The second DM address (given in parenthesis) is the Parameter Backup<br />
Area address. The contents of these words can be updated by executing the<br />
system comm<strong>and</strong> with a comm<strong>and</strong> code to backup parameters (02).
Section 3-6<br />
The following table is designed to first provide the name <strong>and</strong> sometimes a<br />
basic description of the function of each, <strong>and</strong> then, if necessary, to detail the<br />
operation of each bit. The top line of the header thus applies to the first (<strong>and</strong><br />
sometimes only) line of the table for each DM address. The next line applies<br />
to the remaining lines for each DM address. (Here, “address” applies to the<br />
4-bit word address without the bit number, which is not considered part of a<br />
DM address.)<br />
Address Name/Description Default<br />
Bit Content/Meaning<br />
DM 0900 (DM 1900) Operating Mode on Startup<br />
Bits 00 to 07 designate the PC mode on startup if bits 08 to 15 are set to<br />
02. If bits 08 to 15 are set to 00, the PC startup mode will be designated<br />
by the key switch on the Programming Console. If bits 08 to 15 are set to<br />
01, the PC startup mode will be the same mode as it was when the PC<br />
was last turned off.<br />
Key switch<br />
00 to 07 00: PROGRAM<br />
01: MONITOR<br />
02: RUN<br />
08 to 15 00: As set on Programming Console key switch<br />
01: Mode when PC was last turned off (in AR 15)<br />
02: Mode set in bits 00 to 07, above<br />
DM 0901 (DM 1901) Cycle Time Limit<br />
A cycle time limit can be set in bits 00 to 07 that will be valid if bits 08 to<br />
10 are set to 01. If bits 08 to 15 are set to 00, the cycle time limit will be<br />
100 ms.<br />
100 ms<br />
00 to 07 Cycle time limit in units of ten milliseconds. Setting is<br />
between 00 <strong>and</strong> 99 in BCD resulting in cycle time limits<br />
between 000 <strong>and</strong> 990 ms, respectively.<br />
08 to 15 00: Bits 00 to 07 disabled (i.e., cycle time limit is 100 ms)<br />
01: Bits 00 to 07 enabled<br />
DM 0902 (DM 1902) Peripheral Device Service Time<br />
The percent of the cycle time allocated to servicing the Programming<br />
Console <strong>and</strong> other Peripheral Devices connected to the CPU can be set<br />
in bits 00 to 07. This value will be valid if bits 08 to 10 are set to 01. If bits<br />
08 to 15 are set to 00, the service time will be 5%. The Device will be<br />
serviced for at least 1 ms regardless of the cycle time <strong>and</strong> this setting.<br />
5%<br />
00 to 07 Percent of cycle time allocated to Device servicing between<br />
00 <strong>and</strong> 99 in BCD.<br />
08 to 15 00: Bits 00 to 07 disabled (i.e., servicing set to 5%)<br />
01: Bits 00 to 07 enabled<br />
DM 0903 (DM 1903) RS-232C Interface Service Time<br />
The percent of the cycle time allocated to servicing the RS-232C interface<br />
can be set in bits 00 to 07. This value will be valid if bits 08 to 10 are set<br />
to 01. If bits 08 to 15 are set to 00, the service time will be set to 5%. The<br />
RS-232C Interface will be serviced for at least 1 ms regardless of the<br />
cycle time <strong>and</strong> this setting.<br />
5%<br />
00 to 07 Percent of cycle time allocated to RS-232C interface<br />
servicing between 00 <strong>and</strong> 99 in BCD.<br />
08 to 15 00: Bits 00 to 07 disabled (i.e., servicing set to 5%)<br />
01: Bits 00 to 07 enabled<br />
DM 0904 (DM 1904) Programming Console Message Language Bits<br />
Bits 00 to 07 are not used. Bits 08 to 15 determine the language<br />
displayed on the Programming Console.<br />
English<br />
08 to 15 00: English<br />
01: Japanese<br />
02: German<br />
03: French<br />
04: Italian<br />
05: Spanish
Address Name/Description<br />
Default<br />
Bit<br />
Content/Meaning<br />
DM 0905 (DM 1905) General High-speed Counter Bits<br />
Bits 00 to 07 are the Enable Bits for high-speed counter interrupt outputs.<br />
An interrupt output is enabled if it Enable Bit is ON. Bits 08 through 15 are<br />
various controls for the high-speed counter.<br />
00 IR 00200 Enable Bit<br />
01 IR 00201 Enable Bit<br />
02 IR 00202 Enable Bit<br />
03 IR 00203 Enable Bit<br />
04 IR 00204 Enable Bit<br />
05 IR 00205 Enable Bit<br />
06 IR 00206 Enable Bit<br />
07 IR 00207 Enable Bit<br />
08 to 10 Final step for bank 0 (0 to 7)<br />
11 to 13 Final step for bank 1 (0 to 7)<br />
14 Hard Reset Enable Bit (Turn ON to enable hard reset.)<br />
15 High-speed Counter Enable Bit (Turn ON to enable counter.)<br />
DM 0906 (DM 1906) High-speed Counter Interrupt Output Table<br />
The bits in this <strong>and</strong> the following seven DM words are used to set the<br />
pattern that will be output when the high-speed counter is set for<br />
operation according to this output table. Each set of eight bits determines<br />
the status that will be output to IR 00200 to IR 00207 for each step of<br />
interrupt outputs. Refer to 3-8 TC (Timer/Counter) Area for details on the<br />
high-speed counter.<br />
00 Step 0 output status for IR 00200<br />
01 Step 0 output status for IR 00201<br />
02 Step 0 output status for IR 00202<br />
03 Step 0 output status for IR 00203<br />
04 Step 0 output status for IR 00204<br />
05 Step 0 output status for IR 00205<br />
06 Step 0 output status for IR 00206<br />
07 Step 0 output status for IR 00207<br />
08 Step 1 output status for IR 00200<br />
09 Step 1 output status for IR 00201<br />
10 Step 1 output status for IR 00202<br />
11 Step 1 output status for IR 00203<br />
12 Step 1 output status for IR 00204<br />
13 Step 1 output status for IR 00205<br />
14 Step 1 output status for IR 00206<br />
15 Step 1 output status for IR 00207<br />
No counter<br />
---<br />
Section 3-6
Address Name/Description<br />
Default<br />
Bit<br />
Content/Meaning<br />
DM 0907 (DM 1907) High-speed Counter Interrupt Output Table (continued)<br />
This word continues the table started in DM 0906.<br />
00 Step 2 output status for IR 00200<br />
01 Step 2 output status for IR 00201<br />
02 Step 2 output status for IR 00202<br />
03 Step 2 output status for IR 00203<br />
04 Step 2 output status for IR 00204<br />
05 Step 2 output status for IR 00205<br />
06 Step 2 output status for IR 00206<br />
07 Step 2 output status for IR 00207<br />
08 Step 3 output status for IR 00200<br />
09 Step 3 output status for IR 00201<br />
10 Step 3 output status for IR 00202<br />
11 Step 3 output status for IR 00203<br />
12 Step 3 output status for IR 00204<br />
13 Step 3 output status for IR 00205<br />
14 Step 3 output status for IR 00206<br />
15 Step 3 output status for IR 00207<br />
DM 0908 (DM 1908) High-speed Counter Interrupt Output Table (continued)<br />
This word continues the table started in DM 0906.<br />
00 Step 4 output status for IR 00200<br />
01 Step 4 output status for IR 00201<br />
02 Step 4 output status for IR 00202<br />
03 Step 4 output status for IR 00203<br />
04 Step 4 output status for IR 00204<br />
05 Step 4 output status for IR 00205<br />
06 Step 4 output status for IR 00206<br />
07 Step 4 output status for IR 00207<br />
08 Step 5 output status for IR 00200<br />
09 Step 5 output status for IR 00201<br />
10 Step 5 output status for IR 00202<br />
11 Step 5 output status for IR 00203<br />
12 Step 5 output status for IR 00204<br />
13 Step 5 output status for IR 00205<br />
14 Step 5 output status for IR 00206<br />
15 Step 5 output status for IR 00207<br />
---<br />
---<br />
Section 3-6
#<br />
Address Name/Description<br />
Default<br />
Bit<br />
Content/Meaning<br />
DM 0909 (DM 1909)3 High-speed Counter Interrupt Output Table (continued)<br />
This word continues the table started in DM 0906.<br />
00 Step 6 output status for IR 00200<br />
01 Step 6 output status for IR 00201<br />
02 Step 6 output status for IR 00202<br />
03 Step 6 output status for IR 00203<br />
04 Step 6 output status for IR 00204<br />
05 Step 6 output status for IR 00205<br />
06 Step 6 output status for IR 00206<br />
07 Step 6 output status for IR 00207<br />
08 Step 7 output status for IR 00200<br />
09 Step 7 output status for IR 00201<br />
10 Step 7 output status for IR 00202<br />
11 Step 7 output status for IR 00203<br />
12 Step 7 output status for IR 00204<br />
13 Step 7 output status for IR 00205<br />
14 Step 7 output status for IR 00206<br />
15 Step 7 output status for IR 00207<br />
DM 0910 to DM 0917<br />
(DM 1910 to DM 1917)<br />
DM 0918 <strong>and</strong> DM 0919<br />
(DM 1918 <strong>and</strong><br />
DM 1919)<br />
DM 0920 to DM 0926<br />
(DM 1920 to DM 1926)<br />
High-speed Counter Step Table<br />
These words contain the width of each step of the counter. The total width<br />
of the counter is the sum of all the widths set below. As shown below, the<br />
rightmost digit of the DM address is the same as the corresponding step.<br />
Step 0: DM 0910<br />
Step 1: DM 0911<br />
Step 2: DM 0912<br />
Step 3: DM 0913<br />
Step 4: DM 0914<br />
Step 5: DM 0915<br />
Step 6: DM 0916<br />
Step 7: DM 0917<br />
Set the rightmost two digits to 11 or higher (although 00 is O.K.) to<br />
prevent the poor responsiveness to high-frequency input signals. For<br />
example, set values of 0010 <strong>and</strong> 5001 would risk inaccurate counting,<br />
while set values of 2011 <strong>and</strong> 3000 would not.<br />
Not used. ---<br />
RS-232C Interface Settings<br />
These words are used to set various aspects of communications through<br />
the RS-232C interface. DM 0920 bits 00 to 07 are used to select st<strong>and</strong>ard<br />
or custom communications settings. If these bits are set to 01, the<br />
settings in DM 0921 are used.<br />
DM 0920 (DM 1920) 00 to 07 St<strong>and</strong>ard/Custom Communications Format Selection<br />
00: St<strong>and</strong>ard<br />
(1 start bit, 7-bit data length, even parity, 2 stop bits,<br />
9,600 baud)<br />
01: Custom settings<br />
(i.e., according to contents of DM 0921)<br />
08 to 15 RS-232C Mode<br />
00: Host link<br />
01: Memory upload/download<br />
02: ASCII I/O mode<br />
---<br />
Section 3-6<br />
0000 (10000) when<br />
the counter is<br />
enabled.<br />
See below.<br />
St<strong>and</strong>ard<br />
Host link
Address Name/Description<br />
Default<br />
Bit<br />
Content/Meaning<br />
DM 0921 (DM 1921) 00 to 07 Baud Rate (if DM 0920 bits 00 to 07 are 01)<br />
00: 300 bps<br />
01: 600 bps<br />
02: 1,200 bps<br />
03: 2,400 bps<br />
04: 4,800 bps*<br />
05: 9,600 bps*<br />
08 to 15 Data Format (if DM 0920 bits 00 to 07 are 01)<br />
00: 1 start bit, 7-bit data, 2 stop bits, even parity<br />
01: 1 start bit, 7-bit data, 2 stop bits, odd parity<br />
02: 1 start bit, 8-bit data, 1 stop bits, no parity<br />
03: 1 start bit, 8-bit data, 2 stop bits, no parity<br />
04: 1 start bit, 8-bit data, 1 stop bits, even parity<br />
05: 1 start bit, 8-bit data, 1 stop bits, odd parity<br />
DM 0922 (DM 1922) 00 to 07 Transmission Delay<br />
In tenths of milliseconds between 00 <strong>and</strong> 99 (BCD,<br />
correspond to 000 <strong>and</strong> 990 ms delays, respectively)<br />
08 to 15 RTS/CTS Control<br />
00: Without RTS/CTS<br />
01: With RTS/CTS<br />
9600 bps<br />
1 start bit, 7-bit<br />
data, 2 stop bits,<br />
even parity<br />
0ms<br />
Without RTS/CTS<br />
DM 0923 (DM 1923) 00 to 07 Not used. ---<br />
08 to 15 Unit number for host link mode between 00 <strong>and</strong> 31 in BCD #0<br />
DM 0924 (DM 1924) 00 to 07 Not used. ---<br />
08 to 15 Transmission Format for Memory Upload/Download<br />
00: Intel HEX<br />
01: Motorola S-Record<br />
Intel HEX<br />
DM 0925 (DM 1925) 00 to 07 Starting Code<br />
This byte contains the starting code used in POUT(63) <strong>and</strong><br />
PIN(64) transmissions when bits 08 to 15 contain 01.<br />
No starting code<br />
08 to 15 Starting Code/No Starting Code Selection<br />
00: No starting code<br />
01: Starting code set in bits 00 to 07<br />
DM 0926 (DM 1926) 00 to 07 End Code<br />
This byte contains the end code used in POUT(63) <strong>and</strong><br />
PIN(64) transmissions when bits 08 to 15 contain 01.<br />
No end code<br />
08 to 15 End Code/No End Code Selection<br />
00: No end code<br />
01:Endcodesetinbits00to07<br />
DM 0927 to DM 0929<br />
(DM 1927 to DM 1929)<br />
Not used. ---<br />
*Higher baud rates may produce errors in RS-232C communications if both RS-232C interface <strong>and</strong> Peripheral Interface<br />
Unit are used.<br />
3-6-3 Error History Area<br />
Section 3-6<br />
DM 0969 to DM 0999 are used to store up to 10 records that show the nature,<br />
time, <strong>and</strong> date of errors that have occurred in the PC. The time <strong>and</strong> date<br />
entries in these records are only recorded in <strong>PCs</strong> that are equipped with the<br />
calendar/clock function.<br />
The Error History Area will store system-generated or<br />
FAL(06)/FALS(07)-generated error codes whenever AR 0715 (Error History<br />
Enable Bit) is ON. Refer to Section 9 Troubleshooting for details on error<br />
codes.<br />
'
Area Structure Error records occupy three words each stored between DM 0970 <strong>and</strong> DM<br />
0999. The last record that was stored can be obtained via the content of DM<br />
0969 (Error Record Pointer). The record number, DM words, <strong>and</strong> pointer value<br />
for each of the ten records are as follows:<br />
(<br />
Record Addresses Pointer value<br />
None N.A. 0000<br />
1 DM 0970 to DM 0972 0001<br />
2 DM 0973 to DM 0975 0002<br />
3 DM 0976 to DM 0978 0003<br />
4 DM 0979 to DM 0981 0004<br />
5 DM 0982 to DM 0984 0005<br />
6 DM 0985 to DM 0987 0006<br />
7 DM 0988 to DM 0990 0007<br />
8 DM 0991 to DM 0993 0008<br />
9 DM 0994 to DM 0996 0009<br />
10 DM 0997 to DM 0999 000A<br />
Section 3-6<br />
Although each of them contains a different record, the structure of each record<br />
is the same: the first word contains the error code; the second <strong>and</strong> third<br />
words, the day <strong>and</strong> time. The error code will be either one generated by the<br />
system or by FAL(06)/FALS(07); the time <strong>and</strong> date will be the date <strong>and</strong> time<br />
from AR 18 <strong>and</strong> AR 19 (Calender/date Area). Also recorded with the error<br />
code is an indication of whether the error is fatal (08) or non-fatal (00). This<br />
structure is shown below.<br />
Word Bit Content<br />
First 00 to 07 Error code<br />
08 to 15 00 (non-fatal) or 08 (fatal)<br />
Second 00 to 07 Seconds<br />
08 to 15 Minutes<br />
Third 00 to 07 Hours<br />
08 to 15 Day of month<br />
Operation When the first error code is generated with AR 0715 (Error History Enable<br />
Bit) turned ON, the relevant data will be placed in the error record after the<br />
one indicated by the History Record Pointer (initially this will be record 1) <strong>and</strong><br />
the Pointer will be incremented. Any other error codes generated thereafter<br />
will be placed in consecutive records until the last one is used. Processing of<br />
further error records is based on the status of AR 0713 (Error History Overwrite<br />
Bit).<br />
If AR 0713 is ON <strong>and</strong> the Pointer contains 000A, the next error will be written<br />
into record 10, the contents of record 10 will be moved to record 9, <strong>and</strong> so on<br />
until the contents of record 1 is moved off the end <strong>and</strong> lost, i.e., the area<br />
functions like a shift register. The Record Pointer will remain set to 000A.<br />
If AR 0713 is OFF <strong>and</strong> the Pointer reaches 000A, the contents of the Error<br />
History Error will remain as it is <strong>and</strong> any error codes generate thereafter will<br />
not be recorded until AR 0713 is turned OFF or until the Error History Area is<br />
reset.<br />
The Error History Area can be reset by turning ON <strong>and</strong> then OFF AR 0714<br />
(Error History Reset Bit). When this is done, the Record Pointer will be reset<br />
to 0000, the Error History Area will be reset (i.e., cleared), <strong>and</strong> any further<br />
error codes will be recorded from the beginning of the Error History Area. AR<br />
0715 (Error History Enable Bit) must be ON to reset the Error History Area.
3-6-4 User Program Header Area<br />
DM 1990 to DM 1999 can be used to record the name, version, <strong>and</strong> creation/<br />
alteration data of the user program to aid in program management. This information<br />
(except for the seconds) can also be displayed on the Programming<br />
Console by pressing CLR, SFT, <strong>and</strong> MONTR (see Section 7 Program<br />
Debugging <strong>and</strong> Execution for details).<br />
The creation date will not be updated if programs are transferred into the PC<br />
from other than the <strong>C20H</strong>/<strong>C28H</strong>/<strong>C40H</strong>/<strong>C60H</strong>. It will be updated only if instructions<br />
are written (not transferred), deleted, or inserted from a Programming<br />
Device (e.g., Programming Console, GPC, or FIT). If the CPU is<br />
equipped with the Calendar/clock Area, the creation date will be updated<br />
whenever instructions are written, deleted, or inserted, or when timer/counter<br />
SVs are set.<br />
If non-<strong>C20H</strong>/<strong>C28H</strong>/<strong>C40H</strong>/<strong>C60H</strong> programs are transferred into the PC, the<br />
Programming Console or other Peripheral Device must be used to artificially<br />
write data to the header area.<br />
The User Program Header Area is structured as shown below.<br />
Address* Bits Contents<br />
DM 1990 00 to 07 Program version number in BCD without the decimal<br />
08 to 15 Name/version Enable Bit (Set to 5A to enable the name<br />
<strong>and</strong> version. These will not be displayed on the<br />
Programming Console unless enabled. Any other value<br />
will disable the name <strong>and</strong> version.)<br />
DM 1991 to 00 to 15 Program name in ASCII, eight characters. Characters<br />
DM 1994<br />
are displayed on the Programming Console in order<br />
from DM 1991 to DM 1994, with the leftmost ASCII<br />
character in each word (bits 08 to 15) displayed to the<br />
left of the rightmost (bits 00 to 07).<br />
DM 1995 00 to 07 Seconds of creation date<br />
08 to 15 Minutes of creation date<br />
DM 1996 00 to 07 Hour of creation date<br />
08 to 15 Day of month of creation date<br />
DM 1997 00 to 07 Month of creation date<br />
08 to 15 Year of creation date<br />
DM 1995 to<br />
DM 1999<br />
Not used.<br />
Note *Use the hexadecimal addresses shown below when using a commercially<br />
available PROM writer to read data from a User Program Header Area that<br />
has been stored in ROM.<br />
DM 1990 (bits 08 to 15): 07BC<br />
DM 1990 (bits 00 to 07): 07BD<br />
. . .<br />
. . .<br />
. . .<br />
DM 1997 (bits 08 to 15): 07CA<br />
DM 1997 (bits 00 to 07): 07CB<br />
Section 3-6
,<br />
" Section 3-8<br />
3-7 HR (Holding Relay) Area<br />
3-8 TC (Timer/Counter) Area<br />
The HR area is used to store/manipulate various kinds of data <strong>and</strong> can be<br />
accessed either by word or by bit. Word addresses range from HR 00<br />
through HR 99; bit addresses, from HR 0000 through HR 9915. HR bits can<br />
be used in any order required <strong>and</strong> can be programmed as often as required.<br />
The HR area retains status when the system operating mode is changed,<br />
when power is interrupted, or when PC operation is stopped.<br />
HR area bits <strong>and</strong> words can be used to to preserve data whenever PC operation<br />
is stopped. HR bits also have various special applications, such as<br />
creating latching relays with the Keep instruction <strong>and</strong> forming self-holding<br />
outputs. These are discussed in Section 4 Writing <strong>and</strong> Entering Programs<br />
<strong>and</strong> Section 5 Instruction Set.<br />
The TC area is used to create <strong>and</strong> program timers <strong>and</strong> counters <strong>and</strong> holds<br />
the Completion flags, set values (SV), <strong>and</strong> present values (PV) for all timers<br />
<strong>and</strong> counters. All of these are accessed through TC numbers ranging from<br />
TC 000 through TC 511. Each TC number is defined as either a timer or<br />
counter using one of the following instructions: TIM, TIMH(15), CNT,<br />
CNTR(12), RDM(60) or HDM(61). No prefix is required when using a TC<br />
number in a timer or counter instruction.<br />
Once a TC number has been defined using one of these instructions, it cannot<br />
be redefined elsewhere in the program either using the same or a different<br />
instruction. If the same TC number is defined in more than one of these<br />
instructions or in the same instruction twice, an error will be generated during<br />
the program check. There are no restrictions on the order in which TC numbers<br />
can be used.<br />
Once defined, a TC number can be designated as an oper<strong>and</strong> in one or more<br />
of certain set of instructions other than those listed above. When defined as a<br />
timer, a TC number designated as an oper<strong>and</strong> takes a TIM prefix. The TIM<br />
prefix is used regardless of the timer instruction that was used to define the<br />
timer. Once defined as a counter, the TC number designated as an oper<strong>and</strong><br />
takes a CNT prefix. The CNT is also used regardless of the counter instruction<br />
that was used to define the counter.<br />
TC numbers can be designated for oper<strong>and</strong>s that require bit data or for oper<strong>and</strong>s<br />
that require word data. When designated as an oper<strong>and</strong> that requires<br />
bit data, the TC number accesses the completion flag of the timer or counter.<br />
When designated as an oper<strong>and</strong> that requires word data, the TC number accesses<br />
a memory location that holds the PV of the timer or counter.<br />
TC numbers are also used to access the SV of timers <strong>and</strong> counters from a<br />
Programming Device. The procedures for doing so using the Programming<br />
Console are provided in 7-2 Monitoring Operation <strong>and</strong> Modifying Data.<br />
The TC area retains the SVs of both timers <strong>and</strong> counters during power interruptions.<br />
The PVs of timers are reset when PC operation is begun <strong>and</strong> when<br />
reset in interlocked program sections. Refer to 5-7 INTERLOCK <strong>and</strong> INTER-<br />
LOCK CLEAR - IL(02) <strong>and</strong> ILC(03) for details on timer <strong>and</strong> counter operation<br />
in interlocked program sections. The PVs of counters are not reset at these<br />
times.
" Section 3-8<br />
3-8-1 High-speed Counter<br />
Hardware Reset/Disable<br />
Input (IR 00001)<br />
High-speed Counter<br />
Reset Bit (AR 0211)<br />
PC RUN signal<br />
Count input ( IR 0000)<br />
High-speed Counter<br />
Bank Bit (AR 0311)<br />
Interrupt Output<br />
Enable Bit (25210)<br />
Note that in programming “TIM 000” is used to designate three things: the<br />
Timer instruction defined with TC number 000, the completion flag for this<br />
timer, <strong>and</strong> the PV of this timer. The meaning in context should be clear, i.e.,<br />
the first is always an instruction, the second is always a bit, <strong>and</strong> the third is<br />
always a word. The same is true of all other TC numbers prefixed with TIM or<br />
CNT.<br />
The <strong>C20H</strong>/<strong>C28H</strong>/<strong>C40H</strong>/<strong>C60H</strong> are equipped with a built-in high-speed counter<br />
that can be activated either through use of the interrupt drum output function<br />
or through the HIGH-SPEED DRUM COUNTER instruction (HDM(61)). The<br />
high-speed counter is allocated to TC 511. Even if the interrupt drum output<br />
function is used, TC 511 can be used like any other TC bit, i.e., it can be<br />
used to access the Completion Flag <strong>and</strong> PV for the counter. The PV for the<br />
high-speed counter, however, is always reset to 0000 when power to the PC<br />
is shut off.<br />
The high-speed counter is an incremental ring counter that can be set for<br />
between 1 <strong>and</strong> 80,000 counts per revolution. All counter settings are in the<br />
Parameter <strong>and</strong> Parameter Backup Area of System DM. These settings include<br />
a High-speed Counter Enable Bit, a Hardware Reset Enable Bit, Interrupt<br />
Output Enable Bits, an Interrupt Output Table, <strong>and</strong> a Step Table. These<br />
are described below <strong>and</strong> also listed in tabular form in 3-6 DM (Data Memory)<br />
Area.<br />
There are also various controls for the high-speed counter in the AR area,<br />
including a High-speed Counter Reset Bit, a High-speed Counter Reset Flag,<br />
<strong>and</strong> a High-speed Counter Bank Bit.<br />
The overall operation of the high-speed counter is as shown below.<br />
High-speed counter controls<br />
in System DM<br />
High-speed Counter Enable Bit<br />
Hardware Reset Enable Bit<br />
Set Patterns<br />
Interrupt Output Enable Bits<br />
Interrupt Output Table<br />
Set Table (Banks 0 <strong>and</strong> 1)<br />
Reset<br />
input<br />
Count<br />
input<br />
High-speed<br />
counter<br />
TC 511<br />
Counter’s PV<br />
TC 511 Completion Flag<br />
High-speed Counter<br />
Reset Flag (AR 0212)<br />
Interrupt outputs<br />
(IR 00200 to<br />
IR 00207)<br />
"
#4<br />
" Section 3-8<br />
Counter Controls <strong>and</strong> I/O<br />
The high-speed counter is controlled <strong>and</strong> operates through the following IR<br />
<strong>and</strong> AR bits. The remaining controls for the high-speed counter are in the DM<br />
area <strong>and</strong> are described in 3-8-2 System DM High-speed Counter Parameters.<br />
Counter Input The high-speed counter will be incremented on the rising edge of IR 00000<br />
as long as the hardware reset/disable input (IR 00001) <strong>and</strong> the High-speed<br />
Counter Reset Bit (AR 0211) are both OFF <strong>and</strong> the PC is in either MONITOR<br />
or RUN mode. Inputs are not counted in PROGRAM mode.<br />
The pulse width for the counter input must be at least 250 �s (2 kHz with a<br />
1:1 duty rate).<br />
Hardware Reset/Disable IR 00001 (on the CPU) can be used either as a hardware reset <strong>and</strong> a counter<br />
disable, or it can be used as a counter disable only. When IR 0001 is used as<br />
a hard reset, AR 0212 will be turned ON for one cycle.<br />
The Hardware Reset/Disable must remain ON for at least 250 �s. The reset<br />
is serviced immediately, i.e., without being delayed by the cycle time.<br />
High-speed Counter Reset<br />
Bit<br />
High-speed Counter Reset<br />
Flag<br />
The high-speed counter can also be reset by turning on AR 0211. The highspeed<br />
counter will be reset when either this bit, IR 00001, or both are ON.<br />
The High-speed Counter Reset Bit is not serviced until after the END(01) instruction<br />
is executed, i.e., servicing is delayed by the cycle time.<br />
AR 0212 will turn ON for one cycle when IR 00001 has come ON to reset the<br />
high-speed counter.<br />
CNT 511 Completion Flag The completion flag of CNT will turn ON for one cycle each time a set value<br />
for a step has been reached. This flag can be used to activate a carry or as a<br />
normal counter completion output.<br />
The following figure shows the relationship between the counter input, the<br />
present value, the completion flag, <strong>and</strong> the PC cycle. This figure assumes<br />
that only step 0 has been set <strong>and</strong> that it is set to 500.<br />
High-speed Counter Bank<br />
Bit<br />
Counter input<br />
PV<br />
Completion Flag<br />
PC cycles<br />
0299 0300 0499 0000 0001 0002<br />
AR 0311 is used with the interrupt output function. Eight steps each can be<br />
recorded into two banks <strong>and</strong> then the status of AR 0311 can be used to control<br />
which bank is currently being used.<br />
If AR 0311 is ON, bank 1 is used; if it is OFF, bank 0 is used. If the bank is<br />
changed during counter operation, the present value <strong>and</strong> the set value will be<br />
reset. When switching from bank 1 to bank 0, counting will start from zero in<br />
step 0. When switching from bank 0 to bank 1, counting will start from zero in<br />
the step designated by the Beginning Step for Bank 1 setting.<br />
Interrupt Outputs IR 00200 through 00207 can be used with the high-speed counter as interrupt<br />
drum outputs. Output tables can be set for these bits by step. These outputs<br />
are refreshed on an interrupt basis, i.e., they are not affected by the<br />
cycle time. Refer to 3-8-3 Interrupt Drum Outputs for details. SR 25210 (Interrupt<br />
Output Enable Bit) must be ON to use these outputs.
" Section 3-8<br />
3-8-2 System DM High-speed Counter Parameters<br />
System DM contain several parameters that can be used to control highspeed<br />
counter operations. Specific bit allocations are provided in 3-6 DM<br />
(Data Memory) Area. This section explains operational aspects that are affected<br />
by these parameters.<br />
Interrupt Output Enable Bits Each of bits 00 to 07 of DM 0905 (DM 1905) correspond to one of the interrupt<br />
drum outputs for the high-speed counter. If the bit corresponding to an<br />
interrupt output is ON, that output will be refreshed in every step according to<br />
the output tables.<br />
Bank Range Settings Bits 08 to 10 of DM 0905 (DM 1905) are used to specify the final step for<br />
bank 0 between 0 <strong>and</strong> 7. Bank 0 will thus extend from step 0 to the step set<br />
here. Bits 11 to 13 are the beginning step for bank 1 <strong>and</strong> can be set between<br />
0 <strong>and</strong> 7. Bank 1 will thus range from the step set here to set 7.<br />
The steps for bank 0 <strong>and</strong> bank 1 may overlap, e.g., bank 0 may range from<br />
step 0 through step 5 at the same time that bank 1 ranges from step 2 to step<br />
7.<br />
Hard Reset Enable Bit Bit 14 of DM 0905 (DM 1905) controls the operation of the hardware reset/<br />
disable (IR 00001). If bit 14 is turned ON, IR 00001 will function to both disable<br />
<strong>and</strong> reset the high-speed counter. If bit 14 is OFF, IR 00001 will function<br />
only to disable the high-speed counter; it will not reset it.<br />
High-speed Counter Enable<br />
Bit<br />
Bit 15 of DM 0905 (DM 1905) is turned ON to enable the high-speed counter<br />
<strong>and</strong> turned OFF to disable it.<br />
Interrupt Output Table The bits in DM 0906 through DM 0909 (DM 1906 through DM 1909) are used<br />
to set the patterns that will be output when the interrupt drum outputs are<br />
used. Each set of eight bits determines the status that will be output to IR<br />
00200 to IR 00207 for each step of interrupt outputs. Refer to 3-8-3 Interrupt<br />
Drum Outputs for details.<br />
High-speed Counter Step<br />
Table<br />
DM 0910 to DM 0917 (DM 1910 to DM 1917) contain the width settings<br />
(counts per revolution) for each step of the counter. There are a total of eight<br />
steps, each of which can be set to between 1 <strong>and</strong> 10,000 counts per revolution<br />
( a setting of 0000 is equivalent to 10,000). Data must be in BCD. The<br />
total width of the counter is the sum of all the step widths being used in the<br />
active bank. As shown below, the rightmost digit of the DM address is the<br />
same as the corresponding step.<br />
Step 0 width: DM 0910<br />
Step1width: DM0911<br />
Step 2 width: DM 0912<br />
Step 3 width: DM 0913<br />
Step 4 width: DM 0914<br />
Step 5 width: DM 0915<br />
Step 6 width: DM 0916<br />
Step 7 width: DM 0917<br />
The current step will be reset when PC power it turned ON, when the highspeed<br />
counter is reset, <strong>and</strong> when the bank designation is changed. In bank<br />
0, the current step is always reset to step 0; in bank 1, to the step designated<br />
in the Beginning Step for Bank 1.<br />
When the interrupt outputs are not used, the counter width can still be set to<br />
a value greater than 10,000 by setting widths for multiple step. The total<br />
width will be the sum of all width settings, producing a maximum of 80,000<br />
counts per revolution.<br />
Note The rightmost two digits of the width settings must be 11 or higher (although<br />
00 is O.K.) to prevent the poor responsiveness to high-frequency input sig-<br />
#
#<br />
" Section 3-8<br />
3-8-3 Interrupt Drum Outputs<br />
Interrupt Output Response<br />
Time<br />
nals. For example, set values of 0010 <strong>and</strong> 5001 would risk inaccurate counting,<br />
while set values of 2011 <strong>and</strong> 3000 would not.<br />
The high-speed counter can be used to activate interrupt outputs (IR 00200<br />
through IR 00207) according to patterns set in output tables for each of up to<br />
eight steps. These outputs are refreshed on an interrupt basis, i.e., they are<br />
not delayed by the cycle time. SR 25210 (Interrupt Output Enable Bit) must<br />
be ON to use the interrupt outputs.<br />
The interrupt drum outputs can be used to control cam switches <strong>and</strong> similar<br />
devices according to inputs received from incremental rotary recorders.<br />
Although the interrupt outputs are not delayed by the cycle time, there is<br />
delay of up to 1.5 ms from the time that the counter reaches its set value.<br />
There is an additional delay of up to 2 ms when a Peripheral Interface Unit is<br />
being used.<br />
Interrupt Output Bits IR 00200 through IR 00207 are used as the interrupt outputs. These bits are<br />
available for use as normal outputs when the high-speed counter is not being<br />
used. Note: these bits cannot be output directly from the program when they<br />
are enabled as the interrupt outputs.<br />
When not using IR 00200 through IR 00207 as interrupt outputs, be sure to<br />
disable them by turning off the corresponding Interrupt Output Enable Bits.<br />
Output Steps <strong>and</strong> Banks There are eight steps available that can be set up in two banks to control the<br />
interrupt outputs. Each bank can be from 1 to 8 steps in length <strong>and</strong> can control<br />
anywhere from 1 to 8 of the interrupt outputs. The settings to control<br />
these parameters are described in 3-8-2 System DM High-speed Counter<br />
Parameters.<br />
When counter operation begins, all enabled interrupt outputs are refreshed<br />
according to the pattern set in the output table for the first step (step 0 if bank<br />
0 is being used; the designated beginning step if bank 1 is being used).<br />
When the counter reaches the value set for the first step, the enabled interrupt<br />
outputs are again refreshed, this time according to the output table patterns<br />
set for the second step. This operation continues until the count for the<br />
last step has been reached (the designated last step for bank 0 or step 7 for<br />
bank 1), at which time the count is reset <strong>and</strong> operation repeats from the first<br />
step.<br />
Example This example describes operation when the End Step for Bank 0 is set to 3,<br />
the Beginning Step for Bank 1 is set to 4, all interrupt outputs are enabled,<br />
<strong>and</strong> the step widths <strong>and</strong> output table are set as shown below.<br />
Bank Step Width Output patterns<br />
00200 00201 00202 00203 00204 00205 00206 00207<br />
0 0 1,500 1 0 0 0 0 0 0 0<br />
0 1 3,000 0 1 0 0 0 0 0 0<br />
0 2 700 1 0 1 0 0 0 0 0<br />
0 <strong>and</strong> 1 3 1,800 0 0 0 1 1 0 0 0<br />
1 4 3,500 0 0 0 0 1 0 0 1<br />
1 5 1,500 0 0 0 0 0 1 0 0<br />
1 6 1,200 0 0 0 0 0 1 1 0<br />
1 7 4,000 0 0 0 0 0 0 1 1<br />
The above table shows that bank 0 runs from step 0 through step 3 <strong>and</strong> has<br />
a total width of 7,000 <strong>and</strong> that bank 1 runs from step 3 through step 7 <strong>and</strong>
Step 3<br />
1,800 counts<br />
Step 2<br />
700 counts<br />
Bank 0<br />
Bank 1<br />
" Section 3-8<br />
IR 00200<br />
IR 00201<br />
IR 00202<br />
IR<br />
00203<br />
IR 00204<br />
IR 00203<br />
IR 00204<br />
IR 00205<br />
IR<br />
00206<br />
IR 00207<br />
5,200<br />
has a total width of 12,000. In drum form, the operation of bank 0 <strong>and</strong> bank 1<br />
appears as follows:<br />
Bank 0 Bank 1<br />
4,500<br />
0<br />
1,500<br />
Step 0<br />
1,500 counts<br />
Step 1<br />
3,000 counts<br />
Step 7<br />
4,000 counts<br />
Step 6<br />
1,200 counts<br />
8,000<br />
6,800<br />
0<br />
1,800<br />
5,300<br />
Step 5<br />
1,500 counts<br />
Step 3<br />
1,800 counts<br />
Step 4<br />
3,500 counts<br />
In terms of output timing, operation would appear as shown below. Only the<br />
outputs that are set to turn ON during operation of each bank are shown.<br />
5000 6000 0000 1000 2000 3000 4000 5000 6000 0000 1000 2000<br />
11000 0000 1000 2000 3000 4000 5000 6000 7000 8000 9000 10000 11000 0000 1000<br />
#
3-9 LR (Link Relay) Area<br />
3-10 Program Memory<br />
3-11 TR (Temporary Relay) Area<br />
##<br />
Section 3-11<br />
The LR area is used as a common data area by <strong>PCs</strong> that support a PC Link<br />
System. Certain words will be allocated as the write words of each PC.<br />
These words are written by the PC <strong>and</strong> automatically transferred to the same<br />
LR words in the other <strong>PCs</strong> in the PC Link System. The write words of the<br />
other <strong>PCs</strong> are transferred in as read words so that each PC can access the<br />
data written by the other <strong>PCs</strong> in the PC Link System. Only the write words<br />
allocated to the particular PC will be available for writing; all other words may<br />
be read only. Refer to the PC Link System Manual for details.<br />
The LR area is accessible either by bit or by word. LR area word addresses<br />
range from LR 00 to LR 63; LR area bit addresses, from LR 0000 to LR<br />
6315. In <strong>PCs</strong> that do not support a PC Link System, the LR area is available<br />
for as work words or work bits.<br />
LR area data is not retained when the power is interrupted, when the PC is<br />
changed to PROGRAM mode, or when it is reset in an interlocked program<br />
section. Refer to 5-7 INTERLOCK <strong>and</strong> INTERLOCK CLEAR - IL(02) <strong>and</strong><br />
ILC(03) for details on interlocks.<br />
Program Memory is where the user program is stored. Memory Units come in<br />
different <strong>type</strong>s, i.e., RAM, EEPROM, <strong>and</strong> ROM Units. There are different<br />
sizes for ROM. (Refer to the Installation Guide for details.)<br />
The amount of Program Memory available is 2878 words, regardless of the<br />
<strong>type</strong> of chip used for ROM. The RAM <strong>and</strong> EEPROM chips are already installed<br />
<strong>and</strong> ready for use; the ROM chip must be purchased separately.<br />
For every memory chip, 1218 words are used for the DM area <strong>and</strong> other purposes.<br />
The remainder of the chip’s capacity is available for the Program<br />
Memory. If a 27128 or 27256 EPROM chip is installed, only the first 4K of<br />
memory is usable. Refer to the memory chip table in Appendix A St<strong>and</strong>ard<br />
Models for details.<br />
To store instructions in Program Memory, input the instructions through the<br />
Programming Console, or download programming data from a FIT, floppy<br />
disk, cassette tape, or host computer. Refer to the end of Appendix A St<strong>and</strong>ard<br />
Products for information on FIT <strong>and</strong> other special products. Programming<br />
Console operations, including those for program input, are described in<br />
Section 7 Program Debugging <strong>and</strong> Execution.<br />
The TR area provides eight bits that are used only with the LD <strong>and</strong> OUT instructions<br />
to enable certain <strong>type</strong>s of branching ladder diagram programming.<br />
The use of TR bits is described in Section 4 Writing <strong>and</strong> Entering Programs.<br />
TR addresses range from TR 0 though TR 7. Each of these bits can be used<br />
as many times as required <strong>and</strong> in any order required as long as the same TR<br />
bit is not used twice in the same instruction block.
$ % % & %<br />
���� ������� �������� ��� ����� ����� ��� �������� �������� �� ������� � ����� ������ ������� �������� ��������� ��� ����<br />
���� ���� ������� ��� ��������� ��� �� ���������� ��� ������������ ���� ��� ���� �� ����� ��� ����� ��������� �� ��� ������<br />
������� ��� ������� ��� ���������� ��� ������ ��� �� ������������ ���� �� ����������� �� ��������� �� ������� � ��������<br />
���� ����<br />
��� ����� ��������� ���������������������������������������������������������� ��<br />
��� ����������� ����������� ���������������������������������������������������� ��<br />
��� ����� ������ �������� ���������������������������������������������������� ��<br />
����� ����� ����� ������������������������������������������������������ ��<br />
����� �������� ���� ��������������������������������������������������� ��<br />
����� ������ ������������ ������������������������������������������������ ��<br />
����� ������ ��� ������ ��� ���������������������������������������� ��<br />
����� ��� ��� ����������� ����������������������������������������������� ��<br />
����� ����� ����� ������������ �������������������������������������������� ��<br />
����� ������ �������� ������������ ����������������������������������������� ��<br />
��� ��� ����������� ������� ������������������������������������������������� ��<br />
����� �������� ��� ������� ����� ����������������������������������� ��<br />
����� ��� �������� ���������������������������������������������������� ��<br />
����� �� ����� �������������������������������������������������������� ��<br />
��� ����������� ��� ��������� ��������������������������������������������������� ��<br />
����� �������� ��� �������� ���������������������������������������������� ��<br />
����� �������� ������ �������������������������������������������������� ��<br />
����� �������� ����� �������� �������������������������������������������� ��<br />
��� ���������� ���������� ��� �������� ��� ������� �������������������������������� ��<br />
����� ������� ��� ������� ���� ������� ������ ������� ��������������������� ��<br />
����� �������� �� ������� �������� ���������������������������������������� ��<br />
����� �������� ��� ������� ���������������������������������������������� ��<br />
����� ���������� ��� ����� ���� ������������������������������������������ ��<br />
����� ������� �������� ������������������������������������������������� ��<br />
����� ��������� ��� �������� ������������ ������������������������������������ ��<br />
����� ��������� ����������� ����� ����������������������������������������� ��<br />
����� ����� ����������������������������������������������������������� ��<br />
��� ����������� ��� ������ ������������������������������������������������������ ��<br />
����� ������������� �� ��� ������������� ���� �������������������� ��<br />
����� ���� ����������������������������������������������������������� ��<br />
����� ���������������� ���� ������ ����������������������������������������� ��<br />
��� ���� ���� ��������� ������� ������������������������������������������������� ��<br />
��� ����������� ����������� �������������������������������������������������� ��<br />
���� ������� ��������� ��������������������������������������������������������<br />
��<br />
#<br />
#'
4-1 Basic Procedure<br />
#(<br />
There are several basic steps involved in writing a program. Sheets that can<br />
be copied to aid in programming are provided in Appendix F Word Assignment<br />
Recording Sheets <strong>and</strong> Appendix G Program Coding Sheet.<br />
1, 2, 3... 1. Obtain a list of all I/O devices <strong>and</strong> the I/O points that have been assigned<br />
to them <strong>and</strong> prepare a table that shows the I/O bit allocated to each I/O<br />
device.<br />
2. If the PC has any Units that are allocated words in data areas other than<br />
the IR area or are allocated IR words in which the function of each bit is<br />
specified by the Unit, prepare similar tables to show what words are used<br />
for which Units <strong>and</strong> what function is served by each bit within the words.<br />
3. Determine what words are available for work bits <strong>and</strong> prepare a table in<br />
which you can allocate these as you use them.<br />
4. Also prepare tables of TC numbers <strong>and</strong> jump numbers so that you can<br />
allocate these as you use them. Remember, the function of a TC number<br />
can be defined only once within the program; jump numbers 01 through<br />
99 can be used only once each. (TC number are described in 5-10 Timer<br />
<strong>and</strong> Counter Instructions; jump numbers are described later in this section.)<br />
5. Draw the ladder diagram.<br />
6. Input the program into the CPU. When using the Programming Console,<br />
this will involve converting the program to mnemonic form.<br />
7. Check the program for syntax errors <strong>and</strong> correct these.<br />
8. Execute the program to check for execution errors <strong>and</strong> correct these.<br />
9. After the entire Control System has been installed <strong>and</strong> is ready for use,<br />
execute the program <strong>and</strong> fine tune it if required.<br />
10. Back up the program.<br />
The basics of ladder-diagram programming <strong>and</strong> conversion to mnemonic<br />
code are described in 4-3 Basic Ladder Diagrams. Preparing for <strong>and</strong> inputting<br />
the program via the Programming Console are described in 4-4 The Programming<br />
Console through 4-6 Inputting, Modifying, <strong>and</strong> Checking the Program.<br />
The rest of Section 4 covers more advanced programming, programming<br />
precautions, <strong>and</strong> program execution. All special application instructions<br />
are covered in Section 5 Instruction Set. Debugging is described in Section 7<br />
Debugging <strong>and</strong> Execution. Section 9 Troubleshooting also provides information<br />
required for debugging.<br />
4-2 Instruction Terminology<br />
Section 4-2<br />
There are basically two <strong>type</strong>s of instructions used in ladder-diagram programming:<br />
1, 2, 3... 1. Instructions that correspond to the conditions on the ladder diagram <strong>and</strong><br />
are used in instruction form only when converting a program to mnemonic<br />
code.<br />
2. Instructions that are used on the right side of the ladder diagram <strong>and</strong> are<br />
executed according to the conditions on the instruction lines leading to<br />
them.
# $ %% Section 4-3<br />
4-3 Basic Ladder Diagrams<br />
Most instructions have at least one or more oper<strong>and</strong>s associated with them.<br />
Oper<strong>and</strong>s indicate or provide the data on which an instruction is to be performed.<br />
These are sometimes input as the actual numeric values, but are<br />
usually the addresses of data area words or bits that contain the data to be<br />
used. For instance, a MOVE instruction that has IR 000 designated as the<br />
source oper<strong>and</strong> will move the contents of IR 000 to some other location. The<br />
other location is also designated as an oper<strong>and</strong>. A bit whose address is designated<br />
as an oper<strong>and</strong> is called an oper<strong>and</strong> bit; a word whose address is<br />
designated as an oper<strong>and</strong> is called an oper<strong>and</strong> word. If the actual value is<br />
entered as a constant, it is preceded by # to indicate that it is not an address.<br />
Other terms used in describing instructions are introduced in Section5Instruction<br />
Set.<br />
A ladder diagram consists of one line running down the left side with lines<br />
branching off to the right. The line on the left is called the bus bar; the<br />
branching lines, instruction lines or rungs. Along the instruction lines are<br />
placed conditions that lead to other instructions on the right side. The logical<br />
combinations of these conditions determine when <strong>and</strong> how the instructions at<br />
the right are executed. A ladder diagram is shown below.<br />
00000 06315<br />
00001<br />
00100 00002<br />
00010<br />
00011<br />
25208 HR 0109 LR 2503 24400<br />
24401<br />
00501 00502 00503 00504<br />
00003 HR 0050 00007 TIM 001 LR 0515<br />
21001 21002<br />
21005 21007<br />
00403<br />
00405<br />
Instruction<br />
Instruction<br />
As shown in the diagram above, instruction lines can branch apart <strong>and</strong> they<br />
can join back together. The vertical pairs of lines are called conditions. Conditions<br />
without diagonal lines through them are called normally open conditions<br />
<strong>and</strong> correspond to a LOAD, AND, or OR instruction. The conditions with<br />
diagonal lines through them are called normally closed conditions <strong>and</strong> correspond<br />
to a LOAD NOT, AND NOT, or OR NOT instruction. The number<br />
above each condition indicates the oper<strong>and</strong> bit for the instruction. It is the<br />
status of the bit associated with each condition that determines the execution<br />
condition for following instructions. The way the operation of each of the instructions<br />
corresponds to a condition is described below. Before we consider<br />
these, however, there are some basic terms that must be explained.<br />
Note When displaying ladder diagrams with a GPC, a FIT, or LSS, a second bus<br />
bar will be shown on the right side of the ladder diagram <strong>and</strong> will be connected<br />
to all instructions on the right side. This does not change the ladder-diagram<br />
program in any functional sense. No conditions can be placed<br />
between the instructions on the right side <strong>and</strong> the right bus bar, i.e., all instructions<br />
on the right must be connected directly to the right bus bar. Refer<br />
to the GPC, FIT, orLSS Operation Manual for details.<br />
#
# $ %% Section 4-3<br />
4-3-1 Basic Terms<br />
Normally Open <strong>and</strong><br />
Normally Closed<br />
Conditions<br />
Execution Conditions<br />
Oper<strong>and</strong> Bits<br />
Logic Blocks<br />
4-3-2 Mnemonic Code<br />
#,<br />
Each condition in a ladder diagram is either ON or OFF depending on the<br />
status of the oper<strong>and</strong> bit that has been assigned to it. A normally open condition<br />
is ON if the oper<strong>and</strong> bit is ON; OFF if the oper<strong>and</strong> bit is OFF. A normally<br />
closed condition is ON if the oper<strong>and</strong> bit is OFF; OFF if the oper<strong>and</strong> bit is<br />
ON. Generally speaking, you use a normally open condition when you want<br />
something to happen when a bit is ON, <strong>and</strong> a normally closed condition when<br />
you want something to happen when a bit is OFF.<br />
00000<br />
Normally open<br />
condition<br />
00000<br />
Normally closed<br />
condition<br />
Instruction<br />
Instruction<br />
Instruction is executed<br />
when IR 00000 is ON.<br />
Instruction is executed<br />
when IR 00000 is OFF.<br />
In ladder diagram programming, the logical combination of ON <strong>and</strong> OFF conditions<br />
before an instruction determines the compound condition under which<br />
the instruction is executed. This condition, which is either ON or OFF, is<br />
called the execution condition for the instruction. All instructions other than<br />
LOAD instructions have execution conditions.<br />
The oper<strong>and</strong>s designated for any of the ladder instructions can be any bit in<br />
the IR, SR, HR, AR, LR, or TC areas. This means that the conditions in a<br />
ladder diagram can be determined by I/O bits, flags, work bits, timers/counters,<br />
etc. LOAD <strong>and</strong> OUTPUT instructions can also use TR area bits, but they<br />
do so only in special applications. Refer to 4-6-7 Branching Instruction Lines<br />
for details.<br />
The way that conditions correspond to what instructions is determined by the<br />
relationship between the conditions within the instruction lines that connect<br />
them. Any group of conditions that go together to create a logic result is<br />
called a logic block. Although ladder diagrams can be written without actually<br />
analyzing individual logic blocks, underst<strong>and</strong>ing logic blocks is necessary for<br />
efficient programming <strong>and</strong> is essential when programs are to be input in mnemonic<br />
code.<br />
The ladder diagram cannot be directly input into the PC via a Programming<br />
Console; a GPC, a FIT, or LSS is required. To input from a Programming<br />
Console, it is necessary to convert the ladder diagram to mnemonic code.<br />
The mnemonic code provides exactly the same information as the ladder diagram,<br />
but in a form that can be <strong>type</strong>d directly into the PC. Actually you can<br />
program directly in mnemonic code, although it in not recommended for beginners<br />
or for complex programs. Also, regardless of the Programming Device<br />
used, the program is input in mnemonic form, making it important to underst<strong>and</strong><br />
mnemonic code.<br />
Because of the importance of the Programming Console as a peripheral device<br />
<strong>and</strong> because of the importance of mnemonic code in complete underst<strong>and</strong>ing<br />
of a program, we will introduce <strong>and</strong> describe the mnemonic code<br />
along with the ladder diagram. Remember, you will not need to use the mnemonic<br />
code if you are inputting via a GPC, a FIT, or LSS (although you can<br />
use it with these devices too, if you prefer).
# $ %% Section 4-3<br />
Program Memory Structure<br />
The program is input into addresses in Program Memory. Addresses in Program<br />
Memory are slightly different to those in other memory areas because<br />
each address does not necessarily hold the same amount of data. Rather,<br />
each address holds one instruction <strong>and</strong> all of the definers <strong>and</strong> oper<strong>and</strong>s (described<br />
in more detail later) required for that instruction. Because some instructions<br />
require no oper<strong>and</strong>s, while others require up to three oper<strong>and</strong>s,<br />
Program Memory addresses can be from one to four words long.<br />
Program Memory addresses start at 00000 <strong>and</strong> run until the capacity of Program<br />
Memory has been exhausted. The first word at each address defines<br />
the instruction. Any definers used by the instruction are also contained in the<br />
first word. Also, if an instruction requires only a single bit oper<strong>and</strong> (with no<br />
definer), the bit oper<strong>and</strong> is also programmed on the same line as the instruction.<br />
The rest of the words required by an instruction contain the oper<strong>and</strong>s<br />
that specify what data is to be used. When converting to mnemonic code, all<br />
but ladder diagram instructions are written in the same form, one word to a<br />
line, just as they appear in the ladder diagram symbols. An example of mnemonic<br />
code is shown below. The instructions used in it are described later in<br />
the manual.<br />
Address Instruction Oper<strong>and</strong>s<br />
00000 LD HR 0001<br />
00001 AND 00001<br />
00002 OR 00002<br />
00003 LD NOT 00100<br />
00004 AND 00101<br />
00005 AND LD 00102<br />
00006 MOV(21)<br />
000<br />
DM 0000<br />
00007 CMP(20)<br />
DM 0000<br />
HR 00<br />
00008 LD 25505<br />
00009 OUT 00501<br />
00010 MOV(21)<br />
DM 0000<br />
DM 0500<br />
00011 DIFU(13) 00502<br />
00012 AND 00005<br />
00013 OUT 00503<br />
The address <strong>and</strong> instruction columns of the mnemonic code table are filled in<br />
for the instruction word only. For additional data lines, the left two columns<br />
are left blank. If the instruction requires no definer or bit oper<strong>and</strong>, the oper<strong>and</strong><br />
column is left blank for first line. It is a good idea to cross through any<br />
blank data column spaces (for all instruction words that do not require data)<br />
so that the data column can be quickly scanned to see if any addresses have<br />
been left out.<br />
When programming, addresses are automatically displayed <strong>and</strong> do not have<br />
to be input unless for some reason a different location is desired for the instruction.<br />
When converting to mnemonic code, it is best to start at Program<br />
Memory address 00000 unless there is a specific reason for starting elsewhere.<br />
#"
# $ %% Section 4-3<br />
4-3-3 Ladder Instructions<br />
LOAD <strong>and</strong> LOAD NOT<br />
AND <strong>and</strong> AND NOT<br />
'4<br />
The ladder instructions are those instructions that correspond to the conditions<br />
on the ladder diagram. Ladder instructions, either independently or in<br />
combination with the logic block instructions described next, form the execution<br />
conditions upon which the execution of all other instructions are based.<br />
3.The first condition that starts any logic block within a ladder diagram corresponds<br />
to a LOAD or LOAD NOT instruction. Each of these instruction requires<br />
one line of mnemonic code. “Instruction” is used as a dummy instruction<br />
in the following examples <strong>and</strong> could be any instruction described later in<br />
this manual.<br />
00000<br />
A LOAD instruction.<br />
00000<br />
A LOAD NOT instruction.<br />
Address Instruction Oper<strong>and</strong>s<br />
00000 LD 00000<br />
00001 Instruction<br />
00002 LD NOT 00000<br />
00003 Instruction<br />
When this is the only condition on the instruction line, the execution condition<br />
for the instruction at the right is ON when the condition is ON. For the LOAD<br />
instruction (i.e., a normally open condition), the execution condition would be<br />
ON when IR 00000 was ON; for the LOAD NOT instruction (i.e., a normally<br />
closed condition), it would be ON when IR 00000 was OFF.<br />
4.When two or more conditions lie in series on the same instruction line, the<br />
first one corresponds to a LOAD or LOAD NOT instruction; <strong>and</strong> the rest of<br />
the conditions, to AND or AND NOT instructions. The following example<br />
shows three conditions which correspond in order from the left to a LOAD, an<br />
AND NOT, <strong>and</strong> an AND instruction. Again, each of these instructions requires<br />
one line of mnemonic code.<br />
00000 00100 LR 0000<br />
Address Instruction Oper<strong>and</strong>s<br />
00000 LD 00000<br />
00001 AND NOT 00100<br />
00002 AND LR 0000<br />
00003 Instruction<br />
Instruction<br />
The instruction would have an ON execution condition only when all three<br />
conditions are ON, i.e., when IR 00000 was ON, IR 00100 was OFF, <strong>and</strong> LR<br />
0000 was ON.<br />
AND instructions in series can be considered individually, with each taking<br />
the logical AND of the execution condition (i.e., the total of all conditions up to<br />
that point) <strong>and</strong> the status of the AND instruction’s oper<strong>and</strong> bit. If both of these<br />
are ON, an ON execution condition will be produced for the next instruction.<br />
If either is OFF, the result will also be OFF. The execution condition for the<br />
first AND instruction in a series is the first condition on the instruction line.<br />
Each AND NOT instruction in a series would take the logical AND between<br />
its execution condition <strong>and</strong> the inverse of its oper<strong>and</strong> bit.
# $ %% Section 4-3<br />
OR <strong>and</strong> OR NOT<br />
Combining AND <strong>and</strong> OR<br />
Instructions<br />
5.When two or more conditions lie on separate instruction lines running in<br />
parallel <strong>and</strong> then joining together, the first condition corresponds to a LOAD<br />
or LOAD NOT instruction; the rest of the conditions correspond to OR or OR<br />
NOT instructions. The following example shows three conditions which correspond<br />
in order from the top to a LOAD NOT, an OR NOT, <strong>and</strong> an OR instruction.<br />
Again, each of these instructions requires one line of mnemonic code.<br />
00000<br />
00100<br />
LR 0000<br />
Address Instruction Oper<strong>and</strong>s<br />
00000 LD 00000<br />
00001 OR NOT 00100<br />
00002 OR LR 0000<br />
00003 Instruction<br />
Instruction<br />
The instruction would have an ON execution condition when any one of the<br />
three conditions was ON, i.e., when IR 00000 was OFF, when IR 00100 was<br />
OFF, or when LR 0000 was ON.<br />
OR <strong>and</strong> OR NOT instructions can be considered individually, each taking the<br />
logical OR between its execution condition <strong>and</strong> the status of the OR instruction’s<br />
oper<strong>and</strong> bit. If either one of these were ON, an ON execution condition<br />
would be produced for the next instruction.<br />
When AND <strong>and</strong> OR instructions are combined in more complicated diagrams,<br />
they can sometimes be considered individually, with each instruction<br />
performing a logic operation on the execution condition <strong>and</strong> the status of the<br />
oper<strong>and</strong> bit. The following is one example. Study this example until you are<br />
convinced that the mnemonic code follows the same logic flow as the ladder<br />
diagram.<br />
00000 00001<br />
00200<br />
00002 00003<br />
Address Instruction Oper<strong>and</strong>s<br />
00000 LD 00000<br />
00001 AND 00001<br />
00002 OR 00200<br />
00003 AND 00002<br />
00004 AND NOT 00003<br />
00005 Instruction<br />
Instruction<br />
Here, an AND is taken between the status of IR 00000 <strong>and</strong> that of IR 00001<br />
to determine the execution condition for an OR with the status of IR 00200.<br />
The result of this operation determines the execution condition for an AND<br />
with the status of IR 00002, which in turn determines the execution condition<br />
for an AND with the inverse (i.e., <strong>and</strong> AND NOT) of the status of IR 00003.<br />
'
# $ %% Section 4-3<br />
4-3-4 OUTPUT <strong>and</strong> OUTPUT NOT<br />
'<br />
00000<br />
00001<br />
4-3-5 The END Instruction<br />
In more complicated diagrams, however, it is necessary to consider logic<br />
blocks before an execution condition can be determined for the final instruction,<br />
<strong>and</strong> that’s where AND LOAD <strong>and</strong> OR LOAD instructions are used. Before<br />
we consider more complicated diagrams, however, we’ll look at the instructions<br />
required to complete a simple “input-output” program.<br />
The simplest way to output the results of combining execution conditions is to<br />
output it directly with the OUTPUT <strong>and</strong> OUTPUT NOT. These instructions are<br />
used to control the status of the designated oper<strong>and</strong> bit according to the execution<br />
condition. With the OUTPUT instruction, the oper<strong>and</strong> bit will be<br />
turned ON as long as the execution condition is ON <strong>and</strong> will be turned OFF<br />
as long as the execution condition is OFF. With the OUTPUT NOT instruction,<br />
the oper<strong>and</strong> bit will be turned ON as long as the execution condition is<br />
OFF <strong>and</strong> turned OFF as long as the execution condition is ON. These appear<br />
as shown below. In mnemonic code, each of these instructions requires one<br />
line.<br />
00200<br />
00201<br />
Address Instruction Oper<strong>and</strong>s<br />
00000 LD 00000<br />
00001 OUT 00200<br />
Address Instruction Oper<strong>and</strong>s<br />
00000 LD 00001<br />
00001 OUT NOT 00201<br />
In the above examples, IR 00200 will be ON as long as IR 00000 is ON <strong>and</strong><br />
IR 00201 will be OFF as long as IR 00001 is ON. Here, IR 00000 <strong>and</strong> IR<br />
00001 would be input bits <strong>and</strong> IR 00200 <strong>and</strong> IR 00201 output bits assigned to<br />
the Units controlled by the PC, i.e., the signals coming in through the input<br />
points assigned IR 00000 <strong>and</strong> IR 00001 are controlling the output points assigned<br />
IR 00200 <strong>and</strong> IR 00201, respectively.<br />
The length of time that a bit is ON or OFF can be controlled by combining the<br />
OUTPUT or OUTPUT NOT instruction with Timer instructions. Refer to Examples<br />
under 5-10-1 TIMER - TIM for details.<br />
The last instruction required to complete a simple program is the END instruction.<br />
When the CPU cycles the program, it executes all instructions up to<br />
the first END instruction before returning to the beginning of the program <strong>and</strong><br />
beginning execution again. Although an END instruction can be placed at any<br />
point in a program, which is sometimes done when debugging, no instructions<br />
past the first END instruction will be executed until it is removed. The<br />
number following the END instruction in the mnemonic code is its function<br />
code, which is used when inputted most instruction into the PC. These are
# $ %% Section 4-3<br />
described later. The END instruction requires no oper<strong>and</strong>s <strong>and</strong> no conditions<br />
can be placed on the same instruction line with it.<br />
00000 00001<br />
4-3-6 Logic Block Instructions<br />
AND LOAD<br />
Address Instruction Oper<strong>and</strong>s<br />
00000 LD 00000<br />
00001 AND NOT 00001<br />
00002 Instruction<br />
00003 END(01) ---<br />
Instruction<br />
END(01)<br />
Program execution<br />
ends here.<br />
If there is no END instruction anywhere in the program, the program will not<br />
be executed at all.<br />
Now you have all of the instructions required to write simple input-output programs.<br />
Before we finish with ladder diagram basics <strong>and</strong> go onto inputting the<br />
program into the PC, let’s look at logic block instruction (AND LOAD <strong>and</strong> OR<br />
LOAD), which are sometimes necessary even with simple programs.<br />
Logic block instructions do not correspond to specific conditions on the ladder<br />
diagram; rather, they describe relationships between logic blocks. The<br />
AND LOAD instruction logically ANDs the execution conditions produced by<br />
two logic blocks. The OR LOAD instruction logically ORs the execution conditions<br />
produced by two logic blocks.<br />
6.Although simple in appearance, the diagram below requires an AND LOAD<br />
instruction.<br />
00000<br />
00001<br />
00002<br />
00003<br />
Address Instruction Oper<strong>and</strong>s<br />
00000 LD 00000<br />
00001 OR 00001<br />
00002 LD 00002<br />
00003 OR NOT 00003<br />
00004 AND LD ---<br />
Instruction<br />
The two logic blocks are indicated by dotted lines. Studying this example<br />
shows that an ON execution condition will be produced when: either of the<br />
conditions in the left logic block is ON (i.e., when either IR 00000 or IR 00001<br />
is ON), <strong>and</strong> when either of the conditions in the right logic block is ON (i.e.,<br />
when either IR 00002 is ON or IR 00003 is OFF).<br />
The above ladder diagram cannot, however, be converted to mnemonic code<br />
using AND <strong>and</strong> OR instructions alone. If an AND between IR 00002 <strong>and</strong> the<br />
results of an OR between IR 00000 <strong>and</strong> IR 00001 is attempted, the OR NOT<br />
between IR 00002 <strong>and</strong> IR 00003 is lost <strong>and</strong> the OR NOT ends up being an<br />
OR NOT between just IR 00003 <strong>and</strong> the result of an AND between IR 00002<br />
<strong>and</strong> the first OR. What we need is a way to do the OR (NOT)’s independently<br />
<strong>and</strong> then combine the results.<br />
'
# $ %% Section 4-3<br />
OR LOAD<br />
Logic Block Instructions in<br />
Series<br />
'#<br />
To do this, we can use the LOAD or LOAD NOT instruction in the middle of<br />
an instruction line. When LOAD or LOAD NOT is executed in this way, the<br />
current execution condition is saved in special buffers <strong>and</strong> the logic process<br />
is begun over. To combine the results of the current execution condition with<br />
that of a previous “unused” execution condition, an AND LOAD or an OR<br />
LOAD instruction is used. Here “LOAD” refers to loading the last unused execution<br />
condition. An unused execution condition is produced by using the<br />
LOAD or LOAD NOT instruction for any but the first condition on an instruction<br />
line.<br />
Analyzing the above ladder diagram in terms of mnemonic instructions, the<br />
condition for IR 00000 is a LOAD instruction <strong>and</strong> the condition below it is an<br />
OR instruction between the status of IR 00000 <strong>and</strong> that of IR 00001. The<br />
condition at IR 00002 is another LOAD instruction <strong>and</strong> the condition below is<br />
an OR NOT instruction, i.e., an OR between the status of IR 00002 <strong>and</strong> the<br />
inverse of the status of IR 00003. To arrive at the execution condition for the<br />
instruction at the right, the logical AND of the execution conditions resulting<br />
from these two blocks would have to be taken. AND LOAD does this. The<br />
mnemonic code for the ladder diagram is shown below. The AND LOAD instruction<br />
requires no oper<strong>and</strong>s of its own, because it operates on previously<br />
determined execution conditions. Here too, dashes are used to indicate that<br />
no oper<strong>and</strong>s needs designated or input.<br />
7.The following diagram requires an OR LOAD instruction between the top<br />
logic block <strong>and</strong> the bottom logic block. An ON execution condition would be<br />
produced for the instruction at the right either when IR 00000 is ON <strong>and</strong> IR<br />
00001 is OFF, or when IR 00002 <strong>and</strong> IR 00003 are both ON. The operation<br />
of the OR LOAD instruction <strong>and</strong> its mnemonic code is exactly the same as<br />
that for an AND LOAD instruction, except that the current execution condition<br />
is ORed with the last unused execution condition.<br />
00000 00001<br />
00002 00003<br />
Address Instruction Oper<strong>and</strong>s<br />
00000 LD 00000<br />
00001 AND NOT 00001<br />
00002 LD 00002<br />
00003 AND 00003<br />
00004 OR LD ---<br />
Instruction<br />
Naturally, some diagrams will require both AND LOAD <strong>and</strong> OR LOAD instructions.<br />
To code diagrams with logic block instructions in series, the diagram must be<br />
divided into logic blocks. Each block is coded using a LOAD instruction to<br />
code the first condition, <strong>and</strong> then AND LOAD or OR LOAD is used to logically<br />
combine the blocks. With both AND LOAD <strong>and</strong> OR LOAD there are two ways<br />
to achieve this. One is to code the logic block instruction after the first two<br />
blocks <strong>and</strong> then after each additional block. The other is to code all of the<br />
blocks to be combined, starting each block with LOAD or LOAD NOT, <strong>and</strong><br />
then to code the logic block instructions which combine them. In this case,<br />
the instructions for the last pair of blocks should be combined first, <strong>and</strong> then<br />
each preceding block should be combined, working progressively back to the<br />
first block. Although either of these methods will produce exactly the same
# $ %% Section 4-3<br />
result, the second method, that of coding all logic block instructions together,<br />
can be used only if eight or fewer blocks are being combined, i.e., if seven or<br />
fewer logic block instructions are required.<br />
The following diagram requires AND LOAD to be converted to mnemonic<br />
code because three pairs of parallel conditions lie in series. The two means<br />
of coding the programs are also shown.<br />
00000 00002 00004<br />
00001 00003 00005<br />
Address Instruction Oper<strong>and</strong>s Address Instruction Oper<strong>and</strong>s<br />
00000 LD 00000<br />
00001 OR NOT 00001<br />
00002 LD NOT 00002<br />
00003 OR 00003<br />
00004 AND LD —<br />
00005 LD 00004<br />
00006 OR 00005<br />
00007 AND LD —<br />
00008 OUT 00500<br />
00500<br />
00000 LD 00000<br />
00001 OR NOT 00001<br />
00002 LD NOT 00002<br />
00003 OR 00003<br />
00004 LD 00004<br />
00005 OR 00005<br />
00006 AND LD —<br />
00007 AND LD —<br />
00008 OUT 00500<br />
Again, with the method on the right, a maximum of eight blocks can be combined.<br />
There is no limit to the number of blocks that can be combined with<br />
the first method.<br />
The following diagram requires OR LOAD instructions to be converted to<br />
mnemonic code because three pairs of conditions in series lie in parallel to<br />
each other.<br />
00000 00001<br />
00002 00003<br />
00040 00005<br />
The first of each pair of conditions is converted to LOAD with the assigned bit<br />
oper<strong>and</strong> <strong>and</strong> then ANDed with the other condition. The first two blocks can<br />
be coded first, followed by OR LOAD, the last block, <strong>and</strong> another OR LOAD,<br />
or the three blocks can be coded first followed by two OR LOADs. The mnemonic<br />
code for both methods is shown below.<br />
Address Instruction Oper<strong>and</strong>s Address Instruction Oper<strong>and</strong>s<br />
00000 LD 00000<br />
00001 AND NOT 00001<br />
00002 LD NOT 00002<br />
00003 AND NOT 00003<br />
00004 OR LD —<br />
00005 LD 00004<br />
00006 AND 00005<br />
00007 OR LD —<br />
00008 OUT 00501<br />
00501<br />
00000 LD 00000<br />
00001 AND NOT 00001<br />
00002 LD NOT 00002<br />
00003 AND NOT 00003<br />
00004 LD 00004<br />
00005 AND 00005<br />
00006 OR LD —<br />
00007 OR LD —<br />
00008 OUT 00501<br />
''
# $ %% Section 4-3<br />
Combining AND LOAD <strong>and</strong><br />
OR LOAD<br />
'(<br />
Again, with the method on the right, a maximum of eight blocks can be combined.<br />
There is no limit to the number of blocks that can be combined with<br />
the first method.<br />
Both of the coding methods described above can also be used when using<br />
AND LOAD <strong>and</strong> OR LOAD, as long as the number of blocks being combined<br />
does not exceed eight.<br />
The following diagram contains only two logic blocks as shown. It is not necessary<br />
to further separate block b components, because it can coded directly<br />
using only AND <strong>and</strong> OR.<br />
00000 00001 00002 00003<br />
Block<br />
a<br />
00201<br />
00004<br />
Block<br />
b<br />
Address Instruction Oper<strong>and</strong>s<br />
00000 LD 00000<br />
00001 AND NOT 00001<br />
00002 LD 00002<br />
00003 AND 00003<br />
00004 OR 00201<br />
00005 OR 00004<br />
00006 AND LD —<br />
00007 OUT 00501<br />
Although the following diagram is similar to the one above, block b in the diagram<br />
below cannot be coded without separating it into two blocks combined<br />
with OR LOAD. In this example, the three blocks have been coded first <strong>and</strong><br />
then OR LOAD has been used to combine the last two blocks followed by<br />
AND LOAD to combine the execution condition produced by the OR LOAD<br />
with the execution condition of block a.<br />
When coding the logic block instructions together at the end of the logic<br />
blocks they are combining, they must, as shown below, be coded in reverse<br />
order, i.e., the logic block instruction for the last two blocks is coded first, followed<br />
by the one to combine the execution condition resulting from the first<br />
logic block instruction <strong>and</strong> the execution condition of the logic block third from<br />
the end, <strong>and</strong> on back to the first logic block that is being combined.<br />
00000 00001 00002 00003<br />
Block<br />
a<br />
Block<br />
b1<br />
00004 00202<br />
Block<br />
b2<br />
Block<br />
b<br />
00501<br />
00502
# $ %% Section 4-3<br />
Complicated Diagrams<br />
Address Instruction Oper<strong>and</strong>s<br />
00000 LD NOT 00000<br />
00001 AND 00001<br />
00002 LD 00002<br />
00003 AND NOT 00003<br />
00004 LD NOT 00004<br />
00005 AND 00202<br />
00006 OR LD —<br />
00007 AND LD —<br />
00008 OUT 00502<br />
When determining what logic block instructions will be required to code a diagram,<br />
it is sometimes necessary to break the diagram into large blocks <strong>and</strong><br />
then continue breaking the large blocks down until logic blocks that can be<br />
coded without logic block instructions have been formed. These blocks are<br />
then coded, combining the small blocks first, <strong>and</strong> then combining the larger<br />
blocks. Either AND LOAD or OR LOAD is used to combine the blocks, i.e.,<br />
AND LOAD or OR LOAD always combines the last two execution conditions<br />
that existed, regardless of whether the execution conditions resulted from a<br />
single condition, from logic blocks, or from previous logic block instructions.<br />
When working with complicated diagrams, blocks will ultimately be coded<br />
starting at the top left <strong>and</strong> moving down before moving across. This will generally<br />
mean that, when there might be a choice, OR LOAD will be coded before<br />
AND LOAD.<br />
The following diagram must be broken down into two blocks <strong>and</strong> each of<br />
these then broken into two blocks before it can be coded. As shown below,<br />
blocks a <strong>and</strong> b require an AND LOAD. Before AND LOAD can be used, however,<br />
OR LOAD must be used to combine the top <strong>and</strong> bottom blocks on both<br />
sides, i.e., to combine a1 <strong>and</strong> a2; b1 <strong>and</strong> b2.<br />
Block<br />
a1<br />
00000 00001 00004 00005<br />
00002 00003<br />
Block<br />
a2<br />
Block<br />
a<br />
Block<br />
b1<br />
00006 00007<br />
Block<br />
b2<br />
Block<br />
b<br />
Address Instruction Oper<strong>and</strong>s<br />
00000 LD 00000<br />
00001 AND NOT 00001<br />
00002 LD NOT 00002<br />
00003 AND 00003<br />
00004 OR LD —<br />
00005 LD 00004<br />
00006 AND 00005<br />
00007 LD 00006<br />
00008 AND 00007<br />
00009 OR LD —<br />
00010 AND LD —<br />
00011 OUT 00503<br />
Blocks a1 <strong>and</strong> a2<br />
Blocks b1 <strong>and</strong> b2<br />
Blocks a <strong>and</strong> b<br />
00503<br />
'
# $ %% Section 4-3<br />
',<br />
00000 00001<br />
00002 00003<br />
00001<br />
00004 00005<br />
00006 00007<br />
00002 00003<br />
00000<br />
00004 00005<br />
00006 00007<br />
The following <strong>type</strong> of diagram can be coded easily if each block is coded in<br />
order: first top to bottom <strong>and</strong> then left to right. In the following diagram,<br />
blocks a <strong>and</strong> b would be combined using AND LOAD as shown above, <strong>and</strong><br />
then block c would be coded <strong>and</strong> a second AND LOAD would be used to<br />
combined it with the execution condition from the first AND LOAD. Then<br />
block d would be coded, a third AND LOAD would be used to combine the<br />
execution condition from block d with the execution condition from the second<br />
AND LOAD, <strong>and</strong> so on through to block n.<br />
Block<br />
a<br />
Block<br />
b<br />
Block<br />
c<br />
The following diagram requires an OR LOAD followed by an AND LOAD to<br />
code the top of the three blocks, <strong>and</strong> then two more OR LOADs to complete<br />
the mnemonic code.<br />
LR 0000<br />
Block<br />
n<br />
00500<br />
Address Instruction Oper<strong>and</strong>s<br />
00000 LD 00000<br />
00001 LD 00001<br />
00002 LD 00002<br />
00003 AND NOT 00003<br />
00004 OR LD ----<br />
00005 AND LD ----<br />
00006 LD NOT 00004<br />
00007 AND 00005<br />
00008 OR LD ----<br />
00009 LD NOT 00006<br />
00010 AND 00007<br />
00011 OR LD ----<br />
00012 OUT LR 0000<br />
Although the program will execute as written, this diagram could be drawn as<br />
shown below to eliminate the need for the first OR LOAD <strong>and</strong> the AND<br />
LOAD, simplifying the program <strong>and</strong> saving memory space.<br />
LR 0000<br />
Address Instruction Oper<strong>and</strong>s<br />
00000 LD 00002<br />
00001 AND NOT 00003<br />
00002 OR 00001<br />
00003 AND 00000<br />
00004 LD NOT 00004<br />
00005 AND 00005<br />
00006 OR LD ----<br />
00007 LD NOT 00006<br />
00008 AND 00007<br />
00009 OR LD ----<br />
00010 OUT LR 0000
# $ %% Section 4-3<br />
00000<br />
Block a<br />
00001 00002<br />
Block b<br />
Block c<br />
00003 00004<br />
The following diagram requires five blocks, which here are coded in order<br />
before using OR LOAD <strong>and</strong> AND LOAD to combine them starting from the<br />
last two blocks <strong>and</strong> working backward. The OR LOAD at program address<br />
00008 combines blocks blocks d <strong>and</strong> e, the following AND LOAD combines<br />
the resulting execution condition with that of block c, etc.<br />
00005<br />
Block d<br />
00006 00007<br />
Block e<br />
LR 0000<br />
Blocks d <strong>and</strong> e<br />
Block c with result of above<br />
Block b with result of above<br />
Block a with result of above<br />
Address Instruction Oper<strong>and</strong>s<br />
00000 LD 00000<br />
00001 LD 00001<br />
00002 AND 00002<br />
00003 LD 00003<br />
00004 AND 00004<br />
00005 LD 00005<br />
00006 LD 00006<br />
00007 AND 00007<br />
00008 OR LD ----<br />
00009 AND LD ----<br />
00010 OR LD ----<br />
00011 AND LD ----<br />
00012 OUT LR 0000<br />
Again, this diagram can be redrawn as follows to simplify program structure<br />
<strong>and</strong> coding <strong>and</strong> to save memory space.<br />
00006 00007<br />
00005<br />
00001 00002<br />
00003 00004 00000<br />
Address Instruction Oper<strong>and</strong>s<br />
00000 LD 00006<br />
00001 AND 00007<br />
00002 OR 00005<br />
00003 AND 00003<br />
00004 AND 00004<br />
00005 LD 00001<br />
00006 AND 00002<br />
00007 OR LD ----<br />
00008 AND 00000<br />
00009 OUT LR 0000<br />
LR 0000<br />
'"
# $ %% Section 4-3<br />
(4<br />
The next <strong>and</strong> final example may at first appear very complicated but can be<br />
coded using only two logic block instructions. The diagram appears as follows:<br />
00000 00001<br />
01000 01001<br />
00500<br />
Block a<br />
00002 00003<br />
Block b<br />
00004 00005<br />
00006<br />
Block c<br />
The first logic block instruction is used to combine the execution conditions<br />
resulting from blocks a <strong>and</strong> b, <strong>and</strong> the second one is to combine the execution<br />
condition of block c with the execution condition resulting from the normally<br />
closed condition assigned IR 00003. The rest of the diagram can be<br />
coded with OR, AND, <strong>and</strong> AND NOT instructions. The logical flow for this <strong>and</strong><br />
the resulting code are shown below.<br />
Block a<br />
00000 00001<br />
LD 00000<br />
AND 00001<br />
00500<br />
OR LD<br />
OR 00500<br />
00002 00003<br />
AND 00002<br />
AND NOT 00003<br />
Block b<br />
01000 01001<br />
LD 01000<br />
AND 01001<br />
AND LD<br />
Address Instruction Oper<strong>and</strong>s<br />
00500<br />
00000 LD 00000<br />
00001 AND 00001<br />
00002 LD 01000<br />
00003 AND 01001<br />
00004 OR LD ----<br />
00005 OR 00500<br />
00006 AND 00002<br />
00007 AND NOT 00003<br />
00008 LD 00004<br />
00009 AND 00005<br />
00010 OR 00006<br />
00011 AND LD ----<br />
00012 OUT 00500<br />
00004 00005<br />
00006<br />
Block c<br />
LD 00004<br />
AND 00005<br />
OR 00006<br />
00500
4-3-7 Coding Multiple Instructions<br />
00000 00003<br />
00001<br />
00002<br />
HR 0000<br />
If there is more than one instruction executed with the same execution condition,<br />
they are coded consecutively following the last condition on the instruction<br />
line. In the following example, the last instruction line contains one more<br />
condition that corresponds to an AND with IR 00004.<br />
00004<br />
4-4 The Programming Console<br />
HR<br />
0001<br />
00500<br />
00506<br />
4-4-1 TERMINAL <strong>and</strong> CONSOLE Modes<br />
Section 4-4<br />
Address Instruction Oper<strong>and</strong>s<br />
00000 LD 00000<br />
00001 OR 00001<br />
00002 OR 00002<br />
00003 OR HR 0000<br />
00004 AND 00003<br />
00005 OUT HR 0001<br />
00006 OUT 00500<br />
00007 AND 00004<br />
00008 OUT 00506<br />
Once a program has been written, it must be input into the PC. This can be<br />
done in graphic (ladder diagram) form using a GPC,a FIT, or LSS. The most<br />
common way of inputting a program, however, is through a Programming<br />
Console using mnemonic code. This section <strong>and</strong> 4-4-1 TERMINAL <strong>and</strong> CON-<br />
SOLE Modes describe the Programming Console <strong>and</strong> the operation necessary<br />
to prepare for program input. Refer to 4-6 Inputting, Modifying, <strong>and</strong><br />
Checking the Program for details on actual procedures for inputting the program<br />
into memory.<br />
Depending on the model of Programming Console used, it is either connected<br />
to the CPU via a Programming Console Adapter <strong>and</strong> Connecting Cable<br />
or it is mounted directly to the CPU.<br />
When mounted to the <strong>C20H</strong>/<strong>C28H</strong>/<strong>C40H</strong>/<strong>C60H</strong>, the Programming Console<br />
can be set to operate as a display terminal in what is called TERMINAL<br />
mode. While the Programming Console is in TERMINAL mode, key inputs<br />
from the Programming Console can be used to turn ON/OFF certain memory<br />
bits. TERMINAL mode is a Programming Console mode; do not confuse it<br />
with PC modes (MONITOR, PROGRAM, <strong>and</strong> RUN mode). The normal Programming<br />
Console mode is CONSOLE mode.<br />
When the Programming Console is in TERMINAL mode, all normal Programming<br />
Console operations <strong>and</strong> the mode switch on the Programming Console<br />
are disabled. You must return to CONSOLE mode to enable normal Programming<br />
Console functions.<br />
Entering TERMINAL Mode There are three ways to enter TERMINAL mode. One is directly through key<br />
operations on the Programming Console; the other is by executing KEY(62).<br />
TERMINAL mode is entered from the Programming Console by pressing<br />
CHG while the password display or a mode display is on the Programming<br />
Console. If the Programming Console is not in one of these conditions, press<br />
CLR to reset the display before pressing CHG. When TERMINAL mode is<br />
entered, a message display will appear (see next section).<br />
To return to CONSOLE mode, press CHG again. A mode display will appear<br />
to indicate the PC mode (either MONITOR, PROGRAM, or RUN mode).<br />
TERMINAL mode can be enter from MONITOR, PROGRAM, or RUN mode.<br />
These modes will not change when TERMINAL mode is entered <strong>and</strong> will also<br />
be maintained when TERMINAL mode is left.<br />
(
KEY(62) is used to execute the Programming Console key operations from<br />
the program. It can therefore be used to execute the key sequence required<br />
to enter <strong>and</strong> leave TERMINAL mode. The normal procedure is to execute<br />
KEY(62) with oper<strong>and</strong> words that contain 4021. The first part, 40 is CLR <strong>and</strong><br />
resets the Programming Console display <strong>and</strong> the second part, 21, is the<br />
CHG key code. The same code can then be used to return the Programming<br />
Console to CONSOLE mode.<br />
KEY(62) will not be executed <strong>and</strong> TERMINAL mode will not be entered unless<br />
a Programming Console is mounted. Refer to Section 5 Instruction Set<br />
for details on KEY(62).<br />
The last way to enter TERMINAL mode is to start up in TERMINAL mode by<br />
either designating it as the startup mode or by designating to restart in the<br />
same mode as when the PC was turned off <strong>and</strong> turning off the PC in TERMI-<br />
NAL mode. These designations are made in DM 0900. Refer to 4-4-3 PC<br />
Modes for details.<br />
TERMINAL Mode Displays When the Programming Console is in TERMINAL mode, displays programmed<br />
with MSG(46) or LMSG(47)will be displayed. With these instructions,<br />
the programmer can input into memory either 16- or 32-character messages<br />
that are output when the instruction is executed.<br />
If one of these instructions has been executed, the message will appear on<br />
the Programming Console as soon as TERMINAL mode is entered. If more<br />
than one of these instruction is executed, the last one will always be<br />
displayed. If none of these instructions has been executed, a display<br />
indicated that no message has yet been generated will appear.<br />
The last message is preserved even after the PC mode is changed.<br />
TERMINAL Mode Key Inputs While in TERMINAL mode, the bits of AR 22 can be turned ON by pressing<br />
the numeric keys on the Programming Console. The keys <strong>and</strong> corresponding<br />
bits in AR 22 are as follows:<br />
(<br />
Key Bit<br />
0 AR 2200<br />
1 AR 2201<br />
2 AR 2202<br />
3 AR 2203<br />
4 AR 2204<br />
5 AR 2205<br />
6 AR 2206<br />
7 AR 2207<br />
8 AR 2208<br />
9 AR 2209<br />
A AR 2210<br />
B AR 2211<br />
C AR 2212<br />
D AR 2213<br />
E AR 2214<br />
F AR 2215<br />
Section 4-4<br />
This operation is controlled by AR 0708 (TERMINAL Mode Input Cancel Bit).<br />
As long as AR 0708 is OFF, Programming Console keys will turn ON the corresponding<br />
bits when pressed. When AR 0708 is turned ON, all AR 22 bits<br />
will be turned OFF <strong>and</strong> key inputs will be disabled until AR 0708 is turned<br />
OFF again.<br />
AR 22 status is maintained when the Programming Console enters <strong>and</strong><br />
leaves TERMINAL mode <strong>and</strong> when PC power is turned off <strong>and</strong> on.
4-4-2 The Keyboard<br />
White: Numeric Keys<br />
Red: CLR Key<br />
Yellow: Operation Keys<br />
Gray: Instruction <strong>and</strong> Data<br />
Area Keys<br />
Section 4-4<br />
The keyboard of the Programming Console is functionally divided by key<br />
color into the following four areas:<br />
The ten white keys are used to input numeric program data such as program<br />
addresses, data area addresses, <strong>and</strong> oper<strong>and</strong> values. The numeric keys are<br />
also used in combination with the function key (FUN) to enter instructions<br />
with function codes.<br />
The CLR key clears the display <strong>and</strong> cancels current Programming Console<br />
operations. It is also used when you key in the password at the beginning of<br />
programming operations. Any Programming Console operation can be cancelled<br />
by pressing the CLR key, although the CLR key may have to be<br />
pressed two or three times to cancel the operation <strong>and</strong> clear the display.<br />
The yellow keys are used for writing <strong>and</strong> correcting programs. Detailed explanations<br />
of their functions are given later in this section.<br />
Except for the SHIFT key on the upper right, the gray keys are used to input<br />
instructions <strong>and</strong> designate data area prefixes when inputting or changing a<br />
program. The SHIFT key is similar to the shift key of a <strong>type</strong>writer, <strong>and</strong> is used<br />
to alter the function of the next key pressed. (It is not necessary to hold the<br />
SHIFT key down; just press it once <strong>and</strong> then press the key to be used with<br />
it.)<br />
(
(#<br />
The gray keys other than the SHIFT key have either the mnemonic name of<br />
the instruction or the abbreviation of the data area written on them. The functions<br />
of these keys are described below.<br />
Pressed before the function code when inputting an instruction<br />
via its function code.<br />
Pressed to enter SFT (the Shift Register instruction).<br />
Input either after a function code to designate the differentiated<br />
form of an instruction or after a ladder instruction to designate<br />
an inverse condition.<br />
Pressed to enter AND (the AND instruction) or used with NOT<br />
to enter AND NOT.<br />
Pressed to enter OR (the OR instruction) or used with NOT to<br />
enter OR NOT.<br />
Pressed to enter CNT (the Counter instruction) or to designate<br />
a TC number that has already been defined as a counter.<br />
Pressed to enter LD (the Load instruction) or used with NOT to<br />
enter LD NOT. Also pressed to indicate an input bit.<br />
Pressed to enter OUT (the Output instruction) or used with<br />
NOT to enter OUT NOT. Also pressed to indicate an output bit.<br />
Pressed to enter TIM (the Timer instruction) or to designate a<br />
TC number that has already been defined as a timer.<br />
Pressed before designating an address in the TR area.<br />
Pressed before designating an address in the LR area.<br />
Pressed before designating an address in the HR area.<br />
Pressed before designating an address in the AR area.<br />
Pressed before designating an address in the DM area.<br />
Pressed before designating an indirect DM address.<br />
Pressed before designating a word address.<br />
Pressed before designating an oper<strong>and</strong> as a constant.<br />
Pressed before designating a bit address.<br />
Section 4-4
4-4-3 PC Modes<br />
Mode Changes<br />
Section 4-4<br />
The Programming Console is equipped with a switch to control the PC mode.<br />
To select one of the three operating modes—RUN, MONITOR, or PRO-<br />
GRAM—use the mode switch. The mode that you select will determine PC<br />
operation as well as the procedures that are possible from the Programming<br />
Console.<br />
RUN mode is the mode used for normal program execution. When the switch<br />
is set to RUN <strong>and</strong> the START input on the CPU Power Supply Unit is ON, the<br />
CPU will begin executing the program according to the program written in its<br />
Program Memory. Although monitoring PC operation from the Programming<br />
Console is possible in RUN mode, no data in any of the memory areas can<br />
be input or changed.<br />
MONITOR mode allows you to visually monitor in-progress program execution<br />
while controlling I/O status, changing PV (present values) or SV (set values),<br />
etc. In MONITOR mode, I/O processing is h<strong>and</strong>led in the same way as<br />
in RUN mode. MONITOR mode is generally used for trial system operation<br />
<strong>and</strong> final program adjustments.<br />
In PROGRAM mode, the PC does not execute the program. PROGRAM<br />
mode is for creating <strong>and</strong> changing programs, clearing memory areas, <strong>and</strong><br />
registering <strong>and</strong> changing the I/O table. A special Debug operation is also<br />
available within PROGRAM mode that enables checking a program for correct<br />
execution before trial operation of the system.<br />
TERMINAL mode <strong>and</strong> CONSOLE mode are Programming Console modes<br />
<strong>and</strong> are independent of RUN, MONITOR, <strong>and</strong> PROGRAM modes, i.e., the<br />
System can simultaneously be in both TERMINAL <strong>and</strong> RUN mode. TERMI-<br />
NAL <strong>and</strong> CONSOLE modes are described in Section 4-4-1 TERMINAL <strong>and</strong><br />
CONSOLE Modes.<br />
DANGER! Do not leave the Programming Console connected to the PC by an extension<br />
cable when in RUN mode. Noise entering via the extension cable can enter<br />
the PC, affecting the program <strong>and</strong> thus the controlled system.<br />
When the PC is turned on, the initial operating mode is affected by any Peripheral<br />
Device connected or mounted to the CPU as well as by designations<br />
made in DM 0900 as shown in the following table:<br />
Setting in DM 0900, bits 08 to 15 CPU connector Initial operating mode<br />
Set to start in mode set on Nothing connected RUN/CONSOLE mode<br />
Programming Console mode switch Programming Console mounted Mode set on mode switch <strong>and</strong><br />
CONSOLE mode<br />
Peripheral Interface Unit mounted PROGRAM/CONSOLE mode<br />
Set to continue mode PC was in Nothing connected Mode the PC was in when turned off.<br />
when last turned off Programming Console mounted<br />
Peripheral Interface Unit mounted<br />
Set to start in mode set in Nothing connected Mode set in bits 00 to 07 of DM 0900<br />
bits 00 to 07 of DM 0900 Programming Console mounted<br />
Peripheral Interface Unit mounted<br />
If the PC power supply is already turned on when a Peripheral Device is attached<br />
to the PC, the PC will stay in the same mode it was in before the Peripheral<br />
Device was attached. The mode can be changed with the mode<br />
switch on the Programming Console once the password has been entered.<br />
The mode will not change when a peripheral device is removed from the PC<br />
after PC power is turned on.<br />
('
((<br />
DANGER! Always confirm that the Programming Console is in PROGRAM mode when<br />
turning on the PC with a Programming Console connected unless another<br />
mode is desired for a specific purpose. If the Programming Console is in<br />
RUN mode when PC power is turned on, any program in Program Memory<br />
will be executed, possibly causing a PC-controlled system to begin operation.<br />
4-5 Preparation for Operation<br />
This section describes the procedures required to begin Programming Console<br />
operation. These include password entry, clearing memory, error message<br />
clearing, <strong>and</strong> I/O table operations. I/O table operations are also necessary<br />
at other times, e.g., when changes are to be made in Units used in the<br />
PC configuration.<br />
The following sequence of operations must be performed before beginning<br />
initial program input.<br />
1, 2, 3... 1. Confirm that all wiring for the PC has been installed <strong>and</strong> checked properly.<br />
2. Confirm that a RAM Unit is mounted as the Memory Unit <strong>and</strong> that the<br />
write-protect switch is OFF.<br />
3. Connect the Programming Console to the PC. Make sure that the Programming<br />
Console is securely connected or mounted to the CPU; improper<br />
connection may inhibit operation.<br />
4. Set the mode switch to PROGRAM mode.<br />
5. Turn on PC power.<br />
6. Enter the password.<br />
7. Clear memory.<br />
Each of these operations from entering the password on is described in detail<br />
in the following subsections. All operations should be done in PROGRAM<br />
mode unless otherwise noted.<br />
4-5-1 Entering the Password<br />
Section 4-5<br />
To gain access to the PC’s programming functions, you must first enter the<br />
password. The password prevents unauthorized access to the program.<br />
The PC prompts you for a password when PC power is turned on or, if PC<br />
power is already on, after the Programming Console has been connected to<br />
the PC. To gain access to the system when the “Password!” message appears,<br />
press CLR <strong>and</strong> then MONTR. Then press CLR to clear the display.
Beeper<br />
4-5-2 Clearing Memory<br />
If the Programming Console is connected to the PC when PC power is already<br />
on, the first display below will indicate the mode the PC was in before<br />
the Programming Console was connected. Ensure that the PC is in PRO-<br />
GRAM mode before you enter the password. When the password is entered,<br />
the PC will shift to the mode set on the mode switch, causing PC operation<br />
to begin if the mode is set to RUN or MONITOR. The mode can be<br />
changed to RUN or MONITOR with the mode switch after entering the password.<br />
���������<br />
��������<br />
��������� ��<br />
Indicates the mode set by the mode selector switch.<br />
Section 4-5<br />
8.Immediately after the password is input or anytime immediately after the<br />
mode has been changed, SHIFT <strong>and</strong> then the 1 key can be pressed to turn<br />
on <strong>and</strong> off the beeper that sounds when Programming Console keys are<br />
pressed. If BZ is displayed in the upper right corner, the beeper is operative.<br />
If BZ is not displayed, the beeper is not operative.<br />
This beeper also will also sound whenever an error occurs during PC operation.<br />
Beeper operation for errors is not affected by the above setting.<br />
Using the Memory Clear operation it is possible to clear all or part of the Program<br />
Memory, <strong>and</strong> the IR, HR, AR, DM <strong>and</strong> TC areas. Unless otherwise<br />
specified, the clear operation will clear all of the above memory areas, provided<br />
that the Memory Unit attached to the PC is a RAM Unit or an EEPROM<br />
Unit <strong>and</strong> the write-enable switch is ON. If the write-enable switch is OFF or<br />
the Memory Unit is an EPROM Unit, Program Memory cannot be cleared.<br />
(The system DM areas, DM 0900 to DM 0999 <strong>and</strong> DM 1900 to DM 1999, will<br />
not be cleared in any circumstances.)<br />
Before beginning to programming for the first time or when installing a new<br />
program, all areas should normally be cleared. Before clearing memory,<br />
check to see whether there is already a program loaded. If there is one, determine<br />
whether it is one that you need. If you do need the program, clear<br />
only the memory areas that you do not need. Check the existing program<br />
with the program check key sequence before using it. The check sequence is<br />
provided later in this section. Further debugging methods are provided in<br />
Section 7 Program Debugging <strong>and</strong> Execution. To clear all memory areas<br />
press CLR until all zeros are displayed, <strong>and</strong> then input the keystrokes given<br />
in the top line of the following key sequence. The branch lines shown in the<br />
sequence are used only when performing a partial memory clear, which is<br />
described below.<br />
Memory can be cleared in PROGRAM mode only.<br />
(
Key Sequence<br />
All Clear<br />
Partial Clear<br />
(,<br />
Both AR <strong>and</strong> HR areas<br />
TC area<br />
DM area<br />
Program Memory cleared<br />
from designated address.<br />
Retained if pressed<br />
The following procedure is used to clear memory completely. Before executing<br />
these steps, the write enable switch on the CPU must be switched ON. If<br />
the switch is not ON, the Program Memory <strong>and</strong> DM 1000 to DM 1899 cannot<br />
be cleared. (The HR, AR, <strong>and</strong> TC areas, as well as DM 0000 to 0899, will be<br />
cleared even if the write enable switch is OFF.) After turning on the switch,<br />
follow the key sequence described below.<br />
������ ���<br />
��� ���� ��� ��<br />
�����<br />
�����<br />
����� ��� ��� �<br />
�� ��� ��<br />
�������� ���<br />
��� �� ��� ��<br />
Continue pressing<br />
the CLR key once for<br />
each error message<br />
until “00000” appears<br />
on the display.<br />
All clear<br />
Section 4-5<br />
It is possible to retain the data in specified areas or part of the Program<br />
Memory. To retain the data in the HR <strong>and</strong> AR, TC, <strong>and</strong>/or DM areas, press<br />
the appropriate key after entering REC/RESET. HR is pressed to designate<br />
both the HR <strong>and</strong> AR areas. In other words, specifying that HR is to be retained<br />
will ensure that AR is retained also. If not specified for retention, both<br />
areas will be cleared. CNT is used for the entire TC area. The display will<br />
show those areas that will be cleared.<br />
It is also possible to retain a portion of the Program Memory from the beginning<br />
to a specified address. After designating the data areas to be retained,<br />
specify the first Program Memory address to be cleared. For example, to<br />
leave addresses 00000 to 00122 untouched, but to clear addresses from<br />
00123 to the end of Program Memory, input 00123.
4-5-3 Clearing Error Messages<br />
Key Sequence<br />
To leave the TC area uncleared <strong>and</strong> retaining Program Memory addresses<br />
00000 through 00122, input as follows:<br />
�����<br />
�����<br />
�����<br />
�������� ��� �<br />
�� ��� ��<br />
�������� ��� �<br />
�� ��<br />
�������� ��� �<br />
�� ��<br />
�������� ���<br />
��� �� ��<br />
Section 4-5<br />
Any error messages recorded in memory should be cleared. It is assumed<br />
here that the causes of any of the errors for which error messages appear<br />
have already been taken care of. If the beeper sounds when an attempt is<br />
made to clear an error message, eliminate the cause of the error, <strong>and</strong> then<br />
clear the error message (refer to Section 9 Troubleshooting).<br />
To display any recorded error messages, press CLR, FUN, <strong>and</strong> then<br />
MONTR. The first message will appear. Pressing MONTR again will clear the<br />
present message <strong>and</strong> display the next error message. Continue pressing<br />
MONTR until all messages have been cleared.<br />
Although error messages can be accessed in any mode, they can be cleared<br />
only in PROGRAM mode.<br />
("
4-6 Inputting, Modifying, <strong>and</strong> Checking the Program<br />
4<br />
Once a program is written in mnemonic code, it can be input directly into the<br />
PC from a Programming Console. Mnemonic code is keyed into Program<br />
Memory addresses from the Programming Console. Checking the program<br />
involves a syntax check to see that the program has been written according<br />
to syntax rules. once syntax errors are corrected, a trial execution can begin<br />
<strong>and</strong>, finally, correction under actual operating conditions can be made.<br />
The operations required to input a program are explained below. Operations<br />
to modify programs that already exist in memory are also provided in this<br />
section, as well as the procedure to obtain the current cycle time.<br />
Before starting to input a program, check to see whether there is a program<br />
already loaded. If there is a program already loaded that you do not need,<br />
clear it first using the program memory clear key sequence, then input the<br />
new program. If you need the previous program, be sure to check it with the<br />
program check key sequence <strong>and</strong> correct it as required. Further debugging<br />
methods are provided in Section 7 Debugging <strong>and</strong> Execution.<br />
4-6-1 Setting <strong>and</strong> Reading from Program Memory Address<br />
Key Sequence<br />
& % & % ' Section 4-6<br />
When inputting a program for the first time, it is generally written to Program<br />
Memory starting from address 00000. Because this address appears when<br />
the display is cleared, it is not necessary to specify it.<br />
When inputting a program starting from other than 00000 or to read or modify<br />
a program that already exists in memory, the desired address must be designated.<br />
To designate an address, press CLR <strong>and</strong> then input the desired address.<br />
Leading zeros of the address need not be input, i.e., when specifying<br />
an address such as 00053 you need to enter only 53. The contents of the<br />
designated address will not be displayed until the down key is pressed.<br />
Once the down key has been pressed to display the contents of the designated<br />
address, the up <strong>and</strong> down keys can be used to scroll through Program<br />
Memory. Each time one of these keys is pressed, the next or previous word<br />
in Program Memory will be displayed.<br />
If Program Memory is read in RUN or MONITOR mode, the ON/OFF status<br />
of any displayed bit will also be shown.
Example<br />
& % & % ' Section 4-6<br />
�����<br />
�����<br />
If the following mnemonic code has already been input into Program Memory,<br />
the key inputs below would produce the displays shown.<br />
��������� ���<br />
�� �����<br />
��������� ��<br />
��� �����<br />
��������� ���<br />
��� ���<br />
�����<br />
��� �����<br />
��������� ��<br />
�� �����<br />
4-6-2 Entering or Editing Programs<br />
Address Instruction Oper<strong>and</strong>s<br />
00200 LD 00000<br />
00201 AND 00001<br />
00202 TIM 000<br />
# 0123<br />
00203 LD 00100<br />
Programs can be entered or edited only in PROGRAM mode. The write-enable<br />
switch on the CPU must also be set to ON.<br />
The same procedure is used to either input a program for the first time or to<br />
edit a program that already exists. In either case, the current contents of Program<br />
Memory is overwritten, i.e., if there is no previous program, the<br />
NOP(00) instruction, which will be written at every address, will be overwritten.<br />
To input a program, just follow the mnemonic code that was produced from<br />
the ladder diagram, ensuring that the proper address is set before starting.<br />
Once the proper address is displayed, input the first instruction word, press<br />
WRITE. Next, input any oper<strong>and</strong>s required, <strong>and</strong> press WRITE after each, i.e.,<br />
WRITE is pressed at the end of each line of the mnemonic code. When<br />
WRITE is pressed, the designated instruction will be entered <strong>and</strong> the next<br />
display will appear. If the instruction requires two or more words, the next<br />
display will indicate the next oper<strong>and</strong> required <strong>and</strong> provide a default value for<br />
it. If the instruction requires only one word, the next address will be displayed.<br />
Continue inputting each line of the mnemonic code until the entire<br />
program has been entered.<br />
When inputting numeric values for oper<strong>and</strong>s, it is not necessary to input leading<br />
zeros. Leading zeros are required only when inputting function codes<br />
(see below). When designating oper<strong>and</strong>s, be sure to designate the data area<br />
for all but IR <strong>and</strong> SR addresses by pressing the corresponding data area key,<br />
<strong>and</strong> to designate each constant by pressing CONT/#. CONT/# is not required<br />
for counter or timer SVs (see below). The AR area is designated by pressing<br />
SHIFT <strong>and</strong> then HR. TC numbers as bit oper<strong>and</strong>s (i.e., completion flags) are<br />
designated by pressing either TIM or CNT before the address, depending on<br />
whether the TC number has been used to define a timer or a counter. To designate<br />
an indirect DM address, press CH/� before the address (pressing DM<br />
is not necessary for an indirect DM address).
Key Sequence<br />
& % & % ' Section 4-6<br />
Inputting SV for Counters<br />
<strong>and</strong> Timers<br />
Designating Instructions<br />
The SV (set value) for a timer or counter is generally entered as a constant,<br />
although inputting the address of a word that holds the SV is also possible.<br />
When inputting an SV as a constant, CONT/# is not required; just input the<br />
numeric value <strong>and</strong> press WRITE. To designate a word, press CLR <strong>and</strong> then<br />
input the word address as described above.<br />
The most basic instructions are input using the Programming Console keys<br />
provided for them. All other instructions are entered using function codes.<br />
These function codes are always written after the instruction’s mnemonic. If<br />
no function code is given, there should be a Programming Console key for<br />
that instruction.<br />
To designate the differentiated form of an instruction, press NOT after the<br />
function code.<br />
To input an instruction using a function code, set the address, press FUN,<br />
input the function code including any leading zeros, press NOT if the differentiated<br />
form of the instruction is desired, input any bit oper<strong>and</strong>s or definers<br />
required on the instruction line, <strong>and</strong> then press WRITE.<br />
Caution Enter function codes with care <strong>and</strong> be sure to press SHIFT when required.<br />
[Address displayed] [Instruction word] [Oper<strong>and</strong>]
Example<br />
& % & % ' Section 4-6<br />
�����<br />
�����<br />
The following program can be entered using the key inputs shown below.<br />
Displays will appear as indicated.<br />
�����<br />
�� �����<br />
���������<br />
��� ����<br />
�����<br />
��� ���<br />
����� ��� ����<br />
�����<br />
����� ���<br />
�����<br />
���������<br />
��� ����<br />
�����<br />
��� ����<br />
�����<br />
���� ���� ���<br />
����� ���� ����<br />
�����<br />
����� ����<br />
�����<br />
���������<br />
��� ����<br />
Address Instruction Oper<strong>and</strong>s<br />
00200 LD 00002<br />
00201 TIM 000<br />
# 0123<br />
00202 TIMH(15) 001<br />
# 0500
Error Messages<br />
#<br />
The following error messages may appear when inputting a program. Correct<br />
the error as indicated <strong>and</strong> continue with the input operation. The asterisks in<br />
the displays shown below will be replaced with numeric data, normally an<br />
address, in the actual display.<br />
Message Cause <strong>and</strong> correction<br />
�������� ��� An attempt was made to write to ROM or to write-protected RAM. Be sure a RAM<br />
Unit is mounted <strong>and</strong> that its write-protect switch is set to OFF.<br />
�������� ���� The instruction at the last address in memory is not NOP(00). Erase all<br />
unnecessary instructions at the end of the program or use a larger Memory Unit.<br />
�������� ���� An address was set that is larger than the highest memory in Program Memory.<br />
Input a smaller address<br />
����������� ��� Data has been input in the wrong format or beyond defined limits, e.g., a<br />
hexadecimal value has been input for BCD. Re-input the data. This error will<br />
generate a FALS 00 error.<br />
������� ��� ��� A data area address has been designated that exceeds the limit of the data area,<br />
e.g., an address is too large. Confirm the requirements for the instruction <strong>and</strong><br />
re-enter the address.<br />
4-6-3 Checking the Program<br />
Key Sequence<br />
& % & % ' Section 4-6<br />
Check Levels <strong>and</strong> Error<br />
Messages<br />
Once a program has been entered, it should be checked for syntax to be<br />
sure that no programming rules have been violated. This check should also<br />
be performed if the program has been changed in any way that might create<br />
a syntax error.<br />
To check the program, input the key sequence shown below. The numbers<br />
indicate the desired check level (see below). When the check level is entered,<br />
the program check will start. If an error is discovered, the check will<br />
stop <strong>and</strong> a display indicating the error will appear. Press SRCH to continue<br />
the check. If an error is not found, the program will be checked through to the<br />
first END(01), with a display indicating when each 64 instructions have been<br />
checked (e.g., display #1 of the example after the following table).<br />
CLR can be pressed to cancel the check after it has been started, <strong>and</strong> a display<br />
like display #2, in the example, will appear. When the check has reached<br />
the first END, a display like display #3 will appear.<br />
A syntax check can be performed on a program only in PROGRAM mode.<br />
(0, 1, 2, Check levels)<br />
To check<br />
up to END(01)<br />
To abort<br />
Three levels of program checking are available. The desired level must be<br />
designated to indicate the <strong>type</strong> of errors that are to be detected. The following<br />
table provides the error <strong>type</strong>s, displays, <strong>and</strong> explanations of all syntax<br />
errors. Check level 0 checks for <strong>type</strong> A, B, <strong>and</strong> C errors; check level 1, for<br />
<strong>type</strong> A <strong>and</strong> B errors; <strong>and</strong> check level 2, for <strong>type</strong> A errors only.<br />
The address where the error was generated will also be displayed.
& % & % ' Section 4-6<br />
Many of the following errors are for instructions that have not yet been described.<br />
Refer to 4-7 Controlling Bit Status or Section 5 Instruction Set for<br />
details on these.<br />
Type Message Meaning <strong>and</strong> appropriate response<br />
Type A ����� The program has been lost. Re-enter the program.<br />
�� ��� ����� There is no END(01) in the program. Write END(01) at the final address in the program.<br />
������� ��� The number of logic blocks <strong>and</strong> logic block instructions does not agree, i.e., either LD<br />
or LD NOT has been used to start a logic block whose execution condition has not been<br />
used by another instruction, or a logic block instruction has been used that does not<br />
have the required number of logic blocks. Check your program.<br />
���� ��� An instruction is in the wrong place in the program. Check instruction requirements <strong>and</strong><br />
correct the program.<br />
���� The same jump number, block number, or subroutine number has been used twice.<br />
Correct the program so that the same number is only used once for each. (Jump<br />
number 00 may be used as often as required.)<br />
��� ������ SBS(91) has been programmed for a subroutine number that does not exist. Correct<br />
the subroutine number or program the required subroutine.<br />
��������� A JME(04) is missing for a JMP(05). Correct the jump number or insert the proper<br />
JME(04).<br />
���� ��� STEP(08) with a section number <strong>and</strong> STEP(08) without a section number have been<br />
used correctly. Check STEP(08) programming requirements <strong>and</strong> correct the program.<br />
Type B ������� ��� IL(02) <strong>and</strong> ILC(03) are not used in pairs. Correct the program so that each IL(02) has<br />
a unique ILC(03). Although this error message will appear if more than one IL(02) is<br />
used with the same ILC(03), the program will executed as written. Make sure your<br />
program is written as desired before proceeding.<br />
����������� JMP(04) 00 <strong>and</strong> JME(05) 00 are not used in pairs. Although this error message will<br />
appear if more than one JMP(04) 00 is used with the same JME(05) 00, the program<br />
will be executed as written. Make sure your program is written as desired before<br />
proceeding.<br />
�������� ��� If the displayed address is that of SBN(92), two different subroutines have been defined<br />
with the same subroutine number. Change one of the subroutine numbers or delete one<br />
of the subroutines. If the displayed address is that of RET(93), RET(93) has not been<br />
used properly. Check requirements for RET(93) <strong>and</strong> correct the program.<br />
Type C ��� ������ JME(05) has been used with no JMP(04) with the same jump number. Add a JMP(04)<br />
with the same number or delete the JME(05) that is not being used.<br />
��� ������ A subroutine exists that is not called by SBS(91). Program a subroutine call in the<br />
proper place, or delete the subroutine if it is not required.<br />
Note The Programming Console does not check whether output bits are controlled<br />
by more than one instruction. Check the program from the LSS, FIT, or GPC<br />
to check for duplicate output bits.<br />
'
Example<br />
(<br />
The following example shows some of the displays that can appear as a result<br />
of a program check.<br />
�����<br />
4-6-4 Displaying the Cycle Time<br />
Example<br />
& % & % ' Section 4-6<br />
��������� ���<br />
�������� ������<br />
��������� ���<br />
Halts program check<br />
��������� ������<br />
Check continues until END(01)<br />
��������� ���<br />
��� �����������<br />
When errors are found<br />
������������ ���<br />
��� �����<br />
����������� ���<br />
��� ����<br />
������� ��������<br />
���<br />
Display #1<br />
Display #2<br />
Display #3<br />
Once the program has been cleared of syntax errors, the cycle time should<br />
be checked. This is possible only in RUN or MONITOR mode while the program<br />
is being executed. See Section 6 Program Execution Timing for details<br />
on the cycle time.<br />
To display the current average cycle time, press CLR then MONTR. The time<br />
displayed by this operation is a typical cycle time. The differences in displayed<br />
values depend on the execution conditions that exist when MONTR is<br />
pressed.<br />
Note “SCAN TIME” is displayed instead of cycle time.<br />
�����<br />
��������� ����<br />
�������<br />
��������� ����<br />
�������
4-6-5 Program Searches<br />
Key Sequence<br />
& % & % ' Section 4-6<br />
The program can be searched for occurrences of any designated instruction<br />
or data area address used in an instruction. Searches can be performed from<br />
any currently displayed address or from a cleared display.<br />
To designate a bit address, press SHIFT, press CONT/#, then input the address,<br />
including any data area designation required, <strong>and</strong> press SRCH. To<br />
designate an instruction, input the instruction just as when inputting the program<br />
<strong>and</strong> press SRCH. Once an occurrence of an instruction or bit address<br />
has been found, any additional occurrences of the same instruction or bit can<br />
be found by pressing SRCH again. SRCH’G will be displayed while a search<br />
is in progress.<br />
When the first word of a multiword instruction is displayed for a search operation,<br />
the other words of the instruction can be displayed by pressing the down<br />
key before continuing the search.<br />
If Program Memory is read in RUN or MONITOR mode, the ON/OFF status<br />
of any bit displayed will also be shown.
Example:<br />
Instruction Search<br />
Example:<br />
Bit Search<br />
,<br />
& % & % ' Section 4-6<br />
�����<br />
�����<br />
�� �����<br />
���������<br />
�� �����<br />
�����<br />
�� �����<br />
���������<br />
��� ������������<br />
�����<br />
�����<br />
�����<br />
��� ���<br />
���������<br />
��� ���<br />
����� ��� ����<br />
�����<br />
�����<br />
��������� ����<br />
���� �����<br />
��������� ����<br />
�� �����<br />
��������� ����<br />
��� �����<br />
�����<br />
��� ������������
4-6-6 Inserting <strong>and</strong> Deleting Instructions<br />
Key Sequences<br />
Example<br />
00100 00101<br />
00103<br />
00201<br />
& % & % ' Section 4-6<br />
In PROGRAM mode, any instruction that is currently displayed can be deleted<br />
or another instruction can be inserted before it. These are not possible<br />
in RUN or MONITOR modes.<br />
To insert an instruction, display the instruction before which you want the new<br />
instruction to be placed, input the instruction word in the same way as when<br />
inputting a program initially, <strong>and</strong> then press INS <strong>and</strong> the down key. If other<br />
words are required for the instruction, input these in the same way as when<br />
inputting the program initially.<br />
To delete an instruction, display the instruction word of the instruction to be<br />
deleted <strong>and</strong> then press DEL <strong>and</strong> the up key. All the words for the designated<br />
instruction will be deleted.<br />
Caution Be careful not to inadvertently delete instructions; there is no way to recover<br />
them without reinputting them completely.<br />
When an instruction is inserted or deleted, all addresses in Program Memory<br />
following the operation are adjusted automatically so that there are no blank<br />
addresses or no unaddressed instructions.<br />
The following mnemonic code shows the changes that are achieved in a program<br />
through the key sequences <strong>and</strong> displays shown below.<br />
Original Program<br />
Address Instruction Oper<strong>and</strong>s<br />
00000 LD 00100<br />
00001 AND 00101<br />
00002 LD 00201<br />
00003 AND NOT 00102<br />
00004 OR LD --<br />
00005 AND 00103<br />
00006 AND NOT 00104<br />
00007 OUT 00201<br />
00008 END(01) --<br />
Before Insertion: Before Deletion:<br />
00102<br />
00105<br />
00104<br />
00201<br />
END(01)<br />
00100 00101<br />
00103 00105 00104<br />
00201<br />
00102<br />
Delete<br />
00201<br />
END(01)<br />
"
,4<br />
& % & % ' Section 4-6<br />
Inserting an Instruction<br />
�����<br />
The following key inputs <strong>and</strong> displays show the procedure for achieving the<br />
program changes shown above.<br />
�����<br />
��� �����<br />
�����<br />
��� �����<br />
���������<br />
��� �����<br />
���������<br />
��� ��� �����<br />
�����<br />
��� �����<br />
�����<br />
��� �����<br />
������������<br />
��� �����<br />
����������� ���<br />
��� ��� �����<br />
���������<br />
��� �����<br />
Find the address<br />
prior to the insertion<br />
point<br />
Program After Insertion<br />
Address Instruction Oper<strong>and</strong>s<br />
00000 LD 00100<br />
00001 AND 00101<br />
00002 LD 00201<br />
00003 AND NOT 00102<br />
00004 OR LD --<br />
00005 AND 00103<br />
00006 AND 00105<br />
00007 AND NOT 00104<br />
00008 OUT 00201<br />
00009 END(01) --<br />
Insert the<br />
instruction
Deleting an Instruction<br />
�����<br />
�����<br />
��� �����<br />
�����<br />
��� �����<br />
���������<br />
��� �����<br />
���������<br />
��� ��� �����<br />
����� �������<br />
��� ��� �����<br />
����������� ���<br />
��� �����<br />
���������<br />
��� �����<br />
4-6-7 Branching Instruction Lines<br />
00000<br />
00000<br />
& % & % ' Section 4-6<br />
Branching<br />
point<br />
Branching<br />
point<br />
00002<br />
00002<br />
Find the instruction<br />
that requires deletion.<br />
Program After Deletion<br />
Address Instruction Oper<strong>and</strong>s<br />
00000 LD 00100<br />
00001 AND 00101<br />
00002 LD 00201<br />
00003 AND NOT 00102<br />
00004 OR LD --<br />
00005 AND 00103<br />
00006 AND 00105<br />
00007 OUT 00201<br />
00008 END(01) --<br />
Confirm that this is the<br />
instruction to be deleted.<br />
When an instruction line branches into two or more lines, it is sometimes<br />
necessary to use either interlocks or TR bits to maintain the execution condition<br />
that existed at a branching point. This is because instruction lines are<br />
executed across to a right-h<strong>and</strong> instruction before returning to the branching<br />
point to execute instructions one a branch line. If a condition exists on any of<br />
the instruction lines after the branching point, the execution condition could<br />
change during this time making proper execution impossible. The following<br />
diagrams illustrate this. In both diagrams, instruction 1 is executed before<br />
returning to the branching point <strong>and</strong> moving on to the branch line leading to<br />
instruction 2.<br />
Diagram A: Correct Operation<br />
00001<br />
Diagram B: Incorrect Operation<br />
Instruction 1<br />
Instruction 2<br />
Instruction 1<br />
Instruction 2<br />
Address Instruction Oper<strong>and</strong>s<br />
00000 LD 00000<br />
00001 Instruction 1<br />
00002 AND 00002<br />
00003 Instruction 2<br />
Address Instruction Oper<strong>and</strong>s<br />
00000 LD 00000<br />
00001 AND 00001<br />
00002 Instruction 1<br />
00003 AND 00002<br />
00004 Instruction 2<br />
,
TR Bits<br />
,<br />
00000<br />
& % & % ' Section 4-6<br />
00002<br />
If, as shown in diagram A, the execution condition that existed at the branching<br />
point cannot be changed before returning to the branch line (instructions<br />
at the far right do not change the execution condition), then the branch line<br />
will be executed correctly <strong>and</strong> no special programming measure is required.<br />
If, as shown in diagram B, a condition exists between the branching point<br />
<strong>and</strong> the last instruction on the top instruction line, the execution condition at<br />
the branching point <strong>and</strong> the execution condition after completing the top instruction<br />
line will sometimes be different, making it impossible to ensure correct<br />
execution of the branch line.<br />
There are two means of programming branching programs to preserve the<br />
execution condition. One is to use TR bits; the other, to use interlocks<br />
(IL(02)/IL(03)).<br />
The TR area provides eight bits, TR 0 through TR 7, that can be used to temporarily<br />
preserve execution conditions. If a TR bit is placed at a branching<br />
point, the current execution condition will be stored at the designated TR bit.<br />
When returning to the branching point, the TR bit restores the execution status<br />
that was saved when the branching point was first reached in program<br />
execution.<br />
The previous diagram B can be written as shown below to ensure correct<br />
execution. In mnemonic code, the execution condition is stored at the<br />
branching point using the TR bit as the oper<strong>and</strong> of the OUTPUT instruction.<br />
This execution condition is then restored after executing the right-h<strong>and</strong> instruction<br />
by using the same TR bit as the oper<strong>and</strong> of a LOAD instruction<br />
TR 0 Address Instruction Oper<strong>and</strong>s<br />
00001<br />
Diagram B: Corrected Using a TR bit<br />
Instruction 1<br />
Instruction 2<br />
00000 LD 00000<br />
00001 OUT TR 0<br />
00002 AND 00001<br />
00003 Instruction 1<br />
00004 LD TR 0<br />
00005 AND 00002<br />
00006 Instruction 2<br />
In terms of actual instructions the above diagram would be as follows: The<br />
status of IR 00000 is loaded (a LOAD instruction) to establish the initial execution<br />
condition. This execution condition is then output using an OUTPUT<br />
instruction to TR 0 to store the execution condition at the branching point.<br />
The execution condition is then ANDed with the status of IR 00001 <strong>and</strong> instruction<br />
1 is executed accordingly. The execution condition that was stored<br />
at the branching point is then re-loaded (a LOAD instruction with TR 0 as the<br />
oper<strong>and</strong>), this is ANDed with the status of IR 00002, <strong>and</strong> instruction 2 is executed<br />
accordingly.
& % & % ' Section 4-6<br />
TR 0<br />
TR 1<br />
00000 00001<br />
00002<br />
00004<br />
00005<br />
The following example shows an application using two TR bits.<br />
00003<br />
Instruction 1<br />
Instruction 2<br />
Instruction 3<br />
Instruction 4<br />
Address Instruction Oper<strong>and</strong>s<br />
00000 LD 00000<br />
00001 OUT TR 0<br />
00002 AND 00001<br />
00003 OUT TR 1<br />
00004 AND 00002<br />
00005 OUT 00500<br />
00006 LD TR 1<br />
00007 AND 00003<br />
00008 OUT 00501<br />
00009 LD TR 0<br />
00010 AND 00004<br />
00011 OUT 00502<br />
00012 LD TR 0<br />
00013 AND NOT 00005<br />
00014 OUT 00503<br />
In this example, TR 0 <strong>and</strong> TR 1 are used to store the execution conditions at<br />
the branching points. After executing instruction 1, the execution condition<br />
stored in TR 1 is loaded for an AND with the status IR 00003. The execution<br />
condition stored in TR 0 is loaded twice, the first time for an AND with the<br />
status of IR 00004 <strong>and</strong> the second time for an AND with the inverse of the<br />
status of IR 00005.<br />
TR bits can be used as many times as required as long as the same TR bit is<br />
not used more than once in the same instruction block. Here, a new instruction<br />
block is begun each time execution returns to the bus bar. If, in a single<br />
instruction block, it is necessary to have more than eight branching points<br />
that require the execution condition be saved, interlocks (which are described<br />
next) must be used.<br />
When drawing a ladder diagram, be careful not to use TR bits unless necessary.<br />
Often the number of instructions required for a program can be reduced<br />
<strong>and</strong> ease of underst<strong>and</strong>ing a program increased by redrawing a diagram that<br />
would otherwise required TR bits. In both of the following pairs of diagrams,<br />
the bottom versions require fewer instructions <strong>and</strong> do not require TR bits. In<br />
the first example, this is achieved by reorganizing the parts of the instruction<br />
block: the bottom one, by separating the second OUTPUT instruction <strong>and</strong><br />
using another LOAD instruction to create the proper execution condition for<br />
it.<br />
,
Interlocks<br />
,#<br />
& % & % ' Section 4-6<br />
Note Although simplifying programs is always a concern, the order of execution of<br />
instructions is sometimes important. For example, a MOVE instruction may<br />
be required before the execution of a BINARY ADD instruction to place the<br />
proper data in the required oper<strong>and</strong> word. Be sure that you have considered<br />
execution order before reorganizing a program to simplify it.<br />
00000<br />
00000<br />
00000<br />
00001<br />
TR 0<br />
TR 0<br />
00002<br />
00004<br />
00001<br />
00001<br />
00003<br />
00001 00002<br />
00003<br />
00000<br />
00001<br />
00004<br />
Instruction 1<br />
Instruction 2<br />
Instruction 2<br />
Instruction 1<br />
Instruction 1<br />
Instruction 2<br />
Instruction 1<br />
Instruction 2<br />
Note TR bits are only used when programming using mnemonic code. They are<br />
not necessary when inputting ladder diagrams directly, as is possible from a<br />
GPC. The above limitations on the number of branching points requiring TR<br />
bits, <strong>and</strong> considerations on methods to reduce the number of programming<br />
instructions, still hold.<br />
The problem of storing execution conditions at branching points can also be<br />
h<strong>and</strong>led by using the INTERLOCK (IL(02)) <strong>and</strong> INTERLOCK CLEAR<br />
(ILC(03)) instructions to eliminate the branching point completely while allowing<br />
a specific execution condition to control a group of instructions. The IN-<br />
TERLOCK <strong>and</strong> INTERLOCK CLEAR instructions are always used together.
& % & % ' Section 4-6<br />
00000<br />
00001<br />
00002<br />
00003<br />
00005<br />
00006<br />
00000<br />
00001<br />
00002<br />
00004<br />
When an INTERLOCK instruction is placed before a section of a ladder program,<br />
the execution condition for the INTERLOCK instruction will control the<br />
execution of all instruction up to the next INTERLOCK CLEAR instruction. If<br />
the execution condition for the INTERLOCK instruction is OFF, all right-h<strong>and</strong><br />
instructions through the next INTERLOCK CLEAR instruction will be executed<br />
with OFF execution conditions to reset the entire section of the ladder<br />
diagram. The effect that this has on particular instructions is described in 5-7<br />
INTERLOCK <strong>and</strong> INTERLOCK CLEAR - IL(02) <strong>and</strong> ILC(03).<br />
Diagram B on page 81 can also be corrected with an interlock. Here, the conditions<br />
leading up to the branching point are placed on an instruction line for<br />
the INTERLOCK instruction, all of lines leading from the branching point are<br />
written as separate instruction lines, <strong>and</strong> another instruction line is added for<br />
the INTERLOCK CLEAR instruction. No conditions are allowed on the instruction<br />
line for INTERLOCK CLEAR. Note that neither INTERLOCK nor<br />
INTERLOCK CLEAR requires an oper<strong>and</strong>.<br />
IL(02) Address Instruction Oper<strong>and</strong>s<br />
Instruction 1<br />
Instruction 2<br />
ILC(03)<br />
00000 LD 00000<br />
00001 IL(02) ---<br />
00002 LD 00001<br />
00003 Instruction 1<br />
00004 LD 00002<br />
00005 Instruction 2<br />
00006 ILC(03) ---<br />
If IR 00000 is ON in the revised version of diagram B, above, the status of IR<br />
00001 <strong>and</strong> that of IR 00002 would determine the execution conditions for instructions<br />
1 <strong>and</strong> 2, respectively. Because IR 00000 is ON, this would produce<br />
the same results as ANDing the status of each of these bits. If IR 00000 is<br />
OFF, the INTERLOCK instruction would produce an OFF execution condition<br />
for instructions 1 <strong>and</strong> 2 <strong>and</strong> then execution would continue with the instruction<br />
line following the INTERLOCK CLEAR instruction.<br />
As shown in the following diagram, more than one INTERLOCK instruction<br />
can be used within one instruction block; each is effective through the next<br />
INTERLOCK CLEAR instruction.<br />
IL(02)<br />
Instruction 1<br />
IL(02)<br />
Instruction 2<br />
Instruction 3<br />
Instruction 4<br />
ILC(03)<br />
Address Instruction Oper<strong>and</strong>s<br />
00000 LD 00000<br />
00001 IL(02) ---<br />
00002 LD 00001<br />
00003 Instruction 1<br />
00004 LD 00002<br />
00005 IL(02) ---<br />
00006 LD 00003<br />
00007 AND NOT 00004<br />
00008 Instruction 2<br />
00009 LD 00005<br />
00010 Instruction 3<br />
00011 LD 00006<br />
00012 Instruction 4<br />
00013 ILC(03) ---<br />
,'
4-6-8 Jumps<br />
,(<br />
& % & % ' Section 4-6<br />
00000<br />
00001<br />
00002<br />
If IR 00000 in the above diagram is OFF (i.e., if the execution condition for<br />
the first INTERLOCK instruction is OFF), instructions 1 through 4 would be<br />
executed with OFF execution conditions <strong>and</strong> execution would move to the<br />
instruction following the INTERLOCK CLEAR instruction. If IR 00000 is ON,<br />
the status of IR 00001 would be loaded as the execution condition for instruction<br />
1 <strong>and</strong> then the status of IR 00002 would be loaded to form the execution<br />
condition for the second INTERLOCK instruction. If IR 00002 is OFF, instructions<br />
2 through 4 will be executed with OFF execution conditions. If IR 00002<br />
is ON, IR 00003, IR 00005, <strong>and</strong> IR 00006 will determine the first execution<br />
condition in new instruction lines.<br />
A specific section of a program can be skipped according to a designated<br />
execution condition. Although this is similar to what happens when the execution<br />
condition for an INTERLOCK instruction is OFF, with jumps, the oper<strong>and</strong>s<br />
for all instructions maintain status. Jumps can therefore be used to control<br />
devices that require a sustained output, e.g., pneumatics <strong>and</strong> hydraulics,<br />
whereas interlocks can be used to control devices that do not required a sustained<br />
output, e.g., electronic instruments.<br />
Jumps are created using the JUMP (JMP(04)) <strong>and</strong> JUMP END (JME(05))<br />
instructions. If the execution condition for a JUMP instruction is ON, the program<br />
is executed normally as if the jump did not exist. If the execution condition<br />
for the JUMP instruction is OFF, program execution moves immediately<br />
to a JUMP END instruction without changing the status of anything between<br />
the JUMP <strong>and</strong> JUMP END instruction.<br />
All JUMP <strong>and</strong> JUMP END instructions are assigned jump numbers ranging<br />
between 00 <strong>and</strong> 49. There are two <strong>type</strong>s of jumps. The jump number used<br />
determines the <strong>type</strong> of jump.<br />
A jump can be defined using jump numbers 01 through 49 only once, i.e.,<br />
each of these numbers can be used once in a JUMP instruction <strong>and</strong> once in<br />
a JUMP END instruction. When a JUMP instruction assigned one of these<br />
numbers is executed, execution moves immediately to the JUMP END instruction<br />
that has the same number as if all of the instruction between them<br />
did not exist. Diagram B from the TR bit <strong>and</strong> interlock example could be redrawn<br />
as shown below using a jump. Although 01 has been used as the<br />
jump number, any number between 01 <strong>and</strong> 49 could be used as long as it<br />
has not already been used in a different part of the program. JUMP <strong>and</strong><br />
JUMP END require no other oper<strong>and</strong> <strong>and</strong> JUMP END never has conditions<br />
on the instruction line leading to it.<br />
Diagram B: Corrected with a Jump<br />
JMP(04) 01 Address Instruction Oper<strong>and</strong>s<br />
Instruction 1<br />
Instruction 2<br />
JME(05) 01<br />
00000 LD 00000<br />
00001 JMP(04) 01<br />
00002 LD 00001<br />
00003 Instruction 1<br />
00004 LD 00002<br />
00005 Instruction 2<br />
00006 JME(05) 01<br />
This version of diagram B would have a shorter execution time when 00000<br />
was OFF than any of the other versions.
& % & % ' Section 4-6<br />
00000<br />
00001<br />
00002<br />
00003<br />
00005<br />
00006<br />
00004<br />
The other <strong>type</strong> of jump is created with a jump number of 00. As many jumps<br />
as desired can be created using jump number 00 <strong>and</strong> JUMP instructions using<br />
00 can be used consecutively without a JUMP END using 00 between<br />
them. It is even possible for all JUMP 00 instructions to move program<br />
execution to the same JUMP END 00, i.e., only one JUMP END 00<br />
instruction is required for all JUMP 00 instruction in the program. When 00 is<br />
used as the jump number for a JUMP instruction, program execution moves<br />
to the instruction following the next JUMP END instruction with a jump number<br />
of 00. Although, as in all jumps, no status is changed <strong>and</strong> no instructions<br />
are executed between the JUMP 00 <strong>and</strong> JUMP END 00 instructions, the program<br />
must search for the next JUMP END 00 instruction, producing a slightly<br />
longer execution time.<br />
Execution of programs containing multiple JUMP 00 instructions for one<br />
JUMP END 00 instruction is similar to that of interlocked sections. The following<br />
diagram is the same as that used for the interlock example above, except<br />
redrawn with jumps. The execution of this diagram would differ from that of<br />
the diagram described above (e.g., in the previous diagram interlocks would<br />
reset certain parts of the interlocked section, however, jumps do not affect<br />
the status of any bit between the JUMP <strong>and</strong> JUMP END instructions).<br />
JMP(04) 00<br />
Instruction 1<br />
JMP(04) 00<br />
Instruction 2<br />
Instruction 3<br />
Instruction 4<br />
JME(05) 00<br />
Address Instruction Oper<strong>and</strong>s<br />
00000 LD 00000<br />
00001 JMP(04) 00<br />
00002 LD 00001<br />
00003 Instruction 1<br />
00004 LD 00002<br />
00005 JMP(04) 00<br />
00006 LD 00003<br />
00007 AND NOT 00004<br />
00008 Instruction 2<br />
00009 LD 00005<br />
00010 Instruction 3<br />
00011 LD 00006<br />
00012 Instruction 4<br />
00013 JME(05) 00<br />
,
4-7 Controlling Bit Status<br />
,,<br />
There are five instructions that can be used generally to control individual bit<br />
status. These are the OUTPUT, OUTPUT NOT, DIFFERENTIATE UP, DIF-<br />
FERENTIATE DOWN, <strong>and</strong> KEEP instructions. All of these instructions appear<br />
as the last instruction in an instruction line <strong>and</strong> take a bit address for an<br />
oper<strong>and</strong>. Although details are provided in 5-6 Bit Control Instructions, these<br />
instructions (except for OUTPUT <strong>and</strong> OUTPUT NOT, which have already<br />
been introduced) are described here because of their importance in most<br />
programs. Although these instructions are used to turn ON <strong>and</strong> OFF output<br />
bits in the IR area (i.e., to send or stop output signals to external devices),<br />
they are also used to control the status of other bits in the IR area or in other<br />
data areas.<br />
4-7-1 DIFFERENTIATE UP <strong>and</strong> DIFFERENTIATE DOWN<br />
4-7-2 KEEP<br />
# Section 4-7<br />
00000<br />
00001<br />
DIFFERENTIATE UP <strong>and</strong> DIFFERENTIATE DOWN instructions are used to<br />
turn the oper<strong>and</strong> bit ON for one scan at a time. The DIFFERENTIATE UP<br />
instruction turns ON the oper<strong>and</strong> bit for one scan after the execution condition<br />
for it goes from OFF to ON; the DIFFERENTIATE DOWN instruction<br />
turns ON the oper<strong>and</strong> bit for one scan after the execution condition for it goes<br />
from ON to OFF. Both of these instructions require only one line of mnemonic<br />
code.<br />
DIFU(13) 00200<br />
DIFD(14) 00201<br />
Address Instruction Oper<strong>and</strong>s<br />
00000 LD 00000<br />
00001 DIFU(13) 00200<br />
Address Instruction Oper<strong>and</strong>s<br />
00000 LD 00001<br />
00001 DIFD(14) 00201<br />
Here, IR 00200 will be turned ON for one scan after IR 00000 goes ON. The<br />
next time DIFU(13) 00200 is executed, IR 00200 will be turned OFF, regardless<br />
of the status of IR 00000. With the DIFFERENTIATE DOWN instruction,<br />
IR 00201 will be turned ON for one scan after IR 00001 goes OFF (IR 00201<br />
will be kept OFF until then), <strong>and</strong> will be turned OFF the next time DIFD(14)<br />
00201 is executed.<br />
The KEEP instruction is used to maintain the status of the oper<strong>and</strong> bit based<br />
on two execution conditions. To do this, the KEEP instruction is connected to<br />
two instruction lines. When the execution condition at the end of the first instruction<br />
line is ON, the oper<strong>and</strong> bit of the KEEP instruction is turned ON.<br />
When the execution condition at the end of the second instruction line is ON,<br />
the oper<strong>and</strong> bit of the KEEP instruction is turned OFF. The oper<strong>and</strong> bit for the<br />
KEEP instruction will maintain its ON or OFF status even if it is located in an<br />
interlocked section of the diagram.
( ' # Section 4-8<br />
00002<br />
00004<br />
00005<br />
00003<br />
In the following example, HR 0000 will be turned ON when IR 00002 is ON<br />
<strong>and</strong> IR 00003 is OFF. HR 0000 will then remain ON until either IR 00004 or<br />
IR 00005 turns ON. With KEEP, as with all instructions requiring more than<br />
one instruction line, the instruction lines are coded first before the instruction<br />
that they control.<br />
S: set input KEEP(11)<br />
R: reset input<br />
4-7-3 Self-maintaining Bits (Seal)<br />
00002 00003<br />
HR 0000<br />
00004<br />
00005<br />
HR 0000<br />
Address Instruction Oper<strong>and</strong>s<br />
00000 LD 00002<br />
00001 AND NOT 00003<br />
00002 LD 00004<br />
00003 OR 00005<br />
00004 KEEP(11) HR 0000<br />
Although the KEEP instruction can be used to create self-maintaining bits, it<br />
is sometimes necessary to create self-maintaining bits in another way so that<br />
they can be turned OFF when in an interlocked section of a program.<br />
To create a self-maintaining bit, the oper<strong>and</strong> bit of an OUTPUT instruction is<br />
used as a condition for the same OUTPUT instruction in an OR setup so that<br />
the oper<strong>and</strong> bit of the OUTPUT instruction will remain ON or OFF until<br />
changes occur in other bits. At least one other condition is used just before<br />
the OUTPUT instruction to function as a reset. Without this reset, there would<br />
be no way to control the oper<strong>and</strong> bit of the OUTPUT instruction.<br />
The above diagram for the KEEP instruction can be rewritten as shown below.<br />
The only difference in these diagrams would be their operation in an interlocked<br />
program section when the execution condition for the INTERLOCK<br />
instruction was ON. Here, just as in the same diagram using the KEEP instruction,<br />
two reset bits are used, i.e., HR 0000 can be turned OFF by turning<br />
ON either IR 00004 or IR 00005.<br />
HR 0000<br />
4-8 Work Bits (Internal Relays)<br />
Address Instruction Oper<strong>and</strong>s<br />
00000 LD 00002<br />
00001 AND NOT 00003<br />
00002 OR HR 0000<br />
00003 AND NOT 00004<br />
00004 OR NOT 00005<br />
00005 OUT HR 0000<br />
In programming, combining conditions to directly produce execution conditions<br />
is often extremely difficult. These difficulties are easily overcome, however,<br />
by using certain bits to trigger other instructions indirectly. Such programming<br />
is achieved by using work bits. Sometimes entire words are required<br />
for these purposes. These words are referred to as work words.<br />
Work bits are not transferred to or from the PC. They are bits selected by the<br />
programmer to facilitate programming as described above. I/O bits <strong>and</strong> other<br />
dedicated bits cannot be used as works bits. All bits in the IR area that are<br />
not allocated as I/O bits, <strong>and</strong> certain unused bits in the AR area, are available<br />
for use as work bits. Be careful to keep an accurate record of how <strong>and</strong><br />
where you use work bits. This helps in program planning <strong>and</strong> writing, <strong>and</strong><br />
also aids in debugging operations.<br />
,"
( ' # Section 4-8<br />
Work Bit Applications Examples given later in this subsection show two of the most common ways<br />
to employ work bits. These should act as a guide to the almost limitless number<br />
of ways in which the work bits can be used. Whenever difficulties arise in<br />
programming a control action, consideration should be given to work bits <strong>and</strong><br />
how they might be used to simplify programming.<br />
Reducing Complex<br />
Conditions<br />
"4<br />
00000<br />
00002<br />
00003<br />
24600<br />
24600<br />
00004<br />
24600<br />
00006<br />
00007<br />
00001<br />
00004<br />
Work bits are often used with the OUTPUT, OUTPUT NOT, DIFFERENTIATE<br />
UP, DIFFERENTIATE DOWN, <strong>and</strong> KEEP instructions. The work bit is used<br />
first as the oper<strong>and</strong> for one of these instructions so that later it can be used<br />
as a condition that will determine how other instructions will be executed.<br />
Work bits can also be used with other instructions, e.g., with the SHIFT REG-<br />
ISTER instruction (SFT(10)). An example of the use of work words <strong>and</strong> bits<br />
with the SHIFT REGISTER instruction is provided in 5-11-1 SHIFT REGIS-<br />
TER - SFT(10).<br />
Although they are not always specifically referred to as work bits, many of the<br />
bits used in the examples in Section 5 Instruction Set use work bits. Underst<strong>and</strong>ing<br />
the use of these bits is essential to effective programming.<br />
Work bits can be used to simplify programming when a certain combination<br />
of conditions is repeatedly used in combination with other conditions. In the<br />
following example, IR 00000, IR 00001, IR 00002, <strong>and</strong> IR 00003 are combined<br />
in a logic block that stores the resulting execution condition as the status<br />
of IR 24600. IR 24600 is then combined with various other conditions to<br />
determine output conditions for IR 00100, IR 00101, <strong>and</strong> IR 00102, i.e., to<br />
turn the outputs allocated to these bits ON or OFF.<br />
00005<br />
00005<br />
24600<br />
00100<br />
00101<br />
00102<br />
Address Instruction Oper<strong>and</strong>s<br />
00000 LD 00000<br />
00001 AND NOT 00001<br />
00002 OR 00002<br />
00003 OR NOT 00003<br />
00004 OUT 24600<br />
00005 LD 24600<br />
00006 AND 00004<br />
00007 AND NOT 00005<br />
00008 OUT 00100<br />
00009 LD 24600<br />
00010 OR NOT 00004<br />
00011 AND 00005<br />
00012 OUT 00101<br />
00013 LD NOT 24600<br />
00014 OR 00006<br />
00015 OR 00007<br />
00016 OUT 00102
Differentiated Conditions Work bits can also be used if differential treatment is necessary for some, but<br />
not all, of the conditions required for execution of an instruction. In this example,<br />
IR 00100 must be left ON continuously as long as IR 00001 is ON <strong>and</strong><br />
both IR 00002 <strong>and</strong> IR 00003 are OFF, or as long as IR 00004 is ON <strong>and</strong> IR<br />
00005 is OFF. It must be turned ON for only one scan each time IR 00000<br />
turns ON (unless one of the preceding conditions is keeping it ON continuously).<br />
This action is easily programmed by using IR 22500 as a work bit as the oper<strong>and</strong><br />
of the DIFFERENTIATE UP instruction (DIFU(13)). When IR 00000<br />
turns ON, IR 22500 will be turned ON for one scan <strong>and</strong> then be turned OFF<br />
the next scan by DIFU(13). Assuming the other conditions controlling IR<br />
00100 are not keeping it ON, the work bit IR 22500 will turn IR 00100 ON for<br />
one scan only.<br />
22500<br />
00000<br />
00001 00002 00003<br />
00004 00005<br />
4-9 Programming Precautions<br />
00000<br />
00001<br />
00001<br />
00000<br />
00000<br />
00001<br />
00004<br />
00002<br />
00003<br />
00004<br />
00004<br />
Diagram A<br />
Diagram B<br />
DIFU(13) 22500<br />
00100<br />
Address Instruction Oper<strong>and</strong>s<br />
00000 LD 00000<br />
00001 DIFU(13) 22500<br />
00002 LD 22500<br />
00003 LD 00001<br />
00004 AND NOT 00002<br />
00005 AND NOT 00003<br />
00006 OR LD ---<br />
00007 LD 00004<br />
00008 AND NOT 00005<br />
00009 OR LD ---<br />
00010 OUT 00100<br />
The number of conditions that can be used in series or parallel is unlimited<br />
as long as the memory capacity of the PC is not exceeded. Therefore, use as<br />
many conditions as required to draw a clear diagram. Although very complicated<br />
diagrams can be drawn with instruction lines, there must not be any<br />
conditions on lines running vertically between two other instruction lines. Diagram<br />
A shown below, for example, is not possible, <strong>and</strong> should be drawn as<br />
diagram B. Mnemonic code is provided for diagram B only; coding diagram A<br />
would be impossible.<br />
00002<br />
00003<br />
Instruction 1<br />
Instruction 2<br />
Instruction 1<br />
Instruction 2<br />
Section 4-9<br />
Address Instruction Oper<strong>and</strong>s<br />
00000 LD 00001<br />
00001 AND 00004<br />
00002 OR 00000<br />
00003 AND 00002<br />
00004 Instruction 1<br />
00005 LD 00000<br />
00006 AND 00004<br />
00007 OR 00001<br />
00008 AND NOT 00003<br />
00009 Instruction 2<br />
"
"<br />
00000<br />
00001 00207<br />
00001<br />
00000<br />
00207<br />
25313<br />
The number of times any particular bit can be assigned to conditions is not<br />
limited, so use them as many times as required to simplify your program.<br />
Often, complicated programs are the result of attempts to reduce the number<br />
of times a bit is used.<br />
Except for instructions for which conditions are not allowed (e.g., INTER-<br />
LOCK CLEAR <strong>and</strong> JUMP END, see below), every instruction line must also<br />
have at least one condition on it to determine the execution condition for the<br />
instruction at the right. Again, diagram A , below, must be drawn as diagram<br />
B. If an instruction must be continuously executed (e.g., if an output must<br />
always be kept ON while the program is being executed), the Always ON<br />
Flag (SR 25313) in the SR area can be used.<br />
Diagram A<br />
Diagram B<br />
Instruction<br />
Instruction<br />
Address Instruction Oper<strong>and</strong>s<br />
00000 LD 25313<br />
00001 Instruction<br />
There are a few exceptions to this rule, including the INTERLOCK CLEAR,<br />
JUMP END, <strong>and</strong> step instructions. Each of these instructions is used as the<br />
second of a pair of instructions <strong>and</strong> is controlled by the execution condition of<br />
the first of the pair. Conditions should not be placed on the instruction lines<br />
leading to these instructions. Refer to Section 5 Instruction Set for details.<br />
When drawing ladder diagrams, it is important to keep in mind the number of<br />
instructions that will be required to input it. In diagram A, below, an OR LOAD<br />
instruction will be required to combine the top <strong>and</strong> bottom instruction lines.<br />
This can be avoided by redrawing as shown in diagram B so that no AND<br />
LOAD or OR LOAD instructions are required. Refer to 5-5-2 AND LOAD <strong>and</strong><br />
OR LOAD for more details <strong>and</strong> 4-6 Inputting, Modifying <strong>and</strong> Checking the<br />
Program for further examples.<br />
Diagram A<br />
Diagram B<br />
00207<br />
00207<br />
Section 4-9<br />
Address Instruction Oper<strong>and</strong>s<br />
00000 LD 00000<br />
00001 LD 00001<br />
00002 AND 00207<br />
00003 OR LD ---<br />
00004 OUT 00207<br />
Address Instruction Oper<strong>and</strong>s<br />
00000 LD 00001<br />
00001 AND 00207<br />
00002 OR 00000<br />
00003 OUT 00207
)! Section 4-10<br />
4-10 Program Execution<br />
When program execution is started, the CPU scans the program from top to<br />
bottom, checking all conditions <strong>and</strong> executing all instructions accordingly as it<br />
moves down the bus bar. It is important that instructions be placed in the<br />
proper order so that, for example, the desired data is moved to a word before<br />
that word is used as the oper<strong>and</strong> for an instruction. Remember that an instruction<br />
line is completed to the terminal instruction at the right before executing<br />
instruction lines branching from the first instruction line to other terminal<br />
instructions at the right.<br />
Program execution is only one of the tasks carried out by the CPU as part of<br />
the scan time. Refer to Section 6 Program Execution Timing for details.<br />
"
���� ������� �������� ���� ����������� �� ��� ����� ���� ������ �� ����������� ���� ��� �������� ��� ������ ������� ����<br />
���� ���� ������ ��� ����� ���� ���� �����<br />
��� ������������ ��� ��������� �� ��������� ����������� �� ����������� ������ ����� ������ ������� ������ ������� ���<br />
����������� ��� ������� ������������� ����� ��� ������� ������������� ���� �������� ������������� ���� �������� ��������<br />
������ ���� ���������� ������������� ���� ���������� ������������� ������ ����������� ������������� ��� �����������<br />
������������� ����� ������������� ������������ ��� ������� �������������<br />
���� ������������� ���� �� ����� ��� ������� ������������� ��� ���� �� ������� ��������� �� ����� ������������� ����� � ���<br />
���������� ���� ����� �� ���� �� ���� �� � ��� ���� ��� ���� ������ ��� ��� ��� ����� ��� �������� �������� ����� �����<br />
������������ ��� ����� ���� �� ������� ������ ���� ������� ��� ������ ������������ ���� ��� �� ���� �� ������� ��������� ��<br />
����� ������������ �� ����� ��� ������ ������������ ���� �� �������� �� ���� ������ ��� ��������� ��������� �� �������� ��<br />
����� ������������ �� ������ ��� ������� ��� �������� ������������ ����� ���� ����������� ������ ���� ���������<br />
��� �������� ���������������������������������������������������������������� ��<br />
��� ����������� ������ �������������������������������������������������������� ��<br />
��� ���� ������ ������� ������� ��� ����� ����������������������������������������� ��<br />
��� �������������� ������������ �������������������������������������������������� ��<br />
��� ������ ������� ������������ ������������������������������������������������ ���<br />
����� ����� ���� ���� ���� ��� ���� ��� ��� �� ��� ����������������� ���<br />
����� ��� ���� ��� �� ���� ����������������������������������������� ���<br />
����� ������ ���������� ��� ����� ������������ ������������������������������ ���<br />
��� ��� ������� ������������ ���������������������������������������������������� ���<br />
����� ������ ��� ������ ��� �� ��� ��� ��� ��� ��������������������� ���<br />
����� ������������� �� ��� ���� �� �������� ��� �������� �������������� ���<br />
����� ���� �� �������� ������������������������������������������������� ���<br />
��� ��������� ��� ��������� ����� �� ������ ��� ������� �������������������� ���<br />
��� ���� ��� ���� ��� �� ������� ��� ������� �������������������������������� ���<br />
��� ��� �� ������� ���������������������������������������������������������� ���<br />
���� ����� ��� ������� ������������ ���������������������������������������������� ���<br />
������ ����� �� ��� ���������������������������������������������������� ���<br />
������ ���������� ����� �� �������� ����������������������������������� ���<br />
������ ������� �� ��� ������������������������������������������������� ���<br />
������ ���������� ������� �� �������� ������������������������������� ���<br />
������ ���������� ���� ������� �� ������� ������������������������� ���<br />
������ ���������� ������� �� ������� �������������������������������� ���<br />
���� ���� �������� ������������������������������������������������������������ ���<br />
������ ����� �������� �� ������� ���������������������������������������� ���<br />
������ ���� ����� �� �������� ����������������������������������������� ���<br />
������ ���������� ���� ����� �� ������� ������������������������������ ���<br />
������ ���������� ����� ���� �� ������� ������������������������������� ���<br />
������ ���������� ����� ����� �� ������� ������������������������������ ���<br />
������ ������ ���� �� ������� ������������������������������������������ ���<br />
������ ������ ����� �� ������� ���������������������������������������� ���<br />
������ ��� ����� ����� ���� �� ������� ��������������������������������� ���<br />
������ ��� ����� ����� ����� �� ������� �������������������������������� ���<br />
������� ���������� ����� �������� �� �������� �������������������������� ���<br />
���� ���� �������� ���������������������������������������������������������� ���<br />
������ ���� �� ������� ������������������������������������������������ ���<br />
������ ���� ��� �� ������� ������������������������������������������� ���<br />
������ ����� �������� �� �������� ������������������������������������ ���<br />
������ ����� ��� �� �������� �������������������������������������������<br />
���<br />
'<br />
"'
"(<br />
������ ���� �������� �� �������� ������������������������������������ ���<br />
������ ���� ��� �� �������� ������������������������������������������� ���<br />
������ ���� ����� �� �������� ����������������������������������������� ���<br />
���� ���� ���������� ��������������������������������������������������������� ���<br />
������ ������� �� ������� ��������������������������������������������� ���<br />
������ ����� ������� �� �������� ������������������������������������ ���<br />
���� ���� ���������� ���������������������������������������������������������� ���<br />
������ ������������� �� ������� ���������������������������������������� ���<br />
������ ������������� �� ������� ��������������������������������������� ���<br />
������ ���������������� �� ������� ����������������������������������� ���<br />
������ ���������������� �� ������� ����������������������������������� ���<br />
������ ����������� ������� �� ������� ������������������������������ ���<br />
������ ������� ������� �� �������� ������������������������������������ ���<br />
������ ������� ������� �� �������� ������������������������������������ ���<br />
������ ����� ������� �� ������� ���������������������������������������� ���<br />
���� ��� ������������ ��������������������������������������������������������� ���<br />
������ ��������� �� ������� ������������������������������������������� ���<br />
������ ��������� �� ������� ������������������������������������������ ���<br />
������ ��� ����� �� ������� �������������������������������������������� ���<br />
������ ����� ����� �� ������� ����������������������������������������� ���<br />
������ ��� ��� �� ������� ��������������������������������������������� ���<br />
������ ��� �������� �� ������� ���������������������������������������� ���<br />
������ ��� �������� �� ������� ���������������������������������������� ���<br />
������ ��� ������ �� ������� �������������������������������������������� ���<br />
���� ������ ������������ ������������������������������������������������������� ���<br />
������ ������ ��� �� ������� ������������������������������������������ ���<br />
������ ������ �������� �� ������� ������������������������������������ ���<br />
������ ������ �������� �� ������� ������������������������������������ ���<br />
������ ������ ������ �� ������� ��������������������������������������� ���<br />
���� ����� ������������ ��������������������������������������������������������� ���<br />
������ ���������� �� ������� ���������������������������������������� ���<br />
������ ������� ��� �� �������� ��������������������������������������� ���<br />
������ ������� �� �� ������� ������������������������������������������ ���<br />
������ ��������� �� �� �������� �������������������������������������� ���<br />
������ ��������� ��� �� �������� ������������������������������������� ���<br />
���� ����������� �������������������������������������������������������������� ���<br />
������ �������� �������������������������������������������������������� ���<br />
������ ���������� ����� ��� ������ �� ��������������� ���������������� ���<br />
������ ���������� ����� �� ������� ����������������������������������� ���<br />
���� ���� ������������ ���������������������������������������������������������� ���<br />
������ ���� ������ ��� ���� ������������������������ ������������������ ���<br />
���� ������� ������������ ������������������������������������������������������� ���<br />
������ ������� ����� �� ������� ���<br />
������ ������� ����� �� �������� ������������������������������ ���<br />
������ ����� ���� �� �������� ����������������������������������������� ���<br />
������ ������� ������� �� ������� ������������������������������������ ���<br />
������ ���� ������� �� �������� �������������������������������������� ���<br />
������ ��� ������ �� ������� ������������������������������������������� ���<br />
������ ��� ����� �� ������� �������������������������������������������� ���<br />
������ ������� ���� ������ �� �������� �������������������������������� ���<br />
������ ������� ���� ����� �� ������� ������������������������������������ ���<br />
������ ��� ������� �� �������� ���������������������������������������� ���<br />
������� �������� ����� ��������� ������� ��������������������������� ���<br />
������� ��� ������� �� �������� ������������������������������������������<br />
���
& * & % + Section 5-3<br />
5-1 Notation<br />
5-2 Instruction Format<br />
In the remainder of this manual, all instructions will be referred to by their<br />
mnemonics. For example, the Output instruction will be called OUT; the AND<br />
Load instruction, AND LD. If you’re not sure of the instruction a mnemonic is<br />
used for, refer to Appendix B Programming Instructions.<br />
If an instruction is assigned a function code, it will be given in parentheses<br />
after the mnemonic. These function codes, which are 2-digit decimal numbers,<br />
are used to input most instructions into the CPU <strong>and</strong> are described<br />
briefly below <strong>and</strong> in more detail in 4-6 Inputting, Modifying <strong>and</strong> Checking the<br />
Program. A table of instructions listed in order of function codes, is also provided<br />
in Appendix B.<br />
An @ before a mnemonic indicates the differentiated version of that instruction.<br />
Differentiated instructions are explained in 5-4 Differentiated Instructions.<br />
Most instructions have at least one or more oper<strong>and</strong>s associated with them.<br />
Oper<strong>and</strong>s indicate or provide the data on which an instruction is to be performed.<br />
These are sometimes input as the actual numeric values (i.e., as<br />
constants), but are usually the addresses of data area words or bits that contain<br />
the data to be used. A bit whose address is designated as an oper<strong>and</strong> is<br />
called an oper<strong>and</strong> bit; a word whose address is designated as an oper<strong>and</strong> is<br />
called an oper<strong>and</strong> word. In some instructions, the word address designated<br />
in an instruction indicates the first of multiple words containing the desired<br />
data.<br />
Each instruction requires one or more words in Program Memory. The first<br />
word is the instruction word, which specifies the instruction <strong>and</strong> contains any<br />
definers (described below) or oper<strong>and</strong> bits required by the instruction. Other<br />
oper<strong>and</strong>s required by the instruction are contained in following words, one<br />
oper<strong>and</strong> per word. Some instructions required up to four words.<br />
A definer is an oper<strong>and</strong> associated with an instruction <strong>and</strong> contained in the<br />
same word as the instruction itself. These oper<strong>and</strong>s define the instruction<br />
rather than telling what data it is to used. Examples of definers are TC numbers,<br />
which are used in timer <strong>and</strong> counter instructions to create timers <strong>and</strong><br />
counters, as well as jump numbers (which define which Jump instruction is<br />
paired with which Jump End instruction). Bit oper<strong>and</strong>s are also contained in<br />
the same word as the instruction itself, although these are not considered<br />
definers.<br />
5-3 Data Areas, Definer Values, <strong>and</strong> Flags<br />
In this section, each instruction description includes its ladder diagram symbol,<br />
the data areas that can be used by its oper<strong>and</strong>s, <strong>and</strong> the values that can<br />
be used as definers. Details for the data areas are also specified by the oper<strong>and</strong><br />
names <strong>and</strong> the <strong>type</strong> of data required for each oper<strong>and</strong> (i.e., word or bit<br />
<strong>and</strong>, for words, hexadecimal or BCD).<br />
Not all addresses in the specified data areas are necessarily allowed for an<br />
oper<strong>and</strong>, e.g., if an oper<strong>and</strong> requires two words, the last word in a data area<br />
cannot be designated as the first word of the oper<strong>and</strong> because all words for a<br />
single oper<strong>and</strong> must be in the same data area. Unless a limit is specified,<br />
any bit/word in the area can be used. Any limitations are specified in a Limitations<br />
subsection. Refer to Section 3 Memory Areas for addressing conventions<br />
<strong>and</strong> the addresses of flags <strong>and</strong> control bits.<br />
"
Indirect Addressing<br />
",<br />
& * & % + Section 5-3<br />
Designating Constants<br />
Caution The IR <strong>and</strong> SR areas are considered as separate data areas. If an oper<strong>and</strong><br />
has access to one area, it doesn’t necessarily mean that the same oper<strong>and</strong><br />
will have access to the other area. The border between the IR <strong>and</strong> SR areas<br />
can, however, be crossed for a single oper<strong>and</strong>, i.e., the last bit in the IR area<br />
may be specified for an oper<strong>and</strong> that requires more than one word as long as<br />
the SR area is also allowed for that oper<strong>and</strong>.<br />
The Flags subsection lists flags that are affected by execution of an instruction.<br />
These flags include the following SR area flags.<br />
Abbreviation Name Bit<br />
ER Instruction Execution Error Flag 25503<br />
CY Carry Flag 25504<br />
GR Greater Than Flag 25505<br />
EQ Equals Flag 25506<br />
LE Less Than Flag 25507<br />
ER is the flag most commonly used for monitoring an instruction’s execution.<br />
When ER goes ON, it indicates that an error has occurred in attempting to<br />
execute the current instruction. The Flags subsection of each instruction lists<br />
possible reasons for ER being ON. ER will turn ON if oper<strong>and</strong>s are not entered<br />
correctly. Instructions are not executed when ER is ON. A table of instructions<br />
<strong>and</strong> the flags they affect is provided in Appendix D Error <strong>and</strong> Arithmetic<br />
Flag Operation.<br />
When the DM area is specified for an oper<strong>and</strong>, an indirect address can be<br />
used. Indirect DM addressing is specified by placing an asterisk before the<br />
DM: �DM.<br />
When an indirect DM address is specified, the designated DM word will contain<br />
the address of the DM word that contains the data that will be used as<br />
the oper<strong>and</strong> of the instruction. If, for example, �DM 0001 was designated as<br />
the first oper<strong>and</strong> <strong>and</strong> LR 00 as the second oper<strong>and</strong> of MOV(21), the contents<br />
of DM 0001 was 0324, <strong>and</strong> DM 0324 contained 5555, the value 5555 would<br />
be moved to LR 00.<br />
MOV(21)<br />
�DM 0001<br />
LR 00<br />
Indirect<br />
address<br />
Word Content<br />
DM 0000 4C59<br />
DM 0001 0324<br />
DM 0002 F35A<br />
DM 0324 5555<br />
DM 0325 2506<br />
DM 0326 D541<br />
Indicates<br />
DM 0324.<br />
5555 moved<br />
to LR 00.<br />
When using indirect addressing, the address of the desired word must be in<br />
BCD <strong>and</strong> it must specify a word within the DM area. In the above example,<br />
the content of �DM 0000 would have to be in BCD (between 0000 <strong>and</strong> 0999).<br />
Although data area addresses are most often given as oper<strong>and</strong>s, many oper<strong>and</strong>s<br />
<strong>and</strong> all definers are input as constants. The value available for a given<br />
definer or oper<strong>and</strong> depends on the particular instruction that uses it. Constants<br />
must also be entered in the form required by the instruction, i.e., in<br />
BCD or in hexadecimal.
% Section 5-4<br />
5-4 Differentiated Instructions<br />
00000<br />
00000<br />
Diagram A<br />
Diagram B<br />
Most instructions are provided in both differentiated <strong>and</strong> non-differentiated<br />
forms. Differentiated instructions are distinguished by an @ in front of the<br />
instruction mnemonic.<br />
A non-differentiated instruction is executed each time it is cycled as long as<br />
its execution condition is ON. A differentiated instruction is executed only<br />
once after its execution condition goes from OFF to ON. If the execution condition<br />
has not changed or has changed from ON to OFF since the last time<br />
the instruction was cycled, the instruction will not be executed. The following<br />
two examples show how this works with MOV(21) <strong>and</strong> @MOV(21), which are<br />
used to move the data in the address designated by the first oper<strong>and</strong> to the<br />
address designated by the second oper<strong>and</strong>.<br />
MOV(21)<br />
HR 10<br />
DM 0000<br />
@MOV(21)<br />
HR 10<br />
DM 0000<br />
Address Instruction Oper<strong>and</strong>s<br />
00000 LD 00000<br />
00001 MOV(21)<br />
HR 10<br />
DM 0000<br />
Address Instruction Oper<strong>and</strong>s<br />
00000 LD 00000<br />
00001 @MOV(21)<br />
HR 10<br />
DM 0000<br />
In diagram A, the non-differentiated MOV(21) will move the content of HR 10<br />
to DM 0000 whenever it is cycled with 00000. If the cycle time is 80 ms <strong>and</strong><br />
00000 remains ON for 2.0 seconds, this move operation will be performed 25<br />
times <strong>and</strong> only the last value moved to DM 0000 will be preserved there.<br />
In diagram B, the differentiated @MOV(21) will move the content of HR 10 to<br />
DM 0000 only once after 00000 goes ON. Even if 00000 remains ON for 2.0<br />
seconds with the same 80 ms cycle time, the move operation will be executed<br />
only during the first cycle in which 00000 has changed from OFF to<br />
ON. Because the content of HR 10 could very well change during the 2 seconds<br />
while 00000 is ON, the final content of DM 0000 after the 2 seconds<br />
could be different depending on whether MOV(21) or @MOV(21) was used.<br />
All oper<strong>and</strong>s, ladder diagram symbols, <strong>and</strong> other specifications for instructions<br />
are the same regardless of whether the differentiated or non-differentiated<br />
form of an instruction is used. When inputting, the same function codes<br />
are also used, but NOT is input after the function code to designate the differentiated<br />
form of an instruction. Most, but not all, instructions have differentiated<br />
forms.<br />
Refer to 5-7 INTERLOCK <strong>and</strong> INTERLOCK CLEAR - IL(02) <strong>and</strong> IL(03) for<br />
the effects of interlocks on differentiated instructions.<br />
The <strong>C20H</strong>/<strong>C28H</strong>/<strong>C40H</strong>/<strong>C60H</strong> also provide differentiation instructions:<br />
DIFU(13) <strong>and</strong> DIFD(14). DIFU(13) operates the same as a differentiated instruction,<br />
but is used to turn ON a bit for one cycle. DIFD(14) also turns ON a<br />
bit for one cycle, but does it when the execution condition has changed from<br />
ON to OFF. Refer to 5-6-2 DIFFERENTIATE UP <strong>and</strong> DOWN - DIFU(13) <strong>and</strong><br />
DIFD(14) for details.<br />
""
$ %% Section 5-5<br />
5-5 Ladder Diagram Instructions<br />
44<br />
Ladder Diagram instructions include Ladder instructions <strong>and</strong> Logic Block instructions.<br />
Ladder instructions correspond to the conditions on the ladder<br />
diagram. Logic block instructions are used to relate more complex parts of<br />
the diagram that cannot be programmed with Ladder instructions alone.<br />
5-5-1 LOAD, LOAD NOT, AND, AND NOT, OR, <strong>and</strong> OR NOT<br />
LOAD -- LD<br />
LOAD NOT -- LD NOT<br />
AND -- AND<br />
AND NOT -- AND NOT<br />
OR -- OR B<br />
ORNOT--ORNOT B<br />
Limitations<br />
Description<br />
Ladder Symbols Oper<strong>and</strong> Data Areas<br />
B<br />
B<br />
B<br />
B<br />
B: Bit<br />
IR, SR, AR, HR, TC, LR, TR<br />
B: Bit<br />
IR, SR, AR, HR, TC, LR<br />
B: Bit<br />
IR, SR, AR, HR, TC, LR<br />
B: Bit<br />
IR, SR, AR, HR, TC, LR<br />
B: Bit<br />
IR, SR, AR, HR, TC, LR<br />
B: Bit<br />
IR, SR, AR, HR, TC, LR<br />
There is no limit to the number of any of these instructions, or restrictions in<br />
the order in which they must be used, as long as the memory capacity of the<br />
PC is not exceeded.<br />
These six basic instructions correspond to the conditions on a ladder diagram.<br />
As described in Section 4 Writing <strong>and</strong> Entering Programs, the status of<br />
the bits assigned to each instruction determines the execution conditions for<br />
all other instructions. Each of these instructions <strong>and</strong> each bit address can be<br />
used as many times as required. Each can be used in as many of these instructions<br />
as required.<br />
The status of the bit oper<strong>and</strong> (B) assigned to LD or LD NOT determines the<br />
first execution condition. AND takes the logical AND between the execution<br />
condition <strong>and</strong> the status of its bit oper<strong>and</strong>; AND NOT, the logical AND be-
$ %% Section 5-5<br />
tween the execution condition <strong>and</strong> the inverse of the status of its bit oper<strong>and</strong>.<br />
OR takes the logical OR between the execution condition <strong>and</strong> the status of its<br />
bit oper<strong>and</strong>; OR NOT, the logical OR between the execution condition <strong>and</strong><br />
the inverse of the status of its bit oper<strong>and</strong>. Refer to 4-3-3 Ladder Instructions<br />
for details.<br />
Flags There are no flags affected by these instructions.<br />
5-5-2 AND LOAD <strong>and</strong> OR LOAD<br />
AND LOAD -- AND LD 00000<br />
00002<br />
Ladder Symbol<br />
OR LOAD -- OR LD 00000 00001<br />
Description<br />
Ladder Symbol<br />
00001<br />
00002 00003<br />
When instructions are combined into blocks that cannot be logically combined<br />
using only OR <strong>and</strong> AND operations, AND LD <strong>and</strong> OR LD are used.<br />
Whereas AND <strong>and</strong> OR operations logically combine a bit status <strong>and</strong> an execution<br />
condition, AND LD <strong>and</strong> OR LD logically combine two execution conditions,<br />
the current one <strong>and</strong> the last unused one.<br />
In order to draw ladder diagrams, it is not necessary to use AND LD <strong>and</strong> OR<br />
LD instructions, nor are they necessary when inputting ladder diagrams directly,<br />
as is possible from the GPC. They are required, however, to convert<br />
the program to <strong>and</strong> input it in mnemonic form. The procedures for these, limitations<br />
for different procedures, <strong>and</strong> examples are provided in 4-6 Inputting,<br />
Modifying, <strong>and</strong> Checking the Program.<br />
In order to reduce the number of programming instructions required, a basic<br />
underst<strong>and</strong>ing of logic block instructions is required. For an introduction to<br />
logic blocks, refer to 4-3-6 Logic Block Instructions.<br />
Flags There are no flags affected by these instructions.<br />
5-5-3 Coding Conditions <strong>and</strong> Other Instructions<br />
Writing mnemonic code for ladder instructions is described in Section 4 Writing<br />
<strong>and</strong> Inputting the Program. Converting the information in the ladder diagram<br />
symbol for all other instructions follows the same pattern, as described<br />
below, <strong>and</strong> is not specified for each instruction individually.<br />
Refer to the figures on page 102 for a sample ladder diagram <strong>and</strong> corresponding<br />
mnemonic code written on program coding sheet from Appendix G.<br />
The first word of any instruction defines the instruction <strong>and</strong> provides any definers.<br />
If the instruction requires only a single bit oper<strong>and</strong> with no definer, the<br />
bit oper<strong>and</strong> is also placed on the same line as the mnemonic. All other oper<strong>and</strong>s<br />
are placed on lines after the instruction line, one oper<strong>and</strong> per line <strong>and</strong> in<br />
the same order as they appear in the ladder symbol for the instruction.<br />
The address <strong>and</strong> instruction columns of the mnemonic code table are filled in<br />
for the instruction word only. For all other lines, the left two columns are left<br />
00003<br />
4
$ %% Section 5-5<br />
4<br />
00000 00001<br />
00002<br />
00100 00200<br />
01001 01002 LR 6300<br />
00005<br />
TIM 000<br />
HR 0015<br />
22500<br />
blank. If the instruction requires no definer or bit oper<strong>and</strong>, the data column is<br />
left blank for first line. It is a good idea to cross through any blank data column<br />
spaces (for all instruction words that do not require data) so that the<br />
data column can be quickly cycled to see if any addresses have been left<br />
out.<br />
If an IR or SR address is used in the data column, the left side of the column<br />
is left blank. If any other data area is used, the data area abbreviation is<br />
placed on the left side <strong>and</strong> the address is place on the right side. If a constant<br />
is to be input, the number symbol (#) is placed on the left side of the<br />
data column <strong>and</strong> the number to be input is placed on the right side. Any numbers<br />
input as definers in the instruction word do not require the number symbol<br />
on the right side. TC bits, once defined as a timer or counter, take a TIM<br />
(timer) or CNT (counter) prefix.<br />
When coding an instruction that has a function code, be sure to write in the<br />
function code, which will be necessary when inputting the instruction via the<br />
Programming Console. Also be sure to designate the differentiated instruction<br />
with the @ symbol.<br />
The following diagram <strong>and</strong> corresponding mnemonic code illustrate the<br />
points described above.<br />
DIFU(13) 22500<br />
BCNT(67)<br />
#0001<br />
004<br />
HR 00<br />
TIM 000<br />
#0150 15 s<br />
MOV(21)<br />
HR 00<br />
LR 00<br />
00500<br />
Address Instruction Data<br />
00000 LD 00000<br />
00001 AND 00001<br />
00002 OR 00002<br />
00003 DIFU(13) 22500<br />
00004 LD 00100<br />
00005 AND NOT 00200<br />
00006 LD 01001<br />
00007 AND NOT 01002<br />
00008 AND NOT LR 6300<br />
00009 OR LD ----<br />
00010 AND 22500<br />
00011 BCNT(67) ----<br />
# 0001<br />
004<br />
HR 00<br />
00012 LD 00005<br />
00013 TIM 000<br />
# 0150<br />
00014 LD TIM 000<br />
00015 MOV(21) ----<br />
HR 00<br />
LR 00<br />
00016 LD HR 0015<br />
00017 OUT NOT 00500
# Section 5-6<br />
Multiple Instruction Lines<br />
00000 00001<br />
00002<br />
00100 00200<br />
01001 01002 LR 6300<br />
HR 0015<br />
22500<br />
5-6 Bit Control Instructions<br />
If an instruction requires multiple instruction lines (such as KEEP(11)), all of<br />
the lines for the instruction are entered before the right-h<strong>and</strong> instruction.<br />
Each of the lines for the instruction is coded, starting with LD or LD NOT, to<br />
form ‘logic blocks’ that are combined by the instruction. An example of this<br />
for SFT(10) is shown below.<br />
I<br />
P<br />
R<br />
SFT(10)<br />
HR 00<br />
HR 00<br />
00500<br />
Address Instruction Oper<strong>and</strong>s<br />
00000 LD 00000<br />
00001 AND 00001<br />
00002 LD 00002<br />
00003 LD 00100<br />
00004 AND NOT 00200<br />
00005 LD 01001<br />
00006 AND NOT 01002<br />
00007 AND NOT LR 6300<br />
00008 OR LD ----<br />
00009 AND 22500<br />
00010 SFT(10) ----<br />
HR 00<br />
HR 00<br />
00011 LD HR 0015<br />
00012 OUT NOT 00500<br />
There are five instructions that can be used generally to control individual bit<br />
status. These are OUT, OUT NOT, DIFU(13), DIFD(14), <strong>and</strong> KEEP(11).<br />
These instructions are used to turn bits ON <strong>and</strong> OFF in different ways.<br />
5-6-1 OUTPUT <strong>and</strong> OUTPUT NOT -- OUT <strong>and</strong> OUT NOT<br />
OUTPUT -- OUT<br />
OUTPUT NOT -- OUT NOT<br />
Limitations<br />
Description<br />
Ladder Symbol Oper<strong>and</strong> Data Areas<br />
B<br />
B: Bit<br />
IR, SR, AR, HR, TC, LR, TR<br />
Ladder Symbol Oper<strong>and</strong> Data Areas<br />
B<br />
B: Bit<br />
IR, SR, AR, HR, TC, LR<br />
Any output bit can generally be used in only one instruction that controls its<br />
status. Refer to 3-3 IR Area for details.<br />
OUT <strong>and</strong> OUT NOT are used to control the status of the designated bit according<br />
to the execution condition.<br />
OUT turns ON the designated bit for an ON execution condition, <strong>and</strong> turns<br />
OFF the designated bit for an OFF execution condition. With a TR bit, OUT<br />
appears at a branching point rather than at the end of an instruction line. Refer<br />
to 4-6-7 Branching Instruction Lines for details.<br />
OUT NOT turns ON the designated bit for a OFF execution condition, <strong>and</strong><br />
turns OFF the designated bit for an ON execution condition.<br />
4
# Section 5-6<br />
Flags<br />
4#<br />
OUT <strong>and</strong> OUT NOT can be used to control execution by turning ON <strong>and</strong> OFF<br />
bits that are assigned to conditions on the ladder diagram, thus determining<br />
execution conditions for other instructions. This is particularly helpful <strong>and</strong> allows<br />
a complex set of conditions to be used to control the status of a single<br />
work bit, <strong>and</strong> then that work bit can be used to control other instructions.<br />
The length of time that a bit is ON or OFF can be controlled by combining the<br />
OUT or OUT NOT with TIM. Refer to Examples under 5-10-1 TIMER - TIM<br />
for details.<br />
There are no flags affected by these instructions.<br />
5-6-2 DIFFERENTIATE UP <strong>and</strong> DOWN -- DIFU(13) <strong>and</strong> DIFD(14)<br />
Limitations<br />
Description<br />
Ladder Symbols Oper<strong>and</strong> Data Areas<br />
DIFU(13) B<br />
DIFD(14) B<br />
B: Bit<br />
IR, AR, HR, LR<br />
B: Bit<br />
IR, AR, HR, LR<br />
Any output bit can generally be used in only one instruction that controls its<br />
status. Refer to 3-3 IR Area for details.<br />
DIFU(13) <strong>and</strong> DIFD(14) are used to turn the designated bit ON for one cycle<br />
only.<br />
Whenever executed, DIFU(13) compares its current execution with the previous<br />
execution condition. If the previous execution condition was OFF <strong>and</strong> the<br />
current one is ON, DIFU(13) will turn ON the designated bit. If the previous<br />
execution condition was ON <strong>and</strong> the current execution condition is either ON<br />
or OFF, DIFU(13) will either turn the designated bit OFF or leave it OFF (i.e.,<br />
if the designated bit is already OFF). The designated bit will thus never be<br />
ON for longer than one cycle, assuming the instruction is executed each<br />
cycle (see Precautions, below).<br />
Whenever executed, DIFD(14) compares its current execution with the previous<br />
execution condition. If the previous execution condition was ON <strong>and</strong> the<br />
current one is OFF, DIFD(14) will turn ON the designated bit. If the previous<br />
execution condition was OFF <strong>and</strong> the current execution condition is either<br />
ON or OFF, DIFD(14) will either turn the designated bit OFF or leave it OFF.<br />
The designated bit will thus never be ON for longer than one cycle, assuming<br />
the instruction is executed each cycle (see Precautions, below).<br />
These instructions are used when differentiated instructions (i.e., those prefixed<br />
with an @) are not available <strong>and</strong> single-cycle execution of a particular<br />
instruction is desired. They can also be used with non-differentiated forms of<br />
instructions that have differentiated forms when their use will simplify programming.<br />
Examples of these are shown below.<br />
Flags There are no flags affected by these instructions.
# Section 5-6<br />
Precautions<br />
Example 1:<br />
Use When There Are No<br />
Differentiated Instructions<br />
Example 2:<br />
Use to Simplify<br />
Programming<br />
22500<br />
00000<br />
00000<br />
22500<br />
00000<br />
00001 00002 00003<br />
00004 00005<br />
Diagram A<br />
Diagram B<br />
DIFU(13) <strong>and</strong> DIFD(14) operation can be uncertain when the instructions are<br />
programmed between IL <strong>and</strong> ILC, between JMP <strong>and</strong> JME, or in subroutines.<br />
Refer to 5-7 INTERLOCK <strong>and</strong> INTERLOCK CLEAR - IL(02) <strong>and</strong> ILC(03), 5-8<br />
JUMP <strong>and</strong> JUMP END - JMP(04) <strong>and</strong> JME(05), <strong>and</strong> 5-18 Subroutines for<br />
details.<br />
In diagram A, below, whenever CMP(20) is executed with an ON execution<br />
condition it will compare the contents of the two oper<strong>and</strong> words (HR 10 <strong>and</strong><br />
DM 0000) <strong>and</strong> set the arithmetic flags (GR, EQ, <strong>and</strong> LE) accordingly. If the<br />
execution condition remains ON, flag status may be changed each cycle if<br />
the content of one or both oper<strong>and</strong>s change. Diagram B, however, is an example<br />
of how DIFU(13) can be used to ensure that CMP(20) is executed only<br />
once each time the desired execution condition goes ON.<br />
CMP(20)<br />
HR 10<br />
DM 0000<br />
DIFU(13) 22500<br />
CMP(20)<br />
HR 10<br />
DM 0000<br />
Address Instruction Oper<strong>and</strong>s<br />
00000 LD 00000<br />
00001 CMP(20)<br />
HR 10<br />
DM 0000<br />
Address Instruction Oper<strong>and</strong>s<br />
00000 LD 00000<br />
00001 DIFU(13) 22500<br />
00002 LD 22500<br />
00003 CMP(20)<br />
HR 10<br />
DM 000<br />
Although a differentiated form of MOV(21) is available, the following diagram<br />
would be very complicated to draw using it because only one of the conditions<br />
determining the execution condition for MOV(21) requires differentiated<br />
treatment.<br />
DIFU(13) 22500<br />
MOV(21)<br />
HR 10<br />
DM 0000<br />
Address Instruction Oper<strong>and</strong>s<br />
00000 LD 00000<br />
00001 DIFU(13) 22500<br />
00002 LD 22500<br />
00003 LD 00001<br />
00004 AND NOT 00002<br />
00005 AND NOT 00003<br />
00006 OR LD ---<br />
00007 LD 00004<br />
00008 AND NOT 00005<br />
00009 OR LD ---<br />
00010 MOV(21)<br />
HR 10<br />
DM 0000<br />
4'
# Section 5-6<br />
5-6-3 KEEP -- KEEP(11)<br />
Limitations<br />
Description<br />
00002 00003<br />
00500<br />
00002<br />
00003<br />
4(<br />
Ladder Symbol Oper<strong>and</strong> Data Areas<br />
S<br />
R<br />
KEEP(11)<br />
B<br />
B: Bit<br />
IR, AR, HR, LR<br />
Any output bit can generally be used in only one instruction that controls its<br />
status. Refer to 3-3 IR Area for details.<br />
KEEP(11) is used to maintain the status of the designated bit based on two<br />
execution conditions. These execution conditions are labeled S <strong>and</strong> R. S is<br />
the set input; R, the reset input. KEEP(11) operates like a latching relay that<br />
is set by S <strong>and</strong> reset by R.<br />
When S turns ON, the designated bit will go ON <strong>and</strong> stay ON until reset, regardless<br />
of whether S stays ON or goes OFF. When R turns ON, the designated<br />
bit will go OFF <strong>and</strong> stay OFF until set, regardless of whether R stays<br />
ON or goes OFF. The relationship between execution conditions <strong>and</strong><br />
KEEP(11) bit status is shown below.<br />
S execution condition<br />
R execution condition<br />
Status of B<br />
The following two diagrams would function identically, though the one using<br />
KEEP(11) requires one less instruction to program <strong>and</strong> would maintain status<br />
even in an interlocked program section.<br />
S<br />
R<br />
00500<br />
KEEP(11)<br />
Flags There are no flags affected by this instruction.<br />
00500<br />
Address Instruction Oper<strong>and</strong>s<br />
00000 LD 00002<br />
00001 OR 00500<br />
00002 AND NOT 00003<br />
00003 OUT 00500<br />
Address Instruction Oper<strong>and</strong>s<br />
00000 LD 00002<br />
00001 LD 00003<br />
00002 KEEP(11) 00500
# Section 5-6<br />
Precautions<br />
Example<br />
00002<br />
00003<br />
00004<br />
Reset input<br />
00005<br />
HR 0000<br />
Indicates<br />
emergency<br />
situation<br />
Never use an input bit in an inverse condition on the reset (R) for KEEP(11)<br />
when the input device uses an AC power supply. The delay in shutting down<br />
the PC’s DC power supply (relative to the AC power supply to the input device)<br />
can cause the designated bit of KEEP(11) to be reset. This situation is<br />
shown below.<br />
A<br />
Input Unit<br />
NEVER<br />
A<br />
S<br />
R<br />
KEEP(11)<br />
HR 0000<br />
Bits used in KEEP are not reset in interlocks. Refer to the 5-7 INTERLOCK<br />
<strong>and</strong> INTERLOCK CLEAR - IL(02) <strong>and</strong> ILC(03) for details.<br />
If a HR bit or an AR bit is used, bit status will be retained even during a<br />
power interruption. KEEP(11) can thus be used to program bits that will maintain<br />
status after restarting the PC following a power interruption. An example<br />
of this that can be used to produce a warning display following a system<br />
shutdown for an emergency situation is shown below. Bits 00002, 00003, <strong>and</strong><br />
00004 would be turned ON to indicate some <strong>type</strong> of error. Bit 00005 would be<br />
turned ON to reset the warning display. HR 0000, which is turned ON when<br />
any one of the three bits indicates an emergency situation, is used to turn ON<br />
the warning indicator through 00500.<br />
S<br />
KEEP(11)<br />
HR 0000<br />
R<br />
00500<br />
Activates<br />
warning<br />
display<br />
Address Instruction Oper<strong>and</strong>s<br />
00000 LD 00002<br />
00001 OR 00003<br />
00002 OR 00004<br />
00003 LD 00005<br />
00004 KEEP(11) HR 0000<br />
00005 LD HR 0000<br />
00006 OUT 00500<br />
KEEP(11) can also be combined with TIM to produce delays in turning bits<br />
ON <strong>and</strong> OFF. Refer to 5-10-1 TIMER - TIM for details.<br />
4
, ) $ - % , ) $ - $) .. $ /0 % $ /1 Section 5-7<br />
5-7 INTERLOCK <strong>and</strong> INTERLOCK CLEAR -- IL(02) <strong>and</strong> ILC(03)<br />
Description<br />
DIFU(13) <strong>and</strong> DIFD(14) in<br />
Interlocks<br />
4,<br />
Ladder Symbol IL(02)<br />
Ladder Symbol ILC(03)<br />
IL(02) is always used in conjunction with ILC(03) to create interlocks. Interlocks<br />
are used to enable branching in the same way as can be achieved with<br />
TR bits, but treatment of instructions between IL(02) <strong>and</strong> ILC(03) differs from<br />
that with TR bits when the execution condition for IL(02) is OFF. If the execution<br />
condition of IL(02) is ON, the program will be executed as written, with<br />
an ON execution condition used to start each instruction line from the point<br />
where IL(02) is located through the next ILC(03). Refer to 4-6-7 Branching<br />
Instruction Lines for basic descriptions of both methods.<br />
If the execution condition for IL(02) is OFF, the interlocked section between<br />
IL(02) <strong>and</strong> ILC(03) will be treated as shown in the following table:<br />
Instruction Treatment<br />
OUT <strong>and</strong> OUT NOT Designated bit turned OFF.<br />
TIM <strong>and</strong> TIMH(15) Reset.<br />
CNT, CNTR(12) PV maintained.<br />
KEEP(11) Bit status maintained.<br />
DIFU(13) <strong>and</strong> DIFD(14) Not executed (see below).<br />
All others Not executed.<br />
IL(02) <strong>and</strong> ILC(03) do not necessarily have to be used in pairs. IL(02) can be<br />
used several times in a row, with each IL(02) creating an interlocked section<br />
through the next ILC(03). ILC(03) cannot be used unless there is at least one<br />
IL(02) between it <strong>and</strong> any previous ILC(03).<br />
Changes in the execution condition for a DIFU(13) or DIFD(14) are not recorded<br />
if the DIFU(13) or DIFD(14) is in an interlocked section <strong>and</strong> the execution<br />
condition for the IL(02) is OFF. When DIFU(13) or DIFD(14) is execution<br />
in an interlocked section immediately after the execution condition for the<br />
IL(02) has gone ON, the execution condition for the DIFU(13) or DIFD(14)<br />
will be compared to the execution condition that existed before the interlock<br />
became effective (i.e., before the interlock condition for IL(02) went OFF).<br />
The ladder diagram <strong>and</strong> bit status changes for this are shown below. The
, ) $ - % , ) $ - $) .. $ /0 % $ /1 Section 5-7<br />
00000<br />
00001<br />
01000<br />
ON<br />
OFF<br />
ON<br />
OFF<br />
ON<br />
OFF<br />
Precautions<br />
00000<br />
00001<br />
interlock is in effect while 00000 is OFF. Notice that 01000 is not turned ON<br />
at the point labeled A even though 00001 has turned OFF <strong>and</strong> then back ON.<br />
A<br />
IL(02)<br />
DIFU(13) 01000<br />
ILC(03)<br />
Address Instruction Oper<strong>and</strong>s<br />
00000 LD 00000<br />
00001 IL(02)<br />
00002 LD 00001<br />
00003 DIFU(13) 01000<br />
00004 ILC(03)<br />
There must be an ILC(03) following any one or more IL(02).<br />
Although as many IL(02) instructions as are necessary can be used with one<br />
ILC(03), ILC(03) instructions cannot be used consecutively without at least<br />
one IL(02) in between, i.e., nesting is not possible. Whenever a ILC(03) is<br />
executed, all interlocks between the active ILC(03) <strong>and</strong> the preceding<br />
ILC(03) are cleared.<br />
When more than one IL(02) is used with a single ILC(03), an error message<br />
will appear when the program check is performed, but execution will proceed<br />
normally.<br />
Flags There are no flags affected by these instructions.<br />
Example<br />
00000<br />
00001<br />
00002<br />
00003<br />
00100<br />
00005<br />
00004<br />
The following diagram shows IL(02) being used twice with one ILC(03).<br />
CP<br />
R<br />
IL(02)<br />
TIM 511<br />
#0015 1.5 s<br />
IL(02)<br />
CNT 001<br />
IR 010<br />
00502<br />
ILC(03)<br />
Address Instruction Oper<strong>and</strong>s<br />
00000 LD 00000<br />
00001 IL(02)<br />
00002 LD 00001<br />
00003 TIM 511<br />
# 0015<br />
00004 LD 00002<br />
00005 IL(02)<br />
00006 LD 00003<br />
00007 AND NOT 00004<br />
00008 LD 00100<br />
00009 CNT 001<br />
010<br />
00010 LD 00005<br />
00011 OUT 00502<br />
00012 ILC(03)<br />
When the execution condition for the first IL(02) is OFF, TIM 511 will be reset<br />
to 1.5 s, CNT 001 will not be changed, <strong>and</strong> 00502 will be turned OFF. When<br />
the execution condition for the first IL(02) is ON <strong>and</strong> the execution condition<br />
for the second IL(02) is OFF, TIM 511 will be executed according to the<br />
status of 00001, CNT 001 will not be changed, <strong>and</strong> 00502 will be turned OFF.<br />
4"
23 % 23 ), .. 2 /4 % 2 ) /5 Section 5-8<br />
4<br />
When the execution conditions for both the IL(02) are ON, the program will<br />
execute as written.<br />
5-8 JUMP <strong>and</strong> JUMP END -- JMP(04) <strong>and</strong> JME(05)<br />
Limitations<br />
Description<br />
DIFU(13) <strong>and</strong> DIFD(14) in<br />
Jumps<br />
Ladder Symbols Definer Values<br />
JMP(04) N<br />
JME(05) N<br />
N: Jump number<br />
# (00 to 49)<br />
N: Jump number<br />
# (00 to 49)<br />
Jump numbers 01 through 49 may be used only once in JMP(04) <strong>and</strong> once in<br />
JME(05), i.e., each can be used to define one jump only. Jump number 00<br />
can be used as many times as desired.<br />
JMP(04) is always used in conjunction with JME(05) to create jumps, i.e., to<br />
skip from one point in a ladder diagram to another point. JMP(04) defines the<br />
point from which the jump will be made; JME(05) defines the destination of<br />
the jump. When the execution condition for JMP(04) in ON, no jump is made<br />
<strong>and</strong> the program is executed consecutively as written. When the execution<br />
condition for JMP(04) is OFF, a jump is made to the JME(05) with the same<br />
jump number <strong>and</strong> the instruction following JME(05) is executed next.<br />
If the jump number for JMP(04) is between 01 <strong>and</strong> 49, jumps, when made,<br />
will go immediately to JME(05) with the same jump number without executing<br />
any instructions in between. The status of timers, counters, bits used in OUT,<br />
bits used in OUT NOT, <strong>and</strong> all other status controlled by the instructions between<br />
JMP(04) <strong>and</strong> JMP(05) will not be changed. Each of these jump numbers<br />
can be used to define only one jump. Because all of instructions between<br />
JMP(04) <strong>and</strong> JME(05) are skipped, jump numbers 01 through 49 can<br />
be used to reduce cycle time.<br />
If the jump number for JMP(04) is 00, the CPU will look for the next JME(05)<br />
with a jump number of 00. To do so, it must search through the program,<br />
causing a longer cycle time (when the execution condition is OFF) than for<br />
other jumps. The status of timers, counters, bits used in OUT, bits used in<br />
OUT NOT, <strong>and</strong> all other status controlled by the instructions between<br />
JMP(04) 00 <strong>and</strong> JMP(05) 00 will not be changed. Jump number 00 can be<br />
used as many times as desired. A jump from JMP(04) 00 will always go to<br />
the next JME(05) 00 in the program. It is thus possible to use JMP(04) 00<br />
consecutively <strong>and</strong> match them all with the same JME(05) 00. It makes no<br />
sense, however, to use JME(05) 00 consecutively, because all jumps made<br />
to them will end at the first JME(05) 00.<br />
Although DIFU(13) <strong>and</strong> DIFD(14) are designed to turn ON the designated bit<br />
for one cycle, they will not necessarily do so when written between JMP(04)<br />
<strong>and</strong> JMP (05). Once either DIFU(13) or DIFD(14) has turned ON a bit, it will<br />
remain ON until the next time DIFU(13) or DIFD(14) is executed again. In<br />
normal programming, this means the next cycle. In a jump, this means the<br />
next time the jump from JMP(04) to JME(05) is not made, i.e., if a bit is<br />
turned ON by DIFU(13) or DIFD(14) <strong>and</strong> then a jump is made in the next
Precautions<br />
cycle so that DIFU(13) or DIFD(14) are skipped, the designated bit will remain<br />
ON until the next time the execution condition for the JMP(04) controlling<br />
the jump is ON.<br />
When JMP(04) <strong>and</strong> JME(05) are not used in pairs, an error message will appear<br />
when the program check is performed. Although this message also appears<br />
if JMP(04) 00 <strong>and</strong> JME(05) 00 are not used in pairs, the program will<br />
execute properly as written.<br />
Flags There are no flags affected by these instructions.<br />
Examples<br />
5-9 END -- END(01)<br />
Description<br />
% Section 5-10<br />
Examples of jump programs are provided in 4-6-8 Jumps.<br />
Ladder Symbol END(01)<br />
END(01) is required as the last instruction in any program. If there are subroutines,<br />
END(01) is placed after the last subroutine. No instruction written<br />
after END(01) will be executed. END(01) can be placed anywhere in the program<br />
to execute all instructions up to that point, as is sometimes done to debug<br />
a program, but it must be removed to execute the remainder of the program.<br />
If there is no END(01) in the program, no instructions will be executed <strong>and</strong><br />
the error message “NO END INST” will appear.<br />
Flags END(01) turns OFF the ER, CY, GR, EQ, <strong>and</strong> LE flags.<br />
5-10 Timer <strong>and</strong> Counter Instructions<br />
TIM <strong>and</strong> TIMH are decrementing ON-delay timer instructions which require a<br />
TC number <strong>and</strong> a set value (SV).<br />
CNT is a decrementing counter instruction <strong>and</strong> CNTR is a reversible counter<br />
instruction. Both require a TC number <strong>and</strong> a SV. Both are also connected to<br />
multiple instruction lines which serve as an input signal(s) <strong>and</strong> a reset.<br />
Any one TC number cannot be defined twice, i.e., once it has been used as<br />
the definer in any of the timer or counter instructions, it cannot be used<br />
again. Once defined, TC numbers can be used as many times as required as<br />
oper<strong>and</strong>s in instructions other than timer <strong>and</strong> counter instructions.<br />
TC numbers run from 000 through 511. No prefix is required when using a<br />
TC number as a definer in a timer or counter instruction. Once defined as a<br />
timer, a TC number can be prefixed with TIM for use as an oper<strong>and</strong> in certain<br />
instructions. The TIM prefix is used regardless of the timer instruction that<br />
was used to define the timer. Once defined as a counter, a TC number can<br />
be prefixed with CNT for use as an oper<strong>and</strong> in certain instructions. The CNT<br />
is also used regardless of the counter instruction that was used to define the<br />
counter.<br />
TC numbers can be designated as oper<strong>and</strong>s that require either bit or word<br />
data. When designated as an oper<strong>and</strong> that requires bit data, the TC number<br />
accesses a bit that functions as a “completion flag” that indicates when the<br />
time/count has expired, i.e., the bit, which is normally OFF, will turn ON when<br />
the designated SV has expired. When designated as an oper<strong>and</strong> that re-
5-10-1 TIMER -- TIM<br />
Limitations<br />
Description<br />
Execution condition<br />
Completion flag<br />
% Section 5-10<br />
ON<br />
OFF<br />
ON<br />
OFF<br />
quires word data, the TC number accesses a memory location that holds the<br />
present value (PV) of the timer or counter. The PV of a timer or counter can<br />
thus be used as an oper<strong>and</strong> in CMP(20), or any other instruction for which<br />
the TC area is allowed. This is done by designating the TC number used to<br />
define that timer or counter to access the memory location that holds the PV.<br />
Note that “TIM 000” is used to designate the TIMER instruction defined with<br />
TC number 000, to designate the completion flag for this timer, <strong>and</strong> to designate<br />
the PV of this timer. The meaning of the term in context should be clear,<br />
i.e., the first is always an instruction, the second is always a bit oper<strong>and</strong>, <strong>and</strong><br />
the third is always a word oper<strong>and</strong>. The same is true of all other TC numbers<br />
prefixed with TIM or CNT.<br />
An SV can be input as a constant or as a word address in a data area. If an<br />
IR area word assigned to an Input Unit is designated as the word address,<br />
the Input Unit can be wired so that the SV can be set externally through<br />
thumbwheel switches or similar devices. Timers <strong>and</strong> counters wired in this<br />
way can only be set externally during RUN or MONITOR mode. All SVs, including<br />
those set externally, must be in BCD.<br />
Ladder Symbol<br />
TIM N<br />
SV<br />
Definer Values<br />
N: TC number<br />
# (000 through 511)<br />
Oper<strong>and</strong> Data Areas<br />
SV: Set value (word, BCD)<br />
IR, AR, DM, HR, LR, #<br />
SV is between 000.1 <strong>and</strong> 999.9. The decimal point is not entered.<br />
Each TC number can be used as the definer in only one TIMER or<br />
COUNTER instruction.<br />
TC 000 through TC 003 should not be used in TIM if they are required for<br />
TIMH(15). Refer to 5-10-2 HIGH-SPEED TIMER - TIMH(15) for details.<br />
A timer is activated when its execution condition goes ON <strong>and</strong> is reset (to<br />
SV) when the execution condition goes OFF. Once activated, TIM measures<br />
in units of 0.1 second from the SV. TIM accuracy is +0.0/--0.1 second.<br />
If the execution condition remains ON long enough for TIM to time down to<br />
zero, the completion flag for the TC number used will turn ON <strong>and</strong> will remain<br />
ON until TIM is reset (i.e., until its execution condition is goes OFF).<br />
The following figure illustrates the relationship between the execution condition<br />
for TIM <strong>and</strong> the completion flag assigned to it.<br />
SV SV
Precautions<br />
Timers in interlocked program sections are reset when the execution condition<br />
for IL(02) is OFF. Power interruptions also reset timers. If a timer that is<br />
not reset under these conditions is desired, SR area clock pulse bits can be<br />
counted to produce timers using CNT. Refer to 5-10-3 COUNTER - CNT for<br />
details.<br />
Program execution will continue even if a non-BCD SV is used, but timing will<br />
not be accurate.<br />
Flags ER: SV is not in BCD.<br />
Indirectly addressed DM word is non-existent. (Content of �DM word<br />
is not BCD, or the DM area boundary has been exceeded.)<br />
Examples<br />
00000<br />
TIM 000<br />
00001<br />
00000<br />
TIM 001<br />
TIM 002<br />
% Section 5-10<br />
Example 1:<br />
Basic Application<br />
TIM 001<br />
Example 2:<br />
Extended Timers<br />
All of the following examples use OUT in diagrams that would generally be<br />
used to control output bits in the IR area. There is no reason, however, why<br />
these diagrams cannot be modified to control execution of other instructions.<br />
The following example shows two timers, one set with a constant <strong>and</strong> one set<br />
via input word 005. Here, 00200 will be turned ON after 00000 goes ON <strong>and</strong><br />
stays ON for at least 15 seconds. When 00000 goes OFF, the timer will be<br />
reset <strong>and</strong> 00200 will be turned OFF. When 00001 goes ON, TIM 001 is<br />
started from the SV provided through IR word 005. Bit 00201 is also turned<br />
ON when 00001 goes ON. When the SV in 005 has expired, 00201 is turned<br />
OFF. This bit will also be turned OFF when TIM 001 is reset, regardless of<br />
whether or not SV has expired.<br />
TIM 000<br />
#0150<br />
00200<br />
TIM 001<br />
005<br />
00201<br />
015.0 s<br />
IR 005<br />
Address Instruction Oper<strong>and</strong>s<br />
00000 LD 00000<br />
00001 TIM 000<br />
# 0150<br />
00002 LD TIM 000<br />
00003 OUT 00200<br />
00004 LD 00001<br />
00005 TIM 001<br />
005<br />
00006 AND NOT TIM 001<br />
00007 OUT 00201<br />
There are two ways to achieve timers that operate for longer than 999.9 seconds.<br />
One method is to program consecutive timers, with the Completion<br />
Flag of each timer used to activate the next timer. A simple example with two<br />
900.0-second (15-minute) timers combined to functionally form a 30-minute<br />
timer.<br />
TIM 001<br />
#9000<br />
TIM 002<br />
#9000<br />
00200<br />
900.0 s<br />
900.0 s<br />
Address Instruction Oper<strong>and</strong>s<br />
00000 LD 00000<br />
00001 TIM 001<br />
# 9000<br />
00002 LD TIM 001<br />
00003 TIM 002<br />
# 9000<br />
00004 LD TIM 002<br />
00005 OUT 00200
Example 3:<br />
ON/OFF Delays<br />
00000<br />
00500 00000<br />
TIM 001<br />
TIM 002<br />
00000<br />
00500<br />
Example 4:<br />
One-Shot Bits<br />
#<br />
% Section 5-10<br />
5.0 s 3.0 s<br />
In this example, 00200 will be turned ON 30 minutes after 00000 goes ON.<br />
TIM can also be combined with CNT or CNT can be used to count SR area<br />
clock pulse bits to produce longer timers. An example is provided in 5-10-3<br />
COUNTER - CNT.<br />
TIM can be combined with KEEP(11) to delay turning a bit ON <strong>and</strong> OFF in<br />
reference to a desired execution condition. KEEP(11) is described in 5-6-3<br />
KEEP - KEEP(11).<br />
To create delays, the Completion Flags for two TIM are used to determine<br />
the execution conditions for setting <strong>and</strong> reset the bit designated for<br />
KEEP(11). The bit whose manipulation is to be delayed is used in KEEP(11).<br />
Turning ON <strong>and</strong> OFF the bit designated for KEEP(11) is thus delayed by the<br />
SV for the two TIM. The two SV could naturally be the same if desired.<br />
In the following example, 00500 would be turned ON 5.0 seconds after<br />
00000 goes ON <strong>and</strong> then turned OFF 3.0 seconds after 00000 goes OFF. It<br />
is necessary to use both 00500 <strong>and</strong> 00000 to determine the execution condition<br />
for TIM 002; 00000 in an normally closed condition is necessary to reset<br />
TIM 002 when 00000 goes ON <strong>and</strong> 00500 is necessary to activate TIM 002<br />
(when 00000 is OFF).<br />
S<br />
R<br />
TIM 001<br />
0050<br />
TIM 002<br />
0030<br />
KEEP(11)<br />
00500<br />
5.0 s<br />
3.0 s<br />
Address Instruction Oper<strong>and</strong>s<br />
00000 LD 00000<br />
00001 TIM 001<br />
# 0050<br />
00002 LD 00500<br />
00003 AND NOT 00000<br />
00004 TIM 002<br />
# 0030<br />
00005 LD TIM 001<br />
00006 LD TIM 002<br />
00007 KEEP(11) 00500<br />
The length of time that a bit is kept ON or OFF can be controlled by combining<br />
TIM with OUT or OUT NO. The following diagram demonstrates how this<br />
is possible. In this example, 00204 would remain ON for 1.5 seconds after<br />
00000 goes ON regardless of the time 00000 stays ON. This is achieved by<br />
using 01000 as a self-maintaining bit activated by 00000 <strong>and</strong> turning ON<br />
00204 through it. When TIM 001 comes ON (i.e., when the SV of TIM 001<br />
has expired), 00204 will be turned OFF through TIM 001 (i.e., TIM 001 will
01000<br />
00000<br />
01000<br />
TIM 001<br />
01000 TIM 001<br />
00000<br />
00204<br />
Example 5:<br />
Flicker Bits<br />
00000 TIM 002<br />
TIM 001<br />
TIM 001<br />
00000<br />
00205<br />
% Section 5-10<br />
1.5 s 1.5 s<br />
1.0 s 1.5 s 1.0 s 1.5 s<br />
turn ON which, as an inverse condition, creates an OFF execution condition<br />
for OUT 00204).<br />
01000<br />
TIM 001<br />
#0015 1.5 s<br />
00204<br />
Address Instruction Oper<strong>and</strong>s<br />
00000 LD 01000<br />
00001 AND NOT TIM 001<br />
00002 OR 00000<br />
00003 OUT 01000<br />
00004 LD 01000<br />
00005 TIM 001<br />
# 0015<br />
00006 LD 01000<br />
00007 AND NOT TIM 001<br />
00008 OUT 00204<br />
Bits can be programmed to turn ON <strong>and</strong> OFF at regular intervals while a designated<br />
execution condition is ON by using TIM twice. One TIM functions to<br />
turn ON <strong>and</strong> OFF a specified bit, i.e., the completion flag of this TIM turns the<br />
specified bit ON <strong>and</strong> OFF. The other TIM functions to control the operation of<br />
the first TIM, i.e., when the first TIM’s completion flag goes ON, the second<br />
TIM is started <strong>and</strong> when the second TIM’s completion flag goes ON, the first<br />
TIM is started.<br />
TIM 001<br />
#0010 1.0 s<br />
TIM 002<br />
#0015<br />
00205<br />
1.5 s<br />
Address Instruction Oper<strong>and</strong>s<br />
00000 LD 00000<br />
00001 AND TIM 002<br />
00002 TIM 001<br />
# 0010<br />
00003 LD TIM 001<br />
00004 TIM 002<br />
# 0015<br />
00005 LD TIM 001<br />
00006 OUT 00205<br />
A simpler but less flexible method of creating a flicker bit is to AND one of the<br />
SR area clock pulse bits with the execution condition that is to be ON when<br />
the flicker bit is operating. Although this method does not use TIM, it is included<br />
here for comparison. This method is more limited because the ON<br />
<strong>and</strong> OFF times must be the same <strong>and</strong> they depend on the clock pulse bits<br />
available in the SR area.<br />
In the following example the 1-second clock pulse is used (25502) so that<br />
00206 would be turned ON <strong>and</strong> OFF every second, i.e., it would be ON for<br />
'
00000 25502<br />
5-10-2 HIGH-SPEED TIMER -- TIMH(15)<br />
Limitations<br />
Description<br />
Precautions<br />
(<br />
% Section 5-10<br />
0.5 seconds <strong>and</strong> OFF for 0.5 seconds. Precise timing <strong>and</strong> the initial status of<br />
00206 would depend on the status of the clock pulse when 00000 goes ON.<br />
Ladder Symbol<br />
TIMH(15) N<br />
SV<br />
00206<br />
Address Instruction Oper<strong>and</strong>s<br />
00000 LD 00000<br />
00001 AND 25502<br />
00002 OUT 00206<br />
Definer Values<br />
N: TC number<br />
# (000 through 511, but 000<br />
through 003 preferred)<br />
Oper<strong>and</strong> Data Areas<br />
SV: Set value (word, BCD)<br />
IR, AR, DM, HR, LR, #<br />
SV is between 00.02 <strong>and</strong> 99.99. (Although 00.00 <strong>and</strong> 00.01 may be set,<br />
00.00 will disable the timer, i.e., turn ON the Completion Flag immediately,<br />
<strong>and</strong> 00.01 is not reliably cycled.) The decimal point is not entered.<br />
Each TC number can be used as the definer in only one timer or counter instruction.<br />
TC 000 through TC 003 must be used to ensure adequate accuracy if the<br />
cycle time is greater than 10 ms.<br />
TIMH(15) operates in the same way as TIM except that TIMH measures in<br />
units of 0.01 second.<br />
Refer to 5-10-1 TIMER - TIM for operational details <strong>and</strong> examples. Except<br />
for the above, <strong>and</strong> all aspects of operation are the same.<br />
Timers in interlocked program sections are reset when the execution condition<br />
for IL(02) is OFF. Power interruptions also reset timers. If a timer that is<br />
not reset under these conditions is desired, SR area clock pulse bits can be<br />
counted to produce timers using CNT. Refer to 5-10-3 COUNTER - CNT for<br />
details.<br />
The cycle time affects TIMH(15) accuracy if TC 004 through TC 511 are<br />
used. If the cycle time is greater than 10 ms, use TC 000 through TC 003.<br />
Program execution will continue even if a non-BCD SV is used, but timing will<br />
not be accurate.<br />
Flags ER: SV is not in BCD.<br />
Indirectly addressed DM word is non-existent. (Content of �DM word<br />
is not BCD, or the DM area boundary has been exceeded.)
5-10-3 COUNTER -- CNT<br />
Limitations<br />
Description<br />
Precautions<br />
% Section 5-10<br />
Ladder Symbol<br />
CP<br />
R<br />
CNT N<br />
SV<br />
Definer Values<br />
N: TC number<br />
# (000 through 511)<br />
Oper<strong>and</strong> Data Areas<br />
SV: Set value (word, BCD)<br />
IR, AR, DM, HR, LR, #<br />
Each TC number can be used as the definer in only one TIMER or COUNT-<br />
ER instruction.<br />
CNT is used to count down from SV when the execution condition on the<br />
count pulse, CP, goes from OFF to ON, i.e., the present value (PV) will be<br />
decremented by one whenever CNT is executed with an ON execution condition<br />
for CP <strong>and</strong> the execution condition was OFF for the last execution. If the<br />
execution condition has not changed or has changed from ON to OFF, the<br />
PV of CNT will not be changed. The completion flag for a counter is turned<br />
ON when the PV reaches zero <strong>and</strong> will remain ON until the counter is reset.<br />
CNT is reset with a reset input, R. When R goes from OFF to ON, the PV is<br />
reset to SV. The PV will not be decremented while R is ON. Counting down<br />
from SV will begin again when R goes OFF. The PV for CNT will not be reset<br />
in interlocked program sections or by power interruptions.<br />
Changes in execution conditions, the completion flag, <strong>and</strong> the PV are illustrated<br />
below. PV line height is meant only to indicate changes in the PV.<br />
Execution condition<br />
on count pulse (CP)<br />
Execution condition<br />
on reset (R)<br />
Completion flag<br />
PV<br />
ON<br />
OFF<br />
ON<br />
OFF<br />
ON<br />
OFF<br />
SV<br />
SV -- 1<br />
SV -- 2<br />
Program execution will continue if a non-BCD SV is used, but the SV might<br />
not be correct.<br />
Flags ER: SV is not in BCD.<br />
Indirectly addressed DM word is non-existent. (Content of �DM word<br />
is not BCD, or the DM area boundary has been exceeded.)<br />
0002<br />
0001<br />
0000<br />
SV
,<br />
00000<br />
% Section 5-10<br />
Example 1:<br />
Basic Application<br />
00000<br />
00002<br />
CNT 004<br />
00002<br />
25315<br />
CNT 004<br />
00001<br />
Example 2:<br />
Extended Counter<br />
00001<br />
In the following example, the PV will be decremented whenever both 00000<br />
<strong>and</strong> 00001 are ON provided that 00002 is OFF <strong>and</strong> either 00000 or 00001<br />
was OFF the last time CNT 004 was executed. When 150 pulses have been<br />
counted down (i.e., when PV reaches zero), 00205 will be turned ON.<br />
CP<br />
R<br />
CNT 004<br />
#0150<br />
00205<br />
Address Instruction Oper<strong>and</strong>s<br />
00000 LD 00000<br />
00001 AND 00001<br />
00002 LD 00002<br />
00003 CNT 0004<br />
# 0150<br />
00004 LD CNT 004<br />
00005 OUT 00205<br />
Here, 00000 can be used to control when CNT is operative <strong>and</strong> 00001 can<br />
be used as the bit whose OFF to ON changes are being counted.<br />
The above CNT can be modified to restart from SV each time power is<br />
turned ON to the PC. This is done by using the First Cycle Flag in the SR<br />
area (25315) to reset CNT as shown below.<br />
CP<br />
R<br />
CNT 004<br />
#0150<br />
00205<br />
Address Instruction Oper<strong>and</strong>s<br />
00000 LD 00000<br />
00001 AND 00001<br />
00002 LD 00002<br />
00003 OR 25315<br />
00004 CNT 004<br />
# 0150<br />
00005 LD CNT 004<br />
00006 OUT 00205<br />
Counters that can count past 9,999 can be programmed by using one CNT to<br />
count the number of times another CNT has counted to zero from SV.<br />
In the following example, 00000 is used to control when CNT 001 operates.<br />
CNT 001, when 00000 is ON, counts down the number of OFF to ON<br />
changes in 00001. CNT 001 is reset by its completion flag, i.e., it starts<br />
counting again as soon as its PV reaches zero. CNT 002 counts the number<br />
of times the completion flag for CNT 001 goes ON. Bit 00002 serves as a<br />
reset for the entire extended counter, resetting both CNT 001 <strong>and</strong> CNT 002<br />
when it is OFF. The completion flag for CNT 002 is also used to reset CNT<br />
001 to inhibit CNT 001 operation, once SV for CNT 002 has been reached,<br />
until the entire extended counter is reset via 00002.<br />
Because in this example the SV for CNT 001 is 100 <strong>and</strong> the SV for CNT 002<br />
is 200, the completion flag for CNT 002 turns ON when 100 x 200 or 20,000
00000 00001<br />
00002<br />
CNT 001<br />
CNT 002<br />
CNT 001<br />
00002<br />
CNT 002<br />
00000 TIM 001 CNT 002<br />
TIM 001<br />
00001<br />
CNT 002<br />
% Section 5-10<br />
Example 3:<br />
Extended Timers<br />
OFF to ON changes have been counted in 00001. This would result in 00203<br />
being turned ON.<br />
CP<br />
R<br />
CP<br />
R<br />
CNT 001<br />
#0100<br />
CNT 002<br />
#0200<br />
00203<br />
Address Instruction Oper<strong>and</strong>s<br />
00000 LD 00000<br />
00001 AND 00001<br />
00002 LD NOT 00002<br />
00003 OR CNT 001<br />
00004 OR CNT 002<br />
00005 CNT 001<br />
# 0100<br />
00006 LD CNT 001<br />
00007 LD NOT 00002<br />
00008 CNT 002<br />
# 0200<br />
00009 LD CNT 002<br />
00010 OUT 00203<br />
CNT can be used in sequence as many times as required to produce counters<br />
capable of counting any desired values.<br />
CNT can be used to create extended timers in two ways: by combining TIM<br />
with CNT <strong>and</strong> by counting SR area clock pulse bits.<br />
In the following example, CNT 002 counts the number of times TIM 001<br />
reaches zero from its SV. The completion flag for TIM 001 is used to reset<br />
TIM 001 so that is runs continuously <strong>and</strong> CNT 002 counts the number of<br />
times the completion flag for TIM 001 goes ON (CNT 002 would be executed<br />
once each time between when the completion flag for TIM 001 goes ON <strong>and</strong><br />
TIM 001 is reset by its completion flag). TIM 001 is also reset by the completion<br />
flag for CNT 002 so that the extended timer would not start again until<br />
CNT 002 was reset by 00001, which serves as the reset for the entire extended<br />
timer.<br />
Because in this example the SV for TIM 001 is 5.0 seconds <strong>and</strong> the SV for<br />
CNT 002 is 100, the completion flag for CNT 002 turns ON when 5 seconds x<br />
100 times, i.e., 500 seconds (or 8 minutes <strong>and</strong> 20 seconds) have expired.<br />
This would result in 00201 being turned ON.<br />
CP<br />
R<br />
TIM 001<br />
#0050<br />
CNT<br />
002<br />
#0100<br />
00200<br />
Address Instruction Oper<strong>and</strong>s<br />
00000 LD 00000<br />
00001 AND NOT TIM 001<br />
00002 AND NOT CNT 002<br />
00003 TIM 001<br />
# 0050<br />
00004 LD TIM 001<br />
00005 LD 00001<br />
00006 CNT 002<br />
# 0100<br />
00007 LD CNT 002<br />
00008 OUT 00200<br />
In the following example, CNT 001 counts the number of times the 1-second<br />
clock pulse bit (25502) goes from OFF to ON. Here again, 00000 is used to<br />
control the times when CNT is operating.<br />
"
00000 25502<br />
00001<br />
CNT 001<br />
4<br />
Because in this example the SV for CNT 001 is 700, the completion flag for<br />
CNT 002 turns ON when 1 second x 700 times, or 11 minutes <strong>and</strong> 40 seconds<br />
have expired. This would result in 00202 being turned ON.<br />
CP<br />
R<br />
CNT<br />
001<br />
#0700<br />
00202<br />
Address Instruction Oper<strong>and</strong>s<br />
00000 LD 00000<br />
00001 AND 25502<br />
00002 LD NOT 00001<br />
00003 CNT 001<br />
# 0700<br />
00004 LD CNT 001<br />
00005 OUT 00202<br />
Caution The shorter clock pulses will not necessarily produce accurate timers because<br />
their short ON times might not be read accurately during longer cycles.<br />
In particular, the 0.02-second <strong>and</strong> 0.1-second clock pulses should not be<br />
used to create timers with CNT instructions.<br />
5-10-4 REVERSIBLE COUNTER -- CNTR(12)<br />
Limitations<br />
Description<br />
% Section 5-10<br />
Ladder Symbol<br />
II<br />
DI<br />
R<br />
CNTR(12)<br />
N<br />
SV<br />
Definer Values<br />
N: TC number<br />
# (000 through 511)<br />
Oper<strong>and</strong> Data Areas<br />
SV: Set value (word, BCD)<br />
IR, AR, DM, HR, LR, #<br />
Each TC number can be used as the definer in only one timer or counter instruction.<br />
The CNTR(12) is a reversible, up/down circular counter, i.e., it is used to<br />
count between zero <strong>and</strong> SV according to changes in two execution conditions,<br />
those in the increment input (II) <strong>and</strong> those in the decrement input (DI).<br />
The present value (PV) will be incremented by one whenever CNTR(12) is<br />
executed with an ON execution condition for II <strong>and</strong> the last execution condition<br />
for II was OFF. The present value (PV) will be decremented by one<br />
whenever CNTR(12) is executed with an ON execution condition for DI <strong>and</strong><br />
the last execution condition for DI was OFF. If OFF to ON changes have occurred<br />
in both II <strong>and</strong> DI since the last execution, the PV will not be changed.<br />
If the execution conditions have not changed or have changed from ON to<br />
OFF for both II <strong>and</strong> DI, the PV of CNT will not be changed.<br />
When decremented from 0000, the present value is set to SV <strong>and</strong> the completion<br />
flag is turned ON until the PV is decremented again. When incremented<br />
past the SV, the PV is set to 0000 <strong>and</strong> the completion flag is turned<br />
ON until the PV is incremented again.<br />
CNTR(12) is reset with a reset input, R. When R goes from OFF to ON, the<br />
PV is reset to zero. The PV will not be incremented or decremented while R
Precautions<br />
% Section 5-10<br />
is ON. Counting will begin again when R goes OFF. The PV for CNTR(12)<br />
will not be reset in interlocked program sections or by the effects of power<br />
interruptions.<br />
Changes in II <strong>and</strong> DI execution conditions, the completion flag, <strong>and</strong> the PV<br />
are illustrated below starting from part way through CNTR(12) operation (i.e.,<br />
when reset, counting begins from zero). PV line height is meant to indicate<br />
changes in the PV only.<br />
Execution condition<br />
on increment (II)<br />
Execution condition<br />
on decrement (DI)<br />
Completion flag<br />
PV<br />
ON<br />
OFF<br />
ON<br />
OFF<br />
ON<br />
OFF<br />
SV<br />
SV -- 1<br />
SV -- 2<br />
0001<br />
0000 0000<br />
SV<br />
SV -- 1<br />
Program execution will continue even if a non-BCD SV is used, but the SV<br />
will not be correct.<br />
Flags ER: SV is not in BCD.<br />
Indirectly addressed DM word is non-existent. (Content of �DM word<br />
is not BCD, or the DM area boundary has been exceeded.)<br />
5-10-5 REVERSIBLE DRUM COUNTER -- RDM(60)<br />
Ladder Symbol<br />
RDM(60)<br />
N<br />
T<br />
R<br />
Oper<strong>and</strong> Data Areas<br />
N: TC number<br />
TC (TC 500 to TC 511)<br />
T: Beginning table word (BCD)<br />
IR, AR, DM, HR, TC, LR<br />
R: Beginning result word<br />
IR, AR, DM, HR, TC, LR<br />
Limitations TC 500 through TC 511 must be used to create a reversible counter. The<br />
table starting in T must be within the same data area <strong>and</strong> all table words from<br />
T+1 on must be in BCD. Set this data carefully; the Error Flag (SR 25503)<br />
will not detect non-BCD data.<br />
Description RDM(60) is used to create a reversible ring counter that counts from 0 to<br />
9999, compare the PV to a table of ranges, <strong>and</strong> turn ON corresponding bits<br />
in R whenever the PV is within a range in the table. The counter input is the<br />
execution condition of RDM(60). Inputs are counted on the rising edge.<br />
The size of the table is determined by the value of n contained in bits 00 to<br />
07 of T. n is one less than the number of ranges in the table <strong>and</strong> can be anywhere<br />
from 0 to 255, designating from 1 to 256 ranges. The actual table of<br />
SV -- 2
% Section 5-10<br />
ranges begin in T+1. Each range is determined by the BCD values in consecutive<br />
word pairs, with each pair beginning with T+1. Ranges should be set so<br />
that the first value is less than the second unless the range includes zero,<br />
e.g., if the range includes 9998, 9999, 0000, 0001, <strong>and</strong> 0002, the first value<br />
should be set to 9998; the second value to 0002.<br />
When the counter value is found to lie within the first range, the first bit in R,<br />
bit 00, will be turned ON; if the counter value is within the second range, bit<br />
01 will be turned ON. Results for more than the first 16 ranges are placed in<br />
consecutive result words from R+1 on. The correspondence between table<br />
words <strong>and</strong> result words is shown below.<br />
First word Second word Result bit<br />
T+1 T+2 00 of R<br />
T+3 T+4 01 of R<br />
T+5 T+6 02 of R<br />
T+7 T+8 03 of R<br />
T+9 T+10 04 of R<br />
T+11 T+12 05 of R<br />
T+13 T+14 06 of R<br />
T+15 T+16 07 of R<br />
T+17 T+18 08 of R<br />
T+19 T+20 09 of R<br />
T+21 T+22 10 of R<br />
T+23 T+24 11 of R<br />
T+25 T+26 12 of R<br />
T+27 T+28 13 of R<br />
T+29 T+30 14 of R<br />
T+31 T+32 15 of R<br />
T+33 T+34 00 of R+1<br />
T+35 T+36 01 of R+1<br />
T+37 T+38 02 of R+1<br />
etc. etc. etc.<br />
T+2n+1 T+2n+2 See below.<br />
The last bit required for the result will be the truncated integer quotient of<br />
(n--1)/15, with one less than the remainder being the bit number of the last<br />
required bit.<br />
Result words are updated according to the present value of the counter regardless<br />
of whether or not the Reset Bit (see below) is ON, i.e., then the Reset<br />
Bit is ON, the results words will be updated according to a present value<br />
of zero.<br />
Table values can be changed during counter operation. Operation will continue<br />
according to the new values.
The direction of the counter <strong>and</strong> resetting the counter are designated via AR<br />
bits. Each of the eleven possible counters has a dedicated Reset Bit <strong>and</strong><br />
Counter Direction Bit. The Reset Bits are contained in AR 0200 to AR 0210;<br />
the Counter Direction Bits, in AR 0300 to AR 0310. These correspond to the<br />
TC numbers as follows:<br />
TC number Reset Bit Counter Direction Bit<br />
CNT 500 AR 0200 AR 0300<br />
CNT 501 AR 0201 AR 0301<br />
CNT 502 AR 0202 AR 0302<br />
CNT 503 AR 0203 AR 0303<br />
CNT 504 AR 0204 AR 0304<br />
CNT 505 AR 0205 AR 0305<br />
CNT 506 AR 0206 AR 0306<br />
CNT 507 AR 0207 AR 0307<br />
CNT 508 AR 0208 AR 0308<br />
CNT 509 AR 0209 AR 0309<br />
CNT 510 AR 0210 AR 0310<br />
When the corresponding Reset Bit is ON, the counter will be reset to zero<br />
<strong>and</strong> will not operate until the Reset Bit goes OFF. When the corresponding<br />
Counter Direction Bit is ON, the counter will count down; when the Counter<br />
Direction Bit is OFF, the counter will count up.<br />
Flags ER: T, T+1, <strong>and</strong> T+2 are not within the same data area.<br />
Indirectly addressed DM word is non-existent. (Content of �DM word<br />
is not BCD, or the DM area boundary has been exceeded.)<br />
Example The following example shows the minimal programming required to use<br />
RDM(60). Both the Reset Bit <strong>and</strong> the Counter Direction Bit are control via<br />
input bits, i.e., IR 00100 <strong>and</strong> IR 00101. The table values <strong>and</strong> result word status<br />
for a PC of 0001 are shown. It is assumed that IR 00100 would be turned<br />
ON to reset the counter at 2,400 counts.<br />
00100<br />
00101<br />
00102<br />
% Section 5-10<br />
RDM(60)<br />
CNT 500<br />
DM 1000<br />
128<br />
AR 0200<br />
AR 0300<br />
Address Instruction Oper<strong>and</strong>s<br />
00000 LD 00100<br />
00001 OUT AR 0200<br />
00002 LD 00101<br />
00003 OUT AR 0300<br />
00004 LD 00102<br />
00005 RDM(60) ---<br />
CNT 500<br />
DM 1000<br />
128
PV of CNT 500<br />
AR 0200 (reset)<br />
AR 0300 (direction)<br />
IR 00102 (count input)<br />
#<br />
% Section 5-10<br />
IR 12800 (1st result bit)<br />
N = CNT 500<br />
T = DM 1000<br />
0 0 1 7<br />
(n = 23, i.e.,<br />
24 ranges)<br />
T+1 = DM 1001 T+2 = DM 1002<br />
0 0 0 1 2 3 9 8 0 0 0 2 12800 1<br />
T+3 = DM 1003 T+4 = DM 1004<br />
0 0 9 8 0 1 0 2 12801 0<br />
T+5 = DM 1005 T+6 = DM 1006<br />
0 1 9 8 0 2 0 2 12801 0<br />
T+31 = DM 1031 T+21 = DM 1032<br />
1 4 9 8 1 5 0 2 12815 0<br />
T+33 = DM 1033 T+34 = DM 1034<br />
1 5 9 8 1 6 0 2 12900 0<br />
T+35 = DM 1035 T+36 = DM 1036<br />
1 6 9 8 1 7 0 2 12901 0<br />
T+37 = DM 1037 T+38 = DM 1038<br />
1 7 9 8 1 8 0 2 12902 0<br />
T+47 = DM 1047 T+48 = DM 1048<br />
R = IR 128<br />
2 2 9 8 2 3 0 2 12907 0<br />
The following timing chart shows counter operation for a limited range of<br />
PVs. Although only IR 12800 is shown because it is the only result bit affected<br />
by the PVs shown, the other bits in result words would operate the<br />
same for PVs that lie within the corresponding table ranges.<br />
2398 2399 0000 0001 0002 0003 0004 0005 0004 0003 0002 0001 0000<br />
5-10-6 HIGH-SPEED COUNTER -- HDM(61)<br />
Ladder Symbol<br />
HDM(61)<br />
T<br />
R<br />
---<br />
Oper<strong>and</strong> Data Areas<br />
T: Beginning table word (BCD)<br />
IR, AR, DM, HR, TC, LR<br />
R: Beginning result word<br />
IR, AR, DM, HR, TC, LR<br />
---: Not used.<br />
Limitations The table starting in T must be within the same data area <strong>and</strong> all table words<br />
from T+1 on must be in BCD. Set this data carefully; the Error Flag (SR
% Section 5-10<br />
25503) will not detect non-BCD data. Ensure that the system parameters<br />
have been set to enable the High-speed Counter. See the table in 3-6 DM<br />
(Data Memory) Area.<br />
Description HDM(61) is used to compare the PV of the high-speed counter (CNT 511) to<br />
a table of ranges, <strong>and</strong> turn ON corresponding bits in R whenever the PV is<br />
within a range in the table.<br />
The size of the table is determined by the value of n contained in bits 00 to<br />
07 of T. The value of n is one less than the number of ranges in the table <strong>and</strong><br />
can be between 0 <strong>and</strong> 255, designating from 1 to 256 ranges. The actual<br />
table of ranges begin in T+1. Each range is determined by the BCD values in<br />
consecutive word pairs, with each pair beginning with T+1. Ranges should be<br />
set so that the first value is less than the second unless the range includes<br />
zero, e.g., if the range includes 9998, 9999, 0000, 0001, <strong>and</strong> 0002, the first<br />
value should be set to 9998; the second value to 0002.<br />
When the counter value is found to lie within the first range, the first bit in R,<br />
bit 00, will be turned ON; if the counter value is within the second range, bit<br />
01 will be turned ON; <strong>and</strong> so on. Results for more than the first 16 ranges are<br />
placed in consecutive result words from R+1 on. The correspondence between<br />
table words <strong>and</strong> result words is shown below.<br />
First word Second word Result bit<br />
T+1 T+2 00 of R<br />
T+3 T+4 01 of R<br />
T+5 T+6 02 of R<br />
T+7 T+8 03 of R<br />
T+9 T+10 04 of R<br />
T+11 T+12 05 of R<br />
T+13 T+14 06 of R<br />
T+15 T+16 07 of R<br />
T+17 T+18 08 of R<br />
T+19 T+20 09 of R<br />
T+21 T+22 10 of R<br />
T+23 T+24 11 of R<br />
T+25 T+26 12 of R<br />
T+27 T+28 13 of R<br />
T+29 T+30 14 of R<br />
T+31 T+32 15 of R<br />
T+33 T+34 00 of R+1<br />
T+35 T+36 01 of R+1<br />
T+37 T+38 02 of R+1<br />
etc. etc. etc.<br />
T+2n+1 T+2n+2 See below.<br />
The last bit required for the result will be the truncated integer quotient of<br />
(n--1)/15, with one less than the remainder being the bit number of the last<br />
required bit.<br />
Result words are updated according to the present value of the counter regardless<br />
of whether or not the High-speed Counter Reset/Disable Bit is ON,<br />
i.e., then the Reset/Disable Bit is ON, the result words will be updated according<br />
to a present value of zero. If the Reset/Disable Bit is ON, the highspeed<br />
counter is reset when END(01) is executed.<br />
Although result words will be updated only when HDM(61) is executed with<br />
an ON execution condition, the execution condition for HDM(61) does not<br />
affect the operation of the high-speed counter.<br />
'
(<br />
Table values can be change during counter operation. Operation will continue<br />
according to the new values.<br />
Flags ER: T, T+1, <strong>and</strong> T+2 are not within the same data area.<br />
Indirectly addressed DM word is non-existent. (Content of �DM word<br />
is not BCD, or the DM area boundary has been exceeded.)<br />
Example 1 The following example shows the programming required to used HDM(61).<br />
Both the Reset Bit <strong>and</strong> the Counter Direction Bit are control via input bits, i.e.,<br />
IR 00100 <strong>and</strong> IR 00101. The table values <strong>and</strong> result word status for a PC of<br />
0001 are shown. It is assumed that IR 00100 would be turned ON to reset<br />
the counter at 2,400 counts.<br />
00101<br />
00100<br />
% Section 5-10<br />
HDM(61)<br />
DM 1000<br />
002<br />
---<br />
High-speed<br />
Counter<br />
Reset Bit<br />
AR 0211<br />
Address Instruction Oper<strong>and</strong>s<br />
00000 LD 00101<br />
00001 OUT AR 0211<br />
00002 LD 00100<br />
00003 HDM(61) ---<br />
DM 1000<br />
002<br />
T = DM 1000 (n = 3, i.e.,<br />
0 0 0 3<br />
4 ranges)<br />
CNT 511<br />
T+1 = DM 1001 T+2 = DM 1002 R = IR 002<br />
0 0 0 1 0 1 9 8 0 0 0 2 00200 1<br />
T+3 = DM 1003 T+4 = DM 1004<br />
0 0 4 8 0 0 5 2 00201 0<br />
T+5 = DM 1005 T+6 = DM 1006<br />
0 0 9 8 0 1 0 2 00201 0<br />
T+7 = DM<br />
T+8 = DM 1008<br />
1007 0 1 4 8 0 1 5 2 00203 0<br />
The following timing chart shows counter operation for a limited range of<br />
PVs. Although only IR 12800 is shown because it is the only result bit
PV of CNT 511<br />
Completion flag of CNT 511<br />
IR 00001 (reset/disable)<br />
IR 00000 (count input)<br />
IR 00101 (reset input)<br />
AR 0211 (reset bit)<br />
Counter enabled (IR 00100<br />
refreshed)<br />
IR 00200 (interrupt output,<br />
terminal refreshed)<br />
PC cycle<br />
% Section 5-10<br />
affected by the PVs shown, the other bits in result words would operated the<br />
same for PVs that lie within the corresponding table ranges.<br />
0000 0001 0002 0003 0004 . . . . 0198 0199 0000 0001 0002<br />
*The above timing chart does not take I/O circuit delays into consideration.<br />
Example 2 The following example shows how to program a high-speed counter that counts<br />
past 9,999. In this particular example, a comparison table to 35,000 is created to<br />
detect a range from 23,000 to 25,000 counts.<br />
DM Area Settings<br />
The General High-speed Counter Bit settings in the DM area (DM0905) are as<br />
follows:<br />
Bit 15 Bit 14 Bit 13 Bit 12 Bit 11 Bit 10 Bit 09 Bit 08 Bits 00 to 07<br />
1 0or1 0 0 0 0 1 1 0or1<br />
Turning ON bit 15 enables the counter, <strong>and</strong> the above settings for bits 08 to 10<br />
set steps 0 to 3 (0 to 40,000) for bank 0.<br />
Step Table Settings<br />
The settings for the step table are as follows:<br />
Word Contents<br />
DM 0910 0000<br />
DM 0911 0000<br />
DM 0912 0000<br />
DM 0913 5000<br />
Data<br />
The following data is used.<br />
Word Contents<br />
DM 0010 0002<br />
DM 1000 0000<br />
DM 1001 3000<br />
DM 1002 5000
,<br />
% Section 5-10<br />
Programming<br />
In the following program section, the INC(38) increments DM 0000 when each<br />
step is completed thus allowing CMP(20) to activate the high-speed counter for<br />
steps one <strong>and</strong> two. The high-speed counter is thus used to compare only the<br />
rightmost four digits <strong>and</strong> INC(38) <strong>and</strong> CMP(20) are combined to control execution<br />
of RDM(61) through the values of the leftmost digits.<br />
CNT511<br />
25315<br />
Always ON Flag<br />
25506 Equals Flag<br />
INC(38)<br />
DM 0000<br />
CMP(20)<br />
DM 0000<br />
DM 0010<br />
RDM(61)<br />
DM 1000<br />
010<br />
---<br />
Refreshing Result Words Refreshing of results words (beginning with R) is influenced by the cycle<br />
time. The time required from refreshing of the PV of the high-speed counter<br />
<strong>and</strong> refreshing of a result word bit is as shown below. As shown, it is necessary<br />
to reduce the cycle time as much as possible when rapid response is<br />
desired in result words.<br />
Max. cycle time<br />
T1<br />
Max. cycle time<br />
T2<br />
Output<br />
HDM(61) executed<br />
PV refreshed<br />
The second part of this delay time, T2, can be eliminated by using IORF(97)<br />
to refresh the desired I/O terminals during program execution.<br />
An interrupt drum output can also be used with HDM(61) to reduce the delay<br />
time (normally T1 +T2) to 1.5 ms max. Refer to 3-8-1 High-speed Counter for<br />
details.<br />
Output Delays Relay outputs are st<strong>and</strong>ard on the <strong>C20H</strong>/<strong>C28H</strong>/<strong>C40H</strong>/<strong>C60H</strong>. When used with<br />
high-speed counters (e.g., in a simple positioning system), the 15 ms max.<br />
relay’s ON/OFF delay can interfere with operation. If this delay is a problem,<br />
the outputs can be easily replaced with transistor outputs, which have a<br />
delay of 1.5 ms. Refer to the Installation Guide for details.
5-11 Data Shifting<br />
5-11-1 SHIFT REGISTER -- SFT(10)<br />
Limitations<br />
Description<br />
Lost<br />
data<br />
I : Data input<br />
P : Clock pulse<br />
R: Reset<br />
All of the instructions described in this section are used to shift data, but in<br />
differing amounts <strong>and</strong> directions. The first shift instruction, SFT(10), shifts an<br />
execution condition into a shift register; the rest of the instructions shift data<br />
that is already in memory.<br />
Ladder Symbol<br />
I<br />
P<br />
R<br />
SFT(10)<br />
St<br />
E<br />
Oper<strong>and</strong> Data Areas<br />
St: Starting word<br />
IR, AR, HR, LR<br />
E: Endword<br />
IR, AR, HR, LR<br />
St must be less than or equal to E, <strong>and</strong> St <strong>and</strong> E must be in the same data<br />
area.<br />
If a bit address in one of the words used in a shift register is also used in an<br />
instruction such as KEEP (11) that controls individual bit status, an error<br />
(“COIL DUPL”) will be generated when program syntax is checked on a Programming<br />
Device other than the Programming Console. The program, however,<br />
will be executed as written. See Example 2: Controlling Bits in Shift<br />
Registers for a programming example that does this.<br />
If I is ON at the leading edge of P, then a logical 1 is placed in bit 00 of word<br />
St. If I is 0 at leading edge of P, the a logical 0 is put in bit 00 of word St. In<br />
either case, all bits are shifted one bit position to the left between St <strong>and</strong> E.<br />
E St+1, St+2, ... St<br />
Execution<br />
condition I<br />
St designates the rightmost word of the shift register; E designates the leftmost.<br />
The shift register includes both of these words <strong>and</strong> all words between<br />
them. The same word may be designated for St <strong>and</strong> E to create a 16-bit (i.e.,<br />
1-word) shift register.<br />
When execution condition R goes ON, all bits in the shift register will be<br />
turned OFF (i.e., set to 0) <strong>and</strong> the shift register will not operate until R goes<br />
OFF again.<br />
Flags There are no flags affected by SFT(10).<br />
Section 5-11<br />
"
Example 1:<br />
Basic Application<br />
4<br />
00005<br />
25502<br />
00006<br />
Example 2:<br />
Controlling Bits in Shift<br />
Registers<br />
00200<br />
00202<br />
00203<br />
00004<br />
12800<br />
12800<br />
00201<br />
Example 3:<br />
Control Action<br />
The following example uses the 1-second clock pulse bit (25502) so that the<br />
execution condition produced by 00005 is shifted into a 3-word register between<br />
IR 010 <strong>and</strong> IR 012 every second.<br />
I<br />
P<br />
R<br />
SFT(10)<br />
010<br />
012<br />
Address Instruction Oper<strong>and</strong>s<br />
00000 LD 00005<br />
00001 LD 25502<br />
00002 LD 00006<br />
00003 SFT(10)<br />
010<br />
012<br />
The following program is used to control the status of the 17th bit of a shift<br />
register running from AR 00 through AR 01. When the 17th bit is to be set,<br />
00004 is turned ON. This causes the jump for JMP(04) 00 not to be made for<br />
that one cycle, <strong>and</strong> AR 0100 (the 17th bit) will be turned ON. When 12800 is<br />
OFF (i.e., at all times except during the first cycle after 00004 has changed<br />
from OFF to ON), the jump is executed <strong>and</strong> the status of AR 0100 will not be<br />
changed.<br />
I<br />
P<br />
R<br />
SFT(10)<br />
AR 00<br />
AR 01<br />
DIFU(13) 12800<br />
JMP(04) 00<br />
AR 0100<br />
JME(05) 00<br />
Section 5-11<br />
Address Instruction Oper<strong>and</strong>s<br />
00000 LD 00200<br />
00001 AND 00201<br />
00002 LD 00202<br />
00003 LD 00203<br />
00004 SFT(10)<br />
AR 00<br />
AR 01<br />
00005 LD 00004<br />
00006 DIFU(13) 12800<br />
00007 LD 12800<br />
00008 JMP(04) 00<br />
00009 LD 12800<br />
00010 OUT AR 0100<br />
00011 JME(05) 00<br />
When a bit that is part of a shift register is used in OUT (or any other instruction<br />
that controls bit status), a syntax error will be generated during the program<br />
check, but the program will executed properly (i.e., as written).<br />
The following program controls the conveyor line shown below so that faulty<br />
products detected at the sensor are pushed down a chute. To do this, the<br />
execution condition determined by inputs from the first sensor (00001) are<br />
stored in a shift register: ON for good products; OFF for faulty ones. Conveyor<br />
speed has been adjusted so that HR 0003 of the shift register can be<br />
used to activate a pusher (00500) when a faulty product reaches it, i.e., when<br />
HR 0003 turns ON, 00500 is turned ON to activate the pusher.
00000<br />
00001<br />
00000<br />
00003<br />
HR 0003<br />
00002<br />
The program is set up so that a rotary encoder (00000) controls execution of<br />
SFT(10) through a DIFU(13), the rotary encoder is set up to turn ON <strong>and</strong><br />
OFF each time a product passes the first sensor. Another sensor (00002) is<br />
used to detect faulty products in the chute so that the pusher output <strong>and</strong> HR<br />
0003 of the shift register can be reset as required.<br />
Sensor<br />
(00001)<br />
Rotary Encoder<br />
(00000)<br />
5-11-2 WORD SHIFT -- WSFT(16)<br />
Limitations<br />
DIFU(13) 00001<br />
I<br />
P<br />
R<br />
SFT(10)<br />
HR 00<br />
HR 01<br />
00500<br />
00500<br />
HR 0003<br />
Sensor<br />
(00002)<br />
Pusher<br />
(00500)<br />
Chute<br />
Section 5-11<br />
Address Instruction Oper<strong>and</strong>s<br />
00000 LD 00000<br />
00001 DIFU(13) 00001<br />
00002 LD 00001<br />
00003 LD 00000<br />
00004 LD 00003<br />
00005 SFT(10)<br />
HR 00<br />
HR 01<br />
00006 LD HR 0003<br />
00007 OUT 00500<br />
00008 LD 00002<br />
00009 OUT NOT 00500<br />
00010 OUT NOT HR 0003<br />
Ladder Symbols Oper<strong>and</strong> Data Areas<br />
St: Starting word<br />
WSFT(16)<br />
@WSFT(16)<br />
IR, AR, DM, HR, LR<br />
St<br />
St<br />
E: Endword<br />
E<br />
E<br />
IR, AR, DM, HR, LR<br />
St must be less than or equal to E, <strong>and</strong> St <strong>and</strong> E must be in the same data<br />
area.
Description<br />
When the execution condition is OFF, WSFT(16) is not executed. When the<br />
execution condition is ON, WSFT(16) shifts data between St <strong>and</strong> E in word<br />
units. Zeros are written into St <strong>and</strong> the content of E is lost.<br />
Lost<br />
E St + 1 St<br />
F 0 C 2 3 4 5 2 1 0 2 9<br />
E St + 1 St<br />
3 4 5 2 1 0 2 9 0 0 0 0<br />
Flags ER: The St <strong>and</strong> E words are in different areas, or St is greater than E.<br />
Indirectly addressed DM word is non-existent. (Content of �DM word<br />
is not BCD, or the DM area boundary has been exceeded.)<br />
5-11-3 REVERSIBLE WORD SHIFT -- RWS(17)<br />
RWS(17)<br />
C<br />
St<br />
E<br />
Ladder Symbols<br />
@RWS(17)<br />
C<br />
St<br />
E<br />
0000<br />
Oper<strong>and</strong> Data Areas<br />
C: Control word<br />
IR, AR, DM, HR, TC, LR, #<br />
St: Start word<br />
IR, AR, DM, HR, TC, LR<br />
E: Endword<br />
Section 5-11<br />
IR, AR, DM, HR, TC, LR<br />
Limitations St must be less than or equal to E, <strong>and</strong> St <strong>and</strong> E must be in the same data<br />
area.<br />
Description When executed with an OFF execution condition, RWS(17) does nothing <strong>and</strong><br />
the next instruction line is moved to. When executed with an ON execution<br />
condition, RWS(17) is used to create <strong>and</strong> control a reversible non-synchronous<br />
word shift register between St <strong>and</strong> E. This shift register only shifts<br />
words when the next word in the register is zero, e.g., if no words in the register<br />
contain zero, nothing is shifted. Also, only one word is shifted for each<br />
word in the register that contains zero. When the contents of a word are<br />
shifted to the next word, the original word’s contents are set to zero. In essence,<br />
when the register is shifted, each zero word in the register trades<br />
places with the next word. (See Example below.)<br />
The shift direction (i.e., whether the “next word” is the next higher or the next<br />
lower word) is designated in C. C is also used to reset the register. All of any<br />
portion of the register can be reset by designating the desired portion with St<br />
<strong>and</strong> E.
Control Word Bits 00 through 12 of C are not used. Bit 13 is the shift direction: turn bit 13<br />
ON to shift the non-zero data down (toward lower addressed words) <strong>and</strong><br />
OFF to shift up (toward higher addressed words). Bit 14 is the Shift Enable<br />
Bit: turn bit 14 ON to enable shift register operation according to bit 13, <strong>and</strong><br />
OFF to disable the register. Bit 15 is the Reset Bit: the register will be reset<br />
(set to zero) between St <strong>and</strong> E when RWS(17) is executed with bit 15 ON.<br />
Turn bit 15 OFF for normal operation.<br />
15 14 13 12 Not used.<br />
Not used.<br />
Shift direction<br />
1 (ON): Down<br />
0 (OFF): Up<br />
Shift Enable Bit<br />
Flags ER: St <strong>and</strong> E are not in the same data area or St is greater than E.<br />
Indirectly addressed DM word is non-existent. (Content of �DM word<br />
is not BCD, or the DM area boundary has been exceeded.)<br />
Example Thefollowinginstructionisusedtoshiftwordsinan11-wordshiftregister<br />
created between DM 0100 <strong>and</strong> DM 0110 assuming that HR 1215 (the Reset<br />
Bit in the control word) is OFF. If HR 1215 is ON, the entire register would be<br />
set to 0000. The data changes that would occur for the given register <strong>and</strong><br />
control word contents are also shown.<br />
HR 1213: OFF (Shift upward)<br />
HR 1214: ON (Shift enabled)<br />
HR 1215: OFF (Reset OFF)<br />
Reset<br />
Before<br />
execution<br />
After<br />
execution<br />
DM 0100 1234 0000<br />
DM 0101 0000 1234<br />
DM 0102 0000 0000<br />
DM 0103 2345 2345<br />
DM 0104 3456 0000<br />
DM 0105 0000 3456<br />
DM 0106 4567 4567<br />
DM 0107 5678 5678<br />
DM 0108 6789 0000<br />
DM 0109 0000 6789<br />
DM 0110 789A 789A<br />
Shift<br />
direction<br />
Section 5-11
5-11-4 ARITHMETIC SHIFT LEFT -- ASL(25)<br />
Description<br />
#<br />
ASL(25)<br />
Wd<br />
Ladder Symbols Oper<strong>and</strong> Data Areas<br />
@ASL(25)<br />
Wd<br />
Wd: Shiftword<br />
IR, AR, DM, HR, LR<br />
When the execution condition is OFF, ASL(25) is not executed. When the<br />
execution condition is ON, ASL(25) shifts a 0 into bit 00 of Wd, shifts the bits<br />
of Wd one bit to the left, <strong>and</strong> shifts the status of bit 15 into CY.<br />
CY<br />
Bit<br />
Bit<br />
15<br />
00<br />
1 0 0 1 1 1 0 0 0 1 0 1 0 0 1 1<br />
Flags ER: Indirectly addressed DM word is non-existent. (Content of �DM word<br />
is not BCD, or the DM area boundary has been exceeded.)<br />
CY: Receives the status of bit 15.<br />
EQ: ON when the content of Wd is zero; otherwise OFF.<br />
5-11-5 ARITHMETIC SHIFT RIGHT -- ASR(26)<br />
Description<br />
ASR(26)<br />
Wd<br />
Ladder Symbols Oper<strong>and</strong> Data Areas<br />
@ASR(26)<br />
Wd<br />
0<br />
Wd: Shiftword<br />
IR, AR, DM, HR, LR<br />
When the execution condition is OFF, ASR(25) is not executed. When the<br />
execution condition is ON, ASR(25) shifts a 0 into bit 15 of Wd, shifts the bits<br />
of Wd one bit to the right, <strong>and</strong> shifts the status of bit 00 into CY.<br />
0<br />
Bit<br />
Bit<br />
15<br />
00<br />
1 1 0 0 1 0 1 1 0 0 1 1 0 0 1 0<br />
Flags ER: Indirectly addressed DM word is non-existent. (Content of �DM word<br />
is not BCD, or the DM area boundary has been exceeded.)<br />
CY: Receives the data of bit 00.<br />
EQ: ON when the content of Wd is zero; otherwise OFF.<br />
CY<br />
Section 5-11
5-11-6 ROTATE LEFT -- ROL(27)<br />
Description<br />
Precautions<br />
ROL(27)<br />
Wd<br />
Ladder Symbols Oper<strong>and</strong> Data Areas<br />
@ROL(27)<br />
Wd<br />
Wd: Rotate word<br />
IR, AR, DM, HR, LR<br />
When the execution condition is OFF, ROL(27) is not executed. When the<br />
execution condition is ON, ROL(27) shifts all Wd bits one bit to the left, shifting<br />
CY into bit 00 of Wd <strong>and</strong> shifting bit 15 of Wd into CY.<br />
CY<br />
0<br />
Bit<br />
15<br />
Bit<br />
00<br />
1 0 1 1 0 0 1 1 1 0 0 0 1 1 0 1<br />
Use STC(41) to set the status of CY or CLC(41) to clear the status of CY before<br />
doing a rotate operation to ensure that CY contains the proper status<br />
before execution ROL(27).<br />
Flags ER: Indirectly addressed DM word is non-existent. (Content of �DM word<br />
is not BCD, or the DM area boundary has been exceeded.)<br />
CY: Receives the data of bit 15.<br />
EQ: ON when the content of Wd is zero; otherwise OFF.<br />
5-11-7 ROTATE RIGHT -- ROR(28)<br />
Description<br />
Precautions<br />
ROR(28)<br />
Wd<br />
Ladder Symbols Oper<strong>and</strong> Data Areas<br />
@ROR(28)<br />
Wd<br />
Wd: Rotate word<br />
IR, AR, DM, HR, LR<br />
When the execution condition is OFF, ROR(28) is not executed. When the<br />
execution condition is ON, ROR(28) shifts all Wd bits one bit to the right,<br />
shifting CY into bit 15 of Wd <strong>and</strong> shifting bit 00 of Wd into CY.<br />
CY<br />
0<br />
Bit<br />
15<br />
Bit<br />
00<br />
0 1 0 1 0 1 0 0 0 1 1 1 0 0 0 1<br />
Section 5-11<br />
Use STC(41) to set the status of CY or CLC(41) to clear the status of CY before<br />
doing a rotate operation to ensure that CY contains the proper status<br />
before execution ROR(28).<br />
Flags ER: Indirectly addressed DM word is non-existent. (Content of �DM word<br />
is not BCD, or the DM area boundary has been exceeded.)<br />
CY: Receives the data of bit 15.<br />
EQ: ON when the content of Wd is zero; otherwise OFF.<br />
'
5-11-8 ONE DIGIT SHIFT LEFT -- SLD(74)<br />
Limitations<br />
Description<br />
Precautions<br />
Flags<br />
(<br />
SLD(74)<br />
St<br />
E<br />
Ladder Symbols Oper<strong>and</strong> Data Areas<br />
St: Starting word<br />
@SLD(74)<br />
St<br />
E<br />
IR, AR, DM, HR, LR<br />
E: Endword<br />
IR, AR, DM, HR, LR<br />
St <strong>and</strong> E must be in the same data area, <strong>and</strong> E must be greater than or equal<br />
to St.<br />
When the execution condition is OFF, SLD(74) is not executed. When the<br />
execution condition is ON, SLD(74) shifts data between St <strong>and</strong> E (inclusive)<br />
by one digit (four bits) to the left. 0 is written into the rightmost digit of the St,<br />
<strong>and</strong> the content of the leftmost digit of E is lost.<br />
...<br />
E<br />
St<br />
8 F C 5 D 7 9 1<br />
Lost data 0<br />
5-11-9 ONE DIGIT SHIFT RIGHT -- SRD(75)<br />
Limitations<br />
Section 5-11<br />
The shift operation might not be completed if a power failure occurs during<br />
shift operation.<br />
ER: The St <strong>and</strong> E words are in different areas, or St is greater than E.<br />
Indirectly addressed DM word is non-existent. (Content of �DM word<br />
is not BCD, or the DM area boundary has been exceeded.)<br />
Ladder Symbols Oper<strong>and</strong> Data Areas<br />
E: Endword<br />
SRD(75)<br />
@SRD(75)<br />
IR, AR, DM, HR, LR<br />
E<br />
E<br />
St: Starting word<br />
St<br />
St<br />
IR, AR, DM, HR, LR<br />
St <strong>and</strong> E must be in the same data area, <strong>and</strong> E must be less than or equal to<br />
St.
Description<br />
Precautions<br />
When the execution condition is OFF, SRD(75) is not executed. When the<br />
execution condition is ON, SRD(75) shifts data between St <strong>and</strong> E (inclusive)<br />
by one digit (four bits) to the right. 0 is written into the leftmost digit of St <strong>and</strong><br />
the rightmost digit of E is lost.<br />
St<br />
E<br />
3 4 5 2 F 8 C 1<br />
0<br />
...<br />
Lost data<br />
The shift operation might not be completed if a power failure occurs during<br />
shift operation.<br />
Flags ER: The St <strong>and</strong> E words are in different areas, or St is greater than E.<br />
Indirectly addressed DM word is non-existent. (Content of �DM word<br />
is not BCD, or the DM area boundary has been exceeded.)<br />
5-11-10 REVERSIBLE SHIFT REGISTER -- SFTR(84)<br />
Limitations<br />
Description<br />
SFTR(84)<br />
C<br />
St<br />
E<br />
Ladder Symbols<br />
@SFTR(84)<br />
C<br />
St<br />
E<br />
Oper<strong>and</strong> Data Areas<br />
C: Control word<br />
IR, AR, DM, HR, LR<br />
St: Starting word<br />
IR, AR, DM, HR, LR<br />
E: Endword<br />
IR, AR, DM, HR, LR<br />
St must be less than or equal to E, <strong>and</strong> St <strong>and</strong> E must be in the same data<br />
area.<br />
SFTR(84) is used to create a single- or multiple-word shift register that can<br />
shift data to either the right or the left. To create a single-word register, designate<br />
the same word for St <strong>and</strong> E. The control word provides the shift direction,<br />
the status to be put into the register, the shift pulse, <strong>and</strong> the reset input.<br />
The control word is allocated as follows:<br />
15 14 13 12 Not used.<br />
Shift direction<br />
1 (ON): Left<br />
0 (OFF): Right<br />
Data input<br />
Clock pulse<br />
Flags ER: St <strong>and</strong> E are not in the same data area or ST is greater than E.<br />
Indirectly addressed DM word is non-existent. (Content of �DM word<br />
is not BCD, or the DM area boundary has been exceeded.)<br />
CY: Receives the status of bit 00 of St or bit 15 of E, depending on the<br />
shift direction.<br />
Reset<br />
Section 5-11
Example<br />
,<br />
00005<br />
00006<br />
00007<br />
00008<br />
00009<br />
In the following example, IR 00005, IR 00006, IR 00007, <strong>and</strong> IR 00008 are<br />
used to control the bits of C used in @SHIFT(84). The shift register is between<br />
LR 20 <strong>and</strong> LR 21, <strong>and</strong> it is controlled through IR 00009.<br />
05012<br />
05013<br />
05014<br />
05015<br />
@SFTR(84)<br />
050<br />
LR 20<br />
LR 21<br />
Direction<br />
Status to input<br />
Shift pulse<br />
Address Instruction Oper<strong>and</strong>s Address Instruction Oper<strong>and</strong>s<br />
00000 LD 00005<br />
00001 OUT 05012<br />
00002 LD 00006<br />
00003 OUT 05013<br />
00004 LD 00007<br />
00005 OUT 05014<br />
00006 LD 00008<br />
Reset<br />
00007 OUT 05015<br />
00008 LD 00009<br />
00009 @SFTR(84)<br />
050<br />
LR 20<br />
LR 21<br />
Section 5-11
5-12 Data Movement<br />
5-12-1 MOVE -- MOV(21)<br />
Description<br />
Precautions<br />
This section describes the instructions used for moving data between different<br />
addresses in data areas. These movements can be programmed to be<br />
within the same data area or between different data areas. Data movement is<br />
essential for utilizing all of the data areas of the PC. Effective communications<br />
in Link Systems also require data movement. All of these instructions<br />
change only the content of the words to which data is being moved, i.e., the<br />
content of source words is the same before <strong>and</strong> after execution of any of the<br />
data movement instructions.<br />
MOV(21)<br />
S<br />
D<br />
Ladder Symbols Oper<strong>and</strong> Data Areas<br />
@MOV(21)<br />
S<br />
D<br />
S: Source word<br />
IR, SR, AR, DM, HR, TC, LR, #<br />
D: Destination word<br />
IR, AR, DM, HR, LR<br />
When the execution condition is OFF, MOV(21) is not executed. When the<br />
execution condition is ON, MOV(21) copies the content of S to D.<br />
Source word Destination word<br />
Bit status<br />
not changed.<br />
TC numbers cannot be designated as D to change the PV of the timer or<br />
counter. However, these can be easily changed using BSET(71).<br />
Flags ER: Indirectly addressed DM word is non-existent. (Content of �DM word<br />
is not BCD, or the DM area boundary has been exceeded.)<br />
EQ: ON when all zeros are transferred to D.<br />
5-12-2 MOVE NOT -- MVN(22)<br />
Description<br />
MVN(22)<br />
S<br />
D<br />
Ladder Symbols Oper<strong>and</strong> Data Areas<br />
@MVN(22)<br />
S<br />
D<br />
S: Source word<br />
IR, SR, AR, DM, HR, TC, LR, #<br />
D: Destination word<br />
IR, AR, DM, HR, LR<br />
Section 5-12<br />
When the execution condition is OFF, MVN(22) is not executed. When the<br />
execution condition is ON, MVN(22) transfers the complement of the content<br />
of S (specified word or four-digit hexadecimal constant) to D, i.e., for each<br />
"
Precautions<br />
#4<br />
ON bit in S, the corresponding bit in D is turned OFF, <strong>and</strong> for each OFF bit in<br />
S, the corresponding bit in D is turned ON.<br />
Source word Destination word<br />
Bit status<br />
inverted.<br />
TC numbers cannot be designated as D to change the PV of the timer or<br />
counter. However, these can be easily changed using BSET(71).<br />
Flags ER: Indirectly addressed DM word is non-existent. (Content of �DM word<br />
is not BCD, or the DM area boundary has been exceeded.)<br />
EQ: ON when all zeros are transferred to D.<br />
5-12-3 BLOCK TRANSFER -- XFER(70)<br />
Limitations<br />
Description<br />
XFER(70)<br />
N<br />
S<br />
D<br />
Ladder Symbols<br />
@XFER(70)<br />
N<br />
S<br />
D<br />
Oper<strong>and</strong> Data Areas<br />
N: Number of words (BCD)<br />
IR, SR, AR, DM, HR, TC, LR, #<br />
S: Starting source word<br />
IR,SR,AR,DM,HR,TC,LR<br />
D: Starting destination word<br />
IR, AR, DM, HR, TC, LR<br />
Both S <strong>and</strong> D may be in the same data area, but their respective block areas<br />
must not overlap. S <strong>and</strong> S+N--1 must be in the same data area, as must D<br />
<strong>and</strong> D+N--1.<br />
When the execution condition is OFF, XFER(70) is not executed. When the<br />
execution condition is ON, XFER(70) copies the contents of S, S+1, ...,<br />
S+N--1 to D, D+1, ..., D+N--1.<br />
S<br />
3 4 5<br />
S+1<br />
3 4 5<br />
S+2<br />
3 4 2<br />
2<br />
1<br />
2<br />
S+N--1<br />
6 4 5 2<br />
D<br />
3 4 5<br />
D+1<br />
3 4 5<br />
D+2<br />
3 4 2<br />
2<br />
1<br />
2<br />
D+N--1<br />
6 4 5 2<br />
Section 5-12<br />
Flags ER: N is not BCD<br />
S <strong>and</strong> S+N--1 or D <strong>and</strong> D+N--1 are not in the same data area.<br />
Indirectly addressed DM word is non-existent. (Content of �DM word<br />
is not BCD, or the DM area boundary has been exceeded.)
5-12-4 BLOCK SET -- BSET(71)<br />
Limitations<br />
Description<br />
BSET(71)<br />
S<br />
St<br />
E<br />
Ladder Symbols<br />
@BSET(71)<br />
S<br />
St<br />
E<br />
Oper<strong>and</strong> Data Areas<br />
S: Source data<br />
IR, SR, AR, DM, HR, TC, LR, #<br />
St: Starting word<br />
IR, AR, DM, HR, TC, LR<br />
E: EndWord<br />
IR, AR, DM, HR, TC, LR<br />
St must be less than or equal to E, <strong>and</strong> St <strong>and</strong> E must be in the same data<br />
area.<br />
When the execution condition is OFF, BSET(71) is not executed. When the<br />
execution condition is ON, BSET(71) copies the content of S to all words<br />
from St through E.<br />
S<br />
St<br />
3 4 5 2<br />
3 4 5 2<br />
St+1<br />
3 4 5<br />
St+2<br />
3 4 5<br />
E<br />
3 4 5<br />
2<br />
2<br />
2<br />
Section 5-12<br />
BSET(71) can be used to change timer/counter PV. (This cannot be done<br />
with MOV(21) or MVN(22).) BSET(71) can also be used to clear sections of a<br />
data area, i.e., the DM area, to prepare for executing other instructions.<br />
Flags ER: St <strong>and</strong> E are not in the same data area or St is greater than E.<br />
Indirectly addressed DM word is non-existent. (Content of �DM word<br />
is not BCD, or the DM area boundary has been exceeded.)<br />
#
Example<br />
#<br />
00003<br />
00004<br />
00003<br />
00004<br />
00004<br />
00003<br />
The following example shows how to use BSET(71) to change the PV of a<br />
timer depending on the status of IR 00003 <strong>and</strong> IR 00004. When IR 00003 is<br />
ON, TIM 010 will operate as a 50-second timer; when IR 00004 is ON, TIM<br />
010 will operate as a 30-second timer.<br />
@BSET(71)<br />
#0500<br />
TIM 010<br />
TIM 010<br />
@BSET(71)<br />
#0300<br />
TIM 010<br />
TIM 010<br />
TIM 010<br />
#9999<br />
5-12-5 DATA EXCHANGE -- XCHG(73)<br />
Description<br />
XCHG(73)<br />
E1<br />
E2<br />
999.9 s<br />
Address Instruction Oper<strong>and</strong>s<br />
00000 LD 00003<br />
00001 AND NOT 00004<br />
00002 @BSET(71)<br />
# 0500<br />
TIM 010<br />
TIM 010<br />
00003 LD 00004<br />
00004 AND NOT 00003<br />
00005 @BSET(71)<br />
# 0300<br />
TIM 010<br />
TIM 010<br />
00006 LD 00003<br />
00007 OR 00004<br />
00008 TIM 010<br />
# 9999<br />
Ladder Symbols Oper<strong>and</strong> Data Areas<br />
@XCHG(73)<br />
E1<br />
E2<br />
E1: Exchange word 1<br />
IR, AR, DM, HR, TC, LR<br />
E2: Exchange word 2<br />
IR, AR, DM, HR, TC, LR<br />
When the execution condition is OFF, XCHG(73) is not executed. When the<br />
execution condition is ON, XCHG(73) exchanges the content of E1 <strong>and</strong> E2.<br />
E1<br />
E2<br />
Section 5-12<br />
If you want to exchange content of blocks whose size is greater than 1 word,<br />
use work words as an intermediate buffer to hold one of the blocks using<br />
XFER(70) three times.<br />
Flags ER: Indirectly addressed DM word is non-existent. (Content of �DM word<br />
is not BCD, or the DM area boundary has been exceeded.)
5-12-6 MOVE BIT -- MOVB(82)<br />
MOVB(82)<br />
S<br />
Bi<br />
D<br />
Ladder Symbols<br />
@MOVB(82)<br />
S<br />
Bi<br />
D<br />
Oper<strong>and</strong> Data Areas<br />
S: Source word<br />
IR, SR, AR, DM, HR, LR, #<br />
Bi: Bit designator (BCD)<br />
IR, AR, DM, HR, TC, LR, #<br />
D: Destination word<br />
IR, AR, DM, HR, LR<br />
Limitations: The rightmost two digits <strong>and</strong> the leftmost two digits of Bi must each be between<br />
00 <strong>and</strong> 15.<br />
Description<br />
Bi<br />
1 2 0<br />
1<br />
When the execution condition is OFF, MOVB(82) is not executed. When the<br />
execution condition is ON, MOVB(82) copies the specified bit of S to the specified<br />
bit in D. The bits in S <strong>and</strong> D are specified by Bi. The rightmost two digits<br />
of Bi designate the source bit; the leftmost two bits designate the destination<br />
bit.<br />
Source bit (00 to 15)<br />
Destination bit (00 to 15)<br />
Bi<br />
S<br />
D<br />
Bit<br />
15<br />
0 0 0 1 0 0 1 0 0 0 0 0 0 0 0 1<br />
Bit<br />
15<br />
1 2 0 1<br />
0 1 0 1 0 1 0 0 0 1 1 1 0 0 0 1<br />
Bit<br />
15<br />
0 1 0 0 0 1 0 0 0 1 1 1 0 0 0 1<br />
Flags ER: C is not BCD, or it is specifying a non-existent bit (i.e., bit specification<br />
must be between 00 <strong>and</strong> 15).<br />
Indirectly addressed DM word is non-existent. (Content of �DM word<br />
is not BCD, or the DM area boundary has been exceeded.)<br />
5-12-7 MOVE DIGIT -- MOVD(83)<br />
MOVD(83)<br />
S<br />
Di<br />
D<br />
Ladder Symbols<br />
@MOVD(83)<br />
S<br />
Di<br />
D<br />
Bit<br />
00<br />
Bit<br />
00<br />
Bit<br />
00<br />
Oper<strong>and</strong> Data Areas<br />
S: Source word<br />
IR, SR, AR, DM, HR, TC, LR, #<br />
Di: Digit designator (BCD)<br />
IR, AR, DM, HR, TC, LR, #<br />
D: Destination word<br />
IR, AR, DM, HR, TC, LR<br />
Limitations The rightmost three digits of Di must each be between 0 <strong>and</strong> 3.<br />
Section 5-12<br />
#
Description<br />
Digit Designator<br />
Flags<br />
##<br />
When the execution condition is OFF, MOVD(83) is not executed. When the<br />
execution condition is ON, MOVD(83) copies the content of the specified<br />
digit(s) in S to the specified digit(s) in D. Up to four digits can be transferred<br />
at one time. The first digit to be copied, the number of digits to be copied,<br />
<strong>and</strong> the first digit to receive the copy are designated in Di as shown below.<br />
Digits from S will be copied to consecutive digits in D starting from the designated<br />
first digit <strong>and</strong> continued for the designated number of digits. If the last<br />
digit is reached in either S or D, further digits are used starting back at digit 0.<br />
Digit number: 3 2 1 0<br />
First digit in S (0 to 3)<br />
Number of digits (0 to 3)<br />
0: 1 digit<br />
1: 2 digits<br />
2: 3 digits<br />
3: 4 digits<br />
First digit in D (0 to 3)<br />
Not used.<br />
The following show examples of the data movements for various values of<br />
Di.<br />
Di: 0010<br />
S<br />
0<br />
1<br />
2<br />
3<br />
Di: 0031 Di: 0023<br />
S<br />
D<br />
S<br />
0<br />
1<br />
2<br />
3<br />
D<br />
0<br />
1<br />
2<br />
3<br />
0<br />
1<br />
2<br />
3<br />
Di: 0030<br />
S<br />
0<br />
1<br />
2<br />
3<br />
0<br />
1<br />
2<br />
3<br />
ER: At least one of the rightmost three digits of Di is not between 0 <strong>and</strong> 3.<br />
Indirectly addressed DM word is non-existent. (Content of �DM word<br />
is not BCD, or the DM area boundary has been exceeded.)<br />
D<br />
0<br />
1<br />
2<br />
3<br />
D<br />
0<br />
1<br />
2<br />
3<br />
Section 5-12
5-13 Data Comparison<br />
5-13-1 COMPARE -- CMP(20)<br />
Limitations<br />
Description<br />
Precautions<br />
This section describes the instructions used for comparing data. CMP(20) is<br />
used to compare the contents of two words; BCMP(68) is used to determine<br />
within which of several preset ranges the content of one word lies.<br />
Ladder Symbols Oper<strong>and</strong> Data Areas<br />
CMP(20)<br />
Cp1<br />
Cp2<br />
Section 5-13<br />
Cp1: First compare word<br />
IR, SR, AR, DM, HR, TC, TR, #<br />
Cp2: Second compare word<br />
IR, SR, AR, DM, HR, TC, LR, #<br />
When comparing a value to the PV of a timer or counter, the value must be in<br />
BCD.<br />
When the execution condition is OFF, CMP(20) is not executed. When the<br />
execution condition is ON, CMP(20) compares Cp1 <strong>and</strong> Cp2 <strong>and</strong> outputs the<br />
result to the GR, EQ, <strong>and</strong> LE flags in the SR area.<br />
Placing other instructions between CMP(20) <strong>and</strong> the operation which accesses<br />
the EQ, LE, <strong>and</strong> GR flags may change the status of these flags. Be<br />
sure to access them before the desired status is changed.<br />
Flags ER: Indirectly addressed DM word is non-existent. (Content of �DM word<br />
is not BCD, or the DM area boundary has been exceeded.)<br />
EQ: ON if Cp1 equals Cp2.<br />
LE: ON if Cp1 is less than Cp2.<br />
GR: ON if Cp1 is greater than Cp2.<br />
#'
Example 1:<br />
Saving CMP(20) Results<br />
#(<br />
00000<br />
TR<br />
0<br />
25505<br />
25506<br />
25507<br />
Example 2:<br />
Obtaining Indications<br />
during Timer Operation<br />
The following example shows how to save the comparison result immediately.<br />
If the content of HR 09 is greater than that of 010, 00200 is turned ON;<br />
if the two contents are equal, 00201 is turned ON; if content of HR 09 is less<br />
than that of 010, 00202 is turned ON. In some applications, only one of the<br />
three OUTs would be necessary, making the use of TR 0 unnecessary. With<br />
this <strong>type</strong> of programming, 00200, 00201, <strong>and</strong> 00202 are changed only when<br />
CMP(20) is executed.<br />
CMP(20)<br />
010<br />
HR 09<br />
00200<br />
00201<br />
00202<br />
Greater Than<br />
Equal<br />
Less Than<br />
Address Instruction Oper<strong>and</strong>s Address Instruction Oper<strong>and</strong>s<br />
00000 LD 00000<br />
00001 OUT TR 0<br />
00002 CMP(20)<br />
010<br />
HR 09<br />
00003 AND 25505<br />
00004 OUT 00200<br />
00005 LD TR 0<br />
00006 AND 25506<br />
00007 OUT 00201<br />
00008 LD TR 0<br />
0009 AND 25507<br />
00010 OUT 00202<br />
Section 5-13<br />
The following example uses TIM, CMP(20), <strong>and</strong> the LE flag (25507) to produce<br />
outputs at particular times in the timer’s countdown. The timer is started<br />
by turning ON 00000. When 00000 is OFF, TIM 010 is reset <strong>and</strong> the second<br />
two CMP(20)s are not executed (i.e., executed with OFF execution conditions).<br />
Output 00200 is produced after 100 seconds; output 00201, after 200<br />
seconds; output 00202, after 300 seconds; <strong>and</strong> output 00204, after 500 seconds.<br />
The branching structure of this diagram is important in order to ensure that<br />
00200, 00201, <strong>and</strong> 00202 are controlled properly as the timer counts down.
00000<br />
00200<br />
00201<br />
TIM 010<br />
25507<br />
25507<br />
25507<br />
Because all of the comparisons here use to the timer’s PV as reference, the<br />
other oper<strong>and</strong> for each CMP(20) must be in 4-digit BCD.<br />
CMP(20)<br />
TIM 010<br />
#4000<br />
CMP(20)<br />
TIM 010<br />
#3000<br />
CMP(20)<br />
TIM 010<br />
#2000<br />
00200<br />
00201<br />
00202<br />
00204<br />
Output at<br />
100 s.<br />
Output at<br />
200 s.<br />
Output at<br />
300 s.<br />
Output at<br />
500 s.<br />
Address Instruction Oper<strong>and</strong>s Address Instruction Oper<strong>and</strong>s<br />
00000 LD 00000<br />
00001 TIM 010<br />
# 5000<br />
00002 CMP(20)<br />
TIM 010<br />
# 4000<br />
00003 AND 25507<br />
00004 OUT 00200<br />
00005 LD 00200<br />
00006 CMP(20)<br />
TIM 010<br />
# 3000<br />
TIM 010<br />
#5000<br />
00007 AND 25507<br />
00008 OUT 00201<br />
00009 LD 00201<br />
00010 CMP(20)<br />
TIM 010<br />
# 2000<br />
00011 AND 25507<br />
00012 OUT 00202<br />
00013 LD TIM 010<br />
00014 OUT 00204<br />
Section 5-13<br />
#
5-13-2 BLOCK COMPARE -- BCMP(68)<br />
Limitations<br />
Description<br />
#,<br />
BCMP(68)<br />
CD<br />
CB<br />
R<br />
Ladder Symbols<br />
@BCMP(68)<br />
CD<br />
CB<br />
R<br />
Oper<strong>and</strong> Data Areas<br />
CD: Compare data (BCD)<br />
IR, SR, AR, DM, HR, TC, LR, #<br />
CB: First comparison block word<br />
IR, AR, DM, HR, TC, LR<br />
R: First result word<br />
Section 5-13<br />
IR, AR, DM, HR, TC, LR<br />
All data is compared in BCD form except for CB, which is in hexadecimal. All<br />
comparison block words must be within the same data area, as must all result<br />
words.<br />
When the execution condition is OFF, BCMP(68) is not executed. When the<br />
execution condition is ON, BCMP(68) compares CD to the ranges defined by<br />
a block consisting of CB+1, CB+2, CB+3 ..., CB+2n+2. The size of the table<br />
is determined by n, which is given in bits 00 through 07 of CB. The value of n<br />
is in hexadecimal <strong>and</strong> can be between 0 <strong>and</strong> 255, i.e., comparisons can be<br />
made for between 1 <strong>and</strong> 256 ranges.<br />
Each range is defined by two words, the first one providing one limit <strong>and</strong> the<br />
second word providing the other limit. If CD is found to be within any of these<br />
ranges (inclusive of the limits), the corresponding bit in R is set. If more than<br />
16 ranges are compared, bits are turned ON in consecutive words following<br />
R, i.e., R+1, R+2, etc. The comparisons that are made <strong>and</strong> the corresponding<br />
bit in R that is set for each true comparison are shown below. The rest of<br />
the bits in the results words will be turned OFF.<br />
CB+1 ≤ CD ≤ CB+2 Bit00ofR<br />
CB+3 ≤ CD ≤ CB+4 Bit01ofR<br />
CB+5 ≤ CD ≤ CB+6 Bit02ofR<br />
CB+7 ≤ CD ≤ CB+8 Bit03ofR<br />
CB+9 ≤ CD ≤ CB+10 Bit 04 of R<br />
CB+11 ≤ CD ≤ CB+12 Bit 05 of R<br />
CB+13 ≤ CD ≤ CB+14 Bit 06 of R<br />
CB+15 ≤ CD ≤ CB+16 Bit 07 of R<br />
CB+17 ≤ CD ≤ CB+18 Bit 08 of R<br />
CB+29 ≤ CD ≤ CB+20 Bit 09 of R<br />
CB+21 ≤ CD ≤ CB+22 Bit 10 of R<br />
CB+23 ≤ CD ≤ CB+24 Bit 11 of R<br />
CB+25 ≤ CD ≤ CB+26 Bit 12 of R<br />
CB+27 ≤ CD ≤ CB+28 Bit 13 of R<br />
CB+39 ≤ CD ≤ CB+30 Bit 14 of R<br />
CB+31 ≤ CD ≤ CB+32 Bit 15 of R<br />
CB+33 ≤ CD ≤ CB+34 Bit 00 of R+1<br />
CB+35 ≤ CD ≤ CB+36 Bit 01 of R+1<br />
CB+37 ≤ CD ≤ CB+38 Bit 02 of R+1<br />
etc. etc.<br />
CB+2n+1 ≤ CD ≤ CB+2n+2 (See below.)<br />
The last bit required for the result will be the truncated integer quotient of<br />
(n--1)/15, with one less than the remainder being the bit number of the last<br />
required bit.
Ring Tables Because the values of word pairs determining any one range can be set with<br />
either the largest or the smallest value first, the table can be set up to operateinringform.<br />
Flags ER: CB through CB+2 exceeds the data area.<br />
Indirectly addressed DM word is non-existent. (Content of �DM word<br />
is not BCD, or the DM area boundary has been exceeded.)<br />
Example 1<br />
00000<br />
The following example shows the comparisons made <strong>and</strong> the results provided<br />
for BCMP(68). Here, the comparison is made during each cycle when<br />
00000 is ON.<br />
BCMP(68)<br />
000<br />
DM 1000<br />
128<br />
CD: 000 First limits Second limits R: 128<br />
Section 5-13<br />
000 = 0175 DM 1001 0000 DM 1002 0100 IR 12800 0<br />
Compare data in IR 000<br />
DM 1003 0080 DM 1004 0180 IR 12801 1<br />
(which contains 0175)<br />
with the given ranges.<br />
DM 1005<br />
etc.<br />
DM 1031<br />
0160<br />
etc.<br />
1200<br />
DM 1006<br />
etc.<br />
DM 1032<br />
0260<br />
etc.<br />
1300<br />
IR 12802<br />
etc.<br />
IR 12815<br />
1<br />
etc.<br />
0<br />
CB: 1000 DM 1033 1280 DM 1034 1380 IR 12900 0<br />
DM 1035 1360 DM 1036 1460 IR 12901 0<br />
DM 1000 = 0017 DM 1037 1440 DM 1038 1540 IR 12902 0<br />
Content of CB desig-<br />
etc. etc. etc. etc. etc. etc.<br />
nates normal BCD comparison<br />
<strong>and</strong> 24 ranges,<br />
i.e., n is 23.<br />
DM 1047 1840 DM 1048 1940 IR 12907 0<br />
Flags ER: Indirectly addressed DM word is non-existent. (Content of �DM word<br />
is not BCD, or the DM area boundary has been exceeded.)<br />
#"
Example 2<br />
'4<br />
Always<br />
ON Flag<br />
12800<br />
12801<br />
12802<br />
12803<br />
12804<br />
12805<br />
12806<br />
18<br />
The following example shows how to control the operation of water sprinklers<br />
<strong>and</strong> lights based on the current time in AR 17.<br />
19<br />
17<br />
20<br />
16<br />
21<br />
15<br />
Spray<br />
22<br />
Spray<br />
14<br />
23<br />
13<br />
0<br />
Spray<br />
Lights ON<br />
Spray<br />
12<br />
1<br />
11<br />
BCMP(68)<br />
AR 17<br />
DM 0000<br />
128<br />
00200<br />
00201<br />
2<br />
Spray<br />
10<br />
Spray<br />
Spray<br />
Light ON<br />
3<br />
9<br />
4<br />
8<br />
5<br />
7<br />
6<br />
DM 0000 0006<br />
DM 0001 0000<br />
DM 0002 0100<br />
DM 0003 0400<br />
DM 0004 0500<br />
DM 0005 0800<br />
DM 0006 0900<br />
DM 0007 1200<br />
DM 0008 1300<br />
DM 0009 1600<br />
DM 0010 1700<br />
DM 0011 2000<br />
DM 0012 2100<br />
DM 0013 1800<br />
DM 0014 0600<br />
Section 5-13
5-14 Data Conversion<br />
The conversion instructions convert word data from one format into another<br />
format <strong>and</strong> output the converted data to specified result word(s). Conversions<br />
are available to convert between binary (hexadecimal) <strong>and</strong> BCD, to <strong>and</strong> from<br />
ASCII, <strong>and</strong> between multiplexed <strong>and</strong> non-multiplexed data. All of these instructions<br />
change only the content of the words to which converted data is<br />
being moved, i.e., the content of source words is the same before <strong>and</strong> after<br />
execution of any of the conversion instructions.<br />
5-14-1 BCD-TO-BINARY -- BIN(23)<br />
Description<br />
BIN(23)<br />
S<br />
R<br />
Ladder Symbols Oper<strong>and</strong> Data Areas<br />
@BIN(23)<br />
S<br />
R<br />
S: Source word (BCD)<br />
IR,SR,AR,DM,HR,TC,LR<br />
R: Result word<br />
IR, AR, DM, HR, LR<br />
When the execution condition is OFF, BIN(23) is not executed. When the<br />
execution condition is ON, BIN(23) converts the BCD content of S into the<br />
numerically equivalent binary bits, <strong>and</strong> outputs the binary value to R. Only<br />
the content of R is changed; the content of S is left unchanged.<br />
BCD<br />
Binary<br />
S<br />
R<br />
BIN(23) can be used to convert BCD to binary so that displays on the Programming<br />
Console or any other programming device will appear in hexadecimal<br />
rather than decimal. It can also be used to convert to binary to perform<br />
binary arithmetic operations rather than BCD arithmetic operations, e.g.,<br />
when BCD <strong>and</strong> binary values must be added.<br />
Flags ER: The content of S is not BCD.<br />
Indirectly addressed DM word is non-existent. (Content of �DM word<br />
is not BCD, or the DM area boundary has been exceeded.)<br />
EQ: ONwhen0isplacedinR.<br />
5-14-2 BINARY-TO-BCD -- BCD(24)<br />
Limitations<br />
BCD(24)<br />
S<br />
R<br />
Ladder Symbols Oper<strong>and</strong> Data Areas<br />
@BCD(24)<br />
S<br />
R<br />
S: Source word (binary)<br />
IR, SR, AR, DM, HR, LR<br />
R: Result word<br />
IR, AR, DM, HR, LR<br />
Section 5-14<br />
If the content of S exceeds 270F, the converted result would exceed 9999<br />
<strong>and</strong> BCD(24) will not be executed. When the instruction is not executed, the<br />
content of R remains unchanged.<br />
'
Description<br />
'<br />
BCD(24) converts the binary (hexadecimal) content of S into the numerically<br />
equivalent BCD bits, <strong>and</strong> outputs the BCD bits to R. Only the content of R is<br />
changed; the content of S is left unchanged.<br />
Binary<br />
BCD<br />
S<br />
R<br />
BCD(24) can be used to convert binary to BCD so that displays on the Programming<br />
Console or any other programming device will appear in decimal<br />
rather than hexadecimal. It can also be used to convert to BCD to perform<br />
BCD arithmetic operations rather than binary arithmetic operations, e.g.,<br />
when BCD <strong>and</strong> binary values must be added.<br />
Flags ER: S is greater than 270F.<br />
Indirectly addressed DM word is non-existent. (Content of �DM word<br />
is not BCD, or the DM area boundary has been exceeded.)<br />
EQ: ON when the content of R is zero.<br />
5-14-3 HOURS-TO-SECONDS -- HTS(65)<br />
HTS(65)<br />
S<br />
R<br />
---<br />
Ladder Symbols<br />
@HTS(65)<br />
S<br />
R<br />
---<br />
Oper<strong>and</strong> Data Areas<br />
S: Beginning source word (BCD)<br />
IR,SR,AR,DM,HR,TC,LR<br />
R: Beginning result word (BCD)<br />
IR, AR, DM, HR, TC, LR<br />
---: Not used.<br />
Section 5-14<br />
Limitations S <strong>and</strong> S+1 must be within the same data area. R <strong>and</strong> R+1 must be within the<br />
same data area. S <strong>and</strong> S+1 must be BCD <strong>and</strong> must be in the proper hours/<br />
minutes/seconds format.<br />
Description HTS(65) is used to convert time notation in hours/minutes/seconds to an<br />
equivalent time in seconds only.<br />
For the source data, the seconds are designated in bits 00 through 07 <strong>and</strong><br />
the minutes are designated in bits 08 through 15 of S. The hours are designated<br />
in S+1. The maximum is thus 9,999 hours, 59 minutes, <strong>and</strong> 59 seconds.<br />
The results are output to R <strong>and</strong> R+1. The maximum obtainable value is<br />
35,999,999 seconds.<br />
Flags ER: S <strong>and</strong> S+1 or R <strong>and</strong> R+1 are not in the same data area.<br />
S <strong>and</strong>/or S+1 do not contain BCD.<br />
Number of seconds <strong>and</strong>/or minutes exceeds 59.<br />
Indirectly addressed DM word is non-existent. (Content of �DM word<br />
is not BCD, or the DM area boundary has been exceeded.)<br />
EQ: Turns ON when the result is zero.
Example When 00000 is OFF (i.e., the execution condition is ON), the following instruction<br />
would convert the hours, minutes, <strong>and</strong> seconds given in HR 12 <strong>and</strong><br />
HR 13 to seconds <strong>and</strong> store the results in DM 0100 <strong>and</strong> DM 0101 as shown.<br />
00000<br />
HR 12 3 2 0 7<br />
HR 13 2 8 1 5<br />
DM 0100 5 9 2 7<br />
DM 0101 1 0 1 3<br />
2,815 hrs, 32 min, 07 s<br />
10,135,927 s<br />
HTS(65)<br />
HR 12<br />
DM 0100<br />
000<br />
5-14-4 SECONDS-TO-HOURS -- STH(66)<br />
STH(66)<br />
S<br />
R<br />
---<br />
Ladder Symbols<br />
@STH(66)<br />
S<br />
R<br />
---<br />
Address Instruction Oper<strong>and</strong>s<br />
00000 LD NOT 00000<br />
00001 HTS(65)<br />
HR 12<br />
DM 0100<br />
000<br />
Oper<strong>and</strong> Data Areas<br />
S: Beginning source word (BCD)<br />
IR,SR,AR,DM,HR,TC,LR<br />
R: Beginning result word (BCD)<br />
IR, AR, DM, HR, TC, LR<br />
---: Not used.<br />
Limitations S <strong>and</strong> S+1 must be within the same data area. R <strong>and</strong> R+1 must be within the<br />
same data area. S <strong>and</strong> S+1 must be BCD <strong>and</strong> must be between 0 <strong>and</strong><br />
35,999,999 seconds. For any setting over 15,000,000 seconds, increase the<br />
watchdog timer to 180 ms.<br />
Description STH(66) is used to convert time notation in seconds to an equivalent time in<br />
hours/minutes/seconds.<br />
The number of seconds designated in S <strong>and</strong> S+1 is converted to hours/minutes/seconds<br />
<strong>and</strong> placed in R <strong>and</strong> R+1.<br />
For the results, the seconds are placed in bits 00 through 07 <strong>and</strong> the minutes<br />
are placed in bits 08 through 15 of R. The hours are placed in R+1. The maximum<br />
will be 9,999 hours, 59 minutes, <strong>and</strong> 59 seconds.<br />
Flags ER: S <strong>and</strong> S+1 or R <strong>and</strong> R+1 are not in the same data area.<br />
S <strong>and</strong>/or S+1 do not contain BCD or exceed 35,999,999 seconds.<br />
Indirectly addressed DM word is non-existent. (Content of �DM word<br />
is not BCD, or the DM area boundary has been exceeded.)<br />
EQ: Turns ON when the result is zero.<br />
Section 5-14<br />
'
Example When 00000 is OFF (i.e., the execution condition is ON), the following instruction<br />
would convert the seconds given in HR 12 <strong>and</strong> HR 13 to hours, minutes,<br />
<strong>and</strong> seconds <strong>and</strong> store the results in DM 0100 <strong>and</strong> DM 0101 as shown.<br />
00000<br />
'#<br />
HR 12 5 9 2 7<br />
HR 13 1 0 1 3<br />
DM 0100 3 2 0 7<br />
DM 0101 2 8 1 5<br />
10,135,927 s<br />
2,815 hrs, 32 min, 07 s<br />
STH(66)<br />
HR 12<br />
DM 0100<br />
000<br />
5-14-5 HEXADECIMAL CONVERT -- HEX(69)<br />
Limitations<br />
Description<br />
HEX(69)<br />
S<br />
Di<br />
D<br />
Ladder Symbols<br />
@HEX(69)<br />
Di must be within the values given below.<br />
All source words must be in the same data area.<br />
S<br />
Di<br />
D<br />
Address Instruction Oper<strong>and</strong>s<br />
00000 LD NOT 00000<br />
00001 STH(66)<br />
HR 12<br />
DM 0100<br />
000<br />
Oper<strong>and</strong> Data Areas<br />
S: Source word<br />
IR,SR,AR,DM,HR,TC,LR<br />
Di: Digit designator<br />
IR, AR, DM, HR, TC, LR, #<br />
D: First destination word<br />
IR, AR, DM, HR, LR<br />
The ASCII codes in the source bytes designated for conversion must be<br />
equivalent to hexadecimal numbers (between 0 <strong>and</strong> F).<br />
When the execution condition is OFF, HEX(69) is not executed. When the<br />
execution condition is ON, HEX(69) converts the designated 8-bit ASCII<br />
code(s) in S into it’s hexadecimal equivalent <strong>and</strong> places it into the destination<br />
word D beginning at the designated digit.<br />
Up to four ASCII codes in S to S+2 may be converted in order from the designated<br />
first code. The first code (rightmost or leftmost 8 bits), the number of<br />
codes to be converted, <strong>and</strong> the digit of D to receive the first number are designated<br />
in Di. If multiple codes are designated, they will be placed in order<br />
starting from the designated digit of D. If more digits are designated than remain<br />
in D (counting from the first designated digit), further digits will be used<br />
starting back at the beginning of D.<br />
ASC(86) can be used together with HEX(69) to convert data to <strong>and</strong> from<br />
ASCII characters for transmission through the RS-232C interface.<br />
Refer to Appendix I for a table of extended ASCII characters.<br />
Section 5-14
Digit Designator<br />
Parity<br />
The digits of Di are set as shown below.<br />
Digit number: 3 2 1 0<br />
Specifies the first digit of D to be used (0 to 3).<br />
Number of codes to be converted (0 to 3).<br />
0: 1 code<br />
1: 2 codes<br />
2: 3 codes<br />
3: 4 codes<br />
First half of S to be converted.<br />
0: Rightmost 8 bits (1st half)<br />
1: Leftmost 8 bits (2nd half)<br />
Parity 0: none,<br />
1: even,<br />
2: odd<br />
Some examples of Di values <strong>and</strong> the 8-bit ASCII code to 4-bit binary conversions<br />
that they produce are shown below.<br />
S<br />
1st half<br />
2nd half<br />
Di: 0011<br />
Di: 0112<br />
S<br />
1st half<br />
2nd half<br />
S+1<br />
1st half<br />
2nd half<br />
D<br />
0<br />
1<br />
2<br />
3<br />
D<br />
0<br />
1<br />
2<br />
3<br />
S<br />
1st half<br />
2nd half<br />
S+1<br />
1st half<br />
2nd half<br />
Di: 0030<br />
Di: 0130<br />
S<br />
1st half<br />
2nd half<br />
S+1<br />
1st half<br />
2nd half<br />
S+1<br />
1st half<br />
2nd half<br />
The leftmost bit of each 2-digit ASCII character is adjusted for either even,<br />
odd, or no parity. If no parity is designated, the leftmost bit must be zero.<br />
When even parity is designated, the leftmost bit must be adjusted so that the<br />
total number of ON bits is even, e.g., when adjusted for even parity, ASCII<br />
“31” (00110001) will be “B1” (10110001: parity bit turned ON to create an<br />
even number of ON bits); ASCII “36” (00110110) will be “36” (00110110: parity<br />
bit turned OFF because the number of ON bits is already even). The status<br />
of the parity bit does not affect the meaning of the ASCII code.<br />
When odd parity is designated, the leftmost bit of each ASCII character must<br />
be adjusted so that there is an odd number of ON bits.<br />
If the parity in a source ASCII character does not agree with the parity specified<br />
in Di, the ER Flag will be turned ON <strong>and</strong> the instruction will not be executed.<br />
D<br />
0<br />
1<br />
2<br />
3<br />
D<br />
0<br />
1<br />
2<br />
3<br />
Section 5-14<br />
''
Flags ER: The first source word, S, is not in the same data area as S+1 or S+2.<br />
Indirectly addressed DM word is non-existent. (Content of �DM word<br />
is not BCD, or the DM area boundary has been exceeded.)<br />
5-14-6 4-TO-16 DECODER -- MLPX(76)<br />
Limitations<br />
Description<br />
'(<br />
MLPX(76)<br />
S<br />
Di<br />
R<br />
The parity in the source ASCII code does not agree with the parity<br />
specified in Di.<br />
The source ASCII code is not in the range 0 to F <strong>and</strong> cannot be converted<br />
to hexadecimal.<br />
Ladder Symbols<br />
@MLPX(76)<br />
S<br />
Di<br />
R<br />
Oper<strong>and</strong> Data Areas<br />
S: Source word<br />
IR,SR,AR,DM,HR,TC,LR<br />
Di: Digit designator<br />
IR, AR, DM, HR, TC, LR, #<br />
R: First result word<br />
IR, AR, DM, HR, LR<br />
The rightmost two digits of Di must each be between 0 <strong>and</strong> 3.<br />
All result words must be in the same data area.<br />
When the execution condition is OFF, MLPX(76) is not executed. When the<br />
execution condition is ON, MLPX(76) converts up to four, four-bit hexadecimal<br />
digits from S into decimal values from 0 to 15, each of which is used to<br />
indicate a bit position. The bit whose number corresponds to each converted<br />
value is then turned ON in a result word. If more than one digit is specified,<br />
then one bit will be turned ON in each of consecutive words beginning with R.<br />
(See examples, below.)<br />
The following is an example of a one-digit decode operation from digit number<br />
1 of S, i.e., here Di would be 0001.<br />
Source word<br />
C<br />
Bit C (i.e., bit number 12) turned ON.<br />
First result word<br />
0 0 0 1 0 0 0 0 0 0 0 0 0 0 0 0<br />
Section 5-14<br />
The first digit <strong>and</strong> the number of digits to be converted are designated in Di. If<br />
more digits are designated than remain in S (counting from the designated<br />
first digit), the remaining digits will be taken starting back at the beginning of<br />
S. The final word required to store the converted result (R plus the number of<br />
digits to be converted) must be in the same data area as R, e.g., if two digits<br />
are converted, the last word address in a data area cannot be designated; if<br />
three digits are converted, the last two words in a data area cannot be designated.
Digit Designator<br />
The digits of Di are set as shown below.<br />
Digit number: 3 2 1 0<br />
Specifies the first digit to be converted (0 to 3)<br />
Number of digits to be converted (0 to 3)<br />
0: 1 digit<br />
1: 2 digits<br />
2: 3 digits<br />
3: 4 digits<br />
Not used<br />
Some example Di values <strong>and</strong> the digit-to-word conversions that they produce<br />
are shown below.<br />
S<br />
0<br />
1<br />
2<br />
3<br />
0<br />
1<br />
2<br />
3<br />
Di: 0010<br />
R<br />
R+1<br />
Di: 0031 Di: 0023<br />
S<br />
S<br />
R<br />
R+1<br />
R+2<br />
R+3<br />
Di: 0030<br />
S<br />
Flags ER: Undefined digit designator, or R plus number of digits exceeds a data<br />
area.<br />
Indirectly addressed DM word is non-existent. (Content of �DM word<br />
is not BCD, or the DM area boundary has been exceeded.)<br />
0<br />
1<br />
2<br />
3<br />
0<br />
1<br />
2<br />
3<br />
R<br />
R+1<br />
R+2<br />
R+3<br />
R<br />
R+1<br />
R+2<br />
Section 5-14<br />
'
Example<br />
00000<br />
',<br />
The following program converts three digits of data from DM 0020 to bit positions<br />
<strong>and</strong> turns ON the corresponding bits in three consecutive words starting<br />
with HR 10.<br />
MLPX(76)<br />
DM 0020<br />
#0021<br />
HR 10<br />
Address Instruction Oper<strong>and</strong>s<br />
00000 LD 00000<br />
00001 MLPX(76)<br />
DM 00200<br />
# 0021<br />
HR 10<br />
S: DM 0020 R: HR 10 R+1: HR 11 R+2: HR 12<br />
DM 00 20 HR 1000 0 HR 1100 0 HR 1200 1<br />
DM 01 21 HR 1001 0 HR 1101 0 HR 1201 0<br />
DM 02 22 HR 1002 0 HR 1102 0 HR 1202 0<br />
DM 03 23 HR 1003 0 HR 1103 0 HR 1203 0<br />
DM 04 1 20 DM 05 1 2<br />
HR 1004 0 HR 1104 0 HR 1204 0<br />
1 1 HR 1005 0 HR 1105 0 HR 1205 0<br />
DM 06 1 22 HR 1006 0 HR 1106 1 HR 1206 0<br />
DM 07 1 23 HR 1007 0 HR 1107 0 HR 1207 0<br />
DM 08 0 20 DM 09 1 2<br />
HR 1008 0 HR 1108 0 HR 1208 0<br />
1 2 HR 1009 0 HR 1109 0 HR 1209 0<br />
DM 10 1 22 HR 1010 0 HR 1110 0 HR 1210 0<br />
DM 11 0 23 HR 1011 0 HR 1111 0 HR 1211 0<br />
DM 12 0 20 DM 13 0 2<br />
HR 1012 0 HR 1112 0 HR 1212 0<br />
1 3 HR 1013 0 HR 1113 0 HR 1213 0<br />
DM 14 0 22 HR 1014 0 HR 1114 0 HR 1214 0<br />
DM 15 0 23 Not<br />
Converted<br />
15<br />
6<br />
0<br />
HR 1015 1 HR 1115 0 HR 1215 0<br />
5-14-7 16-TO-4 ENCODER -- DMPX(77)<br />
Limitations<br />
Description<br />
DMPX(77)<br />
SB<br />
R<br />
Di<br />
Ladder Symbols<br />
@DMPX(77)<br />
SB<br />
R<br />
Di<br />
Oper<strong>and</strong> Data Areas<br />
SB: First source word<br />
IR,SR,AR,DM,HR,TC,LR<br />
R: Result word<br />
IR, AR, DM, HR, LR<br />
Di: Digit designator<br />
IR, AR, DM, HR, TC, LR, #<br />
The rightmost two digits of Di must each be between 0 <strong>and</strong> 3.<br />
All source words must be in the same data area.<br />
Section 5-14<br />
When the execution condition is OFF, DMPX(77) is not executed. When the<br />
execution condition is ON, DMPX(77) determines the position of the highest<br />
ON bit in S, encodes it into single-digit hexadecimal value corresponding to
Digit Designator<br />
the bit number of the highest ON bit number, then transfers the hexadecimal<br />
value to the specified digit in R. The digits to receive the results are specified<br />
in Di, which also specifies the number of digits to be encoded.<br />
The following is an example of a one-digit encode operation to digit number 1<br />
of R, i.e., here Di would be 0001.<br />
Result word<br />
First source word<br />
0 0 0 1 0 0 0 1 0 0 0 1 0 1 1 0<br />
C transferred to indicate bit number 12 as<br />
the highest ON bit.<br />
C<br />
Up to four digits from four consecutive source words starting with S may be<br />
encoded <strong>and</strong> the digits written to R in order from the designated first digit. If<br />
more digits are designated than remain in R (counting from the designated<br />
first digit), the remaining digits will be placed at digits starting back at the beginning<br />
of R.<br />
The final word to be converted (S plus the number of digits to be converted)<br />
must be in the same data area as SB.<br />
The digits of Di are set as shown below.<br />
Digit number: 3 2 1 0<br />
Specifies the first digit to receive converted data (0 to 3).<br />
Number of words to be converted (0 to 3)<br />
0: 1 word<br />
1: 2 words<br />
2: 3 words<br />
3: 4 words<br />
Not used.<br />
Some example Di values <strong>and</strong> the word-to-digit conversions that they produce<br />
are shown below.<br />
S<br />
S+1<br />
S<br />
S+1<br />
Di: 0011<br />
Di: 0013<br />
R<br />
0<br />
1<br />
2<br />
3<br />
R<br />
0<br />
1<br />
2<br />
3<br />
S<br />
S+1<br />
S+2<br />
S+3<br />
S<br />
S+1<br />
S+2<br />
S+3<br />
Di: 0030<br />
Di: 0032<br />
R<br />
0<br />
1<br />
2<br />
3<br />
R<br />
0<br />
1<br />
2<br />
3<br />
Section 5-14<br />
'"
Flags ER: Undefined digit designator, or S plus number of digits exceeds a data<br />
area.<br />
Content of a source word is 0.<br />
Indirectly addressed DM word is non-existent. (Content of �DM word<br />
is not BCD, or the DM area boundary has been exceeded.)<br />
Example<br />
00000<br />
(4<br />
IR 010<br />
01000<br />
:<br />
01011 0<br />
01012 0<br />
: :<br />
01015 0<br />
LR 10<br />
LR 1000<br />
LR 1001 1<br />
LR 1002 0<br />
: :<br />
: :<br />
LR 1015 0<br />
When 00000 is ON, the following diagram encodes IR words 010 <strong>and</strong> 011 to<br />
the first two digits of HR 20 <strong>and</strong> then encodes LR 10 <strong>and</strong> 11 to the last two<br />
digits of HR 20. Although the status of each source word bit is not shown, it is<br />
assumed that the bit with status 1 (ON) shown is the highest bit that is ON in<br />
the word.<br />
IR 011<br />
01100<br />
:<br />
01109 1<br />
01110 0<br />
: :<br />
01115 0<br />
LR 11<br />
LR 1100<br />
:<br />
LR 1108 1<br />
LR 1109 0<br />
: :<br />
LR 1115 0<br />
5-14-8 ASCII CONVERT -- ASC(86)<br />
Limitations<br />
ASC(86)<br />
S<br />
Di<br />
D<br />
Ladder Symbols<br />
DMPX(77)<br />
010<br />
HR 20<br />
#0010<br />
DMPX(77)<br />
LR 10<br />
HR 20<br />
#0012<br />
@ASC(86)<br />
S<br />
Di<br />
D<br />
HR 20<br />
Digit 0<br />
Digit 1<br />
Digit 2<br />
Digit 3<br />
Di must be within the values given in the following.<br />
All destination words must be in the same data area.<br />
Address Instruction Oper<strong>and</strong>s<br />
00000 LD 00000<br />
00001 DMPX(77)<br />
010<br />
HR 20<br />
# 0010<br />
00002 DMPX(77)<br />
LR 10<br />
HR 20<br />
# 0012<br />
B<br />
9<br />
1<br />
8<br />
Oper<strong>and</strong> Data Areas<br />
S: Source word<br />
IR,SR,AR,DM,HR,TC,LR<br />
Di: Digit designator<br />
IR, AR, DM, HR, TC, LR, #<br />
D: First destination word<br />
IR, AR, DM, HR, LR<br />
Section 5-14
Description<br />
Digit Designator<br />
When the execution condition is OFF, ASC(86) is not executed. When the<br />
execution condition is ON, ASC(86) converts the designated digit(s) of S into<br />
the equivalent 8-bit ASCII code <strong>and</strong> places it into the destination word(s) beginning<br />
with D.<br />
Any or all of the digits in S may be converted in order from the designated<br />
first digit. The first digit, the number of digits to be converted, <strong>and</strong> the half of<br />
D to receive the first ASCII code (rightmost or leftmost 8 bits) are designated<br />
in Di. If multiple digits are designated, they will be placed in order starting<br />
from the designated half of D, each requiring two digits. If more digits are<br />
designated than remain in S (counting from the designated first digit), further<br />
digits will be used starting back at the beginning of S.<br />
Refer to Appendix I for a table of extended ASCII characters.<br />
The digits of Di are set as shown below.<br />
Digit number: 3 2 1 0<br />
Specifies the first digit to be converted (0 to 3).<br />
Number of digits to be converted (0 to 3).<br />
0: 1 digit<br />
1: 2 digits<br />
2: 3 digits<br />
3: 4 digits<br />
First half of D to be used.<br />
0: Rightmost 8 bits (1st half)<br />
1: Leftmost 8 bits (2nd half)<br />
Parity 0: none,<br />
1: even,<br />
2: odd<br />
Some examples of Di values <strong>and</strong> the 4-bit binary to 8-bit ASCII conversions<br />
that they produce are shown below.<br />
S<br />
0<br />
1<br />
2<br />
3<br />
S<br />
0<br />
1<br />
2<br />
3<br />
Di: 0011<br />
Di: 0112<br />
D<br />
1st half<br />
2nd half<br />
D<br />
1st half<br />
2nd half<br />
D+1<br />
1st half<br />
2nd half<br />
S<br />
0<br />
1<br />
2<br />
3<br />
S<br />
0<br />
1<br />
2<br />
3<br />
Di: 0030<br />
Di: 0130<br />
D<br />
1st half<br />
2nd half<br />
D+1<br />
1st half<br />
2nd half<br />
D<br />
1st half<br />
2nd half<br />
D+1<br />
1st half<br />
2nd half<br />
D+2<br />
1st half<br />
2nd half<br />
Section 5-14<br />
(
# Section 5-15<br />
Parity<br />
(<br />
The leftmost bit of each 2-digit ASCII character can be automatically adjusted<br />
for either even or odd parity. If no parity is designated, the leftmost bit will<br />
always be zero.<br />
When even parity is designated, the leftmost bit will be adjusted so that the<br />
total number of ON bits is even, e.g., when adjusted for even parity, ASCII<br />
“31” (00110001) will be “B1” (10110001: parity bit turned ON to create an<br />
even number of ON bits); ASCII “36” (00110110) will be “36” (00110110: parity<br />
bit turned OFF because the number of ON bits is already even). The status<br />
of the parity bit does not affect the meaning of the ASCII code.<br />
When odd parity is designated, the leftmost bit of each ASCII character will<br />
be adjusted so that there is an odd number of ON bits.<br />
Flags ER: Incorrect digit designator, or data area for destination exceeded.<br />
Indirectly addressed DM word is non-existent. (Content of �DM word<br />
is not BCD, or the DM area boundary has been exceeded.)<br />
5-15 BCD Calculations<br />
5-15-1 INCREMENT -- INC(38)<br />
Description<br />
The BCD calculation instructions -- INC(38), DEC(39), ADD(30), SUB(31),<br />
MUL(32), <strong>and</strong> DIV(33) -- all perform arithmetic operations on BCD data.<br />
For INC(38) <strong>and</strong> DEC(39) the source <strong>and</strong> result words are the same. That is,<br />
the content of the source word is overwritten with the instruction result. All<br />
other instructions change only the content of the words in which results are<br />
placed, i.e., the contents of source words are the same before <strong>and</strong> after execution<br />
of any of the other BCD calculation instructions.<br />
STC(40) <strong>and</strong> CLC(41), which set <strong>and</strong> clear the carry flag, are included in this<br />
group because most of the BCD operations make use of the Carry Flag (CY)<br />
in their results. Binary calculations <strong>and</strong> shift operations also use CY.<br />
The addition <strong>and</strong> subtraction instructions include CY in the calculation as well<br />
as in the result. Be sure to clear CY if its previous status is not required in the<br />
calculation, <strong>and</strong> to use the result placed in CY, if required, before it is<br />
changed by execution of any other instruction.<br />
INC(38)<br />
Wd<br />
Ladder Symbols Oper<strong>and</strong> Data Areas<br />
@INC(38)<br />
Wd<br />
Wd: Increment word (BCD)<br />
IR, AR, DM, HR, LR<br />
When the execution condition is OFF, INC(38) is not executed. When the<br />
execution condition is ON, INC(38) increments Wd, without affecting Carry<br />
(CY).<br />
Flags ER: Wd is not BCD<br />
Indirectly addressed DM word is non-existent. (Content of �DM word<br />
is not BCD, or the DM area boundary has been exceeded.)<br />
EQ: ON when the result of the increment is 0.
# Section 5-15<br />
5-15-2 DECREMENT -- DEC(39)<br />
Description<br />
DEC(39)<br />
Wd<br />
Ladder Symbols Oper<strong>and</strong> Data Areas<br />
@DEC(39)<br />
Wd<br />
Wd: Decrement word (BCD)<br />
IR, AR, DM, HR, LR<br />
When the execution condition is OFF, DEC(39) is not executed. When the<br />
execution condition is ON, DEC(39) decrements Wd, without affecting CY.<br />
DEC(39) works the same way as INC(38) except that it decrements the value<br />
instead of incrementing it.<br />
Flags ER: Wd is not BCD<br />
Indirectly addressed DM word is non-existent. (Content of �DM word<br />
is not BCD, or the DM area boundary has been exceeded.)<br />
5-15-3 SET CARRY -- STC(40)<br />
5-15-4 CLEAR CARRY -- CLC(41)<br />
EQ: ON when the decremented result is 0.<br />
Ladder Symbols<br />
STC(40) @STC(40)<br />
When the execution condition is OFF, STC(40) is not executed.When the execution<br />
condition is ON, STC(40) turns ON CY (SR 25504).<br />
Ladder Symbols<br />
CLC(41) @CLC(41)<br />
When the execution condition is OFF, CLC(41) is not executed.When the execution<br />
condition is ON, CLC(41) turns OFF CY (SR 25504).<br />
(
# Section 5-15<br />
5-15-5 BCD ADD -- ADD(30)<br />
Description<br />
(#<br />
ADD(30)<br />
Au<br />
Ad<br />
R<br />
Ladder Symbols<br />
@ADD(30)<br />
Au<br />
Ad<br />
R<br />
Oper<strong>and</strong> Data Areas<br />
Au: Augend word (BCD)<br />
IR, SR, AR, DM, HR, TC, LR, #<br />
Ad: Addend word (BCD)<br />
IR, SR, AR, DM, HR, TC, LR, #<br />
R: Result word<br />
IR, AR, DM, HR, LR<br />
When the execution condition is OFF, ADD(30) is not executed. When the<br />
execution condition is ON, ADD(30) adds the contents of Au, Ad, <strong>and</strong> CY,<br />
<strong>and</strong> places the result in R. CY will be set if the result is greater than 9999.<br />
Au + Ad + CY CY R<br />
Flags ER: Au <strong>and</strong>/or Ad is not BCD.<br />
Indirectly addressed DM word is non-existent. (Content of �DM word<br />
is not BCD, or the DM area boundary has been exceeded.)<br />
Example<br />
00002<br />
TR 0<br />
25504<br />
25504<br />
CY: ON when there is a carry in the result.<br />
EQ: ON when the result is 0.<br />
If 00002 is ON, the program represented by the following diagram clears CY<br />
with CLC(41), adds the content of LR 25 to a constant (6103), places the result<br />
in DM 0100, <strong>and</strong> then moves either all zeros or 0001 into DM 0101 depending<br />
on the status of CY (25504). This ensures that any carry from the<br />
last digit is preserved in R+1 so that the entire result can be later h<strong>and</strong>led as<br />
eight-digit data.<br />
CLC(41)<br />
ADD(30)<br />
LR 25<br />
#6103<br />
DM 0100<br />
MOV(21)<br />
#0001<br />
DM 0101<br />
MOV(21)<br />
#0000<br />
DM 0101<br />
Address Instruction Oper<strong>and</strong>s<br />
00000 LR 00002<br />
00001 OUT TR 0<br />
00002 CLC(41)<br />
00003 ADD(30)<br />
LR 25<br />
# 6103<br />
DM 0100<br />
00004 AND 25504<br />
00005 MOV(21)<br />
# 0001<br />
DM 0101<br />
00006 LD TR 0<br />
00007 AND NOT 25504<br />
00008 MOV(21)<br />
# 0000<br />
DM 0101
# Section 5-15<br />
5-15-6 BCD SUBTRACT -- SUB(31)<br />
Description<br />
SUB(31)<br />
Mi<br />
Su<br />
R<br />
Ladder Symbols<br />
@SUB(31)<br />
Mi<br />
Su<br />
R<br />
Oper<strong>and</strong> Data Areas<br />
Mi: Minuend word (BCD)<br />
IR, SR, AR, DM, HR, TC, LR, #<br />
Su: Subtrahend word (BCD)<br />
IR, SR, AR, DM, HR, TC, LR, #<br />
R: Result word<br />
IR, AR, DM, HR, LR<br />
When the execution condition is OFF, SUB(31) is not executed. When the<br />
execution condition is ON, SUB(31) subtracts the contents of Su <strong>and</strong> CY<br />
from Mi, <strong>and</strong> places the result in R. If the result is negative, CY is set <strong>and</strong> the<br />
10’s complement of the actual result is placed in R. To convert the 10’s complement<br />
to the true result, subtract the content of R from zero (see example<br />
below).<br />
Mi -- Su -- CY CY R<br />
Flags ER: Mi <strong>and</strong>/or Su is not BCD.<br />
Indirectly addressed DM word is non-existent. (Content of �DM word<br />
is not BCD, or the DM area boundary has been exceeded.)<br />
Example 1: Subtraction of<br />
4-digit Numbers<br />
CY: ON when the result is negative, i.e., when Mi is less than Su plus CY.<br />
EQ: ON when the result is 0.<br />
Caution Be sure to clear the carry flag with CLC(41) before executing SUB(31) if its<br />
previous status is not required, <strong>and</strong> check the status of CY after doing a subtraction<br />
with SUB(31). If CY is ON as a result of executing SUB(31) (i.e., if<br />
the result is negative), the result is output as the 10’s complement of the true<br />
answer. To convert the output result to the true value, subtract the value in R<br />
from 0.<br />
When 00002 is ON, the following ladder program clears CY, subtracts the<br />
contents of DM 0100 <strong>and</strong> CY from the content of 010 <strong>and</strong> places the result in<br />
HR 20.<br />
If CY is set by executing SUB(31), the result in HR 20 is subtracted from zero<br />
(note that CLC(41) is again required to obtain an accurate result), the result<br />
is placed back in HR 20, <strong>and</strong> HR 2100 is turned ON to indicate a negative<br />
result.<br />
If CY is not set by executing SUB(31), the result is positive, the second subtraction<br />
is not performed, <strong>and</strong> HR 2100 is not turned ON. HR 2100 is programmed<br />
as a self-maintaining bit so that a change in the status of CY will<br />
not turn it OFF when the program is recycled.<br />
('
# Section 5-15<br />
00002<br />
((<br />
TR 0<br />
25504<br />
25504<br />
HR 2100<br />
Example 2: Subtraction of<br />
8-digit Numbers<br />
In this example, differentiated forms of SUB(31) are used so that the subtraction<br />
operation is performed only once each time 00002 is turned ON. When<br />
another subtraction operation is to be performed, 00002 will need to be<br />
turned OFF for at least one cycle (resetting HR 2100) <strong>and</strong> then turned back<br />
ON.<br />
CLC(41)<br />
@SUB(31)<br />
010<br />
DM 0100<br />
HR 20<br />
CLC(41)<br />
@SUB(31)<br />
#0000<br />
HR 20<br />
HR 20<br />
HR 2100<br />
Turned ON to indicate a<br />
negative result.<br />
First<br />
subtraction<br />
Second<br />
subtraction<br />
Address Instruction Oper<strong>and</strong>s<br />
00000 LD 00002<br />
00001 OUT TR 0<br />
00002 CLC(41)<br />
00003 @SUB(31)<br />
010<br />
DM 0100<br />
HR 20<br />
00004 AND 25504<br />
00005 CLC(41)<br />
00006 @SUB(31)<br />
# 0000<br />
HR 20<br />
HR 20<br />
00007 LD TR 0<br />
00008 AND 25504<br />
00009 OR HR 2100<br />
00010 OUT HR 2100<br />
The first <strong>and</strong> second subtractions for this diagram are shown below using<br />
example data for 010 <strong>and</strong> DM 0100.<br />
Note The actual SUB(31) operation involves subtracting Su <strong>and</strong> CY from 10,000<br />
plus Mi. For positive results the leftmost digit is truncated. For negative<br />
results the 10s complement is obtained. The procedure for establishing the<br />
correct answer is given below.<br />
First Subtraction<br />
IR 010 1029<br />
DM 0100 -- 3452<br />
CY -- 0<br />
HR 20 7577 (1029 + (10000 -- 3452))<br />
CY 1 (negative result)<br />
Second Subtraction<br />
0000<br />
HR 20 --7577<br />
CY --0<br />
HR 20 2423 (0000 + (10000 -- 7577))<br />
CY 1 (negative result)<br />
In the above case, the program would turn ON HR 2100 to indicate that the<br />
value held in HR 20 is negative.<br />
In this example, the 8-digit content of DM 0100 <strong>and</strong> DM 0101 is subtracted<br />
from the 8-digit content of 010 <strong>and</strong> 011 <strong>and</strong> the result is placed in HR 20, HR
# Section 5-15<br />
21, <strong>and</strong> HR 22. (The content of HR 22 is set to #0001 to indicate a negative<br />
result.)<br />
00002<br />
TR 0<br />
25504 (CY)<br />
25504 (CY)<br />
25504 (CY)<br />
CLC(41)<br />
SUB(31)<br />
SUB(31)<br />
CLC(41)<br />
SUB(31)<br />
SUB(31)<br />
MOV(21)<br />
MOV(21)<br />
010<br />
DM 0100<br />
HR 20<br />
011<br />
DM 0101<br />
HR 21<br />
#0000<br />
HR 20<br />
HR 20<br />
#0000<br />
HR 21<br />
HR 21<br />
#0001<br />
HR 22<br />
#0000<br />
HR 22<br />
1, 2, 3... 1. When 00002 is ON, CY is set to zero, the content of DM 0100 is subtracted<br />
from the content of 010, <strong>and</strong> the result is placed in HR 20.<br />
--<br />
--<br />
IR 010<br />
3 5 4 9<br />
DM 0100<br />
6 5 3 7<br />
CY Flag<br />
0<br />
3549 + (1000 -- 6537)<br />
HR 20<br />
7 0 1 2<br />
Set to 0 by<br />
CLC(41).<br />
CY Flag 1 Set to 1 when the<br />
result is negative.<br />
(1)<br />
(2)<br />
(3)<br />
(4)<br />
(5)<br />
(
# Section 5-15<br />
(,<br />
2. The content of DM 0101 <strong>and</strong> CY are then subtracted from the content of<br />
011 <strong>and</strong> the result is placed in HR 21.<br />
--<br />
--<br />
IR 011<br />
1 5 6 8<br />
DM 0101<br />
8 1 2 9<br />
CY Flag<br />
HR 21<br />
1<br />
3 4 3 8<br />
Set to 1 when the result of the<br />
subtraction in step 1 is negative.<br />
3. If the result of the subtraction in step 2 is negative, CY will be turned ON<br />
<strong>and</strong> the result placed in HR 20 <strong>and</strong> HR 21 will be the 10’s complement<br />
of the actual result. Here the 10’s complement of the 4 digits in HR 20 is<br />
converted to the actual result.<br />
#0000--7012=0000+(10000--7012)=2988<br />
4. The 10’s complement of the 4 digits in HR 21 is converted to the actual<br />
result. The 1 in the equation comes from the CY Flag set in step 3.<br />
#0000--3438--1=0000+(10000--3438--1)=6561<br />
5. HR 22 will contain #0001 if the result is negative <strong>and</strong> #0000 if the result<br />
is positive. The final result is shown below.<br />
HR 22<br />
0 0 0 1<br />
HR 21<br />
6 5 6 1<br />
5-15-7 BCD MULTIPLY -- MUL(32)<br />
Description<br />
MUL(32)<br />
Md<br />
Mr<br />
R<br />
Ladder Symbols<br />
HR 20<br />
2 9 8 8<br />
@MUL(32)<br />
Md<br />
Mr<br />
R<br />
Oper<strong>and</strong> Data Areas<br />
Md: Multiplic<strong>and</strong> (BCD)<br />
IR, SR, AR, DM, HR, TC, LR, #<br />
Mr: Multiplier (BCD)<br />
IR, SR, AR, DM, HR, TC, LR, #<br />
R: First result word<br />
IR, AR, DM, HR LR<br />
When the execution condition is OFF, MUL(32) is not executed. When the<br />
execution condition is ON, MUL(32) multiplies Md by the content of Mr, <strong>and</strong><br />
places the result In R <strong>and</strong> R+1.<br />
X<br />
Md<br />
Mr<br />
R+1 R
# Section 5-15<br />
Example 1: Multiplication of<br />
4-digit Numbers<br />
00000<br />
X<br />
Example 2: Multiplication of<br />
8-digit Numbers<br />
R+1: HR 08 R: HR 07<br />
0 0 0 8 3 9 0 0<br />
When IR 00000 is ON with the following program, the contents of IR 013 <strong>and</strong><br />
DM 0005 are multiplied <strong>and</strong> the result is placed in HR 07 <strong>and</strong> HR 08. Example<br />
data <strong>and</strong> calculations are shown below the program.<br />
Md: IR 013<br />
3 3 5 6<br />
Mr: DM 0005<br />
0 0 2 5<br />
MUL(32)<br />
013<br />
DM 0005<br />
HR 07<br />
Address Instruction Oper<strong>and</strong>s<br />
00000 LD 00000<br />
00001 MUL(32)<br />
013<br />
DM 00005<br />
HR 07<br />
In this example, the 8-digit content of 010 <strong>and</strong> 011 is multiplied by the 8-digit<br />
content of DM 0100 <strong>and</strong> DM 0101 <strong>and</strong> the result is placed in HR 00 to HR<br />
03.<br />
The letters in the table below are assigned to the 4 source words to make<br />
later calculations easier to follow.<br />
Letter Source word Contents<br />
A IR 011 1234<br />
B IR 010 5678<br />
C DM 0101 8765<br />
D DM 0100 4321<br />
("
# Section 5-15<br />
4<br />
Fewer calculations <strong>and</strong> thus fewer instructions will be required if the multiplication<br />
is rearranged as shown below:<br />
(A×10 4 +B) × (C×10 4 +D) = A×C×10 4 +(B×C +A×D) × 10 4 +B×D<br />
00003<br />
TR 0<br />
MUL(32)<br />
MUL(32)<br />
MUL(32)<br />
MUL(32)<br />
CLC(41)<br />
ADD(30)<br />
ADD(30)<br />
ADD(30)<br />
ADD(30)<br />
ADD(30)<br />
ADD(30)<br />
010<br />
DM 0100<br />
HR 00<br />
011<br />
DM 0101<br />
HR 02<br />
010<br />
DM 0101<br />
128<br />
011<br />
DM 0100<br />
130<br />
HR 01<br />
128<br />
HR 01<br />
HR 02<br />
129<br />
HR 02<br />
HR 03<br />
#0000<br />
HR 03<br />
HR 01<br />
130<br />
HR 01<br />
HR 02<br />
131<br />
HR 02<br />
HR 03<br />
#0000<br />
HR 03<br />
(1)<br />
(2)<br />
(3)<br />
(4)<br />
(5)
# Section 5-15<br />
1, 2, 3... 1. The least significant 4-digits in each number are multiplied first (B×D).<br />
HR 01<br />
2 4 5 3<br />
x<br />
IR 010<br />
5 6 7 8<br />
DM 0100<br />
4 3 2 1<br />
HR 00<br />
4 6 3 8<br />
B<br />
D<br />
2. The most significant 4-digits in each number are multiplied (A×C).<br />
HR 03<br />
1 0 8 1<br />
x<br />
IR 011<br />
1 2 3 4<br />
DM 0101<br />
8 7 6 5<br />
HR 02<br />
6 0 1 0<br />
A<br />
C<br />
3. The least significant 4-digits of the first number are multiplied by the<br />
most significant 4-digits of the second (B×C).<br />
IR 129<br />
4 9 7 6<br />
x<br />
IR 010<br />
5 6 7 8<br />
DM 0101<br />
8 7 6 5<br />
IR 128<br />
7 6 7 0<br />
B<br />
C<br />
4. The most significant 4-digits of the first number are multiplied by the<br />
least significant 4-digits of the second (A×D).<br />
IR 131<br />
0 5 3 3<br />
x<br />
IR 011<br />
1 2 3 4<br />
DM 0100<br />
4 3 2 1<br />
IR 130<br />
2 1 1 4<br />
A<br />
D
# Section 5-15<br />
+ CY Flag<br />
+ CY Flag<br />
5. The results of the multiplications in steps 1 to 4 are combined. The 10 4<br />
terms <strong>and</strong> 10 8 terms are arranged in columns <strong>and</strong> added. The result of<br />
addition in the 10 8 -term column exceeds 9999, so the 10 12 term is incremented<br />
by 1.<br />
Result of step 2<br />
multiplication (A×C).<br />
HR 03<br />
1 0 8 1<br />
1<br />
0<br />
HR 02<br />
6 0 1 0<br />
HR 01<br />
2 4 5 3<br />
IR 129 IR 128<br />
4 9 7 6 7 6 7 0<br />
IR 131 IR 130<br />
0 5 3 3 2 1 1 4<br />
Result of step 1<br />
multiplication (B×D).<br />
HR 00<br />
4 6 3 8<br />
HR 03 HR 02 HR 01 HR 00<br />
1 0 8 2 1 5 2 0 2 2 3 7 4 6 3 8<br />
x10 13 x10 6 x10 4 x10 8<br />
Result of step 3<br />
multiplication (B×C).<br />
Result of step 4<br />
multiplication (A×D).<br />
Flags ER: Md <strong>and</strong>/or Mr not BCD.<br />
Indirectly addressed DM word is non-existent. (Content of �DM word<br />
is not BCD, or the DM area boundary has been exceeded.)<br />
CY: ON when there is a carry in the result.<br />
EQ: ON when the result is 0.<br />
5-15-8 BCD DIVIDE -- DIV(33)<br />
Limitations<br />
Description<br />
Ladder Symbol<br />
DIV(33)<br />
Dd<br />
Dr<br />
R<br />
R <strong>and</strong> R+1 must be in the same data area.<br />
Oper<strong>and</strong> Data Areas<br />
Dd: Dividend word (BCD)<br />
IR, SR, AR, DM, HR, TC, LR, #<br />
Dr: Divisor word (BCD)<br />
IR, SR, AR, DM, HR, TC, LR, #<br />
R: First result word (BCD)<br />
IR, AR, DM, HR, LR<br />
When the execution condition is OFF, DIV(33) is not executed <strong>and</strong> the program<br />
moves to the next instruction. When the execution condition is ON, Dd<br />
is divided by Dr <strong>and</strong> the result is placed in R <strong>and</strong> R + 1: the quotient in R <strong>and</strong><br />
the remainder in R + 1.<br />
Dr<br />
Quotient Remainder<br />
Dd<br />
R R+1
# Section 5-15<br />
Flags ER: Dd or Dr is not in BCD.<br />
Indirectly addressed DM word is non-existent. (Content of �DM word<br />
is not BCD, or the DM area boundary has been exceeded.)<br />
Example 1: Division of<br />
4-digit Numbers<br />
00000<br />
Dr: HR 09<br />
0 0 0 3<br />
EQ: ON when the result is 0.<br />
When IR 00000 is ON with the following program, the content of IR 020 is<br />
divided by the content of HR 09 <strong>and</strong> the result is placed in DM 0017 <strong>and</strong> DM<br />
0018. Example data <strong>and</strong> calculations are shown below the program.<br />
DIV(33)<br />
020<br />
HR 09<br />
DM 0017<br />
Quotient Remainder<br />
R: DM 0017 R + 1: DM 0018<br />
1 1 5 0 0 0 0 2<br />
Dd: IR 020<br />
3 4 5 2<br />
Address Instruction Oper<strong>and</strong>s<br />
00000 LD 00000<br />
00001 DIV(33)<br />
020<br />
HR 09<br />
DM 0017
# Section 5-15<br />
Example 2: Division of<br />
8-digits by 3-digits<br />
#<br />
0000<br />
(*Continued above right.)<br />
In this example, the 8-digit content of HR 00 <strong>and</strong> HR 01 is divided by a 3-digit<br />
number in HR 02, the quotient is placed in DM 0010 <strong>and</strong> DM 0011, <strong>and</strong> the<br />
remainder is placed in DM 0012.<br />
DIV(33)<br />
DIV(33)<br />
MUL(32)<br />
MUL(32)<br />
HR 01<br />
HR 02<br />
HR 03<br />
MOV(21)<br />
HR 00<br />
DM 0000<br />
MOV(21)<br />
HR 04<br />
DM 0001<br />
SLD(74)<br />
DIV(33)<br />
DM 0000<br />
DM 0001<br />
DM 0001<br />
HR 02<br />
HR 05<br />
HR 05<br />
#1000<br />
HR 13<br />
MOV(21)<br />
HR 06<br />
DM 0001<br />
SLD(74)<br />
DM 0000<br />
DM 0001<br />
DM 0000<br />
HR 02<br />
HR 07<br />
HR 07<br />
#0100<br />
DM 0002<br />
DRW(35)<br />
DM 0002<br />
HR 13<br />
HR 13<br />
(1)<br />
(2)<br />
(3)<br />
(4)<br />
(5)<br />
(6)<br />
(7)<br />
(*Continued.)<br />
MOV(21)<br />
HR 08<br />
DM 0001<br />
SLD(74)<br />
DIV(33)<br />
MUL(32)<br />
ORW(35)<br />
DM 0000<br />
DM 0001<br />
DM 0001<br />
HR 02<br />
HR 09<br />
HR 09<br />
#0010<br />
DM 0002<br />
DRW(35)<br />
DM 0002<br />
HR 13<br />
HR 13<br />
MOV(21)<br />
HR 10<br />
DM 0001<br />
SLD(74)<br />
DIV(33)<br />
DM 0000<br />
DM 0001<br />
DM 0001<br />
HR 02<br />
HR 11<br />
HR 11<br />
HR 13<br />
HR 13<br />
MOV(21)<br />
HR 03<br />
DM 0011<br />
MOV(21)<br />
HR 13<br />
DM 0010<br />
MOV(21)<br />
HR 12<br />
DM 0012<br />
(8)<br />
(9)
# Section 5-15<br />
1, 2, 3... 1. The most significant 4-digits are divided first.<br />
/<br />
HR 01<br />
1 2 3 4<br />
HR 02<br />
0 3 2 1<br />
HR 03 HR 04<br />
0 0 0 3 0 2 7 1<br />
2. The quotient is placed in DM 0000 <strong>and</strong> the remainder is placed in<br />
DM 0001.<br />
DM 0001 DM 0000<br />
0 2 7 1 5 6 7 8<br />
3. The 8 digits in DM 0000 <strong>and</strong> DM 0001 are shifted one digit to the left.<br />
DM 0001 DM 0000<br />
2 7 1 5 6 7 8 0<br />
4. The fifth digit is divided, the quotient is placed in HR 05 <strong>and</strong> the remainder<br />
in HR 06.<br />
/<br />
DM 0001<br />
2 7 1 5<br />
HR 02<br />
0 3 2 1<br />
HR 05 HR 06<br />
0 0 0 8 0 1 4 7<br />
5. The quotient is multiplied by 1000 <strong>and</strong> placed in HR 13.<br />
HR 13<br />
8 0 0 0<br />
6. The sixth digit is divided in the same way, the quotient is placed in<br />
HR 07 <strong>and</strong> the remainder in HR 08.<br />
HR 07 HR 08<br />
0 0 0 4 0 1 9 2<br />
7. The quotient is multiplied by 100 <strong>and</strong> placed in DM 0002. DM 0002 is<br />
logically ORed with HR 13 <strong>and</strong> the result is placed back in HR 13.<br />
HR 13<br />
8 4 0 0<br />
'
# Section 5-15<br />
(<br />
8. The same calculations are carried out on the seventh <strong>and</strong> eighth digits,<br />
<strong>and</strong> the results output to HR 13.<br />
HR 13 HR 12<br />
8 4 6 0 0 0 1 8<br />
9. The contents of HR 03, HR 13, <strong>and</strong> HR 12 are transferred to DM 0011,<br />
DM 0010, <strong>and</strong> DM 0012, respectively. The final result of the division has<br />
the overall structure shown below.<br />
HR 01 HR 00<br />
1 2 3 4 5 6 7 8<br />
/<br />
HR 020<br />
0 3 2 1<br />
DM0011 DM0010<br />
0 0 0 3 8 4 6 0<br />
Remainder:<br />
DM0012<br />
0 0 1 8
# Section 5-16<br />
5-16 Binary Calculations<br />
5-16-1 BINARY ADD -- ADB(50)<br />
Description<br />
The binary calculation instructions -- ADB(50), SBB(51), MLB(52) <strong>and</strong><br />
DVB(53) -- all perform arithmetic operations on binary (hexadecimal) data.<br />
The addition <strong>and</strong> subtraction instructions include CY in the calculation as well<br />
as in the result. Be sure to clear CY if its previous status is not required in the<br />
calculation, <strong>and</strong> to use the result placed in CY, if required, before it is<br />
changed by the execution of any other instruction. STC(40) <strong>and</strong> CLC(41) can<br />
be used to control CY. Refer to 5-15 BCD Calculations.<br />
ADB(50)<br />
Au<br />
Ad<br />
R<br />
Ladder Symbols<br />
@ADB(50)<br />
Au<br />
Ad<br />
R<br />
Oper<strong>and</strong> Data Areas<br />
Au: Augend word (binary)<br />
IR, SR, AR, DM, HR, TC, LR, #<br />
Ad: Addend word (binary)<br />
IR, SR, AR, DM, HR, TC, LR, #<br />
R: Result word<br />
IR, AR, DM, HR, LR<br />
When the execution condition is OFF, ADB(50) is not executed. When the<br />
execution condition is ON, ADB(50) adds the contents of Au, Ad, <strong>and</strong> CY,<br />
<strong>and</strong> places the result in R. CY will be set if the result is greater than FFFF.<br />
Au + Ad + CY CY R<br />
Flags ER: Indirectly addressed DM word is non-existent. (Content of �DM word<br />
is not BCD, or the DM area boundary has been exceeded.)<br />
CY: ON when the result is greater than FFFF.<br />
EQ: ON when the result is 0.<br />
Examples The following example shows a four-digit addition with CY used to place either<br />
0000 or 0001 into R+1 to ensure that any Carry is preserved.<br />
00000<br />
TR 0<br />
25504<br />
25504<br />
CLC(41)<br />
ADB(50)<br />
010<br />
DM 0100<br />
HR 10<br />
MOV(21)<br />
#0000<br />
HR 11<br />
MOV(21)<br />
#0001<br />
HR 11<br />
=R<br />
=R+1<br />
=R+1<br />
Address Instruction Oper<strong>and</strong>s<br />
00000 LD 00000<br />
00001 OUT TR 0<br />
00002 CLC(41)<br />
00003 ADB(50)<br />
010<br />
DM 0100<br />
HR 10<br />
00004 AND NOT 25504<br />
00005 MOV(21)<br />
# 0000<br />
HR 11<br />
00006 LD TR 0<br />
00007 AND 25504<br />
00008 MOV(21)<br />
# 00001<br />
HR 11
# Section 5-16<br />
00000<br />
,<br />
In the case below, A6E2 + 80C5 = 127A7. The result is a 5-digit number, so<br />
CY (SR 25504) = 1, <strong>and</strong> the content of R + 1 becomes #0001.<br />
+<br />
Au: IR 010<br />
A 6 E 2<br />
Ad: DM 0100<br />
8 0 C 5<br />
R+1: HR 11 R: HR 10<br />
0 0 0 1 2 7 A 7<br />
The following example performs eight-digit addition by using ADB(50) twice.<br />
ADB(50) is also used to place the carry into DM 0302 (one word greater than<br />
the rest of the answer). The complete answer thus ends up in DM 0300<br />
through DM 0302.<br />
CLC(41)<br />
@ADB(50)<br />
LR 20<br />
DM 0200<br />
DM 0300<br />
@ADB(50)<br />
LR 21<br />
DM 0201<br />
DM 0301<br />
@ADB(50)<br />
#0000<br />
#0000<br />
DM 0302<br />
Address Instruction Oper<strong>and</strong>s<br />
00000 LD 00000<br />
00001 CLC(41)<br />
00002 @ADB(50)<br />
LR 20<br />
DM 0200<br />
DM 0300<br />
00003 @ADB(50)<br />
LR 21<br />
DM 0201<br />
DM 0301<br />
00004 @ADB(50)<br />
# 0000<br />
# 0000<br />
DM 0302<br />
In the case below, 4F52A6E2 + EC3B80C5 = 13B8E27A7. The sum of the<br />
addition of the lower 4 digits is a 5-digit number, so CY (SR 25504) = 1, <strong>and</strong><br />
the sum of the higher 4-digit addition is incremented by 1.<br />
+<br />
Lower 4 digits. Higher 4 digits.<br />
Au: LR 20<br />
A 6 E 2<br />
Ad: DM 0200<br />
8 0 C 5<br />
R: DM 0300<br />
2 7 A 7<br />
CY = 1<br />
+<br />
CY = 1<br />
Au: LR 21<br />
4 F 5 2<br />
Ad: DM 0201<br />
E C 3 B<br />
R: DM 0301<br />
3 B 8 E<br />
R+2: DM 0302 R+1: DM 0301 R: DM 0300<br />
0 0 0 1 3 B 8 E 2 7 A 7
# Section 5-16<br />
5-16-2 BINARY SUBTRACT -- SBB(51)<br />
Description<br />
SBB(51)<br />
Mi<br />
Su<br />
R<br />
Ladder Symbols<br />
@SBB(51)<br />
Mi<br />
Su<br />
R<br />
Oper<strong>and</strong> Data Areas<br />
Mi: Minuend word (binary)<br />
IR, SR, AR, DM, HR, TC, LR, #<br />
Su: Subtrahend word (binary)<br />
IR, SR, AR, DM, HR, TC, LR, #<br />
R: Result word<br />
IR, AR, DM, HR, LR<br />
When the execution condition is OFF, SBB(51) is not executed. When the<br />
execution condition is ON, SBB(51) subtracts the contents of Su <strong>and</strong> CY from<br />
Mi <strong>and</strong> places the result in R. If the result is negative, CY is set <strong>and</strong> the 2’s<br />
complement of the actual result is placed in R.<br />
Mi -- Su -- CY CY R<br />
Flags ER: Indirectly addressed DM word is non-existent. (Content of �DM word<br />
is not BCD, or the DM area boundary has been exceeded.)<br />
CY: ON when the result is negative, i.e., when Mi is less than Su plus CY.<br />
EQ: ON when the result is 0.<br />
"
# Section 5-16<br />
Example The following example shows eight-digit subtraction. CY is tested following<br />
the first two subtractions to see if the result is negative. If it is, the first result<br />
is subtracted from zero to obtain the true result, which is placed in HR 10 <strong>and</strong><br />
HR 11, <strong>and</strong> either 0000 or 0001 is placed in HR 12 (0001 indicates a negative<br />
answer).<br />
,4<br />
00000<br />
TR 0<br />
25504<br />
25504<br />
25504<br />
CLC(41)<br />
SBB(51)<br />
010<br />
DM 0100<br />
HR 10<br />
SBB(51)<br />
011<br />
DM 0101<br />
HR 11<br />
CLC(41)<br />
SBB(51)<br />
#0000<br />
HR 10<br />
HR 10<br />
SBB(51)<br />
#0000<br />
HR 11<br />
HR 11<br />
MOV(21)<br />
#0000<br />
HR 12<br />
MOV(21)<br />
#0001<br />
HR 12<br />
Address Instruction Oper<strong>and</strong>s<br />
00000 LD 00000<br />
00001 OUT TR 0<br />
00002 CLC(41)<br />
00003 SBB(51)<br />
010<br />
DM 0100<br />
HR 10<br />
00004 SBB(51)<br />
011<br />
DM 0101<br />
HR 11<br />
00005 AND 25504<br />
00006 CLC(41)<br />
00007 SBB(51)<br />
# 0000<br />
HR 10<br />
HR 10<br />
00008 SBB(51)<br />
# 0000<br />
HR 11<br />
HR 11<br />
00009 LD TR 0<br />
00010 AND NOT 25504<br />
00011 MOV(21)<br />
# 0000<br />
HR 12<br />
00012 LD TR 0<br />
00013 AND 25504<br />
00014 MOV(21)<br />
# 0001<br />
HR 12
# Section 5-16<br />
In the case below, 20F55A10 -- B8A360E3 = 97AE06D3. In the the lower<br />
4-digit subtraction, Su > Mi, so CY(SR 25504) becomes 1, <strong>and</strong> the result of<br />
the higher 4-digit subtraction is decremented by 1. In the final calculations,<br />
#0000 -- F9D2 = 0000 + (10000 -- F9D2) = 06D3.<br />
#0000 -- 6851 --1 (from CY = 1) = 0000 + (10000 -- 6851 -- 1) = 97AE.<br />
The content of HR 12, #0001, indicates a negative result.<br />
--<br />
--<br />
Lower 4 digits. Higher 4 digits.<br />
Mi: IR 010<br />
5 A 1 0<br />
Su: DM 0100<br />
6 0 E 3<br />
0 0 0 0<br />
5A10 + (10000 -- 60E3)<br />
5-16-3 BINARY MULTIPLY -- MLB(52)<br />
Description<br />
MLB(52)<br />
Md<br />
Mr<br />
R<br />
Ladder Symbols<br />
R: HR 10<br />
F 9 2 D<br />
CY = 0<br />
(from CLC(41))<br />
CY = 1<br />
--<br />
Mi: IR 011<br />
2 0 F 5<br />
Su: DM 0101<br />
B 8 A 3<br />
-- 0 0 0 1<br />
CY = 1<br />
20F5 + (10000 -- B8A3) -- 1<br />
R+2: HR 12 R+1: HR 11 R: HR 10<br />
0 0 0 1 9 7 A E 0 6 D 3<br />
@MLB(52)<br />
Md<br />
Mr<br />
R<br />
R: HR 11<br />
6 8 5 1<br />
Oper<strong>and</strong> Data Areas<br />
Md: Multiplic<strong>and</strong> word (binary)<br />
IR, SR, AR, DM, HR, TC, LR, #<br />
Mr: Multiplier word (binary)<br />
IR, SR, AR, DM, HR, TC, LR, #<br />
R: First result word<br />
IR, AR, DM, HR LR<br />
When the execution condition is OFF, MLB(52) is not executed. When the<br />
execution condition is ON, MLB(52) multiplies the content of Md by the contents<br />
of Mr, places the rightmost four digits of the result in R, <strong>and</strong> places the<br />
leftmost four digits in R+1.<br />
X<br />
Md<br />
Mr<br />
R+1 R<br />
Flags ER: Indirectly addressed DM word is non-existent. (Content of �DM word<br />
is not BCD, or the DM area boundary has been exceeded.)<br />
EQ: ON when the result is 0.<br />
,
$ Section 5-17<br />
5-16-4 BINARY DIVIDE -- DVB(53)<br />
Description<br />
,<br />
DVB(53)<br />
Dd<br />
Dr<br />
R<br />
Ladder Symbols<br />
@DVB(53)<br />
Dd<br />
Dr<br />
R<br />
Oper<strong>and</strong> Data Areas<br />
Dd: Dividend word (binary)<br />
IR, SR, AR, DM, HR, TC, LR, #<br />
Dr: Divisor word (binary)<br />
IR, SR, AR, DM, HR, TC, LR, #<br />
R: First result word<br />
IR, AR, DM, HR LR<br />
When the execution condition is OFF, DVB(53) is not executed. When the<br />
execution condition is ON, DVB(53) divides the content of Dd by the content<br />
of Dr <strong>and</strong> the result is placed in R <strong>and</strong> R+1: the quotient in R, the remainder<br />
in R+1.<br />
Dr<br />
Quotient Remainder<br />
R R + 1<br />
Flags ER: Dr contains 0.<br />
Indirectly addressed DM word is non-existent. (Content of �DM word<br />
is not BCD, or the DM area boundary has been exceeded.)<br />
EQ: ON when the result is 0.<br />
5-17 Logic Instructions<br />
The logic instructions -- COM(29), ANDW(34), ORW(35), XORW(36), <strong>and</strong><br />
XNRW(37) -- perform logic operations on word data.<br />
5-17-1 COMPLEMENT -- COM(29)<br />
Description<br />
Example<br />
COM(29)<br />
Wd<br />
Dd<br />
Ladder Symbols Oper<strong>and</strong> Data Areas<br />
@COM(29)<br />
Wd<br />
Wd: Complement word<br />
IR, AR, DM, HR, LR<br />
When the execution condition is OFF, COM(29) is not executed. When the<br />
execution condition is ON, COM(29) clears all ON bits <strong>and</strong> sets all OFF bits<br />
in Wd.<br />
Original<br />
Complement<br />
15 00<br />
1 0 0 1 1 0 0 1 1 0 0 1 1 0 0 1<br />
15 00<br />
0 1 1 0 0 1 1 0 0 1 1 0 0 1 1 0
$ Section 5-17<br />
Flags ER: Indirectly addressed DM word is non-existent. (Content of �DM word<br />
is not BCD, or the DM area boundary has been exceeded.)<br />
EQ: ON when the result is 0.<br />
5-17-2 LOGICAL AND -- ANDW(34)<br />
Description<br />
Example<br />
ANDW(34)<br />
I1<br />
I2<br />
R<br />
Ladder Symbols Oper<strong>and</strong> Data Areas<br />
@ANDW(34)<br />
I1<br />
I2<br />
R<br />
I1: Input 1<br />
IR, SR, AR, DM, HR, TC, LR, #<br />
I2: Input 2<br />
IR, SR, AR, DM, HR, TC, LR, #<br />
R: Result word<br />
IR, AR, DM, HR, LR<br />
When the execution condition is OFF, ANDW(34) is not executed. When the<br />
execution condition is ON, ANDW(34) logically AND’s the contents of I1 <strong>and</strong><br />
I2 bit-by-bit <strong>and</strong> places the result in R.<br />
I1<br />
I2<br />
R<br />
15 00<br />
1 0 0 1 1 0 0 1 1 0 0 1 1 0 0 1<br />
15 00<br />
0 1 0 1 0 1 0 1 0 1 0 1 0 1 0 1<br />
15 00<br />
0 0 0 1 0 0 0 1 0 0 0 1 0 0 0 1<br />
Flags ER: Indirectly addressed DM word is non-existent. (Content of �DM word<br />
is not BCD, or the DM area boundary has been exceeded.)<br />
EQ: ON when the result is 0.<br />
5-17-3 LOGICAL OR -- ORW(35)<br />
Description<br />
ORW(35)<br />
I1<br />
I2<br />
R<br />
Ladder Symbols<br />
@ORW(35)<br />
I1<br />
I2<br />
R<br />
Oper<strong>and</strong> Data Areas<br />
I1: Input 1<br />
IR, SR, AR, DM, HR, TC, LR, #<br />
I2: Input 2<br />
IR, SR, AR, DM, HR, TC, LR, #<br />
R: Result word<br />
IR, AR, DM, HR, LR<br />
When the execution condition is OFF, ORW(35) is not executed. When the<br />
execution condition is ON, ORW(35) logically OR’s the contents of I1 <strong>and</strong> I2<br />
bit-by-bit <strong>and</strong> places the result in R.<br />
,
$ Section 5-17<br />
Example<br />
,#<br />
I1<br />
I2<br />
R<br />
15 00<br />
1 0 0 1 1 0 0 1 1 0 0 1 1 0 0 1<br />
15 00<br />
0 1 0 1 0 1 0 1 0 1 0 1 0 1 0 1<br />
15 00<br />
1 1 0 1 1 1 0 1 1 1 0 1 1 1 0 1<br />
Flags ER: Indirectly addressed DM word is non-existent. (Content of �DM word<br />
is not BCD, or the DM area boundary has been exceeded.)<br />
EQ: ON when the result is 0.<br />
5-17-4 EXCLUSIVE OR -- XORW(36)<br />
Description<br />
Example<br />
XORW(36)<br />
I1<br />
I2<br />
R<br />
Ladder Symbols<br />
@XORW(36)<br />
I1<br />
I2<br />
R<br />
Oper<strong>and</strong> Data Areas<br />
I1: Input 1<br />
IR, SR, AR, DM, HR, TC, LR, #<br />
I2: Input 2<br />
IR, SR, AR, DM, HR, TC, LR, #<br />
R: Result word<br />
IR, AR, DM, HR, LR<br />
When the execution condition is OFF, XORW(36) is not executed. When the<br />
execution condition is ON, XORW(36) exclusively OR’s the contents of I1<br />
<strong>and</strong> I2 bit-by-bit <strong>and</strong> places the result in R.<br />
I1<br />
I2<br />
R<br />
15 00<br />
1 0 0 1 1 0 0 1 1 0 0 1 1 0 0 1<br />
15 00<br />
0 1 0 1 0 1 0 1 0 1 0 1 0 1 0 1<br />
15 00<br />
1 1 0 0 1 1 0 0 1 1 0 0 1 1 0 0<br />
Flags ER: Indirectly addressed DM word is non-existent. (Content of �DM word<br />
is not BCD, or the DM area boundary has been exceeded.)<br />
EQ: ON when the result is 0.
$ Section 5-17<br />
5-17-5 EXCLUSIVE NOR -- XNRW(37)<br />
Description<br />
XNRW(37)<br />
I1<br />
I2<br />
R<br />
Ladder Symbols<br />
@XNRW(37)<br />
I1<br />
I2<br />
R<br />
Oper<strong>and</strong> Data Areas<br />
I1: Input 1<br />
IR, SR, AR, DM, HR, TC, LR, #<br />
I2: Input 2<br />
IR, SR, AR, DM, HR, TC, LR, #<br />
R: Result word<br />
IR, AR, DM, HR, LR<br />
When the execution condition is OFF, XNRW(37) is not executed. When the<br />
execution condition is ON, XNRW(37) exclusively NOR’s the contents of I1<br />
<strong>and</strong> I2 bit-by-bit <strong>and</strong> places the result in R.<br />
I1<br />
I2<br />
R<br />
15 00<br />
1 0 0 1 1 0 0 1 1 0 0 1 1 0 0 1<br />
15 00<br />
0 1 0 1 0 1 0 1 0 1 0 1 0 1 0 1<br />
15 00<br />
0 0 1 1 0 0 1 1 0 0 1 1 0 0 1 1<br />
Flags ER: Indirectly addressed DM word is non-existent. (Content of �DM word<br />
is not BCD, or the DM area boundary has been exceeded.)<br />
EQ: ON when the result is 0.<br />
,'
5-18 Subroutines<br />
5-18-1 Overview<br />
Subroutines break large control tasks into smaller ones <strong>and</strong> enable you to<br />
reuse a given set of instructions. When the main program calls a subroutine,<br />
control is transferred to the subroutine <strong>and</strong> the subroutine instructions are<br />
executed. The instructions within a subroutine are written in the same way as<br />
the main program code. When all the subroutine instructions have been executed,<br />
control returns to the main program to the point just after the point<br />
from which the subroutine was entered (unless otherwise specified in the<br />
subroutine).<br />
5-18-2 SUBROUTINE START <strong>and</strong> RETURN -- SBN(92)/RET(93)<br />
Limitations<br />
Description<br />
,(<br />
Ladder Symbols Oper<strong>and</strong> Data Areas<br />
SBN(92) N<br />
RET(93)<br />
N: Subroutine number<br />
# (00 to 49)<br />
Each subroutine number can be used in SBN(92) once only, i.e., up to 50<br />
subroutines may be programmed.<br />
SBN(92) is used to mark the beginning of a subroutine program; RET(93) is<br />
used to mark the end. Each subroutine is identified with a subroutine number,<br />
N, that is programmed as a definer for SBN(92). This same subroutine number<br />
is used in any SBS(91) that calls the subroutine (see 5-18-3 SUBROU-<br />
TINE ENTER - SBS(91)). No subroutine number is required with RET(93).<br />
All subroutines must be programmed at the end of the main program. When<br />
one or more subroutines have been programmed, the main program will be<br />
executed up to the first SBN(92) before returning to address 00000 for the<br />
next cycle. Subroutines will not be executed unless called by SBS(91).<br />
END(01) must be placed at the end of the last subroutine program, i.e., after<br />
the last RET(93). It is not required at any other point in the program. (Refer to<br />
5-18-3 SUBROUTINE ENTER - SBS(91) for further details.)<br />
Precautions If SBN(92) is mistakenly placed in the main program, it will inhibit program<br />
execution past that point, i.e., program execution will return to the beginning<br />
when SBN(92) is encountered.<br />
If either DIFU(13) or DIFU(14) is placed within a subroutine, the oper<strong>and</strong> bit<br />
will not be turned OFF until the next time the subroutine is executed, i.e., the<br />
oper<strong>and</strong> bit may stay ON longer than one cycle.<br />
Flags There are no flags directly affected by these instructions.<br />
5-18-3 SUBROUTINE ENTER -- SBS(91)<br />
Description<br />
Ladder Symbol Oper<strong>and</strong> Data Areas<br />
SBS(91) N<br />
N: Subroutine number<br />
# (00 to 49)<br />
Section 5-18<br />
A subroutine can be executed by placing SBS(91) in the main program at the<br />
point where the subroutine is desired. The subroutine number used in
SBS(91) indicates the desired subroutine. When SBS(91) is executed (i.e.,<br />
when the execution condition for it is ON), the instructions between the<br />
SBN(92) with the same subroutine number <strong>and</strong> the first RET(93) after it are<br />
executed before execution returns to the instruction following the SBS(91)<br />
that made the call.<br />
Main program<br />
SBS(91) 00<br />
Main program<br />
SBN(92) 00<br />
Subroutine<br />
RET(93)<br />
END(01)<br />
SBS(91) may be used as many times as desired in the program, i.e., the<br />
same subroutine may be called from different places in the program).<br />
SBS(91) may also be placed into a subroutine to shift program execution<br />
from one subroutine to another, i.e., subroutines may be nested. When the<br />
second subroutine has been completed (i.e., RET(93) has been reached),<br />
program execution returns to the original subroutine which is then completed<br />
before returning to the main program. Nesting of up to sixteen levels is possible.<br />
A subroutine cannot call itself, (e.g., SBS(91) 00 cannot be programmed<br />
within the subroutine defined with SBN(92) 00). The following diagram illustrates<br />
two levels of nesting.<br />
SBN(92) 10 SBN(92) 11 SBN(92) 12<br />
SBS(91) 10 SBS(91) 11<br />
SBS(91) 12<br />
RET(93)<br />
Section 5-18<br />
RET(93) RET(93)<br />
,
,,<br />
The following diagram illustrates program execution flow for various execution<br />
conditions for two SBS(91).<br />
Main<br />
program<br />
Subroutines<br />
A<br />
SBS(91) 00<br />
B<br />
SBS(91) 01<br />
C<br />
SBN(92) 00<br />
D<br />
RET(93)<br />
SBN(92) 01<br />
E<br />
RET(93)<br />
END(01)<br />
OFF execution conditions for<br />
subroutines 00 <strong>and</strong> 01<br />
A<br />
A<br />
A<br />
A<br />
B<br />
B<br />
C<br />
ON execution condition for<br />
subroutine 00 only<br />
D<br />
D<br />
B<br />
E<br />
B<br />
C<br />
ON execution condition for<br />
subroutine 01 only<br />
C<br />
ON execution conditions for<br />
subroutines 00 <strong>and</strong> 01<br />
Flags ER: A subroutine does not exist for the specified subroutine number.<br />
A subroutine has called itself.<br />
Subroutines have been nested to more than sixteen levels.<br />
Section 5-18<br />
Caution SBS(91) will not be executed <strong>and</strong> the subroutine will not be called when ER<br />
is ON.<br />
E<br />
C
5-19 Step Instructions<br />
The step instructions STEP(08) <strong>and</strong> SNXT(09) are used in conjunction to set<br />
up breakpoints between sections in a large program so that the sections can<br />
be executed as units <strong>and</strong> reset upon completion. A section of program will<br />
usually be defined to correspond to an actual process in the application. (Refer<br />
to the application examples later in this section.) A step is like normal programming<br />
code, except that certain instructions (e.g. IL(02)/ILC(03),<br />
JMP(04)/JME(05)) may not be included.<br />
5-19-1 STEP DEFINE <strong>and</strong> STEP START--STEP(08)/SNXT(09)<br />
Ladder Symbols Definer Data Areas<br />
STEP(08) B STEP(08)<br />
SNXT(09) B<br />
B: Control bit<br />
IR, AR, HR, LR<br />
B: Control bit<br />
IR, AR, HR, LR<br />
Limitations All control bits must be in the same word <strong>and</strong> must be consecutive.<br />
Description<br />
Section 5-19<br />
STEP(08) uses a control bit in the IR or HR areas to define the beginning of<br />
a section of the program called a step. STEP(08) does not require an execution<br />
condition, i.e., its execution is controlled through the control bit. To start<br />
execution of the step, SNXT(09) is used with the same control bit as used for<br />
STEP(08). If SNXT(09) is executed with an ON execution condition, the step<br />
with the same control bit is executed. If the execution condition is OFF, the<br />
step is not executed. The SNXT(09) instruction must be written into the program<br />
so that it is executed before the program reaches the step it starts. It<br />
can be used at different locations before the step to control the step according<br />
to two different execution conditions (see example 2, below). Any step in<br />
the program that has not been started with SNXT(09) will not be executed.<br />
Once SNXT(09) is used in the program, step execution will continue until<br />
STEP(08) is executed without a control bit. STEP(08) without a control bit<br />
must be preceded by SNXT(09) with a dummy control bit. The dummy control<br />
bit may be any unused IR or HR bit. It cannot be a control bit used in a<br />
STEP(08).<br />
,"
Precautions<br />
"4<br />
00000<br />
00001<br />
00002<br />
Execution of a step is completed either by execution of the next SNXT(09) or<br />
by turning OFF the control bit for the step (see example 3 below). When the<br />
step is completed, all of the IR <strong>and</strong> HR bits in the step are turned OFF <strong>and</strong> all<br />
timers in the step are reset to their SVs. Counters, shift registers, <strong>and</strong> bits<br />
used in KEEP(11) maintain status. Two simple examples are shown below.<br />
Step controlled by LR 2000<br />
Step controlled by LR 2001<br />
SNXT(09) LR 2000<br />
STEP(08) LR 2000<br />
SNXT(09) LR 2001<br />
STEP(08) LR 2001<br />
SNXT(09) LR 2002<br />
STEP(08)<br />
Starts step execution<br />
1st step<br />
2nd step<br />
Ends step execution<br />
Address Instruction Oper<strong>and</strong>s Address Instruction Oper<strong>and</strong>s<br />
00000 LD 00000<br />
00001 SNXT(09) LR 2000<br />
00002 STEP(08) LR 2000<br />
Step controlled by LR 2000.<br />
00100 LD 00001<br />
00101 SNXT(09) LR 2001<br />
00102 STEP(08) LR 2001<br />
Step controlled by LR 2001.<br />
00200 LD 00002<br />
00201 SNXT(09) LR 2002<br />
00202 STEP(08) ---<br />
Section 5-19<br />
Steps can be programmed in consecutively. Each step must start with<br />
STEP(08) <strong>and</strong> generally ends with SNXT(09) (see example 3, below, for an<br />
exception). When steps are programmed in series, three <strong>type</strong>s of execution<br />
are possible: sequential, branching, or parallel. The execution conditions for,<br />
<strong>and</strong> the positioning of, SNXT(09) determine how the steps are executed. The<br />
three examples given below demonstrate these three <strong>type</strong>s of step execution.<br />
Interlocks, jumps, SBN(92), <strong>and</strong> END(01) cannot be used within step programs.<br />
Bits used as control bits must not be used anywhere else in the program unless<br />
they are being used to control the operation of the step (see example 3,<br />
below). All control bits must be in the same word <strong>and</strong> must be consecutive.<br />
If IR or LR bits are used for control bits, their status will be lost during any<br />
power interruption. If it is necessary to maintain status to resume execution<br />
at the same step, HR bits must be used.
Flags 25407: Step Start Flag; turns ON for one cycle when STEP(08) is executed<br />
<strong>and</strong> can be used to reset counters in steps as shown below if necessary.<br />
Examples<br />
Example 1:<br />
Sequential Execution<br />
00000<br />
00100<br />
25407<br />
CP<br />
R<br />
SNXT(09) 01000<br />
STEP(08) 01000<br />
CNT 01<br />
#0003<br />
01000<br />
25407<br />
Start<br />
1 cycle<br />
Address Instruction Oper<strong>and</strong>s Address Instruction Oper<strong>and</strong>s<br />
00000 LD 00000<br />
00001 SNXT(09) 01000<br />
00002 STEP(08) 01000<br />
00003 LD 00100<br />
00004 LD 25407<br />
00005 CNT 01<br />
# 0003<br />
The following three examples demonstrate the three <strong>type</strong>s of execution control<br />
possible with step programming. Example 1 demonstrates sequential<br />
execution; example 2, branching execution; <strong>and</strong> example 3, parallel execution.<br />
The following process requires that three processes, loading, part installation,<br />
<strong>and</strong> inspection/discharge, be executed in sequence with each process<br />
being reset before continuing on the the next process. Various sensors<br />
(SW1, SW2, SW3, <strong>and</strong> SW4) are positioned to signal when processes are to<br />
start <strong>and</strong> end.<br />
SW 1<br />
SW 2<br />
SW 3<br />
Loading Part installation Inspection/discharge<br />
Section 5-19<br />
SW 4<br />
"
"<br />
00001 (SW1)<br />
00002 (SW2)<br />
00003 (SW3)<br />
00004 (SW4)<br />
The following diagram demonstrates the flow of processing <strong>and</strong> the switches<br />
that are used for execution control.<br />
Process A<br />
Process B<br />
Process C<br />
SW1<br />
SW2<br />
SW3<br />
SW4<br />
Loading<br />
Part Installation<br />
Inspection/discharge<br />
The program for this process, shown below, utilizes the most basic <strong>type</strong> of<br />
step programming: each step is completed by a unique SNXT(09) that starts<br />
the next step. Each step starts when the switch that indicates the previous<br />
step has been completed turns ON.<br />
Process A<br />
Process B<br />
Process C<br />
SNXT(09) 12800<br />
STEP(08) 12800<br />
SNXT(09) 12801<br />
STEP(08) 12801<br />
SNXT(09) 12802<br />
STEP(08) 12802<br />
SNXT(09) 12803<br />
STEP(08)<br />
Process A started.<br />
Process A reset.<br />
Process B started.<br />
Process B reset.<br />
Process C started.<br />
Process C reset.<br />
Address Instruction Oper<strong>and</strong>s Address Instruction Oper<strong>and</strong>s<br />
00000 LD 00001<br />
00001 SNXT(09) 12800<br />
00002 STEP(08) 12800<br />
Process A<br />
00100 LD 00002<br />
00101 SNXT(09) 12801<br />
00102 STEP(08) 12801<br />
Process B<br />
00100 LD 00003<br />
00101 SNXT(09) 12802<br />
00102 STEP(08) 12802<br />
Process C<br />
00200 LD 00004<br />
00201 SNXT(09) 12803<br />
00202 STEP(08) ---<br />
Section 5-19
Example 2:<br />
Branching Execution<br />
Weight scale<br />
The following process requires that a product is processed in one of two<br />
ways, depending on its weight, before it is printed. The printing process is the<br />
same regardless of which of the first processes is used. Various sensors are<br />
positioned to signal when processes are to start <strong>and</strong> end.<br />
SW A1<br />
Process A<br />
Process B<br />
SW B1 SW B2<br />
SW A2<br />
Printer<br />
Process C<br />
SW D<br />
The following diagram demonstrates the flow of processing <strong>and</strong> the switches<br />
that are used for execution control. Here, either process A or process B is<br />
used depending on the status of SW A1 <strong>and</strong> SW B1.<br />
Process A<br />
Process C<br />
End<br />
SW A1<br />
SW B1<br />
SW A2 SW B2<br />
SW D<br />
Process B<br />
Section 5-19<br />
"
"#<br />
00001 (SW A1)<br />
00001 (SW A1)<br />
00003 (SW A2)<br />
00004 (SW B2)<br />
00005 (SW D)<br />
The program for this process, shown below, starts with two SNXT(09) instructions<br />
that start processes A <strong>and</strong> B. Because of the way 00001 (SW A1)<br />
<strong>and</strong> 00002 (SB B1) are programmed, only one of these will be executed to<br />
start either process A or process B. Both of the steps for these processes<br />
end with a SNXT(09) that starts the step for process C.<br />
00002 (SW B2)<br />
00002 (SW B2)<br />
Process A<br />
Process B<br />
Process C<br />
SNXT(09) HR 0000<br />
SNXT(09) HR 0001<br />
STEP(08) HR 0000<br />
SNXT(09) HR 0002<br />
STEP(08) HR 0001<br />
SNXT(09) HR 0002<br />
STEP(08) HR 0002<br />
SNXT(09) HR 0003<br />
STEP(08)<br />
Process A started.<br />
Process A reset.<br />
Process C started.<br />
Process B reset.<br />
Process C started.<br />
Process C reset.<br />
Address Instruction Oper<strong>and</strong>s Address Instruction Oper<strong>and</strong>s<br />
00000 LD 00001<br />
00001 AND NOT 00002<br />
00002 SNXT(09) HR 0000<br />
00003 LD NOT 00001<br />
00004 AND 00002<br />
00005 SNXT(09) HR 0001<br />
00006 STEP(08) HR 0000<br />
Process A<br />
00100 LD 00003<br />
00101 SNXT(09) HR 0002<br />
00102 STEP(08) HR 0001<br />
Process B<br />
00100 LD 00004<br />
00101 SNXT(09) HR 0002<br />
00102 STEP(08) HR 0002<br />
Process C<br />
00200 LD 00005<br />
00201 SNXT(09) HR 0003<br />
00202 STEP(08) ---<br />
Section 5-19
Example 3:<br />
Parallel Execution<br />
SW2<br />
SW1<br />
Process C<br />
The following process requires that two parts of a product pass simultaneously<br />
through two processes each before they are joined together in a fifth<br />
process. Various sensors are positioned to signal when processes are to<br />
start <strong>and</strong> end.<br />
Process A<br />
SW4<br />
SW3<br />
Process B<br />
Process D<br />
SW6<br />
SW5 SW7<br />
Process E<br />
The following diagram demonstrates the flow of processing <strong>and</strong> the switches<br />
that are used for execution control. Here, process A <strong>and</strong> process C are<br />
started together. When process A finishes, process B starts; when process C<br />
finishes, process D starts. When both processes B <strong>and</strong> D have finished,<br />
process E starts.<br />
Process A<br />
Process E<br />
End<br />
SW3<br />
SW7<br />
SW 1 <strong>and</strong> SW2 both ON<br />
Process C<br />
Process B Process D<br />
SW5 <strong>and</strong> SW6 both ON<br />
SW4<br />
Section 5-19<br />
The program for this operation, shown below, starts with two SNXT(09) instructions<br />
that start processes A <strong>and</strong> C. These instructions branch from the<br />
same instruction line <strong>and</strong> are always executed together, starting steps for<br />
both A <strong>and</strong> C. When the steps for both A <strong>and</strong> C have finished, the steps for<br />
process B <strong>and</strong> D begin immediately.<br />
When both process B <strong>and</strong> process D have finished (i.e., when SW5 <strong>and</strong> SW6<br />
turn ON), processes B <strong>and</strong> D are reset together by the SNXT(09) at the end<br />
of the programming for process B. Although there is no SNXT(09) at the end<br />
of process D, the control bit for it is turned OFF by executing SNXT(09) LR<br />
0004. This is because the OUT for LR 0003 is in the step reset by SNXT(09)<br />
LR 0004, i.e., LR 003 is turned OFF when SNXT(09) LR 0004 is executed<br />
"'
"(<br />
00001 (SW1 <strong>and</strong> SW2))<br />
00002 (SW3)<br />
01101<br />
00003 (SW4)<br />
00005 (SW7)<br />
Process B is thus reset directly <strong>and</strong> process D is reset indirectly before executing<br />
the step for process E.<br />
Process A<br />
Process B<br />
00004 (SW5 <strong>and</strong> SW6)<br />
Process C<br />
Process D<br />
Process E<br />
SNXT(09) LR 0000<br />
SNXT(09) LR 0002<br />
STEP(08) LR 0000<br />
SNXT(09) LR 0001<br />
STEP(08) LR 0001<br />
LR 0003<br />
SNXT(09) LR 0004<br />
STEP(08) LR 0002<br />
SNXT(09) LR 0003<br />
STEP(08) LR 0003<br />
STEP(08) LR 0004<br />
SNXT(09) LR 0005<br />
STEP(08)<br />
Process A started.<br />
Process C started.<br />
Process A reset.<br />
Process B started.<br />
Used to<br />
turn off<br />
process D.<br />
Process E started.<br />
Process C reset.<br />
Process D started.<br />
Process E reset.<br />
Section 5-19
Address Instruction Oper<strong>and</strong>s Address Instruction Oper<strong>and</strong>s<br />
00000 LD 00001<br />
00001 SNXT(09) LR 0000<br />
00002 SNXT(09) LR 0002<br />
00003 STEP(08) LR 0000<br />
Process A<br />
00100 LD 00002<br />
00101 SNXT(09) LR 0001<br />
00102 STEP(08) LR 0001<br />
Process B<br />
00100 LD 01101<br />
00101 OUT LR 0003<br />
00101 AND 00004<br />
00101 SNXT(09) LR 0004<br />
5-20 Special Instructions<br />
00102 STEP(08) LR 0002<br />
Process C<br />
00200 LD 00003<br />
00201 SNXT(09) LR 0003<br />
00202 STEP(08) LR 0003<br />
Process D<br />
00300 STEP(08) LR 0004<br />
Process E<br />
00400 LD 00005<br />
00401 SNXT(09) LR 0005<br />
00402 STEP(08) ---<br />
The instructions in this section are used for various operations, including programming<br />
user error codes <strong>and</strong> messages, counting ON bits, setting the<br />
watchdog timer, <strong>and</strong> refreshing I/O during program execution.<br />
5-20-1 FAILURE ALARM -- FAL(06) <strong>and</strong><br />
SEVERE FAILURE ALARM -- FALS(07)<br />
Description<br />
FAL(06) N<br />
Ladder Symbols Definer Data Areas<br />
FALS(07) N<br />
@FAL(06) N<br />
N: FAL number<br />
# (00 to 99)<br />
N: FAL number<br />
# (01 to 99)<br />
FAL(06) <strong>and</strong> FALS(07) are provided so that the programmer can output error<br />
numbers for use in operation, maintenance, <strong>and</strong> debugging. When executed<br />
with an ON execution condition, either of these instruction will output a FAL<br />
number to bits 00 to 07 of SR 253. The FAL number that is output can be<br />
between 01 <strong>and</strong> 99 <strong>and</strong> is input as the definer for FAL(06) or FALS(07).<br />
FAL(06) with a definer of 00 is used to reset this area (see below).<br />
FAL Area<br />
25307 25300<br />
X10 1 X10 0<br />
Section 5-20<br />
"
Resetting Errors<br />
5-20-2 CYCLE TIME -- SCAN(18)<br />
",<br />
When FAL(06) is executed with an ON execution condition, the warning indicator<br />
on the front of the CPU will light, but PC operation will continue. When<br />
FALS(07) is executed with an ON execution condition, the alarm indicator will<br />
light <strong>and</strong> PC operation will stop.<br />
The system also generates error codes to the FAL area.<br />
A maximum of three FAL error codes will be retained in memory, although<br />
only one of these is available in the FAL area. To access the other FAL<br />
codes, reset the FAL area by executing FAL(06) 00. Each time FAL(06) 00 is<br />
executed, another FAL error will be moved to the FAL area, clearing the one<br />
that is already there.<br />
FAL(06) 00 is also used to clear messages programmed with the instruction,<br />
MSG(46).<br />
If the FAL area cannot be cleared, as is generally the case when FALS(07) is<br />
executed, first remove the cause of the error <strong>and</strong> then clear the FAL area<br />
through the Programming Console (see 7-1 Displaying <strong>and</strong> Clearing Error<br />
Messages).<br />
SCAN(18)<br />
Mi<br />
---<br />
---<br />
Ladder Symbols<br />
@SCAN(18)<br />
Limitations Only the rightmost three digits of Mi are used.<br />
Mi<br />
---<br />
---<br />
Oper<strong>and</strong> Data Areas<br />
Mi: Multiplier (BCD)<br />
IR, AR, DM, HR, TC, LR, #<br />
---: Not used.<br />
---: Not used.<br />
Section 5-20<br />
Description SCAN(18) is used to set a minimum cycle time. Mi is the minimum cycle time<br />
that will be set in tenths of milliseconds, e.g., if Mi is 0120, the minimum cycle<br />
time will be 12.0 ms. The possible setting range is from 0 to 999.9 milliseconds.<br />
If the actual cycle time is less than the cycle time set with SCAN(18) the CPU<br />
will wait until the designated time has elapsed before starting the next cycle.<br />
If the actual cycle time is greater than the set time, the set time will be ignored<br />
<strong>and</strong> the program will be executed to completion.<br />
Flags ER: Indirectly addressed DM word is non-existent. (Content of �DM word<br />
is not BCD, or the DM area boundary has been exceeded.)
5-20-3 DISPLAY MESSAGE -- MSG(46)<br />
Description<br />
Message Buffering <strong>and</strong><br />
Priority<br />
Clearing Messages<br />
MSG(46)<br />
FM<br />
Ladder Symbols Oper<strong>and</strong> Data Areas<br />
@MSG(46)<br />
FM<br />
FM: First message word<br />
IR, AR, DM, HR, LR<br />
When executed with an ON execution condition, MSG(46) reads eight words<br />
of extended ASCII code from FM to FM+7 <strong>and</strong> displays the message on the<br />
Programming Console or on the GPC. The displayed message can be up to<br />
16 characters long, i.e., each ASCII character code requires eight bits (two<br />
digits). Refer to Appendix I for the extended ASCII codes. Japanese katakana<br />
characters are included in this code.<br />
If not all eight words are required for the message, it can be stopped at any<br />
point by inputting “OD.” When OD is encountered in a message, no more<br />
words will be read <strong>and</strong> the words that normally would be used for the message<br />
can be used for other purposes.<br />
Note If different messages are being used, some characters from longer messages<br />
will remain on the display when a shorter message is output. Input<br />
spaces after shorter messages so that the messages are the same length<br />
<strong>and</strong> all of the characters of the longer messages will be overwritten.<br />
Up to three messages can be buffered in memory. Once stored in the buffer,<br />
they are displayed on a first in, first out basis. Since it is possible that more<br />
than three MSG(46)s may be executed within a single cycle, there is a priority<br />
scheme, based on the area where the messages are stored, for the selection<br />
of those messages to be buffered.<br />
The priority of the data areas is as follows for message display:<br />
LR > IR (I/O) > IR (not I/O) > HR > AR > DM<br />
Section 5-20<br />
In h<strong>and</strong>ling messages from the same area, those with the lowest address<br />
values have higher priority.<br />
In h<strong>and</strong>ling indirectly addressed messages (i.e. �DM), those with the lowest<br />
DM address values have higher priority.<br />
To clear a message, execute FAL(06) 00 or clear it via a Programming Console<br />
using the procedure in 7-1 Displaying <strong>and</strong> Clearing Error Messages.<br />
If the message data changes while the message is being displayed, the display<br />
will also change.<br />
Flags ER: Indirectly addressed DM word is non-existent. (Content of �DM word<br />
is not BCD, or the DM area boundary has been exceeded.)<br />
""
Example<br />
44<br />
00000<br />
00001<br />
DM contents ASCII<br />
equivalent<br />
DM 0010 4 1 4 2 A B<br />
DM 0011 4 3 4 4 C D<br />
DM 0012 4 5 4 6 E F<br />
DM 0013 4 7 4 8 G H<br />
DM 0014 4 9 4 A I J<br />
DM 0015 4 B 4 C K L<br />
DM 0016 4 D 4 E M N<br />
DM 0017 4 F 5 0 O P<br />
The following example shows the display that would be produced for the instruction<br />
<strong>and</strong> data given when 00000 was ON. If 00001 goes ON, a message<br />
will be cleared.<br />
MSG(46)<br />
DM 0010<br />
FAL(06) 00<br />
5-20-4 LONG MESSAGE -- LMSG(47)<br />
LMSG(47)<br />
S<br />
D<br />
---<br />
Ladder Symbols<br />
@LMSG(47)<br />
S<br />
D<br />
---<br />
Address Instruction Oper<strong>and</strong>s<br />
00000 LD 00000<br />
00001 MSG(46)<br />
DM 0010<br />
00002 LD 00001<br />
00003 FAL(06) 00<br />
���<br />
����������������<br />
Oper<strong>and</strong> Data Areas<br />
S: First source word (ASCII)<br />
IR, AR, DM, HR, LR<br />
D: Destination<br />
(000, 001, or 002)<br />
---: Not used.<br />
Section 5-20<br />
Limitations A maximum of 32 characters are permitted. S through S+15 must be in the<br />
same data area <strong>and</strong> must be in ASCII code. The message data string is terminated<br />
with a null character (00) placed in the S <strong>and</strong> S+15 range. The last<br />
character before the null character must always be the ASCII code for a carriage<br />
return (0D).<br />
Description LMSG(47) is used to output from 1 to 32 ASCII characters through either the<br />
Programming Console or the built-in RS-232C port. The message to be output<br />
must be in ASCII beginning in S <strong>and</strong> ending in S+15. The last character<br />
in the message must be the ASCII code for a carriage return (0D) or the<br />
message will not be sent. If a message shorter than 32 characters is desired,<br />
placing a null character (00) after the carriage return (0D) will truncate the<br />
message at that point. No characters after the null character will be output.<br />
The destination of the message is designated in D. (Note that D appears to<br />
be a word number address. However in this case it is not.) Provided that the<br />
Programming Console is set to the TERMINAL mode (refer to 4-4-1 TERMI-<br />
NAL <strong>and</strong> CONSOLE Mode for details), if D is 000, the output will be to the
Programming Console. Provided that the System Parameter for the RS-232C<br />
port has been set to ASCII I/O mode (refer to 3-8-2 System DM <strong>and</strong> 3-5-11<br />
System Comm<strong>and</strong> Bits), if D is 001, the output will be from the leftmost byte<br />
through the serial port. If D is 002, the output will be from the rightmost byte<br />
through the serial port. If neither TERMINAL nor ASCII mode is set, the instruction<br />
will still execute but no message data will appear.<br />
When D is 001 or 002 all valid ASCII characters can be sent through the serial<br />
port. Refer to Appendix I for ASCII codes.<br />
Flags ER: S <strong>and</strong> S+15 are not in the same data area.<br />
Indirectly addressed DM word is non-existent. (Content of �DM word<br />
is not BCD, or the DM area boundary has been exceeded.)<br />
The communications buffer of the RS-232C interface is being used<br />
by another instruction.<br />
Example The following example shows the display that would be produced for the instruction<br />
<strong>and</strong> data given when 00000 was ON with the Programming Console<br />
in TERMINAL mode. In TERMINAL mode the screen is cleared by sending<br />
two consecutive carriage return (0D) codes.<br />
00000<br />
DM contents ASCII<br />
equivalent<br />
DM 0000 4 1 4 2 A B<br />
DM 0001 4 3 4 4 C D<br />
DM 0002 4 5 4 6 E F<br />
DM 0003 4 7 4 8 G H<br />
DM 0004 4 9 4 A I J<br />
DM 0005 4 B 4 C K L<br />
DM 0006 4 D 4 E M N<br />
DM 0007 4 F 5 0 O P<br />
DM 0008 5 1 5 2 Q R<br />
DM 0009 5 3 5 4 S T<br />
DM 0010 5 5 5 6 U V<br />
DM 0011 0 D 0 0 CR 0<br />
LMSG(47)<br />
DM 0000<br />
000<br />
000<br />
Address Instruction Oper<strong>and</strong>s<br />
00000 LD 00000<br />
00001 LMSG(47)<br />
DM 0000<br />
000<br />
000<br />
����������������<br />
������<br />
Section 5-20<br />
4
5-20-5 SET SYSTEM -- SYS(49)<br />
4<br />
SYS(49)<br />
P<br />
---<br />
---<br />
Ladder Symbols<br />
@SYS(49)<br />
Limitations Only specific values are valid for P (see below).<br />
Description<br />
P<br />
---<br />
---<br />
Oper<strong>and</strong> Data Areas<br />
P: Parameters<br />
#<br />
---: Not used.<br />
---: Not used.<br />
SYS(49) has two functions; it can be used for bit control of certain operating<br />
parameters, or to execute the same system comm<strong>and</strong>s that are possible<br />
from the AR area. The contents bits 08 to 15 of P determine which function<br />
SYS(49) will have.<br />
Bit Control If bits 08 to 15 of P contain A3, SYS(49) is used to set system operating parameters.<br />
To be effective, it must be programmed at program address 00001<br />
with LD AR 1001 at program address 00000.<br />
15 14 13 12 11 10 9 8<br />
1 0 1 0 0 0 1 1<br />
A 3<br />
7 6 5 4 3 2 1 0<br />
1 1 0 0 0 0 0 1<br />
Enables the Forced Status<br />
Hold Bit (SR 25211).<br />
Enables the I/O Status<br />
Hold Bit (SR 25212).<br />
Section 5-20<br />
Excludes battery<br />
check from system<br />
error checks.<br />
Only bits 00, 06, <strong>and</strong> 07 are used. If bit 00 is 1, the battery check will be excluded<br />
from system error checks when PC power is turned ON. If bit 06 is 1,<br />
the Forced Status Hold Bit (SR 25211) will be turned ON. If bit 07 is 1, the I/O<br />
Status Hold Bit (SR 25212) will ensure that I/O bit status is maintained when<br />
PC power is turned ON.
System Comm<strong>and</strong>s If bits 08 to 15 of P contain 00, the system comm<strong>and</strong> indicated by the comm<strong>and</strong><br />
code in bits 00 to 07 will be executed. As shown in the following table.<br />
Comm<strong>and</strong><br />
code<br />
Name Meaning<br />
01 Parameter set The contents of the Parameter Area (DM 0900<br />
to DM 0929) are set into the system, the value of<br />
each parameter is checked for validity, all invalid<br />
values are replaced with the default values, <strong>and</strong><br />
a checksum is generated.<br />
02 Parameter backup The contents of the Parameter Area (DM 0900<br />
to DM 0929) is transferred to the Parameter<br />
Backup Area (DM 1900 to 1929), a checksum is<br />
generated, the data in the Parameter Backup<br />
Area is enabled, <strong>and</strong> AR 1314 (System<br />
Parameter Backup Flag) is turned ON. Because<br />
the Parameter Backup Area is contained in the<br />
Memory Unit, parameter backup will not be<br />
possible if the Memory Unit is write-protected or<br />
EPROM.<br />
03 Backup disable The data contained in the Parameter Backup<br />
Area is disabled <strong>and</strong> AR 1314 (System<br />
Parameter Backup Flag) is turned OFF.<br />
04 Parameter clear All words in the Parameter Area (DM 0900 to<br />
DM 0929) are turned OFF (i.e., set to zero).<br />
05 General parameter<br />
set<br />
06 High-speed counter<br />
parameter set<br />
07 RS-232C<br />
parameter set<br />
Works in the same way as 01, but only DM 0900<br />
to DM 0905 are set.<br />
Works in the same way as 01, but only DM 0905<br />
to DM 0919 are set.<br />
Works in the same way as 01, but only DM 0920<br />
to DM 0929 are set.<br />
Flags ER: When bits 08 to 15 of P contain 00, bits 00 to 07 do not contain a<br />
valid comm<strong>and</strong> code (00 to 07).<br />
Example The following example shows how to change the RS-232C port from factoryset<br />
mode to ASCII output mode.<br />
00000<br />
MOV(21)<br />
#0200<br />
DM 0920<br />
SYS(49)<br />
#0007<br />
000<br />
000<br />
Section 5-20<br />
Address Instruction Oper<strong>and</strong>s<br />
00000 LD 00000<br />
00001 MOV(21)<br />
# 0200<br />
DM 0920<br />
00002 SYS(49)<br />
# 0007<br />
000<br />
000<br />
4
5-20-6 KEY INPUT -- KEY(62)<br />
4#<br />
KEY(62)<br />
S<br />
---<br />
---<br />
Ladder Symbols<br />
@KEY(62)<br />
S<br />
---<br />
---<br />
Oper<strong>and</strong> Data Areas<br />
S: First source word (key codes)<br />
IR, AR, DM, HR, LR<br />
---: Not used.<br />
---: Not used.<br />
Limitations S <strong>and</strong> S+15 must be in the same data area <strong>and</strong> must contain key codes. SR<br />
25503 must be OFF <strong>and</strong> a Programming Console must be mounted.<br />
Description KEY(62) is used to perform Programming Console operations from within the<br />
program. S designates the first word containing a key code. When KEY(62) is<br />
executed with an ON execution condition, the key codes will produce the<br />
same effect as pressing the equivalent Programming Console keys.<br />
Key codes are executed from bits 08 to 15 first, then 00 to 07, then 08 to 15<br />
of the next word, <strong>and</strong> so on. The key code string can be up to 16 words (i.e.,<br />
32 key equivalents) in length, but can be ended at any point by inputting a<br />
null code (00).<br />
The Programming Console display can be reset to the initial display by inputting<br />
the reset code, 40.<br />
Key codes are provided in Appendix J.<br />
Flags ER: The key code string is not within the same data area.<br />
A Programming Console is not attached.<br />
Indirectly addressed DM word is non-existent. (Content of �DM word<br />
is not BCD, or the DM area boundary has been exceeded.)<br />
Example When IR 00000 is ON, the following instruction would produce the key sequence<br />
shown for the contents given below for the oper<strong>and</strong> words. When this<br />
instruction is executed, the ‘key sequence will display the current time of timer<br />
TIM 511 onto the Peripheral Device (e.g., Programming Console or Data<br />
Access Console).<br />
00000<br />
08--15 00--07<br />
DM 1000 0B 2B<br />
DM 1001 1C 15<br />
DM 1002 15 1A<br />
DM 1003 00<br />
KEY(62)<br />
DM 1000<br />
000<br />
000<br />
Section 5-20<br />
Address Instruction Oper<strong>and</strong>s<br />
00000 LD NOT 00000<br />
00001 KEY(62)<br />
DM 1000<br />
000<br />
000
5-20-7 RS-232C PORT OUTPUT -- POUT(63)<br />
POUT(63)<br />
S<br />
C<br />
B<br />
Ladder Symbols<br />
@POUT(63)<br />
S<br />
C<br />
B<br />
Oper<strong>and</strong> Data Areas<br />
S: Source beginning word<br />
IR, AR, DM, HR, TC, LR<br />
C: Control number<br />
# (0000 or 0001)<br />
B: Number of bytes<br />
IR, AR, DM, HR, TC, LR, #<br />
Limitations S through S+(B÷2)--1 must be within the same data area. C must be either<br />
#0000 or #0001. B must be BCD between 0000 <strong>and</strong> 0200.<br />
The RS-232C Mode in DM 0920 must be set to ASCII I/O mode.<br />
Description When the execution condition is OFF, POUT(63) is not executed. When the<br />
execution condition is ON, POUT(63) outputs the B bytes of data in S to<br />
S+(B÷2)--1 through the RS-232C port. The control number, C, determines<br />
whether the leftmost (C=#0000) or rightmost (C=#0001) bytes in the words<br />
will be output first. Refer to Section 8 RS-232C Interface for details on the<br />
operation of the interface.<br />
Start <strong>and</strong> End Codes Bits 08 to 15 of DM 0925 specify whether or not there is a start code. If the<br />
content of these bits is 01, the start code (contained in DM 0925 bits 00 to<br />
07) will be output before the data. If the content of bits 08 to 15 of DM 0925 is<br />
00, the start code won’t be output.<br />
Likewise, bits 08 to 15 of DM 0926 specify whether or not there is an end<br />
code. If the content of these bits is 01, the end code (contained in DM 0926<br />
bits 00 to 07) will be output after the data. If the content of bits 08 to 15 of<br />
DM 0926 is 00, the end code won’t be output.<br />
Communications Enable<br />
Flag<br />
POUT(63) will not be executed unless the Communications Enable Flag<br />
(AR 0415) is ON. This flag will be ON if the RS-232C Mode in DM 0920 is set<br />
to ASCII I/O mode <strong>and</strong> the communications buffer is empty. If AR 0415 is<br />
OFF because the communications buffer is being used by LMSG(47) or<br />
another POUT(63) instruction, it will be turned ON again when the buffer is<br />
empty.<br />
Precautions When the RS-232C is set to ASCII I/O mode in DM 0920, communications<br />
are half duplex, so data cannot be received while POUT(63) is being executed<br />
<strong>and</strong> the reception buffer will be cleared when execution of POUT(63)<br />
is completed.<br />
Do not use the same code for both the start <strong>and</strong> end codes.<br />
Flags ER: S <strong>and</strong> S+(B÷2)--1 aren’t in the same data area.<br />
The POUT(63) instruction was executed while a LMSG(47) or<br />
POUT(63) instruction was being executed.<br />
The RS-232C interface is not set to ASCII I/O mode.<br />
Section 5-20<br />
Indirectly addressed DM word is non-existent. (Content of �DM word<br />
is not BCD, or the DM area boundary has been exceeded.)<br />
4'
Example 1<br />
AR 0415<br />
4(<br />
00000<br />
Example 2<br />
When AR 0415 <strong>and</strong> 00000 are ON, the following program outputs the 46<br />
characters of ASCII data in DM 0010 to DM 0032 through the RS-232C interface.<br />
@POUT(63)<br />
DM 0010<br />
#0000<br />
#0046<br />
Address Instruction Oper<strong>and</strong>s<br />
00000 LD AR 0415<br />
00001 AND 00000<br />
00002 @POUT(63)<br />
DM 0010<br />
# 0000<br />
# 0046<br />
When more than one POUT(63) instruction is used in a program (to transmit<br />
more than 200 bytes of data, for example), it is necessary to write the program<br />
so that the instructions are executed consecutively. In this example, two<br />
POUT(63) instructions are used.<br />
00000 AR 0415 C<br />
A<br />
B<br />
C<br />
@POUT(63)<br />
@POUT(63)<br />
S<br />
A<br />
B<br />
KEEP(11)<br />
C<br />
Example 3: Communication with an ID Controller<br />
The POUT(63) instruction can be used to transmit comm<strong>and</strong>s <strong>and</strong> data to an<br />
ID Controller. The OMRON products used in this example are listed below.<br />
Name Model number<br />
ID Controller V620-CA1A<br />
Read/Write Head V620-H01<br />
Data Carrier V620-D2KR01<br />
Monitor Unit V600-P01<br />
R<br />
Section 5-20
Setting Communications<br />
Parameters<br />
The PC is connected to the ID Controller with a 9-pin to 25-pin serial cable.<br />
(The PC has a 9-pin RS-232C interface <strong>and</strong> the ID Controller has a 25-pin<br />
RS-232C interface.) The following diagram shows the pin assignments <strong>and</strong><br />
cable connections.<br />
Pin Signal Signal Pin<br />
1<br />
2<br />
3<br />
4<br />
5<br />
6<br />
7<br />
8<br />
9<br />
FG<br />
SD<br />
RD<br />
RS<br />
CS<br />
5V<br />
SG<br />
--<br />
--<br />
FG<br />
SD<br />
RD<br />
RS<br />
CS<br />
DSR<br />
SG<br />
to<br />
--<br />
1<br />
2<br />
3<br />
4<br />
5<br />
6<br />
7<br />
to<br />
25<br />
Section 5-20<br />
After establishing the physical connection between the PC <strong>and</strong> ID Controller,<br />
it is necessary to set the communications parameters. Set the communications<br />
parameters of the PC in the DM Area as shown below.<br />
Word Setting<br />
DM 0920 (DM 1920) 0201 (ASCII I/O mode)<br />
DM 0921 (DM 1921) 0205 (9,600 bps, 8 data bits, 1 stop bit, no parity)<br />
DM 0922 (DM 1922) 0000 (no transmission delay, no RTS/CTS control)<br />
DM 0926 (DM 1926) 010D (end code = 0D)<br />
Set the communications parameters of the ID Controller with the DIP switch<br />
on the front of the Controller. Set the parameters for 9,600 bps, 1 start bit,<br />
1 stop bit, 8 data bits, <strong>and</strong> no parity. Refer to the ID Controller’s System Manual<br />
for details.<br />
4
Setting Data for<br />
Transmission<br />
System Configuration<br />
4,<br />
The data to be transmitted to the ID Controller is set in the PC’s memory. In<br />
this example, the data <strong>and</strong> comm<strong>and</strong>s are set in the DM area as shown below.<br />
Refer to Appendix I for the extended ASCII table.<br />
DM0000 5 7 5 4 “WT” Write comm<strong>and</strong> header<br />
DM0001 4 1 3 1 “AI” ASCII code, R/W Head 1<br />
DM0002 3 0 3 0 “00”<br />
DM0003 3 0 3 6 “06”<br />
Beginning address (0006)<br />
DM0004 0 0 0 0 Data to be written<br />
DM0005 2 A 0 0 “� ”<br />
DM0200 5 2 4 4 “RD” Read comm<strong>and</strong> header<br />
DM0201 4 1 3 1 “AI” ASCII code, R/W Head 1<br />
DM0202 3 0 3 0 “00”<br />
DM0203 3 0 3 6 “06”<br />
Beginning address (0006)<br />
DM0204 3 0 3 2 “02” Number of bytes to be read<br />
DM0205 2 A 0 0 “� ”<br />
DM0400 4 3 5 5 “CU” Programming Console* display data<br />
DM0401 5 2 5 2 “RR”<br />
DM0402 4 5 4 E “EN”<br />
DM0403 5 4 2 0 “T ”<br />
DM0404 4 4 4 1 “DA”<br />
DM0405 5 4 4 1 “TA”<br />
DM0406 3 A 2 0 “ : ”<br />
DM0407<br />
DM0100<br />
0 0 0 0<br />
DM0101<br />
DM0102<br />
DM0300<br />
DM0301<br />
Write comm<strong>and</strong> response<br />
DM0302<br />
DM0303<br />
Read comm<strong>and</strong> response<br />
Note *Use the Programming Console in TERMINAL mode.<br />
100 VAC<br />
Data Carrier<br />
R/W Head 1<br />
DC Power Supply<br />
24 VDC<br />
V620 ID Controller<br />
<strong>Mini</strong> H-<strong>type</strong> PC<br />
RS-232C<br />
RS-232C<br />
Programming Console<br />
Section 5-20<br />
100 VAC
Sample Ladder Program<br />
4000 4104<br />
4100<br />
AR 415<br />
4101 4102<br />
4101 AR 414<br />
4102 4103<br />
4102 AR 415<br />
4103 4104<br />
TR 0<br />
25506<br />
DIFU(13) 4100<br />
@POUT(63)<br />
DM 000<br />
#0000<br />
#0011<br />
4101<br />
@PIN(64)<br />
DM 100<br />
#0000<br />
#0005<br />
CMP(20)<br />
FALS(07)<br />
#3030<br />
DM 101<br />
4102<br />
4103<br />
01<br />
@POUT(63)<br />
DM 200<br />
#0000<br />
#0011<br />
4103 AR 414<br />
TR 0<br />
25506<br />
25506<br />
Section 5-20<br />
@PIN(64)<br />
DM 300<br />
#0000<br />
#0007<br />
CMP(20)<br />
FALS(07)<br />
DM 004<br />
DM 302<br />
4104<br />
02<br />
@ASC(86)<br />
DM 004<br />
#0012<br />
DM 406<br />
@ASC(86)<br />
DM 004<br />
#0010<br />
DM 407<br />
LMSG(47)<br />
DM 400<br />
000<br />
@INC(38)<br />
DM 004<br />
@MOV(21)<br />
DM 004<br />
002<br />
END(01)<br />
4"
Example 4: Communications between <strong>Mini</strong> H-<strong>type</strong> <strong>PCs</strong><br />
In this example, the POUT(63) <strong>and</strong> PIN(64) instructions are used to transfer<br />
data between two <strong>PCs</strong>. The <strong>PCs</strong> are connected with a 25-pin to 25-pin serial<br />
cable. Refer to 5-20-8 RS-232C PORT INPUT - PIN(64) for details on<br />
PIN(64). The following diagram shows the pin assignments <strong>and</strong> cable connections.<br />
Setting Communications<br />
Parameters<br />
4<br />
PC #1 PC #2<br />
Pin Signal Signal Pin<br />
1<br />
2<br />
3<br />
4<br />
5<br />
6<br />
7<br />
8<br />
9<br />
FG<br />
SD<br />
RD<br />
RS<br />
CS<br />
5V<br />
SG<br />
--<br />
--<br />
FG<br />
SD<br />
RD<br />
RS<br />
CS<br />
DSR<br />
SG<br />
--<br />
--<br />
Set the communications parameters of the <strong>PCs</strong> as shown below.<br />
Word Setting<br />
DM 0920 (DM 1920) 0200 (ASCII I/O mode, st<strong>and</strong>ard settings)<br />
DM 0926 (DM 1926) 010D (end code = 0D)<br />
Data Link Program The following ladder programs are used to change the content of a DM address<br />
in PC #1 to agree with the corresponding DM address in PC #2.<br />
1<br />
2<br />
3<br />
4<br />
5<br />
6<br />
7<br />
8<br />
9<br />
Section 5-20<br />
To accomplish this, the DM address is transmitted from PC #1 to PC #2, the<br />
content of the transmitted DM address is read in PC #2 <strong>and</strong> transmitted back<br />
to PC#1, <strong>and</strong> the content of the corresponding DM address in PC #1 is then<br />
changed to agree with the content of that address in PC #2.
The program below is written in PC #1.<br />
25315<br />
00001<br />
05001 AR 0415<br />
0001 AR 0414<br />
PIN(64)<br />
100<br />
#0000<br />
AR 06<br />
MOV(21)<br />
#0100<br />
DM 0000<br />
DIFU(13)<br />
ASC(86)<br />
POUT(63)<br />
PIN(64)<br />
05001<br />
DM 0000<br />
#0030<br />
010<br />
010<br />
#0000<br />
#0004<br />
100<br />
#0000<br />
AR 06<br />
HEX(69)<br />
100<br />
#0030<br />
�DM 0000<br />
END(01)<br />
Section 5-20<br />
Clears the<br />
communications buffer<br />
(dummy input).<br />
Sets the DM address<br />
(0100) in DM 0000.<br />
Converts the<br />
transmission data to<br />
ASCII code <strong>and</strong> outputs<br />
the result to IR 010 <strong>and</strong><br />
IR 011.<br />
Transmits the address<br />
(in ASCII code) to<br />
PC #2.<br />
Places data received<br />
from PC #2 in IR 100<br />
<strong>and</strong> IR 101.<br />
Converts the received<br />
data from ASCII code<br />
to hexadecimal <strong>and</strong><br />
outputs the result to the<br />
same DM address.
The program below is written in PC #2.<br />
25315<br />
AR 0414<br />
PIN(64)<br />
PIN(64)<br />
HEX(69)<br />
100<br />
#0000<br />
AR 06<br />
100<br />
#0000<br />
AR 06<br />
100<br />
#0030<br />
DM 0000<br />
ASC(86)<br />
�DM 0000<br />
#0030<br />
010<br />
POUT(63)<br />
END(01)<br />
010<br />
#0000<br />
#0004<br />
Clears the<br />
communications buffer<br />
(dummy input).<br />
Places the DM address<br />
received from PC #1 (in<br />
ASCII code) in IR 100<br />
<strong>and</strong> IR 101.<br />
Converts the received<br />
DM address from<br />
ASCII code to<br />
hexadecimal <strong>and</strong><br />
outputs the result to<br />
DM 0000.<br />
Converts the content of<br />
the specified DM<br />
address to ASCII code<br />
<strong>and</strong> outputs the result<br />
to IR 010 <strong>and</strong> IR 011.<br />
Transmits the contents<br />
of the specified DM<br />
address (in ASCII<br />
code) to PC #1.<br />
Example 4: Communications through a Modem<br />
In this example, the POUT(63) <strong>and</strong> PIN(64) instructions are used to transfer<br />
data to <strong>and</strong> from a modem. The PC is connected to the modem with a 9-pin<br />
to 25-pin serial cable. The modem used in this example is the OMRON<br />
MD24FP5V Intelligent Modem. Refer to 5-20-8 RS-232C PORT INPUT -<br />
PIN(64) for details on PIN(64). The following diagram shows the pin assignments<br />
<strong>and</strong> cable connections.<br />
C��H<br />
Pin<br />
no.<br />
1<br />
2<br />
3<br />
4<br />
5<br />
6<br />
7<br />
8<br />
9<br />
Modem<br />
Abbr. Abbr. Pin<br />
no.<br />
FG<br />
FG 1<br />
SD<br />
SD 2<br />
RD<br />
RD 3<br />
RS<br />
RS 4<br />
CS<br />
CS 5<br />
SV<br />
DSR 6<br />
SG<br />
SG 7<br />
--<br />
to to<br />
--<br />
-- 25<br />
Section 5-20
Cables <strong>and</strong> Connectors<br />
The following cables <strong>and</strong> connectors are recommended for this example.<br />
Cable<br />
CO-MA-VV-SB 5PX28AWG (Hitachi)<br />
Connectors<br />
<strong>Mini</strong> H-<strong>type</strong> PC Hood: XM2A-0901 (OMRON)<br />
Plug: XM2S-0911 (OMRON)<br />
Modem Hood: XM2D-2501 (OMRON)<br />
Plug: XM2S-2511 (OMRON)<br />
Bracket: XM2Z-0001 (OMRON)<br />
Modem Settings Place the following settings into the modem’s memory. Refer to the modem’s<br />
operation manual for details.<br />
Item Setting<br />
ER (DTR) signal ER signal is ignored. Set to to remain ON. (Not supported<br />
by PC.)<br />
Comm<strong>and</strong> echo None<br />
Result code Set to use as a numeric parameter.<br />
S register S2 = 13 (carriage return) Although S2 is set to a carriage<br />
return, you may have difficulties in operation if the carriage<br />
return is also set to be treated as a character, e.g., when<br />
using the fall-back character feature.<br />
Breaking Communications The following procedure is used to break the communications line. This procedure<br />
is necessary because the PC does not support an ER signal.<br />
Communications<br />
Communications<br />
stopped for 1 s<br />
or longer<br />
Escape processing<br />
(carriage returns sent)<br />
Enters comm<strong>and</strong> mode<br />
Communications<br />
stopped for 1 s<br />
or longer<br />
ATH executed<br />
Line broken<br />
Line break AT comm<strong>and</strong><br />
Communications Procedures The following procedures are used for transmission <strong>and</strong> reception. In either<br />
case, NCU must be set to AA in the modem.<br />
Setting Communications<br />
Parameters<br />
Transmission The phone number is output <strong>and</strong> then data is output after connection<br />
of the communications line has been confirmed. A response of “1” is<br />
returned to the PC when the line has been connected.<br />
Reception When a request is received, connection of the communications<br />
line is confirmed <strong>and</strong> data is received. A response of “2” is is returned to the<br />
PC as a request for reception <strong>and</strong> a response of “1” is returned to the PC<br />
when the line has been connected.<br />
Set the communications parameters of the <strong>PCs</strong> as shown below.<br />
Word Setting<br />
DM 0920 (DM 1920) 0201 (ASCII I/O mode)<br />
DM 0921 (DM 1921) 0203 (2,400 bps, 8 data bits, 1 stop bit, no parity)<br />
DM 0922 (DM 1922) 0000 (no transmission delay, no RTS/CTS control)<br />
DM 0926 (DM 1926) 010D (end code = 0D)<br />
Section 5-20
#<br />
The following data is set in data memory.<br />
Word Setting<br />
DM 0200 ODOD (��)<br />
DM 0210 4154 (AT)<br />
DM 0211 4800 (H “null”)<br />
DM 0220 4154 (AT)<br />
DM 0221 4450 (DP)<br />
DM 0222 to DM 0206 Phone number (in ASCII)<br />
Data Link Program The following ladder program is used to transmit data from the PC through<br />
the modem.<br />
00000<br />
00000 12803 02001<br />
02000<br />
02000<br />
05000 AR 0415<br />
02000 AR 0414<br />
25506 (***)<br />
@PIN(64))<br />
100<br />
#0000<br />
AR 06<br />
@MOV(21)<br />
#0001<br />
DM 0000<br />
02000<br />
DIFU(13) 05000<br />
PIN(64))<br />
PIN(64))<br />
DM 0220<br />
#0000<br />
#0014<br />
DM 0300<br />
#0000<br />
AR 06<br />
12803<br />
ANDW(34)<br />
DM 0300<br />
#FF00<br />
DM 0310<br />
CMP(20)<br />
DM 0310<br />
#3100<br />
12800<br />
Clears reception buffer.<br />
Initializes reception buffer.<br />
Beginning of communications line connection<br />
Outputs phone number<br />
“ATDP�����������”<br />
Dial<br />
Carriage return code<br />
Phone number<br />
Received connection completer response<br />
Confirms connection<br />
Checks response code<br />
Ends connections<br />
Section 5-20
12800 02002<br />
02001<br />
02001<br />
05001 AR 0415<br />
02001 AR 0414<br />
12801 02003<br />
02002<br />
02002<br />
TIM 010<br />
05002<br />
AR 0415<br />
TIM 012 AR 0415<br />
02001<br />
DIFU(13) 05001<br />
ASC(86)<br />
POUT(63))<br />
PIN(64))<br />
HEX(69)<br />
DM 0000<br />
#0300<br />
010<br />
010<br />
#0000<br />
#0004<br />
100<br />
#0000<br />
AR 06<br />
100<br />
#0030<br />
DM 0010<br />
12001<br />
02002<br />
TIM<br />
010<br />
DIFU(13) 05002<br />
TIM<br />
012<br />
POUT(63)<br />
DM 0200<br />
#0000<br />
#0002<br />
POUT(63))<br />
DM 0210<br />
#0000<br />
#0003<br />
02003<br />
#0015<br />
#0015<br />
Converts transmission data to ASCII<br />
Transmits 4 bytes<br />
Reads received data<br />
Converts received data to hexadecimal<br />
Communications Completed Flag<br />
Stops communications for 1.5 s<br />
Stops communications for 1.5 s<br />
Outputs two carriage returns to switch modem<br />
to comm<strong>and</strong> mode (third carriage return<br />
provided by end code).<br />
Outputs comm<strong>and</strong> to break line (ATH)<br />
Section 5-20<br />
'
5-20-8 RS-232C PORT INPUT -- PIN(64)<br />
(<br />
PIN(64)<br />
D<br />
C<br />
B<br />
Ladder Symbols<br />
@PIN(64)<br />
D<br />
C<br />
B<br />
Oper<strong>and</strong> Data Areas<br />
D: Destination beginning word<br />
IR,SR,AR,DM,HR,TC,LR<br />
C: Control number<br />
# (0000 or 0001)<br />
B: Number of bytes<br />
IR, SR, AR, DM, HR, TC, LR, #<br />
Limitations D through D+(B÷2)--1 must be within the same data area. C must be either<br />
#0000 or #0001. B must be BCD between 0000 <strong>and</strong> 0200.<br />
Description<br />
When the execution condition is OFF, PIN(64) is not executed. When the<br />
execution condition is ON, PIN(64) writes B bytes of data received through<br />
the RS-232C port to words beginning at D. If fewer than B bytes have been<br />
received at the communications buffer, only those bytes received will be input.<br />
The control number, C, determines whether the leftmost (C=#0000) or<br />
rightmost (C=#0001) byte in the words was input first. Refer to Section 8<br />
RS-232C Interface for details on the operation of the interface. Refer to<br />
5-20-7 RS-232C PORT OUTPUT - POUT(63) for examples.<br />
RS-232C Bytes Input Area AR 08 contains the number of bytes of data (BCD) actually input to the PC by<br />
PIN(64). The number of bytes input will vary depending on conditions when<br />
the instruction is executed, as described below.<br />
1, 2, 3... 1. If the number of bytes to input (oper<strong>and</strong> B) is greater than or equal to the<br />
number of bytes received (content of AR 06), the number of bytes received<br />
will be input.<br />
2. If B is less than the content of AR 06, B bytes will be input.<br />
3. PIN(64) might be executed before the RS-232C Reception Completed Flag<br />
(AR 0414) is turned ON. In this case, the number of bytes received would<br />
equal the content of AR 06 just before execution. AR 06 would continue increasing<br />
as more data was received after execution.<br />
Start <strong>and</strong> End Codes Bits 08 to 15 of DM 0925 specify whether or not there is a start code. If the<br />
content of these bits is 01, data following the start code will be input. If the<br />
content of these bits is 00, all received data will be input.<br />
RS-232C Bytes Received<br />
Area<br />
Section 5-20<br />
Likewise, bits 08 to 15 of DM 0926 specify whether or not there is an end<br />
code. If the content of these bits is 01, data up to the end code will be input.<br />
If the content of bits 08 to 15 of DM 0926 is 00, data will be input until the<br />
reception buffer is full (200 bytes). If no end code is specified, data should be<br />
recorded as it arrives, before the reception buffer is full.<br />
The number of bytes of data received through the RS-232C port (excluding<br />
the start <strong>and</strong> end codes) is output to AR 06 every cycle. To input all of the<br />
data received, use AR 06 as the number of bytes oper<strong>and</strong>, B, when entering<br />
the instruction.
Reception Completed Flag The Reception Completion Flag (AR 0414) is turned ON when the end code<br />
is received or the reception buffer is full (200 bytes received). Data cannot be<br />
received while this flag is ON. AR 0414 is turned OFF after PIN(64) has been<br />
executed.<br />
Reception Impossible Flag The RS-232C Reception Impossible Flag (AR 0413) is turned ON when newly<br />
received data cannot be input. New data cannot be input if the previously received<br />
data has not yet been input by PIN(64), or an error occurred during the<br />
previous reception.<br />
RS-232C Communications<br />
Error Flag<br />
SR 25208 functions as the Communications Error Flag for both the RS-232C<br />
Interface <strong>and</strong> the CPU-mounting Host Link Unit. It is turned ON when an error<br />
(a parity, overrun, or framing error) occurs during reception. This flag can<br />
be can be turned OFF by toggling the RS-232C Restart Bit (SR 25209) or<br />
executing PIN(64) with the number of bytes, B, equal to zero. SR 25209 also<br />
functions as the Restart Bit for the CPU-mounting Host Link Unit.<br />
Flags ER: D <strong>and</strong> D+(B÷2)--1 aren’t in the same data area.<br />
The RS-232C interface is busy. (I.e., the RS-232C Transmission<br />
Possible Flag (AR 0415) is OFF.)<br />
The RS-232C interface is not set to ASCII I/O mode.<br />
Indirectly addressed DM word is non-existent. (Content of �DM word<br />
is not BCD, or the DM area boundary has been exceeded.)<br />
Example When AR 0414 <strong>and</strong> 00000 are ON, the following program inputs all of the<br />
characters received through the RS-232C interface (total number contained<br />
in AR 06) beginning at DM 0010.<br />
AR 0414<br />
00000<br />
In this case, the instruction is executed when the Reception Completed Flag<br />
(AR 0414) is ON, but the received data can also be input when AR 0414 is<br />
OFF, i.e., when the end code has not been received <strong>and</strong> the reception buffer<br />
is not full.<br />
@PIN(64)<br />
DM 0010<br />
#0000<br />
#0046<br />
Section 5-20<br />
Address Instruction Oper<strong>and</strong>s<br />
00000 LD AR 0415<br />
00001 AND 00000<br />
00002 @PIN(64)<br />
DM 0010<br />
# 0000<br />
AR 46
5-20-9 BIT COUNTER -- BCNT(67)<br />
,<br />
BCNT(67)<br />
N<br />
SB<br />
Ladder Symbols<br />
Limitations N cannot be 0.<br />
Description<br />
R<br />
@BCNT(67)<br />
N<br />
SB<br />
R<br />
Oper<strong>and</strong> Data Areas<br />
N: Number of words (BCD)<br />
IR, AR, DM, HR, TC, LR, #<br />
SB: Source beginning word<br />
IR,SR,AR,DM,HR,TC,LR<br />
R: Destination word<br />
IR, AR, DM, HR, TC, LR<br />
When the execution condition is OFF, BCNT(67) is not executed. When the<br />
execution condition is ON, BCNT(67) counts the total number of bits that are<br />
ON in all words between SB <strong>and</strong> SB+(N--1) <strong>and</strong> places the result in R.<br />
Flags ER: N is not BCD, or N is 0; SB <strong>and</strong> SB+(N--1) are not in the same area.<br />
The resulting count value exceeds 9999.<br />
Indirectly addressed DM word is non-existent. (Content of �DM word<br />
is not BCD, or the DM area boundary has been exceeded.)<br />
EQ: ON when the result is 0.<br />
5-20-10 WATCHDOG TIMER REFRESH-- WDT(94)<br />
Description<br />
WDT(94) T<br />
Ladder Symbols Definer Data Areas<br />
@WDT(94) T<br />
T: Watchdog timer value<br />
# (00 to 63)<br />
When the execution condition is OFF, WDT(94) is not executed. When the<br />
execution condition is ON, WDT(94) extends the setting of the watchdog timer<br />
(normally set by the system to 130 ms) by 100 ms times T.<br />
Timer extension = 100 ms x T.<br />
Precautions If the cycle time is longer than the time set for the watchdog timer, 9F will be<br />
output to the FAL area <strong>and</strong> the CPU will stop.<br />
If the cycle time exceeds 6,500 ms, a FALS 9F will be generated <strong>and</strong> the system<br />
will stop.<br />
Timers might not function properly when the cycle time exceeds 100 ms.<br />
When using WDT(94), the same timer should be repeated in the program at<br />
intervals that are less than 100 ms apart.<br />
Flags There are no flags affected by this instruction.<br />
Section 5-20
5-20-11 I/O REFRESH -- IORF(97)<br />
Limitations<br />
Description<br />
Execution Time<br />
Ladder Symbol<br />
IORF(97)<br />
St<br />
E<br />
Oper<strong>and</strong> Data Areas<br />
St: Starting word<br />
IR (I/O word only)<br />
E: Endword<br />
IR (I/O word only)<br />
This instruction is only effective for I/O words. IR 000 to IR 039 are allocated<br />
to I/O Units.<br />
St must be less than or equal to E.<br />
When the execution condition is OFF, IORF(97) is not executed. When the<br />
execution condition is ON, all words between St <strong>and</strong> E will be refreshed. This<br />
will be in addition to the normal I/O refresh performed during the CPU’s cycle.<br />
The execution time for IORF(97), T IORF, is computed as follows:<br />
Inputs T = 600 μs +(70μs x 2 x number of words refreshed)<br />
Outputs T = 600 μs +(40μs x 2 x number of words refreshed)<br />
Flags There are no flags affected by this instruction.<br />
Section 5-20<br />
"
(<br />
& % ) %<br />
��� ������ �� ������� ���������� ���� �� ���������� ���� ���� ������� ��� ��������� � �������� ��� ���� �������� ��<br />
������� ��� ������� ��� ������� ����� ��� ���������� �� ���������� �� �� ��� ������ �� ���� ������ ������ ���� ��� �����<br />
��� ��� �� �� ����� �� ������� ��� ������� ������� ������ �� ��� ����� ����� ���� ������� �������� ��� ����� ��� ����� ���<br />
�� ��������� ��� ����� ���� ��� ��� �������� ������<br />
��� �������� ����� �� ���� ������� ��� ��������� �� ��� ���������� ������ �������� ����� ��� ������ �� ��� ��� ������<br />
���� � �������������<br />
��� ����� ���� �������������������������������������������������������������� ���<br />
��� ����������� ����� ���� ���������������������������������������������������� ���<br />
��� ����������� ��������� ����� ������������������������������������������������ ���<br />
��� ��� �������� ���� �������������������������������������������������������� ���<br />
��� �������� �������� ���� ��������������������������������������������������<br />
���
6-1 Cycle Time<br />
Section 6-1<br />
To aid in PC operation, the average, maximum, <strong>and</strong> minimum cycle times<br />
can be displayed on the Programming Console or any other Programming<br />
Device <strong>and</strong> the maximum cycle time <strong>and</strong> current cycle time values are held in<br />
AR 26 <strong>and</strong> AR 27. Underst<strong>and</strong>ing the operations that occur during the cycle<br />
<strong>and</strong> the elements that affect cycle time is essential to effective programming<br />
<strong>and</strong> PC operations.<br />
The major factors in determining program timing are the cycle time <strong>and</strong> the<br />
I/O response time. One cycle of CPU operation is called a cycle; the time<br />
required for one cycle is called the cycle time. The time required to produce a<br />
control output signal following reception of an input signal is called the I/O<br />
response time.
Set error flags <strong>and</strong> activates indicators<br />
ERROR or ALARM?<br />
ERROR<br />
The overall flow of CPU operation is as shown in the following flowchart.<br />
NO<br />
ALARM<br />
Power application<br />
Clear IR area <strong>and</strong> resets all timers<br />
Check I/O Unit connections<br />
Reset watchdog timer<br />
Check hardware <strong>and</strong> Program Memory<br />
Check OK?<br />
YES<br />
Resets watchdog timer <strong>and</strong> program counter<br />
Execute user program<br />
YES<br />
Reset watchdog timer <strong>and</strong> adjust cycle time<br />
Compute cycle time<br />
Reset watchdog timer<br />
End of program?<br />
SCAN(18) executed?<br />
YES<br />
Refresh input bits <strong>and</strong> output terminals<br />
Service RS-232C interface<br />
Service host link comm<strong>and</strong>s for C200H (backplane-mounting<br />
model)<br />
Service CPU-mounted devices<br />
NO<br />
NO<br />
Initialization<br />
Overseeing<br />
processes<br />
Program<br />
execution<br />
Cycle time<br />
processing<br />
I/O refreshing<br />
RS--232C<br />
servicing<br />
Host link<br />
servicing<br />
Device<br />
servicing<br />
Section 6-1<br />
The first three operations, immediately after power application, are performed<br />
only once each time the PC is turned on. The rest of the operations are performed<br />
in cyclic fashion, with each cycle forming one cycle. The cycle time is<br />
PC cycle
#<br />
the time that is required for the CPU to complete one of these cycles. This<br />
cycle includes basically seven operations.<br />
The following table shows the breakdown of the PC cycle, time requirements,<br />
<strong>and</strong> reasons for variations in the cycle time. The total cycle time will be the<br />
sum of all the following.<br />
Process Content Time requirements<br />
Overseeing Resetting watchdog timer, I/O bus check,<br />
UM check, refreshing clock<br />
2.9 ms<br />
Program execution Execution of user program Total time for executing all instructions<br />
according to current execution conditions.<br />
Varies with instructions used <strong>and</strong><br />
execution conditions. Refer to 6-3<br />
Instruction Execution Times for details.<br />
Cycle time adjustments Computation of cycle time <strong>and</strong> required<br />
adjustment for SCAN(18)<br />
I/O refresh Output terminal status updated according to<br />
output bit status <strong>and</strong> input bits status<br />
updated according to input terminal status.<br />
Almost instantaneous (less than 1 ms) if<br />
no adjustment is necessary.<br />
Time required is determined by oper<strong>and</strong> of<br />
SCAN(18) if adjustment is necessary.<br />
Inputs: 0.07 ms per 8 pts.<br />
Outputs: 0.04 ms per 8 pts. (I/O Units with<br />
12 outputs are treated as having 16 output<br />
points).<br />
RS-232C servicing Built-in RS-232C interface serviced. If not set in System DM, 5% of the<br />
calculation cycle time will be used (but the<br />
minimum time is 1 ms); otherwise, the<br />
percentage set in System DM (between<br />
0% <strong>and</strong> 99%) will be used. The minimum<br />
servicing time is 0.2 ms even if System<br />
DM is set to 0%.<br />
Host link servicing Comm<strong>and</strong>s from host computer connected<br />
to C200H Host Link Unit<br />
(backplane-mounting model) serviced.<br />
8msmax.<br />
Peripheral Device servicing Peripheral Devices connect to CPU<br />
serviced (e.g., Programming Devices)<br />
Watchdog Timer <strong>and</strong> Long<br />
Cycle Times<br />
Section 6-1<br />
If not set in System DM, 5% of the<br />
calculation cycle time will be used (but the<br />
minimum time is 1 ms); otherwise, the<br />
percentage set in System DM (between<br />
0% <strong>and</strong> 99%) will be used. The minimum<br />
servicing time is 0.2 ms even if System<br />
DM is set to 0%.<br />
Within the PC, the watchdog timer measures the cycle time <strong>and</strong> compares it<br />
to a set value. If the cycle time exceeds the set value of the watchdog timer,<br />
a FALS 9F error is generated <strong>and</strong> the CPU stops. WDT(94) can be used to<br />
extend the set value for the watchdog timer.<br />
Even if the cycle time does not exceed the set value of the watchdog timer, a<br />
long cycle time can adversely affect the accuracy of system operations as<br />
shown in the following table.<br />
Cycle time (ms) Possible adverse affects<br />
10 or greater TIMH(15) inaccurate when TC 016 through TC 511 are used.<br />
20 or greater 0.02-second clock pulse not accurately readable.<br />
100 or greater 0.1-second clock pulse not accurately readable <strong>and</strong> Cycle<br />
Timer Error flag (25309) turns ON.<br />
200 or greater 0.2-second clock pulse not accurately readable.<br />
6,500 or greater FALS code 9F generated regardless of watchdog timer setting<br />
<strong>and</strong> the system halts.
)! Section 6-3<br />
6-2 Calculating Cycle Time<br />
The PC configuration, the program, <strong>and</strong> program execution conditions must<br />
be taken into consideration when calculating the cycle time. This means taking<br />
into account such things as the number of I/O points, the programming<br />
instructions used, <strong>and</strong> whether or not peripheral devices are employed. This<br />
section shows some basic cycle time calculation examples. To simplify the<br />
example, the instructions used in the programs have been assumed to be all<br />
either LD or OUT. The average execution time for the instructions is thus<br />
0.94 μs. (Operating times are given in the table in Section 6-3.)<br />
In this example, we’ll compute the cycle time for a <strong>C20H</strong> CPU. It is assumed<br />
that the program contains 500 instructions requiring an average of 0.94 μs<br />
eachtoexecute.<br />
The equation for the cycle time from above is given below. The portions not<br />
required for this simple PC have been left out. It is assumed that there is no<br />
adjustment to the cycle time.<br />
Cycle time = overseeing time<br />
+ execution time<br />
+ I/O refresh time<br />
+ RS-232C servicing time<br />
+ peripheral device servicing time<br />
In this example, as shown in the table below, the total cycle time is between<br />
3.6 <strong>and</strong> 5.6 ms depending on RS-232C <strong>and</strong> Peripheral Device connections.<br />
Process Calculation RS-232C <strong>and</strong><br />
Peripheral Device<br />
not connected<br />
RS-232C <strong>and</strong><br />
Peripheral Device<br />
processing times<br />
set to 5%*<br />
RS-232C <strong>and</strong><br />
Peripheral Device<br />
processing times<br />
set to 0%*<br />
Overseeing time Fixed 2.9 ms 2.9 ms 2.9 ms<br />
Execution time 0.94 μs x 500 instructions 0.5 ms 0.5 ms 0.5 ms<br />
I/O refresh time 0.07 ms x 2 + 0.04 ms x 1 0.2 ms 0.2 ms 0.2 ms<br />
RS-232C servicing time Zero or percentage of<br />
execution time<br />
0ms 1.0 ms 0.2 ms<br />
Peripheral device servicing Zero or percentage of 0ms 1.0 ms 0.2 ms<br />
time<br />
execution time<br />
Cycle time Total of above 3.6 ms 5.6 ms 4.0 ms<br />
*If the servicing time for RS-232C <strong>and</strong> peripheral devices is set to 0%, the servicing time will be 0.2 ms <strong>and</strong> the response time will be extremely<br />
slow.<br />
6-3 Instruction Execution Times<br />
This following table lists the execution times for all instructions that are available<br />
for the <strong>C20H</strong>/<strong>C28H</strong>/<strong>C40H</strong>/<strong>C60H</strong>. The maximum <strong>and</strong> minimum execution<br />
times <strong>and</strong> the conditions which cause them are given where relevant. When<br />
“word” is referred to in the Conditions column, it implies the content of any<br />
word except for indirectly addressed DM words. Indirectly addressed DM<br />
words, which create longer execution times when used, are indicated by<br />
“�DM.”<br />
Execution times for most instructions depend on whether they are executed<br />
with an ON or an OFF execution condition. Exceptions are the ladder diagram<br />
instructions OUT <strong>and</strong> OUT NOT, which require the same time regardless<br />
of the execution condition. The OFF execution time for an instruction<br />
can also vary depending on the circumstances, i.e., whether it is in an interlocked<br />
program section <strong>and</strong> the execution condition for IL is OFF, whether it<br />
is between JMP(04) 00 <strong>and</strong> JME(05) 00 <strong>and</strong> the execution condition for<br />
JMP(04) 00 is OFF, or whether it is reset by an OFF execution condition. “R,”<br />
“IL,” <strong>and</strong> “JMP” are used to indicate these three times.<br />
'
Table: Instruction Execution Times<br />
Instruction Conditions ON execution time (μs) * OFF execution time (μs) *<br />
LD --- 0.75 1.5<br />
LD NOT --- 0.75 1.5<br />
AND --- 0.75 1.5<br />
AND NOT --- 0.75 1.5<br />
OR --- 0.75 1.5<br />
OR NOT --- 0.75 1.5<br />
AND LD --- 0.75 1.5<br />
OR LD --- 0.75 1.5<br />
OUT --- 1.13 2.25<br />
OUT NOT --- 1.13 2.25<br />
TIM Constant for SV 2.25 R: 2.25<br />
IL: 2.25<br />
JMP: 2.25<br />
�DM for SV R: 259<br />
IL: 2.25<br />
JMP: 2.25<br />
CNT Constant for SV 2.25 R: 2.25<br />
IL: 2.25<br />
JMP: 2.25<br />
�DM for SV R: 255<br />
IL: 2.25<br />
JMP: 2.25<br />
NOP(00) --- 0.75 ---<br />
END(01) --- 85 ---<br />
IL(02) --- 32 35<br />
ILC(03) --- 59 35<br />
JMP(04) --- 35 35<br />
JME(05) --- 45 35<br />
FAL(06) FAL(06) 00 (reset) 357 2.25<br />
FAL(06) 01 to 99 247 2.25<br />
FALS(07) --- 11.1 ms 2.25<br />
STEP(08) --- 364 2.25<br />
SNXT(09) --- 22 2.25<br />
SFT(10) With 1-word shift register 227 R: 191<br />
IL: 30<br />
JMP: 30<br />
With 250-word shift register 8.06 ms R: 1.81 ms<br />
IL: 30<br />
JMP: 30<br />
KEEP(11) --- 1.13 ---<br />
CNTR(12) Constant for SV 107 R: 85<br />
IL: 49<br />
�DM for SV 265 JMP: 49<br />
DIFU(13) --- 105 Normal: 93<br />
IL: 93<br />
JMP: 84<br />
Note: * The execution time is given in microseconds unless otherwise stated.<br />
(<br />
)! Section 6-3
)! Section 6-3<br />
Instruction OFF execution time (μs) *<br />
ON execution time (μs) *<br />
Conditions<br />
DIFD(14) --- 104 Normal: 92<br />
IL: 92<br />
JMP: 84<br />
TIMH(15) Interrupt, Constant for SV 149 R: 199<br />
IL: 199<br />
Normal cycle, Constant for SV 169 JMP: 73<br />
Interrupt, �DM for SV 149 R: 291<br />
IL: 291<br />
Normal cycle, �DM for SV 169 JMP: 73<br />
WSFT(16) When shifting 1 word 260 3<br />
When shifting 1000 words using �DM 17.3 ms<br />
RWS(17) When shifting 1 word 558 3.75<br />
When shifting 1000 words using �DM 57.4 ms<br />
SCAN(18) --- Cycle time set in<br />
instruction -- actual cycle<br />
time<br />
3.75<br />
CMP(20) When comparing a constant to a word 162 3<br />
When comparing two �DM 447<br />
MOV(21) When transferring a constant to a word 113 3<br />
When transferring �DM to �DM 321<br />
MVN(22) When transferring a constant to a word 115 3<br />
When transferring �DM to �DM 392<br />
BIN(23) When converting a word to a word 197 3<br />
When converting �DM to �DM 465<br />
BCD(24) When converting a word to a word 198 3<br />
When converting �DM to �DM 451<br />
ASL(25) When shifting a word 62 2.25<br />
When shifting �DM 190<br />
ASR(26) When shifting a word 62 2.25<br />
When shifting �DM 190<br />
ROL(27) When rotating a word 66 2.25<br />
When rotating �DM 194<br />
ROR(28) When rotating a word 66 2.25<br />
When rotating �DM 194<br />
COM(29) When inverting a word 379 2.25<br />
When inverting �DM 506<br />
ADD(30) Constant + word � word 166 3.75<br />
�DM + �DM ��DM 593<br />
SUB(31) Constant + word � word 192 3.75<br />
�DM -- �DM ��DM 600<br />
MUL(32) Constant x word � word 634 3.75<br />
�DM x �DM � word 1045<br />
DIV(33) Word ÷ constant � word 737 3.75<br />
�DM ÷ �DM ��DM 1156<br />
ANDW(34) Constant < word � word 162 3.75<br />
�DM < �DM ��DM 557<br />
ORW(35) Constant > word � word 162 3.75<br />
�DM > �DM ��DM 560<br />
XORW(36) Constant XORW word � word 162 3.75<br />
�DM XORW �DM ��DM 560<br />
Note: * The execution time is given in microseconds unless otherwise stated.
Instruction OFF execution time (μs) *<br />
ON execution time (μs) *<br />
Conditions<br />
XNRW(37) Constant XNRW word � word 163 3.75<br />
Note: * The execution time is given in microseconds unless otherwise stated.<br />
,<br />
)! Section 6-3<br />
�DM XNRW �DM ��DM 561<br />
INC(38) When incrementing a word 79 2.25<br />
When incrementing �DM 207<br />
DEC(39) When decrementing a word 72 2.25<br />
When decrementing �DM 260<br />
STC(40) --- 21 1.5<br />
CLC(41) --- 21 1.5<br />
MSG(46) --- 88 2.25<br />
LMSG(47) When outputting character string to<br />
Programming Console from word<br />
334 3.75<br />
When outputting character string to<br />
Programming Console set by �DM<br />
414<br />
When outputting character string to<br />
RS-232C from word<br />
751<br />
When outputting character string to<br />
RS-232C set by �DM<br />
1679<br />
SYS(49) When using comm<strong>and</strong> code 01. 1998 3.75<br />
ADB(50) Constant + word � word 208 3.75<br />
�DM + �DM ��DM 604<br />
SBB(51) Constant -- word � word 208 3.75<br />
�DM -- �DM ��DM 604<br />
MLB(52) Constant x word � word 283 3.75<br />
�DM x �DM ��DM 658<br />
DVB(53) Word ÷ constant � word 516 3.75<br />
�DM ÷ �DM ��DM 927<br />
RDM(60) When comparing 1 range with words 719 719<br />
When comparing max. ranges with �DM 18.0 ms 18.0 ms<br />
HDM(61) When comparing 1 range with words 1079 3.75<br />
When comparing max. ranges with �DM 18.5 ms<br />
KEY(62) When using words 464 3.75<br />
When using �DM 489<br />
POUT(63) When outputting 0 bytes 464 3.75<br />
When outputting 200 bytes of �DM 4.78 ms<br />
PIN(64) When inputting 0 bytes 646 3.75<br />
When inputting 200 bytes of �DM 4.95 ms<br />
HTS(65) Word conversion 468 3.75<br />
�DM conversion (converting max. time) 60.6 ms<br />
STH(66) Word conversion 572 3.75<br />
�DM conversion (converting max.<br />
seconds)<br />
175.3 ms<br />
BCNT(67) When counting 1 word 531 3.75<br />
When counting 1000 words using �DM 253.6 ms<br />
BCMP(68) Comparing constant to word-designated<br />
table<br />
823 3.75<br />
Comparing �DM ��DM-designated table 17 ms<br />
HEX(69) Converting word to word 433 3.75<br />
Converting �DM to �DM 1.20 ms<br />
XFER(70) When transferring 1 word 433 3.75<br />
When transferring 1000 words using �DM 47.1 ms<br />
BSET(71) When setting a constant to 1 word 280 3.75
)! Section 6-3<br />
Instruction OFF execution time (μs) *<br />
ON execution time (μs) *<br />
Conditions<br />
When setting �DM ms to 1,000 words<br />
using �DM<br />
1.56 ms<br />
XCHG(73) Between words 215 3<br />
Between �DM 408<br />
SLD(74) Shifting 1 word 211 3<br />
Shifting 1,000 words using �DM 25.3 ms<br />
SRD(75) Shifting 1 word 208 3<br />
Shifting 1,000 words using �DM 25.3 ms<br />
MLPX(76) When decoding word to word 337 3.75<br />
When decoding �DM to �DM 708<br />
DMPX(77) When encoding a word to a word 404 3.75<br />
When encoding �DM to �DM 758<br />
MOVB (82) When transferring word to a word 172 3.75<br />
When transferring �DM to �DM 557<br />
MOVD(83) When transferring word to a word 210 3.75<br />
When transferring �DM to �DM 459<br />
SFTR(84) When shifting 1 word 475 3.75<br />
When shifting 1000 DM words using �DM 18.7 ms<br />
ASC(86) Word � word 385 3.75<br />
�DM ��DM 746<br />
SBS(91) --- 320 2.25<br />
SBN(92) --- --- ---<br />
RET(93) --- 207 1.5<br />
WDT(94) --- 27 2.25<br />
IORF(97) 1-word refresh 675 3<br />
30-word refresh 4ms<br />
Note: * The execution time is given in microseconds unless otherwise stated.<br />
"
" Section 6-4<br />
6-4 I/O Response Time<br />
<strong>Mini</strong>mum I/O Response<br />
Time<br />
4<br />
The I/O response time is the time it takes for the PC to output a control signal<br />
after it has received an input signal. The time it takes to respond depends on<br />
the cycle time <strong>and</strong> when the CPU receives the input signal relative to the input<br />
refresh period.<br />
The minimum <strong>and</strong> maximum I/O response time calculations described below<br />
are for where 00000 is the input bit that receives the signal <strong>and</strong> 00200 is the<br />
output bit corresponding to the desired output point.<br />
00000<br />
00200<br />
The PC responds most quickly when it receives an input signal just prior to<br />
the input refresh period in the cycle. Once the input bit corresponding to the<br />
signal has been turned ON, the program would have to be executed once to<br />
turn ON the output bit for the desired output signal <strong>and</strong> then the input refresh<br />
<strong>and</strong> overseeing operations would have to be repeated before the output refresh<br />
operation refreshes the output bit. The I/O response time in this case is<br />
thus found by adding the input ON-delay time, the cycle time (including the<br />
I/O refresh times <strong>and</strong> the overseeing time), <strong>and</strong> the output ON-delay time.<br />
This situation is illustrated below.<br />
CPU reads<br />
input signal<br />
Cycle<br />
Input<br />
signal<br />
Output<br />
signal<br />
Input refresh<br />
Input ON delay<br />
Cycle time<br />
CPU writes<br />
output signal<br />
I/O response time<br />
Overseeing<br />
Cycle time<br />
Output refresh<br />
Output ON delay<br />
<strong>Mini</strong>mum I/O response time = input ON delay + cycle time + I/O refresh time<br />
+ overseeing time + output ON delay
6 $ ' Section 6-5<br />
Maximum I/O Response<br />
Time<br />
Calculation Example<br />
The PC takes longest to respond when it receives the input signal just after<br />
the input refresh phase of the cycle. In this case the CPU does not recognize<br />
the input signal until the end of the next cycle. The maximum response time<br />
is thus one cycle longer than the minimum I/O response time, except that the<br />
input refresh time would not need to be added in because the input comes<br />
just after it rather than before it.<br />
Overseeing<br />
Cycle<br />
Input<br />
signal<br />
Output<br />
signal<br />
Input refresh<br />
Input ON delay<br />
Cycle time<br />
CPU reads<br />
input signal<br />
I/O response time<br />
Cycle time<br />
Output refresh<br />
CPU writes<br />
output signal<br />
Output ON delay<br />
Maximum I/O response time = input ON delay + (cycle time x 2) + overseeing<br />
time + output ON delay<br />
The data in the following table would produce the minimum <strong>and</strong> maximum<br />
cycle times shown calculated below.<br />
Input ON-delay 1.5 ms<br />
Cycle time 20 ms<br />
Input refresh time 0.23 ms<br />
Overseeing time 3.0 ms<br />
Output ON-delay 15 ms<br />
6-5 Host Link Response Time<br />
<strong>Mini</strong>mum I/O response time = 1.5 + 20 + 0.23 + 3.0 +15 = 39.73 ms<br />
Maximum I/O response time = 1.5 + (20 x 2) + 3.0 +15 = 59.5 ms<br />
The processing that determines <strong>and</strong> the methods for calculating the minimum<br />
<strong>and</strong> maximum times required from an input on one PC in a Host Link System<br />
to an output on another PC in the same Host Link System are described below.<br />
The transfer between the <strong>PCs</strong> is h<strong>and</strong>led through a host computer connected<br />
to both these <strong>PCs</strong>. Although more precise equations may be written if<br />
required, those used in the following calculations do not consider fractions of<br />
a cycle.<br />
In considering response times, it is important to remember the sequence of<br />
processing that occurs during the PC cycle. The main factor that affects the<br />
response time is the timing of inputs <strong>and</strong> outputs, the length of the transmission,<br />
<strong>and</strong> the time required for host computer processing.
6 $ ' Section 6-5<br />
The following diagram illustrates the setup used in response time calculations.<br />
Input<br />
Host computer<br />
PC Cycle time<br />
PC<br />
(50 ms)<br />
x +<br />
Output<br />
Cycle time<br />
(30 ms)<br />
The following equations are used to calculate the minimum <strong>and</strong> maximum<br />
response times for the <strong>C20H</strong>/<strong>C28H</strong>/<strong>C40H</strong>/<strong>C60H</strong>. The maximum response<br />
time is an approximation.<br />
<strong>Mini</strong>mum response time = Input ON delay + Comm<strong>and</strong> transmission time + (Cycle time of PC for Unit #0 x 2) + Response transmission<br />
time + Host computer processing time + Comm<strong>and</strong> transmission time + (Cycle time of PC for Unit #31<br />
x 2) + Output ON delay<br />
Maximum response time = Input ON delay + Comm<strong>and</strong> transmission time + (Cycle time of PC for Unit #0 x 10) + Response transmission<br />
time + Host computer processing time + Comm<strong>and</strong> transmission time + (Cycle time of PC for Unit #31<br />
x 10) + Output ON delay
& % * + %% % )<br />
���� ������� �������� ��� ���������� ��� ��������� � �������� ��� ��� ���������� ��� ����������� ��� �� ������� � ����<br />
�������� ��������<br />
�� ��� ��� ����� � ���� � ���� �� � �������� ������� ���� ����� �� ��� ��������� ������ ��� ���������� �� ������<br />
��� ���������� ��� �������� ����� �������� ��������������������������������������� ���<br />
��� ���������� ��������� ��� ��������� ���� ������������������������������������� ���<br />
����� �������� ������� ������������������������������������������������� ���<br />
����� ������ ��������� �������������������������������������������������� ���<br />
����� ������ ��������� ������ �������������������������������������������� ���<br />
����� ��������������� ���� ������������ ���������������������������������� ���<br />
����� ��������� ������� ������ ������������������������������������������ ���<br />
����� ������� ������ ������� �������������������������������������������� ���<br />
����� ������ ������� ��������������������������������������������������� ���<br />
����� ������ ���� ������������ ������������������������������������������� ���<br />
����� ������ ������� ��������������������������������������������������� ���<br />
������ ������ ���� ������������ ������������������������������������������� ���<br />
������ �������� ������������� �� ����������������������������������������� ���<br />
������ ���� ������ ���������� �������������������������������������������<br />
���
7-1 Displaying <strong>and</strong> Clearing Error Messages<br />
Key Sequence<br />
#<br />
% ) Section 7-1<br />
After inputting a program <strong>and</strong> correcting it for syntax errors, it must be executed<br />
<strong>and</strong> all execution errors must be eliminated. Execution errors include<br />
an excessively long cycle, errors in settings for various Units in the PC, <strong>and</strong><br />
inappropriate control actions, i.e., the program not doing what it is designed<br />
to do.<br />
If desired, the program can first be executed isolated from the actual control<br />
system <strong>and</strong> wired to dummy inputs <strong>and</strong> outputs to check for certain <strong>type</strong>s of<br />
errors before actual trial operation with the controlled system.<br />
When an error occurs during program execution, it can be displayed for identification<br />
by pressed CLR, FUN, <strong>and</strong> then MONTR. If an error message is<br />
displayed, MONTR can be pressed to access any other error messages that<br />
are stored by the system in memory. If MONTR is pressed in PROGRAM<br />
mode, the error message will be cleared from memory. Be sure to write down<br />
the error message when required before pressing MONTR. OK will be displayed<br />
when the last message has been cleared. This procedure can also be<br />
used to clear messages produced by the program through MSG(46).<br />
If a beeper sounds <strong>and</strong> the error cannot be cleared by pressing MONTR, the<br />
cause of the error still exists <strong>and</strong> must be eliminated before the error message<br />
can be cleared. If this happens, take the appropriate corrective action to<br />
eliminate the error. Refer to Section 9 Troubleshooting for all details on all<br />
error messages. The sequence in which error messages are displayed depends<br />
on the priority levels of the errors. The messages for fatal errors (i.e.,<br />
those that stop PC operation) are displayed before non-fatal ones.<br />
Although error messages can be displayed in any mode, they can be cleared<br />
only in PROGRAM mode. There is no way to restart the PC following a fatal<br />
error without first clearing the error message in PROGRAM mode.
Example<br />
% % Section 7-2<br />
The following displays show some of the messages that may appear. Refer<br />
to Section 9 Troubleshooting for an extensive list of error messages, their<br />
meanings, <strong>and</strong> the appropriate responses.<br />
�����<br />
�����<br />
��� ����<br />
�������� ���<br />
��<br />
������ ���<br />
�� ��� ����<br />
��� ��� ���<br />
��� ���� ����<br />
��� ���� ����<br />
��� ���� ���<br />
���� ���<br />
���� ���� ����<br />
Program-generated messages<br />
�������� ���<br />
��<br />
7-2 Monitoring Operation <strong>and</strong> Modifying Data<br />
Fatal<br />
errors<br />
Non-fatal<br />
errors<br />
All errors<br />
have been<br />
cleared<br />
The simplest form of operation monitoring is to display the address whose<br />
oper<strong>and</strong> bit status is to be monitored using the Program Read or one of the<br />
search operations. As long as the operation is performed in RUN or MONI-<br />
TOR mode, the status of any bit displayed will be indicated.<br />
This section provides other procedures for monitoring data as well as procedures<br />
for modifying data that already exists in a data area. Data that can be<br />
modified includes the PV (present value) <strong>and</strong> SV (set value) for any timer or<br />
counter.<br />
'
7-2-1 Bit/Word Monitor<br />
(<br />
% % Section 7-2<br />
All monitor operations in this section can be performed in RUN, MONITOR,<br />
or PROGRAM mode <strong>and</strong> can be cancelled by pressing CLR.<br />
All data modification operations except for timer/counter SV changes are performed<br />
after first preforming one of the monitor operations. Data modification<br />
is possible in either MONITOR or PROGRAM mode, but cannot be performed<br />
in RUN mode.<br />
The status of any bit or word in any data area can be monitored using the<br />
following operation. Although the operation is possible in any mode, ON/OFF<br />
status displays will be provided for bits in MONITOR or RUN mode only.<br />
The Bit/Word Monitor operation can be entered either from a cleared display<br />
by designating the first bit or word to be monitored or it can be entered from<br />
any address in the program by displaying the bit or word address whose<br />
status is to be monitored <strong>and</strong> pressing MONTR.<br />
When a bit is monitored, it’s ON/OFF status will be displayed (in MONITOR<br />
or RUN mode); when a word address is designated other than a timer or<br />
counter, the digit contents of the word will be displayed; <strong>and</strong> when a timer or<br />
counter number is designated, the PV of the timer will be displayed <strong>and</strong> a<br />
small box will appear if the completion flag of a timer or counter is ON. When<br />
multiple words are monitored, a caret will appear under the leftmost digit of<br />
the address designation to help distinguish between different addresses. The<br />
status of TR bits <strong>and</strong> SR flags (e.g., the arithmetic flags), cleared when<br />
END(01) is executed, cannot be monitored.<br />
Up to six memory addresses, either bits, words, or a combination of both,<br />
can be monitored at once, although only three of these are displayed at any<br />
one time. To monitor more than one address, return to the start of the procedure<br />
<strong>and</strong> continue designating addresses. Monitoring of all designated addresses<br />
will be maintained unless more than six addresses are designated. If<br />
more than six addresses are designated, the leftmost address of those being<br />
monitored will be cancelled.<br />
To display addresses that are being monitored but are not presently on the<br />
Programming Console display, press MONTR without designating another<br />
address. The addresses being monitored will be shifted to the right. As<br />
MONTR is pressed, the addresses being monitored will continue shifting to<br />
the right until the rightmost address is shifted back onto the display from the<br />
left.<br />
During a monitor operation the up <strong>and</strong> down keys can be pressed to increment<br />
<strong>and</strong> decrement the leftmost address on the display <strong>and</strong> CLR can be<br />
pressed to cancel monitoring the leftmost address on the display. If the last<br />
address is cancelled, the monitor operation will be cancelled. The monitor<br />
operation can also be cancelled regardless of the number of addresses being<br />
monitored by pressing SHIFT <strong>and</strong> then CLR.<br />
LD <strong>and</strong> OUT can be used only to designate the first address to be displayed;<br />
they cannot be used when an address is already being monitored.
Key Sequence<br />
Examples<br />
Program Read then Monitor<br />
% % Section 7-2<br />
Clears leftmost<br />
address<br />
Cancels monitor<br />
operation<br />
The following examples show various applications of this monitor operation.<br />
�����<br />
���������<br />
��� ���<br />
����<br />
����<br />
�����<br />
�����<br />
�����<br />
��� ���<br />
Indicates Completion flag is ON<br />
Monitor operation<br />
is cancelled
Bit Monitor<br />
Word Monitor<br />
,<br />
% % Section 7-2<br />
�����<br />
�����<br />
�� �����<br />
�����<br />
� ��<br />
�����<br />
���� �����<br />
�����<br />
�����<br />
������� ���<br />
�����<br />
������� �� ��<br />
����<br />
����<br />
����<br />
����
Multiple Address Monitoring<br />
7-2-2 Forced Set/Reset<br />
% % Section 7-2<br />
�����<br />
�����<br />
��� ���<br />
����<br />
����<br />
����� ����<br />
����<br />
����� ����<br />
����<br />
����� ����<br />
� ��� ����<br />
���������� ����<br />
���� ����<br />
���������� ����<br />
����� ��� ����<br />
��������������<br />
���� ����� ���<br />
����������<br />
����� ���<br />
�����<br />
� ���<br />
�����<br />
���� �����<br />
�����<br />
������� �� ����<br />
Cancels monitoring of<br />
leftmost address<br />
Monitor operation<br />
canceled<br />
When the Bit/Word Monitor operation is being performed <strong>and</strong> a bit, timer, or<br />
counter address is leftmost on the display, PLAY/SET can be pressed to turn<br />
ON the bit, start the timer, or increment the counter <strong>and</strong> REC/RESET can be<br />
pressed to turn OFF the bit or reset the timer or counter. Timers will not operate<br />
in PROGRAM mode. SR bits cannot be turned ON <strong>and</strong> OFF with this operation.<br />
If you press PLAY/SET or REC/RESET alone (i.e., without SHIFT), then<br />
Force Set/Reset will continue only as long as the key is held down. If you<br />
press either of these with SHIFT, however, then the operation will continue<br />
until cancelled with NOT.<br />
"
Key Sequence<br />
Example<br />
#4<br />
% % Section 7-2<br />
Without using NOT, the operation may be cancelled in any of the following<br />
four ways:<br />
• With the Restore Status operation<br />
• With a PC mode change<br />
• When operation halts due to an error<br />
• When operation halts due to a power failure<br />
This operation can be used in MONITOR mode to check wiring of outputs<br />
from the PC prior to actual program execution. This operation cannot be<br />
used in RUN mode.<br />
The following example shows how either bits or timers can be controlled with<br />
the Force Set/Reset operation. The displays shown below are for the following<br />
program section.<br />
00002<br />
TIM 000<br />
Address Instruction Oper<strong>and</strong>s<br />
00200 LD 00002<br />
00201 TIM 000<br />
# 0123<br />
00202 LD TIM 000<br />
00203 OUT 00500<br />
TIM 000<br />
#0123<br />
00500<br />
012.3 s
The following displays show what happens when TIM 000 is set with 00100<br />
OFF (i.e., 00500 is turned ON) <strong>and</strong> what happens when TIM 000 is reset with<br />
00100 ON (i.e., timer starts operation, turning OFF 00500, which is turned<br />
back ON when the timer has finished counting down the SV).<br />
(This example is in MONITOR mode.)<br />
����������<br />
� ���� ���<br />
����������<br />
� �� � ���<br />
����������<br />
���� � ���<br />
Monitoring<br />
00100 <strong>and</strong><br />
00500.<br />
Indicates that force set/reset is in progress.<br />
��������������<br />
� ���� ���<br />
��������������<br />
����� ���� ���<br />
��������������<br />
������ ���� ��<br />
��������������<br />
����� ���� ���<br />
��������������<br />
������ ��� ��<br />
��������������<br />
������ ��� ���<br />
��������������<br />
����� ��� ���<br />
��������������<br />
������ ��� ��<br />
Indicates that the time is up.<br />
*Timing not done in PROGRAM mode.<br />
7-2-3 Forced Set/Reset Cancel<br />
Key Sequence<br />
% % Section 7-2<br />
Monitoring<br />
TIM 000.<br />
Setting TIM 000<br />
turns ON 00500.<br />
Returns to the beginning<br />
when the key is released.<br />
Display with 0010 originally<br />
ON.<br />
Timer starts timing, turning<br />
00500 OFF.*<br />
When the time is up, 00500<br />
goes ON again.<br />
This operation restores the status of all bits in the I/O, IR, TIM, CNT, HR, AR,<br />
or LR areas which have been force set or reset. It can be performed in PRO-<br />
GRAM or MONITOR mode.<br />
When the PLAY/SET <strong>and</strong> REC/RESET keys are pressed, a beeper will<br />
sound. If you mistakenly press the wrong key, then press CLR <strong>and</strong> start<br />
again from the beginning.<br />
#
Example<br />
#<br />
The following example shows the displays that appear when Restore Status<br />
is carried out normally.<br />
�����<br />
�����<br />
���������� �����<br />
���������� ����<br />
���<br />
7-2-4 Hexadecimal/BCD Data Modification<br />
Key Sequence<br />
% % Section 7-2<br />
When the Bit/Word Monitor operation is being performed <strong>and</strong> a BCD or hexadecimal<br />
value is leftmost on the display, CHG can be input to change the<br />
value. SR words cannot be changed.<br />
If a timer or counter is leftmost on the display, the PV will be displayed <strong>and</strong><br />
will be the value changed. See 7-2-11 Changing Timer/Counter SV for the<br />
procedure to change SV. PV can be changed in MONITOR mode only when<br />
the timer or counter is operating.<br />
To change contents of the leftmost word address, press CHG, input the desired<br />
value, <strong>and</strong> press WRITE<br />
Word currently<br />
monitored on<br />
left of display.<br />
[Data]
Example<br />
7-2-5 Hex/ASCII Display Change<br />
Key Sequence<br />
% % Section 7-2<br />
The following example shows the effects of changing the PV of a timer.<br />
This example is in MONITOR mode<br />
�����<br />
�����<br />
��� ���<br />
����<br />
����<br />
��������� ����<br />
���� ���� ����<br />
��������� ����<br />
���� ���� ����<br />
����<br />
����<br />
Timing<br />
PV changed<br />
Timing<br />
Timing<br />
Timing<br />
This operation converts DM data displays back <strong>and</strong> forth between 4-digit<br />
hexadecimal data <strong>and</strong> ASCII.<br />
Word currently<br />
displayed.<br />
#
Example<br />
##<br />
�����<br />
�����<br />
�� �� ����<br />
�����<br />
����<br />
�����<br />
����<br />
�����<br />
����<br />
7-2-6 Program Header Display<br />
Key Sequence<br />
Example<br />
7-2-7 3-word Monitor<br />
% % Section 7-2<br />
With this operation you can display the name of the program, along with the<br />
version number <strong>and</strong> the time it was last revised (given in year, month, day,<br />
hour, <strong>and</strong> minute).<br />
When the SHIFT <strong>and</strong> MONITOR keys are pressed, the Programming Console<br />
displays the program name, version number, <strong>and</strong> so on, which have previously<br />
been stored in the DM System area. If the title/version enable (5A) in<br />
DM 1990 is OFF, then asterisks will be displayed.<br />
On models with a clock function, the revision time is generated automatically<br />
whenever there is an insertion, deletion, or addition to the program, or when<br />
memory is cleared or timer/counter SVs are set. For models without the clock<br />
function, it is necessary to set the revision time.<br />
For more detail, refer to 3-6 DM (Data Memory) Area.<br />
�����<br />
��������� ����<br />
�������� �����<br />
To monitor three consecutive words together, specify the lowest numbered<br />
word, press MONTR, <strong>and</strong> then press EXT to display the data contents of the<br />
specified word <strong>and</strong> the two words that follow it.<br />
A CLR entry changes the three-word monitor operation to a single-word display.
Key Sequence<br />
Example<br />
Single Word monitor in progress<br />
�����<br />
�����<br />
������� �� ����<br />
�����<br />
����<br />
���������������<br />
���� ���� ����<br />
���������������<br />
���� ���� ����<br />
���������������<br />
���� ���� ����<br />
���������������<br />
���� ���� ����<br />
���������������<br />
���� ���� ����<br />
�����<br />
����<br />
7-2-8 3-word Data Modification<br />
Key Sequence<br />
% % Section 7-2<br />
This operation changes the contents of a word during the 3-word Monitor operation.<br />
The blinking square indicates where the data can be changed. After<br />
the new data value is keyed in, pressing WRITE causes the original data to<br />
be overwritten with the new data. If CLR is pressed before WRITE, the<br />
change operation will be cancelled <strong>and</strong> the previous 3-word Monitor operation<br />
will resume.<br />
3 words currently<br />
displayed<br />
[Data]<br />
#'
Example<br />
7-2-9 Binary Monitor<br />
Key Sequence<br />
#(<br />
% % Section 7-2<br />
���������������<br />
���� ���� ����<br />
����� ���������<br />
����� ���� ����<br />
����� ���������<br />
����� ���� ����<br />
����� ���������<br />
��������� ����<br />
����� ���������<br />
��������� ����<br />
���������������<br />
���� ���� ����<br />
���������������<br />
���� ���� ����<br />
3-word monitor<br />
in progress.<br />
Stops in the middle<br />
of monitoring.<br />
Resumes previous<br />
monitoring.<br />
You can specify that the contents of a monitored word be displayed in binary<br />
by pressing SHIFT <strong>and</strong> MONTR after the word address has been input.<br />
Words can be successively monitored by using the up <strong>and</strong> down keys to increment<br />
<strong>and</strong> decrement the displayed word address. To clear the binary display,<br />
press CLR.<br />
[Word]<br />
Binary monitor<br />
clear<br />
All monitor<br />
clear
Example<br />
7-2-10 Binary Data Modification<br />
% % Section 7-2<br />
�����<br />
�����<br />
������� ���<br />
���� �����<br />
����������������<br />
���� �����<br />
����������������<br />
�����<br />
������� ���<br />
�����<br />
�����<br />
������� �� ����<br />
�����<br />
����<br />
����� �����<br />
����������������<br />
�����<br />
����<br />
�����<br />
������� �� ����<br />
This operation assigns a new 16-digit binary value to an IR, HR, AR, LR, or<br />
DM word.<br />
The blinking square, which can be shifted to the left with the up key <strong>and</strong> to<br />
the right with the down key, indicates the position of the bit that can be<br />
changed. After positioning to the desired bit, a 0 or a 1 can then be entered<br />
as the new bit value. Besides 0 or 1, a change can be executed with SHIFT<br />
<strong>and</strong> PLAY/SET or SHIFT <strong>and</strong> REC/RESET.<br />
#
Key Sequence<br />
#,<br />
% % Section 7-2<br />
Forced Set <strong>and</strong> Forced Reset are indicated by S <strong>and</strong> R, <strong>and</strong> set at 1 <strong>and</strong> 0.<br />
They are cancelled by NOT. (See Force Set/Reset Indicators in 7-2-1 Bit/<br />
Word Monitor. After a bit value has been changed, the blinking square will<br />
appear at the next position to the right of the changed bit.
Example<br />
�����<br />
7-2-11 Changing Timer/Counter SV<br />
% % Section 7-2<br />
�����<br />
������� ���<br />
�����<br />
������� ���<br />
���� �����<br />
����������������<br />
���� ����<br />
����������������<br />
���� ����<br />
����������������<br />
���� ����<br />
����������������<br />
���� ����<br />
����������������<br />
���� ����<br />
����������������<br />
���� ����<br />
����������������<br />
���� ����<br />
����������������<br />
���� �����<br />
����������������<br />
IR bit 00115 IR bit 00100<br />
There are two ways to change the SV of a timer or counter. It can be done<br />
either by inputting a new value; or by incrementing or decrementing the current<br />
SV. Either method can be used only in MONITOR or PROGRAM mode.<br />
In MONITOR mode, the SV can be changed while the program is being executed.<br />
Incrementing <strong>and</strong> decrementing the SV is possible only when the SV<br />
has been entered as a constant.<br />
To use either method, first display the address of the timer or counter whose<br />
SV is to be changed, presses the down key, <strong>and</strong> then press CHG. The new<br />
value can then be input numerically <strong>and</strong> WRITE pressed to change the SV or<br />
EXT can be pressed followed by the up <strong>and</strong> down keys to increment <strong>and</strong><br />
decrement the current SV. When the SV is incremented <strong>and</strong>/or decremented,<br />
CLR can be pressed once to change the SV to the incremented or decremented<br />
value but remaining in the display that appeared when EXT was<br />
pressed or CLR can be pressed twice to return to the original display with the<br />
new SV.<br />
This operation can be used to change a SV from designation as a constant to<br />
a word address designation <strong>and</strong> visa versa.<br />
#"
Key Sequence<br />
Example<br />
Inputting New SV <strong>and</strong><br />
Changing to Word Designation<br />
'4<br />
% % Section 7-2<br />
The following examples show inputting a new constant, changing from a constant<br />
to an address, <strong>and</strong> incrementing to a new constant.<br />
�����<br />
�����<br />
��� ���<br />
���������<br />
��� ���<br />
����� ��� ����<br />
�����<br />
����� ��� ����<br />
���� ����� �����<br />
����� ��� ����<br />
���� ����� �����<br />
����� ��� ����<br />
�����<br />
����� �����<br />
���� ����� ����<br />
����� �����<br />
���� ����� ����<br />
����� ��� ����<br />
���
Incrementing <strong>and</strong><br />
Decrementing<br />
�����<br />
�����<br />
��� ���<br />
���������<br />
��� ���<br />
����� ��� ����<br />
�����<br />
����� ��� ����<br />
���� ����� �����<br />
��������� � ���<br />
���� ����� �����<br />
��������� �<br />
���� ����� �����<br />
��������� �<br />
���� ����� �����<br />
��������� �<br />
���� ����� �����<br />
��������� �<br />
���� ����� �����<br />
7-2-12 PROM Writer Operations<br />
% % Section 7-2<br />
����� ��� ����<br />
�����<br />
Current SV (during<br />
change operation)<br />
SV before the change<br />
Returns to original display<br />
with new SV<br />
You can use the built-in RS-232C interface to download the Program Memory<br />
<strong>and</strong> DM 1000 to DM 1999 to a commercially available PROM writer <strong>and</strong> to<br />
upload the ROM contents of the PROM writer back to the PC.<br />
For this operation you must set the RS-232C interface mode to download/<br />
upload at both the PC <strong>and</strong> the PROM writer. (See 8-1 RS-232C Interface<br />
Modes.) The PC must be in PROGRAM mode. Also, if a baud rate greater<br />
than 2,400 bps is used, reception may not be normal unless a transmission<br />
delay is used at the PROM writer.<br />
For the transfer format, you can use either Intel’s HEX or Motorola’s S.<br />
With the <strong>C20H</strong>/<strong>C28H</strong>/<strong>C40H</strong>, a cassette tape recorder cannot be connected<br />
directly to the cassette jacks on the Programming Console, although it is possible<br />
to connect a cassette recorder to the GPC to store, retrieve, <strong>and</strong> verify<br />
programs on tape.<br />
The GPC not only allows programs to be stored <strong>and</strong> retrieved from tape, but<br />
also allows programs written for the C120 <strong>and</strong> C500 <strong>PCs</strong> to be converted to<br />
the format used with the <strong>C20H</strong>/<strong>C28H</strong>/<strong>C40H</strong>.<br />
'
PC to PROM Writer<br />
Key Sequence<br />
Example<br />
'<br />
% % Section 7-2<br />
You can use the following key sequence to transfer Program Memory from<br />
the PC to the PROM writer. Where ��������� appears below, the transfer<br />
format will be indicated as either Intel’s HEX or Motorola’s S. When writing to<br />
27256 or 27128 chips, the first 8K bytes (0000 to 1FFF) are used.<br />
�����<br />
�����<br />
���� ��� �������<br />
������������<br />
Start PROM writer reception<br />
���� ��� �������<br />
������������<br />
Start PROM writer<br />
reception<br />
Completed normally or cancelled with CLR Key<br />
���� ��� �������<br />
������������<br />
Flashing
PROM Writer to PC<br />
1<br />
Key Sequence<br />
Example<br />
Intel’s HEX Format<br />
% % Section 7-2<br />
You can use the following key sequence to transfer Program Memory from<br />
thePROMwritertothePC.Where��������� appears below, the transfer<br />
format will be indicated as either Intel’s HEX or Motorola’s S-Record.<br />
�����<br />
�����<br />
���� ��� �������<br />
������������<br />
���� ��� �������<br />
���������<br />
Start PROM writer transmission<br />
Completed normally or cancelled with CLR Key<br />
���� ��� �������<br />
������������<br />
Start PROM writer<br />
transmission<br />
Flashing<br />
Intel’s HEX format is completely configured in ASCII characters. Except for<br />
the start mark <strong>and</strong> the load address, it is expressed as two-digit hexadecimal<br />
bytes of data. The format is as shown below.<br />
: l l a a a a t t d d d d d d ................... d d c c <br />
2 3 4 5 6 7<br />
1, 2, 3... Start mark (:)<br />
Indicates the start of a record.<br />
Code number (two digits, hexadecimal)<br />
Indicates the number of bytes in the record, from 01 to FF (1 to 255 bytes).<br />
If the code number is 00, it indicates the final record.<br />
Load address (four digits, hexadecimal)<br />
Indicates the address where the data is stored.<br />
Record <strong>type</strong> (two digits, hexadecimal)<br />
00 <strong>and</strong> 81 are recognized as data records, <strong>and</strong> the data beginning with<br />
the load address is loaded to the buffer RAM. 01 is recognized as the<br />
final record, <strong>and</strong> other <strong>type</strong>s are ignored.<br />
Data (two digits, hexadecimal)<br />
This is the data which is stored in the buffer RAM. Addresses increase<br />
one by one.<br />
Checksum<br />
This is the two’s complement of the total value of (2) through (5) after<br />
they are added together in hexadecimal.The rightmost eight bits are valid.<br />
Carriage return <strong>and</strong> line feed<br />
'
Motorola’s S-Record<br />
1<br />
'#<br />
Motorola’s S-Record are completely configured in ASCII characters. Except<br />
for the start mark, the record <strong>type</strong> <strong>and</strong> the load address, it is expressed as<br />
two-digit hexadecimal bytes of data. The format is as shown below.<br />
S t l l a a a a d d d d d d .................... d d c c <br />
2<br />
Transmission Error<br />
3 4 5 6<br />
1, 2, 3... Start mark (S)<br />
Indicates the start of a record.<br />
Record <strong>type</strong> (0 to 9, excluding 4 <strong>and</strong> 6)<br />
0: Ignored. Record <strong>type</strong> at output time is output as 1.<br />
1: Ordinary data record, with 2-byte (4-character) load address<br />
2: Ordinary data record, with 3-byte (6-character) load address<br />
3: Ordinary data record, with 4-byte (8-character) load address<br />
5: Ignored. Record <strong>type</strong> at output time is output as 1.<br />
7: Indicates final <strong>type</strong> 3 record.<br />
8: Indicates final <strong>type</strong> 2 record.<br />
9: Indicates final <strong>type</strong> 1 record.<br />
Code number (two digits, hexadecimal)<br />
Indicates one half the total number of characters from (4) load address<br />
to (6) checksum.<br />
Load address (4, 6, or 8 digits, hexadecimal)<br />
Indicates the address where the data is stored. When the load address<br />
is 6 or 8, the rightmost four digits are valid.<br />
Data (two digits, hexadecimal)<br />
This is the data which is stored in the buffer RAM.<br />
Checksum<br />
This is the one’s complement of the total value of (3) through (5) after<br />
they are added together in hexadecimal.The rightmost eight bits are valid.<br />
Carriage return <strong>and</strong> line feed<br />
The following table gives the probable causes <strong>and</strong> the procedures for correcting<br />
errors which may occur during transmission between the PC <strong>and</strong> the<br />
PROM writer.<br />
Programming Console Message Probable Cause Correction<br />
���� ��� �������<br />
������� ���<br />
% % Section 7-2<br />
Communication mode setting of<br />
RS-232C interface does not match<br />
that of PROM writer.<br />
RS-232C cable connection is faulty.<br />
PC reception is late.<br />
Verify that the settings of the PC <strong>and</strong><br />
the PROM writer match the<br />
specifications.<br />
Check the Communications Counter<br />
(AR 05) to see if the lines are<br />
transmitting properly.<br />
If there is a transmission delay at the<br />
PROM writer, lower the baud rate or<br />
insert a delay at the PROM writer.<br />
7
- . /<br />
��� ������������������� ���� � �������� ������� ��������� ����� ������ ���� �� ������� �������� �� � ���� ����<br />
������� � ������� ��������� ������������ ��������� ��������� ��� ����� ������� ����� ������ �� ������� ����������<br />
���� ������� ��������� ������ ��������� ��� ���������� ���� ���� ��� ������� ���������� ��� ����������� �� ��������<br />
������������ �������������� ��� ������������� ����� �� ��� ���� ������ ���� ����� ����� ����� ���� ������������ ������<br />
��� ����������� �� ������ ����� ����� ����� ����� ���� ��������� �� � ���� ���� ������� ����� ����� ���� ���� ����� ����<br />
�������� ��� ����������� �� ���� ���� ������� ��������� ����� �������� ���� ����� �� ��� ���� ���� ������ ��������<br />
��� ������� ��������� ����� ��������������������������������������������������������� ���<br />
��� �� ��� �� ���� �������� ��������������������������������������������������������� ���<br />
��� �� ���� ���� ��� ����� ����������������������������������������������������������� ���<br />
��� ���� ���� �������������� �������� ������������������������������������������������� ���<br />
����� ����� ������ ����������������������������������������������������������� ���<br />
����� ����� ������ ���� ���� ���� ��� ����� ������������������������������������ ���<br />
����� ���� �������������� ������������������������������������������������������ ���<br />
����� ��� ����������� ��������������������������������������������������������� ���<br />
����� ��� ����������� ������� ������� ������������������������������������������ ���<br />
��� ���� ���� �������� ��� ��������� ������������������������������������������������ ���<br />
����� ���� ����������������������������������������������������������������� ���<br />
����� ������ ���� ��������������������������������������������������������� ���<br />
����� ����� ���� ���������������������������������������������������������� ���<br />
����� �� ���� ���� �������������������������������������������������������� ���<br />
����� �� ���� ���� �������������������������������������������������������� ���<br />
����� �� ���� ���� �������������������������������������������������������� ���<br />
����� �� ���� ���� �������������������������������������������������������� ���<br />
����� �� ������ ���� ������������������������������������������������������ ���<br />
����� �� ���� ���� ������������������������������������������������������� ���<br />
������ �� ���� �������������������������������������������������������������� ���<br />
������ �� ���� � ������������������������������������������������������������ ���<br />
������ �� ���� � ������������������������������������������������������������ ���<br />
������ ������ ��������<br />
��������������������������������������������������������<br />
������ �� ���� ����� ������������������������������������������������������� ���<br />
������ �� ���� ����� ������������������������������������������������������� ���<br />
������ �� ���� ����� ������������������������������������������������������� ���<br />
������ �� ���� ����� ������������������������������������������������������� ���<br />
������ �� ������ ��������<br />
�����������������������������������������������������<br />
������ �� ���� ����� ������������������������������������������������������ ���<br />
������ �� ����� ������������������������������������������������������������� ���<br />
������ �� ������� ��������������������������������������������������������� ���<br />
������ �� ������� ��������������������������������������������������������� ���<br />
������ ������ ��� ���������������������������������������������������������� ���<br />
������ ������ ����� �������������������������������������������������������� ���<br />
������ �������� ������ ��������� ������������������������������������������ ���<br />
������ �������� ������ ��������� ������ ���� ���������������������������� ���<br />
������ ������ ��������� ������ ������������������������������������������� ���<br />
������ �� ����� ���� ������������������������������������������������������ ���<br />
������ ����� ��� �������������<br />
�������������������������������������������������<br />
������ �������� �� �� ��������� ������� ���������������������������������������� ���<br />
������ �������� ���������� �� ����������� ������� �������������������������������� ���<br />
������ ������� ���� ������������������������������������������������������ ���<br />
������ ������� ��������<br />
������������������������������������������������������<br />
������ ��� �������� ���������������������������������������������������������� ���<br />
������ ��� ���� �������������������������������������������������������������� ���<br />
������ �������� ���� ���� ������������������������������������������������������ ���<br />
������ �������������� �������� ������������������������������������������������ ���<br />
��� ������� ������ ����������������������������������������������������������������<br />
���<br />
,<br />
''
8-1 RS-232C Interface Modes<br />
'(<br />
% Section 8-2<br />
You can use the RS-232C interface in any of three modes:<br />
1, 2, 3... 1. Host Link Mode: Select this mode to connect to a Host Link System or<br />
a FIT. For details, refer to 8-4 Host Link Communications Protocol <strong>and</strong><br />
8-5 Host Link Comm<strong>and</strong>s <strong>and</strong> Responses.<br />
2. Download/Upload Mode: Select this mode to download the Program<br />
Memory <strong>and</strong> DM 1000 to DM 1999 from the PC to a commercial PROM<br />
writer <strong>and</strong> upload the ROM contents of the PROM writer back to the PC.<br />
For the transfer format, you can use either Intel’s HEX or Motorola’s [S].<br />
For details, refer to 7-2-12 PROM Writer Operations.<br />
3. ASCII I/O Mode: ASCII I/O mode can be used to communicate from the<br />
user program with external devices that are equipped with an RS-232C<br />
interface. The following instructions can be used for 2-way half-duplex<br />
communications in ASCII I/O mode: LONG MESSAGE -- LMSG(47),<br />
RS-232C PORT OUTPUT -- POUT(63), <strong>and</strong> RS-232C PORT INPUT --<br />
PIN(64). For hardware configurations, refer to the ����� ����� �����<br />
���� ������������ �����.<br />
8-2 DM <strong>and</strong> AR Area Settings<br />
The interface mode is set in System DM. Refer to DM 0920/DM 1920 in 3-6<br />
DM (Data Memory) Area.<br />
Certain settings in the DM <strong>and</strong> AR areas are relevant to the RS-232C interface.<br />
For information on these settings, refer to 3-5-3 Built-in Host Link Communications<br />
Error Code, 3-5-4 RS-232C Interface Communications Counters,<br />
<strong>and</strong> 3-8-2 System DM. With respect to these settings, the following<br />
points should be noted:<br />
DM Area The interface mode is set in DM 0920/DM1920, bits 08 to 15. Any setting other<br />
than 00, 01, or 02 is regarded as Host Link Mode.<br />
With a setting in DM 0920/DM 1920, bits 00 to 07, you designate the communications<br />
format as st<strong>and</strong>ard or custom. If you designate it as st<strong>and</strong>ard, then<br />
any baud rate or format settings in DM 0921/DM 1921 will be invalid. When<br />
connecting to a FIT at a baud rate of 9,600 bps, it is most expedient to use<br />
the st<strong>and</strong>ard format.<br />
If you set the communications format to custom, then you can select a format<br />
in DM 0921/DM 1921. When using the Host Link Mode, do not select a<br />
no-parity format. Doing so may adversely affect the quality of the communications<br />
data.<br />
You can set a transmission delay in DM 0922/DM 1922, bits 00 to 07. This<br />
can be useful in cases where the receiving party has an overrun, but it will<br />
slow down the transmission time. Always set these bits to 00 when connecting<br />
to a Programming Device (e.g., FIT).
You can designate RS/CS control with a setting in DM 0922/DM1922, bits 08<br />
to 15. Set this to “without RS/CS” when using RS-422 or in other cases<br />
where RS/CS control is unnecessary. Do not use RS/CS control in Host link<br />
or ASCII I/O mode. Communications will proceed as shown below with <strong>and</strong><br />
without RS/CS control.<br />
RS/CS Host link Download/Upload ASCII I/O Mode<br />
Yes<br />
PC to PROM writer PROM writer to PC<br />
No<br />
% Section 8-2<br />
RS ON<br />
CS = ON<br />
Transmit<br />
RS OFF<br />
RS ON<br />
Transmit<br />
RS OFF<br />
Yes<br />
No<br />
CS ON?<br />
RS OFF<br />
Transmit<br />
RS ON<br />
Yes<br />
PC to PROM writer<br />
Transmit<br />
No<br />
RS ON<br />
End of<br />
transmission?<br />
PROM writer to PC<br />
End of<br />
transmission?<br />
RS ON<br />
Transmit<br />
RS OFF<br />
RS ON<br />
Transmit<br />
RS OFF<br />
If bits 08 to 15 of DM 0925 are set to 01, the code set in bits 00 to 07 of DM<br />
0925 will be used as the starting code for POUT(63) <strong>and</strong> PIN(64) transmissions.<br />
If bits 08 to 15 are set to 00, no starting code will be used. If bits 08 to<br />
15 of DM 0926 are set to 01, the code set in bits 00 to 07 of DM 0926 will be<br />
used as the end code for POUT(63) <strong>and</strong> PIN(64) transmissions. If bits 08 to<br />
15 are set to 00, no end code will be used. Refer to Section 5 Instruction Set<br />
for details.<br />
AR Area The following parts of the AR area are used with the RS-232C interface.<br />
Word(s) Bit(s) Function<br />
04 00 to 07 RS-232C Communications Error Code<br />
13 RS-232C Reception Impossible Flag<br />
14 RS-232C Reception Completed Flag<br />
15 RS-232C Transmission Possible Flag<br />
05 00 to 07 RS-232C Reception Counter<br />
08 to 15 RS-232C Transmission Counter<br />
06 00 to 15 RS-232C Bytes Received Area<br />
08 00 to 15 RS-232C Bytes Input Area<br />
'
',<br />
% Section 8-2<br />
RS-232C Communications<br />
Error Code<br />
When an error has occurred in RS-232C communications, the RS-232C Interface<br />
Communications Error Flag is turned ON, <strong>and</strong> a code that indicates<br />
the <strong>type</strong> of error is output to AR 0400 to AR 0407. These codes are in hexadecimal<br />
<strong>and</strong> are as follows:<br />
00: Parity error<br />
01: Framing error<br />
02: Overrun error<br />
03: FCS error<br />
These bits are refreshed each cycle while using the RS-232C interface.<br />
Reception Impossible Flag The RS-232C Reception Impossible Flag (AR 0413) is turned ON when newly<br />
received data cannot be input. There are two possible reasons that the<br />
new data cannot be input:<br />
1, 2, 3... 1. The previously received data has not yet been input by PIN(64).<br />
2. An error occurred during the previous reception.<br />
This flag will be turned OFF when PIN(64) is executed.<br />
Reception Completed Flag The RS-232C Reception Completed Flag (AR 0414) is turned ON when an<br />
end code or 200 bytes of data have been received (not including the starting<br />
<strong>and</strong> end codes if used) at the RS-232C interface. Use this flag in ASCII I/O<br />
mode to confirm that data has been received before execution PIN(64) <strong>and</strong> is<br />
turned OFF when PIN(64) is executed.<br />
Transmission Possible Flag The RS-232C Transmission Possible Flag (AR 0415) is turned ON when data<br />
can be transmitted from the RS-232C interface (i.e., when data is not being<br />
transmitted). This bit is turned OFF whenever the transmission buffer is being<br />
used by LMSG(47), POUT(63), or PIN(64). Be sure to use check this Flag<br />
when executing these instructions.<br />
RS-232C Reception Counter<br />
RS-232C Transmission<br />
Counter<br />
RS-232C Bytes Received<br />
Area<br />
RS-232C Bytes Input Area<br />
When a transmission is received on the RS-232C interface, the number of<br />
characters is counted in hexadecimal <strong>and</strong> then output to AR 0500 to AR<br />
0507 (RS-232C Reception Counter) to assist the user in debugging RS-232C<br />
interface communications. This counter is used for all RS-232C interface operating<br />
modes, as well as for error characters. The counter can be reset by<br />
turning SR 25209 ON <strong>and</strong> then OFF.<br />
AR 0508 to AR 0515 (RS-232C Transmission Counter) operates the same as<br />
AR 0500 to AR 0507, except that it operates for transmisions sent from the<br />
PC through the RS-232C interface.<br />
These counters are refreshed every cycle.<br />
When a transmission is received in ASCII I/O Mode at the RS-232C interface,<br />
the number of bytes of data is counted in BCD <strong>and</strong> then output to AR<br />
06. The start <strong>and</strong> end codes are not counted.<br />
Counting stops when the RS-232C Reception Completed Flag (AR 0414) is<br />
turned ON. The value stored in AR 06 will not be updated after this flag is<br />
turned on even if new data is received at the RS-232C interface. The content<br />
of AR 06 is reset to 0 when PIN(64) is executed.<br />
AR 06 is refreshed every cycle while the RS-232C interface is being used in<br />
ASCII I/O mode.<br />
While AR 06 contains the number of bytes received in ASCII I/O Mode at the<br />
RS-232C interface, AR 08 contains the number of bytes of data (BCD) actually<br />
input to the PC by PIN(64).
Normally, the bytes input will equal the bytes received, but in some cases the<br />
numbers will differ. The two most likely cases are described below.<br />
1, 2, 3... 1. One oper<strong>and</strong> of PIN(64) specifies the number of bytes to input. If the value<br />
of this oper<strong>and</strong> is less than the content of AR 06, then the bytes input<br />
will not equal the bytes received.<br />
2. PIN(64) might be executed before the RS-232C Reception Completed<br />
Flag (AR 0414) is turned ON. In this case, the number of bytes received<br />
would continue increasing as more data was received.<br />
The content of AR 08 is updated each time that PIN(64) is executed.<br />
8-3 SR Area Bits <strong>and</strong> Flags<br />
The SR area contains several bits <strong>and</strong> flags which are used in conjunction<br />
with the RS-232C interface <strong>and</strong> Host Link Systems.<br />
SR bit Functions<br />
25208 1. RS-232C Interface Error Flag<br />
2. CPU-mounting Host Link Unit Communications Error Flag<br />
25209 1. RS-232C Restart Bit<br />
2. CPU-mounting Host Link Unit Restart Bit<br />
The Error Flag is turned ON when an error (e.g., parity, framing, overrun, or<br />
FCS error) has occurred either in communications via the RS-232 Interface<br />
or between the CPU <strong>and</strong> the CPU-mounting Host Link Unit. When the Restart<br />
Bit is turned ON <strong>and</strong> then OFF, both the RS-232C Interface <strong>and</strong> the<br />
CPU-mounting Host Link Unit will be restarted <strong>and</strong> SR 25208, AR 0400 to AR<br />
0407, <strong>and</strong> AR 05 will be cleared.<br />
8-4 Host Link Communications Protocol<br />
The host computer has initial transmission priority. Data transfer between the<br />
host computer <strong>and</strong> the Host Link System is, therefore, initiated when the<br />
computer sends a comm<strong>and</strong> to a PC in the Host Link System.<br />
A set of data in a transmission is called a block. The data block sent from the<br />
host computer to the PC is called a comm<strong>and</strong> block. The block sent from the<br />
PC to the computer is called a response block. Each block starts with a unit<br />
number <strong>and</strong> a header, <strong>and</strong> ends with a Frame Check Sequence (FCS) code<br />
<strong>and</strong> a terminator (� <strong>and</strong> CR). The terminator in the comm<strong>and</strong> block enables<br />
the PC to send a response. The terminator in the response block enables the<br />
host computer to send another comm<strong>and</strong>.<br />
8-4-1 Block Format<br />
X101 X100 @ X X X X X X CR<br />
Unit no. 00 to 31 Header Text FCS Terminator<br />
FCS calculation range<br />
*<br />
Section 8-4<br />
A block is usually made up of one unit called a frame, but long blocks of data<br />
(over 131 characters) must be divided into more than one frame before transmission.<br />
The first frame can have up to 131 characters, <strong>and</strong> subsequent<br />
frames can have up to 128 characters. The data must thus be divided into<br />
more than one frame when there is a block consisting of more than 131 characters.<br />
When multiple frames are used, the beginning <strong>and</strong> intermediate<br />
frames end with a delimiter (CR), instead of a terminator (�CR).<br />
'"
8-4-2 Block Format With More Than One Frame<br />
First Frame (131 Characters or Less)<br />
(4<br />
X101 X100 @ X X X X X X CR<br />
Unit no. 00 to 31 Header Text no. 1 (123 characters max.) FCS<br />
FCS calculation range<br />
Intermediate Frame(s) (128 Characters or Less)<br />
Last Frame (128 Characters or Less)<br />
Text no. 2 to M-1 (125 characters max.) FCS<br />
FCS calculation range<br />
Delimiter<br />
X X CR<br />
Delimiter<br />
X X CR<br />
*<br />
Text no. M (124 characters max.) FCS Terminator<br />
FCS calculation range<br />
Sending Comm<strong>and</strong>s To send a comm<strong>and</strong> block with more than one frame from the computer, initially<br />
send only the first frame in the block. Do not send the next frame until<br />
the host computer has received the delimiter which should have been sent<br />
back from the PC. Do not separate data from a single word into different<br />
frames for any write comm<strong>and</strong>.<br />
Host computer<br />
Host Link Unit<br />
Unit No.<br />
Header<br />
Text<br />
FCS<br />
Delimiter<br />
Delimiter<br />
Text<br />
Next frame transmission<br />
enabled<br />
Comm<strong>and</strong> block<br />
First frame Intermediate frame End frame<br />
FCS<br />
Delimiter<br />
Delimiter<br />
Text<br />
Next frame transmission<br />
enabled<br />
FCS<br />
Terminator<br />
Unit No.<br />
Header<br />
Text<br />
FCS<br />
Terminator<br />
Response<br />
block<br />
Section 8-4
Receiving Comm<strong>and</strong>s To receive a response block consisting of more than one frame from the PC,<br />
the host computer must send the carriage return code (delimiter) to the PC<br />
after receiving the delimiter from the PC. This enables the PC to send the<br />
next frame.<br />
Host computer<br />
Host Link Unit<br />
Unit No.<br />
Header<br />
8-4-3 Data Representation<br />
Hexadecimal Data<br />
Decimal Data<br />
Comm<strong>and</strong> block<br />
Text<br />
FCS<br />
Terminator<br />
Unit No.<br />
Header<br />
Next frame transmission<br />
enabled<br />
First frame<br />
Text<br />
FCS<br />
Delimiter<br />
Delimiter<br />
Text<br />
Next frame transmission<br />
enabled<br />
Intermediate<br />
frame End frame<br />
FCS<br />
Delimiter<br />
Response<br />
block<br />
Delimiter<br />
Text<br />
FCS<br />
Terminator<br />
Numerical data within a transmission is expressed in hexadecimal, decimal,<br />
or binary format. Refer to the format example of each comm<strong>and</strong> in 8-5 Host<br />
Link Comm<strong>and</strong>s <strong>and</strong> Responses for details. The appropriate range is indicated<br />
in the following manner.<br />
X16 3 X16 2 X16 1 X16 0<br />
In the above diagram, the elements X16 3 to X16 0 indicate that the data is<br />
expressed in hexadecimal. Each digit can, therefore, be in the range from 0<br />
(ASCII 48dec, binary 0000) to 9 (ASCII 49dec, binary 1001), or A (ASCII<br />
65 dec, binary 1010) to F (ASCII 70 dec, binary 1111).<br />
X10 3 X10 2 X10 1 X10 0<br />
Section 8-4<br />
In this figure, X10 3 to X10 0 indicate that the data is expressed in decimal.<br />
Each digit can, therefore, be in the range from 0 (binary 0000) to 9 (binary<br />
1001).<br />
(
Binary Data<br />
(<br />
X23 X22 X21 X20 ON/ ON/ ON/ ON/<br />
OFF OFF OFF OFF<br />
In the above figure, the ON/OFF <strong>and</strong> X2 3 to X2 0 indicate that the data is<br />
binary. Each box therefore represents either 0 or 1 as follows:<br />
0 (ASCII 48 dec): OFF<br />
1 (ASCII 49 dec): ON.<br />
Data Areas Data area codes must be entered in capital letters <strong>and</strong> must be 4 characters<br />
wide. Names shorter than 4 characters must be followed by spaces (ASCII<br />
32dec) to make up the 4 characters. Data areas valid for each comm<strong>and</strong> are<br />
listed with the comm<strong>and</strong>.<br />
8-4-4 FCS Calculation<br />
The FCS is 8-bit data converted into two ASCII characters. The 8-bit data is<br />
the result of an EXCLUSIVE OR sequentially performed between each character,<br />
from the first character in the frame to the last character of the text in<br />
that frame.<br />
@10 RH 00310001 58 *CR<br />
Unit no. Header Text<br />
FCS Terminator<br />
@ 0100 0000<br />
XOR<br />
1 0011 0001<br />
XOR<br />
0 0011 0010<br />
XOR<br />
R 0101 0010<br />
:<br />
0 0011 0000<br />
XOR<br />
1 0011 0001<br />
0101 1000<br />
Conversion<br />
to ASCII<br />
0011 0101 0011 1000<br />
5 8<br />
FCS<br />
Section 8-4
% % Section 8-5<br />
8-4-5 FCS Calculation Program Example<br />
The following program is an example of how FCS calculation can be performed<br />
on received data.<br />
Note: in this example, CR (CHR$(13)) is not included in RESPONSE$.<br />
8-5 Host Link Comm<strong>and</strong>s <strong>and</strong> Responses<br />
Transmit/receive data<br />
Number of characters in FCS calculation range.<br />
Receive data contains an FCS, delimiter,<br />
terminator, etc. The ABORT comm<strong>and</strong>,<br />
however, does not contain an FCS.<br />
FCS calculation result<br />
Receive FCS data<br />
A space follows the semicolon if the<br />
FCS reception is performed normally. If<br />
it is not performed, ERR is displayed.<br />
In the Host Link Mode, the host computer can both monitor <strong>and</strong> control the<br />
PC. The host computer monitors the PC by sending comm<strong>and</strong>s to the PC<br />
requesting various <strong>type</strong>s of data: program data, I/O data, <strong>and</strong> error data. The<br />
host computer controls the PC by writing various <strong>type</strong>s of data: data that<br />
changes the PC operating mode, program data, I/O data, <strong>and</strong> memory area<br />
data. In either case it is the host computer that initiates all communications.<br />
Because the PC is passive is all communications, it cannot monitor host<br />
computer errors, it can only check communication errors existing in the data<br />
it receives. These are checked for through parity check <strong>and</strong> frame check sequence.<br />
The response time will vary in accordance with the transfer speed, the<br />
amount of data, <strong>and</strong> the PC cycle time. The RS-232C interface servicing time<br />
can be set in the System DM. The longer the servicing time, the faster the<br />
response time. Long service times will increase the cycle time, possibly causing<br />
inaccuracies in timers (see Section 6). If the servicing time is extremely<br />
short, then the response time will be extremely slow. The following data<br />
shows the actual times required to read 10 words of DM data from a PC with<br />
a cycle time of 30 ms for various settings of the servicing time.<br />
0% servicing time: 7.0 s<br />
1% servicing time: 0.90s<br />
2% servicing time: 0.28 s<br />
10% servicing time: 0.19 s<br />
50% servicing time: 0.14 s<br />
99% servicing time: 0.14 s<br />
The rest of this section describes the comm<strong>and</strong>s sent from the host computer<br />
to the PC. Tables summarizing the complete set of instructions according to<br />
their comm<strong>and</strong> level are included at the end of this section (see Section 8-6).<br />
(
8-5-1 TEST<br />
Comm<strong>and</strong> Format<br />
(#<br />
Transmits one block of data to the PC <strong>and</strong> then returns it, unaltered, to the<br />
host computer. Each frame is treated as a block regardless of whether it<br />
used a terminator or delimiter.<br />
@ T S<br />
X101 X100 Unit no. Any characters (118 max.) other than a carriage return FCS CR<br />
Response Format<br />
@ T S<br />
X101 X100 Unit no. Any characters (118 max.) other than a carriage return FCS CR<br />
8-5-2 STATUS READ<br />
Comm<strong>and</strong> Format<br />
Response Format<br />
@ M S<br />
X101 X100 Unit no.<br />
1: Generation of<br />
FALS instruction<br />
% % Section 8-5<br />
15<br />
1: Error diagnosis in progress<br />
This comm<strong>and</strong> causes the PC to read the operating status of the PC. A message<br />
is entered only when MSG(46) has been executed.<br />
@ M S<br />
X101 X100 Unit no. FCS CR<br />
*<br />
Response<br />
code<br />
X161 X160 14 13 12 11 10 9 8<br />
0<br />
Status data Message<br />
0 1 15<br />
0 0: PROGRAM mode<br />
1 0: RUN mode<br />
1 1: MONITOR mode<br />
1<br />
7<br />
Program area<br />
size<br />
8kbytes:010 *<br />
*<br />
FCS CR<br />
*<br />
Fixedto16characters<br />
6 5 4 3 2 1 0<br />
Program<br />
area<br />
RAM: 1<br />
ROM: 0<br />
0 0 0
% % Section 8-5<br />
8-5-3 ERROR READ<br />
Comm<strong>and</strong> Format<br />
Response Format<br />
X101 X100 @ Unit no. M F<br />
FCS CR<br />
*<br />
15<br />
1: FALS (CPU stops)<br />
1: END(01) instruction missing (F0)<br />
1: Host Link transmission error<br />
1: PC Link transmission error<br />
1: I/O bus error (C0 to 3)<br />
1: Memory error (F1)<br />
1: FAL error<br />
1: Special I/O Unit error (D0)<br />
1: Battery failure (F7)<br />
8-5-4 IR AREA READ<br />
Comm<strong>and</strong> Format<br />
Reads <strong>and</strong> clears errors in the PC. Also checks whether previous errors have<br />
already been cleared.<br />
@ M F<br />
X101 X100 Unit no. Error clear FCS CR<br />
X101 X100 14 13 12 11 10 9 8<br />
0 0 0: CPU Rack<br />
0 0 1: Expansion I/O Rack 1<br />
0 1 0: Expansion I/O Rack 2<br />
0 1 1: Expansion I/O Rack 3<br />
00: Don’t<br />
clear<br />
01: Clear<br />
X161 X160 Response<br />
code Error (first word)<br />
X163 X162 X161 X160 Error (second word)<br />
X163 X162 X161 X160 (Data from I/O bus)<br />
0 0: Group 1 (control signal error)<br />
0 1: Group 2 (data bus failure)<br />
1 0: Group 3 (address bus failure)<br />
15<br />
*<br />
14 13 12 11 10 9 8<br />
FAL, FALS No<br />
7 6 5 4 3 2 1 0<br />
7 6 5 4 3 2 1 0<br />
0 ....$0<br />
~<br />
~<br />
9 .... $9<br />
1: Cycle time over (F8)<br />
1: I/O Unit over (E1)<br />
0 ....$0<br />
~<br />
~<br />
9 .... $9<br />
Reads the contents of the specified number of IR words, starting from the<br />
specified word.<br />
@ R R<br />
X101 X100 Unit no. Beginning word<br />
FCS CR<br />
X103 X102 X101 X100 X103 X102 X101 X100 No. of words<br />
*<br />
('
Response Format<br />
((<br />
% % Section 8-5<br />
@ R R<br />
X101 X100 Unit no.<br />
FCS CR *<br />
8-5-5 HR AREA READ<br />
Comm<strong>and</strong> Format<br />
X161 X160 X163 X162 X161 X160 X163 X162 X161 X160 Response<br />
code<br />
Data from beginning<br />
word<br />
Data from second<br />
word<br />
Reads the contents of the specified number of HR words, starting from the<br />
specified word.<br />
@ R H<br />
X101 X100 Unit no. Beginning word<br />
FCS CR<br />
X103 X102 X101 X100 X103 X102 X101 X100 No. of words<br />
Response Format<br />
@ R H<br />
X101 X100 Unit no.<br />
FCS CR *<br />
8-5-6 AR AREA READ<br />
Comm<strong>and</strong> Format<br />
Response<br />
code<br />
X16 1 X16 0<br />
Data from beginning<br />
word<br />
X16 3 X16 2 X16 1 X16 0<br />
Data from second<br />
word<br />
X16 3 X16 2 X16 1 X16 0<br />
Reads the contents of the specified number of AR words, starting from the<br />
specified word.<br />
@ R J<br />
X101 X100 Unit no. Beginning word<br />
FCS CR<br />
X103 X102 X101 X100 X103 X102 X101 X100 No. of words<br />
Response Format<br />
@ R J<br />
X101 X100 Unit no.<br />
FCS CR *<br />
Response<br />
code<br />
X16 1 X16 0<br />
Data from beginning<br />
word<br />
X16 3 X16 2 X16 1 X16 0<br />
Data from second<br />
word<br />
X16 3 X16 2 X16 1 X16 0<br />
*<br />
*
% % Section 8-5<br />
8-5-7 LR AREA READ<br />
Comm<strong>and</strong> Format<br />
Reads the contents of the specified number of LR words, starting from the<br />
specified word.<br />
@ R L<br />
X101 X100 Unit no. Beginning word<br />
FCS CR<br />
X103 X102 X101 X100 X103 X102 X101 X100 No.ofwords<br />
Response Format<br />
@ R L<br />
X101 X100 Unit no.<br />
FCS CR *<br />
8-5-8 TC STATUS READ<br />
Comm<strong>and</strong> Format<br />
Response<br />
code<br />
X16 1 X16 0<br />
Data from beginning<br />
word<br />
X16 3 X16 2 X16 1 X16 0<br />
Data from second<br />
word<br />
X16 3 X16 2 X16 1 X16 0<br />
Reads the status of the Completion Flags of the specified number of timers/<br />
counters, starting from the specified timer/counter.<br />
@ R G<br />
X101 X100 Beginning<br />
Unit no. timer/counter<br />
FCS CR<br />
X10 *<br />
3 X102 X101 X100 X103 X102 X101 X100 No. of timers/counters<br />
Response Format<br />
@ R G<br />
X101 X100 Unit no.<br />
8-5-9 DM AREA READ<br />
Comm<strong>and</strong> Format<br />
X161 X160 Response<br />
code<br />
ON/<br />
OFF<br />
ON/<br />
OFF<br />
FCS * CR<br />
Data from second timer/counter<br />
Data from beginning timer/counter<br />
Reads the contents of the specified number of DM words, starting from the<br />
specified word.<br />
@ R D<br />
X101 X100 Unit no. Beginning word<br />
X103 X102 X101 X100 X103 X102 X101 X100 No.ofwords<br />
*<br />
FCS CR *<br />
(
Response Format<br />
(,<br />
% % Section 8-5<br />
@ R D<br />
X101 X100 Unit no.<br />
FCS CR *<br />
8-5-10 PV READ<br />
Comm<strong>and</strong> Format<br />
Response<br />
code<br />
X16 1 X16 0<br />
Data from beginning Data from second<br />
word<br />
word<br />
X163 X162 X161 X160 X163 X162 X161 X160 Reads the specified number of timer/counter PVs (present values), starting<br />
from the specified timer/counter.<br />
@ R C<br />
X101 X100 Unit no. FCS CR<br />
X103 X102 X101 X100 X103 X102 X101 X100 Beginning TIM/CNT Number<br />
Response Format<br />
@ R C<br />
X101 X100 Unit no.<br />
FCS CR *<br />
8-5-11 SV READ 1<br />
Comm<strong>and</strong> Format<br />
@ R #<br />
X101 X100 Unit no.<br />
Response Format<br />
Response<br />
code<br />
X16 1 X16 0<br />
Data from beginning<br />
timer/counter<br />
X10 3 X10 2 X10 1 X10 0<br />
Data from second<br />
timer/counter<br />
X10 3 X10 2 X10 1 X10 0<br />
Reads the set value (a constant) of the specified timer/counter instruction.<br />
Reads from the beginning of the program <strong>and</strong> may therefore require about 20<br />
seconds or more to produce a response. Refer also to SV READ 2.<br />
x101 x100 x103 x102 TIM/CNT<br />
T I M --<br />
T I M H<br />
C N T --<br />
C N T R<br />
Note: Dashes represent spaces.<br />
Number<br />
x101 x100 x103 x102 0 0 0 0<br />
: :<br />
: :<br />
0 5 1 1<br />
@ R #<br />
X101 X100 X101 X100 X103 X102 X161 X160 Unit no.<br />
Response<br />
code<br />
Set value<br />
*<br />
FCS CR<br />
*<br />
FCS CR *
% % Section 8-5<br />
8-5-12 SV READ 2<br />
Comm<strong>and</strong> Format<br />
@ R $<br />
X101 X100 Unit no.<br />
Response Format<br />
FCS CR *<br />
If the comm<strong>and</strong> is used more than once, the set value of only the first instruction<br />
will be read. If the second word (the oper<strong>and</strong>) is not a constant, an error<br />
response (16) will be returned.<br />
Reads the set value (a constant, or data area <strong>and</strong> word) of the specified timer/counter<br />
instruction. The timer/counter instruction is designated by program<br />
address.<br />
X101 X100 Address<br />
X103 X102 X10 3 X10 2<br />
TIM/CNT<br />
X10 1 X10 0<br />
T I M --<br />
T I M H<br />
C N T --<br />
C N T R<br />
Note: Dashes represent spaces.<br />
Number<br />
X101 X100 X103 X102 0 0 0 0<br />
: :<br />
: :<br />
0 5 1 1<br />
@ R $<br />
X101 X100 X101 X103 X102 X101 Data area FCS CR<br />
X16 *<br />
1 X160 Response<br />
Unit no.<br />
code<br />
Word<br />
OP1 OP2 OP3 OP4<br />
8-5-13 STATUS WRITE<br />
Comm<strong>and</strong> Format<br />
C I O --...IR area<br />
L R -- --...LR area<br />
H R -- --...HR area<br />
A R -- --...AR area<br />
D M -- --...DM area<br />
D M � --...�DM area<br />
C O N --...Constant<br />
Note: Dashes represent spaces.<br />
Changes the operating mode of the PC according to the information input<br />
into digit X16 0 .<br />
@ S C Mode data<br />
X161 X160 X101 X100 Unit no.<br />
X16 1 X16 2<br />
7 6 5 4 3 2 1 0<br />
0 0 0 0 0 0<br />
FCS CR *<br />
0 0: PROGRAM mode<br />
1 0: MONITOR mode<br />
1 1: RUN mode<br />
("
Response Format<br />
8-5-14 IR AREA WRITE<br />
Comm<strong>and</strong> Format<br />
@ W R<br />
X101 X100 Unit no.<br />
Response Format<br />
4<br />
% % Section 8-5<br />
FCS CR *<br />
8-5-15 HR AREA WRITE<br />
Comm<strong>and</strong> Format<br />
FCS CR *<br />
@ Unit no. S C<br />
X101 X100 X161 X160 Response<br />
code<br />
FCS CR *<br />
Writes data to the IR area, starting from the specified word. Writing is done<br />
word by word.<br />
X103 X102 X101 X100 X161 X160 Beginning word<br />
X163 X162 X161 X160 X163 X162 Data for beginning<br />
word<br />
Data for second<br />
word<br />
@ W R<br />
X101 X100 Unit no.<br />
X161 X160 Response<br />
code<br />
FCS CR *<br />
Writes data to the HR area, starting from the specified word. Writing is done<br />
word by word.<br />
@ W H<br />
X101 X100 X103 X102 X101 X100 Unit no.<br />
Beginning word<br />
Data for beginning<br />
word<br />
Data for second<br />
word<br />
X163 X162 X161 X160 X163 X162 X161 X160 Response Format<br />
@ Unit no. W H<br />
X101 X100 X161 X160 Response<br />
code<br />
FCS CR *
% % Section 8-5<br />
8-5-16 AR AREA WRITE<br />
Comm<strong>and</strong> Format<br />
FCS CR *<br />
Writes data to the AR area, starting from the specified word. Writing is done<br />
word by word.<br />
@ W J<br />
X101 X100 X103 X102 X101 X100 Unit no.<br />
Beginning word<br />
Data for beginning<br />
word<br />
Data for second<br />
word<br />
X163 X162 X161 X160 X163 X162 X161 X160 Response Format<br />
8-5-17 LR AREA WRITE<br />
Comm<strong>and</strong> Format<br />
FCS CR *<br />
@ Unit no. W J<br />
X101 X100 X161 X160 Response<br />
code<br />
FCS CR *<br />
Writes data to the LR area, starting from the specified word. Writing is done<br />
word by word.<br />
@ W L<br />
X101 X100 X103 X102 X101 X100 Unit no.<br />
Beginning word<br />
Data for beginning<br />
word<br />
Data for second<br />
word<br />
X163 X162 X161 X160 X163 X162 X161 X160 Response Format<br />
8-5-18 TC STATUS WRITE<br />
Comm<strong>and</strong> Format<br />
@ Unit no. W L<br />
X101 X100 @ W G<br />
X101 X100 X103 X102 X101 X100 Unit no.<br />
Timer/Counter<br />
X161 X160 Response<br />
code<br />
FCS CR *<br />
Writes the status of Completion Flags to the TC area, starting form the specified<br />
timer/counter.<br />
ON/<br />
OFF<br />
ON/<br />
OFF<br />
FCS CR *<br />
Status of second timer/counter<br />
Status of beginning timer/counter<br />
Beginning timer/counter<br />
0: OFF<br />
1: ON
% % Section 8-5<br />
Response Format<br />
8-5-19 DM AREA WRITE<br />
Comm<strong>and</strong> Format<br />
@ W D<br />
X101 X100 Unit no.<br />
FCS CR *<br />
Response Format<br />
8-5-20 PV WRITE<br />
Comm<strong>and</strong> Format<br />
FCS CR *<br />
X101 X100 @ Unit no. W G<br />
X161 X160 Response<br />
code<br />
FCS CR *<br />
Writes data to the DM area, starting from the specified word. Writing is done<br />
word by word. If the Program Memory is in an EPROM chip, or if the write<br />
enable switch is set to OFF, the the writing range only extends up to DM<br />
0999.<br />
X103 X102 X101 X100 X161 X160 Beginning word<br />
X163 X162 X161 X160 X163 X162 Data for beginning<br />
word<br />
Data for second<br />
word<br />
@ Unit no. W D<br />
X101 X100 X161 X160 Response<br />
code<br />
FCS CR *<br />
Writes the PVs (present values) of timers/counters starting from the specified<br />
timer/counter.<br />
X101 X100 X103 X102 X101 X100 @ Unit no. W C Beginning word<br />
Data for beginning<br />
word<br />
Data for second<br />
word<br />
X103 X102 X101 X100 X103 X102 X101 X100 Response Format<br />
@ W C<br />
X101 X100 Unit no.<br />
Response<br />
code FCS CR<br />
X16 *<br />
1 X160
% % Section 8-5<br />
8-5-21 SV CHANGE 1<br />
Comm<strong>and</strong> Format<br />
Changes the set value (constant only) of the specified timer/counter instruction.<br />
Reads from the beginning of the program <strong>and</strong> may therefore require up<br />
to about 20 seconds to produce a response. Refer also to SV CHANGE 2.<br />
@ Unit no. W # TIM/CNT<br />
Number<br />
New set value FCS<br />
CR<br />
X103 X102 X101 X100 X101 X100 X103 X102 X101 X100 Response Format<br />
8-5-22 SV CHANGE 2<br />
Comm<strong>and</strong> Format<br />
T I M --<br />
T I M H<br />
C N T --<br />
C N T R<br />
Note: Dashes represent spaces.<br />
0 0 0 0<br />
: :<br />
: :<br />
0 5 1 1<br />
@ W #<br />
X101 X100 Unit no.<br />
@ W $<br />
X101 X100 X103 X102 X101 X100 Unit no.<br />
Address<br />
X161 X160 Response<br />
code<br />
0 0 0 0<br />
: :<br />
: :<br />
9 9 9 9<br />
FCS CR *<br />
Changes the set value (a constant, or data area <strong>and</strong> word) of the specified<br />
timer/counter instruction. The instruction is specified by program address.<br />
Data area Address**<br />
X103 X102 X101 X100 C I O --....IR area<br />
L R -- --....LR area<br />
H R -- --....HR area<br />
A R -- --....AR area<br />
D M -- --....DM area<br />
D M � --....�DM area<br />
C O N --....Constant<br />
Note: Dashes represent spaces.<br />
Response Format<br />
**New set value<br />
@ W $<br />
X101 X100 Unit no.<br />
TIM/CNT<br />
T I M --<br />
T I M H<br />
C N T --<br />
C N T R<br />
FCS CR *<br />
X161 X160 Response<br />
code<br />
X101 X100 Number<br />
X103 X102 0 0 0 0<br />
: :<br />
: :<br />
0 5 1 1<br />
FCS CR *<br />
*
8-5-23 FORCED SET<br />
Comm<strong>and</strong> Format<br />
#<br />
% % Section 8-5<br />
Forced sets a bit in an IR, LR, HR, AR, or TC area. Bits need to be force set<br />
one at a time.<br />
@ K S<br />
X101 X100 X103 X102 Data area<br />
X101 X100 Word<br />
Bit<br />
X101 X100 Unit no.<br />
Response Format<br />
8-5-24 FORCED RESET<br />
Comm<strong>and</strong> Format<br />
C I O -- .... IR area<br />
L R -- -- .... LR area<br />
H R -- -- .... HR area<br />
A R -- -- .... AR area<br />
T I M --<br />
T<br />
C<br />
I<br />
N<br />
M<br />
T<br />
H<br />
--<br />
TC area<br />
C N T R<br />
Note: Dashes represent spaces.<br />
@ Unit no. K S<br />
X101 X100 X161 X160 Response<br />
code<br />
FCS CR *<br />
FCS CR *<br />
Force resets a bit in an IR, LR, HR, AR, or TC area. Bits can only be force<br />
set one at a time. If an attempt is made to simultaneously force reset more<br />
than one bit, none of the bits will reset.<br />
@ K R<br />
X101 X100 X103 X102 Data area<br />
X101 X100 Word<br />
Bit<br />
X101 X100 Unit no.<br />
Response Format<br />
C I O -- .... IR area<br />
L R -- -- .... LR area<br />
H R -- -- .... HR area<br />
A R -- -- .... AR area<br />
T I M --<br />
T<br />
C<br />
I<br />
N<br />
M<br />
T<br />
H<br />
-- TC area<br />
C N T R<br />
Note: Dashes represent spaces.<br />
@ Unit no. K R<br />
X101 X100 X161 X160 Response<br />
code<br />
FCS CR *<br />
FCS CR *
% % Section 8-5<br />
8-5-25 MULTIPLE FORCED SET/RESET<br />
Comm<strong>and</strong> Format<br />
This comm<strong>and</strong> force sets or resets bits in the IR, LR, HR, AR, or TC areas.<br />
All forced status will be lost if the PC is switched to RUN mode.<br />
@ F K<br />
X101 X100 X103 X102 X101 X100 Unit no.<br />
Data area<br />
Word<br />
X160 X160 X160 ... 2 1 0<br />
Response Format<br />
C I O -- .... IR area<br />
L R -- -- .... LR area<br />
H R -- -- .... HR area<br />
A R -- -- .... AR area<br />
T I M --<br />
T<br />
C<br />
I<br />
N<br />
M<br />
T<br />
H<br />
-- TC area<br />
C N T R<br />
Note: Dashes represent spaces.<br />
FCS CR<br />
*<br />
3 2 1 0<br />
0 0 0 0....Ignored<br />
0 0 1 0....Data “0”<br />
0 0 1 1....Data “1”<br />
0 1 0 0....Forced reset<br />
0 1 0 1....Forced set<br />
1 0 0 0....Forced set/reset clear<br />
Forced set/reset/data clear<br />
X16 0 X16 0 X16 0 X16 0<br />
Bit 15 14 13 12<br />
X101 X100 @ F K<br />
X161 X160 Response<br />
Unit no.<br />
code FCS CR<br />
*<br />
8-5-26 MULTIPLE FORCED SET/RESET STATUS READ<br />
Comm<strong>and</strong> Format<br />
Reads the forced set or forced reset status of the PC.<br />
@ Unit no. F R<br />
X101 X100 FCS CR *<br />
'
Response Format<br />
@ Unit no. F R<br />
X101 X100 X103 X102 X101 X100 X16 0P1 0P2 0P3 0P4<br />
1 X160 (<br />
0/1 0/1<br />
Bit 1 0<br />
% % Section 8-5<br />
,<br />
Data area<br />
0P1 0P2 0P3 0P4<br />
Data area<br />
C I O -- .... IR area<br />
L R -- -- .... LR area<br />
H R -- -- .... HR area<br />
A R -- -- .... AR area<br />
T I M --<br />
T<br />
C<br />
I<br />
N<br />
M<br />
T<br />
H<br />
-- TC area<br />
C N T R<br />
Note: Dashes represent spaces.<br />
X10<br />
Word<br />
3 X102 X101 X100 Delineator Only when applicable<br />
8-5-27 FORCED SET/RESET CANCEL<br />
Comm<strong>and</strong> Format<br />
Response Format<br />
8-5-28 PC MODEL READ<br />
Comm<strong>and</strong> Format<br />
Word<br />
Forced set/reset status<br />
0/1 0/1 ... 0/1<br />
Forced set/reset status<br />
0/1 0/1 0/1 0/1<br />
Bit 15 14 13 12<br />
Forced set/reset status<br />
1: Forced set/reset<br />
0: Not forced set/reset<br />
FCS CR<br />
*<br />
Cancels all forced set <strong>and</strong> forced reset bits (including those achieved via<br />
MULTIPLE FORCED SET/RESET.<br />
@ K C<br />
X101 X100 Unit no.<br />
X101 X100 @ Unit no. K C<br />
Reads the model <strong>type</strong> of the PC.<br />
FCS CR *<br />
X161 X160 Response<br />
code<br />
X101 X100 @ Unit no. M M FCS CR<br />
*<br />
FCS CR *
% % Section 8-5<br />
Response Format<br />
@ M M<br />
X101 X100 X161 X160 Response<br />
code FCS CR<br />
X16 *<br />
1 X160 PC model<br />
Unit no.<br />
code<br />
8-5-29 ABORT <strong>and</strong> INITIALIZE<br />
ABORT Comm<strong>and</strong> Format<br />
INITIALIZE Comm<strong>and</strong> Format<br />
0 1 C250 or P-<strong>type</strong><br />
0 2 C500<br />
0 3 C120 or C50<br />
0 9 C250F<br />
0 A C500F<br />
0 B C120F<br />
0 E C2000<br />
1 0 C1000H<br />
1 1 C2000H or K-<strong>type</strong><br />
1 2 C200H or <strong>C20H</strong>/<strong>C28H</strong>/<strong>C40H</strong>/<strong>C60H</strong><br />
1 3 C1000HF<br />
The ABORT comm<strong>and</strong> is used to abort the process being performed by the<br />
Host Link function <strong>and</strong> to then enable reception of the next comm<strong>and</strong>. The<br />
INITIALIZE comm<strong>and</strong> initializes the transmission control procedure of all the<br />
<strong>PCs</strong> connected to the host computer. Neither comm<strong>and</strong> receives a response.<br />
A processing time of 100 ms is required between reception of the ABORT or<br />
INITIALIZE comm<strong>and</strong>s, <strong>and</strong> reception of the next comm<strong>and</strong>. If INITIALIZE is<br />
used in a single-link system, it will be regarded as undefined.<br />
X101 X100 @ Unit no. X Z FCS CR<br />
@ * * CR<br />
8-5-30 Response to an Undefined Comm<strong>and</strong><br />
Response Format<br />
This response is sent if the PC cannot read the comm<strong>and</strong>’s header code, or if<br />
the specified comm<strong>and</strong> is not valid for the comm<strong>and</strong> level or model of PC. If<br />
this response is received check the header code, comm<strong>and</strong> level, <strong>and</strong> PC<br />
model, then execute the correct comm<strong>and</strong>.<br />
X101 X100 @ Unit no. I C FCS CR<br />
*<br />
*
8-5-31 Response Indicating an Unprocessed Comm<strong>and</strong><br />
Response Format<br />
8-5-32 PROGRAM READ<br />
Comm<strong>and</strong> Format<br />
Response Format<br />
,<br />
% % Section 8-5<br />
@ R P<br />
X101 X100 Unit no.<br />
8-5-33 PROGRAM WRITE<br />
Comm<strong>and</strong> Format<br />
Response Format<br />
This response is sent when the PC cannot process a comm<strong>and</strong>. The <strong>type</strong> of<br />
error encountered by the PC can be identified via the response code. (See<br />
Section 8-5-36.)<br />
@<br />
@ W P<br />
X101 X100 Unit no.<br />
X101 X100 X161 X160 Header code Response<br />
Unit no.<br />
code<br />
FCS CR *<br />
The header code varies according to the comm<strong>and</strong> which was sent. The<br />
headers of some comm<strong>and</strong>s include subheader codes (e.g., I/O REGISTER,<br />
I/O READ, <strong>and</strong> DM SIZE CHANGE).<br />
Transmits the contents of the PC program memory.<br />
X101 X100 @ Unit no. R P FCS CR<br />
X161 X160 Response<br />
code<br />
Program<br />
X161 X160 X161 X160 Memory size<br />
Writes the received program into the PC program memory.<br />
Up to maximum memory capacity<br />
*<br />
FCS CR *<br />
X161 X160 X161 X160 Program FCS CR<br />
@ W P<br />
X101 X100 Unit no.<br />
X161 X160 Response<br />
code<br />
*<br />
FCS CR *
8-5-34 I/O REGISTER<br />
Comm<strong>and</strong> Format<br />
Registers the IR, LR, HR, AR, or TC area bit, or the DM word that is to be<br />
read via I/O READ (described in the next subsection). Registered data is retained<br />
until new data is registered, or the power is turned OFF.<br />
@ Q Q M R<br />
X101 X100 X103 X102 Data area<br />
X101 X100 Unit no.<br />
Word<br />
Bit no. or<br />
Word<br />
OP1 OP2 OP3 OP4 OR1 OR2<br />
,<br />
Delineator<br />
Setting Table<br />
% % Section 8-5<br />
Subheader<br />
code<br />
OP1<br />
Data area<br />
OP2 OP3 OP4<br />
C I O --....IR area<br />
L R -- --....LR area<br />
H R -- --...HR area<br />
A R -- --....AR area<br />
T I M --<br />
T<br />
C<br />
I<br />
N<br />
M<br />
T<br />
H<br />
--<br />
TC area<br />
C N T R<br />
D M -- --....DM area<br />
Note: Dashes represent spaces.<br />
Word<br />
X103 X102 X101 X100 Bit no. or<br />
Word FCS CR<br />
OR1 OR2 *<br />
0 0<br />
0 1<br />
: :<br />
: :<br />
1 5<br />
C H<br />
Data Area Word Address Bit or Word Setting Response<br />
Bit IR 0000 to 0255 00 to 15 ON/OFF<br />
LR 0000 to 0063 00 to 15 ON/OFF<br />
HR 0000 to 0099 00 to 15 ON/OFF<br />
AR 0000 to 0027 00 to 15 ON/OFF<br />
TIM/CNT 0000 to 0511 Anything other than CH ON/OFF<br />
Wd IR 0000 to 0255 CH Word data<br />
LR 0000 to 0063 CH Word data<br />
HR 0000 to 0099 CH Word data<br />
AR 0000 to 0027 CH Word data<br />
TIM/CNT 0000 to 0511 CH ON/OFF <strong>and</strong> PV<br />
DM 0000 to 1999 Any character Word data<br />
Response Format<br />
,<br />
Delineator<br />
Bit no.<br />
Word<br />
setting<br />
The maximum number of data items is 128. Count the TC area word specification<br />
as two items.<br />
The data is registered in the same sequence in which it was specified.<br />
X101 X100 @ Q Q M R FCS CR<br />
X16 *<br />
1 X160 Response<br />
Unit no.<br />
code<br />
Subheader<br />
code<br />
"
8-5-35 I/O READ<br />
Comm<strong>and</strong> Format<br />
Response Format<br />
,4<br />
% % Section 8-5<br />
@ Q Q I R<br />
X101 X100 Unit no.<br />
,<br />
Reads the data specified by I/O REGISTER.<br />
X101 X100 @ Unit no. Q Q I R FCS CR<br />
Subheader code<br />
ON/<br />
OFF , ,<br />
Read bit status<br />
0: OFF<br />
1: ON<br />
8-5-36 Response Code List<br />
X161 X160 Response<br />
code<br />
Subheader code<br />
ON/<br />
OFF<br />
Read word data<br />
X163 X162 X161 X160 X16 1 X16 0 Description<br />
0 0 Normal Completion<br />
0 1 Not executable in RUN mode<br />
0 2 Not executable in MONITOR mode<br />
0 3 Not executable with PROM mounted<br />
0 4 Address over (data overflow)<br />
0 B Not executable in PROGRAM mode<br />
1 0 Parity error<br />
1 1 Framing error<br />
1 2 Overrun<br />
1 3 FCS error<br />
1 4 Format error (parameter length error)<br />
*<br />
Present value<br />
X103 X102 X101 X100 For TIM/CNT status read<br />
1 5 Entry number data error (parameter error, data code error, data length error)<br />
1 6 Instruction not found<br />
1 8 Frame length error<br />
,<br />
Delineator<br />
FCS CR *<br />
1 9 Not executable (due to unclearable error, memory error, unwriteable EEPROM, missing I/O table, etc.)<br />
2 2 No Memory Unit mounted<br />
2 3 User memory is write-protected<br />
A 0 Aborted due to parity error in transmit data<br />
A 1 Aborted due to framing error in transmit data<br />
A 2 Aborted due to overrun in transmit data<br />
A 4 Aborted due to format error in transmit data<br />
A 5 Aborted due to entry number data error in transmit data<br />
A 8 Aborted due to frame length error in transmit data<br />
Other Probably produced by noise. Execute comm<strong>and</strong> again.
% % Section 8-5<br />
8-5-37 Communications Examples<br />
The following are examples of comm<strong>and</strong>s from the host computer (first line)<br />
<strong>and</strong> the responses that would be given by the PC (second line). The arrows<br />
indicate the transfer of the right to transmit.<br />
Reading Data from Multiple PC Words (IR 04 to IR 06) (Normal Completion)<br />
@ 1 0 R R 0 0 0 4 0 0 0 3 4 6<br />
FCS<br />
* CR<br />
@ 1 0 R R 0 0 F E D C B A 9 8 7 6 5 4 4 7<br />
Data in Wd<br />
04<br />
Wd 9000 Specified by Mistake in a DM AREA WRITE Comm<strong>and</strong><br />
@ 1 0 W D 9 0 0 0 A B C D 5 F<br />
FCS<br />
* CR<br />
Header Code Destroyed During ERROR READ Operation<br />
@ 1 0 (M)(F)<br />
* CR<br />
Data in Wd<br />
05<br />
Data in Wd<br />
06<br />
@ 1 0 W D 1 5 5 6<br />
@ 1 0 I C 4 B<br />
FCS<br />
FCS<br />
* CR<br />
FCS<br />
* CR<br />
* CR<br />
,
Writing Data into PC Words (“0123” to DM 0400 <strong>and</strong> “FEDC” to DM 0401) <strong>and</strong> Confirming with DM<br />
AREA READ.<br />
,<br />
% % Section 8-5<br />
@ 1 0 W D 0 4 0 0 0 1 2 3 F E D C 5 2<br />
@ 1 0 R D 0 4 0 0 0 0 0 2 5 1<br />
FCS<br />
* CR<br />
FCS<br />
* CR<br />
@ 1 0 W D 0 0 5 2<br />
FCS<br />
@ 1 0 R D 0 0 0 1 2 3 F E D C 5 3<br />
FCS<br />
* CR<br />
* CR
% $ Section 8-6<br />
8-6 Comm<strong>and</strong> Levels<br />
There are three levels of Host Link Unit comm<strong>and</strong>s. These different operating<br />
levels allow the user to establish hierarchical protocols to give more sophisticated<br />
control.<br />
Level 1<br />
Header Code Name PC Mode<br />
RUN MONITOR PROGRAM<br />
TS TEST Valid Valid Valid<br />
MS STATUS READ Valid Valid Valid<br />
MF ERROR READ Valid Valid Valid<br />
RR IR AREA READ Valid Valid Valid<br />
RH HR AREA READ Valid Valid Valid<br />
RJ AR AREA READ Valid Valid Valid<br />
RL LR AREA READ Valid Valid Valid<br />
RG TC STATUS READ Valid Valid Valid<br />
RD DM AREA READ Valid Valid Valid<br />
RC PV READ Valid Valid Valid<br />
R# SV READ 1 Valid Valid Valid<br />
R$ SV READ 2 Valid Valid Valid<br />
SC STATUS WRITE Valid Valid Valid<br />
WR IR AREA WRITE Not Valid Valid Valid<br />
WH HR AREA WRITE Not Valid Valid Valid<br />
WJ AR AREA WRITE Not Valid Valid Valid<br />
WL LR AREA WRITE Not Valid Valid Valid<br />
WG TC STATUS WRITE Not Valid Valid Valid<br />
WD DM AREA WRITE Not Valid Valid Valid<br />
WC PV WRITE Not Valid Valid Valid<br />
W# SV CHANGE 1 Not Valid Valid Valid<br />
W$ SV CHANGE 2 Not Valid Valid Valid<br />
KS FORCED SET Not Valid Valid Not Valid<br />
KR FORCED RESET Not Valid Valid Not Valid<br />
FK MULTIPLE FORCED SET/RESET Not Valid Valid Not Valid<br />
FR MULTIPLE FORCED SET/RESET STATUS READ Not Valid Valid Not Valid<br />
KC FORCED SET/RESET CANCEL Not Valid Valid Not Valid<br />
MM PC MODEL READ Valid Valid Valid<br />
IC Undefined comm<strong>and</strong> (response only) Valid Valid Valid<br />
Unprocessed comm<strong>and</strong> (response only) Valid Valid Valid<br />
XZ ABORT (comm<strong>and</strong> only) Valid Valid Valid<br />
Level 2<br />
Header Code Name PC Mode<br />
RUN MONITOR PROGRAM<br />
RP PROGRAM READ Valid Valid Valid<br />
WP PROGRAM WRITE Not valid Not valid Valid<br />
Level 3<br />
Header Code Name PC Mode<br />
RUN MONITOR PROGRAM<br />
QQ I/O REGISTER Valid Valid Valid<br />
QQ I/O READ Valid Valid Valid<br />
,
"<br />
+0 1 %<br />
��� ������������������� ������� ��������������� ��������� �� �������� ���� ����� �� �������� ������ �����������<br />
����� ��������� �������� �������� ��� ������ ������ ������ ����� �����������<br />
���� ������� �������� ����������� �� �������� ��� �������� ������ ���� ����� ������ �� ���������� ��� ����������� ��<br />
���������� ������� ��� ��� ���������� ��� �������� ����� ��������� ��� ����������� �� ����� ����� ����� ��� �� ���� ��<br />
���������������� ����� �� ��� �� ���� ��� ��� �� ����� ��� ����������� �� ������ ����� ��� ����� ���� ��������� ���<br />
�������� ����� �� ����� �������� ��� ��������<br />
��� ����� ���������� ���������������������������������������������������������� ���<br />
��� ���������� ������ ��� ����� �������� �������������������������������������� ���<br />
��� ������� ��� �������� ������ ��� �������� ������������������������������������� ���<br />
��� ����� �������� ����������������������������������������������������������� ���<br />
��� ����� ������� �������� ����������������������������������������������������� ���<br />
��� �������� ����� ���������� ������������������������������������������������� ���<br />
����� ����� ������� ����������������������������������������������������� ���<br />
����� ������� ���������� ������������������������������������������������� ���<br />
����� ������� ������������ ������������������������������������������������ ���<br />
����� ���� ���������� �������������������������������������������������� ���<br />
����� ������� ����������������������������������������������������������<br />
���<br />
,'
9-1 Alarm Indicators<br />
,(<br />
% % ) % Section 9-3<br />
There are two indicators on the front of the CPU that provide visual indication<br />
of an abnormality in the PC. The error indicator (ERR) indicates fatal errors<br />
(i.e., ones that will stop PC operation); the alarm indicator (ALARM) indicates<br />
nonfatal ones. These indicators are shown in 2-1 Indicators.<br />
Caution The PC will turn ON the error indicator (ERR), stop program execution, <strong>and</strong><br />
turn OFF all outputs from the PC for most hardware errors, for certain fatal<br />
software errors, or when FALS(07) is executed in the program (see tables on<br />
pages 287 to 288). PC operation will continue for all other errors. It is the user’s<br />
responsibility to take adequate measures to ensure that a hazardous<br />
situation will not result from automatic system shutdown for fatal errors <strong>and</strong><br />
to ensure that proper actions are taken for errors for which the system is not<br />
automatically shut down. System flags <strong>and</strong> other system <strong>and</strong>/or user-programmed<br />
error indications can be used to program proper actions.<br />
9-2 Programmed Alarms <strong>and</strong> Error Messages<br />
FAL(06), FALS(07), <strong>and</strong> MSG(46) can be used in the program to provide<br />
user-programmed information on error conditions. With these three instructions,<br />
the user can tailor error diagnosis to aid in troubleshooting.<br />
FAL(06) is used with a FAL number other than 00, which is output to the SR<br />
area when FAL(06) is executed. Executing FAL(06) will not stop PC operation<br />
or directly affect any outputs from the PC.<br />
FALS(07) is also used with a FAL number, which is output to the same location<br />
in the SR area when FALS(07) is executed. Executing FALS(07) will stop<br />
PC operation <strong>and</strong> will cause all outputs from the PC to be turned OFF.<br />
When FAL(06) is executed with a function number of 00, the current FAL<br />
number contained in the SR area is cleared <strong>and</strong> replaced by another, if more<br />
have been stored in memory by the system.<br />
When MSG(46) is used a message contained specified data area words is<br />
displayed onto the Programming Console or another Programming Device.<br />
The use of these instructions is described in detail in Section 5 Instruction<br />
Set.<br />
9-3 Reading <strong>and</strong> Clearing Errors <strong>and</strong> Messages<br />
System error messages can be displayed onto the Programming Console or<br />
any other Programming Device.<br />
On the Programming Console, press the CLR, FUN, <strong>and</strong> MONTR keys. If<br />
there are multiple error messages stored by the system, the MONTR key can<br />
be pressed again to access the next message. If the system is in PROGRAM<br />
mode, pressing the MONTR key will clear the error message, so be sure to<br />
write down all message errors as you read them. (It is not possible to clear<br />
an error or a message while in RUN or MONITOR mode; the PC must be in<br />
PROGRAM mode.) When all messages have been cleared, “ERR CHK OK”<br />
will be displayed.<br />
Details on accessing error messages from the Programming Console are<br />
provided in 7-2 Monitoring Operation <strong>and</strong> Modifying Data. Procedures for the<br />
GPC, LSS, <strong>and</strong> FIT are provided in the relevant operation manuals.
) Section 9-4<br />
9-4 Error Messages<br />
Initialization Error<br />
There are basically three <strong>type</strong>s of errors for which messages are displayed:<br />
initialization errors, non-fatal operating errors, <strong>and</strong> fatal operating errors.<br />
Most of these are also indicated by FAL number being transferred to the FAL<br />
area of the SR area. In addition, there are errors which can occur when inputting<br />
the program. For information on these, <strong>and</strong> their message displays,<br />
refer to 4-6-3 Checking the Program.<br />
The <strong>type</strong> of error can be quickly determined from the indicators on the CPU,<br />
as described below for the three <strong>type</strong>s of errors. If the status of an indicator is<br />
not mentioned in the description, it makes no difference whether it is lit or not.<br />
After eliminating the cause of an error, clear the error message from memory<br />
before resuming operation.<br />
Asterisks in the error messages in the following tables indicate variable numeric<br />
data. An actual number would appear on the display.<br />
The following error message appears before program execution has been<br />
started. The POWER indicator will be lit, the RUN indicator will not be lit, <strong>and</strong><br />
the RUN output will be OFF for this error.<br />
Error <strong>and</strong> message FAL no. Probable cause Possible remedy<br />
Waiting for Units<br />
None Units have not started. Check all system components to<br />
be sure they are working properly<br />
��� ������<br />
<strong>and</strong> replace all faulty Units.<br />
Non-fatal Operating Errors<br />
The following error messages appear for errors that occur after program execution<br />
has been started. PC operation <strong>and</strong> program execution will continue<br />
after one or more of these errors have occurred. For each of these errors, the<br />
POWER <strong>and</strong> RUN indicators will light <strong>and</strong> the ALARM/ERROR indicator will<br />
flash. The RUN output will be ON.<br />
Error <strong>and</strong> message FAL no. Probable cause Possible correction<br />
FAL error<br />
01 to 99 FAL(06) has been Correct according to cause<br />
��� ���� ���<br />
executed in program.<br />
Check the FAL number to<br />
determine conditions that<br />
would cause execution<br />
(set by user).<br />
indicated by FAL number (set by<br />
user).<br />
9E Checksum Flag (AR Check Parameter <strong>and</strong> Parameter<br />
1315) is ON.<br />
Backup areas. Set <strong>and</strong> back up<br />
parameters with system<br />
comm<strong>and</strong>.<br />
Cycle time overrun<br />
F8 Watchdog timer has Program cycle time is longer than<br />
���� ���� ����<br />
exceeded 100 ms. recommended. Reduce cycle time<br />
if possible.<br />
Battery error<br />
���� ���<br />
F7 Backup battery is missing<br />
or its voltage has<br />
dropped.<br />
Host Link Error None • Error exists between<br />
host computer <strong>and</strong><br />
No message<br />
built-in Host Link<br />
Interface.<br />
Check battery <strong>and</strong> replace if<br />
necessary.<br />
• Check link set-up <strong>and</strong><br />
requirements.<br />
,
) Section 9-4<br />
Fatal Operating Errors<br />
,,<br />
The following error messages appear for errors that occur after program execution<br />
has been started. PC operation <strong>and</strong> program execution will stop <strong>and</strong><br />
all outputs from the PC will be turned OFF when any of the following errors<br />
occur. All CPU indicators will not be lit for the power interruption error. For all<br />
other fatal operating errors, the POWER <strong>and</strong> ALARM/ERROR indicators will<br />
be lit. The RUN output will be OFF. For power interruptions, all indicators will<br />
not be lit.<br />
Error <strong>and</strong> message FAL no. Probable cause Possible correction<br />
Power interruption<br />
None Power has been<br />
Check power supply voltage <strong>and</strong><br />
interrupted for at least 10 power lines. Try to power-up<br />
No message<br />
ms.<br />
again.<br />
CPU error<br />
Memory error<br />
������ ���<br />
No message<br />
No END(01) instruction<br />
�� ��� ����<br />
I/O Unit over<br />
��� ���� ����<br />
I/O bus error<br />
��� ��� ���<br />
FALS error<br />
��� ���� �����<br />
Rack no.<br />
None Watchdog timer has<br />
exceeded maximum<br />
setting (default setting:<br />
130 ms).<br />
F1 Memory Unit is<br />
incorrectly mounted or<br />
missing, checksum error<br />
has occurred, or incorrect<br />
instruction exists.<br />
F0 END(01) is not written<br />
anywhere in program.<br />
E1 The I/O capacity of the<br />
PC has been exceeded.<br />
C0 to C3 Error has occurred in the<br />
bus line between the<br />
Units.<br />
01 to 99 FALS has been executed<br />
by the program. Check<br />
the FAL number to<br />
determine conditions that<br />
would cause execution<br />
(Setbyuserorby<br />
system).<br />
9F The cycle time is over<br />
120 ms (or 130 ms to<br />
6.5 s if watchdog timer<br />
instruction is used.)<br />
Restart system in PROGRAM<br />
mode <strong>and</strong> check program. Reduce<br />
cycle time or reset watchdog timer<br />
if longer time required. (Consider<br />
effects of longer cycle time before<br />
resetting.)<br />
Check Memory Unit to make sure<br />
it is mounted <strong>and</strong> backed up<br />
properly. Perform a Program<br />
Check Operation to locate cause<br />
of error. If error not correctable, try<br />
inputting program again.<br />
Write END(01) at the last address<br />
of the program.<br />
Reduce the number of I/O points<br />
<strong>and</strong> restart the PC.<br />
The rightmost digit of the FAL<br />
number will indicate the number of<br />
the Unit where the error was<br />
detected. Check cable<br />
connections between Units.<br />
Correct according to cause<br />
indicated by FAL number. If FAL<br />
number is 9F, check watchdog<br />
timer <strong>and</strong> cycle time, which may<br />
be too long.<br />
9F will be output when FALS(07) is<br />
executed <strong>and</strong> the cycle time is<br />
over 120 ms. Check the program.
6 $ ' ) Section 9-6<br />
9-5 Error History Function<br />
9-6 Host Link Error Processing<br />
If the Error History Enable Bit (AR 0715) has been turned ON, then, when an<br />
error occurs, the FAL no., the date, <strong>and</strong> the time (in hours, minutes, <strong>and</strong> seconds,<br />
i.e., the values stored in AR 18 <strong>and</strong> AR 19) are sent to the System DM.<br />
For details on how this function operates, refer to 3-6DMArea.<br />
This section describes errors that can occur in a computer-linked system employing<br />
the RS-232C interface, including errors processed by the host computer<br />
(see 9-6-1 Error Control <strong>and</strong> 8-4 Host Link Communications Protocol).<br />
Send comm<strong>and</strong>.<br />
Start timer.<br />
Response?<br />
Y<br />
ERROR?<br />
N<br />
Process<br />
response.<br />
Next comm<strong>and</strong>.<br />
N<br />
Y<br />
Tries=n?<br />
Y<br />
Error processing<br />
Time<br />
expired?<br />
Y<br />
Tries=m?<br />
Y<br />
Timeout<br />
processing<br />
Programs to monitor communication time <strong>and</strong> error h<strong>and</strong>ling need to be developed<br />
on the host computer. Be sure that these include processes that can<br />
respond appropriately to errors <strong>and</strong> other abnormalities from the PC by taking<br />
into consideration the kinds of errors described in the sections listed<br />
above.<br />
N<br />
N<br />
N<br />
,"
6 $ ' ) Section 9-6<br />
9-6-1 Error Control<br />
9-6-2 Invalid Processing<br />
9-6-3 Process Interruption<br />
9-6-4 Time Monitoring<br />
9-6-5 Retries<br />
"4<br />
The host computer is responsible for ensuring system recovery after errors<br />
occur in the Host Link System.<br />
The host link interface runs the following checks to detect errors:<br />
1, 2, 3... Parity check<br />
Framing check<br />
Overrun check<br />
Format check<br />
Entry data check (The start word, read word, etc., in the comm<strong>and</strong> format.)<br />
FCS (An Exclusive OR check is performed on all comm<strong>and</strong> or response<br />
data, from the unit number to the end of the text.)<br />
Of the above comm<strong>and</strong>s, 1 to 3 are performed on a character by character<br />
basis. Checks 4 to 6, however, are performed on each block (frame).<br />
Transmit data in a multiple-link system is checked by means of a parity check<br />
<strong>and</strong> a Frame Check Sequence (FCS). The FCS check is not performed in<br />
single-link systems.<br />
If the host link interface detects an error in a single-frame comm<strong>and</strong> or the<br />
first frame of a comm<strong>and</strong> block, it will regard the comm<strong>and</strong> as invalid. The<br />
comm<strong>and</strong> will not be processed <strong>and</strong>, after the terminator is received, an error<br />
response will be sent to the host computer.<br />
If the host link interface detects an error in an intermediate frame, the comm<strong>and</strong>s<br />
up to that point will be processed normally. Those following the erroneous<br />
frame, however, will not be processed. After the host link interface has<br />
received the terminator of the erroneous block, it responds with a response<br />
code that informs the host computer of the process interruption.<br />
If the host link interface does not receive a delimiter or terminator, it cannot<br />
send a response to the host computer. Similarly, if the computer does not<br />
receive a delimiter or terminator, it cannot transmit further comm<strong>and</strong>s to the<br />
host link interface. To allow transmission to alternate smoothly between the<br />
computer <strong>and</strong> the host link interface, the process times need to be monitored.<br />
It is therefore necessary to have a time-monitoring program on the<br />
host computer side. Its purpose is to initiate remedial action if the right to<br />
transmit is not transferred quickly enough.<br />
An error response will be returned to the originating device if the host link<br />
interface detects any communications line data that has been destroyed<br />
(e.g., by noise). If, however, the Unit number has also been lost, no response<br />
will be made at all. It is therefore necessary to have response monitoring <strong>and</strong><br />
retry processing in the host computer to check for error responses.
CPUs<br />
Appendix A<br />
St<strong>and</strong>ard Models<br />
Name Power supply Inputs Outputs Memory* Clock Model number<br />
<strong>C20H</strong> 24 VDC 12, 24-VDC inputs 8 relayy outputs with RAM None <strong>C20H</strong>-C1DR-DE-V1<br />
2 commons sockets k<br />
IC socket <strong>C20H</strong>-C2DR-DE-V1<br />
One with 2 pts. 5 commons EEPROM <strong>C20H</strong>-C3DR-DE-V1<br />
Onewith10pts. 4with1pt.each RAM Built in <strong>C20H</strong>-C5DR-DE-V1<br />
1with4pts. IC socket <strong>C20H</strong>-C6DR-DE-V1<br />
EEPROM <strong>C20H</strong>-C7DR-DE-V1<br />
8 transistor outputs RAM None <strong>C20H</strong>-C1DT-DE-V1<br />
without i h sockets k<br />
IC socket <strong>C20H</strong>-C2DT-DE-V1<br />
5 commons EEPROM <strong>C20H</strong>-C3DT-DE-V1<br />
4with1pt.each RAM Built in <strong>C20H</strong>-C5DT-DE-V1<br />
1with4pts. IC socket <strong>C20H</strong>-C6DT-DE-V1<br />
EEPROM <strong>C20H</strong>-C7DT-DE-V1<br />
<strong>C28H</strong> 24 VDC 16, 24-VDC inputs 12 relayy outputs with RAM None <strong>C28H</strong>-C1DR-DE-V1<br />
2 commons sockets k<br />
IC socket <strong>C28H</strong>-C2DR-DE-V1<br />
One with 2 pts. 6 commons EEPROM <strong>C28H</strong>-C3DR-DE-V1<br />
Onewith14pts. 4with1pt.each RAM Built in <strong>C28H</strong>-C5DR-DE-V1<br />
2with4pts. IC socket <strong>C28H</strong>-C6DR-DE-V1<br />
EEPROM <strong>C28H</strong>-C7DR-DE-V1<br />
12 transistor outputs RAM None <strong>C28H</strong>-C1DT-DE-V1<br />
without i h sockets k<br />
IC socket <strong>C28H</strong>-C2DT-DE-V1<br />
6 commons EEPROM <strong>C28H</strong>-C3DT-DE-V1<br />
4with1pt.each RAM Built in <strong>C28H</strong>-C5DT-DE-V1<br />
2with4pts. IC socket <strong>C28H</strong>-C6DT-DE-V1<br />
EEPROM <strong>C28H</strong>-C7DT-DE-V1<br />
<strong>C40H</strong> 24 VDC 24, 24-VDC inputs 16 relayy outputs with RAM None <strong>C40H</strong>-C1DR-DE-V1<br />
3 commons sockets k<br />
IC socket <strong>C40H</strong>-C2DR-DE-V1<br />
One with 2 pts. 7 commons EEPROM <strong>C40H</strong>-C3DR-DE-V1<br />
One with 8 pts. 4with1pt.each RAM Built in <strong>C40H</strong>-C5DR-DE-V1<br />
Onewith14pts. 3with4pts. IC socket <strong>C40H</strong>-C6DR-DE-V1<br />
EEPROM <strong>C40H</strong>-C7DR-DE-V1<br />
16 transistor outputs RAM None <strong>C40H</strong>-C1DT-DE-V1<br />
without i h sockets k<br />
IC socket <strong>C40H</strong>-C2DT-DE-V1<br />
7 commons EEPROM <strong>C40H</strong>-C3DT-DE-V1<br />
4with1pt.each RAM Built in <strong>C40H</strong>-C5DT-DE-V1<br />
3with4pts. IC socket <strong>C40H</strong>-C6DT-DE-V1<br />
EEPROM <strong>C40H</strong>-C7DT-DE-V1<br />
<strong>C60H</strong> 24 VDC 32, 24-VDC inputs 28 relayy outputs with RAM None <strong>C60H</strong>-C1DR-DE-V1<br />
3 commons sockets k<br />
IC socket <strong>C60H</strong>-C2DR-DE-V1<br />
One with 2 pts. 8 commons EEPROM <strong>C60H</strong>-C3DR-DE-V1<br />
Onewith14pts. 4with1pt.each RAM Built in <strong>C60H</strong>-C5DR-DE-V1<br />
Onewith16pts. 2with4pts. IC socket <strong>C60H</strong>-C6DR-DE-V1<br />
2with8pts. EEPROM <strong>C60H</strong>-C7DR-DE-V1<br />
28 transistor outputs RAM None <strong>C60H</strong>-C1DT-DE-V1<br />
without i h sockets k<br />
IC socket <strong>C60H</strong>-C2DT-DE-V1<br />
8 commons EEPROM <strong>C60H</strong>-C3DT-DE-V1<br />
4with1pt.each RAM Built in <strong>C60H</strong>-C5DT-DE-V1<br />
2with4pts. IC socket <strong>C60H</strong>-C6DT-DE-V1<br />
2with8pts EEPROM <strong>C60H</strong>-C7DT-DE-V1<br />
"
"<br />
% % % Appendix A<br />
*CPUs with IC sockets are not provided with Memory Chips; one of those listed in the following table must be<br />
ordered separately. The memory in other <strong>type</strong>s of CPUs cannot be changed.<br />
Memory Chips<br />
Memory chips can be set on on CPU models equipped with I/O sockets.<br />
Name Specifications Model number<br />
EPROM Chip 2764, 200 ns, write voltage: 21 V ROM-HD<br />
2764, 200 ns, write voltage: 12.5 V ROM-HB-B<br />
27128, 200 ns, write voltage: 12.5 V ROM-IB-B<br />
RAM Chip 6264, 150 ns RAM-H<br />
EEPROM Chip 28C64, 200 ns EEPROM-H<br />
Note:<br />
I/O Units<br />
Only 27128 EPROM chips (ROM-I�-B) can be used if writing via the FIT’s PROM writer or via the C500-PRW06<br />
connected to the GPC.<br />
Name Power supply Inputs Outputs Accessories Model number<br />
<strong>C20H</strong> 24 VDC 12, 24-VDC inputs 8 relay outputs <strong>C20H</strong>-CN311 <strong>C20H</strong>-EDR-D<br />
2 commons<br />
with sockets<br />
Connecting<br />
One with 2 pts. 5 commons<br />
Cable included.<br />
Onewith10pts. 4with1pt.each<br />
1with4pts.<br />
8 transistor outputs<br />
without sockets<br />
5 commons<br />
4with1pt.each<br />
1with4pts.<br />
<strong>C20H</strong>-EDT-D<br />
<strong>C28H</strong> 24 VDC 16, 24-VDC inputs 12 relay outputs <strong>C20H</strong>-CN311 <strong>C28H</strong>-EDR-D<br />
2 commons<br />
with sockets<br />
Connecting<br />
One with 2 pts. 6 commons<br />
Cable included.<br />
Onewith14pts. 4with1pt.each<br />
2with4pts.<br />
12 transistor outputs<br />
without sockets<br />
6 commons<br />
4with1pt.each<br />
2with4pts.<br />
<strong>C28H</strong>-EDT-D<br />
<strong>C40H</strong> 24 VDC 24, 24-VDC inputs 16 relay outputs <strong>C20H</strong>-CN311 <strong>C40H</strong>-EDR-D<br />
3 commons<br />
with sockets<br />
Connecting<br />
One with 2 pts. 7 commons<br />
Cable included.<br />
One with 8 pts. 4with1pt.each<br />
Onewith14pts. 3with4pts.<br />
16 transistor outputs<br />
without sockets<br />
7 commons<br />
4with1pt.each<br />
3with4pts.<br />
<strong>C40H</strong>-EDT-D<br />
<strong>C60H</strong> 24 VDC 32, 24-VDC inputs 28 relay outputs <strong>C20H</strong>-CN311 <strong>C60H</strong>-EDR-D<br />
3 commons<br />
with sockets<br />
Connecting<br />
One with 2 pts. 8 commons<br />
Cable included.<br />
Onewith14pts. 4with1pt.each<br />
Onewith16pts. 2with4pts.<br />
2with8pts.<br />
28 transistor outputs<br />
without sockets<br />
8 commons<br />
4with1pt.each<br />
2with4pts.<br />
2with8pts.<br />
<strong>C60H</strong>-EDT-D
% % %<br />
Connecting Cables<br />
Appendix A<br />
Name Specifications Model number<br />
Connecting Cable* Cable length: 30 cm To connect CPUs <strong>C20H</strong>-CN311<br />
*Total length must be 6m or less.<br />
DIN Products<br />
Cable length: 60 cm <strong>and</strong> I/O Units. <strong>C20H</strong>-CN611<br />
Cable length: 1 m <strong>C20H</strong>-CN121<br />
Cable length: 2 m <strong>C20H</strong>-CN221<br />
Product Specifications Model No.<br />
DIN Track Length: 50 cm; height: 7.3 mm PFP-50N<br />
Length: 1 mm; height: 7.3 mm PFP-100N<br />
Length: 1 m; height: 16 mm PFP-100N2<br />
End Plate - PFP-M<br />
Spacer - PFP-S<br />
Peripheral Devices<br />
Product Description Model No.<br />
Programming Console Vertical, w/backlight<br />
Connecting cable required; sold separately<br />
C200H-PR027-E<br />
Data Access Console Vertical, w/backlight<br />
Connecting cable required; sold separately<br />
C200H-DAC01<br />
Programming g g <strong>and</strong> Data Access For H<strong>and</strong>held console, 2 m C200H-CN222<br />
CConsole l Connecting C i Cable C bl<br />
For H<strong>and</strong>held console, 4 m C200H-CN422<br />
Panel Mounting Bracket For H<strong>and</strong>held Programming Console or Data<br />
Access Console<br />
C200H-ATT01<br />
Cassette Tape Recorder<br />
Connecting Cable*<br />
1m SCYP0R-PLG01<br />
PROM Writer* For C-series <strong>PCs</strong> (12.5/21 V) C500-PRW06<br />
Floppy Disk Interface Unit* For C-series <strong>PCs</strong> 3G2C5-FDI03<br />
Printer Interface Unit* For C-series <strong>PCs</strong> 3G2A5-PRT01-E<br />
Memory Pack (for Printer<br />
Interface)<br />
With comment printing function C2000-MP103-EV3<br />
M1R/M5R 3G2A5-MP003-E<br />
POR 3G2A5-MP004-E<br />
S6 3G2A5-MP005-E<br />
V8 3G2A5-MP006-E<br />
Printer Connecting Cable 2 m (also used for X-Y plotter) SCY-CN201<br />
CPU-mounting g Host Link Unit Connects to optical fiber cable (APF/PCF) 3G2A6-LK101-PEV1<br />
Connects to optical fiber cable (PCF) 3G2A6-LK101-EV1<br />
RS-232C 3G2A6-LK201-EV1<br />
RS-422 3G2A6-LK202-EV1<br />
Peripheral Interface Unit For connecting PC to GPC or FIT C200H-IP004**<br />
Connecting cable required; sold separately C200H-IP006<br />
Connecting Cable To connect GPC to Peripheral Interface Unit 2m 3G2A2-CN221<br />
5m C500-CN523<br />
10 m C500-CN131<br />
20 m C500-CN 231<br />
30 m C500-CN331<br />
"
"#<br />
% % % Appendix A<br />
Product Description<br />
Model No.<br />
40 m C500-CN431<br />
50 m C500-CN531<br />
Graphic Programming Console 100 to 120 VAC, w/comment 3G2C5-GPC03-E<br />
200 to 240 VAC, w/comment 3G2C5-GPC04-E<br />
CRT Interface Unit* For connection between GPC <strong>and</strong> CRT 3G2C5-GDI01<br />
Programming Console Base Unit Required to mount 3G2A5-IP004/<br />
30 m C200H-BP001<br />
3G2A6-LK ���-(P)EV1 -(P)EV1 to <strong>C20H</strong> or <strong>C28H</strong><br />
CPU. 50 m C200H-BP002<br />
FIT Factory Intelligent Terminal FIT 10-SET11-E<br />
*UsedwithGPConly.<br />
**Programming Console Base Unit required to mount to <strong>C20H</strong> or <strong>C28H</strong>.<br />
Graphic Programming Console (GPC)<br />
Name Specifications Model number<br />
GPC (LCD display) 32 kW, with comments 100 VAC 3G2C5-GPC03-E<br />
200 VAC 3G2C5-GPC04-E<br />
GPC Carrying Case With side pocket C500-CS001<br />
GPC System Memory Cassette For <strong>C20H</strong>, <strong>C40H</strong>, C200H, C1000H, C2000H; printing<br />
capability for DM <strong>and</strong> FM lists.<br />
3G2C5-MP304-EV3<br />
Factory Intelligent Terminal (FIT)<br />
Name Specifications Model number<br />
FIT 1. FIT Computer (FIT10-CPU01)<br />
FIT10-SET11-E<br />
2. SYSMATE Ladder Pack (2 system disks, 1 data disk) (FIT10-MF101-EV4)<br />
3. MS-DOS<br />
4. GPC Communications Adapter (C500-IF001)<br />
5. Peripheral Connecting Cable (3G2A2-CN221)<br />
6. Power Cord <strong>and</strong> 3-pin or 2-pin plug<br />
7. Carrying Case<br />
Ladder Support Software (LSS)<br />
Name Specifications Model number<br />
Ladder Support<br />
5.25”, 2D C500-SF711-EV3<br />
SSoftware f<br />
3.5”, 2DD C500-SF312-EV3
Appendix B<br />
Programming Instructions<br />
This appendix provides tables listing the full range of ladder diagram programming instructions used with the<br />
<strong>C20H</strong>/<strong>C28H</strong>/<strong>C40H</strong>/<strong>C60H</strong>. the first table summarizes all instructions <strong>and</strong> gives page references where more<br />
detailed information can be found in the body of the manual. The second table gives the execution times for<br />
the instructions for both ON <strong>and</strong> OFF execution conditions. The third part is divided into two tables <strong>and</strong> summarizes<br />
the instructions, giving the ladder diagram symbol, a brief description, <strong>and</strong> the applicable data areas.<br />
In all tables, the entries are listed alphanumerically. Instructions without function codes are given first in alphabetical<br />
order, according to the mnemonic. These are followed by the instructions with function codes which<br />
are listed numerically, according to the function code.<br />
St<strong>and</strong>ard Instructions<br />
The following table lists the st<strong>and</strong>ard programming instructions available for C-series <strong>PCs</strong>. A PC instruction is<br />
entered either using the appropriate Programming Console key(s) (e.g., LD, AND, OR, NOT), or by using<br />
function codes. To input an instruction using its function code, press FUN, the function code, <strong>and</strong> then WRITE.<br />
Function Code Name Mnemonic Page<br />
---- AND AND 50, 100<br />
---- AND LOAD AND LD 53, 101<br />
---- AND NOT AND NOT 50, 100<br />
---- COUNTER CNT 117<br />
---- LOAD LD 50, 100<br />
---- LOAD NOT LD NOT 50, 100<br />
---- OR OR 51, 100<br />
---- OR LOAD OR LD 54, 101<br />
---- OR NOT OR NOT 51, 100<br />
---- OUTPUT OUT 52, 103<br />
---- OUTPUT NOT OUT NOT 52, 103<br />
---- TIMER TIM 112<br />
00 NO OPERATION NOP ---<br />
01 END END 52, 111<br />
02 INTERLOCK IL 84, 108<br />
03 INTERLOCK CLEAR ILC 84, 108<br />
04 JUMP JMP 86, 110<br />
05 JUMP END JME 86, 110<br />
06 FAILURE ALARM FAL 197<br />
07 SEVERE FAILURE ALARM FALS 197<br />
08 STEP DEFINE STEP 189<br />
09 STEP START SNXT 189<br />
10 SHIFT REGISTER SFT 129<br />
11 KEEP KEEP 106<br />
12 REVERSIBLE COUNTER CNTR 120<br />
13 DIFFERENTIATE UP DIFU 88, 104<br />
14 DIFFERENTIATE DOWN DIFD 88, 104<br />
15 HIGH-SPEED TIMER TIMH 116<br />
16 WORD SHIFT WSFT 131<br />
17 REVERSIBLE WORD SHIFT RWS 132<br />
18 CYCLE TIME SCAN 198<br />
Data Areas<br />
These footnote tables show the actual ranges of all data areas. Bit numbers are provided (except for DM <strong>and</strong> TC areas); remove the rightmost two digits for word numbers.<br />
IR SR HR TR AR LR TC DM #<br />
00000 to 24615 24700 to 25515 HR 0000 to 9915 TR 0 to 7 AR 0000 to 2715 LR 0000 to 6315 TC 000 to 511 Read/Wr: DM 0000 to DM 0999<br />
Rd only: DM 1000 to DM 1999<br />
0000 to 9999<br />
or 0000 to FFFF<br />
"'
"(<br />
Function Code Name<br />
Mnemonic<br />
Page<br />
20 COMPARE CMP 145<br />
21 MOVE MOV 139<br />
22 MOVE NOT MVN 139<br />
23 BCD-TO-BINARY BIN 151<br />
24 BINARY-TO-BCD BCD 151<br />
25 ARITHMETIC SHIFT LEFT ASL 134<br />
26 ARITHMETIC SHIFT RIGHT ASR 134<br />
27 ROTATE LEFT ROL 135<br />
28 ROTATE RIGHT ROR 135<br />
29 COMPLEMENT COM 182<br />
30 BCD ADD ADD 164<br />
31 BCD SUBTRACT SUB 165<br />
32 BCD MULTIPLY MUL 168<br />
33 BCD DIVIDE DIV 172<br />
34 LOGICAL AND ANDW 183<br />
35 LOGICAL OR ORW 183<br />
36 EXCLUSIVE OR XORW 184<br />
37 EXCLUSIVE NOR XNRW 185<br />
38 INCREMENT INC 162<br />
39 DECREMENT DEC 163<br />
40 SET CARRY STC 163<br />
41 CLEAR CARRY CLC 163<br />
46 DISPLAY MESSAGE MSG 199<br />
47 LONG MESSAGE LMSG 200<br />
49 SET SYSTEM SYS 202<br />
50 BINARY ADD ADB 177<br />
51 BINARY SUBTRACT SBB 179<br />
52 BINARY MULTIPLY MLB 181<br />
53 BINARY DIVIDE DVB 182<br />
60 REVERSIBLE DRUM COUNTER RDM 121<br />
61 HIGH-SPEED COUNTER HDM 124<br />
62 KEY INPUT KEY 63, 204<br />
63 RS-232C PORT OUTPUT POUT 205<br />
64 RS-232C PORT INPUT PIN 216<br />
65 HOURS-TO-SECONDS HTS 152<br />
66 SECONDS-TO-HOURS STH 153<br />
67 BIT COUNTER BCNT 218<br />
68 BLOCK COMPARE BCMP 148<br />
69 HEXADECIMAL CONVERT HEX 154<br />
70 BLOCK TRANSFER XFER 140<br />
71 BLOCK SET BSET 141<br />
73 DATA EXCHANGE XCHG 142<br />
74 ONE DIGIT SHIFT LEFT SLD 136<br />
75 ONE DIGIT SHIFT RIGHT SRD 136<br />
76 4-TO-16 DECODER MLPX 156<br />
77 16-TO-4 ENCODER DMPX 158<br />
82 MOVE BIT MOVB 143<br />
83 MOVE DIGIT MOVD 143<br />
84 REVERSIBLE SHIFT REGISTER SFTR 137<br />
Appendix B<br />
Data Areas<br />
These footnote tables show the actual ranges of all data areas. Bit numbers are provided (except for DM <strong>and</strong> TC areas); remove the rightmost two digits for word numbers.<br />
IR SR HR TR AR LR TC DM #<br />
00000 to 24615 24700 to 25515 HR 0000 to 9915 TR 0 to 7 AR 0000 to 2715 LR 0000 to 6315 TC 000 to 511 Read/Wr: DM 0000 to DM 0999<br />
Rd only: DM 1000 to DM 1999<br />
0000 to 9999<br />
or 0000 to FFFF
Function Code Name<br />
Mnemonic<br />
Page<br />
86 ASCII CONVERT ASC 160<br />
91 SUBROUTINE ENTER SBS 186<br />
92 SUBROUTINE START SBN 186<br />
93 RETURN RET 186<br />
94 WATCHDOG TIMER REFRESH WDT 218<br />
97 I/O REFRESH IORF 219<br />
Appendix B<br />
Data Areas<br />
These footnote tables show the actual ranges of all data areas. Bit numbers are provided (except for DM <strong>and</strong> TC areas); remove the rightmost two digits for word numbers.<br />
IR SR HR TR AR LR TC DM #<br />
00000 to 24615 24700 to 25515 HR 0000 to 9915 TR 0 to 7 AR 0000 to 2715 LR 0000 to 6315 TC 000 to 511 Read/Wr: DM 0000 to DM 0999<br />
Rd only: DM 1000 to DM 1999<br />
0000 to 9999<br />
or 0000 to FFFF<br />
"
Table: Instruction Execution Times<br />
The execution time is given in microseconds unless otherwise stated.<br />
",<br />
Appendix B<br />
Instruction Conditions ON execution time OFF execution time Page<br />
LD --- 0.75 1.5 50, 100<br />
LD NOT --- 0.75 1.5 50, 100<br />
AND --- 0.75 1.5 50, 100<br />
AND NOT --- 0.75 1.5 50, 100<br />
OR --- 0.75 1.5 50, 100<br />
OR NOT --- 0.75 1.5 50, 100<br />
AND LD --- 0.75 1.5 53, 101<br />
OR LD --- 0.75 1.5 54, 101<br />
OUT --- 1.13 2.25 52, 103<br />
OUT NOT --- 1.13 2.25 52, 103<br />
TIM Constant for SV 2.25 R: 2.25<br />
112<br />
IL: 2.25<br />
JMP: 2.25<br />
�DM for SV R: 259<br />
IL: 2.25<br />
JMP: 2.25<br />
CNT Constant for SV 2.25 R: 2.25<br />
117<br />
IL: 2.25<br />
JMP: 2.25<br />
�DM for SV R: 255<br />
IL: 2.25<br />
JMP: 2.25<br />
NOP(00) --- 0.75 --- ---<br />
END(01) --- 85 --- 52, 111<br />
IL(02) --- 32 35 84, 108<br />
ILC(03) --- 59 35 84, 108<br />
JMP(04) --- 35 35 86, 110<br />
JME(05) --- 45 35 86, 110<br />
FAL(06) FAL(06) 00 (reset) 357 2.25 197<br />
FAL(06) 01 to 99 247 2.25<br />
FALS(07) --- 11.1 ms 2.25 197<br />
STEP(08) --- 364 2.25 189<br />
SNXT(09) --- 22 2.25 189<br />
SFT(10) With 1-word shift register 227 R: 191<br />
129<br />
IL: 30<br />
JMP: 30<br />
With 250-word shift register 8.06 ms R: 1.81 ms<br />
IL: 30<br />
JMP: 30<br />
KEEP(11) --- 1.13 --- 106<br />
CNTR(12) Constant for SV 107 R: 85<br />
120<br />
IL: 49<br />
�DM for SV 265 JMP: 49<br />
Data Areas<br />
These footnote tables show the actual ranges of all data areas. Bit numbers are provided (except for DM <strong>and</strong> TC areas); remove the rightmost two digits for word numbers.<br />
IR SR HR TR AR LR TC DM #<br />
00000 to 24615 24700 to 25515 HR 0000 to 9915 TR 0 to 7 AR 0000 to 2715 LR 0000 to 6315 TC 000 to 511 Read/Wr: DM 0000 to DM 0999<br />
Rd only: DM 1000 to DM 1999<br />
0000 to 9999<br />
or 0000 to FFFF
Appendix B<br />
Instruction Conditions<br />
ON execution time OFF execution time Page<br />
DIFU(13) --- 105 Normal: 93<br />
88, 104<br />
IL: 93<br />
JMP: 84<br />
DIFD(14) --- 104 Normal: 92<br />
88, 104<br />
IL: 92<br />
JMP: 84<br />
TIMH(15) Interrupt, Constant for SV 149 R: 199<br />
116<br />
IL: 199<br />
Normal cycle, Constant for SV 169 JMP: 73<br />
Interrupt, �DM for SV 149 R: 291<br />
IL: 291<br />
Normal cycle, �DM for SV 169 JMP: 73<br />
WSFT(16) When shifting 1 word 260 3 131<br />
When shifting 1000 words using �DM 17.3 ms<br />
RWS(17) When shifting 1 word 558 3.75 132<br />
When shifting 1000 words using �DM 57.4 ms<br />
SCAN(18) --- Actual cycle time 3.75 198<br />
CMP(20) When comparing a constant to a word 162 3 145<br />
When comparing two �DM 447<br />
MOV(21) When transferring a constant to a word 113 3 139<br />
When transferring �DM to �DM 321<br />
MVN(22) When transferring a constant to a word 115 3 139<br />
When transferring �DM to �DM 392<br />
BIN(23) When converting a word to a word 197 3 151<br />
When converting �DM to �DM 465<br />
BCD(24) When converting a word to a word 198 3 151<br />
When converting �DM to �DM 451<br />
ASL(25) When shifting a word 62 2.25 134<br />
When shifting �DM 190<br />
ASR(26) When shifting a word 62 2.25 134<br />
When shifting �DM 190<br />
ROL(27) When rotating a word 66 2.25 135<br />
When rotating �DM 194<br />
ROR(28) When rotating a word 66 2.25 135<br />
When rotating �DM 194<br />
COM(29) When inverting a word 379 2.25 182<br />
When inverting �DM 506<br />
ADD(30) Constant + word � word 166 3.75 164<br />
�DM + �DM ��DM 593<br />
SUB(31) Constant + word � word 192 3.75 165<br />
�DM -- �DM ��DM 600<br />
MUL(32) Constant x word � word 634 3.75 168<br />
�DM x �DM � word 1045<br />
DIV(33) Word ÷ constant � word 737 3.75 172<br />
�DM ÷ �DM ��DM 1156<br />
Data Areas<br />
These footnote tables show the actual ranges of all data areas. Bit numbers are provided (except for DM <strong>and</strong> TC areas); remove the rightmost two digits for word numbers.<br />
IR SR HR TR AR LR TC DM #<br />
00000 to 24615 24700 to 25515 HR 0000 to 9915 TR 0 to 7 AR 0000 to 2715 LR 0000 to 6315 TC 000 to 511 Read/Wr: DM 0000 to DM 0999<br />
Rd only: DM 1000 to DM 1999<br />
0000 to 9999<br />
or 0000 to FFFF<br />
""
44<br />
Appendix B<br />
Instruction Conditions<br />
ON execution time OFF execution time Page<br />
ANDW(34) Constant < word � word 162 3.75 183<br />
�DM < �DM ��DM 557<br />
ORW(35) Constant > word � word 162 3.75 183<br />
�DM > �DM ��DM 560<br />
XORW(36) Constant XORW word � word 162 3.75 184<br />
�DM XORW �DM ��DM 560<br />
XNRW(37) Constant XNRW word � word 163 3.75 185<br />
�DM XNRW �DM ��DM 561<br />
INC(38) When incrementing a word 79 2.25 162<br />
When incrementing �DM 207<br />
DEC(39) When decrementing a word 72 2.25 163<br />
When decrementing �DM 260<br />
STC(40) --- 21 1.5 163<br />
CLC(41) --- 21 1.5 163<br />
MSG(46) --- 88 2.25 199<br />
LMSG(47) When outputting character string to<br />
Programming Console from word<br />
334 3.75 200<br />
When outputting character string to<br />
Programming Console set by �DM<br />
414<br />
When outputting character string to<br />
RS-232C from word<br />
751<br />
When outputting character string to<br />
RS-232C set by �DM<br />
1679<br />
SYS(49) When using comm<strong>and</strong> code 01. 1998 3.75 202<br />
ADB(50) Constant + word � word 208 3.75 177<br />
�DM + �DM ��DM 604<br />
SBB(51) Constant -- word � word 208 3.75 179<br />
�DM -- �DM ��DM 604<br />
MLB(52) Constant x word � word 283 3.75 181<br />
�DM x �DM ��DM 658<br />
DVB(53) Word ÷ constant � word 516 3.75 182<br />
�DM ÷ �DM ��DM 927<br />
RDM(60) When comparing 1 range with words 719 719 121<br />
When comparing max. ranges with �DM 18.0 ms 18.0 ms<br />
HDM(61) When comparing 1 range with words 1079 3.75 124<br />
When comparing max. ranges with �DM 18.5 ms<br />
KEY(62) When using words 464 3.75 63, 204<br />
When using �DM 489<br />
POUT(63) When outputting 0 bytes 464 3.75 205<br />
When outputting 200 bytes of �DM 4.78 ms<br />
PIN(64) When inputting 0 bytes 646 3.75 216<br />
When inputting 200 bytes of �DM 4.95 ms<br />
HTS(65) Word conversion 468 3.75 152<br />
�DM conversion (converting max. time) 60.6 ms<br />
STH(66) Word conversion 572 3.75 153<br />
�DM conversion (converting max.<br />
seconds)<br />
175.3 ms<br />
Data Areas<br />
These footnote tables show the actual ranges of all data areas. Bit numbers are provided (except for DM <strong>and</strong> TC areas); remove the rightmost two digits for word numbers.<br />
IR SR HR TR AR LR TC DM #<br />
00000 to 24615 24700 to 25515 HR 0000 to 9915 TR 0 to 7 AR 0000 to 2715 LR 0000 to 6315 TC 000 to 511 Read/Wr: DM 0000 to DM 0999<br />
Rd only: DM 1000 to DM 1999<br />
0000 to 9999<br />
or 0000 to FFFF
Appendix B<br />
Instruction Conditions<br />
ON execution time OFF execution time Page<br />
BCNT(67) When counting 1 word 531 3.75 218<br />
When counting 1000 words using �DM 253.6 ms<br />
BCMP(68) Comparing constant to word-designated<br />
table<br />
823 3.75 148<br />
Comparing �DM ��DM-designated table 17 ms<br />
HEX(69) Converting word to word 433 3.75 154<br />
Converting �DM to �DM 1.20 ms<br />
XFER(70) When transferring 1 word 433 3.75 140<br />
When transferring 1000 words using �DM 47.1 ms<br />
BSET(71) When setting a constant to 1 word 280 3.75 141<br />
When setting �DM ms to 1,000 words<br />
using �DM<br />
1.56 ms<br />
XCHG(73) Between words 215 3 142<br />
Between �DM 408<br />
SLD(74) Shifting 1 word 211 3 136<br />
Shifting 1,000 words using �DM 25.3 ms<br />
SRD(75) Shifting 1 word 208 3 136<br />
Shifting 1,000 words using �DM 25.3 ms<br />
MLPX(76) When decoding word to word 337 3.75 156<br />
When decoding �DM to �DM 708<br />
DMPX(77) When encoding a word to a word 404 3.75 158<br />
When encoding �DM to �DM 758<br />
MOVB (82) When transferring word to a word 172 3.75 143<br />
When transferring �DM to �DM 557<br />
MOVD(83) When transferring word to a word 210 3.75 143<br />
When transferring �DM to �DM 459<br />
SFTR(84) When shifting 1 word 475 3.75 137<br />
When shifting 1000 DM words using �DM 18.7 ms<br />
ASC(86) Word � word 385 3.75 160<br />
�DM ��DM 746<br />
SBS(91) --- 320 2.25 186<br />
SBN(92) --- --- --- 186<br />
RET(93) --- 207 1.5 186<br />
WDT(94) --- 27 2.25 218<br />
IORF(97) 1-word refresh 675 3 219<br />
30-word refresh 4ms<br />
Data Areas<br />
These footnote tables show the actual ranges of all data areas. Bit numbers are provided (except for DM <strong>and</strong> TC areas); remove the rightmost two digits for word numbers.<br />
IR SR HR TR AR LR TC DM #<br />
00000 to 24615 24700 to 25515 HR 0000 to 9915 TR 0 to 7 AR 0000 to 2715 LR 0000 to 6315 TC 000 to 511 Read/Wr: DM 0000 to DM 0999<br />
Rd only: DM 1000 to DM 1999<br />
0000 to 9999<br />
or 0000 to FFFF<br />
4
Basic Instructions<br />
Name<br />
Mnemonic<br />
AND<br />
AND<br />
AND LOAD<br />
AND LD<br />
AND NOT<br />
AND NOT<br />
COUNTER<br />
CNT<br />
LOAD<br />
LD<br />
LOAD NOT<br />
LD NOT<br />
OR<br />
OR<br />
4<br />
CP<br />
R<br />
Appendix B<br />
Symbol Function Oper<strong>and</strong> Data Areas Page<br />
B<br />
B<br />
B<br />
CNT N<br />
B<br />
B<br />
SV<br />
Logically ANDs the status of the designated<br />
bit with the current execution condition.<br />
Logically ANDs the resultant execution<br />
conditions of the preceding logic blocks.<br />
Logically ANDs the inverse of the designated<br />
bit with the current execution condition.<br />
A decrementing counter. SV: 0 to 9999;<br />
CP: count pulse; R: reset input. The TC bit<br />
is entered as a constant.<br />
Defines the status of bit B as the execution<br />
condition for subsequent operations in the<br />
instruction line.<br />
Defines the status of the inverse of bit B as<br />
the execution condition for subsequent operations<br />
in the instruction line.<br />
Logically ORs the status of the designated<br />
bit with the current execution condition.<br />
Data Areas<br />
These footnote tables show the actual ranges of all data areas. Bit numbers are provided (except for DM <strong>and</strong> TC areas); remove the rightmost two digits for word numbers.<br />
IR SR HR TR AR LR TC DM #<br />
00000 to 24615 24700 to 25515 HR 0000 to 9915 TR 0 to 7 AR 0000 to 2715 LR 0000 to 6315 TC 000 to 511 Read/Wr: DM 0000 to DM 0999<br />
Rd only: DM 1000 to DM 1999<br />
B:<br />
IR<br />
SR<br />
HR<br />
AR<br />
LR<br />
TC<br />
50, 100<br />
None 53, 101<br />
B:<br />
IR<br />
SR<br />
HR<br />
AR<br />
LR<br />
TC<br />
N:<br />
TC<br />
B:<br />
IR<br />
SR<br />
HR<br />
AR<br />
LR<br />
TC<br />
TR<br />
B:<br />
IR<br />
SR<br />
HR<br />
AR<br />
LR<br />
TC<br />
B:<br />
IR<br />
SR<br />
HR<br />
AR<br />
LR<br />
TC<br />
SV:<br />
IR<br />
HR<br />
AR<br />
LR<br />
DM<br />
#<br />
50, 100<br />
117<br />
50, 100<br />
50, 100<br />
51, 100<br />
0000 to 9999<br />
or 0000 to FFFF
Name<br />
Mnemonic<br />
OR LOAD<br />
OR LD<br />
OR NOT<br />
OR NOT<br />
OUTPUT<br />
OUT<br />
OUTPUT NOT<br />
OUT NOT<br />
TIMER<br />
TIM<br />
Symbol<br />
B<br />
B<br />
B<br />
TIM N<br />
SV<br />
Function<br />
Logically ORs the resultant execution conditions<br />
of the preceding logic blocks.<br />
Logically ORs the inverse of the designated<br />
bit with the execution condition.<br />
Turns ON B for an ON execution condition;<br />
turns OFF B for an OFF execution condition.<br />
Turns OFF B for an ON execution condition;<br />
turns ON B for an OFF execution condition.<br />
ON-delay (decrementing) timer operation.<br />
Set value: 000.0 to 999.9 s. The same TC<br />
bit cannot be assigned to more than one<br />
timer/counter. The TC bit is entered as a<br />
constant.<br />
Oper<strong>and</strong> Data Areas<br />
Appendix B<br />
Data Areas<br />
These footnote tables show the actual ranges of all data areas. Bit numbers are provided (except for DM <strong>and</strong> TC areas); remove the rightmost two digits for word numbers.<br />
IR SR HR TR AR LR TC DM #<br />
00000 to 24615 24700 to 25515 HR 0000 to 9915 TR 0 to 7 AR 0000 to 2715 LR 0000 to 6315 TC 000 to 511 Read/Wr: DM 0000 to DM 0999<br />
Rd only: DM 1000 to DM 1999<br />
Page<br />
None 54, 101<br />
B:<br />
IR<br />
SR<br />
HR<br />
AR<br />
LR<br />
TC<br />
B:<br />
IR<br />
SR<br />
HR<br />
AR<br />
LR<br />
TR<br />
B:<br />
IR<br />
SR<br />
HR<br />
AR<br />
LR<br />
N:<br />
TC<br />
SV:<br />
IR<br />
HR<br />
AR<br />
LR<br />
DM<br />
#<br />
51, 100<br />
52, 103<br />
52, 103<br />
112<br />
0000 to 9999<br />
or 0000 to FFFF<br />
4
Special Instructions<br />
Name<br />
Mnemonic<br />
NO OPERATION<br />
NOP(00)<br />
END<br />
END(01)<br />
INTERLOCK<br />
IL(02)<br />
INTERLOCK<br />
CLEAR<br />
ILC(03)<br />
JUMP<br />
JMP(04)<br />
JUMP END<br />
JME(05)<br />
FAILURE ALARM<br />
(@)FAL(06)<br />
4#<br />
Appendix B<br />
Symbol Function Oper<strong>and</strong> Data<br />
Areas<br />
Page<br />
Nothing is executed <strong>and</strong> program opera- None ---<br />
None<br />
tion moves to the next instruction.<br />
END(01)<br />
IL(02)<br />
ILC(03)<br />
JMP(04)<br />
N<br />
JME(05) N<br />
FAL(06) N<br />
SEVERE<br />
FAILURE ALARM<br />
FALS(07) FALS(07) N<br />
STEP DEFINE<br />
STEP(08)<br />
STEP(08)B<br />
Required at the end of each program. Instructions<br />
located after END(01) will not be<br />
executed.<br />
If an interlock condition is OFF, all outputs<br />
<strong>and</strong> all timer PVs between the current<br />
IL(02) <strong>and</strong> the next ILC(03) are turned OFF<br />
or reset, respectively. Other instructions<br />
are treated as NOP. Counter PVs are maintained.<br />
If the execution condition is ON, execution<br />
continues normally.<br />
When the execution condition for the<br />
JMP(04) instruction is ON, all instructions<br />
between JMP(04) <strong>and</strong> the corresponding<br />
JME(05) are to be ignored or treated as<br />
NOP(00). For direct jumps, the corresponding<br />
JMP(04) <strong>and</strong> JME(05) instructions<br />
have the same N value in the range 01<br />
through 49. Direct jumps are usable only<br />
once each per program (i.e., N is 01<br />
through 49 can be used only once each)<br />
<strong>and</strong> the instructions between the JUMP<br />
<strong>and</strong> JUMP END instructions are ignored;<br />
00 may be used as many times as necessary,<br />
instructions between JMP 00 <strong>and</strong> the<br />
next JME 00 are treated as NOP, thus increasing<br />
cycle time, as compared with direct<br />
jumps.<br />
Assigns a failure alarm code to the given<br />
execution condition.When N can be given<br />
a value between 01 <strong>and</strong> 99 to indicate that<br />
a non-fatal error (i.e., one that will not stop<br />
the CPU) has occurred. This is indicated by<br />
the PLC outputting N (the FAL number) to<br />
the FAL output area. To reset the FAL area,<br />
N can be defined as 00. This will cause all<br />
previously recorded FAL numbers in the<br />
FAL area to be deleted. FAL data sent after<br />
a 00 will be recorded in the normal way. The<br />
same code numbers can be used for both<br />
FAL(06) <strong>and</strong> FALS(07).<br />
A fatal error is indicated by outputting N to<br />
the FAL output area <strong>and</strong> the CPU is<br />
stopped. The same FAL numbers are used<br />
for both FAL(06) <strong>and</strong> FALS(07).<br />
When used with a control bit (B), defines<br />
the start of a new step <strong>and</strong> resets the previous<br />
step. When used without B, it defines<br />
the end of step execution.<br />
None 52,<br />
111<br />
None 84,<br />
108<br />
N:<br />
00 to 49<br />
N:<br />
00 to 99<br />
N:<br />
01 to 99<br />
Data Areas<br />
These footnote tables show the actual ranges of all data areas. Bit numbers are provided (except for DM <strong>and</strong> TC areas); remove the rightmost two digits for word numbers.<br />
IR SR HR TR AR LR TC DM #<br />
00000 to 24615 24700 to 25515 HR 0000 to 9915 TR 0 to 7 AR 0000 to 2715 LR 0000 to 6315 TC 000 to 511 Read/Wr: DM 0000 to DM 0999<br />
Rd only: DM 1000 to DM 1999<br />
B:<br />
IR<br />
HR<br />
AR<br />
LR<br />
86,<br />
110<br />
197<br />
197<br />
189<br />
0000 to 9999<br />
or 0000 to FFFF
Name<br />
Mnemonic<br />
STEP START<br />
SNXT(09)<br />
SHIFT REGISTER<br />
SFT(10)<br />
KEEP<br />
KEEP(11)<br />
REVERSIBLE<br />
COUNTER<br />
CNTR (12)<br />
DIFFERENTIATE<br />
UP<br />
DIFU(13)<br />
DIFFERENTIATE<br />
DOWN<br />
DIFD(14)<br />
I<br />
P<br />
R<br />
II<br />
DI<br />
R<br />
S<br />
R<br />
Symbol<br />
SNXT(09) B<br />
SFT(10)<br />
St<br />
E<br />
KEEP(11)<br />
B<br />
CNTR(12)<br />
N<br />
SV<br />
DIFU(13)<br />
DIFD(14)<br />
HIGH-SPEED<br />
TIMER<br />
TIMH(15) TIMH(15) N<br />
WORD SHIFT<br />
(@)WSFT(16)<br />
B<br />
B<br />
SV<br />
WSFT(16)<br />
St<br />
E<br />
Function<br />
Used with a control bit (B) to indicate the<br />
end of the step, reset the step, <strong>and</strong> start the<br />
next step which has been defined with the<br />
same control bit.<br />
Creates a bit shift register for data from the<br />
starting word (St) through to the ending<br />
word (E). I: input bit; P: shift pulse; R: reset<br />
input. St must be less than or equal to E. St<br />
<strong>and</strong> E must be in the same data area.<br />
15 00 15<br />
E St<br />
Oper<strong>and</strong> Data<br />
Areas<br />
B:<br />
IR<br />
HR<br />
AR<br />
LR<br />
Appendix B<br />
Data Areas<br />
These footnote tables show the actual ranges of all data areas. Bit numbers are provided (except for DM <strong>and</strong> TC areas); remove the rightmost two digits for word numbers.<br />
IR SR HR TR AR LR TC DM #<br />
00000 to 24615 24700 to 25515 HR 0000 to 9915 TR 0 to 7 AR 0000 to 2715 LR 0000 to 6315 TC 000 to 511 Read/Wr: DM 0000 to DM 0999<br />
Rd only: DM 1000 to DM 1999<br />
00<br />
Defines a bit (B) as a latch, controlled by<br />
the set (S) <strong>and</strong> reset (R) inputs.<br />
Increases or decreases the PV by one<br />
whenever the increment input (II) or decrement<br />
input (DI) signals, respectively, go<br />
from OFF to ON. SV: 0 to 9999; R: reset input.<br />
Each TC bit can be used for one timer/<br />
counter only. The TC bit is entered as a<br />
constant.<br />
DIFU(13) turns ON the designated bit (B)<br />
for one cycle on reception of the leading<br />
(rising) edge of the input signal; DIFD(14)<br />
turns ON the bit for one cycle on reception<br />
of the trailing (falling) edge.<br />
A high-speed, ON-delay (decrementing)<br />
timer. SV: 00.02 to 99.99 s. Each TC bit can<br />
be assigned to only one timer or counter.<br />
The TC bit is entered as a constant.<br />
The data in the words from the starting<br />
word (St) through to the ending word (E), is<br />
shifted left in word units, writing all zeros<br />
into the starting word. St must be less than<br />
or equal to E, <strong>and</strong> St <strong>and</strong> E must be in the<br />
same data area.<br />
IN<br />
St/E:<br />
IR<br />
HR<br />
AR<br />
LR<br />
B:<br />
IR<br />
HR<br />
AR<br />
LR<br />
N:<br />
TC<br />
B:<br />
IR<br />
HR<br />
AR<br />
LR<br />
N:<br />
TC<br />
St/E:<br />
IR<br />
HR<br />
AR<br />
LR<br />
DM<br />
SV:<br />
IR<br />
SR<br />
HR<br />
AR<br />
LR<br />
DM<br />
#<br />
SV:<br />
IR<br />
SR<br />
HR<br />
AR<br />
LR<br />
HR<br />
#<br />
Page<br />
189<br />
129<br />
106<br />
120<br />
88,<br />
104<br />
116<br />
131<br />
0000 to 9999<br />
or 0000 to FFFF<br />
4'
4(<br />
Name<br />
Mnemonic<br />
REVERSIBLE<br />
WORD SHIFT<br />
(@)RWS(17)<br />
CYCLE TIME<br />
(@)SCAN(18)<br />
COMPARE<br />
(@)CMP(20)<br />
MOVE<br />
(@)MOV(21)<br />
MOVE NOT<br />
(@)MVN(22)<br />
Symbol<br />
RWS(17)<br />
C<br />
St<br />
E<br />
SCAN(18)<br />
Mi<br />
---<br />
---<br />
CMP(20)<br />
Cp1<br />
Cp2<br />
MOV(21)<br />
S<br />
D<br />
MVN(22)<br />
S<br />
D<br />
Function<br />
Creates <strong>and</strong> controls a reversible nonsynchronous<br />
word shift register between<br />
St <strong>and</strong> E. Exchanges the content of a word<br />
containing zero with the content of either<br />
the preceding or following word, depending<br />
on the shift direction. Bits 13, 14, <strong>and</strong><br />
15 of control word C determine the mode<br />
of operation of the register according to the<br />
following: The shift direction is determined<br />
by bit 13 (OFF shifts the non-zero data to<br />
higher addressed words; ON to lower addressed<br />
words). Bit 14 is the register enable<br />
bit (ON for shift enabled). Bit 15 is the<br />
reset bit (if bit 15 is ON, the register will be<br />
set to zero between St <strong>and</strong> E when the instruction<br />
is executed with bit 14 also ON).<br />
St <strong>and</strong> E must be in the same data area.<br />
Sets the minimum cycle time, Mi, in tenths<br />
of milliseconds. The possible setting range<br />
is from 0 to 999.0 ms. If the actual cycle<br />
time is less than the time set using<br />
SCAN(18), the CPU will wait until the designated<br />
time has elapsed before starting<br />
the next cycle.<br />
Compares the data in two 4-digit hexadecimal<br />
words (Cp1 <strong>and</strong> Cp2) <strong>and</strong> outputs result<br />
to the GR, EQ, or LE Flags.<br />
Transfers data from source word, (S) to<br />
destination word (D).<br />
Transfers the inverse of the data in the<br />
source word (S) to destination word (D).<br />
Oper<strong>and</strong> Data<br />
Areas<br />
Appendix B<br />
Data Areas<br />
These footnote tables show the actual ranges of all data areas. Bit numbers are provided (except for DM <strong>and</strong> TC areas); remove the rightmost two digits for word numbers.<br />
IR SR HR TR AR LR TC DM #<br />
00000 to 24615 24700 to 25515 HR 0000 to 9915 TR 0 to 7 AR 0000 to 2715 LR 0000 to 6315 TC 000 to 511 Read/Wr: DM 0000 to DM 0999<br />
Rd only: DM 1000 to DM 1999<br />
C:<br />
IR<br />
SR<br />
HR<br />
AR<br />
LR<br />
TC<br />
DM<br />
#<br />
Mi:<br />
IR<br />
SR<br />
HR<br />
AR<br />
LR<br />
TC<br />
DM<br />
#<br />
Cp1/Cp2:<br />
IR<br />
SR<br />
HR<br />
AR<br />
LR<br />
TC<br />
DM<br />
#<br />
S:<br />
IR<br />
SR<br />
HR<br />
AR<br />
LR<br />
TC<br />
DM<br />
#<br />
S:<br />
IR<br />
SR<br />
HR<br />
AR<br />
LR<br />
TC<br />
DM<br />
#<br />
St/E:<br />
IR<br />
SR<br />
HR<br />
AR<br />
LR<br />
TC<br />
DM<br />
---:<br />
Not used.<br />
D:<br />
IR<br />
HR<br />
AR<br />
LR<br />
DM<br />
D:<br />
IR<br />
HR<br />
AR<br />
LR<br />
DM<br />
Page<br />
132<br />
198<br />
145<br />
139<br />
139<br />
0000 to 9999<br />
or 0000 to FFFF
Name<br />
Mnemonic<br />
BCD-TO-BINARY<br />
(@)BIN(23)<br />
BINARY-TO-BCD<br />
(@)BCD(24)<br />
ARITHMETIC<br />
SHIFT LEFT<br />
(@)ASL(25)<br />
ARITHMETIC<br />
SHIFT RIGHT<br />
(@)ASR(26)<br />
ROTATE LEFT<br />
(@)ROL(27)<br />
ROTATE RIGHT<br />
(@)ROR(28)<br />
Symbol<br />
BIN(23)<br />
S<br />
R<br />
BCD(24)<br />
S<br />
R<br />
ASL(25)<br />
Wd<br />
ASR(26)<br />
Wd<br />
ROL(27)<br />
Wd<br />
ROR(28)<br />
Function<br />
Converts 4-digit, BCD data in source word<br />
(S) into 16-bit binary data, <strong>and</strong> outputs converted<br />
data to result word (R).<br />
S<br />
x100 x101 x102 x103 R<br />
(BCD) (BIN)<br />
Oper<strong>and</strong> Data<br />
Areas<br />
Appendix B<br />
Data Areas<br />
These footnote tables show the actual ranges of all data areas. Bit numbers are provided (except for DM <strong>and</strong> TC areas); remove the rightmost two digits for word numbers.<br />
IR SR HR TR AR LR TC DM #<br />
00000 to 24615 24700 to 25515 HR 0000 to 9915 TR 0 to 7 AR 0000 to 2715 LR 0000 to 6315 TC 000 to 511 Read/Wr: DM 0000 to DM 0999<br />
Rd only: DM 1000 to DM 1999<br />
x160 x161 x162 x163 Converts binary data in source word (S)<br />
into BCD, <strong>and</strong> outputs converted data to result<br />
word (R).<br />
x160 S R<br />
(BIN) (BCD)<br />
x100 x16 1<br />
x16 2<br />
x16 3<br />
x10 1<br />
x10 2<br />
x10 3<br />
Each bit within a single word of data (Wd)<br />
is shifted one bit to the left, with zero written<br />
to bit 00 <strong>and</strong> bit 15 moving to CY.<br />
15 00<br />
CY Wd 0<br />
Each bit within a single word of data (Wd)<br />
is shifted one bit to the right, with zero written<br />
to bit 15 <strong>and</strong> bit 00 moving to CY.<br />
15 00<br />
0 Wd CY<br />
Each bit within a single word of data (Wd)<br />
is moved one bit to the left, with bit 15 moving<br />
to carry (CY), <strong>and</strong> CY moving to bit 00.<br />
15 00<br />
Wd<br />
CY<br />
Each bit within a single word of data (Wd)<br />
is moved one bit to the right, with bit 00<br />
moving to carry (CY), <strong>and</strong> CY moving to bit<br />
15.<br />
Wd 15 00<br />
CY Wd<br />
S:<br />
IR<br />
SR<br />
HR<br />
AR<br />
LR<br />
TC<br />
DM<br />
S:<br />
IR<br />
SR<br />
HR<br />
AR<br />
LR<br />
DM<br />
Wd:<br />
IR<br />
HR<br />
AR<br />
LR<br />
DM<br />
Wd:<br />
IR<br />
HR<br />
AR<br />
LR<br />
DM<br />
Wd:<br />
IR<br />
HR<br />
AR<br />
LR<br />
DM<br />
Wd:<br />
IR<br />
HR<br />
AR<br />
LR<br />
DM<br />
R:<br />
IR<br />
HR<br />
AR<br />
LR<br />
DM<br />
R:<br />
IR<br />
HR<br />
AR<br />
LR<br />
DM<br />
Page<br />
151<br />
151<br />
134<br />
134<br />
135<br />
135<br />
0000 to 9999<br />
or 0000 to FFFF<br />
4
4,<br />
Name<br />
Mnemonic<br />
COMPLEMENT<br />
(@)COM(29)<br />
BCD ADD<br />
(@)ADD(30)<br />
BCD SUBTRACT<br />
(@)SUB(31)<br />
BCD MULTIPLY<br />
(@)MUL(32)<br />
BCD DIVIDE<br />
(@)DIV(33)<br />
LOGICAL AND<br />
(@)ANDW(34)<br />
Symbol<br />
COM(29)<br />
Wd<br />
ADD(30)<br />
Au<br />
Ad<br />
R<br />
SUB(31)<br />
Mi<br />
Su<br />
R<br />
MUL(32)<br />
Md<br />
Mr<br />
R<br />
DIV(33)<br />
Dd<br />
Dr<br />
R<br />
ANDW(34)<br />
I1<br />
I2<br />
R<br />
Function<br />
Inverts bit status of one word (Wd) of data,<br />
changing 0s to 1s, <strong>and</strong> vice versa.<br />
Wd Wd<br />
Adds two 4-digit BCD values (Au <strong>and</strong> Ad)<br />
<strong>and</strong> content of CY, <strong>and</strong> outputs the result to<br />
the specified result word (R).<br />
Au + Ad + CY R CY<br />
Subtracts both the 4-digit BCD subtrahend<br />
(Su) <strong>and</strong> content of CY, from the 4-digit<br />
BCD minuend (Mi) <strong>and</strong> outputs the result to<br />
the specified result word (R).<br />
Mi -- Su -- CY R CY<br />
Multiplies the 4-digit BCD multiplic<strong>and</strong><br />
(Md) <strong>and</strong> 4-digit BCD multiplier (Mr), <strong>and</strong><br />
outputs the result to the specified result<br />
words (R <strong>and</strong> R + 1). R <strong>and</strong> R + 1 must be<br />
in the same data area.<br />
Md x Mr R+1 R<br />
Divides the 4-digit BCD dividend (Dd) by<br />
the 4-digit BCD divisor (Dr), <strong>and</strong> outputs<br />
the result to the specified result words. R<br />
receives the quotient; R + 1 receives the remainder.<br />
R <strong>and</strong> R + 1 must be in the same<br />
data area.<br />
Dd ÷ Dr<br />
R+1 R<br />
Logically ANDs two 16-bit input words (I1<br />
<strong>and</strong> I2) <strong>and</strong> sets the bits in the result word<br />
(R) if the corresponding bits in the input<br />
words are both ON.<br />
Oper<strong>and</strong> Data<br />
Areas<br />
Wd:<br />
IR<br />
HR<br />
AR<br />
LR<br />
DM<br />
Au/Ad:<br />
IR<br />
SR<br />
HR<br />
AR<br />
LR<br />
TC<br />
DM<br />
#<br />
Mi/Su:<br />
IR<br />
SR<br />
HR<br />
AR<br />
LR<br />
TC<br />
DM<br />
#<br />
Md/Mr:<br />
IR<br />
SR<br />
HR<br />
AR<br />
LR<br />
TC<br />
DM<br />
#<br />
Dd/Dr:<br />
IR<br />
SR<br />
HR<br />
AR<br />
LR<br />
TC<br />
DM<br />
#<br />
I1/I2:<br />
IR<br />
SR<br />
HR<br />
AR<br />
LR<br />
TC<br />
DM<br />
#<br />
Appendix B<br />
Data Areas<br />
These footnote tables show the actual ranges of all data areas. Bit numbers are provided (except for DM <strong>and</strong> TC areas); remove the rightmost two digits for word numbers.<br />
IR SR HR TR AR LR TC DM #<br />
00000 to 24615 24700 to 25515 HR 0000 to 9915 TR 0 to 7 AR 0000 to 2715 LR 0000 to 6315 TC 000 to 511 Read/Wr: DM 0000 to DM 0999<br />
Rd only: DM 1000 to DM 1999<br />
R:<br />
IR<br />
HR<br />
AR<br />
LR<br />
DM<br />
R:<br />
IR<br />
HR<br />
AR<br />
LR<br />
DM<br />
R:<br />
IR<br />
HR<br />
AR<br />
LR<br />
DM<br />
R:<br />
IR<br />
HR<br />
AR<br />
LR<br />
DM<br />
R:<br />
IR<br />
HR<br />
AR<br />
LR<br />
DM<br />
Page<br />
182<br />
164<br />
165<br />
168<br />
172<br />
183<br />
0000 to 9999<br />
or 0000 to FFFF
Name<br />
Mnemonic<br />
LOGICAL OR<br />
(@)ORW(35)<br />
EXCLUSIVE OR<br />
(@)XORW(36)<br />
EXCLUSIVE NOR<br />
(@)XNRW(37)<br />
INCREMENT<br />
(@)INC(38)<br />
DECREMENT<br />
(@)DEC(39)<br />
SET CARRY<br />
(@)STC(40)<br />
CLEAR CARRY<br />
(@)CLC(41)<br />
Symbol<br />
ORW(35)<br />
I1<br />
I2<br />
R<br />
XORW(36)<br />
I1<br />
I2<br />
R<br />
XNRW(37)<br />
I1<br />
I2<br />
R<br />
INC(38)<br />
Wd<br />
DEC(39)<br />
Wd<br />
STC(40)<br />
CLC(41)<br />
Function<br />
Logically ORs two 16-bit input words (I1<br />
<strong>and</strong> I2) <strong>and</strong> sets the bits in the result word<br />
(R) when one or both of the corresponding<br />
bits in the input words is/are ON.<br />
Exclusively ORs two 16-bit input words (I1<br />
<strong>and</strong> I2) <strong>and</strong> sets the bits in the result word<br />
(R) when the corresponding bits in input<br />
words differ in status.<br />
Exclusively NORs two 16-bit input words<br />
(I1 <strong>and</strong> I2) <strong>and</strong> sets the bits in the result<br />
word (R) when the corresponding bits in<br />
both input words have the same status.<br />
Increments the value of a 4-digit BCD word<br />
(Wd) by one, without affecting carry (CY).<br />
Decrements the value of a 4-digit BCD<br />
word by 1, without affecting carry (CY).<br />
I1/I2:<br />
IR<br />
SR<br />
HR<br />
AR<br />
LR<br />
TC<br />
DM<br />
#<br />
I1/I2:<br />
IR<br />
SR<br />
HR<br />
AR<br />
LR<br />
TC<br />
DM<br />
#<br />
I1/I2:<br />
IR<br />
SR<br />
HR<br />
AR<br />
LR<br />
TC<br />
DM<br />
#<br />
Wd:<br />
IR<br />
HR<br />
AR<br />
LR<br />
DM<br />
Oper<strong>and</strong> Data<br />
Areas<br />
Appendix B<br />
Data Areas<br />
These footnote tables show the actual ranges of all data areas. Bit numbers are provided (except for DM <strong>and</strong> TC areas); remove the rightmost two digits for word numbers.<br />
IR SR HR TR AR LR TC DM #<br />
00000 to 24615 24700 to 25515 HR 0000 to 9915 TR 0 to 7 AR 0000 to 2715 LR 0000 to 6315 TC 000 to 511 Read/Wr: DM 0000 to DM 0999<br />
Rd only: DM 1000 to DM 1999<br />
Wd:<br />
IR<br />
HR<br />
AR<br />
LR<br />
DM<br />
R:<br />
IR<br />
HR<br />
AR<br />
LR<br />
DM<br />
R:<br />
IR<br />
HR<br />
AR<br />
LR<br />
DM<br />
R:<br />
IR<br />
HR<br />
AR<br />
LR<br />
DM<br />
Page<br />
183<br />
184<br />
185<br />
162<br />
163<br />
Sets the Carry Flag (i.e., turns CY ON). None 163<br />
Clears the Carry Flag (i.e, turns CY OFF). None 163<br />
0000 to 9999<br />
or 0000 to FFFF<br />
4"
4<br />
Name<br />
Mnemonic<br />
DISPLAY<br />
MESSAGE<br />
(@)MSG(46)<br />
LONG MESSAGE<br />
(@)LMSG(47)<br />
Symbol<br />
MSG(46)<br />
FM<br />
LMSG(47)<br />
S<br />
D<br />
---<br />
SET SYSTEM<br />
(@)SYS(49) SYS(49)<br />
P<br />
---<br />
---<br />
Function<br />
Displays eight words of ASCII code, starting<br />
from FM, on the Programming Console<br />
or GPC. All eight words must be in the<br />
same data area.<br />
Oper<strong>and</strong> Data<br />
Areas<br />
Appendix B<br />
Data Areas<br />
These footnote tables show the actual ranges of all data areas. Bit numbers are provided (except for DM <strong>and</strong> TC areas); remove the rightmost two digits for word numbers.<br />
IR SR HR TR AR LR TC DM #<br />
00000 to 24615 24700 to 25515 HR 0000 to 9915 TR 0 to 7 AR 0000 to 2715 LR 0000 to 6315 TC 000 to 511 Read/Wr: DM 0000 to DM 0999<br />
Rd only: DM 1000 to DM 1999<br />
FM<br />
FM+ 7<br />
A B<br />
C D<br />
D P<br />
ABCD........DP<br />
Outputs a 32-character message to either<br />
a Programming Console, or a device connected<br />
via the RS-232C interface. The<br />
output message must be in ASCII beginning<br />
at address S. The destination of the<br />
message is designated in D: 000 specifies<br />
that the message is to be output to the<br />
GPC; 001 specifies the RS-232C interface,<br />
starting with the leftmost byte; <strong>and</strong><br />
002 specifies the RS-232C interface,<br />
starting from the rightmost byte.<br />
Used to either control certain operating parameters,<br />
or to execute the system comm<strong>and</strong>s<br />
that can be executed from the AR<br />
area.<br />
The contents of the leftmost 8 bits of P determine<br />
which function SYS(49) will have.<br />
If they contain A3, bit 00 specifies whether<br />
the battery will be checked, <strong>and</strong> bit 07<br />
specifies whether I/O status will be maintained<br />
on start up. Bit 06 specifies whether<br />
the Force Status Hold Bit is set.<br />
To be effective SYS(49) must be programmed<br />
at address 00001 with LD AR<br />
1001 at address 00000.<br />
If the leftmost 8 bits of P are 00, one of<br />
seven possible System Comm<strong>and</strong>s, as<br />
specified by the rightmost 8 bits, will be executed<br />
(this option is not available with<br />
C200H PLCs). These comm<strong>and</strong>s can be<br />
used to set or back-up the contents of the<br />
Parameter Area (in the DM area).<br />
FM:<br />
IR<br />
HR<br />
AR<br />
LR<br />
TC<br />
DM<br />
#<br />
S:<br />
IR<br />
HR<br />
AR<br />
LR<br />
TC<br />
DM<br />
P:<br />
#<br />
D:<br />
#000<br />
#001<br />
#002<br />
---:<br />
Not<br />
used.<br />
---:<br />
Not used.<br />
Page<br />
199<br />
200<br />
202<br />
0000 to 9999<br />
or 0000 to FFFF
Name<br />
Mnemonic<br />
BINARY ADD<br />
(@)ADB(50)<br />
BINARY<br />
SUBTRACT<br />
(@)SBB(51)<br />
BINARY<br />
MULTIPLY<br />
(@)MLB(52)<br />
BINARY DIVIDE<br />
(@)DVB(53)<br />
Symbol<br />
ADB(50)<br />
Au<br />
Ad<br />
R<br />
SBB(51)<br />
Mi<br />
Su<br />
R<br />
MLB(52)<br />
Md<br />
Mr<br />
R<br />
DVB(53)<br />
Dd<br />
Dr<br />
R<br />
Function<br />
Adds the 4-digit augend (Au), 4-digit addend<br />
(Ad), <strong>and</strong> content of CY <strong>and</strong> outputs<br />
the result to the specified result word (R).<br />
Oper<strong>and</strong> Data<br />
Areas<br />
Appendix B<br />
Data Areas<br />
These footnote tables show the actual ranges of all data areas. Bit numbers are provided (except for DM <strong>and</strong> TC areas); remove the rightmost two digits for word numbers.<br />
IR SR HR TR AR LR TC DM #<br />
00000 to 24615 24700 to 25515 HR 0000 to 9915 TR 0 to 7 AR 0000 to 2715 LR 0000 to 6315 TC 000 to 511 Read/Wr: DM 0000 to DM 0999<br />
Rd only: DM 1000 to DM 1999<br />
+<br />
Au<br />
Ad<br />
+ CY<br />
R<br />
CY<br />
Subtracts the 4-digit hexadecimal subtrahend<br />
(Su) <strong>and</strong> content of carry, from the<br />
4-digit hexadecimal minuend (Mi), <strong>and</strong> outputs<br />
the result to the specified result word<br />
(R).<br />
��<br />
��<br />
Mi<br />
Su<br />
CY<br />
R<br />
CY<br />
Multiplies the 4-digit hexadecimal multiplic<strong>and</strong><br />
(Md) <strong>and</strong> 4-digit multiplier (Mr), <strong>and</strong><br />
outputs the 8-digit hexadecimal result to<br />
the specified result words (R <strong>and</strong> R+1). R<br />
<strong>and</strong> R+1 must be in the same data area.<br />
X<br />
Quotient<br />
Remainder<br />
Md<br />
Mr<br />
R<br />
R+1<br />
Divides the 4-digit hexadecimal dividend<br />
(Dd) by the 4-digit divisor (Dr), <strong>and</strong> outputs<br />
result to the designated result words ( R<br />
<strong>and</strong> R + 1). R <strong>and</strong> R + 1 must be in the same<br />
data area.<br />
÷<br />
Quotient<br />
Remainder<br />
D<br />
d<br />
Dr<br />
R<br />
R+ 1<br />
Au/Ad:<br />
IR<br />
SR<br />
HR<br />
AR<br />
LR<br />
TC<br />
DM<br />
#<br />
Mi/Su:<br />
IR<br />
SR<br />
HR<br />
AR<br />
LR<br />
TC<br />
DM<br />
#<br />
Md/Mr:<br />
IR<br />
SR<br />
HR<br />
AR<br />
LR<br />
TC<br />
DM<br />
#<br />
Dd/Dr:<br />
IR<br />
SR<br />
HR<br />
AR<br />
LR<br />
TC<br />
DM<br />
#<br />
R:<br />
IR<br />
HR<br />
AR<br />
LR<br />
DM<br />
R:<br />
IR<br />
HR<br />
AR<br />
LR<br />
DM<br />
R:<br />
IR<br />
HR<br />
AR<br />
LR<br />
DM<br />
R:<br />
IR<br />
HR<br />
AR<br />
LR<br />
Page<br />
177<br />
179<br />
181<br />
182<br />
0000 to 9999<br />
or 0000 to FFFF
Name<br />
Mnemonic<br />
REVERSIBLE<br />
DRUM COUNTER<br />
(@)RDM(60)<br />
HIGH-SPEED<br />
DRUM COUNTER<br />
HDM(61)<br />
Symbol<br />
RDM(60)<br />
N<br />
T<br />
R<br />
HDM(61)<br />
T<br />
R<br />
---<br />
KEY INPUT<br />
(@)KEY(62) KEY(62)<br />
S<br />
---<br />
---<br />
RS-232C PORT<br />
OUTPUT<br />
(@)POUT(63)<br />
RS-232C PORT<br />
INPUT<br />
(@)PIN(64)<br />
HOURS-TO-<br />
SECONDS<br />
(@)HTS(65)<br />
SECONDS-TO-<br />
HOURS<br />
(@)STH(66)<br />
POUT(63)<br />
S<br />
C<br />
B<br />
PIN(64)<br />
D<br />
C<br />
B<br />
HTS(65)<br />
S<br />
R<br />
---<br />
STH(66)<br />
S<br />
R<br />
---<br />
Function<br />
Creates a reversible ring counter in TC<br />
500 to TC 511 that counts from 0 to 9999,<br />
compares the PV to a table of ranges, <strong>and</strong><br />
turns ON corresponding bits in R whenever<br />
the PV is within one of the ranges given<br />
in the table.<br />
The size of the table is determined by the<br />
value of n, specified by bits 00 to 07 of T.<br />
The table starting at T must be within one<br />
data area, <strong>and</strong> all table words from T+1 on<br />
must be in BCD.<br />
Compares the PV of the high-speed counter<br />
(CNT 511) to a table of ranges, <strong>and</strong> turns<br />
ON corresponding bits in R whenever the<br />
PV is within one of the ranges given in the<br />
table.<br />
The size of the table is determined by the<br />
value of n, specified by bits 00 to 07 of T.<br />
The table starting at T must be within one<br />
data area, <strong>and</strong> all table words from T+1 on<br />
must be in BCD.<br />
Performs Programming Console operations<br />
from within the program. S designates<br />
the first word containing a key code.<br />
The key codes will produce the same effect<br />
as pressing the equivalent Programming<br />
Console keys.<br />
Outputs the B bytes of data in S to<br />
S+(B÷2)--1 through the RS-232C port. The<br />
control number, C, determines whether the<br />
leftmost (C=#0000) or rightmost<br />
(C=#0001) bytes in the words will be output<br />
first.<br />
Writes B bytes of data received through the<br />
RS-232C port to words beginning at D. The<br />
control number, C, determines whether the<br />
leftmost (C=#0000) or rightmost<br />
(C=#0001) byte in the words was input first.<br />
Converts a time given in hours/minutes/<br />
seconds (S <strong>and</strong> S+1) to an equivalent time<br />
in seconds only (R <strong>and</strong> R+1). S <strong>and</strong> S+1<br />
must be BCD <strong>and</strong> within one data area. R<br />
<strong>and</strong> R+1 must also be within one data<br />
area.<br />
Converts a time given in seconds (S <strong>and</strong><br />
S+1) to an equivalent time in hours/minutes/seconds<br />
(R <strong>and</strong> R+1). S <strong>and</strong> S+1 must<br />
be BCD between 0 <strong>and</strong> 35,999,999, <strong>and</strong><br />
within the same data area. R <strong>and</strong> R+1<br />
must also be within one data area.<br />
Oper<strong>and</strong> Data<br />
Areas<br />
N:<br />
TC 500<br />
through<br />
TC 511<br />
Appendix B<br />
Data Areas<br />
These footnote tables show the actual ranges of all data areas. Bit numbers are provided (except for DM <strong>and</strong> TC areas); remove the rightmost two digits for word numbers.<br />
IR SR HR TR AR LR TC DM #<br />
00000 to 24615 24700 to 25515 HR 0000 to 9915 TR 0 to 7 AR 0000 to 2715 LR 0000 to 6315 TC 000 to 511 Read/Wr: DM 0000 to DM 0999<br />
Rd only: DM 1000 to DM 1999<br />
T:<br />
IR<br />
SR<br />
HR<br />
AR<br />
LR<br />
TC<br />
DM<br />
S:<br />
#<br />
S:<br />
IR<br />
SR<br />
HR<br />
AR<br />
LR<br />
TC<br />
DM<br />
D:<br />
IR<br />
HR<br />
AR<br />
LR<br />
TC<br />
DM<br />
S:<br />
IR<br />
SR<br />
HR<br />
AR<br />
LR<br />
TC<br />
DM<br />
S:<br />
IR<br />
SR<br />
HR<br />
AR<br />
LR<br />
TC<br />
DM<br />
T:<br />
IR<br />
SR<br />
HR<br />
AR<br />
LR<br />
TC<br />
DM<br />
R:<br />
IR<br />
SR<br />
HR<br />
AR<br />
LR<br />
TC<br />
DM<br />
R:<br />
IR<br />
SR<br />
HR<br />
AR<br />
LR<br />
TC<br />
DM<br />
---:<br />
Not<br />
used.<br />
---:<br />
Not used.<br />
C:<br />
#<br />
C:<br />
#<br />
R:<br />
IR<br />
SR<br />
HR<br />
AR<br />
LR<br />
TC<br />
DM<br />
R:<br />
IR<br />
SR<br />
HR<br />
AR<br />
LR<br />
TC<br />
DM<br />
B:<br />
IR<br />
HR<br />
AR<br />
LR<br />
TC<br />
DM<br />
#<br />
B:<br />
IR<br />
HR<br />
AR<br />
LR<br />
TC<br />
DM<br />
#<br />
---:<br />
Not<br />
used.<br />
---:<br />
Not<br />
used.<br />
Page<br />
121<br />
124<br />
63,<br />
204<br />
205<br />
216<br />
152<br />
153<br />
0000 to 9999<br />
or 0000 to FFFF
Name<br />
Mnemonic<br />
BIT COUNTER<br />
(@)BCNT(67)<br />
Symbol<br />
BCNT(67)<br />
N<br />
SB<br />
R<br />
BLOCK<br />
COMPARE<br />
(@)BCMP(68) BCMP(68)<br />
S<br />
CB<br />
R<br />
HEXADECIMAL<br />
CONVERT<br />
(@)HEX(69)<br />
BLOCK<br />
TRANSFER<br />
(@)XFER(70)<br />
HEX(69)<br />
S<br />
Di<br />
D<br />
XFER(70)<br />
N<br />
S<br />
D<br />
Function<br />
Counts the number of ON bits in one or<br />
more words (SB is the beginning source<br />
word) <strong>and</strong> outputs the result to the specified<br />
result word (R). N gives the number of<br />
words to be counted. All words in which bit<br />
are to be counted must be in the same data<br />
area.<br />
Compares a 1-word binary value (S) with<br />
the 16 ranges given in the comparison<br />
table(CBisthestartingwordofthecomparison<br />
block). If the value falls within any<br />
of the ranges, the corresponding bits in the<br />
result word (R) will be set. The comparison<br />
block must be within one data area.<br />
S<br />
Lower limit Upper limit<br />
CB CB+1<br />
CB+2 CB+3<br />
CB+4 CB+5<br />
CB+30 CB+31<br />
Oper<strong>and</strong> Data<br />
Areas<br />
Appendix B<br />
Data Areas<br />
These footnote tables show the actual ranges of all data areas. Bit numbers are provided (except for DM <strong>and</strong> TC areas); remove the rightmost two digits for word numbers.<br />
IR SR HR TR AR LR TC DM #<br />
N:<br />
IR<br />
SR<br />
HR<br />
AR<br />
LR<br />
TC<br />
DM<br />
S:<br />
IR<br />
SR<br />
HR<br />
AR<br />
LR<br />
TC<br />
DM<br />
#<br />
00000 to 24615 24700 to 25515 HR 0000 to 9915 TR 0 to 7 AR 0000 to 2715 LR 0000 to 6315 TC 000 to 511 Read/Wr: DM 0000 to DM 0999<br />
Rd only: DM 1000 to DM 1999<br />
1<br />
0<br />
1<br />
Lower limit ≤ S ≤ Upper limit 1<br />
0<br />
Result<br />
Converts the ASCII codes in words beginning<br />
with S according to specifications in<br />
Di <strong>and</strong> outputs the hexadecimal equivalents<br />
to words beginning with D.<br />
Di specifications: Digit 0: first digit to convert;<br />
digit 1: number of ASCII codes to convert;<br />
digit 2: first half of S to convert; <strong>and</strong><br />
digit 3: parity (0: none; 1: even; 2: odd).<br />
Moves the content of several consecutive<br />
source words (S gives the address of the<br />
starting source word) to consecutive destination<br />
words (D is the starting destination<br />
word). All source words must be in the<br />
same data area, as must all destination<br />
words. Transfers can be within one data<br />
area or between two data areas, but the<br />
source <strong>and</strong> destination words must not<br />
overlap.<br />
S<br />
S+1<br />
D<br />
D+1<br />
S+N--1 D+N--1<br />
No. of<br />
Words<br />
S:<br />
IR<br />
SR<br />
HR<br />
AR<br />
LR<br />
TC<br />
DM<br />
N:<br />
IR<br />
SR<br />
HR<br />
AR<br />
LR<br />
TC<br />
DM<br />
#<br />
R:<br />
IR<br />
HR<br />
AR<br />
LR<br />
TC<br />
DM<br />
CB:<br />
IR<br />
SR<br />
HR<br />
LR<br />
TC<br />
DM<br />
Di:<br />
IR<br />
HR<br />
AR<br />
LR<br />
TC<br />
DM<br />
#<br />
S:<br />
IR<br />
HR<br />
AR<br />
LR<br />
TC<br />
DM<br />
SB:<br />
IR<br />
SR<br />
HR<br />
AR<br />
LR<br />
TC<br />
DM<br />
R:<br />
IR<br />
HR<br />
AR<br />
LR<br />
TC<br />
DM<br />
D:<br />
IR<br />
HR<br />
AR<br />
LR<br />
DM<br />
D:<br />
IR<br />
SR<br />
HR<br />
AR<br />
LR<br />
TC<br />
DM<br />
#<br />
Page<br />
218<br />
148<br />
154<br />
140<br />
0000 to 9999<br />
or 0000 to FFFF
#<br />
Name<br />
Mnemonic<br />
BLOCK SET<br />
(@)BSET(71)<br />
Symbol<br />
BSET(71)<br />
S<br />
St<br />
E<br />
DATA<br />
EXCHANGE<br />
(@)XCHG(73) XCHG(73)<br />
E1<br />
E2<br />
ONE DIGIT SHIFT<br />
LEFT<br />
(@)SLD(74) SLD(74)<br />
St<br />
E<br />
ONE DIGIT SHIFT<br />
RIGHT<br />
(@)SRD(75)<br />
4-TO-16<br />
DECODER<br />
(@)MLPX(76)<br />
SRD(75)<br />
E<br />
St<br />
MLPX(76)<br />
S<br />
Di<br />
R<br />
Function<br />
Copies the content of one word or constant<br />
(S) to several consecutive words (from the<br />
starting word, St, through to the ending<br />
word, E). St <strong>and</strong> E must be in the same data<br />
area.<br />
Oper<strong>and</strong> Data<br />
Areas<br />
Appendix B<br />
Data Areas<br />
These footnote tables show the actual ranges of all data areas. Bit numbers are provided (except for DM <strong>and</strong> TC areas); remove the rightmost two digits for word numbers.<br />
IR SR HR TR AR LR TC DM #<br />
00000 to 24615 24700 to 25515 HR 0000 to 9915 TR 0 to 7 AR 0000 to 2715 LR 0000 to 6315 TC 000 to 511 Read/Wr: DM 0000 to DM 0999<br />
Rd only: DM 1000 to DM 1999<br />
S<br />
Exchanges the contents of two words (E1<br />
<strong>and</strong> E2).<br />
St<br />
E1 E2<br />
Shifts all data, between the starting word<br />
(St) <strong>and</strong> ending word (E), one digit (four<br />
bits) to the left, writing zero into the<br />
rightmost digit of the starting word. St <strong>and</strong><br />
E must be in the same data area.<br />
St<br />
St + 1<br />
E<br />
Shifts all data, between starting word (St)<br />
<strong>and</strong> ending word (E), one digit (four bits) to<br />
the right, writing zero into the leftmost digit<br />
of the ending word. St <strong>and</strong> E must be in the<br />
same data area.<br />
E<br />
E--1<br />
0 St<br />
Converts up to four hexadecimal digits in<br />
the source word (S), into decimal values<br />
from 0 to 15, <strong>and</strong> turns ON the corresponding<br />
bit(s) in the result word(s) (R). There is<br />
one result word for each converted digit.<br />
Digits to be converted are designated by<br />
Di. (The rightmost digit specifies the first<br />
digit. The next digit to the left gives the<br />
number of digits to be converted minus 1.<br />
The two leftmost digits are not used.)<br />
S 0toF<br />
R<br />
15<br />
E<br />
00<br />
0<br />
St/E:<br />
IR<br />
HR<br />
AR<br />
LR<br />
TC<br />
DM<br />
E1/E2:<br />
IR<br />
HR<br />
AR<br />
LR<br />
TC<br />
DM<br />
St/E:<br />
IR<br />
HR<br />
AR<br />
LR<br />
DM<br />
St/E:<br />
IR<br />
HR<br />
AR<br />
LR<br />
DM<br />
S:<br />
IR<br />
SR<br />
HR<br />
AR<br />
LR<br />
TC<br />
DM<br />
S:<br />
IR<br />
SR<br />
HR<br />
AR<br />
LR<br />
TC<br />
DM<br />
#<br />
Di:<br />
IR<br />
HR<br />
AR<br />
LR<br />
TC<br />
DM<br />
#<br />
R:<br />
IR<br />
HR<br />
AR<br />
LR<br />
DM<br />
Page<br />
141<br />
142<br />
136<br />
136<br />
156<br />
0000 to 9999<br />
or 0000 to FFFF
Name<br />
Mnemonic<br />
16-TO-4<br />
ENCODER<br />
(@)DMPX(77)<br />
MOVE BIT<br />
(@)MOVB(82)<br />
MOVE DIGIT<br />
(@)MOVD(83)<br />
Symbol<br />
DMPX(77)<br />
S<br />
R<br />
Di<br />
MOVB(82)<br />
S<br />
Bi<br />
D<br />
MOVD(83)<br />
S<br />
Di<br />
D<br />
Function<br />
Determines the position of the leftmost ON<br />
bit in the source word(s) (starting word: S)<br />
<strong>and</strong> turns ON the corresponding bit(s) in<br />
the specified digit of the result word (R).<br />
One digit is used for each source word.<br />
Digits to receive the converted values are<br />
designated by Di. (The rightmost digit<br />
specifies the first digit. The next digit to left<br />
gives the number of words to be converted<br />
minus 1. The two leftmost digits are not<br />
used.)<br />
Oper<strong>and</strong> Data<br />
Areas<br />
Appendix B<br />
Data Areas<br />
These footnote tables show the actual ranges of all data areas. Bit numbers are provided (except for DM <strong>and</strong> TC areas); remove the rightmost two digits for word numbers.<br />
IR SR HR TR AR LR TC DM #<br />
00000 to 24615 24700 to 25515 HR 0000 to 9915 TR 0 to 7 AR 0000 to 2715 LR 0000 to 6315 TC 000 to 511 Read/Wr: DM 0000 to DM 0999<br />
Rd only: DM 1000 to DM 1999<br />
S<br />
R<br />
15 00<br />
0toF<br />
Transfers the designated bit of the source<br />
word or constant (S) to the designated bit<br />
of the destination word (D). The rightmost<br />
two digits of the bit designator (Bi) specify<br />
the source bit. The two leftmost digits specify<br />
the destination bit.<br />
S<br />
D<br />
Moves hexadecimal content of up to four<br />
specified 4-bit source digit(s) from the<br />
source word to the specified destination<br />
digit(s) (S gives the source word address.<br />
D specifies the destination word). Specific<br />
digits within the source <strong>and</strong> destination<br />
words are defined by the Digit Designator<br />
(Di) digits. (The rightmost digit gives the<br />
first source digit. The next digit to the left<br />
gives the number of digits to be moved. The<br />
next digit specifies the first digit in the<br />
destination word.)<br />
S<br />
D<br />
15 00<br />
S:<br />
IR<br />
SR<br />
HR<br />
AR<br />
LR<br />
TC<br />
DM<br />
S:<br />
IR<br />
SR<br />
HR<br />
AR<br />
LR<br />
DM<br />
#<br />
S:<br />
IR<br />
SR<br />
HR<br />
AR<br />
LR<br />
TC<br />
DM<br />
#<br />
R:<br />
IR<br />
HR<br />
AR<br />
LR<br />
DM<br />
Bi:<br />
IR<br />
HR<br />
AR<br />
LR<br />
TC<br />
DM<br />
#<br />
Di:<br />
IR<br />
HR<br />
AR<br />
LR<br />
TC<br />
DM<br />
#<br />
Di:<br />
IR<br />
HR<br />
AR<br />
LR<br />
TC<br />
DM<br />
#<br />
D:<br />
IR<br />
HR<br />
AR<br />
LR<br />
DM<br />
D:<br />
IR<br />
HR<br />
AR<br />
LR<br />
TC<br />
DM<br />
Page<br />
158<br />
143<br />
143<br />
0000 to 9999<br />
or 0000 to FFFF<br />
'
(<br />
Name<br />
Mnemonic<br />
REVERSIBLE<br />
SHIFT<br />
REGISTER<br />
(@)SFTR(84)<br />
ASCII CONVERT<br />
(@)ASC(86)<br />
SUBROUTINE<br />
ENTER<br />
(@)SBS(91)<br />
SUBROUTINE<br />
START<br />
SBN(92)<br />
Symbol<br />
SFTR(84)<br />
C<br />
St<br />
E<br />
ASC(86)<br />
S<br />
Di<br />
D<br />
SBS(91) N<br />
SBN(92) N<br />
Function<br />
Shifts bits in the specified word or series of<br />
words either left or right. Starting (St) <strong>and</strong><br />
ending words (E) must be specified. Control<br />
word (C) contains shift direction, reset<br />
input, <strong>and</strong> data input. (Bit 12: 0 = shift right,<br />
1=shiftleft.Bit13isthevalueshiftedinto<br />
the source data, with the bit at the opposite<br />
end being moved to CY. Bit 14: 1 = shift enabled,<br />
0 = shift disabled. If bit 15 is ON<br />
when SFTR(89) is executed with an ON<br />
condition, the entire shift register <strong>and</strong> CY<br />
will be set to zero.) St <strong>and</strong> E must be in the<br />
same data area <strong>and</strong> St must be less than<br />
or equal to E.<br />
C<br />
IN<br />
1<br />
5<br />
Oper<strong>and</strong> Data<br />
Areas<br />
Appendix B<br />
Data Areas<br />
These footnote tables show the actual ranges of all data areas. Bit numbers are provided (except for DM <strong>and</strong> TC areas); remove the rightmost two digits for word numbers.<br />
IR SR HR TR AR LR TC DM #<br />
00000 to 24615 24700 to 25515 HR 0000 to 9915 TR 0 to 7 AR 0000 to 2715 LR 0000 to 6315 TC 000 to 511 Read/Wr: DM 0000 to DM 0999<br />
Rd only: DM 1000 to DM 1999<br />
1<br />
4<br />
15<br />
CY<br />
1<br />
3<br />
E<br />
1<br />
2<br />
1<br />
1<br />
Not used<br />
00 15 00<br />
15 00 15<br />
E St<br />
St IN<br />
CY<br />
Converts hexadecimal digits from the<br />
source word (S) into 8-bit ASCII values,<br />
starting at leftmost or rightmost half of the<br />
starting destination word (D). The rightmost<br />
digit of Di designates the first source<br />
digit. The next digit to the left gives the<br />
number of digits to be converted. The next<br />
digit specifies the whether the data is to be<br />
transferred to the rightmost (0) or leftmost<br />
(1) half of the first destination word. The<br />
leftmost digit specifies parity:<br />
0: none,<br />
1: even, or<br />
2: odd.<br />
S<br />
D<br />
15 08 07 00<br />
0toF<br />
8-bit<br />
data<br />
Calls subroutine N. Moves program operation<br />
to the specified subroutine.<br />
00<br />
0<br />
0<br />
St/E/C:<br />
IR<br />
HR<br />
AR<br />
TC<br />
LR<br />
DM<br />
S:<br />
IR<br />
SR<br />
HR<br />
AR<br />
LR<br />
TC<br />
DM<br />
N:<br />
00 to 49<br />
Marks the start of subroutine N. N:<br />
00 to 49<br />
Di:<br />
IR<br />
HR<br />
LR<br />
TC<br />
DM<br />
#<br />
D:<br />
IR<br />
HR<br />
LR<br />
DM<br />
Page<br />
137<br />
160<br />
186<br />
186<br />
0000 to 9999<br />
or 0000 to FFFF
Name<br />
Mnemonic<br />
RETURN<br />
RET(93)<br />
WATCHDOG<br />
TIMER<br />
REFRESH<br />
(@)WDT(94)<br />
I/O REFRESH<br />
(@)IORF(97)<br />
Symbol<br />
RET(93)<br />
WDT(94) T<br />
IORF(97)<br />
St<br />
E<br />
Function<br />
Marks the end of a subroutine <strong>and</strong> returns<br />
control to the main program.<br />
Sets the maximum <strong>and</strong> minimum limits for<br />
the watchdog timer (normally 0 to 130 ms).<br />
New limits:<br />
Maximum time = 130 + (100 x T)<br />
<strong>Mini</strong>mum time = 130 + (100 x (T--1))<br />
Refreshes all I/O words between the start<br />
(St) <strong>and</strong> end (E) words. Only I/O words may<br />
be designated. Normally these words are<br />
refreshed only once per cycle, but refreshing<br />
words before use in an instruction can<br />
increase execution speed. St must be less<br />
than or equal to E.<br />
Appendix B<br />
Data Areas<br />
These footnote tables show the actual ranges of all data areas. Bit numbers are provided (except for DM <strong>and</strong> TC areas); remove the rightmost two digits for word numbers.<br />
IR SR HR TR AR LR TC DM #<br />
00000 to 24615 24700 to 25515 HR 0000 to 9915 TR 0 to 7 AR 0000 to 2715 LR 0000 to 6315 TC 000 to 511 Read/Wr: DM 0000 to DM 0999<br />
Rd only: DM 1000 to DM 1999<br />
Oper<strong>and</strong> Data<br />
Areas<br />
Page<br />
None 186<br />
T:<br />
0to63<br />
St/E:<br />
IR<br />
218<br />
219<br />
0000 to 9999<br />
or 0000 to FFFF
Appendix C<br />
Programming Console Operations<br />
The table below lists the Programming Console operations, a brief description, <strong>and</strong> the page on which they<br />
appear in the body of this manual. All operations are described briefly, <strong>and</strong> the key sequence for inputting<br />
them given, in the tables which form the second part of this appendix.<br />
Name Function Page<br />
Password Input Prompts the user for the access password. 66<br />
Buzzer ON/OFF Controls whether the buzzer will sound for keystroke inputs. 67<br />
Data Clear Used to erase data, either selectively or totally, from the Program Memory <strong>and</strong> the IR,<br />
AR, HR, DM, <strong>and</strong> TC areas.<br />
67<br />
Program Header Display Displays the program name, version number, <strong>and</strong> the date of last revision. 244<br />
Address Designation Displays the specified address. 70<br />
Program Input Used to edit or input program instructions. 71<br />
Program Read Allows the user to scroll through the program address-by-address. In RUN <strong>and</strong> MONI-<br />
TOR modes, status of bits is also given.<br />
70<br />
Program Search Searches a program for the specified data address or instruction. 77<br />
Instruction Insert<br />
Allows a new instruction to be inserted before the displayed instruction, or deletes the 79<br />
Instruction Delete displayed instruction (respectively).<br />
Program Check Checks the completed program for syntax errors (up to three levels). 74<br />
Error Message Read Displays error messages in sequence, starting with the most severe messages. 69, 234<br />
Bit/Word Monitor Displays the specified address whose oper<strong>and</strong> is to be monitored. In RUN or MONTR<br />
mode it will show the status of the oper<strong>and</strong> for any bit or word in any data area.<br />
236<br />
3-word Monitor Simultaneously monitors three consecutive words. 244<br />
Forced Set/Reset Set: Used to turn ON bits or timers, or to increment counters currently displayed on<br />
the left of the screen.<br />
Reset: Used to turn OFF bits, or to reset timers or counters.<br />
239<br />
Clear Forced Set/Reset Simultaneously clears all forced bits within the currently displayed word. 241<br />
Hex/BCD Data Change Used to change the value of the leftmost BCD or hexadecimal word displayed during a<br />
Bit/Word Monitor operation.<br />
242<br />
Binary Data Change Changes the value of 16-bit words bit-by-bit. Bits can be changed temporarily or permanently<br />
to the desired status.<br />
247<br />
SV Change<br />
Alters the SV of a timer or counter either by incrementing or decrementing the value, 249<br />
SV Reset<br />
or by overwriting the original value with a new one.<br />
3-word Change Used to change the value of a word displayed during a 3-word Monitor operation. 245<br />
Scan Time Display Measures the duration of the current cycle. Cycle times will vary according to the execution<br />
conditions which exist in each cycle.<br />
76<br />
Hex/ASCII Display<br />
Change<br />
Converts 4-digit hexadecimal data in the DM area to ASCII <strong>and</strong> vice-versa. 243<br />
Binary Monitor Displays the monitored area in binary format. 246<br />
PC to PROM Writer Outputs Program Memory to the RS-232C interface for writing to a commercial PROM<br />
writer.<br />
252<br />
PROM Writer to PC Reads Program Memory data from a commercial PROM writer into the PC via the<br />
RS-232C interface.<br />
253<br />
"
System Operations<br />
4<br />
Appendix C<br />
The next set of tables lists the Programming Console operations according to their function. A brief description<br />
of each operation is given, along with the allowable modes in which it can be implemented, <strong>and</strong> the keystroke<br />
sequence used to enter it.<br />
Operation/Description Modes* Key sequence<br />
Password Input<br />
RMP<br />
Controls access to the PC’s programming<br />
functions. To gain access to the<br />
CLR MONTR CLR<br />
system once “PASSWORD” has<br />
been displayed, press CLR, MONTR,<br />
<strong>and</strong> then CLR.<br />
Buzzer ON/OFF<br />
The buzzer can be switched to operate<br />
whenever Programming Console<br />
keys are pressed (as well as for the<br />
normal error indication). BZ is displayed<br />
in the upper right corner when<br />
the buzzer is operative. The buzzer<br />
can be enabled by pressing SHIFT<br />
<strong>and</strong> then 1 immediately after entering<br />
the password, or after changing the<br />
mode.<br />
RMP<br />
SHIFT<br />
B<br />
1<br />
Data Clear<br />
Unless otherwise specified, this operation<br />
will clear all erasable memory in<br />
Program Memory <strong>and</strong> IR, HR, AR,<br />
P<br />
CLR<br />
PLAY<br />
SET<br />
NOT<br />
REC<br />
RESET<br />
All Clear<br />
DM, <strong>and</strong> TC areas. To clear EPROM<br />
memory the write enable switch must<br />
[Address]<br />
be ON (i.e., enabled). The branch<br />
lines shown are used only when performing<br />
a partial memory clear, with<br />
HR<br />
each of the memory areas entered<br />
being retained. Specifying an ad-<br />
CNT<br />
dress will result in the Program<br />
Memory after <strong>and</strong> including that address<br />
being deleted. All memory up to<br />
that address will be retained.<br />
DM<br />
Program Header Display<br />
Displays the name of the program,<br />
along with the version number <strong>and</strong><br />
the time it was last revised (given in<br />
year, month, day, hour, <strong>and</strong> minute).<br />
RPM<br />
*Modes in which the given instruction is applicable: R = RUN, M = MONITOR, P = PROGRAM<br />
MONTR<br />
Partial<br />
Clear<br />
Retained if<br />
pressed
Programming <strong>and</strong> Debugging Operations<br />
Operation/Description Modes* Key sequence<br />
Address Designation<br />
RPM<br />
Displays the specified address. Can<br />
be used to start programming from a<br />
non-zero address or to access an address<br />
for editing. Leading zeros need<br />
not be entered. The contents of the<br />
address will not be displayed until the<br />
down key is pressed. The up <strong>and</strong><br />
down keys can then be used to scroll<br />
through the Program Memory.<br />
CLR [Address]<br />
Program Input<br />
P<br />
Used to enter or edit program instructions.<br />
This operation over-writes the<br />
Address<br />
displayed<br />
[Instruction<br />
contents of the memory at the displayed<br />
address. Once at the desired<br />
address, enter the new instruction<br />
word <strong>and</strong> then press WRITE (preceded<br />
by NOT for differentiated instructions).<br />
Input the required oper<strong>and</strong>s,<br />
<strong>and</strong> press WRITE after each.<br />
word]<br />
Program Read<br />
RPM<br />
Allows the user to scroll through the<br />
program address-by-address. If the<br />
Program Memory is read in RUN or<br />
MONITOR mode, the ON/OFF status<br />
of each displayed bit is also shown.<br />
Address<br />
currently<br />
displayed<br />
Program Search<br />
Allows the program to be searched<br />
for occurrences of any designated instruction<br />
or data area address. To<br />
designate a bit address, press SHIFT,<br />
CONT/#, <strong>and</strong> then input the address.<br />
Then press SRCH. Pressing SRCH<br />
again will find the next occurrence.<br />
For multi-word instructions, the up<br />
<strong>and</strong> down keys can be used to scroll<br />
through the words before continuing<br />
the search. In RUN or MONITOR<br />
mode, the ON/OFF status of each<br />
monitored bit will also be displayed.<br />
RPM<br />
CLR SRCH SRCH<br />
CLR SHIFT<br />
[Instruction]<br />
CONT<br />
#<br />
SHIFT<br />
*Modes in which the given instruction is applicable: R = RUN, M = MONITOR, P = PROGRAM<br />
LR<br />
HR<br />
HR<br />
TIM<br />
CNT<br />
(AR)<br />
Appendix C<br />
[Oper<strong>and</strong>]<br />
Scroll through multiword<br />
instructions<br />
[Address]<br />
SRCH SRCH
Operation/Description Modes* Key sequence<br />
Instruction Insert <strong>and</strong><br />
Instruction Delete<br />
The displayed instruction can be deleted,<br />
or another instruction can be inserted<br />
before it. Care should be taken<br />
P<br />
At the desired position<br />
in program:<br />
Insert<br />
[Enter new<br />
instruction]<br />
to avoid inadvertent deletions as<br />
there is no way of recovering the instructions<br />
other than to re-enter them.<br />
When an instruction is deleted all<br />
Delete<br />
Instruction<br />
currently<br />
displayed<br />
subsequent instruction addresses<br />
are automatically adjusted so that<br />
there are no empty addresses, or instructions<br />
without addresses.<br />
P<br />
CLR SRCH<br />
A<br />
0<br />
SRCH<br />
Program Check<br />
Once a program has been entered, it<br />
should be checked for errors. This<br />
program check can be used to search<br />
for three levels of syntax errors. Details<br />
of the errors covered by each level<br />
are given in Section 4-6-3 Checking<br />
the Program. The address where<br />
the error was generated will also be<br />
displayed.<br />
Error Message Read<br />
Displays error messages in sequence<br />
with most severe messages<br />
displayed first. Press monitor to access<br />
remaining messages. In PRO-<br />
GRAM mode, pressing MONTR<br />
clears the displayed message from<br />
memory <strong>and</strong> the next message is displayed.<br />
RPM<br />
B<br />
1<br />
C<br />
2<br />
CLR FUN MONTR MONTR<br />
*Modes in which the given instruction is applicable: R = RUN, M = MONITOR, P = PROGRAM<br />
SRCH<br />
CLR<br />
(0, 1, 2: check levels)<br />
INS<br />
DEL<br />
Appendix C<br />
Press SRCH to find<br />
next error.<br />
Cancel
Monitoring <strong>and</strong> Data Changing Operations<br />
Operation/Description Modes* Key sequence<br />
Bit/Word Monitor<br />
Up to six memory addresses, con-<br />
RPM<br />
taining either words or bits, or a combination<br />
of the two, can be monitored<br />
at once. Only three can be displayed<br />
CLR SHIFT<br />
CONT<br />
#<br />
at any one time. If operated in RUN or<br />
MONITOR mode, the status of moni-<br />
LR<br />
tored bits will also be displayed.<br />
The operation can be started from a<br />
cleared display by entering the ad-<br />
HR<br />
dress of the first word or bit to be monitored<br />
<strong>and</strong> pressing MONTR, or from<br />
any address in the program by dis-<br />
SHIFT HR<br />
playing the address of the bit or word<br />
LD<br />
to be monitored <strong>and</strong> pressing<br />
MONTR.<br />
When a timer or counter is monitored,<br />
its PV will be displayed <strong>and</strong> a box is<br />
OUT<br />
displayed in the bottom left h<strong>and</strong> corner<br />
if the Completion Flag is ON.<br />
TIM<br />
3-word Monitor<br />
Monitors three consecutive words simultaneously.<br />
Specify the lowest valued<br />
address of the three words, press<br />
MONTR, <strong>and</strong> then press EXT to display<br />
the data contents of the specified<br />
word <strong>and</strong> the two words that follow.<br />
Pressing CLR will change the threeword<br />
monitor operation into a singleword<br />
display.<br />
3-word Change<br />
This operation changes the value of a<br />
word displayed during a 3-word Monitor<br />
operation. The blinking cursor indicates<br />
the word that will be affected<br />
by the operation. The cursor can be<br />
moved by using the up <strong>and</strong> down<br />
keys. When the cursor is at the desired<br />
location, press CHG. After entering<br />
the new data, pressing WRITE<br />
causes the original data to be overwritten.<br />
RPM<br />
PM<br />
Bit/Word monitor in progress.<br />
Currently monitored words appear<br />
on the left of the screen.<br />
3-word Monitor<br />
in progress<br />
*Modes in which the given instruction is applicable: R = RUN, M = MONITOR, P = PROGRAM<br />
CNT<br />
DM<br />
EXT<br />
CHG<br />
[Data]<br />
[Address]<br />
MONTR<br />
Clears the leftmost<br />
address<br />
from the screen.<br />
WRITE<br />
Appendix C<br />
CLR<br />
Cancel
#<br />
Operation/Description Modes* Key sequence<br />
Forced Set/Reset<br />
If a bit, timer, or counter address is<br />
leftmost on the screen during a Bit/<br />
Word Monitor operation, pressing<br />
PLAY/SET will turn ON the bit, start<br />
the timer, or increment the counter.<br />
Pressing REC/RESET will turn OFF<br />
the bit, or reset the timer or counter.<br />
These force-sets <strong>and</strong> force-resets<br />
are effective while the key is held<br />
down.<br />
Permanent sets <strong>and</strong> resets can be<br />
implemented. By pressing SHIFT<br />
first, the force operations will be effective<br />
until NOT is pressed, or until a<br />
Clear Forced Set/Reset operation is<br />
performed. Timers will not operate in<br />
PROGRAM mode. SR bits are not affected<br />
by this operation.<br />
Clear Forced Set/Reset<br />
Simultaneously clears all forced set<br />
<strong>and</strong> forced reset bits within the word<br />
currently displayed.<br />
Hex/BCD Data Change<br />
Used to edit the leftmost BCD or hexadecimal<br />
value displayed during a<br />
Bit/Word Monitor operation. If a timer<br />
or counter is leftmost on the display,<br />
the PV will be the value displayed <strong>and</strong><br />
affected by this operation. It can only<br />
be changed in MONITOR mode <strong>and</strong><br />
only while the timer or counter is operating.<br />
SR words cannot be changed<br />
using this operation.<br />
Binary Data Change<br />
This operation is used to change the<br />
value of IR, HR, AR, LR, or DM words<br />
bit-by-bit. The cursor can be moved<br />
left by using the up key, <strong>and</strong> right by<br />
using the down key. The position of<br />
the cursor is the bit that will be overwritten.<br />
There are two <strong>type</strong>s of changes, temporary<br />
<strong>and</strong> permanent. Temporary<br />
changes result if 1 or 0 is entered.<br />
Permanent changes are made by<br />
pressing SHIFT <strong>and</strong> SET, or SHIFT<br />
<strong>and</strong> RESET. The former will result in<br />
an S being displayed in that bit position.<br />
Similarly, SHIFT <strong>and</strong> RESET will<br />
produce an R in the display.<br />
During operation of the PC, the bits<br />
having 1 or 0 values will change according<br />
to the program conditions.<br />
Bits with S or R, however, will always<br />
be treated as a 1 or 0, respectively.<br />
NOT cancels S <strong>and</strong> R settings <strong>and</strong><br />
the bits will become 1 or 0, respectively.<br />
PM Bit/Word monitor in progress. Bit or<br />
Timer/Counter currently monitored<br />
PLAY<br />
appears on left of the screen.<br />
SET<br />
PM<br />
PM<br />
PM<br />
CLR<br />
PLAY<br />
SET<br />
Bit/Word monitor in progress.<br />
Currently monitored word appears<br />
on the left of the screen.<br />
Binary monitor<br />
in progress. Word<br />
currently displayed.<br />
REC<br />
RESET<br />
NOT<br />
REC<br />
RESET<br />
SHIFT<br />
SHIFT<br />
*Modes in which the given instruction is applicable: R = RUN, M = MONITOR, P = PROGRAM<br />
CHG<br />
NOT<br />
PLAY<br />
SET<br />
REC<br />
RESET<br />
CHG [New data] WRITE<br />
SHIFT<br />
SHIFT<br />
B<br />
A<br />
1<br />
0<br />
NOT<br />
PLAY<br />
SET<br />
REC<br />
RESET<br />
Appendix C<br />
WRITE
Operation/Description Modes* Key sequence<br />
SV Change,<br />
SV Reset<br />
There are two ways of modifying the<br />
SVs for timers <strong>and</strong> counters. One<br />
method is to enter a new value.<br />
The second is to increment or decrement<br />
the existing SV. In MONITOR<br />
mode the SV can be changed while<br />
the program is being executed. Incrementing<br />
<strong>and</strong> decrementing can only<br />
be carried out if the SV has been entered<br />
as a constant.<br />
PM<br />
M<br />
Timer/Counter<br />
currently displayed<br />
CHG<br />
Scan (Cycle) Time Display<br />
RM<br />
This operation should be performed<br />
after all syntax errors have been corrected.<br />
The cycle time can only be<br />
checked in RUN or MONITOR mode<br />
<strong>and</strong> while the program is being executed.<br />
The cycle time displayed after<br />
pressing CLR <strong>and</strong> MONTR is that<br />
CLR MONTR MONTR<br />
for the current cycle. Pressing<br />
MONTR again will display a new<br />
cycle time. Any difference between<br />
successive cycle times is due to the<br />
different execution conditions that exist<br />
during each cycle.<br />
Hex/ASCII Display Change RPM<br />
Converts 4-digit hexadecimal DM<br />
data to ASCII <strong>and</strong> vice-versa.<br />
Word currently<br />
displayed<br />
TR<br />
Binary Monitor<br />
The contents of a monitored word can<br />
be specified to be displayed in binary<br />
by pressing SHIFT <strong>and</strong> MONTR after<br />
entering the word address. Words<br />
can be scrolled by pressing the up<br />
<strong>and</strong> down keys to increment <strong>and</strong><br />
decrement the displayed address. To<br />
terminate the binary display, press<br />
CLR.<br />
RPM<br />
*Modes in which the given instruction is applicable: R = RUN, M = MONITOR, P = PROGRAM<br />
EXT<br />
Binary monitor cancel<br />
All monitor cancel<br />
[New SV]<br />
[Word address]<br />
Appendix C<br />
WRITE<br />
WRITE<br />
'
PROM Writer Operations (Non-OMRON Products Only)<br />
Operation/Description Modes* Key sequence<br />
PC to PROM Writer<br />
Copies Program Memory to the<br />
RS-232C interface for writing to a<br />
commercial PROM writer.<br />
P<br />
Start PROM writer<br />
reception<br />
PROM Writer to PC<br />
Reads Program Memory data from a<br />
commercial PROM writer into the PC<br />
via the RS-232C interface. This operation<br />
overwrites the PC’s existing<br />
program memory.<br />
P<br />
*Modes in which the given instruction is applicable: R = RUN, M = MONITOR, P = PROGRAM<br />
(<br />
Appendix C<br />
Start PROM writer<br />
transmission
Appendix D<br />
Error <strong>and</strong> Arithmetic Flag Operation<br />
The following table shows the instructions that affect the ER, CY, GT, LT <strong>and</strong> EQ flags. In general, ER indicates<br />
that oper<strong>and</strong> data is not within requirements. CY indicates arithmetic or data shift results. GT indicates<br />
that a compared value is larger than some st<strong>and</strong>ard, LT that it is smaller, <strong>and</strong> EQ, that it is the same. EQ also<br />
indicates a result of zero for arithmetic operations. Refer to Section 5 Instruction Set for details.<br />
Vertical arrows in the table indicate the flags that are turned ON <strong>and</strong> OFF according to the result of the instruction.<br />
Although ladder diagram instructions,TIM, <strong>and</strong> CNT are executed when ER is ON, other instructions with a<br />
vertical arrow under the ER column are not executed if ER is ON. All of the other flags in the following table<br />
will also not operate when ER is ON.<br />
Instructions not shown do not affect any of the flags in the table. Although only the non-differentiated form of<br />
each instruction is shown, differentiated instructions affect flags in exactly the same way.<br />
Instructions 25503 (ER) 25504 (CY) 25505 (GR) 25506 (EQ) 25507 (LE)<br />
TIM<br />
CNT<br />
Unaffected Unaffected Unaffected Unaffected<br />
END(01) OFF OFF OFF OFF OFF<br />
CNTR(12)<br />
TIMH(15)<br />
WSFT(16)<br />
Unaffected Unaffected Unaffected Unaffected<br />
CMP(20) Unaffected<br />
MOV(21)<br />
MVN(22)<br />
BIN(23)<br />
BCD(24)<br />
Unaffected Unaffected Unaffected<br />
ASL(25)<br />
ASR(26)<br />
ROL(27)<br />
ROR(28)<br />
Unaffected Unaffected<br />
COM(29) Unaffected Unaffected<br />
ADD(30)<br />
SUB(31)<br />
Unaffected Unaffected<br />
MUL(32)<br />
DIV(33)<br />
ANDW(34)<br />
ORW(35)<br />
XORW(36)<br />
XNRW(37)<br />
INC(38)<br />
DEC(39)<br />
Unaffected Unaffected Unaffected<br />
STC(40) Unaffected ON Unaffected Unaffected Unaffected<br />
CLC(41) Unaffected OFF Unaffected Unaffected Unaffected<br />
MSG(46)<br />
LMSG(47)<br />
Unaffected Unaffected Unaffected Unaffected<br />
ADB(50)<br />
SBB(51)<br />
Unaffected Unaffected<br />
MLB(52)<br />
DVB(53)<br />
Unaffected Unaffected Unaffected
) % + Appendix D<br />
Instructions 25503 (ER) 25504 (CY) 25505 (GR) 25506 (EQ) 25507 (LE)<br />
RDM(60) Unaffected Unaffected Unaffected Unaffected<br />
HDM(61)<br />
KEY(62)<br />
POUT(63)<br />
PIN(64)<br />
HTS(65) Unaffected Unaffected Unaffected<br />
STH(66)<br />
BCNT(67)<br />
BCMP(68)<br />
HEX(69) Unaffected Unaffected Unaffected Unaffected<br />
XFER(70) Unaffected Unaffected Unaffected Unaffected<br />
BSET(71)<br />
XCHG(73) Unaffected Unaffected Unaffected Unaffected<br />
SLD(74)<br />
SRD(75)<br />
MLPX(76)<br />
DMPX(77)<br />
MOVB(82) Unaffected Unaffected Unaffected Unaffected<br />
MOVD(83)<br />
SFTR(84) Unaffected Unaffected Unaffected<br />
ASC(86) Unaffected Unaffected Unaffected Unaffected<br />
SBS(91) Unaffected Unaffected Unaffected Unaffected<br />
,
Appendix E<br />
Memory Areas<br />
This appendix contains tables from Section 3 Memory Areas. They have been duplicated here for convenience.<br />
Refer to Section 3 for details. The Parameter Area of System DM is outlined in Appendix K Parameter<br />
Area Coding Charts.<br />
Memory Areas<br />
Area Acronym Range<br />
Internal Relay* IR Words: 040 to 246 Bits: 04000 to 24615<br />
Special Relay SR Words: 247 to 255 Bits: 24700 to 25507<br />
Auxiliary Relay AR Words: AR 00 to AR 27 Bits: AR 0000 to AR 2715<br />
Data Memory DM Read/Write: DM 0000 to DM 0999<br />
Read only: DM 1000 to DM 1999<br />
Holding Relay HR Words: HR 00 to HR 99 Bits: HR 0000 to HR 9915<br />
Timer/Counter TC TC 000 to TC 511 (TC numbers used to access other information)<br />
Link Relay LR Words: LR 00 to LR 63 Bits: LR 0000 to 6315<br />
Temporary Relay TR TR 00 to TR 07 (bits only)<br />
Program Memory UM UM: Depends on Memory Unit used.<br />
* Including I/O words/bits (see next table).<br />
Word Allocations in IR Area<br />
Connected Unit I/O Designation <strong>C20H</strong> or <strong>C28H</strong> <strong>C40H</strong><br />
CPU Input words IR 000 IR 000 to IR 001<br />
Output words IR 002 IR 002 to IR 003<br />
1st Expansion I/O Unit Input words IR 010 IR 010 to IR 011<br />
Output words IR 012 IR 012 to IR 013<br />
2nd Expansion I/O Unit Input words IR 020 IR 020 to IR 021<br />
Output words IR 022 IR 022 to IR 023<br />
3rd Expansion I/O Unit Input words IR 030 IR 030 to IR 031<br />
Output words IR 032 IR 032 to IR 033<br />
CPUs<br />
Model Input bits Outputs bits Work bits<br />
<strong>C20H</strong> IR 00000 to IR 00011 IR 00200 to IR 00207 IR 00208 to IR 00215<br />
<strong>C28H</strong> IR 00000 to IR 00015 IR 00200 to IR 00211 IR 00212 to IR 00215<br />
<strong>C40H</strong> IR 00000 to IR 00015 IR 00200 to IR 00211 IR 00212 to IR 00215<br />
IR 00100 to IR 00107 IR 00300 to IR 00303 IR 00304 to IR 00315<br />
<strong>C60H</strong> IR 00000 to IR 00015 IR 00200 to IR 00211 IR 00312 to IR 00315<br />
IR 00100 to IR 00115 IR 00300 to IR 00315<br />
Expansion I/O Units<br />
Model Input bits Outputs bits Work bits<br />
<strong>C20H</strong> Bits 00 to 11 of IR n Bits 00 to 07 of IR n+2 Bits 08 to 15 of IR n+2<br />
<strong>C28H</strong> Bits 00 to 15 of IR n Bits 00 to 11 of IR n+2 Bits 12 to 15 of IR n+2<br />
<strong>C40H</strong> Bits 00 to 15 of IR n<br />
Bits 00 to 11 of IR n+2 Bits 12 to 15 of IR n+2<br />
Bits 00 to 07 of IR n+1 Bits 00 to 03 of IR n+3 Bits 04 to 15 of IR n+3<br />
<strong>C60H</strong> Bits 00 to 15 of IR n<br />
Bits 00 to 11 of IR n+2 Bits 12 to 15 of IR n+3<br />
Bits 00 to 15 of IR n+1 Bits 00 to 15 of IR n+3<br />
"
SR Area<br />
4<br />
Word(s) Bit(s) Function<br />
247 to 250 00 to 07 Reserved<br />
08 to 15 Reserved<br />
251 00 to 15 Not used<br />
252 00 to 05 Not used<br />
06 Reserved<br />
07 Not used<br />
08 RS-232C Communications Error Flag <strong>and</strong> CPU-mounting Host Link Unit<br />
Communications Error Flag<br />
09 RS-232C Interface Restart Bit <strong>and</strong> CPU-mounting Host Link Unit Restart Bit<br />
10 Calendar/clock Area Refresh Bit<br />
11 Forced Status Hold Bit<br />
12 I/O Status Hold Bit<br />
13 Reserved<br />
14 to 15 Not used<br />
253 00 to 07 FAL number output area.<br />
08 Battery Alarm Flag<br />
09 Cycle Time Error Flag<br />
10 Not used<br />
11 Not used<br />
12 Not used<br />
13 Always ON Flag<br />
14 Always OFF Flag<br />
15 First Cycle<br />
254 00 1-minute clock pulse bit<br />
01 0.02-second clock pulse bit<br />
02 to 06 Reserved for future use<br />
07 Step Flag<br />
08 to 14 Reserved for future use<br />
15 Reserved<br />
255 00 0.1-second clock pulse bit<br />
01 0.2-second clock pulse bit<br />
02 1.0-second clock pulse bit<br />
03 Instruction Execution Error (ER) Flag<br />
04 Carry (CY) Flag<br />
05 Greater Than (GR) Flag<br />
06 Equals (EQ) Flag<br />
07 Less Than (LE) Flag<br />
Appendix E
AR Area<br />
Word(s) Bit(s) Function<br />
02 00 to 10 Reversible Drum Counter (RDM(60)) Reset Bits<br />
11 High-speed Counter Reset Bit<br />
12 High-speed Counter Reset Flag<br />
03 00 to 10 Reversible Drum Counter (RDM(60)) Direction Bits<br />
11 High-speed Counter Bank Bit<br />
04 00 to 07 RS-232C Communications Error Code<br />
13 RS-232C Reception Impossible Flag<br />
14 RS-232C Reception Completed Flag<br />
15 RS-232C Transmission Possible Flag<br />
05 00 to 07 RS-232C Reception Counter<br />
08 to 15 RS-232C Transmission Counter<br />
06 00 to 15 RS-232C Bytes Received Area<br />
07 08 TERMINAL Mode Input Cancel Bit<br />
13 Error History Overwrite Bit<br />
14 Error History Reset Bit<br />
15 Error History Enable Bit<br />
08 00 to 15 RS-232C Bytes Input Area<br />
12 00 to 15 System Parameter Warning Flags<br />
13 00 to 13 System Parameter Warning Flags<br />
14 System Parameter Backup Flag<br />
15 System Parameter/Backup Area Checksum Flag<br />
14 00 to 03 System Comm<strong>and</strong> Response Code<br />
04 to 06 Not used<br />
07 System Comm<strong>and</strong> Completion Flag<br />
08 to 11 System Comm<strong>and</strong> Comm<strong>and</strong> Code<br />
12 to 14 Not used<br />
15 System Comm<strong>and</strong> Execution Bit<br />
15 00 to 07 Startup Operating Mode<br />
17 00 to 15 Current Time Area<br />
Appendix E<br />
18 to 21 00 to 15 Calendar/clock Area (AR 2113: Seconds Round-off Bit; AR 2114: Stop Bit; AR 2115: Set Bit)<br />
22 00 to 15 TERMINAL Mode Key Bits<br />
23 00 to 15 Power-off Counter<br />
24 05 SCAN(18) Scan Time Flag<br />
15 Programming Console or Peripheral Interface Unit Mounted Flag<br />
25 00 to 15 FALS-generating Address<br />
26 00 to 15 Maximum Cycle Time Area<br />
27 00 to 15 Current Cycle Time Area
DM Area<br />
Addresses User program<br />
read/write<br />
Usage<br />
DM 0000 to DM 0899 Read/write General User Area<br />
DM 0900 to DM 0929 Read/write Parameter Area<br />
DM 0930 to DM 0968 --- Not used.<br />
DM 0969 to DM 0999 Read/write Error History Area<br />
DM 1000 to DM 1899 Read only General User Area<br />
DM 1900 to DM 1929 Read only Parameter Backup Area<br />
DM 1930 to DM 1989 --- Not used.<br />
DM 1990 to DM 1999 Read only User Program Header<br />
Appendix E
Appendix F<br />
Word Assignment Recording Sheets<br />
This appendix contains sheets that can be copied by the programmer to record I/O bit allocations <strong>and</strong> terminal<br />
assignments, as well as details of work bits, data storage areas, timers, <strong>and</strong> counters.
Programmer: Program: Date: Page:<br />
Word: Unit:<br />
Bit Field device Notes<br />
00<br />
01<br />
02<br />
03<br />
04<br />
05<br />
06<br />
07<br />
08<br />
09<br />
10<br />
11<br />
12<br />
13<br />
14<br />
15<br />
Word: Unit:<br />
Bit Field device Notes<br />
00<br />
01<br />
02<br />
03<br />
04<br />
05<br />
06<br />
07<br />
08<br />
09<br />
10<br />
11<br />
12<br />
13<br />
14<br />
15<br />
#<br />
I/O Bits<br />
Word: Unit:<br />
Bit Field device Notes<br />
00<br />
01<br />
02<br />
03<br />
04<br />
05<br />
06<br />
07<br />
08<br />
09<br />
10<br />
11<br />
12<br />
13<br />
14<br />
15<br />
Word: Unit:<br />
Bit Field device Notes<br />
00<br />
01<br />
02<br />
03<br />
04<br />
05<br />
06<br />
07<br />
08<br />
09<br />
10<br />
11<br />
12<br />
13<br />
14<br />
15
Programmer: Program: Date: Page:<br />
Area: Word:<br />
Bit Usage Notes<br />
00<br />
01<br />
02<br />
03<br />
04<br />
05<br />
06<br />
07<br />
08<br />
09<br />
10<br />
11<br />
12<br />
13<br />
14<br />
15<br />
Area: Word:<br />
Bit Usage Notes<br />
00<br />
01<br />
02<br />
03<br />
04<br />
05<br />
06<br />
07<br />
08<br />
09<br />
10<br />
11<br />
12<br />
13<br />
14<br />
15<br />
Work Bits<br />
Area: Word:<br />
Bit Usage Notes<br />
00<br />
01<br />
02<br />
03<br />
04<br />
05<br />
06<br />
07<br />
08<br />
09<br />
10<br />
11<br />
12<br />
13<br />
14<br />
15<br />
Area: Word:<br />
Bit Usage Notes<br />
00<br />
01<br />
02<br />
03<br />
04<br />
05<br />
06<br />
07<br />
08<br />
09<br />
10<br />
11<br />
12<br />
13<br />
14<br />
15<br />
'
Programmer: Program: Date: Page:<br />
(<br />
Data Storage<br />
Word Contents Notes Word Contents Notes
Timers <strong>and</strong> Counters<br />
Programmer: Program: Date: Page:<br />
TC address TorC Set value Notes TC address TorC Set value Notes
Appendix G<br />
Program Coding Sheet<br />
The following page can be copied for use in coding ladder diagram programs. It is designed for flexibility, allowing<br />
the user to input all required addresses <strong>and</strong> instructions.<br />
When coding programs, be sure to specify all function codes for instructions <strong>and</strong> data areas (or # for constant)<br />
for oper<strong>and</strong>s. These will be necessary when inputting programs though a Programming Console or other Peripheral<br />
Device.<br />
"
Programmer: Program: Date: Page:<br />
Address Instruction Oper<strong>and</strong>(s) Address Instruction Oper<strong>and</strong>(s) Address Instruction Oper<strong>and</strong>(s)<br />
#4<br />
Program Coding Sheet
Appendix H<br />
Data Conversion Table<br />
Decimal BCD Hex Binary<br />
00 00000000 00 00000000<br />
01 00000001 01 00000001<br />
02 00000010 02 00000010<br />
03 00000011 03 00000011<br />
04 00000100 04 00000100<br />
05 00000101 05 00000101<br />
06 00000110 06 00000110<br />
07 00000111 07 00000111<br />
08 00001000 08 00001000<br />
09 00001001 09 00001001<br />
10 00010000 0A 00001010<br />
11 00010001 0B 00001011<br />
12 00010010 0C 00001100<br />
13 00010011 0D 00001101<br />
14 00010100 0E 00001110<br />
15 00010101 0F 00001111<br />
16 00010110 10 00010000<br />
17 00010111 11 00010001<br />
18 00011000 12 00010010<br />
19 00011001 13 00010011<br />
20 00100000 14 00010100<br />
21 00100001 15 00010101<br />
22 00100010 16 00010110<br />
23 00100011 17 00010111<br />
24 00100100 18 00011000<br />
25 00100101 19 00011001<br />
26 00100110 1A 00011010<br />
27 00100111 1B 00011011<br />
28 00101000 1C 00011100<br />
29 00101001 1D 00011101<br />
30 00110000 1E 00011110<br />
31 00110001 1F 00011111<br />
32 00110010 20 00100000<br />
#
Appendix I<br />
Extended ASCII<br />
Programming Console <strong>and</strong> Data Access Console Displays<br />
Bits 0 to 3 Bits 4 to 7<br />
BIN 0000 0001 0010 0011 0100 0101 0110 0111 1010 1011 1100 1101 1110 1111<br />
HEX 0 1 2 3 4 5 6 7 A B C D E F<br />
0000 0 NUL DLE Space � � � � � � � � � �<br />
0001 1 SOH DC1 � � � � � � � � � � � �<br />
0010 2 STX DC2 � � � � � � � � � � � �<br />
0011 3 ETX DC3 � � � � � � � � � � � �<br />
0100 4 EOT DC4 � � � � � � � � � � � �<br />
0101 5 ENQ NAK � � � � � � � � � � � �<br />
0110 6 ACK SYN � � � � � � � � � � � �<br />
0111 7 BEL ETB � � � � � � � � � � � �<br />
1000 8 BS CAN � � � � � � � � � � � �<br />
1001 9 HT EM � � � � � � � � � � � �<br />
1010 A LF SUB � � � � � � � � � � � �<br />
1011 B VT ESC � � � � � � � � � � � �<br />
1100 C FF FS � � � � � � � � � � � �<br />
1101 D CR GS � � � � � � � � � � � �<br />
1110 E S0 RS � � � � � � � � � � �<br />
1111 F S1 US � � � � � � � � � � � �<br />
#
Appendix J<br />
Programming Console Key Codes<br />
The following codes can be used in KEY(62) to execute Programming Console operations from the user program.<br />
Refer to Section 5 Instruction Set for programming details <strong>and</strong> to Section 7 Program Input, Debugging,<br />
<strong>and</strong> Execution for Programming Console details.<br />
The keys shown below are activated with the hexadecimal code given with it. The Programming Console display<br />
can be reset to the password display by inputting 40hex. 3D 3C 3B 38<br />
None<br />
39<br />
None<br />
35 34 33 30 31 32<br />
2D 2C 2B 28 29 2A<br />
25 24 23 20 21 22<br />
1D 1C 1B 18 19 1A<br />
15 14 13 10 11 12<br />
0D 0C<br />
None<br />
3A<br />
0B 08 09 0A<br />
#'
Appendix K<br />
Parameter Area Coding Charts<br />
This appendix is provided for you to use in determining <strong>and</strong> inputting settings into the parameter area of System<br />
DM. The default settings are given for convenience. Only those settings which differ from the defaults<br />
need to be noted. DM addresses not in parentheses are those in the parameter area; those within parentheses<br />
are those of the corresponding words in the parameter backup area.<br />
Word <strong>and</strong> parameter Default Setting<br />
Bit Content/Meaning<br />
DM 0900 (DM 1900): PC Mode on Startup Key switch: 0000<br />
00 to 07 00: PROGRAM<br />
02: RUN<br />
01: MONITOR<br />
00<br />
08 to 15 00: As set on Programming Console key switch<br />
01: Mode when PC was last turned off (in AR 15)<br />
02: Mode set in bits 00 to 07, above<br />
00<br />
DM 0901 (DM 1901): Cycle Time Limit 100 ms: 1001<br />
00 to 07 Cycle time limit in units of ten milliseconds. Setting is between<br />
00 <strong>and</strong> 99 in BCD resulting in cycle time limits between<br />
000 <strong>and</strong> 990 ms, respectively.<br />
10<br />
08 to 15 00: Bits 00 to 07 disabled (i.e., cycle time limit is 100 ms)<br />
01: Bits 00 to 07 enabled<br />
01<br />
DM 0902 (DM 1902): Peripheral Device Service Time 5%: 0000<br />
00 to 07 Percent of cycle time allocated to Device servicing between<br />
00 <strong>and</strong> 99 in BCD.<br />
00<br />
08 to 15 00: Bits 00 to 07 disabled (i.e., servicing set to 5%)<br />
01: Bits 00 to 07 enabled<br />
00<br />
DM 0903 (DM 1903): RS-232C Interface Service Time 5%: 0000<br />
00 to 07 Percent of cycle time allocated to RS-232C interface servicing<br />
between 00 <strong>and</strong> 99 in BCD.<br />
00<br />
08 to 15 00: Bits 00 to 07 disabled (i.e., servicing set to 5%)<br />
01: Bits 00 to 07 enabled<br />
00<br />
DM 0904 (DM 1904): Programming Console Message Language Bits English:<br />
08 to 15 00: English 01: Japanese 02: German 0000<br />
03: French 04: Italian 05: Spanish<br />
DM 0905 (DM 1905): General High-speed Counter Bits No counter: 0000<br />
00 IR 00200 Enable Bit 0<br />
01 IR 00201 Enable Bit 0<br />
02 IR 00202 Enable Bit 0<br />
03 IR 00203 Enable Bit 0<br />
04 IR 00204 Enable Bit 0<br />
05 IR 00205 Enable Bit 0<br />
06 IR 00206 Enable Bit 0<br />
07 IR 00207 Enable Bit 0<br />
08 to 10 Final step for bank 0 (0 to 7) 0<br />
11 to 13 Final step for bank 1 (0 to 7) 0<br />
14 Hard Reset Enable Bit (Turn ON to enable hard reset.) 0<br />
15 High-speed Counter Enable Bit (Turn ON to enable counter.) 0<br />
#
#,<br />
% Appendix K<br />
Word <strong>and</strong> parameter Default<br />
Setting<br />
Bit Content/Meaning<br />
DM 0906 (DM 1906): High-speed Counter Interrupt Output Table 0000<br />
00 Step 0 output status for IR 00200 0<br />
01 Step 0 output status for IR 00201 0<br />
02 Step 0 output status for IR 00202 0<br />
03 Step 0 output status for IR 00203 0<br />
04 Step 0 output status for IR 00204 0<br />
05 Step 0 output status for IR 00205 0<br />
06 Step 0 output status for IR 00206 0<br />
07 Step 0 output status for IR 00207 0<br />
08 Step 1 output status for IR 00200 0<br />
09 Step 1 output status for IR 00201 0<br />
10 Step 1 output status for IR 00202 0<br />
11 Step 1 output status for IR 00203 0<br />
12 Step 1 output status for IR 00204 0<br />
13 Step 1 output status for IR 00205 0<br />
14 Step 1 output status for IR 00206 0<br />
15 Step 1 output status for IR 00207 0<br />
DM 0907 (DM 1907):<br />
High-speed Counter Interrupt Output Table (continued)<br />
This word continues the table started in DM 0906.<br />
0000<br />
00 Step 2 output status for IR 00200 0<br />
01 Step 2 output status for IR 00201 0<br />
02 Step 2 output status for IR 00202 0<br />
03 Step 2 output status for IR 00203 0<br />
04 Step 2 output status for IR 00204 0<br />
05 Step 2 output status for IR 00205 0<br />
06 Step 2 output status for IR 00206 0<br />
07 Step 2 output status for IR 00207 0<br />
08 Step 3 output status for IR 00200 0<br />
09 Step 3 output status for IR 00201 0<br />
10 Step 3 output status for IR 00202 0<br />
11 Step 3 output status for IR 00203 0<br />
12 Step 3 output status for IR 00204 0<br />
13 Step 3 output status for IR 00205 0<br />
14 Step 3 output status for IR 00206 0<br />
15 Step 3 output status for IR 00207 0
%<br />
Appendix K<br />
Word <strong>and</strong> parameter Default<br />
Setting<br />
Bit Content/Meaning<br />
DM 0908 (DM 1908):<br />
High-speed Counter Interrupt Output Table (continued)<br />
This word continues the table started in DM 0906.<br />
0000<br />
00 Step 4 output status for IR 00200 0<br />
01 Step 4 output status for IR 00201 0<br />
02 Step 4 output status for IR 00202 0<br />
03 Step 4 output status for IR 00203 0<br />
04 Step 4 output status for IR 00204 0<br />
05 Step 4 output status for IR 00205 0<br />
06 Step 4 output status for IR 00206 0<br />
07 Step 4 output status for IR 00207 0<br />
08 Step 5 output status for IR 00200 0<br />
09 Step 5 output status for IR 00201 0<br />
10 Step 5 output status for IR 00202 0<br />
11 Step 5 output status for IR 00203 0<br />
12 Step 5 output status for IR 00204 0<br />
13 Step 5 output status for IR 00205 0<br />
14 Step 5 output status for IR 00206 0<br />
15 Step 5 output status for IR 00207 0<br />
DM 0909 (DM 1909):<br />
High-speed Counter Interrupt Output Table (continued)<br />
This word continues the table started in DM 0906.<br />
0000<br />
00 Step 6 output status for IR 00200 0<br />
01 Step 6 output status for IR 00201 0<br />
02 Step 6 output status for IR 00202 0<br />
03 Step 6 output status for IR 00203 0<br />
04 Step 6 output status for IR 00204 0<br />
05 Step 6 output status for IR 00205 0<br />
06 Step 6 output status for IR 00206 0<br />
07 Step 6 output status for IR 00207 0<br />
08 Step 7 output status for IR 00200 0<br />
09 Step 7 output status for IR 00201 0<br />
10 Step 7 output status for IR 00202 0<br />
11 Step 7 output status for IR 00203 0<br />
12 Step 7 output status for IR 00204 0<br />
13 Step 7 output status for IR 00205 0<br />
14 Step 7 output status for IR 00206 0<br />
15 Step 7 output status for IR 00207 0<br />
#"
'4<br />
% Appendix K<br />
Word <strong>and</strong> parameter Default<br />
Setting<br />
Bit Content/Meaning<br />
High-speed Counter Step Table<br />
These words contain the width of each step of the counter. The total width<br />
of the counter is the sum of all the widths set below.<br />
--- ---<br />
Step 0: DM 0910 0000 ( (10000) ) when<br />
Step 1: DM 0911<br />
counter is i enabled. bl d<br />
Step 2: DM 0912<br />
Step 3: DM 0913<br />
Step 4: DM 0914<br />
Step 5: DM 0915<br />
Step 6: DM 0916<br />
Step 7: DM 0917<br />
DM 0918 <strong>and</strong> DM 0919 (DM 1918 <strong>and</strong> DM 1919) Not used. 0000 0000<br />
DM 0920 (DM 1920) 0000<br />
00 to 07 St<strong>and</strong>ard/Custom Communications Format Selection<br />
00: St<strong>and</strong>ard<br />
(1 start bit, 7-bit data length, even parity, 2 stop bits,<br />
9,600 baud)<br />
01: Custom settings<br />
(i.e., according to contents of DM 0921)<br />
08 to 15 RS-232C Mode<br />
00: Host link 01: Memory upload/download<br />
02: ASCII output mode<br />
DM 0921 (DM 1921) 0000<br />
00 to 07 Baud Rate (if DM 0920 bits 00 to 07 are 01)<br />
00: 300 bps 01: 600 bps 02: 1,200 bps<br />
03: 2,400 bps 04: 4,800 bps* 05: 9,600 bps*<br />
08 to 15 Data Format (if DM 0920 bits 00 to 07 are 01)<br />
00: 1 start bit, 7-bit data, 2 stop bits, even parity<br />
01: 1 start bit, 7-bit data, 2 stop bits, odd parity<br />
02: 1 start bit, 8-bit data, 1 stop bits, no parity<br />
03: 1 start bit, 8-bit data, 2 stop bits, no parity<br />
04: 1 start bit, 8-bit data, 1 stop bits, even parity<br />
05: 1 start bit, 8-bit data, 1 stop bits, odd parity<br />
DM 0922 (DM 1922) 0000<br />
00 to 07 Transmission Delay<br />
In tenths of milliseconds between 00 <strong>and</strong> 99 (BCD, correspond<br />
to 000 <strong>and</strong> 990 ms delays, respectively)<br />
08 to 15 RTS/CTS Control<br />
00: Without RTS/CTS<br />
01: With RTS/CTS<br />
St<strong>and</strong>ard: 00<br />
Host link: 00<br />
300 bps: 00<br />
1 start bit, 7-bit<br />
data, 2 stop bits,<br />
even parity: 00<br />
0ms:00<br />
Without RTS/CTS:<br />
00<br />
DM 0923 (DM 1923) (00 to 07 not used.) 0000 00<br />
08 to 15 Unit number for host link mode between 00 <strong>and</strong> 31 in BCD #0: 00<br />
DM 0924 (DM 1924) (00 to 07 not used.) 0000 00<br />
08 to 15 Transmission Format for Memory Upload/Download<br />
00: Intel HEX 01: Motorola S<br />
DM 0925 (DM 1925) 0000<br />
00 to 07 Starting Code<br />
This byte contains the starting code used in POUT(63) <strong>and</strong><br />
PIN(64) transmissions when bits 08 to 15 contain 01.<br />
08 to 15 Starting Code/No Starting Code Selection<br />
00: No starting code<br />
01: Starting code set in bits 00 to 07<br />
Intel HEX: 00<br />
No starting code
%<br />
Appendix K<br />
Word <strong>and</strong> parameter Default<br />
Setting<br />
Bit Content/Meaning<br />
DM 0926 (DM 1926) 0000<br />
00 to 07 End Code<br />
This byte contains the end code used in POUT(63) <strong>and</strong><br />
PIN(64) transmissions when bits 08 to 15 contain 01.<br />
No end code<br />
08 to 15 End Code/No End Code Selection<br />
00: No end code<br />
01:Endcodesetinbits00to07<br />
DM 0927 to DM 0929 (DM 1927 to DM 1929) 0000 0000<br />
Not used. --- ---<br />
*Higher baud rates may produce errors in RS-232C communications if both RS-232C interface <strong>and</strong> Peripheral Interface<br />
Unit are used.<br />
'
Glossary<br />
address The location in memory where data is stored. For data areas, an address<br />
consists of a two-letter data area designation <strong>and</strong> a number that designates<br />
the word <strong>and</strong>/or bit location. For the UM area, an address designates the instruction<br />
location (UM area). In the FM area, the address designates the<br />
block location, etc.<br />
allocation The process by which the PC assigns certain bits or words in memory for<br />
various functions. This includes pairing I/O bits to I/O points on Units.<br />
AND A logic operation whereby the result is true if <strong>and</strong> only if both premises are<br />
true. In ladder-diagram programming the premises are usually ON/OFF<br />
states of bits or the logical combination of such states called execution conditions.<br />
APF Acronym for all-plastic optical fiber cable.<br />
AR area A PC data area allocated to flags, control bits, <strong>and</strong> work bits.<br />
arithmetic shift A shift operation wherein the carry flag is included in the shift.<br />
ASCII Short for American St<strong>and</strong>ard Code for Information Interchange. ASCII is<br />
used to code characters for output to printers <strong>and</strong> other external devices.<br />
BCD Short for binary-coded decimal.<br />
BCD calculation An arithmetic calculation that uses numbers expressed in binary-coded decimal.<br />
binary A number system where all numbers are expressed in base 2, i.e., numbers<br />
are written using only 0’s <strong>and</strong> 1’s. Each group of four binary bits is equivalent<br />
to one hexadecimal digit.<br />
binary calculation An arithmetic calculation that uses numbers expressed in binary.<br />
binary-coded decimal A system used to represent numbers so that each group of four binary bits is<br />
numerically equivalent to one decimal digit.<br />
bit A binary digit; hence a unit of data in binary notation. The smallest unit of<br />
information that can be electronically stored in a PC. The status of a bit is<br />
either ON or OFF. Different bits at particular addresses are allocated to special<br />
purposes, such as holding the status input from external devices, while<br />
other bits are available for general use in programming.<br />
bit address The location in memory where a bit of data is stored. A bit address must<br />
specify (sometimes by default) the data area <strong>and</strong> word that is being addressed,<br />
as well as the number of the bit.<br />
bit designator An oper<strong>and</strong> that is used to designate the bit or bits of a word to be used by<br />
an instruction.<br />
bit number A number that indicates the location of a bit within a word. Bit 00 is the rightmost<br />
(least-significant) bit; bit 15 is the leftmost (most-significant) bit.<br />
'
uffer A temporary storage space for data in a computerized device.<br />
'#<br />
7<br />
bus bar The line leading down the left <strong>and</strong> sometimes right side of a ladder diagram.<br />
Instruction execution proceeds down the bus bar, which is the starting point<br />
for all instruction lines.<br />
call A process by which instruction execution shifts from the main program to a<br />
subroutine. The subroutine may be called by an instruction or by an interrupt.<br />
carry flag A flag that is used with arithmetic operations to hold a carry from an addition<br />
or multiplication operation, or to indicate that the result is negative in a subtraction<br />
operation. The carry flag is also used with certain <strong>type</strong>s of shift operations.<br />
clock pulse A pulse available at a certain bit in memory for use in timing operations. Various<br />
clock pulses are available with different pulse widths.<br />
clock pulse bit A bit in memory that supplies a pulse that can be used to time operations.<br />
Various clock pulse bits are available with different pulse widths, <strong>and</strong> therefore<br />
different frequencies.<br />
common data Data that is stored in the LR Area of a PC <strong>and</strong> which is shared by other <strong>PCs</strong><br />
in the same the same system. Each PC has a specified section of the LR<br />
Area allocated to it. This allocation is the same in each LR Area of each PC.<br />
condition An message placed in an instruction line to direct the way in which the terminal<br />
instructions, on the right side, are to be executed. Each condition is assigned<br />
to a bit in memory that determines its status. The status of the bit assigned<br />
to each condition determines, in turn, the execution condition for each<br />
instruction up to a terminal instruction on the right side of the ladder diagram.<br />
CONSOLE mode A Programming Console mode that enables key sequences to be input. See<br />
TERMINAL mode.<br />
constant An oper<strong>and</strong> for which the actual numeric value is specified by the user, <strong>and</strong><br />
which is then stored in a particular address in the data memory.<br />
control bit A bit in a memory area that is set either through the program or via a Programming<br />
Device to achieve a specific purpose, e.g., a Restart bit is turned<br />
ON <strong>and</strong> OFF to restart a Unit.<br />
Control System All of the hardware <strong>and</strong> software components used to control other devices.<br />
A Control System includes the PC System, the PC programs, <strong>and</strong> all I/O devices<br />
that are used to control or obtain feedback from the controlled system.<br />
controlled system The devices that are being controlled by a PC System.<br />
control signal A signal sent from the PC to effect the operation of the controlled system.<br />
counter A dedicated group of digits or words in memory used to count the number of<br />
times a specific process has occurred, or a location in memory accessed<br />
through a TC bit <strong>and</strong> used to count the number of times the status of a bit or<br />
an execution condition has changed from OFF to ON.<br />
CPU An acronym for central processing unit. In a PC System, the CPU executes<br />
the program, processes I/O signals, communicates with external devices,<br />
etc.
7<br />
CTS An acronym for clear-to-send, a signal used in communications between<br />
electronic devices to indicate that the receiver is ready to accept incoming<br />
data.<br />
cycle The process used to execute a ladder-diagram program. The program is examined<br />
sequentially from start to finish <strong>and</strong> each instruction is executed in<br />
turn based on execution conditions.<br />
cycle time The time required for a single cycle of the ladder-diagram program.<br />
data area An area in the PC’s memory that is designed to hold a specific <strong>type</strong> of data,<br />
e.g., the LR area is designed to hold common data in a PC Link System.<br />
Memory areas that hold programs are not considered data areas.<br />
data area boundary The highest address available within a data area. When designating an oper<strong>and</strong><br />
that requires multiple words, it is necessary to ensure that the highest<br />
address in the data area is not exceeded.<br />
data sharing An aspect of PC Link Systems <strong>and</strong> of Data Links in Net Link Systems in<br />
which common data areas or common data words are created between two<br />
or more <strong>PCs</strong>.<br />
debug A process by which a draft program is corrected until it operates as intended.<br />
Debugging includes both the removal of syntax errors, as well as the<br />
fine-tuning of timing <strong>and</strong> coordination of control operations.<br />
decimal A number system where all numbers are expressed to the base 10. In a PC<br />
all data is ultimately stored in binary form, four binary bits are often used to<br />
represent one decimal digit, via a system called binary-coded decimal.<br />
decrement Decreasing a numeric value.<br />
default A value automatically set by the PC when the user omits to set a specific value.<br />
Many devices will assume such default conditions upon the application of<br />
power.<br />
definer A number used as an oper<strong>and</strong> for an instruction but that serves to define the<br />
instruction itself, rather that the data on which the instruction is to operate.<br />
Definers include jump numbers, subroutine numbers, etc.<br />
destination The location where an instruction is to place the data on which it is operating,<br />
as opposed to the location from which data is taken for use in the instruction.<br />
The location from which data is taken is called the source.<br />
differentiated instruction An instruction that is executed only once each time its execution condition<br />
goes from OFF to ON. Nondifferentiated instructions are executed each cycle<br />
as long as the execution condition stays ON.<br />
differentiation instruction An instruction used to ensure that the oper<strong>and</strong> bit is never turned ON for<br />
more than one cycle after the execution condition goes either from OFF to<br />
ON for a Differentiate Up instruction or from ON to OFF for a Differentiate<br />
Down instruction.<br />
digit A unit of storage in memory that consists of four bits.<br />
''
'(<br />
7<br />
digit designator An oper<strong>and</strong> that is used to designate the digit or digits of a word to be used<br />
by an instruction.<br />
distributed control An automation concept in which control of each portion of an automated system<br />
is located near the devices actually being controlled, i.e., control is decentralized<br />
<strong>and</strong> ‘distributed’ over the system. Distributed control is one of the<br />
fundamental concepts of PC Systems.<br />
DM area A data area used to hold only word data. Words in the DM area cannot be<br />
accessed bit by bit.<br />
download The process of transferring a program or data from a higher-level computer<br />
to a lower-level computer or PC.<br />
electrical noise R<strong>and</strong>om variations of one or more electrical characteristics such as voltage,<br />
current, <strong>and</strong> data, which might interfere with the normal operation of a device.<br />
error code A numeric code generated to indicate that an error exists, <strong>and</strong> something<br />
about the nature of the error. Some error codes are generated by the system;<br />
others are defined in the program by the operator.<br />
Error History Area An area in System DM that is used to store records indicating the time <strong>and</strong><br />
nature of up to ten errors that have occurred in the system.<br />
exclusive OR A logic operation whereby the result is true if one, <strong>and</strong> only one, of the premises<br />
is true. In ladder-diagram programming the premises are usually the ON/<br />
OFF states of bits, or the logical combination of such states, called execution<br />
conditions.<br />
exclusive NOR A logic operation whereby the result is true if both of the premises are true or<br />
both of the premises are false. In ladder-diagram programming the premises<br />
are usually the ON/OFF states of bits, or the logical combination of such<br />
states, called execution conditions.<br />
exection condition The ON or OFF status under which an instruction is executed. The execution<br />
condition is determined by the logical combination of conditions on the same<br />
instruction line <strong>and</strong> up to the instruction currently being executed.<br />
execution time The time required for the CPU to execute either an individual instruction or<br />
an entire program.<br />
extended counter A counter created in a program by using two or more count instructions in<br />
succession. Such a counter is capable of counting higher than any of the<br />
st<strong>and</strong>ard counters provided by the individual instructions.<br />
extended timer A timer created in a program by using two or more timers in succession.<br />
Such a timer is capable of timing longer than any of the st<strong>and</strong>ard timers provided<br />
by the individual instructions.<br />
Factory Intelligent Terminal A programming device provided with advanced programming <strong>and</strong> debugging<br />
capabilities to facilitate PC operation. The Factory Intelligent Terminal also<br />
provides various interfaces for external devices, such as floppy disk drives.<br />
fatal error An error that stops PC operation <strong>and</strong> requires correction before operation<br />
can continue.
FIT Abbreviation for Factory Intelligent Terminal.<br />
7<br />
flag A dedicated bit in memory that is set by the system to indicate some <strong>type</strong> of<br />
operating status. Some flags, such as the carry flag, can also be set by the<br />
operator or via the program.<br />
flicker bit A bit that is programmed to turn ON <strong>and</strong> OFF at a specific frequency.<br />
floating point decimal A decimal number expressed as a number between 0 <strong>and</strong> 1 (the mantissa)<br />
multiplied by a power of 10, e.g., 0.538 x 10 --5 .<br />
Floppy Disk Interface Unit A Unit used to interface a floppy disk drive to a PC so that programs <strong>and</strong>/or<br />
data can be stored on floppy disks.<br />
force reset The process of forcibly turning OFF a bit via a programming device. Bits are<br />
usually turned OFF as a result of program execution.<br />
force set The process of forcibly turning ON a bit via a programming device. Bits are<br />
usually turned ON as a result of program execution.<br />
function code A two-digit number used to input an instruction into the PC.<br />
GPC Acronym for Graphic Programming Console.<br />
Graphic Programming<br />
Console<br />
A programming device with advanced programming <strong>and</strong> debugging capabilities<br />
to facilitate PC operation. A Graphic Programming Console is provided<br />
with a large display onto which ladder-diagram programs can be written directly<br />
in ladder-diagram symbols for input into the PC without conversion to<br />
mnemonic form.<br />
hardware error An error originating in the hardware structure (electronic components) of the<br />
PC, as opposed to a software error, which originates in software (i.e., programs).<br />
hexadecimal A number system where all numbers are expressed to the base 16. In a PC<br />
all data is ultimately stored in binary form, however, displays <strong>and</strong> inputs on<br />
Programming Devices are often expressed in hexadecimal to simplify operation.<br />
Each group of four binary bits is numerically equivalent to one hexadecimal<br />
digit.<br />
Host Link System A system with one or more host computers connected to one or more <strong>PCs</strong><br />
via Host Link Units so that the host computer can be used to transfer data to<br />
<strong>and</strong> from the PC(s). Host Link Systems enable centralized management <strong>and</strong><br />
control of PC Systems.<br />
Host Link Unit An interface used to connect a PC to a host computer in a Host Link System.<br />
host computer A computer that is used to transfer data or programs to from a PC in a Host<br />
Link System. The host computer is used for data management <strong>and</strong> overall<br />
system control. Host computers are generally personal or business computers.<br />
HR area A data area used to store <strong>and</strong> manipulate data, <strong>and</strong> to preserve data when<br />
power to the PC is turned OFF.<br />
'
increment Increasing a numeric value.<br />
',<br />
7<br />
indirect address An address whose contents indicates another address. The contents of the<br />
second address will be used as the oper<strong>and</strong>. Indirect addressing is possible<br />
intheDMareaonly.<br />
initialization error An error that occurs either in hardware or software during the PC System<br />
startup, i.e., during initialization.<br />
initialize Part of the startup process whereby some memory areas are cleared, system<br />
setup is checked, <strong>and</strong> default values are set.<br />
input The signal coming from an external device into the PC. The term input is often<br />
used abstractly or collectively to refer to incoming signals.<br />
input bit A bit in the IR area that is allocated to hold the status of an input.<br />
input device An external device that sends signals into the PC System.<br />
input point The point at which an input enters the PC System. Input points correspond<br />
physically to terminals or connector pins.<br />
input signal A change in the status of a connection entering the PC. Generally an input<br />
signal is said to exist when, for example, a connection point goes from low to<br />
high voltage or from a nonconductive to a conductive state.<br />
instruction A direction given in the program that tells the PC of an action to be carried<br />
out, <strong>and</strong> which data is to be used in carrying out the action. Instructions can<br />
be used to simply turn a bit ON or OFF, or they can perform much more complex<br />
actions, such as converting <strong>and</strong>/or transferring large blocks of data.<br />
instruction block A group of instructions that is logically related in a ladder-diagram program.<br />
Although any logically related group of instructions could be called an instruction<br />
block, the term is generally used to refer to blocks of instructions called<br />
logic blocks that require logic block instructions to relate them to other instructions<br />
or logic blocks.<br />
instruction execution time The time required to execute an instruction. The execution time for any one<br />
instruction can vary with the execution conditions for the instruction <strong>and</strong> the<br />
oper<strong>and</strong>s used within it.<br />
instruction line A group of conditions that lie together on the same horizontal line of a ladder<br />
diagram. Instruction lines can branch apart or join together to form instruction<br />
blocks.<br />
interface An interface is the conceptual boundary between systems or devices <strong>and</strong><br />
usually involves changes in the way the communicated data is represented.<br />
Interface devices such as NSBs perform operations like changing the coding,<br />
format, or speed of the data.<br />
interlock A programming method used to treat a number of instructions as a group so<br />
that the entire group can be reset together when individual execution is not<br />
required. An interlocked program section is executed normally for an ON execution<br />
condition <strong>and</strong> partially reset for an OFF execution condition.
7<br />
interrupt (signal) A signal that stops normal program execution <strong>and</strong> causes a subroutine to be<br />
run.<br />
Interrupt Input Unit A Rack-mounting Unit used to input external interrupts into a PC System.<br />
inverse condition A condition that produces an ON execution condition when the bit assigned<br />
to it is OFF, <strong>and</strong> an OFF execution condition when the bit assigned to it is<br />
ON.<br />
I/O capacity The number of inputs <strong>and</strong> outputs that a PC is able to h<strong>and</strong>le. This number<br />
ranges from around one hundred for smaller <strong>PCs</strong> to two thous<strong>and</strong> for the<br />
largest ones.<br />
I/O devices The devices to which terminals on I/O Units, Special I/O Units, or Intelligent<br />
I/O Units are connected. I/O devices may be either part of the Control System,<br />
if they function to help control other devices, or they may be part of the<br />
controlled system.<br />
I/O point The place at which an input signal enters the PC System, or at which an output<br />
signal leaves the PC System. In physical terms, I/O points correspond to<br />
terminals or connector pins on a Unit; in terms of programming, an I/O points<br />
correspond to I/O bits in the IR area.<br />
I/O response time The time required for an output signal to be sent from the PC in response to<br />
an input signal received from an external device.<br />
I/O word A word in the IR area that is allocated to a Unit in the PC System.<br />
IR area A data area whose principal function is to hold the status of inputs coming<br />
into the system <strong>and</strong> that of outputs that are to be set out of the system. Bits<br />
<strong>and</strong> words in the IR that are used this way are called I/O bits <strong>and</strong> I/O words.<br />
The remaining bits in the IR area are work bits.<br />
jump A <strong>type</strong> of programming where execution moves directly from one point in a<br />
program to another, without sequentially executing any instructions<br />
inbetween. Jumps are usually conditional on an execution condition.<br />
jump number A definer used with a jump that defines the points from <strong>and</strong> to which a jump<br />
is to be made.<br />
ladder diagram (program) A form of program arising out of relay-based control systems that uses circuit-<strong>type</strong><br />
diagrams to represent the logic flow of programming instructions.<br />
The appearance of the program is similar to a ladder, <strong>and</strong> thus the name.<br />
ladder diagram symbol A symbol used in a ladder-diagram program.<br />
ladder instruction An instruction that represents the ‘rung’ portion of a ladder-diagram program.<br />
The other instructions in a ladder diagram fall along the right side of the diagram<br />
<strong>and</strong> are called terminal instructions.<br />
Ladder Support Software A software package that provides most of the functions of the Factory Intelligent<br />
Terminal on an IBM AT, IBM XT, or compatible computer.<br />
LAN An acronym for local area network.<br />
'"
(4<br />
7<br />
leftmost (bit/word) The highest numbered bits of a group of bits, generally of an entire word, or<br />
the highest numbered words of a group of words. These bits/words are often<br />
called most-significant bits/words.<br />
Link Adapter A Unit used to connect communications lines, either to branch the lines or to<br />
convert between different <strong>type</strong>s of cable. There are two <strong>type</strong>s of Link<br />
Adapter: Branching Link Adapters <strong>and</strong> Converting Link Adapters.<br />
load The processes of copying data either from an external device or from a storage<br />
area to an active portion of the system such as a display buffer. Also, an<br />
output device connected to the PC is called a load.<br />
local area network A network consisting of nodes or positions in a loop arrangement. Each node<br />
can be any one of a number of devices, which can transfer data to <strong>and</strong> from<br />
each other.<br />
logic block A group of instructions that is logically related in a ladder-diagram program<br />
<strong>and</strong> that requires logic block instructions to relate it to other instructions or<br />
logic blocks.<br />
logic block instruction An instruction used to locally combine the execution condition resulting from<br />
a logic block with a current execution condition. The current execution condition<br />
could be the result of a single condition, or of another logic block. AND<br />
Load <strong>and</strong> OR Load are the two logic block instructions.<br />
logic instruction Instructions used to logically combine the content of two words <strong>and</strong> output<br />
the logical results to a specified result word. The logic instructions combine<br />
all the same-numbered bits in the two words <strong>and</strong> output the result to the bit of<br />
the same number in the specified result word.<br />
loop A group of instructions that can be executed more than once in succession<br />
(i.e., repeated) depending on an execution condition or bit status.<br />
LR area A data area that is used in a PC Link System so that data can be transferred<br />
between two or more <strong>PCs</strong>. If a PC Link System is not used, the LR area is<br />
available for use as work bits.<br />
LSS Abbreviation for Ladder Support Software.<br />
main program All of a program except for the subroutines.<br />
masking ‘Covering’ an interrupt signal so that the interrupt is not effective until the<br />
mask is removed.<br />
memory area Any of the areas in the PC used to hold data or programs.<br />
mnemonic code A form of a ladder-diagram program that consists of a sequential list of the<br />
instructions without using a ladder diagram. Mnemonic code is required to<br />
input a program into a PC when using a Programming Console.<br />
MONITOR mode A mode of PC operation in which normal program execution is possible, <strong>and</strong><br />
which allows modification of data held in memory. Used for monitoring or debugging<br />
the PC.<br />
NC input An input that is normally closed, i.e., the input signal is considered to be<br />
present when the circuit connected to the input opens.
7<br />
nest Programming one loop within another loop, programming a call to a subroutine<br />
within another subroutine, or programming an IF--ELSE programming<br />
section within another IF--ELSE section.<br />
node One of the positions in a LAN. Each node incorporates a device that can<br />
communicate with the devices at all of the other nodes. The device at a node<br />
is identified by the node number. One loop of a Net Link System (OMRON’s<br />
LAN) can consist of up to 126 nodes. Each node is occupied by a Net Link<br />
Unit mounted to a PC or a device providing an interface to a computer or<br />
other peripheral device.<br />
NO input An input that is normally open, i.e., the input signal is considered to be present<br />
when the circuit connected to the input closes.<br />
noise interference Disturbances in signals caused by electrical noise.<br />
nonfatal error A hardware or software error that produces a warning but does not stop the<br />
PC from operating.<br />
normal condition A condition that produces an ON execution condition when the bit assigned<br />
to it is ON, <strong>and</strong> an OFF execution condition when the bit assigned to it is<br />
OFF.<br />
NOT A logic operation which inverts the status of the oper<strong>and</strong>. For example, AND<br />
NOT indicates an AND operation with the opposite of the actual status of the<br />
oper<strong>and</strong> bit.<br />
OFF The status of an input or output when a signal is said not to be present. The<br />
OFF state is generally represented by a low voltage or by non-conductivity,<br />
but can be defined as the opposite of either.<br />
OFF delay The delay between the time when a signal is switched OFF (e.g., by an input<br />
device or PC) <strong>and</strong> the time when the signal reaches a state readable as an<br />
OFF signal (i.e., as no signal) by a receiving party (e.g., output device or<br />
PC).<br />
ON The status of an input or output when a signal is said to be present. The ON<br />
state is generally represented by a high voltage or by conductivity, but can be<br />
defined as the opposite of either.<br />
ON delay The delay between the time when an ON signal is initiated (e.g., by an input<br />
device or PC) <strong>and</strong> the time when the signal reaches a state readable as an<br />
ON signal by a receiving party (e.g., output device or PC).<br />
one-shot bit A bit that is turned ON or OFF for a specified interval of time which is longer<br />
than one cycle.<br />
on-line removal Removing a Rack-mounted Unit for replacement or maintenance during PC<br />
operation.<br />
oper<strong>and</strong> Bit(s) or word(s) designated as the data to be used for an instruction. An oper<strong>and</strong><br />
can be input as a constant expressing the actual numeric value to be<br />
used or as an address to express the location in memory of the data to be<br />
used.<br />
(
oper<strong>and</strong> bit A bit designated as an oper<strong>and</strong> for an instruction.<br />
oper<strong>and</strong> word A word designated as an oper<strong>and</strong> for an instruction.<br />
(<br />
7<br />
operating error An error that occurs during actual PC operation as opposed to an initialization<br />
error, which occurs before actual operations can begin.<br />
OR A logic operation whereby the result is true if either of two premises is true, or<br />
if both are true. In ladder-diagram programming the premises are usually ON/<br />
OFF states of bits or the logical combination of such states called execution<br />
conditions.<br />
output The signal sent from the PC to an external device. The term output is often<br />
used abstractly or collectively to refer to outgoing signals.<br />
output bit A bit in the IR area that is allocated to hold the status to be sent to an output<br />
device.<br />
output device An external device that receives signals from the PC System.<br />
output point The point at which an output leaves the PC System. Output points correspond<br />
physically to terminals or connector pins.<br />
output signal A signal being sent to an external device. Generally an output signal is said<br />
to exist when, for example, a connection point goes from low to high voltage<br />
or from a nonconductive to a conductive state.<br />
overseeing Part of the processing performed by the CPU that includes general tasks required<br />
to operate the PC.<br />
overwrite Changing the content of a memory location so that the previous content is<br />
lost.<br />
Parameter Area A part of System DM used to designate various PC operating parameters.<br />
Parameter Backup Area A part of System DM used to back up the Parameter Area.<br />
parity Adjustment of the number of ON bits in a word or other unit of data so that<br />
the total is always an even number or always an odd number. Parity is generally<br />
used to check the accuracy of data after being transmitted by confirming<br />
that the number of ON bits is still even or still odd.<br />
PC An acronym for <strong>Programmable</strong> Controller.<br />
PCB An acronym for printed circuit board.<br />
PC configuration The arrangement <strong>and</strong> interconnections of the Units that are put together to<br />
form a functional PC.<br />
PC Link System A system in which <strong>PCs</strong> are connected through PC Link Units to enable them<br />
to share common data areas, i.e., each of the <strong>PCs</strong> writes to certain words in<br />
the LR area <strong>and</strong> receives the data of the words written by all other PC Link<br />
Units connected in series with it.<br />
PC Link Unit The Unit used to connect <strong>PCs</strong> in a PC Link System.
7<br />
PC System With building-block <strong>PCs</strong>, all of the Racks <strong>and</strong> independent Units connected<br />
directly to them up to, but not including the I/O devices. The boundaries of a<br />
PC System are the PC <strong>and</strong> the program in its CPU at the upper end; <strong>and</strong> the<br />
I/O Units, Special I/O Units, Optical I/O Units, Remote Terminals, etc., at the<br />
lower end.<br />
peripheral device Devices connected to a PC System to aid in system operation. Peripheral<br />
devices include printers, programming devices, external storage media, etc.<br />
port A connector on a PC or computer that serves as a connection to an external<br />
device.<br />
present value The current value registered in a device at any instant during its operation.<br />
Present value is abbreviated as PV.<br />
printed circuit board A board onto which electrical circuits are printed for mounting into a computer<br />
or electrical device.<br />
Printer Interface Unit A Unit used to interface a printer so that ladder diagrams <strong>and</strong> other data can<br />
be printed out.<br />
program The list of instructions that tells the PC the sequence of control actions to be<br />
carried out.<br />
<strong>Programmable</strong> Controller A computerized device that can accept inputs from external devices <strong>and</strong> generate<br />
outputs to external devices according to a program held in memory.<br />
<strong>Programmable</strong> Controllers are used to automate control of external devices.<br />
programmed alarm An alarm given as a result of execution of an instruction designed to generate<br />
the alarm in the program, as opposed to one generated by the system.<br />
programmed error An error arising as a result of the execution of an instruction designed to generate<br />
the error in the program, as opposed to one generated by the system.<br />
programmed message A message generated as a result of execution of an instruction designed to<br />
generate the message in the program, as opposed to one generated by the<br />
system.<br />
Programming Console The simplest form or programming device available for a PC. Programming<br />
Consoles are available both as h<strong>and</strong>-held models <strong>and</strong> as CPU-mounting<br />
models.<br />
Programming Device A peripheral device used to input a program into a PC or to alter or monitor a<br />
program already held in the PC. There are dedicated programming devices,<br />
such as Programming Consoles, <strong>and</strong> there are non-dedicated devices, such<br />
as a host computer.<br />
PROGRAM mode A mode of operation that allows inputting <strong>and</strong> debugging of programs to be<br />
carried out, but that does not permit normal execution of the program.<br />
PROM Writer A peripheral device used to write programs <strong>and</strong> other data into a ROM for<br />
permanent storage <strong>and</strong> application.<br />
prompt A message or symbol that appears on a display to request input from the operator.<br />
(
PV Acronym for present value.<br />
(#<br />
7<br />
refresh The process of updating output status sent to external devices so that it<br />
agrees with the status of output bits held in memory <strong>and</strong> of updating input<br />
bits in memory so that they agree with the status of inputs from external devices.<br />
relay-based control The forerunner of <strong>PCs</strong>. In relay-based control, groups of relays are interconnected<br />
to form control circuits. In a PC, these are replaced by programmable<br />
circuits.<br />
reset The process of turning a bit or signal OFF or of changing the present value of<br />
a timer or counter to its set value or to zero.<br />
return The process by which instruction execution shifts from a subroutine back to<br />
the main program (usually the point from which the subroutine was called).<br />
reversible counter A counter that can be both incremented <strong>and</strong> decremented depending on the<br />
specified conditions.<br />
reversible shift register A shift register that can shift data in either direction depending on the specified<br />
conditions.<br />
right-h<strong>and</strong> instruction Another term for terminal instruction.<br />
rightmost (bit/word) The lowest numbered bits of a group of bits, generally of an entire word, or<br />
the lowest numbered words of a group of words. These bits/words are often<br />
called least-significant bits/words.<br />
rotate register A shift register in which the data moved out from one end is placed back into<br />
the shift register at the other end.<br />
RUN mode The operating mode used by the PC for normal control operations.<br />
scan time See cycle time.<br />
self diagnosis A process whereby the system checks its own operation <strong>and</strong> generates a<br />
warning or error if an abnormality is discovered.<br />
self-maintaining bit A bit that is programmed to maintain either an OFF or ON status until set or<br />
reset by specified conditions.<br />
servicing The process whereby the PC provides data to or receives data from external<br />
devices or remote I/O Units, or otherwise h<strong>and</strong>les data transactions for Link<br />
Systems.<br />
set The process of turning a bit or signal ON.<br />
set value The value from which a decrementing counter starts counting down or to<br />
which an incrementing counter counts up (i.e., the maximum count), or the<br />
time from which or for which a timer starts timing. Set value is abbreviated<br />
SV.<br />
shift register One or more words in which data is shifted a specified number of units to the<br />
right or left in bit, digit, or word units. In a rotate register, data shifted out one<br />
end is shifted back into the other end. In other shift registers, new data (either<br />
specified data, zero(s) or one(s)) is shifted into one end <strong>and</strong> the data<br />
shifted out at the other end is lost.
slot A position on a Rack (Backplane) to which a Unit can be mounted.<br />
software error An error that originates in a software program.<br />
7<br />
software protect A means of protecting data from being changed that uses software as opposed<br />
to a physical switch or other hardware setting.<br />
source The location from which data is taken for use in an instruction, as opposed to<br />
the location to which the result of an instruction is to be written. The latter is<br />
called the destination.<br />
SR area A data area in a PC used mainly for flags, control bits, <strong>and</strong> other information<br />
provided about PC operation. The status of only certain SR bits may be controlled<br />
by the operator, i.e., most SR bits can only be read.<br />
subroutine A group of instructions placed after the main program <strong>and</strong> executed only if<br />
called from the main program or activated by an interrupt.<br />
subroutine number A definer used to identify the subroutine that a subroutine call or interrupt<br />
activates.<br />
SV Abbreviation for set value.<br />
switching capacity The maximum voltage/current that a relay can safely switch on <strong>and</strong> off.<br />
syntax error An error in the way in which a program is written. Syntax errors can include<br />
‘spelling’ mistakes (i.e., a function code that does not exist), mistakes in<br />
specifying oper<strong>and</strong>s within acceptable parameters (e.g., specifying unwritable<br />
SR bits as a destination), <strong>and</strong> mistakes in actual application of instructions<br />
(e.g., a call to a subroutine that does not exist).<br />
System Comm<strong>and</strong> Control bits in the AR area used to manipulate the Parameter <strong>and</strong> Parameter<br />
Backup Areas.<br />
system configuration The arrangement in which Units in a system are connected.<br />
System DM A dedicated portion of the DM area that is used for special purposes in controlling<br />
<strong>and</strong> managing the PC. Includes the Program Version, Parameter<br />
Area, Parameter Backup Area, User Program Header, <strong>and</strong> Error History<br />
Area.<br />
system error An error generated by the system, as opposed to one resulting from execution<br />
of an instruction designed to generate an error.<br />
system error message An error message generated by the system, as opposed to one resulting<br />
from execution of an instruction designed to generate a message.<br />
TC area A data area that can be used only for timers <strong>and</strong> counters. Each bit in the TC<br />
area serves as the access point for the SV, PV, <strong>and</strong> Completion flag for the<br />
timer or counter defined with that bit.<br />
TC number A definer that corresponds to a bit in the TC area <strong>and</strong> used to define the bit<br />
as either a timer or a counter.<br />
terminal instruction An instruction placed on the right side of a ladder diagram that uses the final<br />
execution conditions of an instruction line.<br />
('
((<br />
7<br />
TERMINAL Mode A Programming Console mode used to automatically display messages produced<br />
by the program <strong>and</strong> to input data area-mapped keys.<br />
terminator The code comprising an asterisk <strong>and</strong> a carriage return (* CR) which indicates<br />
the end of a block of data, whether it is a single-frame or multi-frame block.<br />
Frames within a multi-frame block are separated by delimiters.<br />
timer A location in memory accessed through a TC bit <strong>and</strong> used to time down from<br />
the timer’s set value. Timers are turned ON <strong>and</strong> reset according to their execution<br />
conditions.<br />
transmission distance The distance that a signal can be transmitted.<br />
TR area A data area used to store execution conditions so that they can be reloaded<br />
later for use with other instructions.<br />
transfer The process of moving data from one location to another within the PC, or<br />
between the PC <strong>and</strong> external devices. When data is transferred, generally a<br />
copy of the data is sent to the destination, i.e., the content of the source of<br />
the transfer is not changed.<br />
trigger address An address in the program that defines the beginning point for tracing. The<br />
actual beginning point can be altered from the trigger by defining either a<br />
positive or negative delay.<br />
UM area The memory area used to hold the active program, i.e., the program that is<br />
being currently executed.<br />
Unit In OMRON PC terminology, the word Unit is capitalized to indicate any product<br />
sold for a PC System. Though most of the names of these products end<br />
with the word Unit, not all do. Context generally makes any limitations of this<br />
word clear.<br />
unit number A number assigned to some Link Units <strong>and</strong> Special I/O Units to facilitate<br />
identification when assigning words or other operating parameters to it.<br />
User DM The portion of the DM area that is available for general data storage <strong>and</strong> manipulation.<br />
Part of User DM may be dedicated if Special I/O Units or Link<br />
Units are part of the PC.<br />
watchdog timer A timer within the system that ensures that the cycle time stays within specified<br />
limits. When limits are reached, either warnings are given or PC operation<br />
is stopped depending on the particular limit that is reached.<br />
word A unit of data storage in memory that consists of 16 bits. All data areas consists<br />
of words. Some data areas can be accessed only by words; others, by<br />
either words or bits.<br />
word address The location in memory where a word of data is stored. A word address must<br />
specify (sometimes by default) the data area <strong>and</strong> the number of the word that<br />
is being addressed.<br />
work bit A bit in a work word.<br />
work word A word that can be used for data calculation or other manipulation in programming,<br />
i.e., a ‘work space’ in memory. A large portion of the IR area is<br />
always reserved for work words. Parts of other areas not required for special<br />
purposes may also be used as work words.
A<br />
���������� �� ���� ����� ��<br />
����������� ��� ������ �����<br />
���������� ������ ��<br />
���������� ����������<br />
���� �������<br />
������� �������<br />
������ ��<br />
������ ���������� ����� ���� ���<br />
B<br />
�������� ��� ������� ����� ��<br />
���<br />
������������� �������<br />
����������� ��<br />
����������� ��<br />
������<br />
������������� ���<br />
����������� ��<br />
������ ����� ���<br />
����<br />
������������ ���<br />
������ ���������� ���<br />
����������� �������<br />
C<br />
��������������� ��������� ����� ��<br />
���������� ������ ���������� ���<br />
������ ������� ����� ��<br />
����� ����� ����� ��<br />
�������������� ��� �<br />
������������ ��<br />
���������� ��������� ��<br />
������� ���<br />
����������� ��<br />
������������� ��<br />
������� ������� ����������� �<br />
���������� ������� ����������� �<br />
)<br />
��������� �������<br />
���� �� �� ����� ��<br />
�������� ��� ���<br />
���������� ���� ������ ���� ���<br />
�������� �������� ������� ���<br />
��������� ���<br />
��������� ��� ��<br />
���������� ��<br />
���������� ��������� ���<br />
���� ����������� ����� ���<br />
��� ����������� �<br />
������ ����� ����� ����� ��<br />
����� ����� �������<br />
������������ ���<br />
������������ ���<br />
���������� �� ����������� �������� ��<br />
����� ����� ��<br />
���� ��� ��������� ��<br />
���������� ��<br />
������ ��<br />
D<br />
����<br />
���������� ������������� �������<br />
����������� ��� �������<br />
������������� ���<br />
������������� ���<br />
���������� ���<br />
��������� ������ ����� ���<br />
��������� �������� ���<br />
������� �������<br />
������ ����� ���<br />
��������� �������<br />
������������ ������ ������� ���� ���<br />
���� ������ �������� ��� ���������� �������<br />
���� �����<br />
����������� �<br />
������ ��� ���<br />
������� ����� ����<br />
���������� ������ ���������� ���<br />
����� ����� ���������� ���<br />
���������� ��<br />
���� ��������������<br />
������� ���<br />
�������� ���<br />
������������ ���<br />
���� ���������<br />
�� �� ����� ��<br />
�� �� ����� ��<br />
�� �� ����� ��<br />
�� �� ����� ��<br />
�� �� ����� ��<br />
�� �� ����� ��<br />
������� ����� ���<br />
������������� ���<br />
(
��������� ����������� ��<br />
���������� ���<br />
�������������� ������������� ��<br />
�������� ������ ��<br />
������ ����������� ���<br />
����� �������� ��<br />
��������� ���������� ������� ��� ��� ������ ���<br />
(,<br />
E<br />
��� ��� ����� ����������� ��������� �����<br />
����� ������ ������������ ���<br />
����� �������� ���<br />
����� �������� ��������� ����� ��<br />
����� ��������� ������������ ���� ���<br />
������<br />
�������� ��������� ��<br />
���������� ��������� ���<br />
����� �������� ���<br />
������ ���<br />
����� ��������� ������� ���<br />
������� ����� ��<br />
���� ����� ���<br />
��������������� ���<br />
����������� ��������� ����� ����� ��<br />
������� ����������� ���<br />
������� ������� �������<br />
�������� ���� ��������� ��������� ��<br />
���������� ���<br />
������� ������������� ���<br />
����������� ������������ ���<br />
����������� ��������� ���� ���<br />
������� ��� �������� ��������� ���<br />
���������� ���<br />
������������� ���� ������ ����������� ���<br />
��������� ���������� ����������� ��<br />
��������� ����� ������������� ���<br />
F<br />
������� ����������� ��������� ��� ���������� �������<br />
��� ����� ��� ���<br />
���� ����� ������� ���������� ��<br />
���� ��� ���������� �������<br />
% !<br />
����<br />
����������� ��<br />
����������� �������� ���<br />
������� ������ ��<br />
��<br />
��������� ���<br />
�������� ���<br />
����� ���� ������ ��<br />
����������� ��<br />
����� ������ ��<br />
����������� ��������� ������ ��<br />
����� ��<br />
������ ���������� ���<br />
���������� �������<br />
������ ������ ���� ���� ��<br />
�������� ������ ��<br />
G- -H<br />
���� ��� ���������� �������<br />
������� ����������� �������� ��� ���������� �������<br />
������������ ����������� ��<br />
����������� ����� ���<br />
���������� �������� �����<br />
������� ����� ��<br />
��������� ����� ��<br />
��������� ������ ������ ��<br />
���� ������ ��<br />
���� ����<br />
�������� ��������� ���<br />
���������� ������ ������� ���<br />
�������� ��������� ����� ���<br />
�������� ������������� ��� ���<br />
�������� ��� ���������� �������<br />
�������������� ��������� ���<br />
���� ���<br />
����� ����� ��������� ���<br />
����������� ��� ������� ���� ���<br />
���������� ���<br />
������� ����� ���� ���� ���� ���� ���<br />
������� ������� ���<br />
������� ������ ������� ���<br />
������� �� ������ ���<br />
������� ��������� ���<br />
������� ������� ���<br />
������� ����� ��� ������� ������� ���<br />
������� ������������� ��� ���<br />
������� ������������� ��� ���� ���<br />
�������� ������ ���<br />
�������� ����� ���<br />
����������� ���<br />
�������� ���<br />
��������� ��������� ���<br />
������� ����� ���� ���� ���<br />
������� ��������� ���<br />
������� ������������� ��� ���<br />
������� ������������� ������� ���<br />
�� ����� ��
I<br />
��� ���<br />
����������� ��<br />
������� ��<br />
��� ������� ����������� ���<br />
��� �������� ������ ���� ���<br />
��� ������� ������������ ��<br />
��� ����<br />
����������� ��<br />
������� ��<br />
������������� ���<br />
�������� ����������� ��<br />
����� ���<br />
������������� ��<br />
����������� �<br />
����� ������� ����������� �<br />
����� ������ ����������� �<br />
����� ������� ����������� �<br />
����������� ���<br />
�������� ���<br />
�������� ���<br />
���� ��� ���<br />
��������� ���� ��� ��<br />
��� ��� ��� ���<br />
��������� ���� �� ��� ��<br />
��� �� ����� ������� ��<br />
��� ���� ��� ���<br />
��������� ���<br />
�������� ���<br />
�������� ���<br />
�������� ���<br />
�������� ���<br />
��������� ���<br />
��������� ���<br />
�������� ���<br />
��������� ���<br />
�������� ���<br />
�������� ���<br />
���� ���<br />
��������� ���<br />
�������� ���<br />
�������� ���<br />
��������� ��� �������<br />
����� �� ����������� ���<br />
����� �� ������ ���<br />
��������� ��� �������<br />
����� �� ����������� ���<br />
����� �� ������ ���<br />
�������� ���<br />
��������� ���<br />
�������� ���<br />
�������� ��� ���<br />
��������� ������ ���<br />
�������� ���<br />
��������� ���<br />
�������� ���<br />
�������� ���<br />
�������� ���<br />
% !<br />
������� ��� �������<br />
�������� ��� �������<br />
�������� ���<br />
��������� ���<br />
�������� ���<br />
�������� ���<br />
������� ��� �������� ��<br />
��������� ���<br />
�� ����������� ��� ������� ��<br />
�������� ���<br />
�������� ����� ��<br />
������ ������������� ��<br />
��� ��� ���<br />
�� ���� ��� ���<br />
��������� ���<br />
�������� ���<br />
��������� ���<br />
�������� ���<br />
��������� ���<br />
��������� ���<br />
�������� ���<br />
�������� ���<br />
�������� ���<br />
���� ��<br />
��������� ��<br />
��� ��� ���<br />
��������� ���� ���� ��<br />
�� ��� ��� ���<br />
��������� ���� ��� ��� ��<br />
��� �� ����� ������� ��<br />
�� ���� ��� ���<br />
�������� ���<br />
���� ��� ���<br />
��� ���� ��� ���<br />
�������� ���<br />
��������� ���<br />
�������� ���<br />
��������� ����� ��<br />
�������� ���<br />
�������� ���<br />
�������� ���<br />
�������� ���<br />
�������� ���<br />
�������� ���<br />
�������� ���<br />
��������� ���<br />
�������� ���<br />
��������� ���<br />
�������� ���<br />
��������� ���<br />
�������� ���<br />
�������� ���<br />
��������� ���<br />
�������� ���<br />
�������� ���<br />
�������� ���<br />
����������� ������ ������� ��<br />
����������� ��� ������� ��<br />
������������ ��<br />
���� ���<br />
��������� ���<br />
�������� ���<br />
��������� ���<br />
��������� ���<br />
��������� ���<br />
("
��������� ���<br />
��������� ���<br />
������������� ������������ ���� ���������� ��<br />
������ ��� ������� ���<br />
����������� �������<br />
����� ���������������� ���� ��� ��<br />
��������� �������� �����<br />
������ ���� ��<br />
����������� ���<br />
������� ����������� ���<br />
�� ����� �����<br />
4<br />
J- -L<br />
���� �������� ���<br />
������ �������<br />
��� ���������� ��������� ���� �������� ���<br />
������ �������<br />
���������� ��<br />
������ ��� �������� ��<br />
����� �� ����� ��<br />
����������� ��� ������<br />
����� �������� ��� ��������� ��� �������<br />
����� ��������� �������<br />
����� ��� ��� ��� ���� ��<br />
���������� �� �������� ����� �����<br />
������� ��� ���� ���� �� ���� ��<br />
������������<br />
���������� ��� �� ��� �� ��� ��<br />
����������� ��� ������<br />
����� ��������� ��<br />
����� ��� ��� ��� ���� ���<br />
������� ��<br />
��������� ��<br />
���������� ��<br />
����� ����� ������� ��<br />
������ ������� ������������� �������<br />
������ ������� ��������� ��� ���������� �������<br />
����� ��� ��� ����������<br />
��������� ����������� ��<br />
����� ����� ������������� ���������� �� �������� ����� �����<br />
����� ������� ��� ������ �������<br />
����� ������������� �������<br />
�� ����� ��<br />
���� ��� ���������� �������<br />
M<br />
������ ����� ����������� �<br />
������ ������ ��������� ��<br />
��������� ������������ ���� ���<br />
% !<br />
�������� ����� ����������� �����<br />
��������� ����� ����������� ���<br />
����������<br />
������� ���<br />
���������� � ������ ���<br />
N<br />
�������� ������������ ���<br />
��������� ������� ���<br />
�������� ������ ���������� ����������� ��<br />
���� ����������� ��<br />
O<br />
������� ���� ��<br />
��������� ��<br />
��������� ������������� ��<br />
������������� ��<br />
��������� ����� �������� ��<br />
��������� ������ ��<br />
������� ����� ��<br />
��������� ����������� �������� ���<br />
���������� ������������� �����<br />
������ ���<br />
������������� ��<br />
����������� ������ ����� ���<br />
����������� ������� ��� ��<br />
����������� �<br />
������ ������� ����������� �<br />
������ ������ ����������� �<br />
������ ������� ����������� �<br />
P<br />
��������� ����� ��<br />
��������� ����� ��<br />
��������� ������ ����� ��<br />
��������� �������� �� ����������� �������� ��<br />
�� ���� �������� �� ���� ������������ ��<br />
���������� ������� ������� ����� ��<br />
���������� �������� �<br />
���� ������ �������� �<br />
������� ����������� �������� ������ �<br />
������� ����������� ������� ������ �<br />
������ ������� �������� ������ �<br />
������� ��������� ����� �<br />
����������� �������� �� �����<br />
���� ������� �<br />
���������� ��������� ����� ������� ����� ��<br />
������� ������ ��� ��
������� ��������� ����� ��� ���������� �������<br />
������� ������������� ���<br />
������� ���������� ��<br />
������� ������� ��<br />
����������� ���<br />
������� ������� ��<br />
������� ������� ��� ������� �������� �����<br />
���������� ��<br />
�����������<br />
������ ��� ������� �����<br />
�������� ��� �������� ��<br />
�������� ����� ����� ��������� ���<br />
���������� ��������� ��� ��������� �����<br />
��������� ��� �������� ������������� �����<br />
������ ��<br />
������������ ��<br />
��������� ���� �� ���� ������ ���<br />
���������� �����<br />
������� ��� ������� ���� ������ �������� ��<br />
�������������� ���� �������������� ������������� ���<br />
�������� ��<br />
����������� �������� �����<br />
��� ���� ���������� �������<br />
��������� ��<br />
������� ����� ��<br />
��������� ������ ��<br />
����������� �������� ����������� �������� ��� ������ ����<br />
�������� ���<br />
���� ������<br />
��� ���� ���������� �������<br />
������������ ���� ��� �������� ���������� ���<br />
��������� ���� ���� ��������������� ���<br />
��<br />
��������� ��� �� ����� ��<br />
��������� ���<br />
������ ��� ��������� ���<br />
R<br />
�������� �����<br />
���� ����� ���<br />
���� �������<br />
��������� ���� �������� ��<br />
�������� ���<br />
���������� ����������� ��<br />
��������<br />
����� ����� ����� ��� ���<br />
����� �������� ����� ��<br />
�������������� ��������� ��<br />
�������������� ����� ����� ��<br />
��������� ��������� ����� ��<br />
��������� ���������� ����� ��<br />
������������ �������� ����� ��<br />
% !<br />
�������� ���������<br />
�� ��� �� ���� ��������� ���<br />
������ ���<br />
��������� ��������� ��<br />
���� ������ ����������� ���<br />
������� ����� ��<br />
�� ���� ��������� ���<br />
S<br />
��� ������ ��� ��<br />
����� ���������� �������<br />
����������� ���������� ����� ���<br />
������� ������������� �������<br />
�� ����� �����<br />
������ ����������� ��� ��� ����������<br />
���� ���������� ���� ����� ��<br />
���� ������������� �������<br />
���������� ������� ���<br />
������������ �������<br />
��<br />
��������� ��� �� ����� ��<br />
��������� ���<br />
��������� ���<br />
������ ��� ��������� ���<br />
������ �������� ��<br />
��������� ����� ��<br />
������ ��� ������� �� ���� �� ���� ��<br />
T- -W<br />
�� ����� �����<br />
�� �������� ��� ���<br />
�������� ����� ��<br />
����� ������ ���� ��<br />
��� ����� ��<br />
����������� ���<br />
���� ����������� ���<br />
������� �������<br />
���� �� �� ����� ��<br />
�������� ��� ���<br />
���������� ���� ������ ���� ���<br />
������� ����� �������� ���<br />
�������� ������� ���<br />
������� ����� ���<br />
��������� ��� ��<br />
������ ������� ���<br />
�������� ����� ���<br />
�� ����� ��<br />
�� ����� ��� �� ���������� ��<br />
������ ����������� �<br />
����������� ��������� ���<br />
�������� ������ ���<br />
���������� ���<br />
���� ���� ����������� ��<br />
���� ����� ����������� ��
Revision History<br />
A manual revision code appears as a suffix to the catalog number on the front cover of the manual.<br />
Cat. No. W176-E1-4A<br />
Revision code<br />
The following table outlines the changes made to the manual during each revision. Page numbers refer to the<br />
previous version.<br />
Revision code Date Revised content<br />
1 July 1990 Original production<br />
2 June 1991 Page 5: PROM Writer, Floppy Disk Interface Unit, <strong>and</strong> Printer Interface Unit require interfacing via GPC.<br />
Page 15: First paragraph, third line: Replace “3-digit BCD” with “4-digit BCD”.<br />
Pages18<strong>and</strong>19: Remove the first two paragraphs of Section 3 -4 -1.<br />
Page 22: Paragraph four rewritten.<br />
Page 24: Section 3 -5 -4 paragraph one: Replace “converted to a parity code” with “counted in hexadecimal”.<br />
Page 27: N0. 3 under “Executing System Comm<strong>and</strong>” <strong>and</strong> second sentence in paragraph one of Section 3 -5 -10 corrected.<br />
Page 28: Number 3 under “Set Bit” corrected.<br />
Page 29: Table: Replace “AR 200” with “AR 2200”.<br />
Page 30: Second sentence in paragraph four, text in graphic <strong>and</strong> last paragraph corrected.<br />
Page 31: Paragraph two: Replace “DM 1000 to 1799” with “DM 1000 to 1899” in both instances.<br />
Page 37: Replace “RS/CS” with “RTS/CTS,” “Interlec HEX” with “Intel HEX,” <strong>and</strong> “Motorola S” with “Motorola S-Record.”<br />
Page 41: Paragraphs five <strong>and</strong> seven: Replaced “250 #Gms” with “250 �s”. Paragraph eight corrected.<br />
Page 42: Paragraph five, line one corrected.<br />
Page 46: Last paragraph, last sentence corrected.<br />
Page 70: Paragraph five, diagram, <strong>and</strong> paragraph six corrected.<br />
Page 76: Paragraph four, line three corrected.<br />
Page 81: Numerical ranges under <strong>and</strong> in paragraphs one <strong>and</strong> three corrected.<br />
Page 83: Numerical figures in paragraph four <strong>and</strong> six corrected.<br />
Page 98: Ladder symbols, paragraph two, paragraph four, <strong>and</strong> paragraph five corrected.<br />
Page 101: Text in first graphic corrected <strong>and</strong> paragraph two eliminated.<br />
Page 105: First sentence, line one of paragraph four, line three of paragraph four corrected <strong>and</strong> diagram added.<br />
Page 110: TCMP(85) removed (not supported by <strong>Mini</strong> H-<strong>type</strong> <strong>PCs</strong>).<br />
Page 116: Paragraph one: “to 7-segment display data” eliminated from lines three <strong>and</strong> four.<br />
Page 118: Note added to limitations to STH(66).<br />
Page 119: Error Flag description corrected.<br />
Page 120: Second diagram: Replaced “Digit number: 0123” with “Digit number: 3210”.<br />
Page 125: First paragraph of Section 5 -15: AddINC(38) to the BCD calculation instructions.<br />
Page 128: Sentence including ADDL(54) eliminated (not supported by <strong>Mini</strong> H-<strong>type</strong> <strong>PCs</strong>).<br />
Page 131: Last diagram: The remainder should follow the quotient.<br />
Page 132: Last diagram: Replace “Dd: HR 09” with “Dr: HR 09”.<br />
Page 140: Sentence including INT(89) eliminated (not supported by <strong>Mini</strong> H-<strong>type</strong> <strong>PCs</strong>).<br />
Page 152: Leftmost column of table corrected.<br />
Page 153: Section 5--20--4 rewritten:<br />
Page 155: Last paragraph, last line: Replace “...places the result in D.” with “...places the result in R.”<br />
Page 166: ROOT(72) <strong>and</strong> FUN(89) eliminated from table (not supported by <strong>Mini</strong> H-<strong>type</strong> <strong>PCs</strong>).<br />
Page 184: Paragraph nine: Replace “402180” with “4021”, <strong>and</strong> “2180” with “21”.<br />
Page 187: Last key explanation corrected (block programming instructions not supported by <strong>Mini</strong> H-<strong>type</strong> <strong>PCs</strong>).<br />
Page 189: Remove the last sentence.<br />
Page 196: Paragraph four <strong>and</strong> paragraph six corrected to remove reference to block programming instructions.<br />
Page 224: Replace “INTELLEC HEX” with “Intel’s HEX” <strong>and</strong> “MOTOROLA [S]” with “Motorola’s S-Record”.<br />
Pages 225, 226: Add a seventh step added to procedures <strong>and</strong> graphic.<br />
Page 228: Fourth paragraph from the bottom: Eliminate “bits 08 to 15” from line two.<br />
Page 230: Numeric limitations corrected in first <strong>and</strong> second diagrams.<br />
Page 258: Table: Replaced “AR 0000 to AR 0015” with “AR 0000 to AR 0007”<br />
Page 264: Corrected model number for Cassette Recorder Connecting Cable to SCY-P0R-PLG01.<br />
Page 289: Program Read Protect/Clear eliminated (not supported by <strong>Mini</strong> H-<strong>type</strong> <strong>PCs</strong>).<br />
Pages 290, 291: Cassette Tape Operations eliminated (cassette tape recorder requires interfacing via GPC).<br />
Page 291: PROM Writer operations are applicable to non-OMRON products, i.e. Intel’s HEX <strong>and</strong> Motorola’s S-Record.<br />
Page 294: INT(89) eliminated (not supported by <strong>Mini</strong> H-<strong>type</strong> <strong>PCs</strong>).<br />
Page 298: Table, row five: Replace “DM 1000 to DM 1799” with “DM 1000 to DM 1899”.<br />
Page 316: Replace “RS/CS” with “RTS/CTS,” “Interlec HEX” with “Intel HEX,” <strong>and</strong> “Motorola S” with “Motorola S-Record.”<br />
2A August 1991 Pages 86, 87, 110, 276 Jump number range corrected to 00 to 49.<br />
Pages 171, 287 Subroutine number range corrected to 00 to 49.<br />
Page 116 TC number range clarified.<br />
2B December 1991 Page 196 Time required for overseeing changed to 2.9 ms.<br />
Page 197 Times required for processing changed.<br />
Pages 230, 231 Rewritten to remove “Single-link System” protocol.
Revision code Date<br />
Revised content<br />
#<br />
6<br />
3 June 1992 Manual revised for V1 of CPUs <strong>and</strong> to include <strong>C60H</strong>.<br />
Page 51 “NOT” added after “LD” in top table of mnemonic code.<br />
Page77 First digit in last display corrected to “0.”<br />
Page 80 Condition for IR 00105 corrected to NO <strong>and</strong> that for IR 00104 corrected<br />
to NC in Before Insertion portion of example ladder diagram.<br />
Page 81 Bottom table of mnemonic code corrected.<br />
Page 87 “5” removed from end of last oper<strong>and</strong> in top table of mnemonic code.<br />
Page 93 Last oper<strong>and</strong> in bottom table of mnemonic code corrected.<br />
Page 109 Following added to bottom table of mnemonic code: 00008 LD 00100.<br />
Page 113 Last oper<strong>and</strong> in bottom table of mnemonic code corrected.<br />
Page 116 Second “LD” corrected to “AND” in table of mnemonic code.<br />
Page 132 Function code for ASR corrected in illustration.<br />
Page 131 “00514” corrected to “05014” <strong>and</strong> “@SFT(10)” corrected to SFTR(84)<br />
in table of mnemonic code.<br />
Page 157 “AND(30)” corrected to “ADD(30)” in table of mnemonic code.<br />
Page 165 “25505” corrected to “25504” <strong>and</strong> “#0000” corrected to ”#0001” in oper<strong>and</strong>s<br />
in table of mnemonic code.<br />
Page 199 Execution times corrected for TIMH(15).<br />
Page 200 OFF execution times for RDM(60) corrected to the same values as the<br />
ON execution times.<br />
Page 209 Completion Flag ON mark added to display.<br />
Page 211 Caret added to the third display from the bottom.<br />
Page 213 Displays corrected.<br />
Page 218 “0001” corrected to “0123” in the bottom display.<br />
Page 221 Displays corrected.<br />
Page 237 Response for ERROR READ corrected for bits 2, 3, <strong>and</strong> 4.<br />
Page 240 Format for timer/counter data changed to BCD for PV READ, <strong>and</strong> maximum<br />
timer/counter number corrected to 0511 for SV READ 1/2.<br />
Pages 242 <strong>and</strong> 243 Format for data area contents corrected to hexadecimal.<br />
Page 245 Maximum timer/counter number corrected to 0511 for SV CHANGE 2.<br />
Page 247 Code to clear forced set/reset status corrected from “0100” to “1000.”<br />
Page 249 “C120 or C20” changed to “C120 or C50” for PC MODEL READ.<br />
Page 271 Same as for page 199.<br />
Page 273 Same as for page 200.<br />
Page 297 <strong>and</strong> 298 Flag addresses corrected in table column headers.<br />
Page 313 Direction of arrows reversed for E7 <strong>and</strong> F7.<br />
4 March 1993 Page 128 “Example” changed to “Example 1.”<br />
Page 129 Example 2 added.<br />
Page 294: EPROM model number ROM-I�-B has been added to the note.<br />
Pages 295, 296: Peripheral Devices table slightly altered to reflect the list in the<br />
Installation Guide.<br />
Page 296: Programming Console Base Unit specifications were corrected.<br />
4A July 1994 Address change. Scan time changed to Cycle time throughout the manual.<br />
Page 13: Input bits for <strong>C60H</strong> Expansion I/O Units corrected.<br />
Page 333: Output bits for <strong>C60H</strong> CPUs corrected.<br />
Page 334: Output bits for <strong>C60H</strong> Expansion I/O Units corrected.
OMRON ELECTRONICS LLC<br />
1 Commerce Drive<br />
Schaumburg, IL 60173<br />
847.843.7900<br />
For US technical support or<br />
other inquiries: 800.556.6766<br />
OMRON CANADA, INC.<br />
885 Milner Avenue<br />
Toronto, Ontario M1B 5V8<br />
416.286.6465<br />
OMRON ON-LINE<br />
Global - http://www.omron.com<br />
USA - http://www.omron.com/oei<br />
Canada - http://www.omron.ca<br />
W176-E1-4 ©2002 OMRON ELECTRONICS LLC Specifications subject to change without notice.<br />
Printed in the U.S.A.