Building a Mistral Hull
Building a Mistral Hull
Building a Mistral Hull

You also want an ePaper? Increase the reach of your titles
YUMPU automatically turns print PDFs into web optimized ePapers that Google loves.
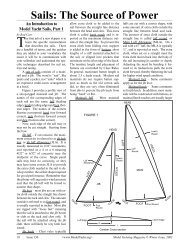
<strong>Building</strong> a US One Meter <strong>Hull</strong><br />
By Jim Linville<br />
US One Meter Class Secretary<br />
One of the things I enjoy most about the US One Meter Class<br />
is building boats, and, in my opinion the US One Meter Construction<br />
Guide is a necessary reference. Many AMYA members<br />
are not aware that a US One Meter Construction Guide and a<br />
number of building plans for US One Meter Class yachts are available<br />
from the class. The Construction Guide was originally written<br />
by class founders Bob DeBow and Bob Jensen. Steve Andre<br />
made major contributions and produced the first computerized<br />
version. Bill Turner added new material and enhanced the drawings.<br />
My contribution will be to continue adding new stuff, introduce<br />
the use of modern materials such as carbon fiber, and prepare<br />
the Guide for distribution on the Web. In my opinion, at $5,<br />
the Guide is one of the best bargains in model yachting, and believe<br />
it or not, the $5 price tag has never changed.<br />
Those of you who have built boats from scratch know that more<br />
time is spent trying to figure out where to put the mast step than<br />
building and installing it. And that’s true for most parts of any<br />
scratch-built boat. For most of us the Construction Guide will<br />
solve this problem. The current edition has more than 50 pages<br />
of highly illustrated, expert information on subjects such as hull<br />
Center Line<br />
The board has to be “warp-free”. It can be plywood or particle<br />
board shelving material. Particle board is a little more difficult to<br />
cut and drive nails into than plywood. Size of the board is about<br />
5/8" x 12" x 48". If you want to keep the board clean, cover it<br />
with shelf paper.<br />
Draw a center line on the length of the board. Draw station<br />
spacing lines at right angles to the center line. Make sure the<br />
spacing is correct for the hull design. Lightly nail small wood<br />
blocks (about 3/4" x 3/4" x 2") to board at station spacing lines.<br />
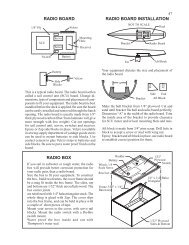
HULL BUILDING BOARD<br />
Block<br />
<strong>Building</strong> Board<br />
Shadow<br />
construction; building rudders, trunks and keels; keel bulbs; decks<br />
and hatches; sail rigging, masts and fittings; radio boards, winch<br />
sheeting, and sail trimming.<br />
I wish we could publish the whole thing here in Model Yachting,<br />
but space constraints rule that out, so check out the following<br />
three-page sample on how to build a balsa hull. The revised<br />
booklet will be available on the Web and from the AMYA Chandlery<br />
before the summer is over. In the meantime copies of the<br />
current edition are available from the US One Meter class secretary.<br />
I’ve also included an abbreviated set of plans for Bob<br />
DeBow’s great US One Meter yacht, <strong>Mistral</strong>... enought to build<br />
the hull.The full set is available from the class.<br />
The class also keeps a library of US One Meter plans that we<br />
make available to the membership at $3 per set. These plans range<br />
from 5 to 8 pages in length and when coupled with the Construction<br />
Guide provide all of the information you’ll need to complete<br />
a really spiffy yacht. Currently we have 19 plans ready to be<br />
built.<br />
For more information, contact me at any of the addresses shown<br />
in the Masthead.<br />
Station Spacing<br />
Note that blocks are placed in front of station lines 1 thru 5 and<br />
behind station lines 6 thru 10. Do not drive nails “home”. They<br />
will be removed later.<br />
Trace shadows (frames or formers) on 1/8" thick “doorskin”<br />
plywood or untempered hardboard. These shadows will be discarded<br />
later. Be sure you have a center line on each shadow. Cut<br />
out shadows, and sand any rough spots. Glue shadows to blocks<br />
on building board. Use 5 Minute Epoxy or hot glue. Be sure center<br />
line on the shadows lines up with center line on building board.
To build a straight hull you must have a sturdy jig to hold the<br />
station formers in alignment with the keel center line, they also<br />
must be perpendicular to the center line both vertically and horizontally.<br />
Draw or trace the station former outlines on paper, cut them out<br />
and glue them to the former material with rubber cement. You can<br />
use 1/8" thick door skin plywood (or any other suitable material)<br />
for former material. Cut the formers out and sand the edges to conform<br />
to the paper templates.<br />
Cover the edges of the formers with masking tape, where the hull<br />
planking will make contact. This helps prevent the glue from sticking<br />
to the formers. Now attach the formers to the building jig. Make<br />
sure station spacing and former alignment is correct.<br />
Before we start building lets talk about materials used in the construction<br />
of the hull. The keel plank and deck rails are 1/8" X 1/4"<br />
wide strips of pine or basswood. The hull is planked with contest<br />
grade “lite” density balsa wood strips. Balsa comes in several densities.<br />
If you use hard density wood its not as easy to form the strips<br />
to the formers and the hull starts getting a little heavy. You can buy<br />
1/8" X 3" wide X 48" long balsa sheets.*<br />
Outer Keel<br />
Keel Plank<br />
(bevel if necessary)<br />
Inner Clamp<br />
<strong>Building</strong> Board<br />
PLANKING THE HULL<br />
Planking<br />
Outer<br />
Clamp<br />
Use a balsa stripper to cut the sheets into 5/16" wide strips for<br />
planking (you can’t buy precut strips in this width and this is about<br />
the maximum width for easy planking). “Zap CA thin” glue can be<br />
used throughout the construction of the hull. It will bond almost<br />
anything, including your fingers and sets up almost instantly. The<br />
joints must be tight, because the glue will not fill gaps. Therefore if<br />
you have any gaps, fill them with Micro-Balloon filler or balsa dust,<br />
and then Zap it.<br />
OK lets start planking the hull. Lay in the first 1/4" wide pine<br />
keel plank and glue to each former. Glue a second pine plank on top<br />
of the first plank. Do this by pressing a few inches of the second<br />
plank tightly against the first plank and apply Zap to the edge where<br />
the planks meet. Capillary action will suck the glue between the<br />
planks. Continue this for the full length of the planks. For added<br />
strength in the keel fin area, glue a short 1/4" wide pine plank against<br />
both sides of the keel planking between formers 4 and 7. Install the<br />
deck rails on both sides with double planks of pine in the same<br />
manner as the keel planks.<br />
*Tech Editor’s Note: I get mot of my wood from Lone Star<br />
Models in Lubbock, TX (800) 687-555. They’re a great source<br />
for most US1M building supplies including balsa, plywood,<br />
carbon fiber sheets, and SS cable.<br />
Start the balsa planking at the deck rail, making sure the plank is<br />
tight against the deck rail edge. Zap the edge joint as you move<br />
along the length of the hull. Continue laying planks making sure<br />
the edges are tight and that they follow the curve of the hull and are<br />
against the formers. Lay in about four planks on one side and then<br />
switch to the other side. Continue to plank the sides until you get<br />
near the water line at the bow. Glue a balsa plank along the hull<br />
bottom against the pine keel plank. Do both sides of the keel this<br />
way. For the remainder of the planking, trial fit each plank for length<br />
and end shape before gluing. When you lay flat planking strips<br />
against the curved area of the formers, the gluing edges don’t meet<br />
squarely and you get a slight gaping of the edges. To eliminate this,<br />
Added keel support<br />
Keel plank<br />
Doubled rails<br />
Stem Piece<br />
Doubled keel planks<br />
Balsa Planks<br />
Inner Clamp<br />
Outer Clamp<br />
use a sanding block to put a slight angle on the edge of the plank to<br />
be glued in. It doesn’t take much, just a swipe or two with the sanding<br />
block down the edge of the plank.<br />
When the planking is completed, trim and sand flush any planking<br />
extending past the bow and stern formers.<br />
OK its time to sand the hull. Use a sanding block with 100 grit<br />
Garnet paper. Its important to use sharp (new) sandpaper. As soon<br />
as it starts getting dull change it.<br />
Don’t press hard on the sanding block, because it will cause low<br />
spots in the hull. The glue line between each plank is harder than<br />
the balsa wood, to prevent ridging of the glue line, sand diagonally<br />
across the planking. Rub your hand over the hull, and you can feel<br />
the bad spots easier than you can see them. When the hull feels and<br />
looks good, finish up with a light freehand (no sanding block) sanding<br />
using 120 grit paper. Remember balsa wood sands fast and easy<br />
and the planking is only 1/8" thick.<br />
Install the keel, ruder log and rudder, deck beams and hatch cover.<br />
These items are covered in other sections of the construction guide.<br />
Jig
TRANSOM<br />
Here’s an easy way to make an attractive transom on your new<br />
hull.<br />
When the hull is planked, nose piece or bumper installed, hull<br />
sanded and BEFORE you remove the frames, place the hull on a<br />
flat surface. Measure the hull for over-all length. The maximum<br />
L.O.A. for a One Meter yacht is 39 3/8". Minimum is 39". This is<br />
measured parallel to the waterline.<br />
Fit and glue a 1/8" thick plywood transom beam between sheer<br />
clamps.<br />
Straight Transom<br />
Sheer<br />
clamp<br />
Apply masking tape to give proper cut line. Use the edge of<br />
the tape as a guide and cut through the clamps, planking and<br />
keel. Discard the last frame.<br />
Use a sanding block to true and bevel edges. Glue a small sheet<br />
of 1/16" plywood across the open end of the hull. Trim and sand<br />
to final shape.<br />
Masking tape<br />
39-3/8" Max<br />
Transom<br />
brace<br />
Curved Transom<br />
Cut line<br />
Transom brace<br />
Sanding block<br />
BE SURE OVERALL LENGTH DOES NOT EXCEED 39 3/8".<br />
LAYING FIBERGLASS CLOTH ON<br />
YOUR HULL<br />
Sand hull smooth with 100 grit sandpaper. Fill in all gaps in<br />
planking and any low spots. Finish sand with 120 grit sandpaper.<br />
Place 1 oz. fiberglass cloth over dry hull, with fibers running<br />
approximately 45% to keel. Smooth out fiberglass cloth with palm<br />
of your hand over entire hull (except transom).<br />
Trim fiberglass cloth approximately 1" from edges of hull.<br />
Gently apply resin or epoxy to the hull, starting in center of<br />
keel and work toward bow and stern. Apply resin or epoxy to the<br />
remainder of the hull using a downward motion and let cure.<br />
Note: If you are working with epoxy, thin approximately 30%<br />
with Isopropyl Alcohol to allow an even flow.<br />
Trim all excess fiberglass from the hull, using a sharp knife or<br />
single edge razor blade. Trimming is easiest if resin is “green”<br />
(not completely cured).<br />
When resin is dry, sand the hull with 225 grit “wet or dry”<br />
sandpaper to remove curtains and runs. If you used epoxy you<br />
will notice a feeling of oil on the un-sanded surface. This can be<br />
wiped off with alcohol or acetone and then sanded.<br />
Note: If you use polyester resin; Use laminating resin for the 1st<br />
coat. Use sanding resin for the 2nd coat. Use finishing resin for<br />
the 3rd or last coat.<br />
Your hull can be finished with a thin coat of high grade spar<br />
varnish or clear two-part epoxy paint.
0<br />
Water Line<br />
4-1/4<br />
3/8<br />
1 2 3 4 5 6 7 8 9 10<br />
1/8 Plywood<br />
1/8 x 1/2 pine<br />
inner keel (keelson)<br />
3-7/8 3-7/8 3-7/8 3-7/8 3-7/8 3-7/8 3-7/8<br />
3-7/8 3-7/8<br />
1/8 x 1/4 pine or spruce<br />
outer clamp<br />
Approx. 19-1/4"<br />
1/8 x 1/4 pine<br />
outer keel<br />
1/8 x 1/4 pine or spruce<br />
inner clamp<br />
1/8 x 1/4 Pine (or Redwood)<br />
clamp (doubled)<br />
This point 20-1/4"<br />
from transom<br />
5 lb. lead bulb<br />
Keel mounting bolts<br />
on 1-1/2" centers<br />
3-3/8"<br />
top of fin<br />
2-1/2" bottom of fin<br />
Approx. hatch opening<br />
location<br />
Balance point 18-3/4" from transom<br />
5/31" I.D.<br />
brass tubing<br />
5/32" brass rod<br />
rudder shaft<br />
Bob Debow's<br />
MISTRAL<br />
US One Meter<br />
3
STEM PIECE<br />
FULL SIZE PATTERNS<br />
Here are the full sized patterns for building<br />
a <strong>Mistral</strong> hull. In the editor’s opinion,<br />
the <strong>Mistral</strong> is one of the best US One<br />
Meters ever designed. Consider that Bob<br />
Debow originally designed it in 1985 and<br />
that it’s still competitive today.<br />
2<br />
3<br />
6<br />
9<br />
TRANSOM BEAM<br />
8<br />
4<br />
7<br />
1<br />
5<br />
10