Induction Cooktop Use and Care Guide - AJ Madison
Induction Cooktop Use and Care Guide - AJ Madison
Induction Cooktop Use and Care Guide - AJ Madison

You also want an ePaper? Increase the reach of your titles
YUMPU automatically turns print PDFs into web optimized ePapers that Google loves.
I NDUCTION C OOKTOPS<br />
USE &CARE INFORMATION
CONTENTS<br />
Introducing Wolf <strong>Induction</strong> <strong>Cooktop</strong>s 3<br />
Safety Instructions & Precautions 4<br />
Wolf <strong>Induction</strong> <strong>Cooktop</strong> Features 6<br />
Wolf <strong>Induction</strong> <strong>Cooktop</strong> <strong>Use</strong> & <strong>Care</strong> 13<br />
Wolf Troubleshooting <strong>Guide</strong> 21<br />
Wolf Service Information 22<br />
Wolf Warranty 23<br />
WOLF ® is a registered trademark of Wolf Appliance, Inc.<br />
As you read this <strong>Use</strong> & <strong>Care</strong> Information,<br />
take particular note of the CAUTION <strong>and</strong><br />
WARNING symbols when they appear.<br />
This information is important for safe <strong>and</strong><br />
efficient use of the Wolf equipment.<br />
signals a situation where minor injury or<br />
product damage may occur if you do not<br />
follow instructions.<br />
states a hazard that may cause serious<br />
injury or death if precautions are not<br />
followed.<br />
In addition, this <strong>Use</strong> & <strong>Care</strong> Information may<br />
signal an IMPORTANT NOTE which highlights<br />
information that is especially important.
INTRODUCING WOLF INDUCTION COOKTOPS<br />
THANK YOU<br />
Your purchase of a Wolf induction cooktop<br />
attests to the importance you place upon the<br />
quality <strong>and</strong> performance of your cooking<br />
equipment. We underst<strong>and</strong> this importance<br />
<strong>and</strong> have designed <strong>and</strong> built your cooktop<br />
with quality materials <strong>and</strong> workmanship to<br />
give you years of dependable service.<br />
We know you are eager to start cooking, but<br />
before you do, please take some time to read<br />
this <strong>Use</strong> & <strong>Care</strong> Information. Whether you are<br />
a beginning cook or an expert chef, it will be<br />
to your benefit to familiarize yourself with the<br />
safety practices, features, operation <strong>and</strong> care<br />
recommendations of the Wolf induction<br />
cooktop.<br />
We appreciate your choice of a Wolf<br />
Appliance product <strong>and</strong> welcome any<br />
suggestions or comments you may have.<br />
To share your opinions with us, please call<br />
800-332-9513.<br />
Your Wolf induction cooktop is protected by a<br />
warranty that is one of the finest in the<br />
industry. Take a moment to read the warranty<br />
statement on page 23 <strong>and</strong> refer to it should<br />
service become necessary.<br />
CONTACT<br />
INFORMATION<br />
Wolf Customer<br />
Service:<br />
800-332-9513<br />
Website:<br />
wolfappliance.com<br />
3
4<br />
SAFETY INSTRUCTIONS AND PRECAUTIONS<br />
WHAT TO DO<br />
IMPORTANT NOTE: Read all<br />
instructions before using this<br />
appliance.<br />
Read this <strong>Use</strong> & <strong>Care</strong> Information<br />
carefully before using your new<br />
cooktop to reduce the risk of fire,<br />
electric shock or injury to persons.<br />
Ensure proper installation <strong>and</strong><br />
servicing. This appliance must be<br />
properly installed <strong>and</strong> grounded by<br />
a qualified technician. Have the<br />
installer show you where the fuse<br />
box is located so that you know<br />
where to turn off power.<br />
Wear proper apparel. Never let loose<br />
clothing or other flammable<br />
materials come in contact with the<br />
cooking surface while in operation.<br />
Fabric may ignite <strong>and</strong> result in<br />
personal injury.<br />
<strong>Use</strong> only dry pot holders when<br />
removing pans from the cooktop.<br />
Wet or damp pot holders on hot<br />
surfaces may result in burns from<br />
steam. Do not let pot holders touch<br />
hot cooking surfaces.<br />
Select cookware of the proper size,<br />
material <strong>and</strong> construction for the<br />
particular type of cooking being<br />
done. This unit is equipped with one<br />
or more surface units of different<br />
size. Refer to the Cookware<br />
Selection <strong>Guide</strong> on page 19.<br />
Always turn pan h<strong>and</strong>les inward so<br />
they do not extend over adjacent<br />
work areas, induction elements or<br />
edges of cooktop to reduce the risk<br />
of burns, ignition of flammable<br />
materials <strong>and</strong> spillage due to<br />
unintentional contact with pan. Do<br />
not turn h<strong>and</strong>les toward the room,<br />
where they may be bumped or<br />
easily hit.
WHAT NOT TO DO<br />
Never use your cooktop to warm<br />
or heat a room.<br />
When using the cooktop, DO NOT<br />
TOUCH THE GLASS SURFACE<br />
directly above or adjacent to the<br />
induction elements. The glass<br />
surface may become hot enough to<br />
cause burns after removing a<br />
saucepan with hot contents.<br />
Never heat an empty pan. It may<br />
damage the cooktop or cookware<br />
<strong>and</strong> overheat the unit.<br />
Do not heat cookware with water<br />
droplets on the outside of the pan.<br />
The droplets may begin to boil <strong>and</strong><br />
splatter. Cookware should always be<br />
dry.<br />
Do not leave children alone or<br />
unattended in the area where the<br />
cooktop is in use. Never allow<br />
children to sit or st<strong>and</strong> on the<br />
appliance. Do not let children play<br />
with the cooktop.<br />
Do not store items of interest to<br />
children above or at the back of the<br />
cooktop as they could climb on the<br />
appliance to reach items <strong>and</strong> be<br />
injured.<br />
Do not repair or replace any part of<br />
the appliance unless it is specifically<br />
recommended in literature you<br />
received. All service should be<br />
referred to a Wolf authorized service<br />
center.<br />
Do not use water on grease fires.<br />
Smother the flame or use a dry<br />
chemical or foam-type extinguisher.<br />
Never leave the cooktop unattended<br />
when using high heat settings.<br />
Boilovers <strong>and</strong> greasy spillovers may<br />
smoke or ignite.<br />
Do not operate the cooktop if the<br />
ceramic glass top is broken or<br />
severely pitted. Call a Wolf<br />
authorized service center to repair<br />
the appliance.<br />
Do not store flammable materials<br />
near hot components or let grease<br />
or other flammable substances<br />
accumulate on the cooktop.<br />
Do not clean the cooktop while it is<br />
still hot. If using a damp sponge or<br />
cloth, wait until the cooktop has<br />
cooled sufficiently to prevent steam<br />
burns. Also, some cleaners give off<br />
noxious fumes when applied to hot<br />
surfaces. Refer to the <strong>Cooktop</strong> <strong>Care</strong><br />
section on page 20.<br />
Do not use aluminum foil on the<br />
top of the cooktop.<br />
5
Model CT15I/S<br />
Model CT30I/S<br />
Model CT36I/S<br />
6<br />
WOLF INDUCTION COOKTOP FEATURES<br />
FRAMED INDUCTION COOKTOPS<br />
Classic stainless steel trim finish<br />
Easy-to-clean black ceramic glass surface<br />
is resistant to scratching, staining, impact<br />
<strong>and</strong> heat<br />
High-efficiency induction elements deliver<br />
power <strong>and</strong> control<br />
<strong>Induction</strong> elements heat cookware, not<br />
the glass, for a cooler, safer cooking<br />
surface<br />
Cookware sensing—elements will not be<br />
energized without an induction-compatible<br />
pan on the cooktop surface<br />
Hi-Power mode boosts power to the<br />
element<br />
Temperature limiter to ensure that safe<br />
operating temperature of ceramic glass is<br />
never exceeded<br />
Illuminated touch controls with graduated<br />
control lighting <strong>and</strong> adjustable sound<br />
frequency <strong>and</strong> volume<br />
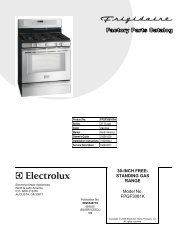
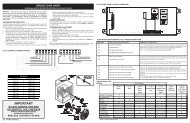
MODEL CT15I/S<br />
15" (381) Framed <strong>Induction</strong> <strong>Cooktop</strong><br />
Two induction<br />
elements<br />
Classic stainless<br />
steel trim finish<br />
Illuminated electronic<br />
touch controls<br />
HI-POWER<br />
SIM OFF ON HIGH<br />
MELT OFF ON HIGH<br />
CLEAR<br />
Location of<br />
rating plate<br />
O<br />
OFF<br />
Countdown timer<br />
Hot-surface<br />
indicator light<br />
Lock key <strong>and</strong><br />
universal OFF<br />
True Simmer or melt<br />
on both elements<br />
Hot-surface indicator light in control<br />
panel<br />
Lock mode—cooktop will be locked so<br />
that no elements can be turned on<br />
Universal OFF turns all elements off<br />
Countdown timer with 1 to 99 minute<br />
range<br />
CSA certified for US <strong>and</strong> Canada<br />
Two <strong>and</strong> five year residential warranty<br />
<strong>Induction</strong> powered by JAEGER HIFLUX®
WOLF INDUCTION COOKTOP FEATURES<br />
FRAMED INDUCTION COOKTOPS<br />
15" (381) INDUCTION COOKTOP<br />
Two induction elements<br />
Maximum element power: 1800 W with<br />
3000 W boost <strong>and</strong> 1200 W<br />
Hi-Power mode boosts power on rear<br />
element by diverting power from front<br />
element<br />
True Simmer setting on rear element<br />
Melt setting on front element<br />
Electric rating: 3.6 kW at 240 V AC,<br />
3.1 kW at 208 V AC<br />
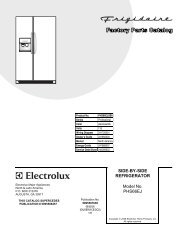
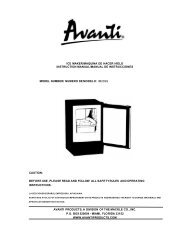
MODEL CT30I/S<br />
30" (762) Framed <strong>Induction</strong> <strong>Cooktop</strong><br />
Four induction<br />
elements<br />
Classic stainless<br />
steel trim finish<br />
MELT OFF ON HIGH<br />
Dimensions in parentheses are in<br />
millimeters unless otherwise specified.<br />
HI-POWER<br />
SIM OFF ON HIGH<br />
Location of<br />
rating plate<br />
Illuminated electronic<br />
touch controls<br />
HI-POWER<br />
SIM OFF ON HIGH<br />
MELT OFF ON HIGH<br />
CLEAR<br />
O<br />
OFF<br />
Lock key <strong>and</strong><br />
universal OFF<br />
True Simmer or melt<br />
on all elements<br />
30" (762) INDUCTION COOKTOP<br />
Four induction elements<br />
Maximum element power: (2) 1800 W with<br />
3000 W boost <strong>and</strong> (2) 1200 W<br />
Hi-Power mode boosts power on 1800 W<br />
elements by diverting power from adjacent<br />
element<br />
True Simmer setting on two elements<br />
Melt setting on two elements<br />
Electric rating: 7.2 kW at 240 V AC,<br />
6.3 kW at 208 V AC<br />
Countdown timer<br />
Hot-surface<br />
indicator light<br />
WOLF<br />
WARRANTY<br />
Wolf products are<br />
covered by a two<br />
<strong>and</strong> five year<br />
residential warranty<br />
(exclusions apply).<br />
See warranty<br />
details at the end<br />
of this guide.<br />
7
WOLF<br />
WARRANTY<br />
Wolf products are<br />
covered by a two<br />
<strong>and</strong> five year<br />
residential<br />
warranty (exclusions<br />
apply). See<br />
warranty details<br />
at the end of this<br />
guide.<br />
8<br />
WOLF INDUCTION COOKTOP FEATURES<br />
FRAMED INDUCTION COOKTOPS<br />
36" (914) INDUCTION COOKTOP<br />
Five induction elements<br />
Maximum element power: 3000 W with<br />
4000 W boost, (2) 1800 W with 3000 W boost<br />
<strong>and</strong> (2) 1200 W<br />
Hi-Power mode boosts power on 1800 W<br />
elements by diverting power from adjacent<br />
element—4000 W element does not divert<br />
power from adjacent element for boost<br />
True Simmer setting on three elements<br />
Melt setting on two elements<br />
Electric rating: 10.2 kW at 240 V AC,<br />
8.9 kW at 208 V AC<br />
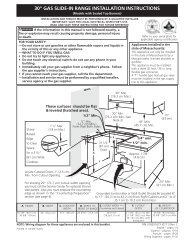
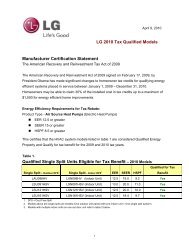
MODEL CT36I/S<br />
36" (914) Framed <strong>Induction</strong> <strong>Cooktop</strong><br />
Five induction<br />
elements<br />
Classic stainless<br />
steel trim finish<br />
Location of<br />
rating plate<br />
MELT OFF ON HIGH<br />
HI-POWER<br />
SIM OFF ON HIGH<br />
HI-POWER<br />
SIM OFF ON HIGH<br />
HI-POWER<br />
SIM OFF ON HIGH<br />
MELT OFF ON HIGH<br />
CLEAR<br />
Illuminated electronic<br />
touch controls<br />
O<br />
True Simmer or melt<br />
on all elements<br />
OFF<br />
Lock key <strong>and</strong><br />
universal OFF<br />
Countdown timer<br />
Hot-surface<br />
indicator light
WOLF INDUCTION COOKTOP FEATURES<br />
VENTILATION OPTIONS<br />
IMPORTANT NOTE: It is recommended that<br />
you operate the Wolf induction cooktop with<br />
either a Wolf cooktop ventilation hood, downdraft<br />
system or Pro ventilation hood. Contact<br />
your Wolf dealer for details.<br />
<strong>Cooktop</strong> Wall Hood – 30" (762) or 36" (914)<br />
widths in classic stainless steel.<br />
<strong>Cooktop</strong> Isl<strong>and</strong> Hood – 42" (1067) width in<br />
classic stainless steel.<br />
Downdraft Ventilation System –<br />
30" (762), 36" (914) or 45" (1143) widths,<br />
with top cover <strong>and</strong> control panel in classic,<br />
platinum <strong>and</strong> carbon stainless steel<br />
finishes—45" (1143) downdraft available<br />
in classic finish only.<br />
Pro Wall Hood – 22" (559), 24" (610) or<br />
27" (686) depths <strong>and</strong> 30" (762) to 66" (1676)<br />
widths in classic stainless steel.<br />
Pro Wall Chimney Hood – 36" (914) to<br />
54" (1372) widths in classic stainless steel.<br />
Pro Isl<strong>and</strong> Hood – 36" (914) to 66" (1676)<br />
widths in classic stainless steel.<br />
Pro Hood Liner – available in widths to<br />
accommodate 36" (914) to 60" (1524) hoods.<br />
All hoods have welded seams, sealed halogen<br />
lighting <strong>and</strong> removable, dishwasher-safe<br />
filters.<br />
Dimensions in parentheses are in<br />
millimeters unless otherwise specified.<br />
9
Model CT30IU<br />
Model CT36IU<br />
10<br />
WOLF INDUCTION COOKTOP FEATURES<br />
UNFRAMED INDUCTION COOKTOPS<br />
Can be mounted flush with top of countertop<br />
or as a frameless installation sitting on<br />
top of the countertop surface<br />
Easy-to-clean black ceramic glass surface<br />
is resistant to scratching, staining, impact<br />
<strong>and</strong> heat<br />
High-efficiency induction elements deliver<br />
power <strong>and</strong> control<br />
<strong>Induction</strong> elements heat cookware, not the<br />
glass, for a cooler, safer cooking surface<br />
Cookware sensing—elements will not be<br />
energized without an induction-compatible<br />
pan on the cooktop surface<br />
Hi-Power mode boosts power to the<br />
element<br />
Temperature limiter to ensure that safe<br />
operating temperature of ceramic glass is<br />
never exceeded<br />
Illuminated touch controls with graduated<br />
control lighting <strong>and</strong> adjustable sound<br />
frequency <strong>and</strong> volume<br />
MODEL CT30IU<br />
30" (762) Unframed <strong>Induction</strong> <strong>Cooktop</strong><br />
Four induction<br />
elements<br />
Unframed edge<br />
MELT OFF ON HIGH<br />
HI-POWER<br />
SIM OFF ON HIGH<br />
Location of<br />
rating plate<br />
Illuminated electronic<br />
touch controls<br />
HI-POWER<br />
SIM OFF ON HIGH<br />
MELT OFF ON HIGH<br />
CLEAR<br />
O<br />
OFF<br />
Lock key <strong>and</strong><br />
universal OFF<br />
True Simmer or melt<br />
on all elements<br />
Hot-surface indicator light in control panel<br />
Lock mode—cooktop will be locked so that<br />
no elements can be turned on<br />
Universal OFF turns all elements off<br />
Countdown timer with 1 to 99 minute range<br />
CSA certified for US <strong>and</strong> Canada<br />
Two <strong>and</strong> five year residential warranty<br />
<strong>Induction</strong> powered by JAEGER HIFLUX®<br />
Countdown timer<br />
Hot-surface<br />
indicator light
WOLF INDUCTION COOKTOP FEATURES<br />
UNFRAMED INDUCTION COOKTOPS<br />
30" (762) UNFRAMED COOKTOP<br />
Four induction elements<br />
Maximum element power: (2) 1800 W with<br />
3000 W boost <strong>and</strong> (2) 1200 W<br />
Hi-Power mode boosts power on 1800 W<br />
elements by diverting power from adjacent<br />
element<br />
True Simmer setting on two elements<br />
Melt setting on two elements<br />
Electric rating: 7.2 kW at 240 V AC,<br />
6.3 kW at 208 V AC<br />
MODEL CT36IU<br />
36" (914) Unframed <strong>Induction</strong> <strong>Cooktop</strong><br />
Five induction<br />
elements<br />
Unframed edge<br />
Location of<br />
rating plate<br />
Dimensions in parentheses are in<br />
millimeters unless otherwise specified.<br />
MELT OFF ON HIGH<br />
HI-POWER<br />
SIM OFF ON HIGH<br />
HI-POWER<br />
SIM OFF ON HIGH<br />
HI-POWER<br />
SIM OFF ON HIGH<br />
MELT OFF ON HIGH<br />
CLEAR<br />
O<br />
Illuminated electronic<br />
touch controls<br />
True Simmer or melt<br />
on all elements<br />
36" (914) UNFRAMED COOKTOP<br />
OFF<br />
Five induction elements<br />
Maximum element power: 3000 W with<br />
4000 W boost, (2) 1800 W with 3000 W boost<br />
<strong>and</strong> (2) 1200 W<br />
Hi-Power mode boosts power on 1800 W<br />
elements by diverting power from adjacent<br />
element—4000 W element does not divert<br />
power from adjacent element for boost<br />
True Simmer setting on three elements<br />
Melt setting on two elements<br />
Electric rating: 10.2 kW at 240 V AC,<br />
8.9 kW at 208 V AC<br />
Lock key <strong>and</strong><br />
universal OFF<br />
Countdown timer<br />
Hot-surface<br />
indicator light<br />
11
12<br />
WOLF INDUCTION COOKTOP FEATURES<br />
INDUCTION COOKING<br />
<strong>Induction</strong> cooking has been used in Europe for<br />
decades by professionals <strong>and</strong> homeowners<br />
dem<strong>and</strong>ing the best in performance.<br />
In induction cooking, the electricity flows<br />
through a coil to produce a magnetic field<br />
under the ceramic cooktop.<br />
When a cast iron or magnetic stainless steel<br />
pan is placed on the ceramic glass surface,<br />
currents are induced in the cooking utensil <strong>and</strong><br />
instant heat is generated due to the resistance<br />
of the pan. <strong>Induction</strong> only works with cooking<br />
vessels made of magnetic materials, such as<br />
cast iron <strong>and</strong> magnetic stainless steel (it will<br />
not work with aluminum or copper pots). To<br />
test the cookware, a magnet must stick to the<br />
bottom of the vessel in order to function.<br />
BENEFITS OF INDUCTION COOKING<br />
Speed. Heating is immediate. Adjustment is<br />
immediate. No slow change from heating up to<br />
cooling down. Heats up to 50% faster than gas<br />
or electric cooktops.<br />
Controllability. Homogeneous cooking to<br />
distribute the heat perfectly (no hot or burned<br />
spots). You can keep sauces <strong>and</strong> chocolates<br />
melted at 50 watts of power, or with the touch<br />
of a finger, activate Hi-Power mode <strong>and</strong> boil<br />
water in half the time you normally do.<br />
Energy efficiency. Energy is supplied directly<br />
to the cooking vessel so 85% to 90% of the<br />
electric energy gets used to cook. This means<br />
a cooler kitchen <strong>and</strong> cooktop.<br />
Easy to clean. The surface remains relatively<br />
cool, so overflows <strong>and</strong> spills do not stick or<br />
burn onto the element. The surface will be<br />
warm after removing a saucepan with hot<br />
contents. Wait until the surface cools to clean<br />
with soapy water.
WOLF INDUCTION COOKTOP USE & CARE<br />
ILLUMINATED CONTROL PANEL<br />
The control panel of your induction cooktop is<br />
illuminated for instant visual indication that<br />
one or more elements are in use. The control<br />
panel features touch controls with graduated<br />
control lighting. The illustrations below show<br />
the control panel of Model CT36I/S.<br />
MELT OFF ON HIGH<br />
HI-POWER<br />
SIM OFF ON HIGH<br />
SIM OFF ON HIGH<br />
HI-POWER<br />
MELT OFF ON HIGH<br />
OFF ON HIGH<br />
HI-POWER<br />
Illuminated touch control panel<br />
Dimensions in parentheses are in<br />
millimeters unless otherwise specified.<br />
SIM<br />
CLEAR<br />
O<br />
OFF<br />
HIGH<br />
M OFF ON HIGH<br />
SIM OFF ON HIGH<br />
HI-POWER<br />
HI-POWER<br />
MODES OF OPERATION<br />
LOCK MODE<br />
In Lock mode, all touch pad operations on the<br />
control panel are disabled <strong>and</strong> all induction<br />
elements are de-energized. A steady glowing<br />
light within the ”key” symbol indicates that<br />
the unit is locked.<br />
To lock the control panel, touch <strong>and</strong> hold<br />
key for 3 seconds. The unit will beep three<br />
times <strong>and</strong> the light within the key symbol<br />
will illuminate. The control unit is now in<br />
Lock mode.<br />
To unlock the control panel, touch <strong>and</strong><br />
hold key for 3 seconds. The unit will beep<br />
twice <strong>and</strong> the light within the key symbol<br />
will go out. The control unit is now in Idle<br />
mode.<br />
IMPORTANT NOTE: When the unit is powered<br />
up for the first time or if there has been a<br />
power outage, the cooktop will default to Lock<br />
mode.<br />
SIM<br />
MELT OFF ON HIGH<br />
OFF ON HIGH<br />
HI-POWER<br />
CLEAR<br />
Lock mode key touch pad<br />
O<br />
OFF<br />
Lock key<br />
touch pad<br />
13
14<br />
WOLF INDUCTION COOKTOP USE & CARE<br />
MODES OF OPERATION<br />
IDLE MODE<br />
After unlocking the control panel as described<br />
in Lock Mode, the unit enters the Idle mode of<br />
operation. The only valid touch pad operations<br />
are OFF ON, the Lock mode key <strong>and</strong> timer<br />
functions.<br />
HI-POWER MODE<br />
Hi-Power mode boosts power on the element<br />
by diverting power from an adjacent element.<br />
The exception is the 4000 W element on the<br />
36" (914) induction cooktop, which does not<br />
divert power from another element in order to<br />
boost. This mode is suitable for frying foods or<br />
boiling water rapidly.<br />
To activate Hi-Power mode, touch the<br />
OFF ON touch pad for the element, Next,<br />
touchHI-POWER. When applicable, power<br />
from the adjacent element will automatically<br />
be diverted to the chosen element <strong>and</strong> the<br />
total output of the adjacent element on HIGH<br />
power will be reduced. This reduction in power<br />
will be displayed in the control panel.<br />
HIGH<br />
M OFF ON HIGH<br />
SIM OFF ON HIGH<br />
HI-POWER<br />
HI-POWER<br />
SIM<br />
MELT OFF ON HIGH<br />
OFF ON HIGH<br />
HI-POWER<br />
CLEAR<br />
Hi-Power mode touch pad<br />
O<br />
Hi-Power<br />
touch pad<br />
OFF
WOLF INDUCTION COOKTOP USE & CARE<br />
HOT-SURFACE INDICATOR<br />
As a safety precaution, a hot-surface indicator<br />
light will illuminate when the surface<br />
temperature of any one of the induction<br />
elements rises above 150˚F (65˚C). ”HOT” will<br />
illuminate in the control panel. It will remain<br />
illuminated until the entire surface temperature<br />
has decreased to a safe level. Even if the<br />
cooktop controls are turned off, you are alerted<br />
that an area of the cooktop remains hot.<br />
HIGH<br />
M OFF ON HIGH<br />
SIM OFF ON HIGH<br />
HI-POWER<br />
HI-POWER<br />
SIM<br />
MELT OFF ON HIGH<br />
OFF ON HIGH<br />
HI-POWER<br />
CLEAR<br />
Hot-surface indicator light<br />
Dimensions in parentheses are in<br />
millimeters unless otherwise specified.<br />
O<br />
OFF<br />
Hot-surface<br />
indicator light<br />
INITIAL START-UP<br />
Before operating the induction cooktop, please<br />
read the entire <strong>Use</strong> & <strong>Care</strong> Information.<br />
Clean the cooktop surface as outlined in the<br />
Ceramic Glass Top cleaning section on page<br />
20. The cooktop surface must be free of any<br />
foreign substance, especially those that could<br />
melt <strong>and</strong> permanently adhere to the glass.<br />
During the first uses of your new induction<br />
cooktop, you may smell a slight burning odor<br />
or see light smoke. Both of these conditions<br />
are normal in new ceramic glass cooktops.<br />
A sound may be detected when the cooktop<br />
begins operation. This is normal.<br />
IMPORTANT NOTE: When the cooktop is<br />
powered up for the first time, the unit will<br />
default to Lock mode. To unlock the control<br />
panel, refer to the Lock Mode section on<br />
page 13.<br />
Make sure that the cooktop surface is<br />
clean <strong>and</strong> dry before operating.<br />
Do not place hot cooking utensils directly<br />
over control panel.<br />
15
16<br />
SIM OFF ON HIGH<br />
N HIGH<br />
OWER<br />
HI-POWER<br />
SIM<br />
MELT OFF ON HIGH<br />
OFF ON HIGH<br />
HI-POWER<br />
CLEAR<br />
O<br />
WOLF INDUCTION COOKTOP USE & CARE<br />
COOKTOP OPERATION<br />
To activate an induction element, touch the<br />
OFF ON touch pad that corresponds to the<br />
element you wish to use. The power bar<br />
indicator graph will begin to blink <strong>and</strong> show<br />
8 LED indicator bars. Refer to the illustrations<br />
below.<br />
To complete the activation, touch one of the<br />
following symbols or touch pads of the<br />
element control while the bar graph is still<br />
blinking:<br />
Touch the ”+” or ”–” symbol to set the heat<br />
output to 25% <strong>and</strong> complete the activation.<br />
Touch HIGH to set the power output to the<br />
high heat setting <strong>and</strong> complete the activation.<br />
Touch SIM or MELT to set the power output<br />
to the lowest heat setting <strong>and</strong> complete the<br />
activation.<br />
Touch HI-POWER to set the power output<br />
to the maximum level <strong>and</strong> complete the<br />
activation.<br />
Power bar<br />
indicator graph<br />
OFF<br />
”+” <strong>and</strong> ”–”<br />
symbols<br />
OFF ON<br />
touch pad<br />
HIGH<br />
M OFF ON HIGH<br />
SIM OFF ON HIGH<br />
HI-POWER<br />
HI-POWER<br />
SIM<br />
MELT OFF ON HIGH<br />
OFF ON HIGH<br />
HI-POWER<br />
CLEAR<br />
O<br />
HIGH<br />
touch pad<br />
OFF<br />
MELT<br />
touch pad<br />
To change the heat setting—the element is<br />
activated <strong>and</strong> the power bar indicator graph<br />
remains steadily lit:<br />
Touch ”+” to increase the heat setting by<br />
preset one or two bars on the power bar<br />
graph.<br />
Touch ”–” to decrease the heat setting by<br />
preset one or two bars on the power bar<br />
graph.<br />
Touch HIGH to increase the heat setting<br />
directly to high.<br />
Touch HI-POWER to boost to Hi-Power<br />
mode.<br />
Touch SIM or MELT to decrease the heat<br />
setting directly to the lowest power.<br />
Touch OFF ON to turn the element off.<br />
IMPORTANT NOTE: If no cookware or an<br />
incompatible pan is placed on an induction<br />
element after activating the element, the<br />
control will blink for 30 seconds, then the<br />
element will automatically shut off.<br />
IMPORTANT NOTE: To quickly de-energize all<br />
induction elements, use the universal OFF<br />
touch pad located in the lower area of the<br />
control panel. Refer to the illustration below.<br />
The illustrations below show the control panel<br />
of Model CT36I/S.<br />
HIGH<br />
M OFF ON HIGH<br />
SIM OFF ON HIGH<br />
HI-POWER<br />
HI-POWER<br />
SIM<br />
MELT OFF ON HIGH<br />
<strong>Induction</strong> element activation Heat settings<br />
Universal OFF touch pad<br />
OFF ON HIGH<br />
HI-POWER<br />
CLEAR<br />
O<br />
OFF<br />
Universal OFF<br />
touch pad
WOLF INDUCTION COOKTOP USE & CARE<br />
TIMER OPERATION<br />
The induction cooktop features a countdown<br />
timer located in the control panel. The timer<br />
may be set to any one-minute increment from<br />
1 to 99. Once set, the remaining time will be<br />
illuminated in the control panel as it counts<br />
down. The timer is available for use in any<br />
mode except Lock mode.<br />
HIGH<br />
To activate the timer, touch ”+” on the<br />
timer control.<br />
Touch <strong>and</strong> hold ”+” or ”–” until the desired<br />
time is reached. The timer will start 3<br />
seconds after the last change in value.<br />
When the timer reaches 0, the unit will<br />
sound. The reminder will continue to sound<br />
until CLEAR is pressed.<br />
M OFF ON HIGH<br />
SIM OFF ON HIGH<br />
HI-POWER<br />
HI-POWER<br />
SIM<br />
MELT OFF ON HIGH<br />
Countdown timer<br />
OFF ON HIGH<br />
HI-POWER<br />
CLEAR<br />
Dimensions in parentheses are in<br />
millimeters unless otherwise specified.<br />
O<br />
OFF<br />
Timer controls<br />
SOUND CONTROL<br />
The induction cooktop is equipped with the<br />
ability to change the volume <strong>and</strong> frequency, or<br />
tone, of the touch controls through the user<br />
option, activated through the timer controls.<br />
To activate the user option, the cooktop<br />
must be in Idle mode.<br />
Touch <strong>and</strong> hold CLEAR for 3 seconds to<br />
activate the volume adjustment. The threedigit<br />
display will show ”Uol.”<br />
Touch <strong>and</strong> hold CLEAR for 5 seconds to<br />
activate the frequency adjustment. The<br />
three-digit display will show ”FRE.”<br />
Both the volume <strong>and</strong> frequency are adjusted<br />
using the timer ”+” <strong>and</strong> ”–” touch pads. One<br />
touch equals one step up or down in volume<br />
or frequency. The power bar indicator graph of<br />
the rear 1800/3000 W element will show the<br />
current status of the volume or frequency <strong>and</strong><br />
change with the user’s input. (1 bar = low, 8<br />
bars = medium <strong>and</strong> 16 bars = high.)<br />
As the volume/frequency is adjusted, the<br />
cooktop will beep with each change. The beep<br />
will represent the volume/frequency level that<br />
is currently displayed by the power bar graph.<br />
To exit the user option <strong>and</strong> return the<br />
cooktop to Idle mode, touch CLEAR.<br />
Or, if no touch pad is touched for 10<br />
seconds, the level is then stored <strong>and</strong> the<br />
cooktop returns to Idle mode.<br />
17
18<br />
WOLF INDUCTION COOKTOP USE & CARE<br />
TEMPERATURE SETTING GUIDE<br />
SETTING USES<br />
MELT Melting, holding chocolate<br />
1 Bar Melting butter<br />
Heating, holding delicate sauces<br />
Warming foods<br />
SIMMER Melting large quantities<br />
2–4 Bars Simmering sauces<br />
Steaming rice<br />
LOW to MEDIUM Frying eggs<br />
10–12 Bars Heating milk, cream sauces, gravies,<br />
puddings <strong>and</strong> cream soups<br />
Panfrying<br />
Simmering large quantities<br />
Boiling vegetables in water<br />
MEDIUM to HIGH Sautéing<br />
14–15 Bars Browning<br />
Braising<br />
Panfrying<br />
Fast boiling large quantities<br />
Quick frying<br />
HIGH Boiling water<br />
All Bars Heating broth soups, stocks<br />
Deep fat frying (to heat oil only)<br />
HI-POWER Rapid boiling<br />
Boost Frying at high temperatures
WOLF INDUCTION COOKTOP USE & CARE<br />
COOKWARE SELECTION<br />
Cookware selection is crucial in the performance<br />
of induction cooking. <strong>Use</strong> the following<br />
guidelines when selecting cookware:<br />
The bottom surface of the cookware must<br />
be a ferrous material (containing iron).<br />
Aluminum, copper, glass <strong>and</strong> certain stainless<br />
steel cookware will not work.<br />
Magnetic stainless steel or cast iron<br />
cookware is required for induction cooking.<br />
To test the cookware, a magnet must stick<br />
to the bottom of the vessel in order to<br />
function.<br />
Select cookware with a diameter that<br />
matches the diameter of the induction<br />
element. When a pan is placed on the<br />
element, it should not extend beyond the<br />
ring around the element. Refer to the<br />
Cookware Selection <strong>Guide</strong>.<br />
Avoid pots <strong>and</strong> pans with uneven or<br />
rounded bottom surfaces. Some specialty<br />
cookware such as woks, pressure cookers,<br />
canning modules <strong>and</strong> deep fat fryers must<br />
be carefully selected to meet induction<br />
cooking criteria.<br />
IMPORTANT NOTE: Digital <strong>and</strong> magnetic<br />
thermometers may produce inaccurate<br />
readings.<br />
IMPORTANT NOTE: Performance is dependant<br />
on cookware material. For optimum<br />
performance use cookware with diameters<br />
corresponding to the element diameter.<br />
See your local fine cookware dealer for<br />
induction-appropriate cookware.<br />
Dimensions in parentheses are in<br />
millimeters unless otherwise specified.<br />
COOKWARE SELECTION GUIDE<br />
Choose cookware that corresponds to the following induction<br />
element diameters:<br />
MODEL CT15I/S<br />
Min Usable<br />
Element Power (watts) Diameter Pan Diameter<br />
Rear 1800/3000 Boost 8 3 /4" (220) 5 1 /2" (140)<br />
Front 1200 6 3 /4" (171) 3 1 /2" (89)<br />
MODEL CT30I/S & CT30IU<br />
Min Usable<br />
Element Power (watts) Diameter Pan Diameter<br />
Left Rear 1200 5 1 /2" (140) 3 1 /2" (89)<br />
Left Front 1800/3000 Boost 8 3 /4" (220) 5 1 /2" (140)<br />
Right Rear 1800/3000 Boost 8 3 /4" (220) 5 1 /2" (140)<br />
Right Front 1200 6 3 /4" (171) 3 1 /2" (89)<br />
MODEL CT36I/S & CT36IU<br />
Min Usable<br />
Element Power (watts) Diameter Pan Diameter<br />
Left Rear 1200 5 1 /2" (140) 3 1 /2" (89)<br />
Left Front 1800/3000 Boost 8 3 /4" (220) 5 1 /2" (140)<br />
Middle Rear 1800/3000 Boost 8 3 /4" (220) 5 1 /2" (140)<br />
Middle Front 1200 6 3 /4" (171) 3 1 /2" (89)<br />
Right Rear 3000/4000 Boost 11" (280) 7" (178)<br />
19
20<br />
WOLF INDUCTION COOKTOP USE & CARE<br />
COOKTOP CARE<br />
CERAMIC GLASS TOP CARE<br />
Follow these guidelines to avoid injury<br />
<strong>and</strong> prevent permanent damage to the<br />
cooktop.<br />
Do not use cooktop as a cutting board.<br />
Do not slide rough-bottom cookware across<br />
the glass surface. Remove any resulting<br />
marks immediately using the method<br />
mentioned in <strong>Cooktop</strong> Cleaning.<br />
Do not allow any item that could melt to<br />
come in contact with the hot ceramic glass<br />
surface. If such a condition occurs, remove<br />
it immediately from the hot element with a<br />
razor blade.<br />
Do not place food directly on cooktop<br />
surface when it is warm or hot.<br />
Do not operate the unit if the ceramic glass<br />
surface is broken. Contact a Wolf authorized<br />
service center.<br />
Do not place a trivet, wok support ring or<br />
other metal st<strong>and</strong> directly onto the cooktop<br />
surface.<br />
Do not apply chlorine bleach, ammonia or<br />
other strong chemicals or cleaners to the<br />
cooktop surface.<br />
Do not use abrasive cleaners or applicators.<br />
Do not wipe the cooktop surface with a<br />
sponge or dish cloth that may leave a film<br />
of detergent; it will cause the cooktop to<br />
discolor during the next heating cycle.<br />
MAINTENANCE<br />
The induction cooktop is a sealed system that<br />
contains a cooling fan <strong>and</strong> does not require<br />
internal maintenance. The cleaning <strong>and</strong> care<br />
information outlines the necessary maintenance<br />
for the ceramic glass surface. A Wolf<br />
authorized service center technician must<br />
perform all other maintenance.<br />
COOKTOP CLEANING<br />
CERAMIC GLASS TOP<br />
Lock the cooktop before cleaning by touching<br />
<strong>and</strong> holding the key symbol for 3 seconds.<br />
Clean the top surface thoroughly before<br />
operating the cooktop for the first time. Apply<br />
approximately 1 teaspoon (5 ml) of nonabrasive<br />
cleaner (such as Elco Cook Top Cleaning<br />
Creme) to the surface of the ceramic glass with<br />
a lightly dampened clean cloth. <strong>Use</strong> a second<br />
clean cloth to remove any remaining cleaner<br />
residue. Wipe the cooktop surface with a dry<br />
cloth to completely eliminate any remaining<br />
moisture.<br />
The cooktop should be cleaned after each use.<br />
Be careful not to wipe or clean any hot areas<br />
to avoid personal injury. It will be safe to clean<br />
each element area whenever the corresponding<br />
residual heat indicator light has gone out.<br />
COOKTOP FRAME<br />
For general cleaning after each use, apply a<br />
nonabrasive cleaner to the stainless steel<br />
cooktop frame <strong>and</strong> gently wipe with a clean<br />
towel or cloth. Be sure to remove any cleaner<br />
residue from the frame <strong>and</strong> ceramic glass<br />
surface before using the cooktop.
WOLF TROUBLESHOOTING GUIDE<br />
TROUBLESHOOTING GUIDE<br />
PROBLEM PROBABLE CAUSE CORRECTION<br />
<strong>Cooktop</strong> does not <strong>Cooktop</strong> is in Lock mode. Touch <strong>and</strong> hold the "key"<br />
function at all symbol for 3 seconds to unlock<br />
the control panel.<br />
No electricity is being Have an electrician check the<br />
supplied to the cooktop. house power supply.<br />
Fuse is blown or circuit Have an electrician replace the<br />
breaker is tripped. fuse or reset the circuit breaker.<br />
<strong>Cooktop</strong> is not connected to Have an electrician verify that<br />
a proper electrical circuit. the proper voltage is being<br />
applied to the cooktop.<br />
<strong>Induction</strong> elements do Improper cookware is Select the proper cookware as<br />
not heat properly being used. outlined in Cookware Selection<br />
on page 19.<br />
Power supply connection Have an electrician tighten<br />
is loose. connections at the terminal box.<br />
<strong>Cooktop</strong> is not connected to Have an electrician verify that<br />
a proper electrical circuit. the proper voltage is being<br />
applied to the cooktop.<br />
Control panel blinks <strong>and</strong> Improper cookware is Select the proper cookware as<br />
cooktop will not heat being used. outlined in Cookware Selection<br />
on page 19.<br />
Unit may be in Showroom Contact Wolf Customer Service<br />
mode. for instruction.<br />
21
CONTACT<br />
INFORMATION<br />
Wolf Customer<br />
Service:<br />
800-332-9513<br />
Website:<br />
wolfappliance.com<br />
22<br />
WOLF SERVICE INFORMATION<br />
SERVICE INFORMATION<br />
When requesting information, literature,<br />
replacement parts or service, always refer to<br />
the model <strong>and</strong> serial number of your cooktop.<br />
This information is found on the rating plate<br />
located on the underside of the cooktop. For<br />
location of the rating plate, refer to the illustration<br />
for your specific model on pages 6–11.<br />
Record the rating plate information below for<br />
future reference.<br />
Model Number<br />
Serial Number<br />
Installation Date<br />
Wolf Authorized Service Center <strong>and</strong> Phone<br />
Wolf Dealer <strong>and</strong> Phone<br />
BEFORE CALLING FOR SERVICE<br />
Before calling your Wolf authorized service<br />
center, refer to the Troubleshooting <strong>Guide</strong> on<br />
page 21. Check the household fuse or circuit<br />
breaker to see if it has been blown or tripped<br />
<strong>and</strong> that the electrical connection to the appliance<br />
has not been disconnected. A power<br />
outage may also have caused a disruption in<br />
service.<br />
PRODUCT REGISTRATION<br />
Register your new Wolf product today so that<br />
we may ensure your satisfaction. You may<br />
register by one of the following options:<br />
1) Mail in the completed Wolf Product<br />
Registration Card.<br />
2) Register online at wolfappliance.com.<br />
3) Register by phone by calling the Wolf<br />
Customer Service Department at<br />
800-332-9513.<br />
The model <strong>and</strong> serial numbers of your<br />
appliance are printed on the enclosed Wolf<br />
Product Registration Card. If you provide us<br />
with your e-mail address, we will send you<br />
exciting new product updates <strong>and</strong> recipes as<br />
they become available, along with information<br />
on special events.<br />
The information <strong>and</strong> images in this book are the<br />
copyright property of Wolf Appliance, Inc., an<br />
affiliate of Sub-Zero, Inc. Neither this book nor<br />
any information or images contained herein may<br />
be copied or used in whole or in part without the<br />
express written permission of Wolf Appliance,<br />
Inc., an affiliate of Sub-Zero, Inc.<br />
©Wolf Appliance, Inc. all rights reserved.
W OLF A PPLIANCE P RODUCTS<br />
L IMITED W ARRANTY<br />
RESIDENTIAL USE ONLY<br />
FULL TWO YEAR WARRANTY*<br />
For two years from the date of original installation, your Wolf Appliance product warranty covers all<br />
parts <strong>and</strong> labor to repair or replace any part of the product that proves to be defective in materials<br />
or workmanship. All service provided by Wolf Appliance under the above warranty must be<br />
performed by a Wolf Appliance authorized service center, unless otherwise specified by Wolf<br />
Appliance. Service will be provided in the home during normal business hours.<br />
LIMITED THIRD THROUGH FIFTH YEAR WARRANTY<br />
From the third through fifth year from the date of original installation, Wolf Appliance will repair or<br />
replace the following parts that prove to be defective in materials or workmanship. Labor to remove<br />
<strong>and</strong> replace defective parts is not covered. Wolf Appliance recommends that you use a Wolf<br />
Appliance authorized service center to perform such service.<br />
Gas Burners (excluding appearance), Electric Heating Elements, Blower Motors (vent hoods),<br />
Electronic Control Boards, Magnetron Tubes <strong>and</strong> <strong>Induction</strong> Generators<br />
LIMITED LIFETIME WARRANTY<br />
For the life of the product, Wolf Appliance will repair or replace any outdoor gas grill body or hood<br />
that rusts through due to defective material or workmanship. Labor to remove <strong>and</strong> replace defective<br />
parts is not covered. Wolf Appliance recommends that you use a Wolf Appliance authorized service<br />
center to perform such service.<br />
TERMS APPLICABLE TO EACH WARRANTY<br />
The warranty applies only to products installed for normal residential use. The warranty applies only<br />
to products installed in any one of the fifty states of the United States, the District of Columbia or<br />
the ten provinces of Canada. This warranty does not cover any parts or labor to correct any defect<br />
caused by negligence, accident or improper use, maintenance, installation, service or repair.<br />
THE REMEDIES DESCRIBED ABOVE FOR EACH WARRANTY ARE THE ONLY ONES THAT WOLF<br />
APPLIANCE, INC. WILL PROVIDE, EITHER UNDER THIS WARRANTY OR UNDER ANY WARRANTY<br />
ARISING BY OPERATION OF LAW. WOLF APPLIANCE, INC. WILL NOT BE RESPONSIBLE FOR ANY<br />
CONSEQUENTIAL OR INCIDENTAL DAMAGES ARISING FROM THE BREACH OF THIS WARRANTY<br />
OR ANY OTHER WARRANTY, WHETHER EXPRESS, IMPLIED OR STATUTORY.<br />
Some states do not allow the exclusion or limitation of incidental or consequential damages, so the<br />
above limitation or exclusion may not apply to you. This warranty gives you specific legal rights <strong>and</strong><br />
you may also have other legal rights that vary from state to state.<br />
To receive parts <strong>and</strong>/or service <strong>and</strong> the name of the Wolf Appliance authorized service center<br />
nearest you, contact Wolf Appliance, Inc., P. O. Box 44848, <strong>Madison</strong>, Wisconsin 53744; check the<br />
Locator section of our website, wolfappliance.com, or call 800-332-9513.<br />
* Stainless Steel (classic, platinum <strong>and</strong> carbon) doors, panels <strong>and</strong> product frames are covered by a<br />
limited 60 day parts <strong>and</strong> labor warranty for cosmetic defects.<br />
23
WOLF APPLIANCE, INC. P. O. BOX 44848 MADISON, WI 53744 800-332-9513 WOLFAPPLIANCE.COM<br />
812139 11/2007