1 Programming PIC Microcontrollers in PicBasic Pro – LCD Lesson ...
1 Programming PIC Microcontrollers in PicBasic Pro – LCD Lesson ...
1 Programming PIC Microcontrollers in PicBasic Pro – LCD Lesson ...

Create successful ePaper yourself
Turn your PDF publications into a flip-book with our unique Google optimized e-Paper software.
<strong><strong>Pro</strong>gramm<strong>in</strong>g</strong> <strong>PIC</strong> <strong>Microcontrollers</strong> <strong>in</strong> <strong>PicBasic</strong> <strong>Pro</strong> <strong>–</strong> <strong>LCD</strong> <strong>Lesson</strong> 2<br />
Cornerstone Electronics Technology and Robotics II<br />
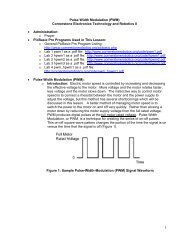
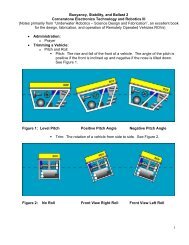
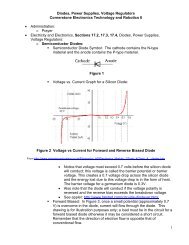
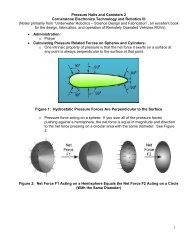
� Adm<strong>in</strong>istration:<br />
o Prayer<br />
� <strong>PicBasic</strong> <strong>Pro</strong> <strong>Pro</strong>grams Used <strong>in</strong> This <strong>Lesson</strong>:<br />
o General <strong>PicBasic</strong> <strong>Pro</strong> <strong>Pro</strong>gram List<strong>in</strong>g:<br />
http://www.cornerstonerobotics.org/picbasic.php<br />
o Lab 1 lcd1 as .pdf file:<br />
http://www.cornerstonerobotics.org/code/<strong>LCD</strong>1.pdf<br />
o Lab 1 lcd2 as .pdf file:<br />
http://www.cornerstonerobotics.org/code/<strong>LCD</strong>2.pdf<br />
� <strong>LCD</strong> Basics Cont<strong>in</strong>ued:<br />
o 4-bit Data Transfer:<br />
� In the last lesson, we focused on the 8-bit data transfer<br />
through the use of all eight data l<strong>in</strong>es to the <strong>LCD</strong>.<br />
� To conserve p<strong>in</strong>s <strong>in</strong> the <strong>PIC</strong> chip, we will transfer the data<br />
us<strong>in</strong>g only four data l<strong>in</strong>es (D4 <strong>–</strong> D7).<br />
� Instead of send<strong>in</strong>g one byte (8-bits), we will send two nibbles<br />
(4-bits).<br />
� Note: Underl<strong>in</strong>ed commands refer to the <strong>LCD</strong> Command<br />
Control Codes table <strong>in</strong> the previous lesson.<br />
� Set RS to LOW<br />
� Set Display On/Off & Cursor commands as 00001111.<br />
� Set the Function Set command to 00101000.<br />
� 8/4 = 0, 4-bit Interface<br />
� 2/1 = 1, 2 L<strong>in</strong>e Mode<br />
� 10/7 = 0, 5x7 Dot Matrix<br />
� This sets the Function Set commands to 4-bit data,<br />
two l<strong>in</strong>es, and 5x7 dot matrix format.<br />
� The 8-bit ASCII standard for the letter A is 01000001. To<br />
send A <strong>in</strong> 4-bit data format, type <strong>in</strong> 0100, then Enable, then<br />
type <strong>in</strong> 0001, then Enable.<br />
� <strong>LCD</strong> <strong>PicBasic</strong> <strong><strong>Pro</strong>gramm<strong>in</strong>g</strong>:<br />
o New <strong>PIC</strong>Basic Command:<br />
� <strong>LCD</strong>OUT:<br />
� Format:<br />
<strong>LCD</strong>OUT Item{,Item...}<br />
Display Items on an <strong>in</strong>telligent Liquid Crystal Display.<br />
If a pound sign (#) precedes an Item, the ASCII<br />
representation for each digit is sent to the <strong>LCD</strong>.<br />
� Other:<br />
o A program should wait for at least half a<br />
second before send<strong>in</strong>g the first command to an<br />
<strong>LCD</strong>. It can take quite a while for an <strong>LCD</strong> to<br />
start up.<br />
1
o Commands are sent to the <strong>LCD</strong> by send<strong>in</strong>g a<br />
$FE followed by the command. Some useful<br />
commands are listed <strong>in</strong> the follow<strong>in</strong>g table:<br />
o Note that there are commands to move the<br />
cursor to the beg<strong>in</strong>n<strong>in</strong>g of the different l<strong>in</strong>es of<br />
a multi-l<strong>in</strong>e display. For most <strong>LCD</strong>s, the<br />
displayed characters and l<strong>in</strong>es are not<br />
consecutive <strong>in</strong> display memory - there can be a<br />
break <strong>in</strong> between locations. For most 16x2<br />
displays, the first l<strong>in</strong>e starts at $80 and the<br />
second l<strong>in</strong>e starts at $C0.<br />
o The command:<br />
<strong>LCD</strong>OUT $FE, $80 + 4<br />
sets the display to start writ<strong>in</strong>g characters at<br />
the forth position of the first l<strong>in</strong>e.<br />
� Examples:<br />
<strong>LCD</strong>OUT $FE,1,“Hello” ‘ Clear display and show “Hello”<br />
<strong>LCD</strong>OUT $FE,$C0,“World” ‘ Jump to second l<strong>in</strong>e and show “World”<br />
<strong>LCD</strong>OUT B0,#B1 ‘ Display B0 and decimal ASCII value of B1<br />
2
� Compare HEX and B<strong>in</strong>ary Command Codes to Control an <strong>LCD</strong>:<br />
o Review the table below and note how the b<strong>in</strong>ary commands used <strong>in</strong><br />
the <strong>Lesson</strong> <strong>LCD</strong>1 (see the <strong>LCD</strong> Command Control Codes Table)<br />
match the HEX command codes used to control the <strong>LCD</strong>.<br />
<strong>LCD</strong> Command Control Codes<br />
Command Hex B<strong>in</strong>ary<br />
Clear Display 1 %00000001<br />
Return Home 2 %00000010<br />
Cursor Off $0C %00001100<br />
Underl<strong>in</strong>e Cursor On $0E %00001110<br />
Bl<strong>in</strong>k<strong>in</strong>g Cursor On $0F %00001111<br />
Move Cursor Beg<strong>in</strong>n<strong>in</strong>g First L<strong>in</strong>e $80 %10000000<br />
Move Cursor Beg<strong>in</strong>n<strong>in</strong>g Second L<strong>in</strong>e $C0 %11000000<br />
Table Compar<strong>in</strong>g HEX and B<strong>in</strong>ary Command Codes<br />
� <strong>LCD</strong> Command Control Codes from <strong>Lesson</strong> <strong>LCD</strong>1:<br />
Command B<strong>in</strong>ary Hex<br />
D7 D6 D5 D4 D3 D2 D1 D0<br />
Clear Display 0 0 0 0 0 0 0 1 01<br />
Display & Cursor Home 0 0 0 0 0 0 1 X 02 or 03<br />
Character Entry Mode 0 0 0 0 0 1 I/D S 04 to 07<br />
Display On/Off & Cursor 0 0 0 0 1 D U B 08 to 0F<br />
Display/Cursor Shift 0 0 0 1 D/C R/L x x 10 to 1F<br />
Function Set 0 0 1 8/4 2/1 10/7 x x 20 to 3F<br />
Set CGRAM Address 0 1 A A A A A A 10 to 7F<br />
Set Display Address 1 A A A A A A A 80 to FF<br />
I/D: 1=Increment*, 0=Decrement R/L: 1=Right Shift, 0=Left Shift<br />
S: 1=Display Shift On, 0=Display Shift Off 8/4: 1=8-bit Interface*, 0=4-bit Interface<br />
D: 1=Display On, 0=Display Off* 2/1: 1=2 L<strong>in</strong>e Mode, 0=1 L<strong>in</strong>e Mode*<br />
U: 1=Cursor Underl<strong>in</strong>e On, 0=Underl<strong>in</strong>e Off* 10/7: 1=5x10 Dot Matrix, 0=5x7 Dot Matrix<br />
B: 1=Cursor Bl<strong>in</strong>k On, 0=Cursor Bl<strong>in</strong>k Off*<br />
D/C: 1=Display Shift, 0=Cursor Move X=Don’t Care *= Initialization Sett<strong>in</strong>gs<br />
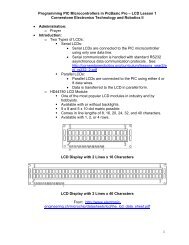
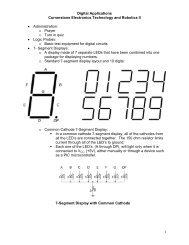
� <strong>LCD</strong> Display Addresses:<br />
7- Bit Display Addresses for 16 Character 2 L<strong>in</strong>e Display <strong>in</strong> B<strong>in</strong>ary<br />
� Perform <strong>LCD</strong>2 LAB 1 <strong>–</strong> lcd1.pbp and lcd2.pbp, <strong>LCD</strong> Commands<br />
3
Cornerstone Electronics Technology and Robotics II<br />
<strong>LCD</strong> <strong>Lesson</strong> 2 LAB 1 <strong>–</strong> lcd1.pbp and lcd2.pbp, <strong>LCD</strong> Commands<br />
� Purpose: The purpose of this lab is to acqua<strong>in</strong>t the student with the<br />
<strong>PicBasic</strong> <strong>Pro</strong> command <strong>LCD</strong>OUT .<br />
� Apparatus and Materials:<br />
� 1 <strong>–</strong> Analog/Digital Tra<strong>in</strong>er or Breadboard<br />
� <strong>PIC</strong>16F88 Microcontroller<br />
� Hantronix HDM16216H-5-300S 16x2 <strong>LCD</strong>, Jameco #618003<br />
� 20 K Potentiometer<br />
� 4.7 K Resistor<br />
� <strong>Pro</strong>cedure:<br />
o Wire the follow<strong>in</strong>g circuit:<br />
� Notice that only D4 <strong>–</strong> D7 data <strong>in</strong>puts are used; we will use 4bit<br />
data transfer to save p<strong>in</strong>s.<br />
o Open lcd1.pbp from your folder and program your chip. Add your<br />
own text. Save your program as lcd10.pbp.<br />
o Open lcd2.pbp from your folder and program your chip. Run the<br />
program on the breadboard.<br />
4
Command Operation Activity Completed<br />
$FE, 1 Clear display 1<br />
$FE, 2 Return home 2<br />
$FE, $0C Cursor off 2<br />
$FE, $0E Underl<strong>in</strong>e cursor on 2<br />
$FE, $0F Bl<strong>in</strong>k<strong>in</strong>g cursor on 2<br />
$FE, $10 Move cursor left one position 5<br />
$FE, $14 Move cursor right one position 5<br />
$FE, $18 Display shift left 4<br />
$FE, $1C Display shift right 4<br />
$FE, $80 Move cursor to beg<strong>in</strong>n<strong>in</strong>g of first l<strong>in</strong>e 3<br />
$FE, $C0 Move cursor to beg<strong>in</strong>n<strong>in</strong>g of second l<strong>in</strong>e 3<br />
$FE, $94 Move cursor to beg<strong>in</strong>n<strong>in</strong>g of third l<strong>in</strong>e - n/a<br />
$FE, $D4 Move cursor to beg<strong>in</strong>n<strong>in</strong>g of fourth l<strong>in</strong>e - n/a<br />
o <strong>LCD</strong> Command Table Experiments: Use the table above to check<br />
off each command as it is completed.<br />
� Activity 1:<br />
� Open lcd1.pbp; save it as lcd11.pbp.<br />
� Revise the program so that “Hello World” rema<strong>in</strong>s on<br />
the <strong>LCD</strong> screen for 2 seconds, then make the <strong>LCD</strong><br />
blank us<strong>in</strong>g the $FE,1 command.<br />
� Activity 2:<br />
� Start with lcd11.pbp and save the new program as<br />
lcd12.pbp<br />
� Revise lcd12.pbp such that:<br />
o “Hello World” rema<strong>in</strong>s on the <strong>LCD</strong> for 2<br />
seconds<br />
o Clear Display<br />
o Return the cursor home and bl<strong>in</strong>k<strong>in</strong>g for 2 more<br />
seconds. Each <strong>LCD</strong> command may be put on<br />
a separate l<strong>in</strong>e.<br />
o Now underl<strong>in</strong>e the cursor for 2 seconds<br />
o Clear display<br />
� Activity 3:<br />
� Start aga<strong>in</strong> with lcd11.pbp and save the new program<br />
as lcd13.pbp<br />
� Remember:<br />
<strong>LCD</strong>OUT $FE, $80 + 4<br />
sets the display to start writ<strong>in</strong>g characters at the forth<br />
position of the first l<strong>in</strong>e.<br />
5
Cornerstone Electronics Technology and Robotics II<br />
<strong>LCD</strong> <strong>Lesson</strong> 2 LAB 1 <strong>–</strong> lcd1.pbp and lcd2.pbp, <strong>LCD</strong> Commands Cont<strong>in</strong>ued<br />
� Activity 3 Cont<strong>in</strong>ued:<br />
� Revise lcd13.pbp such that:<br />
o “Hello” beg<strong>in</strong>s on the first l<strong>in</strong>e, 6 positions <strong>in</strong><br />
from the right.<br />
o Pause 1 second<br />
o “World” beg<strong>in</strong>s on the second l<strong>in</strong>e, 6 positions<br />
<strong>in</strong> from the right<br />
o Pause 1 second<br />
o Clear display for 1 second<br />
o Repeat the whole sequence 3 times<br />
� Activity 4:<br />
� Start with lcd1.pbp and save the new program as<br />
lcd14.pbp<br />
� Revise lcd14.pbp such that:<br />
o “Hello World” shifts to the right one position at<br />
a time for 4 positions<br />
o “Hello World” shifts to the left one position at a<br />
time for 4 positions<br />
o Repeat both shifts 3 times<br />
� Activity 5:<br />
� Start with lcd1.pbp and save the new program as<br />
lcd15.pbp<br />
� Delete the ma<strong>in</strong> code <strong>in</strong> lcd15.pbp<br />
� Revise lcd15.pbp such that:<br />
o Display a variable name “Resistor1 = ”<br />
o Move over to the right one blank space and<br />
display the value of the variable r. At this po<strong>in</strong>t,<br />
you will have to <strong>in</strong>put a value for r, such as, r =<br />
330. To display the value of r <strong>in</strong> the <strong>LCD</strong>OUT<br />
command, place a # sign immediately before r.<br />
<strong>LCD</strong>OUT $FE,1,“ Resistor1 = ”, #r<br />
� Challenge: Display your first name on the first l<strong>in</strong>e and your second<br />
name on the second l<strong>in</strong>e. The first letters of your first and last names are<br />
to appear <strong>in</strong> the far right positions on the <strong>LCD</strong> and rema<strong>in</strong> for 2 seconds.<br />
Then your first and last names are to scroll across the screen right to left.<br />
6