

WORKSHOP 3D Lego RCX Challenge: RoboLab Programming
WORKSHOP 3D Lego RCX Challenge: RoboLab Programming
WORKSHOP 3D Lego RCX Challenge: RoboLab Programming

Create successful ePaper yourself
Turn your PDF publications into a flip-book with our unique Google optimized e-Paper software.
.<br />
<strong>WORKSHOP</strong> <strong>3D</strong> <strong>Lego</strong> <strong>RCX</strong> <strong>Challenge</strong>: <strong>RoboLab</strong> <strong>Programming</strong><br />
HOME<br />
The First <strong>Challenge</strong><br />
<strong>Challenge</strong> Rules<br />
Prizes<br />
Schedule<br />
Register Here<br />
Future Plans<br />
Gallery<br />
Sponsors<br />
Background<br />
Suppliers<br />
<strong>Programming</strong><br />
FAQ<br />
Contact Us<br />
Links<br />
. <strong>WORKSHOP</strong> <strong>3D</strong> <strong>Lego</strong> <strong>RCX</strong> <strong>Challenge</strong><br />
<strong>RoboLab</strong> <strong>Programming</strong><br />
. <strong>RoboLab</strong> is the product line offered by LEGO dacta built around the Mindstorms technology and the <strong>RCX</strong>.<br />
The software for the <strong>RoboLab</strong> products is built over the top of LabView, the same software used by NASA<br />
to program and control the Mars Rover. There are two modes available in the <strong>RoboLab</strong> software, Pilot and<br />
Inventor. Of these, only Inventor is suitable for our sample program, because there is no way to create a<br />
repeating loop in Pilot. Within Inventor, you can access the programming interface at any on of four 'levels',<br />
which provide progressively more control icons. The sample program is developed in level 4.<br />
Sample Line Tracker in ROBOLAB:Inventor<br />
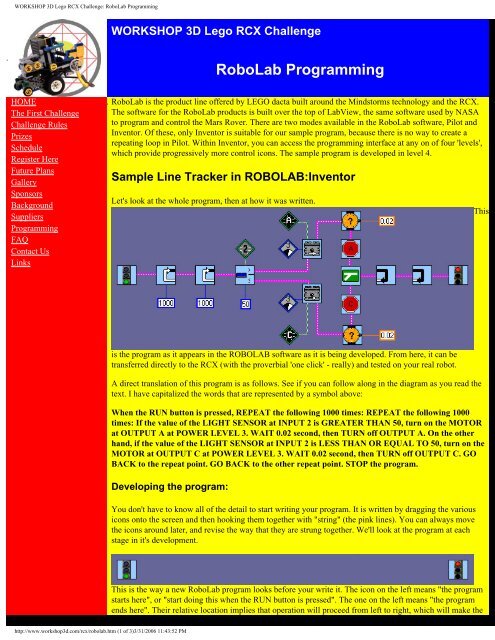
Let's look at the whole program, then at how it was written.<br />
is the program as it appears in the ROBOLAB software as it is being developed. From here, it can be<br />
transferred directly to the <strong>RCX</strong> (with the proverbial 'one click' - really) and tested on your real robot.<br />
A direct translation of this program is as follows. See if you can follow along in the diagram as you read the<br />
text. I have capitalized the words that are represented by a symbol above:<br />
When the RUN button is pressed, REPEAT the following 1000 times: REPEAT the following 1000<br />
times: If the value of the LIGHT SENSOR at INPUT 2 is GREATER THAN 50, turn on the MOTOR<br />
at OUTPUT A at POWER LEVEL 3. WAIT 0.02 second, then TURN off OUTPUT A. On the other<br />
hand, if the value of the LIGHT SENSOR at INPUT 2 is LESS THAN OR EQUAL TO 50, turn on the<br />
MOTOR at OUTPUT C at POWER LEVEL 3. WAIT 0.02 second, then TURN off OUTPUT C. GO<br />
BACK to the repeat point. GO BACK to the other repeat point. STOP the program.<br />
Developing the program:<br />
http://www.workshop3d.com/rcx/robolab.htm (1 of 3)3/31/2006 11:43:52 PM<br />
You don't have to know all of the detail to start writing your program. It is written by dragging the various<br />
icons onto the screen and then hooking them together with "string" (the pink lines). You can always move<br />
the icons around later, and revise the way that they are strung together. We'll look at the program at each<br />
stage in it's development.<br />
This is the way a new <strong>RoboLab</strong> program looks before your write it. The icon on the left means "the program<br />
starts here", or "start doing this when the RUN button is pressed". The one on the left means "the program<br />
ends here". Their relative location implies that operation will proceed from left to right, which will make the<br />
This
..<br />
<strong>WORKSHOP</strong> <strong>3D</strong> <strong>Lego</strong> <strong>RCX</strong> <strong>Challenge</strong>: <strong>RoboLab</strong> <strong>Programming</strong><br />
program easy to read.<br />
http://www.workshop3d.com/rcx/robolab.htm (2 of 3)3/31/2006 11:43:52 PM<br />
This first icon added is probably the most important. It represents the light sensor, and indicates that we have<br />
reached a fork in the road. If the light sensor reads greater than some number (note the '>' symbol on the<br />
icon), we will do one thing, and if it reads less than or equal to that number, it will do something else. This<br />
icon is then connected by string to the start icon, indicating that it is the first thing the robot should do: check<br />
the light sensor.<br />
The next two icons are identical. Each represents one of the motors. This is because if the light sensor sees<br />
black, we will run one of the motors, and if it sees white, we will run the other one. If we attach a wheel to<br />
each motor and mount these on the left and right sides of our robot, this will cause the robot to turn left or<br />
right depending upon whether it sees black or white. Note that each of these is connected by string to the<br />
light sensor, one to the "greater than" sign and the other to the "less than or equal to" sign.<br />
Of course, after turning on the selected motor, we must turn it back off again, or the robot will just keep<br />
turning in the selected direction, so these stop signs are added after the motor icons. Again note that the<br />
program flows from left to right, following the pink string.<br />
By adding a merge icon and connecting the whole thing to the stop sign, we have a complete program. It<br />
starts, it checks the sensor, then turns one of the motors on and then off, then stops the program. The actions<br />
are right, but we want it to do this over and over again, not stop.<br />
By adding these 'repeat' brackets (they must be used in pairs), we can make the robot repeat any portion of<br />
the program. These have been inserted before the light sensor is checked, to make sure that it checks it every
<strong>WORKSHOP</strong> <strong>3D</strong> <strong>Lego</strong> <strong>RCX</strong> <strong>Challenge</strong>: <strong>RoboLab</strong> <strong>Programming</strong><br />
time, and after the merge.<br />
http://www.workshop3d.com/rcx/robolab.htm (3 of 3)3/31/2006 11:43:52 PM<br />
This looks pretty good, but some information is missing. The motors for instance, are turned off immediately<br />
after they are turned on. We need to insert a pause icon between turning the motor on and turning it off:<br />
Here, the pauses have been added, as well as a second set of repeat brackets. We need these because through<br />
experimentation I found at that you could only repeat something a limited number of times (1,000 works,<br />
10,000 doesn't - I don't know what the actual limit is). By doubling up the brackets, we can get it to repeat at<br />
least 1,000 x 1,000 = 1,000,000 times. This sounds sufficient, but we'll do the math in a minute to make sure.<br />
Finally, a number of values are added to the icons to give specific direction about the actions. Working from<br />
left to right, we see the 1000 repetitions repeated 1000 times in the blue boxes below the repeat icons. Below<br />
the light sensor is the value 50, which is the value the actual reading will be compared to to decide which<br />
program branch to take. Above the light sensor is the number of the port (2) on the <strong>RCX</strong> it will be attached<br />
to. Similarly, the port for each motor is indicated (A and C), as well as a "Power Level" value for each, and<br />
the pause icons have each received a value of 0.02 seconds, which is how long each motor will run for before<br />
it stops. That's it. We're done.<br />
Now back to the math. The light sensor is sampled and a motor is pulsed 1,000,000 times. Since each pulse<br />
lasts for 0.02 seconds, the robot will theoretically run for 0.02 seconds times 1,000,000 repetitions = 20,000<br />
seconds, or over five and a half hours. The batteries would probably run out before the program stopped.