Flashback - Prism Kite Technology
Flashback - Prism Kite Technology
Flashback - Prism Kite Technology

Create successful ePaper yourself
Turn your PDF publications into a flip-book with our unique Google optimized e-Paper software.
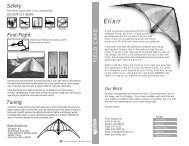
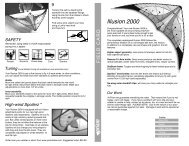
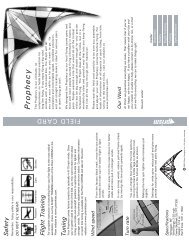
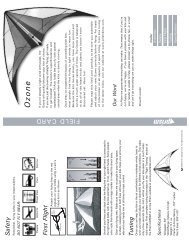
Safety<br />
Remember, flying safely is your responsibility.<br />
DO NOT FLY NEAR:<br />
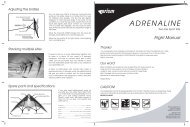
<strong>Flashback</strong><br />
If you're just getting into sport kites,<br />
congratulations - you've made a great choice<br />
in kites! Quick and responsive, but forgiving<br />
enough to learn on, the <strong>Flashback</strong> is a topquality<br />
introduction to sport kiting. Its sophisticated<br />
carbon/hemp frame is designed to take a beating but still<br />
gives you the awesome stiffness and light weight of<br />
carbon fiber.<br />
People Airports Power lines Cars Storms<br />
D<br />
R<br />
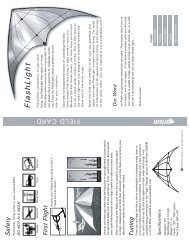
First Flight<br />
A<br />
C<br />
Attach your flying lines using a Lark's<br />
Head knot as shown.<br />
Pigtail<br />
Flying line<br />
D<br />
Once you've mastered the basics (it takes most people 1 to 3 hours<br />
of flying to get the hang of it), the <strong>Flashback</strong> will keep growing<br />
with you as you learn. Set the quick-adjust bridle to the radical<br />
setting and challenge yourself with quicker turns and tighter spins.<br />
When you're ready for more, the <strong>Flashback</strong> is nicely balanced to do<br />
all of the latest tricks as well.<br />
L<br />
E<br />
I<br />
F<br />
Read this field card carefully to be sure you assemble and<br />
adjust your new <strong>Flashback</strong> correctly before flying. For loads<br />
of information on all aspects of sport kiting, from kite tuning<br />
to the latest tricks, visit our website at www.prismkites.com<br />
Left turn Right turn<br />
Unwind your lines and check that the flying line in your right hand is connected to<br />
the right-hand bridle with the kite pointed up. If not, switch hands. Some people<br />
color code their line ends with a magic marker to make this check easy.<br />
Our Word<br />
At <strong>Prism</strong> we guarantee everything we make. That means that if you're<br />
not happy, we're not happy. If you have a problem with your kite and<br />
your retailer is unable to help, please contact us by phone, fax, or e-mail<br />
and we'll do everything we can to make things right.<br />
Clear your flying area. Make sure there are no people in your flying space.<br />
A sharp, sweeping pull on both lines will launch your kite. Keep your arms by your<br />
side and your hands low at all times for best control.<br />
Tuning<br />
Smooth winds!<br />
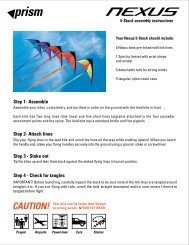
Inside:<br />
Assembly<br />
Once you can keep the kite in the air comfortably in<br />
moderate winds, try switching your bridle to the<br />
radical setting for quicker turns and tighter spins. Find<br />
complete tuning information in the "Flight Training"<br />
section of your <strong>Prism</strong> CDROM or on the <strong>Prism</strong> website<br />
at www.prismkites.com<br />
Tighter, radical turns<br />
First Flight<br />
Safety<br />
Specifications<br />
Tuning<br />
Specifications<br />
Wingspan: 75"<br />
Wind Range: 4-25 mph<br />
Frame: .196" carbon/hemp,<br />
.220 carbon<br />
Sail: Chikara ripstop nylon<br />
Rec'd lines: 80# x 60'<br />
Wider,forgiving turns<br />
C 2000 <strong>Prism</strong> Designs Inc. All rights reserved
ASSEMBLY 1<br />
Unroll your sail and lay it out as<br />
shown. In addition to the sail,<br />
you should have:<br />
2<br />
Connect the leading edge rods<br />
for each wing at the ferrules. Be<br />
sure the bridles are attached<br />
beneath the rubber fittings as<br />
shown.<br />
3<br />
Using your upper spreader as a<br />
tool, tension the elastic at each<br />
wingtip as shown.<br />
4<br />
Two long lower spreaders<br />
One short upper spreader<br />
Two short standoffs<br />
Two long standoffs<br />
With your wingtips tensioned,<br />
check that the sail is smooth<br />
and wrinkle-free along the<br />
leading edge. The tighter your<br />
tip tension, the better.<br />
Plugged end<br />
5<br />
Clip the thin standoff rods into<br />
the holes in the back edge of<br />
the sail. Clip the long rods into<br />
the inner holes, and the short<br />
ones into the holes nearer the<br />
wingtips.<br />
6<br />
Insert the upper and lower<br />
spreaders all the way into the<br />
leading edge fittings. Check<br />
that the bridles are clear of<br />
the fittings, and hold the<br />
spreader rods close to the end<br />
as shown so you don't slip<br />
and puncture the sail.<br />
7<br />
Insert the PLUGGED ends of<br />
the lower spreaders into the<br />
center "T" fitting.<br />
Tension the sail by clipping the<br />
standoffs into the lower<br />
spreaders. Hang the kite from<br />
the bridles to check that they<br />
aren't tangled.