Untitled - Frankonia
Untitled - Frankonia
Untitled - Frankonia

Create successful ePaper yourself
Turn your PDF publications into a flip-book with our unique Google optimized e-Paper software.
Accessories Malfunctions<br />
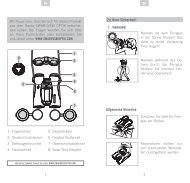
12.4 Installing the mirage band<br />
CAUTION!<br />
The mirage band is only loosely connected<br />
with the rifle<br />
May lead to injuries and damage to the rifle<br />
• Keep the rifle pointed in a safe direction in<br />
order to prevent the mirage band from<br />
injuring persons or damaging property if it<br />
slips unintentionally.<br />
Corresponding figure, see Fig. 24.<br />
Procedure:<br />
1. Insert the twin claws of the mirage band hook<br />
into the hole of the upper central slots of the<br />
flash suppressor.<br />
2. Stretch the mirage band to the rear and slip<br />
hook onto the forward scope mount.<br />
13 Malfunctions<br />
13.1 Detecting a malfunction<br />
Rifle maintenance (cleaning and inspection)<br />
according to the instructions can prevent<br />
malfunctions.<br />
Should, nevertheless, a malfunction occur during<br />
shooting, proceed as follows:<br />
WARNING!<br />
Careless actions may cause uncontrolled<br />
discharge of shot<br />
May lead to death or severe injuries<br />
• Hold the rifle pointed in the firing direction<br />
(safe direction) and keep your fingers off the<br />
trigger while you carry out the steps<br />
described below.<br />
1. Immediately stop shooting and alert others to<br />
the malfunction.<br />
2. Remove magazine and unload the rifle<br />
(see section 5.8.1).<br />
3. Open the bolt. The round or cartridge case is<br />
pulled out of the barrel chamber and ejected.<br />
4. Check that no bullet, round, cartridge case or<br />
foreign matter is in the barrel chamber or<br />
barrel.<br />
5. If the malfunction is listed in the table below<br />
and its remedy is described, then the user is<br />
allowed to remedy the malfunction in<br />
accordance with the table.<br />
6. Clean, lubricate and assemble the rifle.<br />
7. Have the rifle inspected by an armourer or<br />
gunsmith.<br />
Note:<br />
• For malfunctions not listed in the table, the<br />
user must under no circumstances remedy<br />
the malfunction.<br />
• In this case the rifle must be checked and<br />
repaired by a qualified armourer or<br />
gunsmith.<br />
WARNING!<br />
Improper servicing of the rifle<br />
Possibly death or serious injuries<br />
• Never force a bullet stuck in the barrel<br />
(jammed bullet) by „firing it free” with another<br />
bullet.<br />
• Never repair broken or worn components<br />
yourself. Broken or worn components must<br />
be disposed of.<br />
25 GB<br />
07.02