Untitled - Frankonia
Untitled - Frankonia
Untitled - Frankonia

Create successful ePaper yourself
Turn your PDF publications into a flip-book with our unique Google optimized e-Paper software.
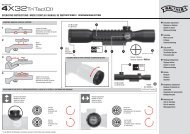
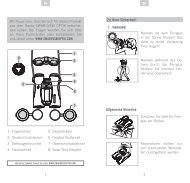
Handling<br />
5.7 Bolt<br />
5.7.1 Cocking the bolt<br />
Before the bolt 100 can be inserted into the rifle,<br />
the firing pin must first be cocked.<br />
A cocking indicator displays whether the bolt is<br />
cocked or not (red = cocked).<br />
Procedure:<br />
1. Insert the tapered end of the supplied key into<br />
the side opening of the lock 113.<br />
2. Turn the lock towards the cocking wheel until it<br />
engages.<br />
Fig. 3, Cocking the bolt<br />
Fig. 4, Cocking indicator of the bolt (left: cocked, right decocked)<br />
5.7.2 Removing the bolt<br />
Procedure:<br />
1. Move the buttstock cheekpiece down as far as<br />
possible or remove it (see section 7.1).<br />
2. Release the rifle safety (see section 6.1).<br />
3. Open the bolt and draw it back approx. half of<br />
its travel.<br />
4. Activate the safety catch (see section 6.2).<br />
5. Rotate the bolt to the left (approx. 90°), until<br />
the bolt channel becomes visible in the bolt<br />
handle guideway.<br />
6. Extract the bolt to the rear.<br />
Fig. 5, Removing the bolt<br />
13 GB<br />
07.02<br />
6.<br />
1.<br />
3b.<br />
5.<br />
3a<br />
4.<br />
2.