You also want an ePaper? Increase the reach of your titles
YUMPU automatically turns print PDFs into web optimized ePapers that Google loves.
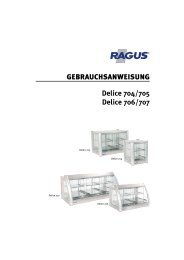
Cleaning recommendations<br />
for the models<br />
Delice 704<br />
Delice 705<br />
Delice 706<br />
Delice 707<br />
Delice 708
TABLE OF CONTENTS<br />
DESCRIPTION OF SYMBOLS ........................................................2<br />
DURING DAILY OPERATIONS .......................................................3<br />
<strong>AFTER</strong> <strong>OPERATING</strong> <strong>THE</strong> <strong>DEVICE</strong>.................................................3<br />
General.........................................................................................3<br />
Cleaning the device: .....................................................................3<br />
Removing sliding doors:............................................................3<br />
Removing cutting board: ...........................................................6<br />
<strong>AFTER</strong> CLEANING <strong>THE</strong> <strong>DEVICE</strong>....................................................6<br />
Reassembling the device:.............................................................6<br />
- Insert radiator cover ...........................................................7<br />
- Reassemble trays ..............................................................8<br />
- Hanging sliding doors ........................................................8<br />
Reposition safety catch .............................................................9<br />
Space for notes:......................................................................10
DESCRIPTION OF SYMBOLS<br />
Please consider all warnings and instructions in order to<br />
guarantee safe handling and maintenance of the device.<br />
WARNING<br />
This symbol is used to indicate that ignoring the relevant safety<br />
instructions may cause severe personal injuries and property<br />
damage.<br />
WARNING: ELECTRICAL VOLTAGE<br />
This symbol is used to indicate that ignoring the relevant safety<br />
instructions may cause fatal or life-threatening injuries.<br />
WARNING: HOT SURFACE<br />
This symbol is used to indicate that ignoring the relevant safety<br />
instructions may cause burns.<br />
NOTE: USE PROTECTIVE GLOVES<br />
This symbol is used to indicate that the respective section contains<br />
information on how to prevent injuries or burns.<br />
INFORMATION<br />
This symbol is used to indicate that the respective section contains<br />
useful information and tips for ensuring a safe use of the device.<br />
2
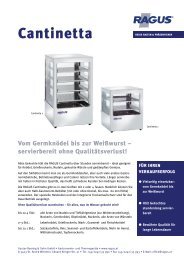
DURING DAILY OPERATIONS<br />
In order to preserve the interior of the device made of high-quality stainless<br />
steel and to prevent incrustation, immediately remove food scraps falling to<br />
the floor.<br />
Check glass surfaces for cleanliness in regular intervals. Make sure you do<br />
not scratch glass during cleaning!<br />
<strong>AFTER</strong> <strong>OPERATING</strong> <strong>THE</strong> <strong>DEVICE</strong><br />
General<br />
- After operating the device, turn it off and/or take the plug out of the<br />
socket.<br />
- Make sure the device has cooled off before you start cleaning.<br />
Remove all food from the device.<br />
Cleaning the device:<br />
Removing sliding doors:<br />
If necessary and if door glass is extremely dirty, it can be removed.<br />
Proceed as follows:<br />
By moving the safety catch to the side,<br />
adjust the position of the door glass until<br />
it is between stop damper and safety<br />
catch.<br />
3
1.<br />
2.<br />
Then move the sliding door upward and<br />
swing it out at the bottom.<br />
It is not necessarily required to remove sliding doors before<br />
cleaning the interior of the device.<br />
See steps 1 – 5 on how to remove and clean trays and tray inserts,<br />
cutting boards, radiator covers and rods (dishwasher-proof; if<br />
washed by hand, clean thoroughly with commercially available<br />
dishwashing detergent and rinse with clear water). If necessary,<br />
disconnect radiator (see fig. 6).<br />
Do not wet-clean radiators! Only swipe with a well wrung-out cloth.<br />
DO NOT PUT IN DISHWASHER! DO NOT CLEAN UNDER RUNNING<br />
WATER!<br />
4
1. Remove trays 2. Remove tray inserts<br />
1.<br />
3. Remove central rods 4. Remove radiator cover<br />
1.<br />
2.<br />
2.<br />
5. Remove outer rods 6. Disconnect radiator<br />
Make sure you do not scratch any stainless steel parts. Scratches may<br />
cause rust.<br />
- Cooled down radiators may be disconnected for easier cleaning (see<br />
fig. 6).<br />
5
- Pre-treat severe incrustations in the interior using foodtechnologically<br />
approved cleaning agents.<br />
CAUTION: Cleaning agent must be suitable for stainless steel<br />
surfaces!<br />
- Next, clean using a mild soapy solution, thoroughly wipe off with<br />
clear water and finally dry using a clean, soft cloth.<br />
Never fill water into the radiator tray – DANGER OF LIFE!<br />
Only wipe device with a moist, NEVER A WET cloth! Do not<br />
clean using steam or high pressure device!<br />
- Clean glass surfaces from the inside and outside using<br />
commercially available glass cleaning agents.<br />
Removing cutting board:<br />
- If your device has an integrated, pull-out cutting board (depending<br />
on model), press it from bottom to top until it can be removed from<br />
the holder and then clean it. Next, swipe the telescopic slides as well<br />
as the handle bar with a wet cloth using a mild soapy solution. Last,<br />
reattach the cutting board to the intended holding bolt in the slides.<br />
<strong>AFTER</strong> CLEANING <strong>THE</strong> <strong>DEVICE</strong><br />
Reassembling the device:<br />
- Insert radiator<br />
The spacer must point to the floor of the<br />
device.<br />
6
- Insert radiator cover<br />
- Insert plating rack: first insert into upper bushings, push up<br />
and then insert at the bottom (see fig. 7).<br />
Rods of the model Delice 708 must be inserted in the following<br />
order (see figures 7 – 9):<br />
First insert outer rods as described above, then insert radiator<br />
cover and only thereafter the two inner rods.<br />
1.<br />
2.<br />
7. Insert outer rods 8. Insert radiator cover<br />
9. Insert inner rods<br />
7
- Reassemble trays, tray inserts and, if applicable, cutting boards<br />
(depending on model) and insert into the device.<br />
- Hanging sliding doors<br />
When hanging sliding doors, please pay attention to the alignment<br />
(left – right or central for model 707) as well as to the arrangement<br />
(front – rear or central slide rail for Delice 707).<br />
In order to insert the sliding door proceed as follows:<br />
1. The left sliding door goes in the front slide rail, the right sliding<br />
door in the rear slide rail. There are two safety catches and two stop<br />
dampers in the upper slide rail.<br />
2. First mount the right door (slider at the bottom, handle to the<br />
right, seal to the left) by attaching it to the rear slide rail on the right<br />
top side and then allowing it to gently fall onto the bottom of the rear<br />
slide rail. Slide the door to the right and then move the safety catch<br />
to the right over the door glass using a screwdriver.<br />
3. Then, mount the left door (slider at the bottom, handle to the left,<br />
seal to the right) by attaching it to the front slide rail at the top and<br />
allowing it to gently fall onto the bottom of the front slide rail. Use a<br />
screwdriver to move the safety catch over the door. Close the door<br />
(slide to the left). After mounting the sliding doors, check if they<br />
work properly.<br />
Note:<br />
The braking power of the stop damper can be<br />
adjusted via the integrated plastic bolt using a<br />
screwdriver.<br />
8
Affixed door seals have to touch one<br />
another when closed.<br />
Reposition safety catch<br />
Your device is now ready for the next operation –<br />
cleaned and well-maintained!<br />
9
Space for notes:<br />
10
Gustav Raming & Sohn GmbH � Gastronomie- und Thermogeräte<br />
A-3423 St. Andrä-Wördern, Eduard Klinger Str. 21 � Tel. +43/2242/33 990-0<br />
Fax +43/2242/33 933 � E-mail: office@ragus.at � www.ragus.at