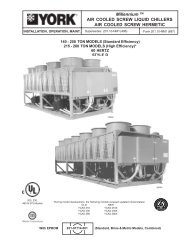
YVAA Style A Air-Cooled Screw Liquid Chillers ... - Johnson Controls
YVAA Style A Air-Cooled Screw Liquid Chillers ... - Johnson Controls
YVAA Style A Air-Cooled Screw Liquid Chillers ... - Johnson Controls

Create successful ePaper yourself
Turn your PDF publications into a flip-book with our unique Google optimized e-Paper software.
FORM 201.28-NM1.1<br />
ISSUE DATE: 8/29/2012<br />
OPERATING CONTROLS<br />
Unit Switch<br />
A double pole single throw ON/OFF rocker switch on<br />
the front of the control panel is used to turn the entire<br />
chiller ON and OFF. When the switch is placed in the<br />
OFF position, the entire unit shuts down immediately<br />
and all systems will be disabled. One pole of the UNIT<br />
switch contacts is wired to the Run Signal input and the<br />
Chiller Control Board “UNIT switch X” digital input<br />
(X equals System 1 or 2). Separate System Fuses are<br />
also wired in series with each set of UNIT switch contacts.<br />
If either fuse is pulled or blown, only the system<br />
with the good fuse (Input is high) will run. When both<br />
inputs are high, the entire chiller will be enabled to run.<br />
When both inputs are low, the chiller will be disabled<br />
as a UNIT switch OFF Shutdown.<br />
Keypad<br />
DISPLAY<br />
KEYPAD<br />
UNIT<br />
SWITCH<br />
FIGURE 16 - KEYBOARD AND DISPLAY<br />
An operator keypad allows complete control of the system<br />
from a central location. The keypad offers a multitude<br />
of command keys on the left and right side of the<br />
keypad to access displays, program setpoints, history<br />
data, and initiate system commands. Most keys have<br />
multiple displays that can be accessed by repetitively<br />
pressing the key or by pressing the ▲,▼,◄, and ►<br />
(ARROW) keys. The keypad utilizes an overlay to<br />
convert the keypad to various languages.<br />
SECTION 7 - OPERATION<br />
LD10605<br />
The keypad also contains keys in the center section for<br />
data entry in the various program modes. These keys<br />
are listed below:<br />
• 0-9 Keys NUMERIC KEYPAD<br />
• PERIOD/DECIMAL<br />
• +/- PLUS/MINUS<br />
• � ENTER<br />
• � CANCEL<br />
• ▲ UP ARROW<br />
• ▼ DOWN ARROW<br />
• ◄ LEFT ARROW<br />
• ► RIGHT ARROW<br />
The numeric keys allow keying numeric values into<br />
memory.<br />
The • (PERIOD/DECIMAL) key allows keying a<br />
decimal point into numeric values.<br />
The +/- (PLUS/MINUS) key allows making numeric<br />
values negative.<br />
The � (ENTER) key stores program changes into<br />
memory.<br />
The X (CANCEL) key is used to cancel the data entry<br />
operation and returns the programmed value to the<br />
original value, before any programming changes were<br />
made, when an error is made.<br />
The ▲ (UP ARROW) and ▼ (DOWN ARROW)<br />
keys allow scrolling backward (▲) and forward (▼)<br />
through items to be programmed under keys such as the<br />
PROGRAM or OPTIONS key.<br />
The ▲ (UP ARROW) and ▼ (DOWN ARROW)<br />
keys also allow scrolling forward (▼) or backwards<br />
(▲) through data display keys that have multiple<br />
displays under keys such as UNIT DATA, SYSTEM<br />
DATA, HISTORY, PROGRAM, OPTIONS, etc. The<br />
arrow keys can be used instead of repeatedly pressing<br />
the data key to see the multiple displays under a key.<br />
Once the ▲ ▼ (ARROW) keys are pressed and used<br />
for scrolling, pressing the original data key will return<br />
to the first display message displayed under the data<br />
(UNIT DATA, SYSTEM DATA, etc.) keys.<br />
JOHNSON CONTROLS 85<br />
7